Cloud Storage Solutions v.18
Odoo अनुलग्नकों को फ़ोल्डरों में लचीले ढंग से व्यवस्थित करने और निर्देशिकाओं को क्लाउड क्लाइंट से सिंक करने का उपकरण: Google Drive, OneDrive/SharePoint, Nextcloud/ownCloud, Dropbox, Amazon S3, Box और NAS. DMS. फ़ाइल प्रबंधक. दस्तावेज़ प्रबंधन प्रणाली
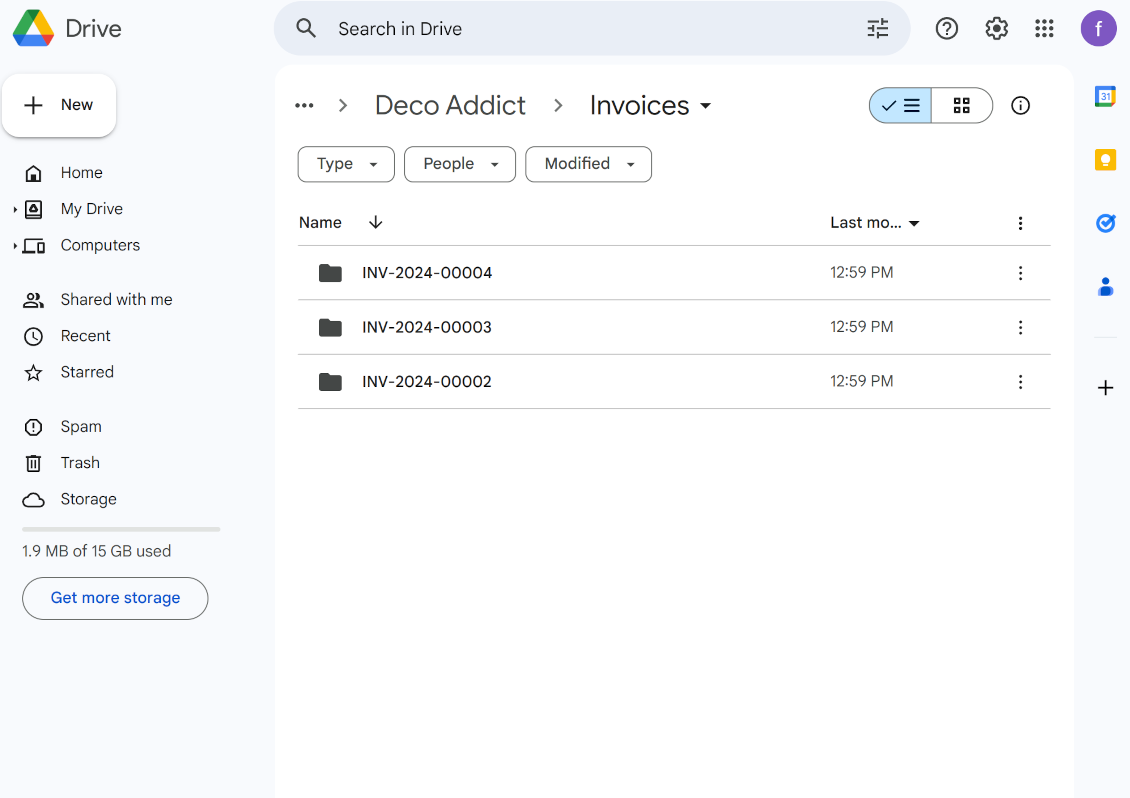
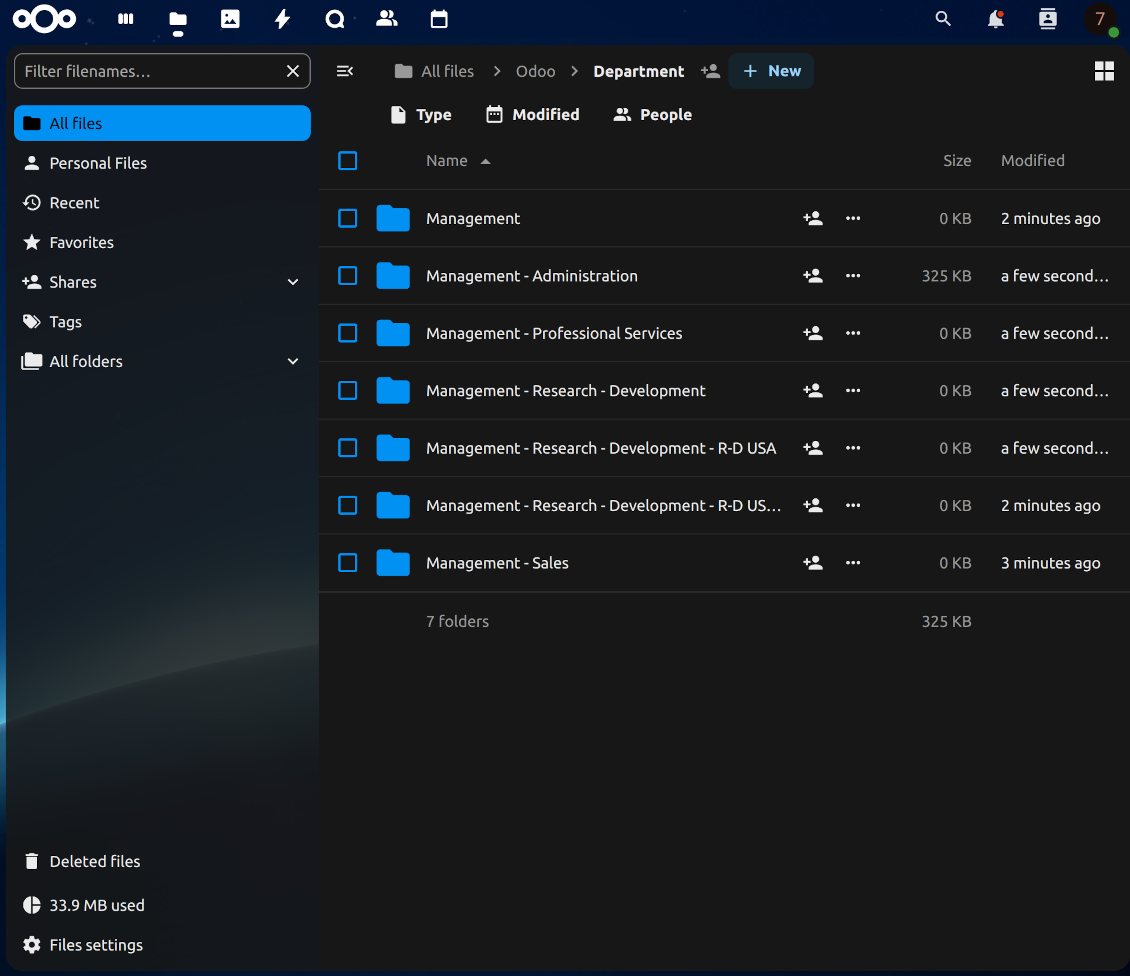
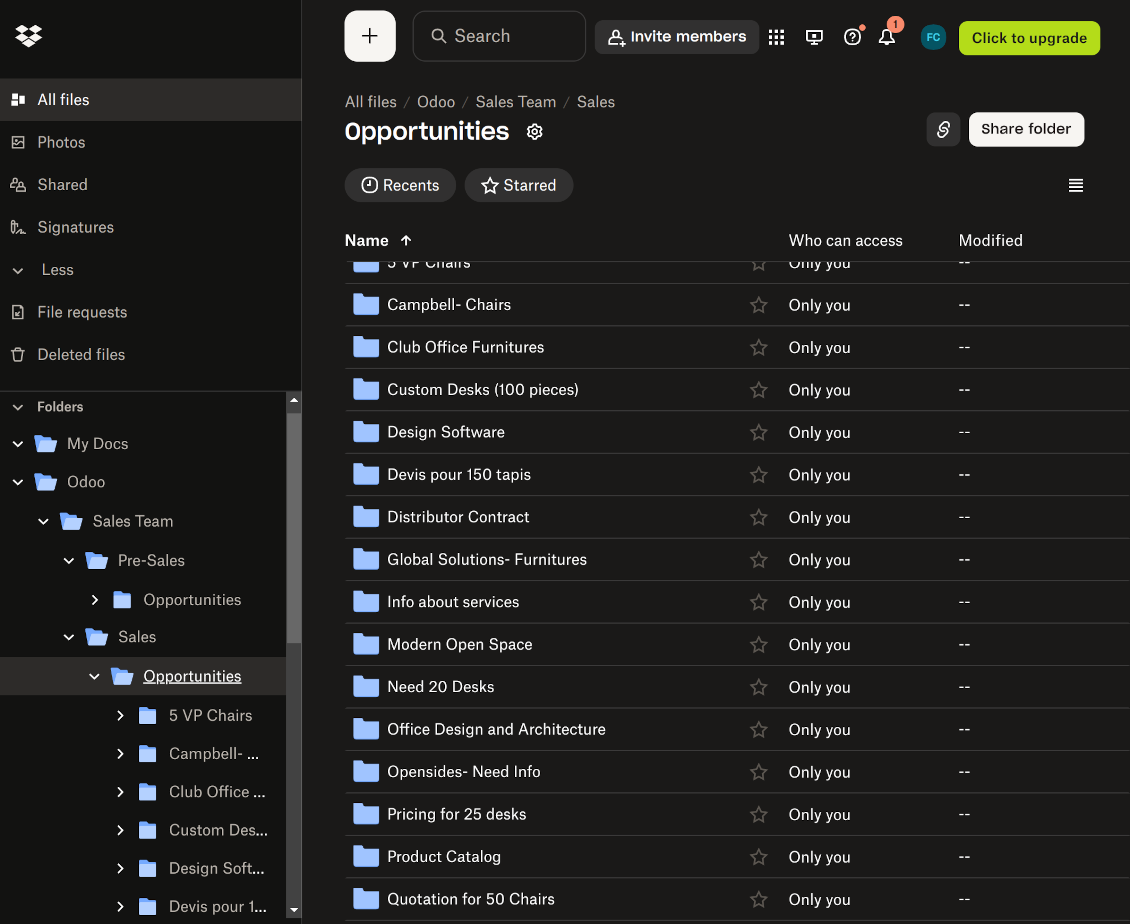
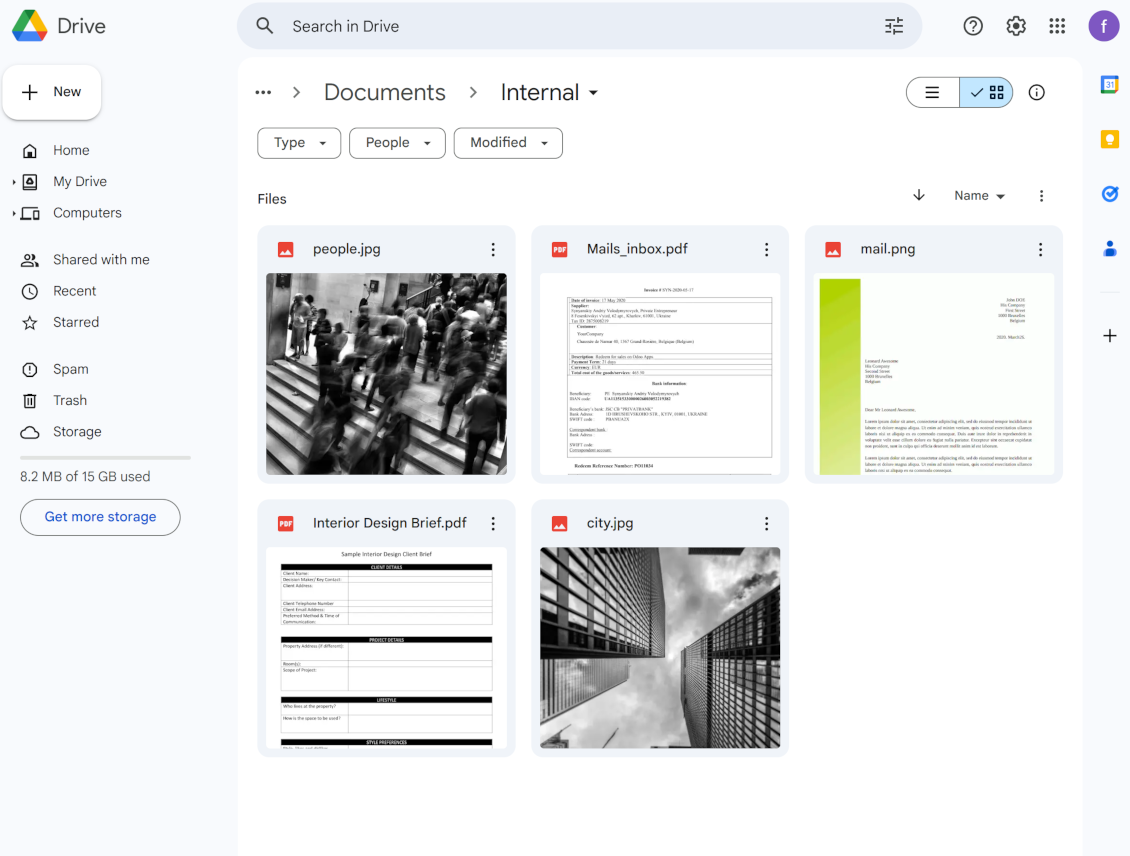
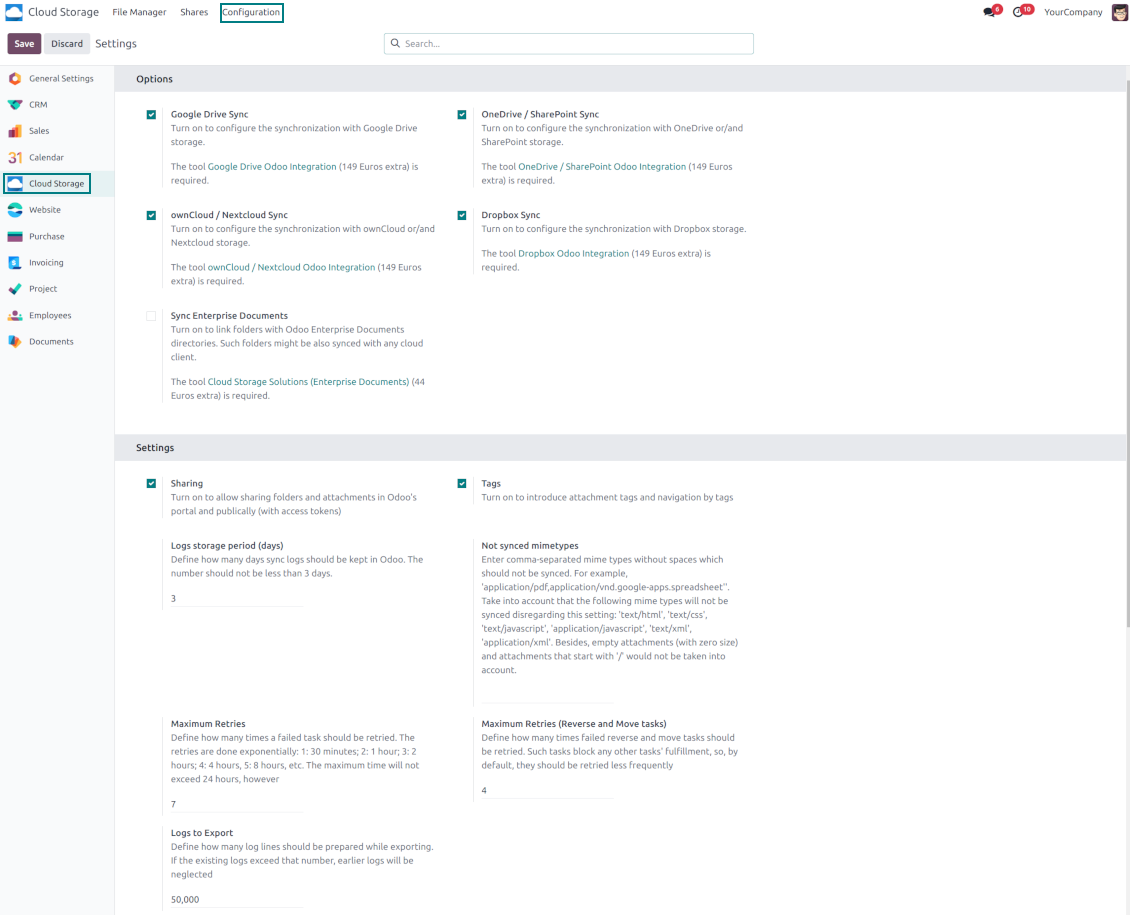

This tool organizes Odoo attachments in folders' trees and synchronizes those with your choice's cloud storage solution(s). The app introduces automatic algorithms to prepare directories for documents and integrate those with workflows of Google Drive, OneDrive/SharePoint, Nextcloud/ownCloud, Dropbox, Amazon/MinIO S3, Box, and NAS/WebDAV (Synology, QNAP, TrueNAS, etc.).
- the core module which introduces the file manager interface and basic mechanics for synchronizations with various cloud clients. कीमत है 398€.
- Odoo फ़ोल्डर और अटैचमेंट को OneDrive और/या SharePoint से सिंक करने वाला कनेक्टर. इस ऐड-ऑन की सुविधाएँ आइकन से चिह्नित हैं. कीमत है 89€.
- Odoo फ़ोल्डर और अटैचमेंट को Google Drive से सिंक करने वाला कनेक्टर। इस ऐड-ऑन की सुविधाएँ आइकन से चिह्नित हैं। कीमत है 89€.
- Odoo फ़ोल्डर और अटैचमेंट को Amazon S3 से सिंक करने वाला कनेक्टर। इस ऐड-ऑन की सुविधाएँ आइकन से चिह्नित हैं। कीमत है 89€.
- Odoo फ़ोल्डर और अटैचमेंट को Nextcloud और/या ownCloud से सिंक करने वाला कनेक्टर. इस ऐड-ऑन की सुविधाएँ आइकन से चिह्नित हैं. कीमत है 89€.
- Odoo फ़ोल्डर और अटैचमेंट को NAS समाधानों (Synology, QNAP, TrueNAS) और सामान्य WebDAV संग्रहण से सिंक करने वाला कनेक्टर. इस ऐड-ऑन की सुविधाएँ आइकन से चिह्नित हैं. कीमत है 89€.
- Odoo फ़ोल्डर और अटैचमेंट को Dropbox से सिंक करने वाला कनेक्टर। इस ऐड-ऑन की सुविधाएँ आइकन से चिह्नित हैं। कीमत है 89€.
- Odoo फ़ोल्डर और अटैचमेंट को Box से सिंक करने वाला कनेक्टर। इस ऐड-ऑन की सुविधाएँ आइकन से चिह्नित हैं। कीमत है 89€.
- कार्यस्थान से संबंधित फ़ोल्डर तैयार करने और Odoo दस्तावेज़ों (Enterprise ऐप 'Documents' द्वारा प्रस्तुत) को क्लाउड से सिंक करने का वैकल्पिक ऐड-ऑन। इस ऐड-ऑन की सुविधाएँ आइकन से चिह्नित हैं। कीमत है 44€.
Automatic Folders
Decide which Odoo document types should have their folder trees. Directories are regularly updated based on flexible rules and existing Odoo objects
Sync with Cloud Storage Solutions
Synchronize chosen folders and files with specific cloud storage: Google Drive, OneDrive, SharePoint, Nextcloud, Dropbox, Amazon, Box, MinIO S3, NAS/WebDAV (Synology, QNAP, TrueNAS, etc.), and ownCloud. Have as many connections as you need
File Manager Interface
Manage folders and attachments from a single view. Comfortably navigate by directories and tags. Search and download files one by one or in a batch. Upload and move attachments
Enhanced Attachment Box
Organize files of any Odoo object in a set of subfolders. Instantly access folders and files in the attachment box and in synced cloud interfaces
Portal Sharing
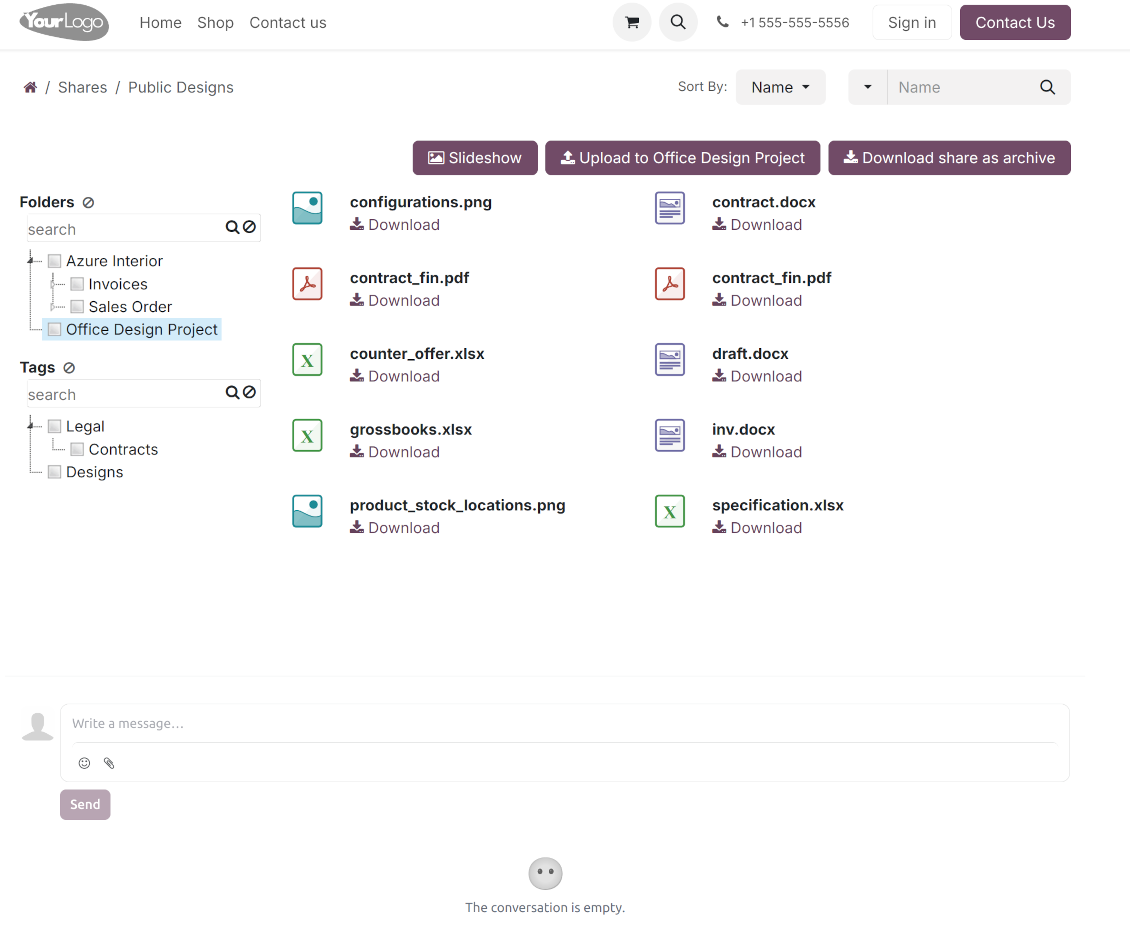
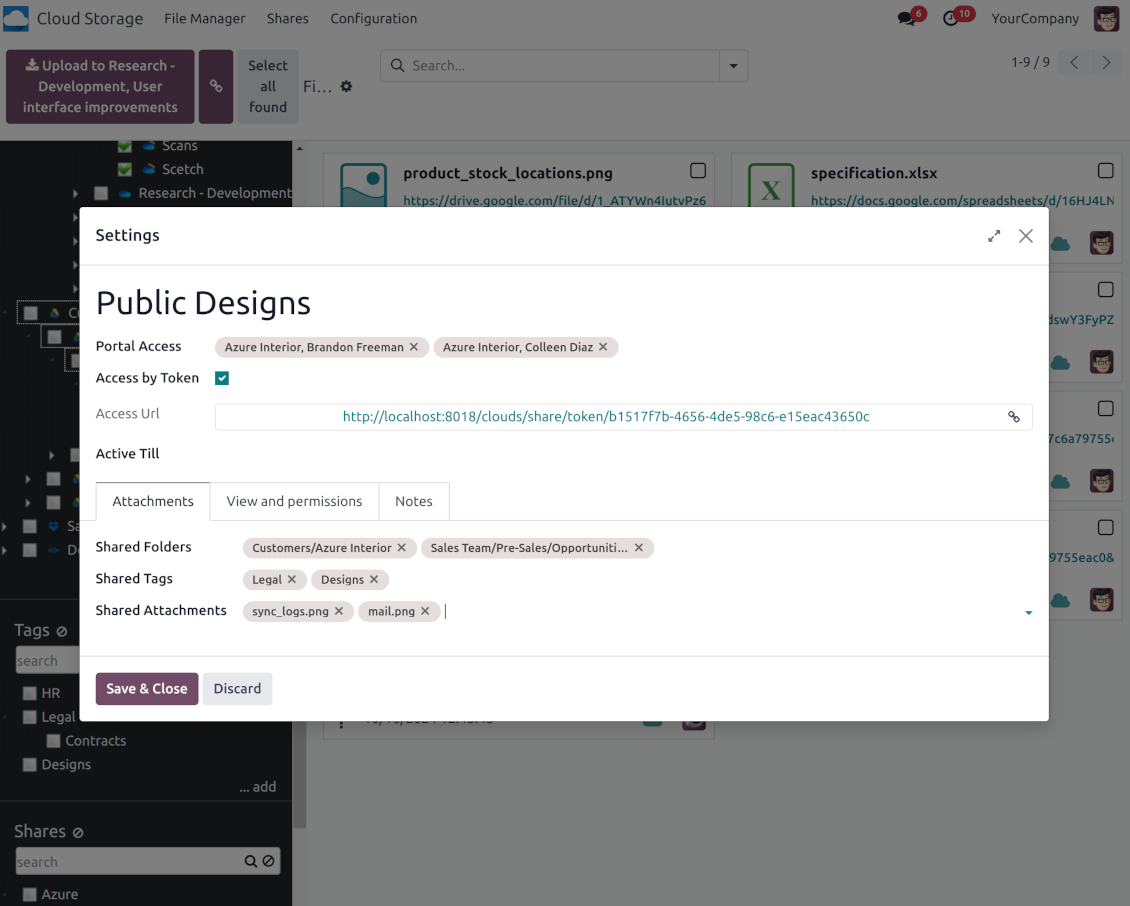
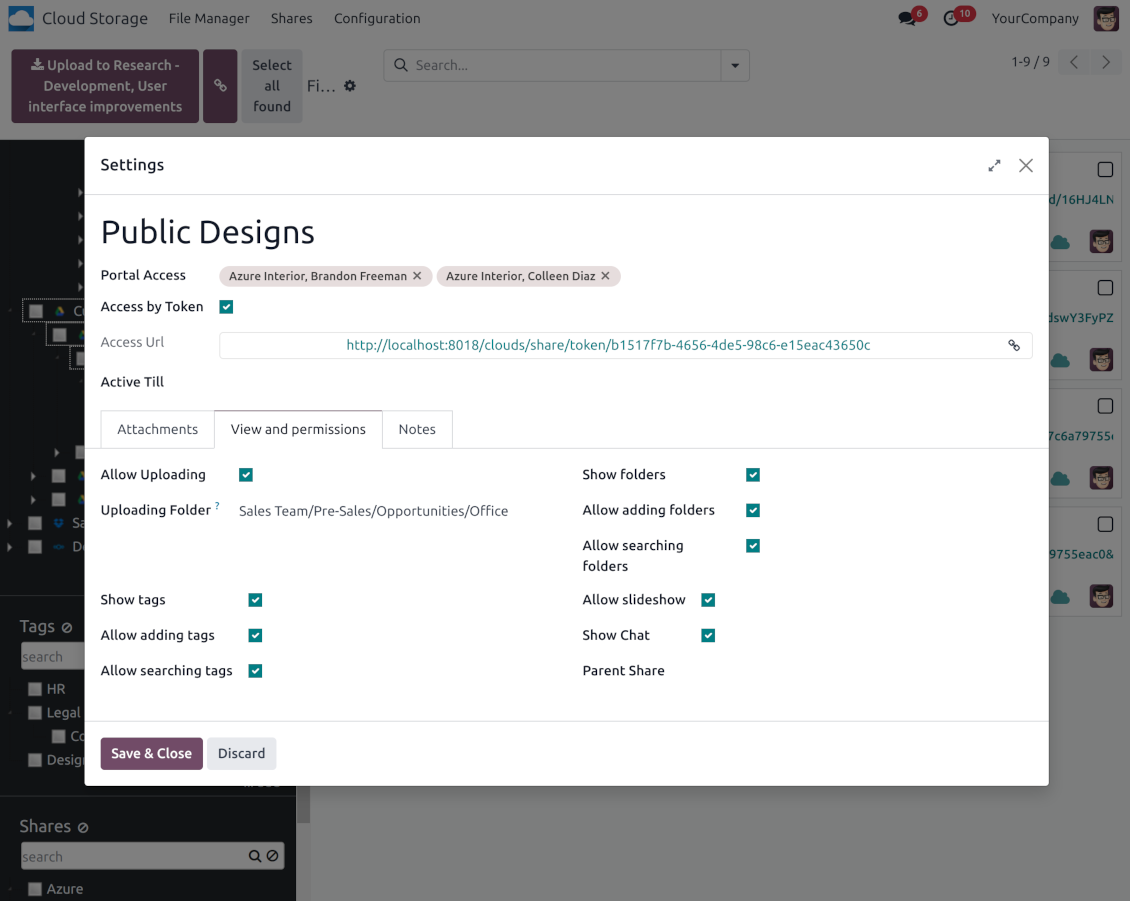
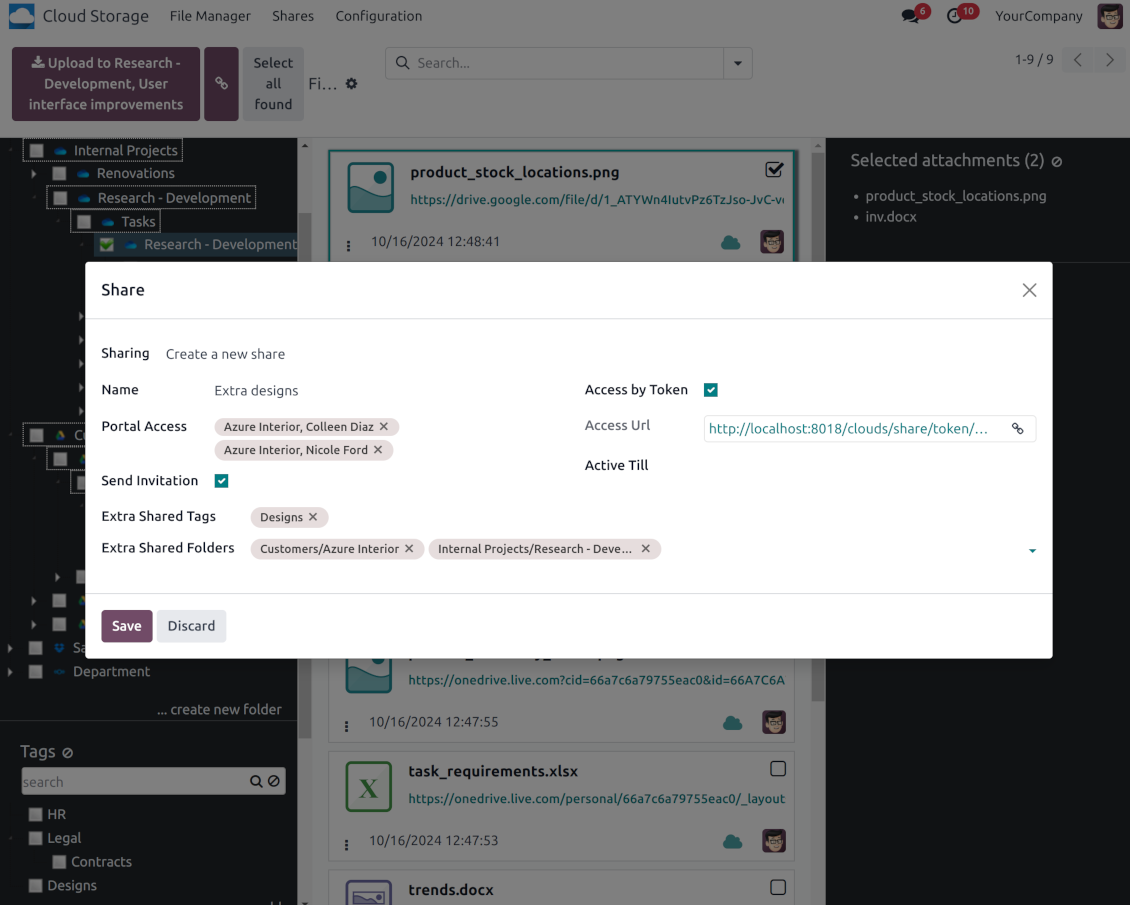
Share files, directories, and tags with particular partners or with an access URL. Let users download whole shares and separate items, upload attachments, and add folders or tags
Enterprise documents compatible
Set up rules to prepare folders based on Odoo Enterprise workspaces. All features, including sharing, downloading, and signing, will work even after the sync
Automatic Regular Sync
Rely on auto-synchronization between Odoo and cloud solutions based on scheduled jobs. No manual interaction is required
Bilateral Sync
Odoo sends attachments to cloud storage solutions and retrieves files from there. Binary content is kept in clouds, while Odoo provides direct access to synced items
Works well with SharePoint. Supportive team
We've been using this with SharePoint and it's been working great. One of the best things is having everything, including logs right in Odoo's interface, so you can actually see what's going on. It's also super convenient that you can view or download synced files from the attachment box without having to leave the page or even log in to Sharepoint.
Setup was pretty smooth for us. When we had a few questions about setting up the folder hierarchy and priorities, the developer team got back to us in just a couple of hours and helped us figure it out. Great support and great extension!
Tricky setup, but works perfectly now
Really solid module. We managed to get a very flexible folder structure (sorted by clients) and synced all our sales orders, invoices and tasks by projects to Google Drive.
Initial setup was a bit of a pain and kinda tricky to configure everything at first, but now it's running smoothly and works perfectly. The faotools team helped a lot. Def worth it if u need to keep your docs organized in Odoo and Google Drive.
Recommended!
Great support, assistance and very good connector!
We are very happy with the support we received when configuring the Sharepoint - Odoo connector. The connector has great functionalities.
All our questions were answered very fast (within one day).
FaOtools helped us optimising our connector and assisted us with future improvements.
We really recommend this connector.
Great module and Great Support!
The module works great! and the support is phenomenal!
A must-buy if it suits your requirements!
very professional app, excellen t customer service
This app is very well programmed and does its job very well. But the best is the excellent customer service who also helps when the problem lies somewhere else. You receive a lot for your money.
Excellent !!!
Great App and great Service from faOtools.
An impressive app and world-class support
I have been very impressed by the way the OneDrive / SharePoint Odoo Integration module synchronises content in both directions and allows me to share documents in Odoo with my SharePoint site. Above all the technical support is top-notch, which greatly increases the value of this product. I highly recommend this product for anyone considering synchronising Odoo with SharePoint/OneDrive.
Very good product
A perfect solution to integrate Owncloud with Odoo. We sync a high volume of objects across multiple Odoo models, which works seamless and stable. For us it is the perfect solution to have an external DMS instead of the Odoo native attachment handling, which also enables us to interchange files between systems in our best-of-breed setup.
The team behind this module is extremely professional and responsive. They helped us on a few occasions and provided clear answers and prompt support when required, and they even went out of their way to assist us with another requirement we had. Cannot recommend the product and team highly enough, try this if you're in the market to connect Odoo with an external document solution.
Works fine, good support
The first experience with the module is excellent. I had some trouble to configure things right on the Microsoft-side, but the team provided quick and good support.
Best module for integration with google drive
The module performs its function correctly and faOtools responds quickly to any problem and, in case of detecting any bug, quickly apply the changes. Its support is 10 stars.
Works according to specs
I have used this app with Odoo 12 and Nextcloud 16 and it works as specified. Odoo Tools offers very responsive support which is really helpful. Of course 5 stars...!
This is Awesome
I have used Cloud Sync on Next/Own Cloud and works really great.
Odoo फ़ाइल प्रबंधक इंटरफ़ेस
-
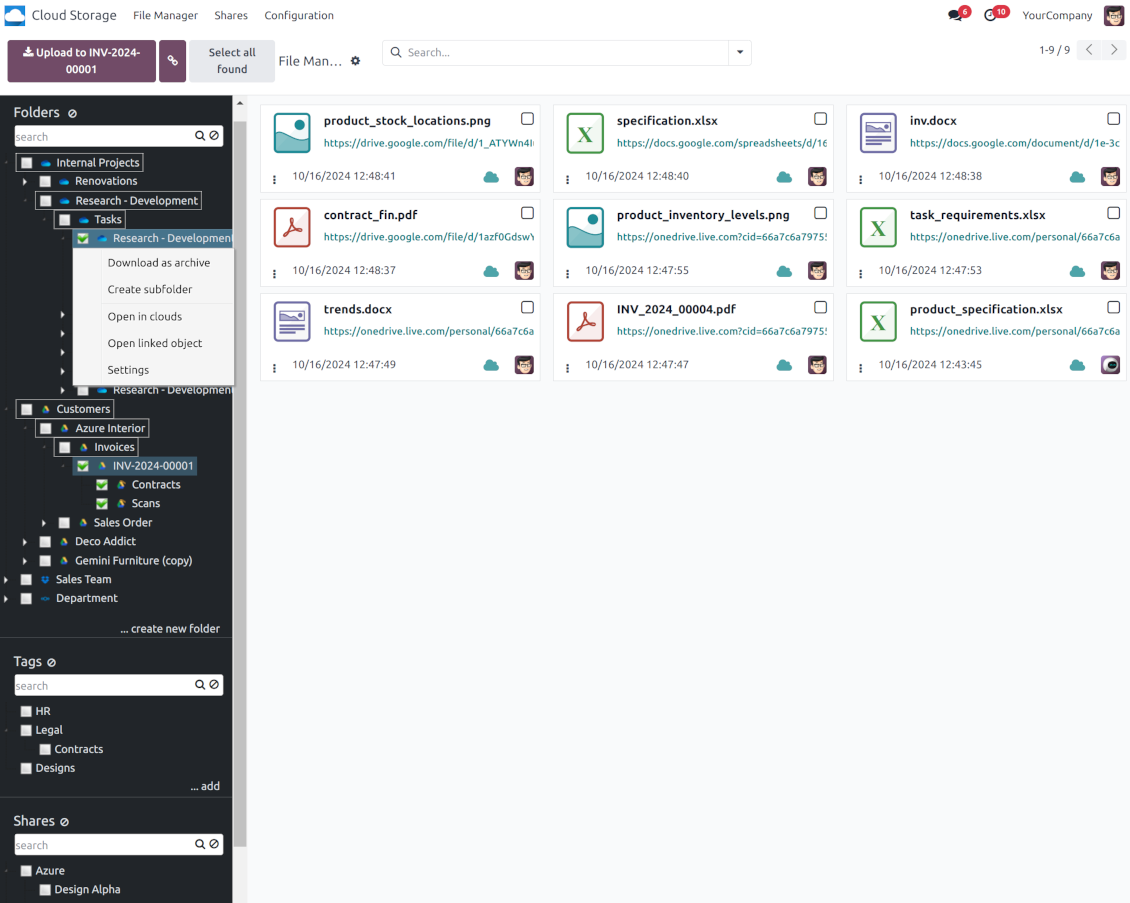
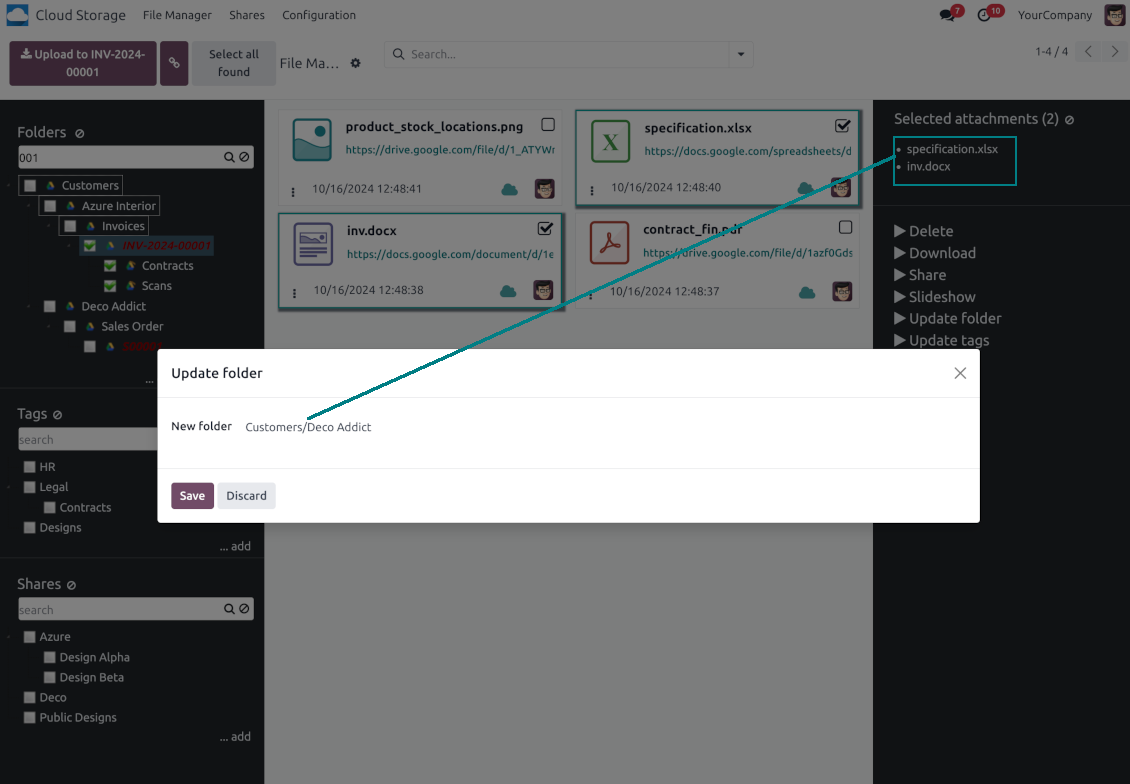
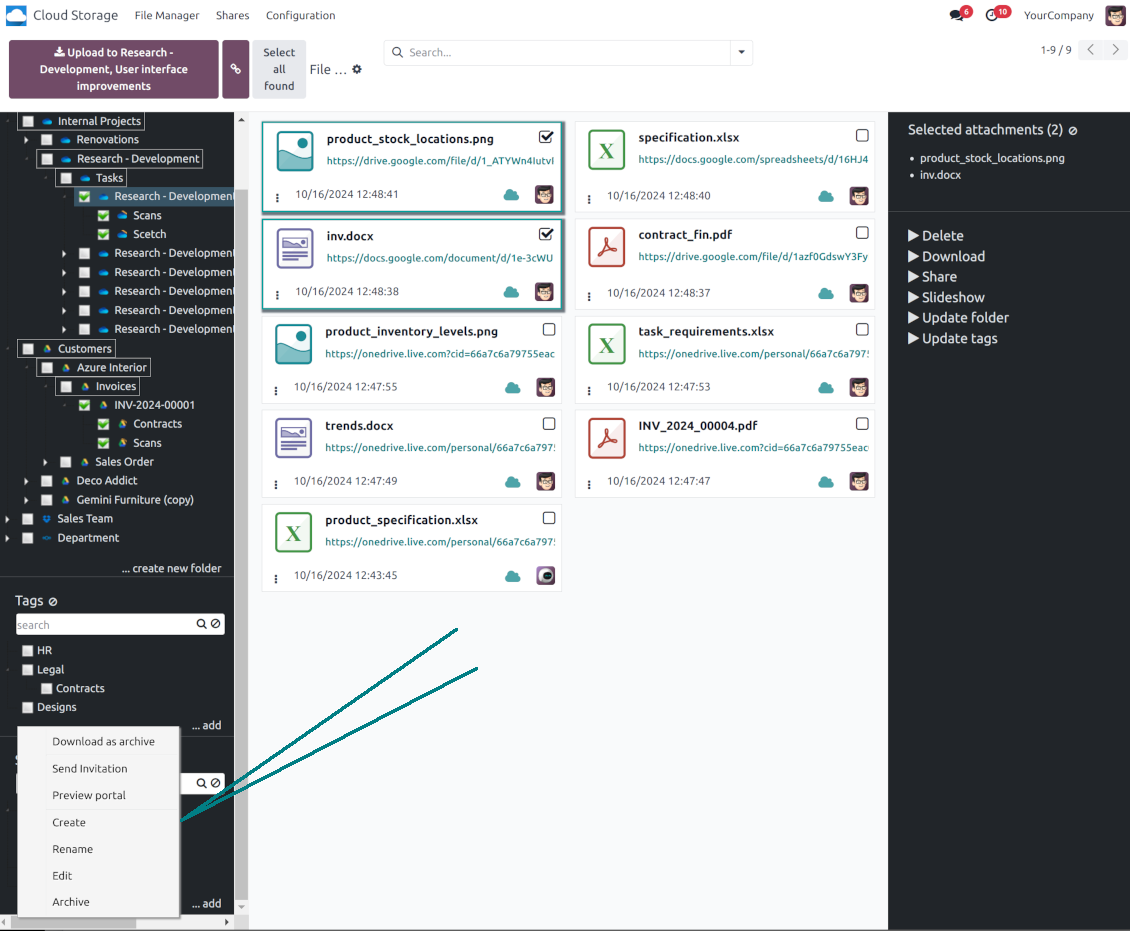
Navigate by folders: select a directory to show its attachments. Expand and hide folders' layers in a click. Add subfolders to any directory (right mouse click > Create subfolder)
-
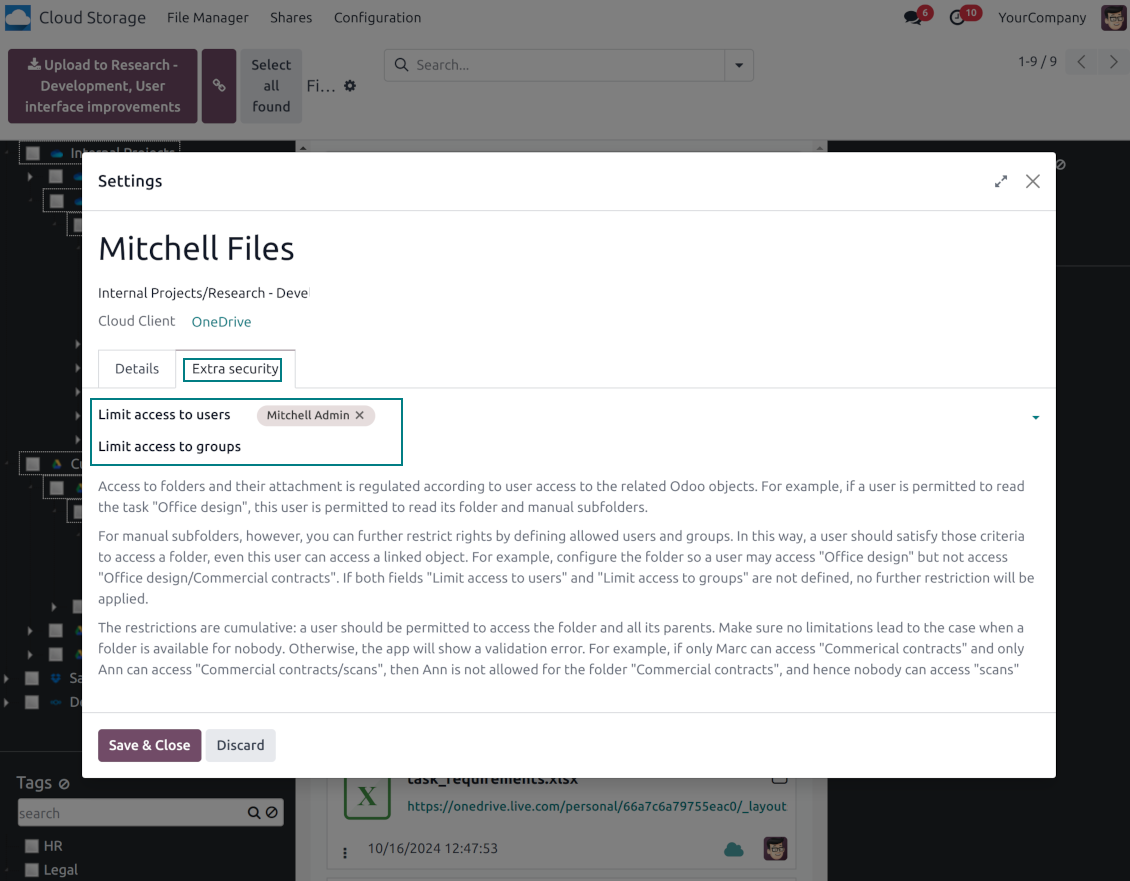
Open any synced folder in its cloud client (right mouse click > Open in clouds). Show a folder peer Odoo object if there is such a connection (right mouse click > Open linked object). Change settings of manually created folders, including granting access rights (right mouse click > Edit Settings)
-
Navigate by attachment tags. Create and edit tags right from the navigation panel
-
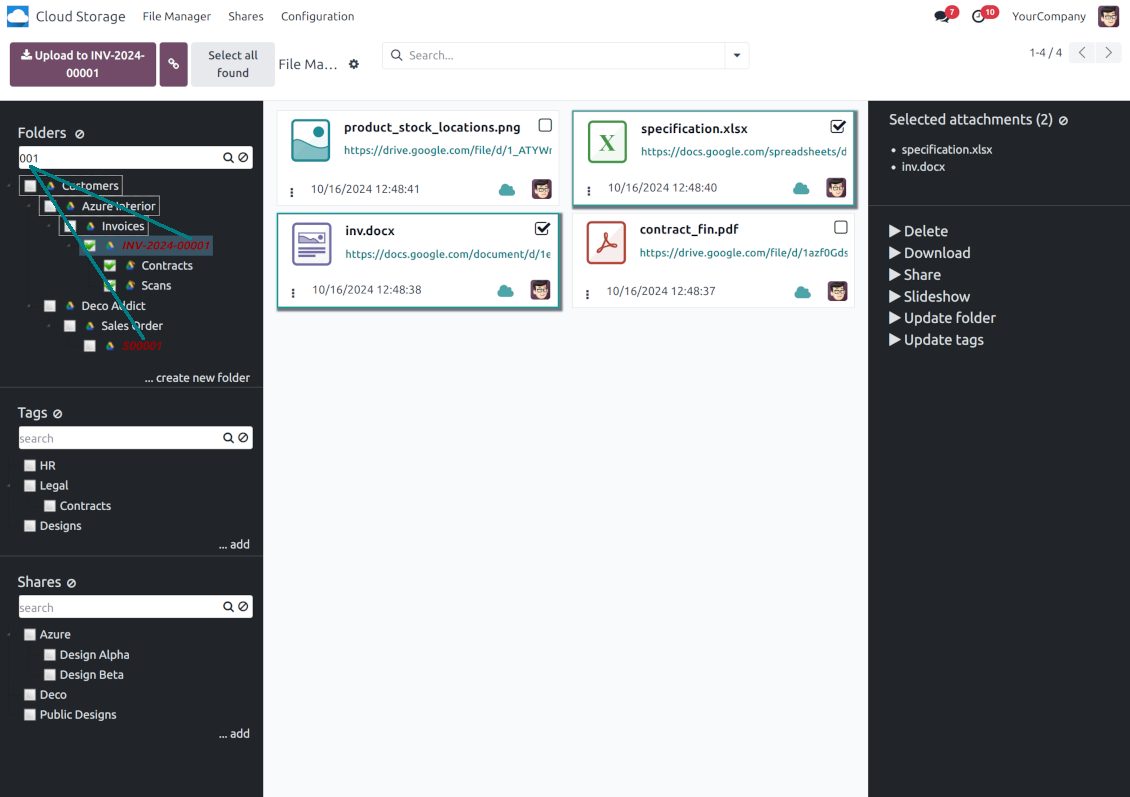
Search and highlight tags and folders in seconds even if there are thousands of items
-
Drag and drop to re-structure folders (relates only to manually created directories; for automatic folders change rules instead) and tags
-
Download any folder or any tag with all its attachments as a single zip archive (right mouse click > Download as archive)
-
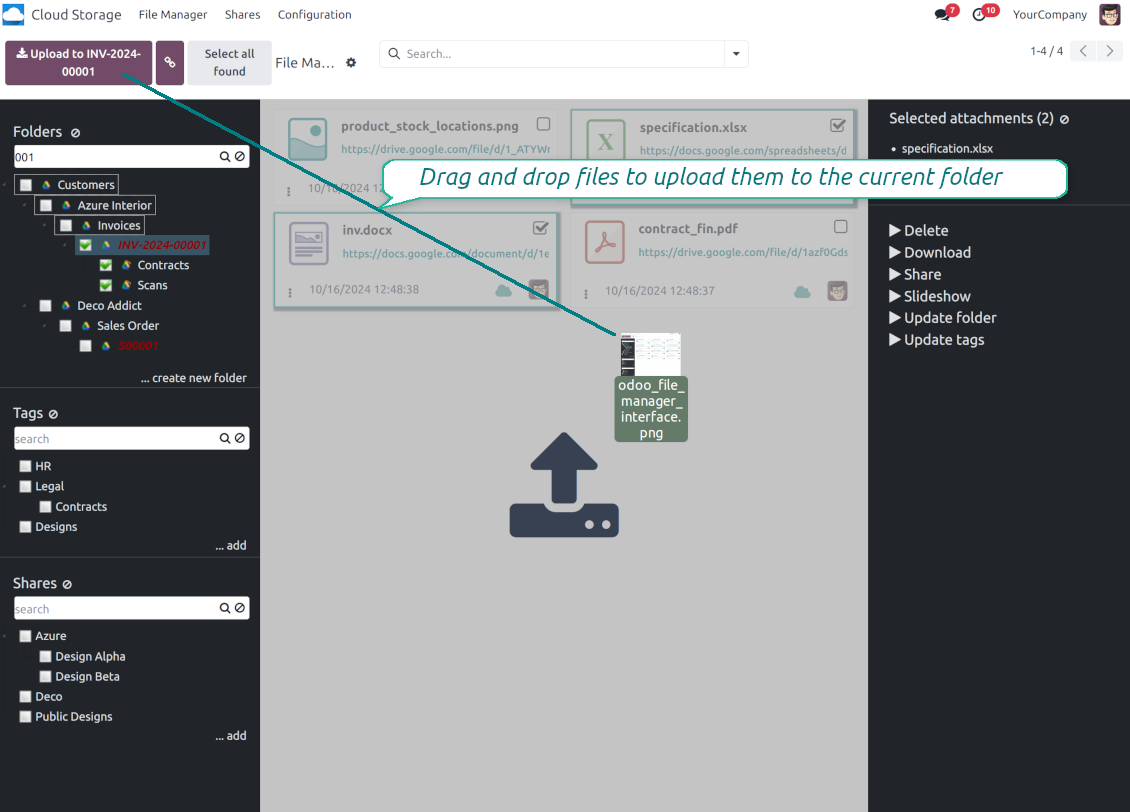
Upload attachments to the current folder. Use the top header button 'Upload file' or drag and drop files
-
Instantly open any synced attachment in a linked cloud client (push the link in the middle of attachment cards)
-
Download any attachment to your local computer disregarding whether it is synced or not (push the icon 'cloud' or 'download' in the footer right corner)
-
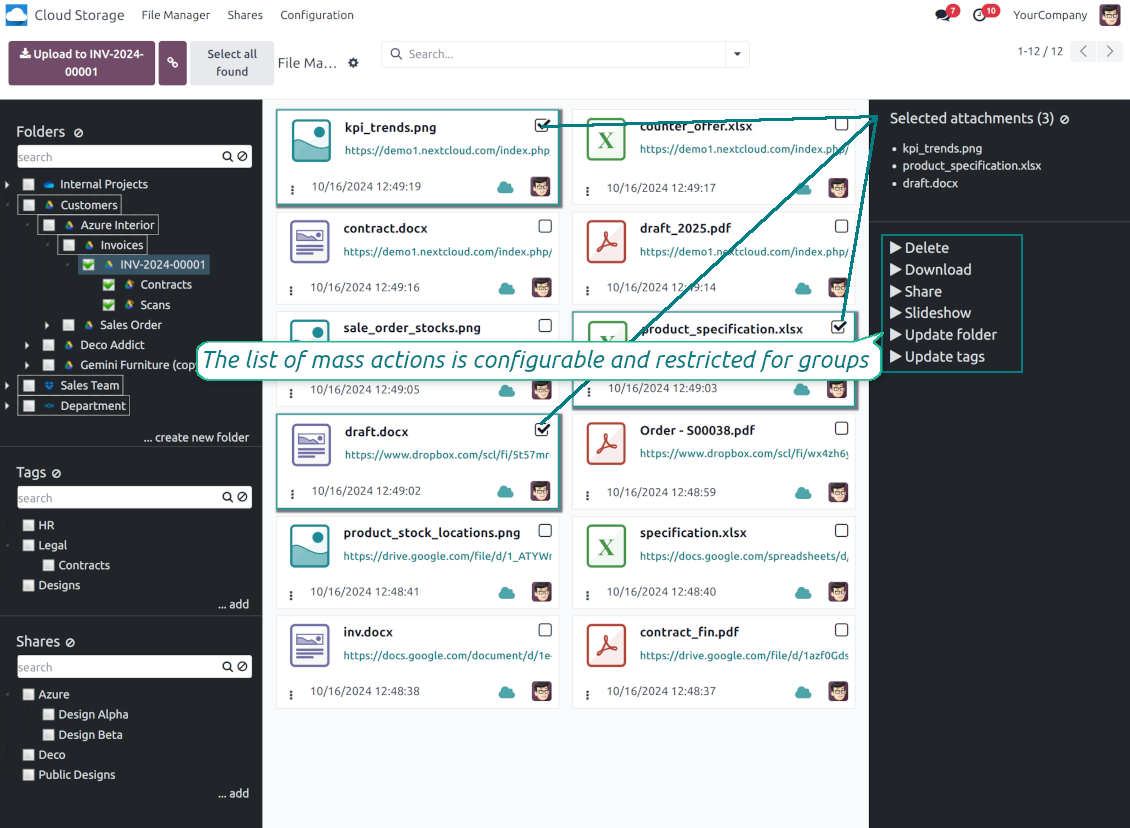
Consequentially select attachments and download them as a single zip archive
-
Move any files to any folder, including re-attaching items between Odoo objects (e.g. from a sale order SO-001 to another quotation or its customer folder). Use the mass action for that end or just drop an attachment to a required directory. Update attachments' tags by dragging those to the left navigation panel or by executing the mass action. Delete attachments in a batch
-
Apply standard attachments search to find required files.
Enhanced Attachment Box
-
Any Odoo object might be linked to its folder. See Automatic folders' structure
-
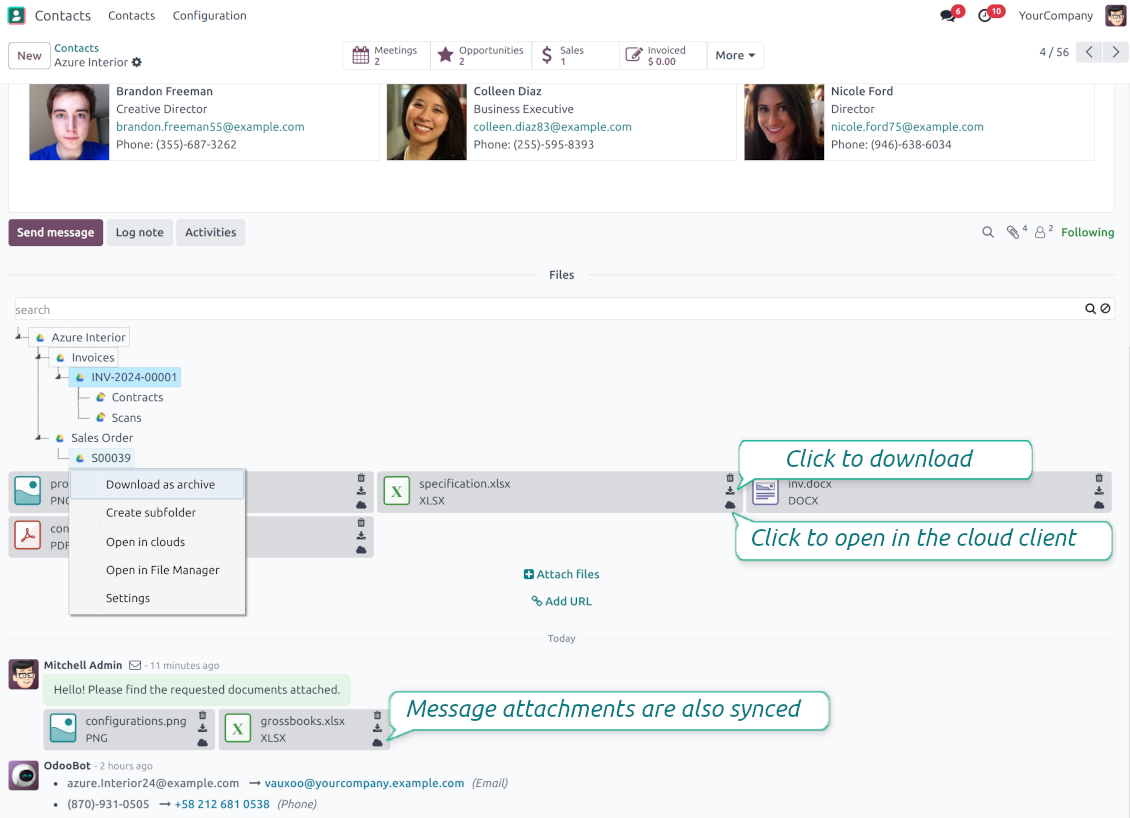
Flexibly define subfolders to organize the structure you need (right mouse click > Create subfolder)
-
Drag and drop to re-structure subfolders
-
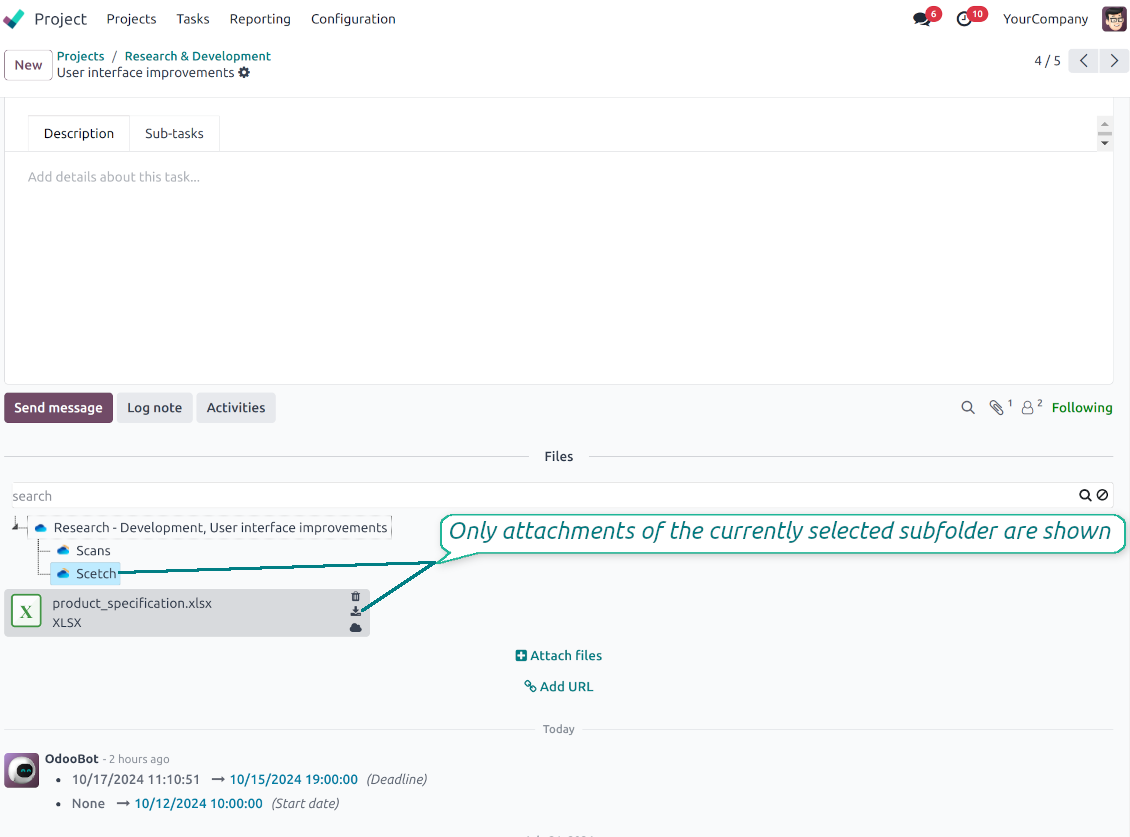
Select a folder to see its attachments. By default, files of the object root directory are shown
-
Download any folder with all attachments as a single zip archive (right mouse click > Download as archive)
-
Open the already synced folder in its cloud client (right mouse click > Open in clouds)
-
Upload attachment to a chosen folder (use the button 'Add attachments' or drag files to the attachment box area)
-
Instantly open any synced attachment in a linked cloud client (push the icon 'clouds')
-
Download any attachment to your local computer disregarding whether it is synced or not (push the icon 'download')
-
Use standard Odoo preview for both synced and local files (click on a file thumbnail)
-
Delete attachments as usual
-
All actions are equally applicable to object attachments and attachments related to messages.
Cloud Storage सिंक
Multi synchronization
-
Use optional add-ons to synchronize the document management system with the cloud client(s) of your choice: Google Drive, OneDrive, SharePoint, Nextcloud, Dropbox, Amazon, Box, MinIO S3, NAS/WebDAV (Synology, QNAP, TrueNAS, etc.), and ownCloud. Have as many connections as you need
-
Establish multiple connections to different cloud clients simultaneously. For example, sync sales-related folders to Google Drive; tasks and projects - to SharePoint or OneDrive; HR documents - to Nextcloud/ownCloud; manufacturing specifications - to Dropbox. Take into account that a specific folder might be synced to only a single cloud storage solution. Its children would be synced to the same client
-
For each cloud client, the app lets set up a few instances. For example, for Google Drive, you may share some folders to your personal drive, others - to one of your team drives, and the rest - to your teammate's drive
-
To establish a connection with particular cloud storage, follow the instructions that are specific for client types. See the tab Configuration for details
-
Any connection might be paused manually if it is needed. It might be also auto-stopped if there are critical issues during the sync. Then, you should re-connect to a target cloud client
Cloud clients
-
Synchronization for all cloud clients is based on the same principles and on the same queue. Simultaneously, there might be differences in sync results due to different features of various cloud storage solutions
-
Establishing connections for different types of cloud clients assumes installing optional add-ons, different approaches for Odoo, and external API configuration. Follow the instructions on the tab 'Guidelines'
-
Google Drive Odoo Integration allows establishing a connection with any personal or team drive
-
OneDrive / SharePoint Odoo Integration assumes synchronization with any drive of personal/business/SharePoint tariffs
-
ownCloud/Nextcloud Odoo Integration et integrate Odoo with any instances of ownCloud and Nextcloud. In comparison to other clients, the app allows setting the type of attachment links. By default, Odoo links are internal: only authorized users may access them. Optionally make links public (the setting 'Use Public URLs'). See details on the guidelines tab
-
Dropbox Odoo Integration works for all DropBox tariffs, including Personal DropBox (Basic, Plus, Family) and business DropBox (Professional, Standard, Advanced). In comparison to other clients, the app allows choosing whether cloud items would be shared or internal. See details on the guidelines tab
-
Amazon S3 Odoo Integration (amazon_s3_odoo) synchronizes Odoo folders and attachments with Amazon S3 buckets
-
NAS/WebDAV Odoo Integration (nas_odoo) connects Odoo documents with NAS and WebDAV-compatible storage, including Synology, QNAP, and TrueNAS
-
Box Odoo Integration (box_odoo) synchronizes Odoo folders and attachments with Box cloud storage
Automatic two-sided sync
-
Integration is based on scheduled jobs and is fully automatized. The app regularly checks changes in systems and runs sync operations
-
Synchronization is bilateral. Updates in Odoo are reflected in cloud clients (direct sync); changes in cloud clients modify Odoo folders and attachments (backward sync)
-
सिंक को एक तरफ़ा रखने के लिए क्लाइंट पर क्लाउड से सिंक बंद करें। Odoo के बदलाव फिर भी क्लाउड स्टोरेज पर भेजे जाते हैं, लेकिन वहाँ बनाई, नाम बदली या हटाई गई फ़ाइलें और फ़ोल्डर Odoo में नहीं दिखते। विकल्प को फिर से बंद करने पर वे जमा बदलाव, मिटाने सहित, अगले सिंक पर लागू होते हैं
-
Any cloud connection might be reset. In this way, the app assumes getting back all items back to Odoo (reverse sync)
-
Odoo folders and attachments might be re-attached to a new cloud client. Hence, items will be first taken back to Odoo (reverse sync) and then put will be put to the new cloud storage (direct sync)
Queue-based synchronization
-
Once in 15 minutes, the app examines updates in Odoo and cloud storage(s) to prepare a synchronization queue
-
Folders' checks follow the First-In-First-Out (FIFO) principle. So, directories that have not been examined for the longest will be processed first
-
Once in 15 minutes, the sync queue is run by the special scheduled job. Firstly, the most important (blocking) tasks would be done
-
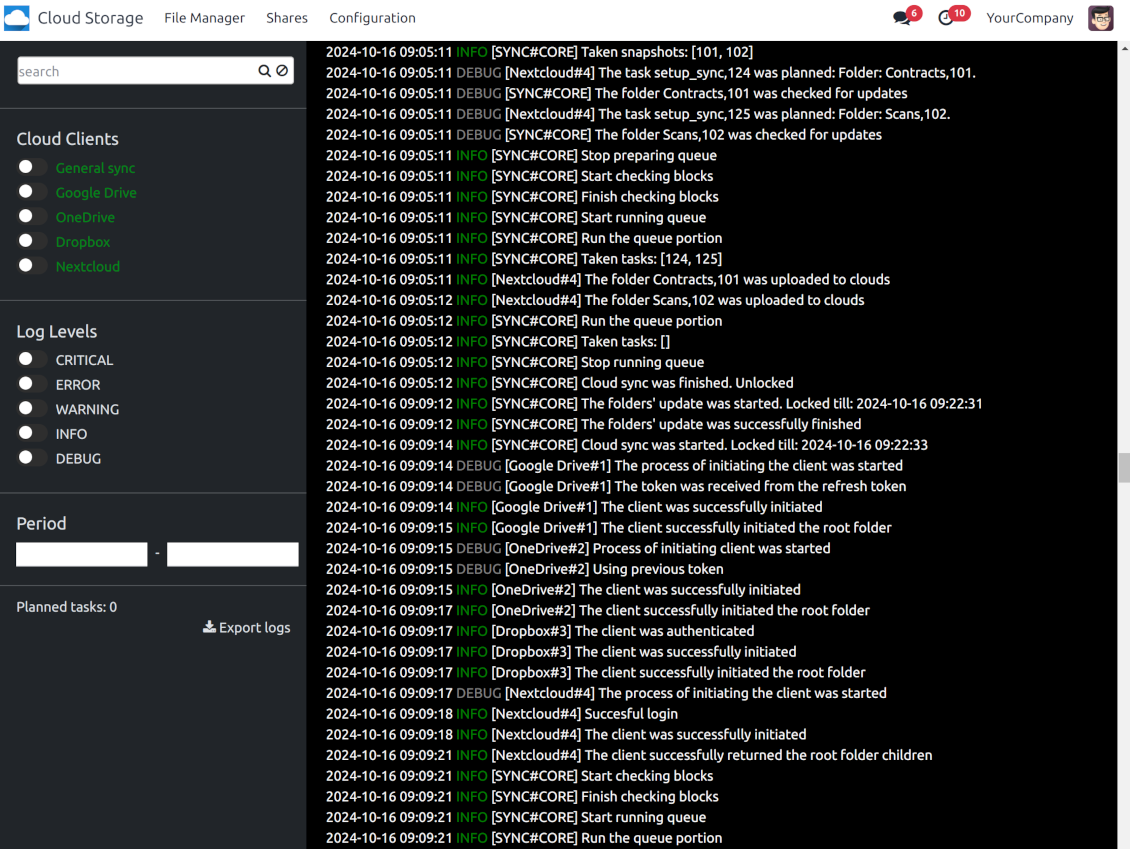
Control planned jobs and their fulfillment in the special Odoo logs interface (Cloud Storage > Configuration > Sync Logs). Subscribe for particular cloud clients notifications
-
If the app faces sync failures, it will re-try operations afterward. Sync queue processing would not be stopped if there are items not blocked by such failures
Odoo attachments for cloud storage: direct sync
-
Direct sync prepares the folders' hierarchy and uploads Odoo attachments for cloud storage
-
Direct sync checks whether attachments are added or deleted for synced directories. If so, they would be created or removed in cloud storage. In particular, it means that any file added to a folder-related Odoo object (e.g. Quotation), would be automatically moved to a linked cloud client
-
Direct sync makes all synced Odoo attachments change their type to a link (URL), while binary content is removed with one of the next Odoo cleaners. So, no actual files would be stored on your Odoo server
-
Direct sync checks whether a new folder is added. Disregarding whether it is done manually or automatically, the app would generate a peer directory in a cloud storage
-
Direct sync checks whether there are any updates in folders. If so, such changes are reflected in a cloud client
Cloud storage files and folders for Odoo: backward sync
-
Backward sync checks whether any files or subfolders are added to cloud storage folders. If so, the app would create URL attachments/subdirectories inside linked Odoo directories (and hence Odoo objects if any)
-
Backward sync checks whether there are any updates in folders or attachments. Such updates would be then reflected in Odoo
-
Backward sync checks whether any files are deleted/moved in a cloud document folder. If so, a linked Odoo attachment would be also unlinked or moved
-
If you deleted a cloud storage folder related to a folder rule / Odoo object, their child files would be deleted as well. Thus, Odoo would remove related attachments. The folders, however, will be recovered with a direct sync
-
In case of conflicts, direct sync changes are in general considered more important than backward updates.
Resetting or changing cloud client: reverse sync
-
In case you decided to reset the connection with a specific cloud client, files would be moved back to Odoo
-
जब क्लाउड स्टोरेज की प्रति ही एकमात्र प्रति रहनी हो, या कनेक्शन टूटा हो, तो क्लाइंट पर रिवर्स सिंक बंद करें। उस क्लाइंट को अलग करने, रीसेट करने या निष्क्रिय करने पर फ़ाइलें वापस नहीं आतीं और क्लाउड स्टोरेज में कुछ नहीं मिटता। Odoo ऑब्जेक्ट और उनके क्लाउड आइटम के बीच का संबंध कट जाता है। सहेजे लिंक फ़ाइलें क्लाउड स्टोरेज में खोलते रहते हैं, लेकिन Odoo उन फ़ोल्डर और फ़ाइलों को अब डाउनलोड, पूर्वावलोकन या खोल नहीं सकता। वह संबंध वापस नहीं आता
-
In case you decided to change the cloud client of a folder rule or a folder, files would be first taken back to Odoo, and then direct sync for a new client would be done
-
Reverse sync operations are prioritized to direct and backward sync operations
-
Not all items can be correctly reversed to Odoo due to cloud client peculiarities. For example, there are documents that may exist only in cloud storage environments (e.g. Google Sheets). The app would try to convert such documents, but in some cases, it would require manual interactions.
Automatic Folder Structure
Rules for automatic folders
-
The app allows preparing its own folder for any Odoo object
-
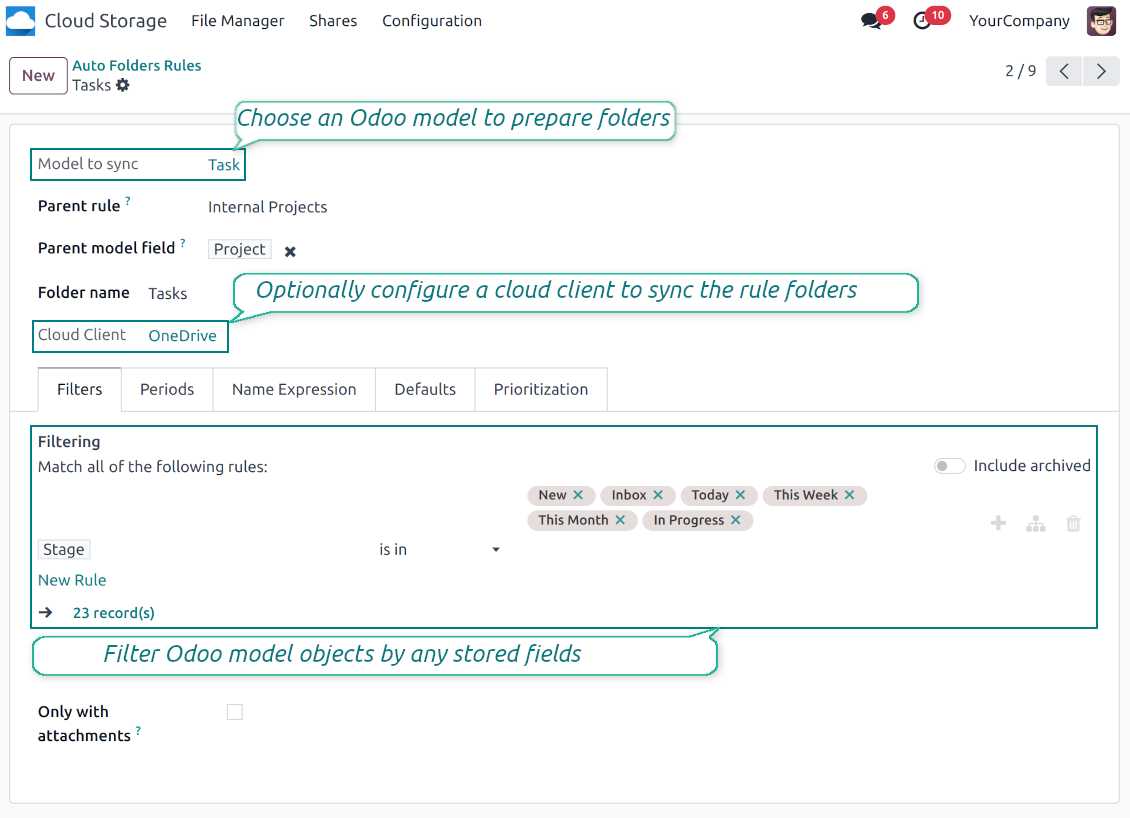
To configure a particular Odoo document type to generate a folder, you should just prepare a new folder rule (Cloud Storage > Configuration > Folder rules). For example, select the model 'Task' to make Odoo add a folder for each project task, so Tasks > Task 1, Task 2, ...
-
Automatically created directories would contain all attachments their linked objects have
-
Folders are updated regularly based on the scheduled job
Multi directories for each model
-
Each Odoo model might have a few linked folders
-
Apply any model storable field to filter Odoo objects and, in this way, split objects into a few super directories. For example, have own folders for individuals and companies, for European and American opportunities, for quotations and confirmed orders, for each project
-
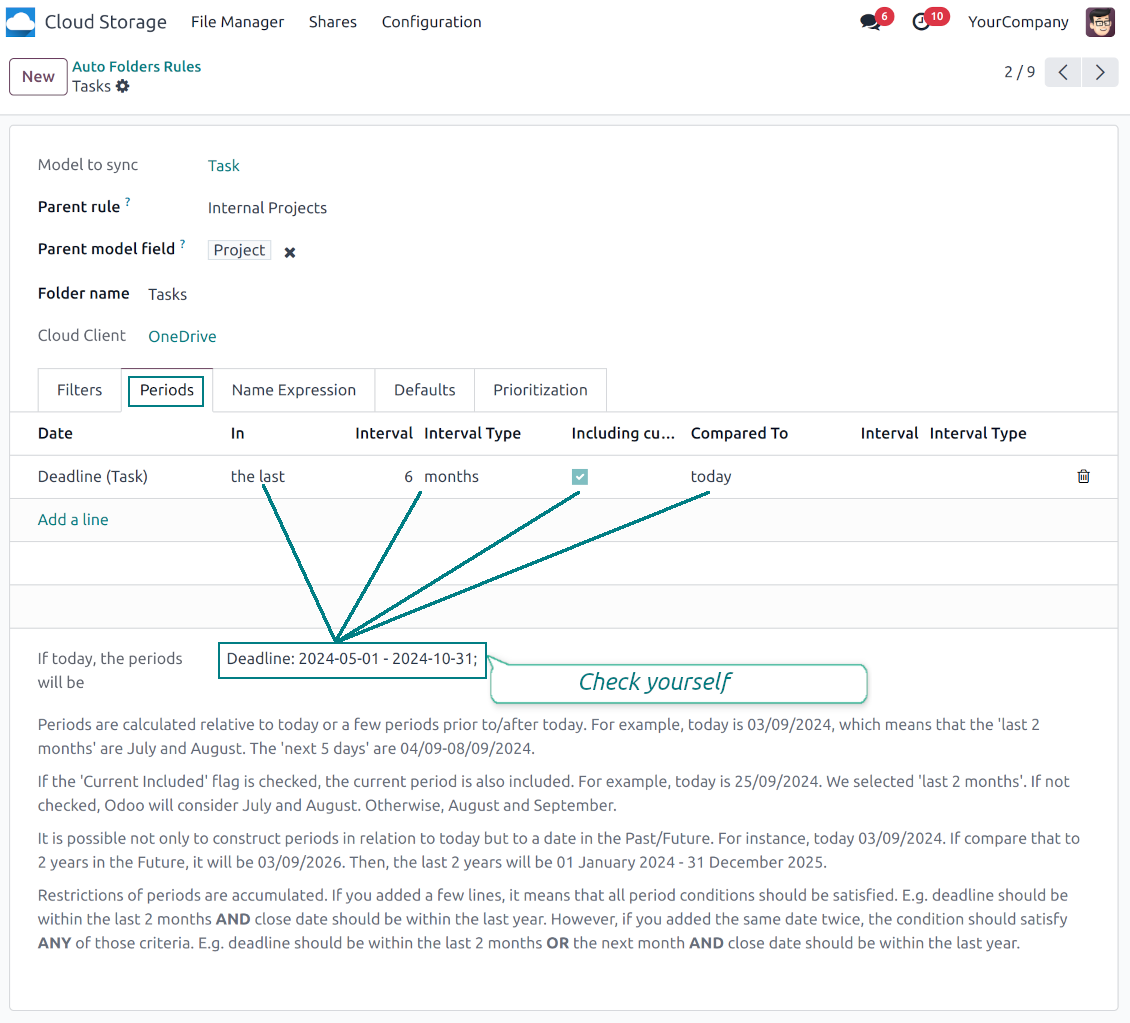
Filter Odoo objects by relative periods by applying date fields of linked documents. For example, leads registered in the last 3 months or invoices updated in the last week
-
As a result, the app lets have paths like 'Odoo > Quotations Europe > SO-001' or ' Odoo > the last year posted invoices (America) > SO-001'
Flexible folders' tree
-
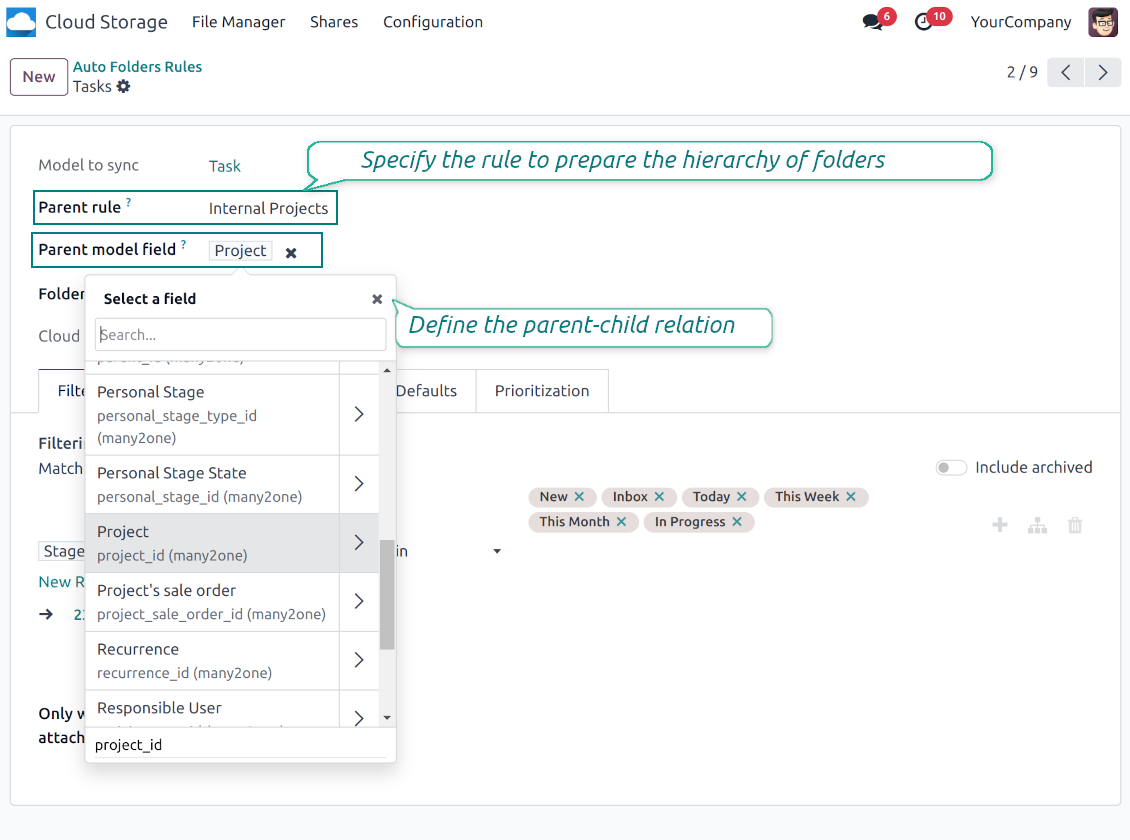
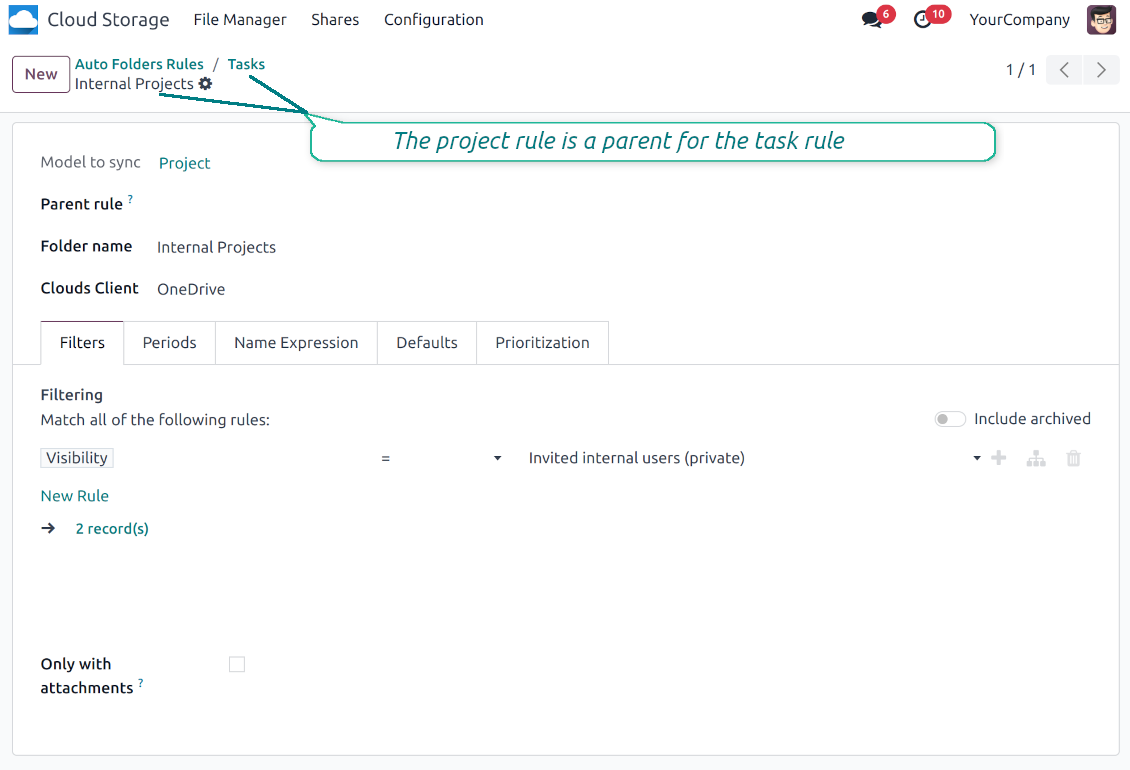
It is possible to set up a hierarchy of folder rules to prepare a more flexible directories structure
-
To that goal define a parent rule for a required folder configuration. For example, use a project-related rule as a parent for a task-related rule, a customer-related rule - for invoices-related rules
-
In order for folder relations to work correctly, it is also needed to enter a parent model field. So, it is the field that links models between each other (many2one relation). For example, 'Project' of a task, 'Customer' of a sales order, or 'Sales Team' of an opportunity
-
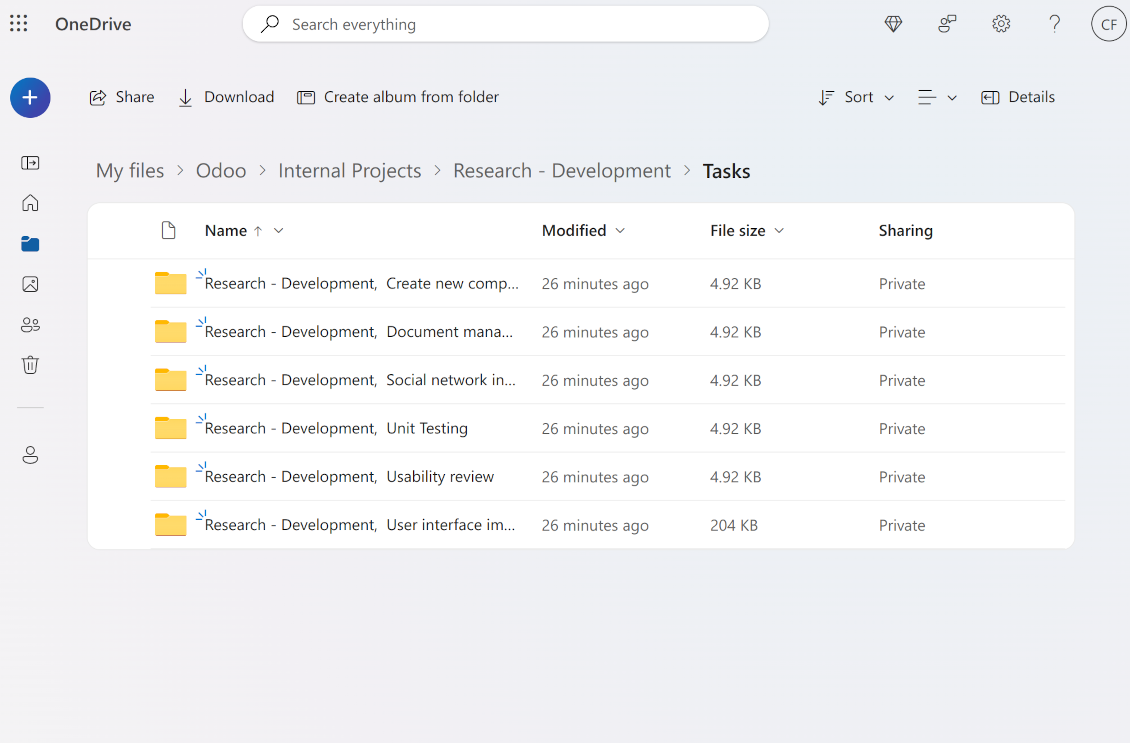
As a result, the tool allows reflecting your Odoo workflow logic and have paths like 'Odoo > Customers > Azure Interior > Projects > Software Design > Prepare Specification' and 'Odoo > Customers > Azure Interior > Quotations > SO-001'
Subfolders, default folders, and default files
-
The app lets add an unlimited number of manual subfolders for each folder. In particular, you may have a directories tree right in each object attachment box
-
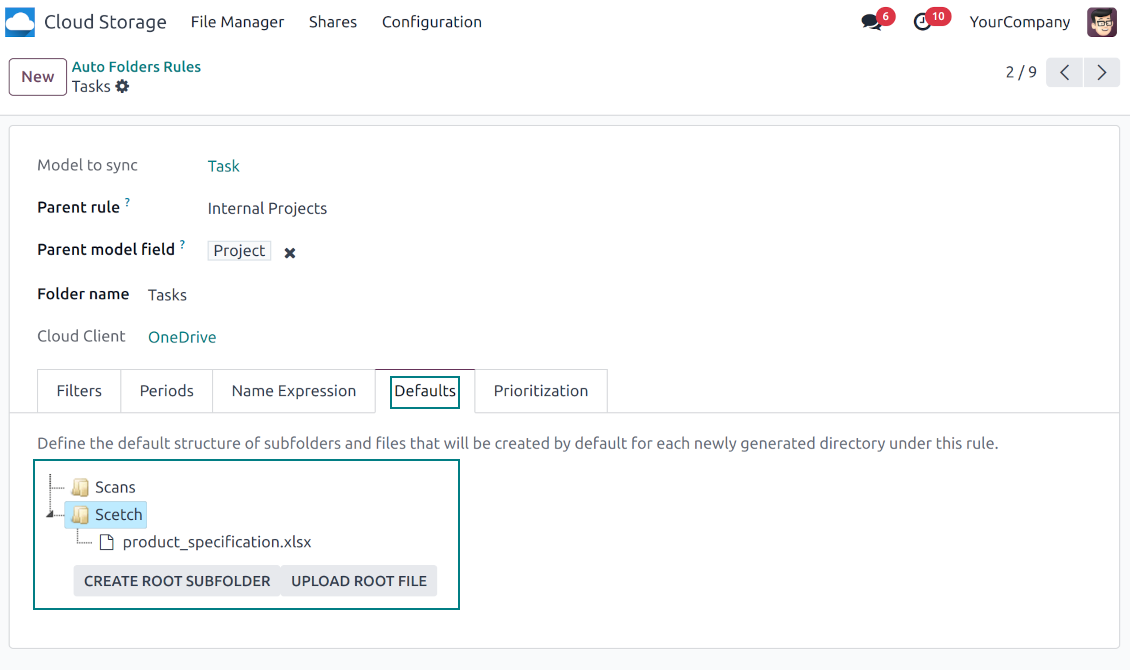
For the first generation, it is possible to define default folders, so subdirectories would be auto-generated for a specific Odoo object folder. Afterward, you may add delete/edit those or add new ones
-
The same mechanics are applied to prepare default files. For example, to have contract/personal card templates which then are assumed to be filled with real data
Configurable folder titles
-
Each folder rule assumes to generate a directory. Names for such directories are assigned right on a rule form. For example, introduce 'Jobs' for a task-related rule or 'HR' for employees' folders. By default, the Odoo model name would be used
-
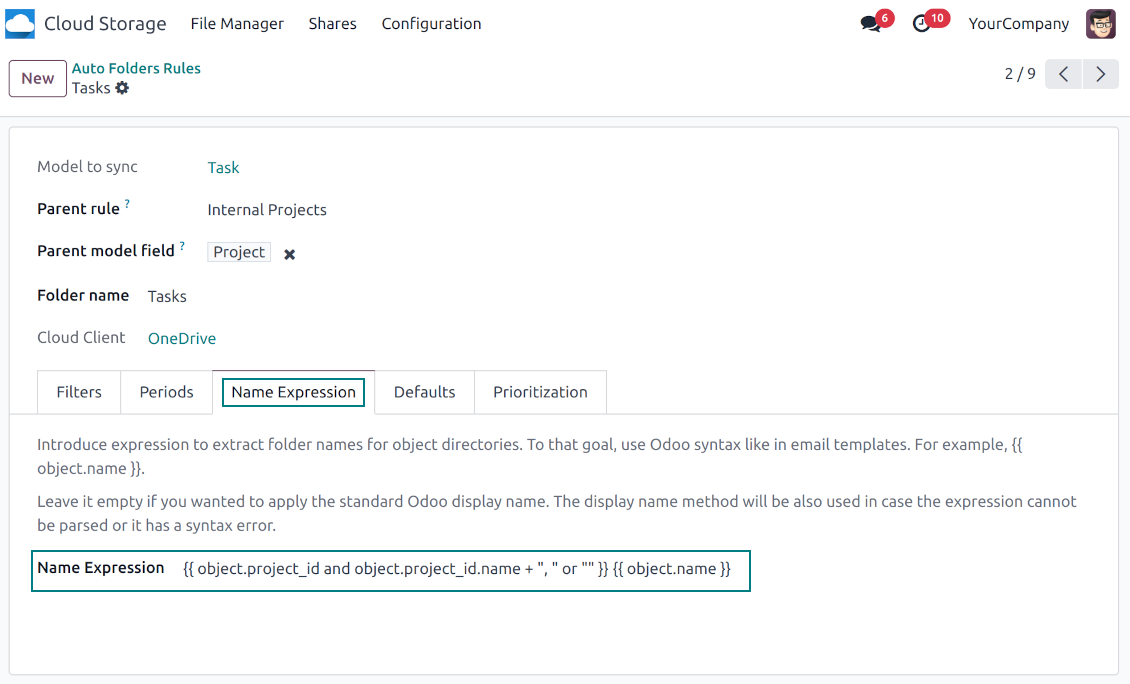
For object-related folders, the names are generated based on the Odoo standard display names. So, if not defined the opposite, it would be the same title as you see in the Odoo form view header
-
The app lets define complex name expressions for object-related folders (the tab 'Name Expression' on a folder rule form). To that goal, apply the syntax used in Odoo email templates. For example, {{ object.project_id.name }}, {{ object.name }} to reflect a project name in tasks folders
-
Avoid the following symbols in folders' and files' names: *, ?, ", ', :, <, >, /, +, %, !, @, \, /,. Direct sync will replace such symbols with '-'. It is done to avoid conflicts with file systems. Avoid also too long names: e.g. more than 100 symbols
Enterprise Documents
-
The app allows generating folders for workspaces introduced by the Odoo Enterprise apps 'Documents'
-
To force Odoo to prepare workspace-related directories, define folder rule(s) of the type 'Workspace-Related rule'. The tool would automatically create linked folders and sync those for chosen cloud storage with one of the next jobs
-
It is not obligatory to reflect the whole DMS structure. Thus, it is possible to filter workspaces by any storable field. For example, to add a folder only for workspaces that contain the keyword 'Internal'. Take into account: if a workspace was synced, all its child workspaces would be also synced
-
If you generated a subfolder for any workspace-related folder, the app would also create such a Documents workspace
Typical use cases
-
Customers: add all partner files in a single super directory. Optionally distinguish companies and individuals. For example, Odoo > Customers > Azure Interior > Contacts > John Brown
-
Sales orders and invoices: keep all sale-related printings and contracts in your own quotation directories for each customer. For example, Odoo > Customers > Azure Interior > Orders > SO-001 and Odoo > Customers > Azure Interior > Invoices > INV-00001
-
Opportunities: store all specifications, requirements, and any files which would let you make a good offer carefully structured by each sales team and case. For example, Odoo > Sale teams > Europe > Leads > Interest in 50 chairs
-
Project and tasks: prepare a folder for each customer project and task. For example, Odoo > Customers > Azure Interior > Projects > Software design > Tasks > Specification
-
Human resources: gather all files by each employee in a single folder: photos, document scans, contracts. Structure employees by department. For example, Odoo > Departments > Accounting department > Employees > Anita Olivier.
फ़ाइल और फ़ोल्डर साझा करना
-
Share particular attachments, whole directories, or even all files of specific tags
-
Grant access to chosen Odoo contacts. Send an invitation to any Odoo portal users at any moment
-
Generate a special access link for public use (even without a user). Change it to make the previous one outdated
-
Make shares for temporary use or available constantly until archived
-
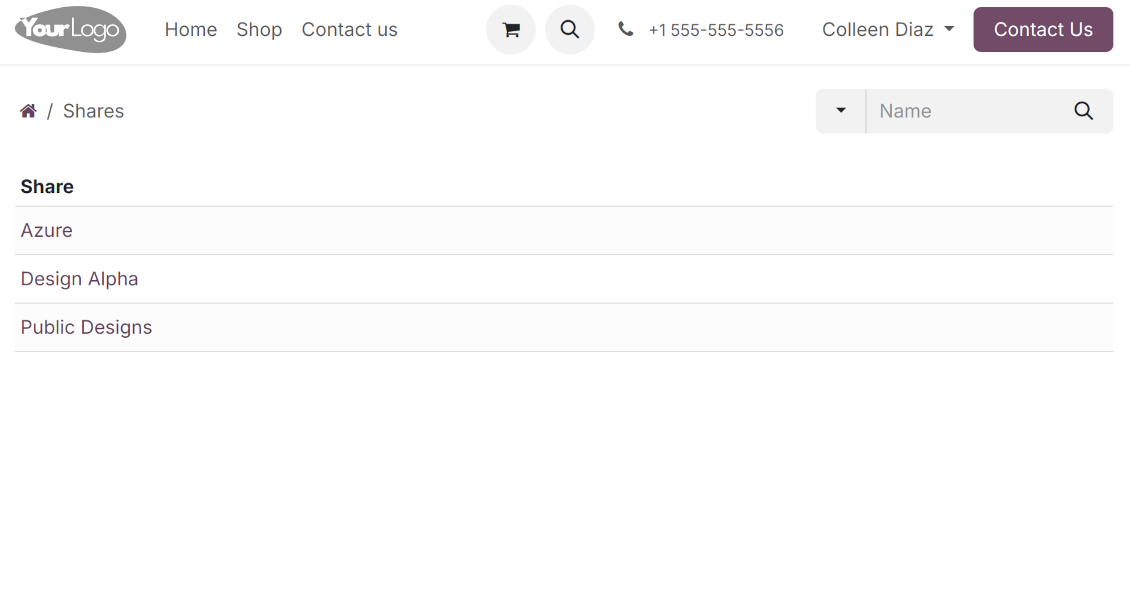
Create an unlimited number of shares with any setups and attachments involved. Portal users might access those through the special entry "Shares" in the Odoo's portal
-
For single-view purposes, shares support hierarchy so as to make comfortable navigation by those
-
Share users can download any shared file, a whole share, a particular directory, or a tag as a ZIP archive
-
Optionally let upload files to the selected or default folder. Files drag and drop is supported
-
Users are always allowed to search attachments by title, linked folder, and tags
-
Optionally allow navigation by folders and/or tags. Shared tags/folders, their children, and ones linked to shared attachments will be available
-
Let users add tags and folders by themselves. Show/hide searching items in tags/folders navigation trees
-
Turn on/off a chat per each share.
दस्तावेज़ प्रबंधन और सिंक पहुँच अधिकार
-
Access for each Odoo automatic folder is regulated based on a linked object. If such an Odoo object is available for a specific user, its directory would be also available for her/him. For example, if Anita Olivier is the task manager of 'Prepare specification', then she may access the folder 'Tasks' and 'Tasks > Prepare Specification'
-
Access to Odoo manual folders is regulated based on its user groups and users stated in those folders' settings. If nobody is specified, a manually created folder is available for everyone. For example, if Anita Oliver is a sales manager, she may access the quotation-related folder 'Odoo > Orders > SO-001'
-
To access any folder, a user should be able to access all its parents. For example, if Anita Oliver has rights for employees but does not have for departments, then she might not read 'Odoo > Departments > Administration > Employees > Mitchel Admin'. However, if the folder 'Employees' becomes a stand-alone folder without a parent, then Anita would be able to access 'Odoo > Employees > Mitchel Admin'
-
The app does not regulate access levels for cloud clients and their items. The tool regulates rights only for Odoo objects and synchronizes those to required storage. After the sync, if necessary, you should apply the settings for a target cloud client, folders, and files
-
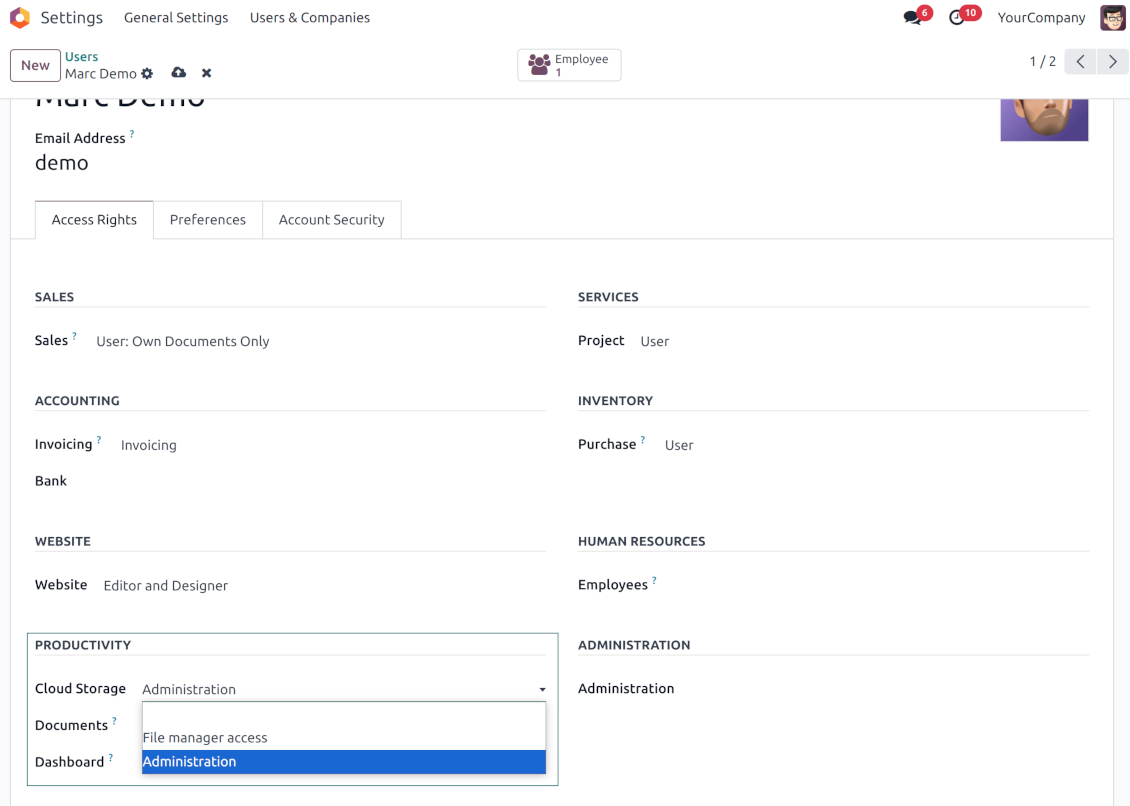
To observe the menu 'Cloud Storage' and the app file manager, a user should belong to the security group 'Cloud Storage > File Manager Access'
-
To configure automatic folder rules, establish connections with various cloud clients, control sync logs, and apply the app settings, a user should belong to the security group 'Cloud Storage > Administration'.
उपयोग नोट
-
The app assumes automatic regular synchronization with various cloud clients. Please take into account that synchronization is not real-time but is based on tasks queue and scheduled jobs. Depending on the number of folders and attachments, it might take time for the app to check all directories and do the jobs. That's why, until the sync is done, Odoo attachment interfaces work as in standard Odoo.
-
Cloud connections rely upon the API of the related cloud clients. Such communication between systems is risky by concept due to possible disconnections, API updates, and unsolvable conflicts. The app is designed to cope with such risks by carefully processing failures and checking cloud client states. Simultaneously, make sure that you have configured a proper backup strategy for both Odoo and cloud clients.
-
The special factors of risks are sync scope and reverse operations. The higher the sync scope is, the more it would take Odoo to finish integrations. Hence, more space for errors exists. Try to decrease sync scope logically by choosing only required folders. Reverse operations might be risky since assume reflecting cloud clients' features which might be absent in Odoo. For example, Google Sheets cannot be opened outside Google Docs. The app would try to solve the scenarios by applying similar features (e.g. by converting a file to simple electronic tables). However, that is not always possible, and in this way, manual interactions would be required.
कॉन्फ़िगरेशन और इंस्टॉलेशन सुझाव: Cloud Storage Solutions Odoo v.18
Odoo सर्वर कॉन्फ़िगरेशन
सिंक्रनाइज़ेशन सही चले, इसके लिए Odoo कॉन्फ़िगरेशन फ़ाइल में उचित timeout लगाएँ: LIMIT_TIME_CPU, LIMIT_TIME_REAL, LIMIT_TIME_REAL_CRON 900 सेकंड से अधिक होने चाहिए।
Odoo.sh पर यह नहीं करना चाहिए, क्योंकि टाइमआउट पूर्वनिर्धारित हैं और कॉन्फ़िगर नहीं होते।
ऐप द्वारा मानी गई cron जॉब आवृत्ति भी न बदलें: '[Cloud Storage] Prepare Cloud Folders', '[Cloud Storage] Run / Prepare sync queue'। ये जॉब हर 15 मिनट पर चलने के लिए कॉन्फ़िगर हैं, और वह आवृत्ति एल्गोरिद्म में व्यवधान और डेटा हानि रोकने के लिए उपयोग होती है। यदि कुछ समय के लिए सिंक रोकना हो, तो विशिष्ट cloud client को पॉज़ करें।
सामान्य Python निर्भरता
उपकरण बाहरी लाइब्रेरी 'sortedcontainers' पर निर्भर है। Odoo सर्वर पर इस कमांड से स्थापित करें:
pip3 install sortedcontainersOneDrive या/और SharePoint एकीकरण सेट अप करना
Python निर्भरता
उपकरण बाहरी लाइब्रेरी 'microsoftgraph' पर निर्भर है। Odoo सर्वर पर इस कमांड से स्थापित करें:
pip3 install microsoftgraph-python
कॉन्फ़िगरेशन और लॉग इन
- विकल्प 'OneDrive / SharePoint Sync' चालू करें (cloud Storage > Configuration > Configuration)। वैकल्पिक ऐड-ऑन OneDrive / SharePoint Odoo Integration आवश्यक है
- सुनिश्चित करें कि आपके Microsoft उपयोगकर्ता के पास उस OneDrive / SharePoint के लिए पूर्ण व्यवस्थापक अधिकार हैं जिसे आप Odoo से जोड़ना चाहते हैं। यह उपयोगकर्ता केवल अनुमति देने के लिए चाहिए; उपयोगकर्ता डेटा Odoo में नहीं रखा जाएगा और बाद में उपयोग नहीं किया जाएगा। साथ ही सुनिश्चित करें कि आपके द्वारा उपयोग किया कोई Microsoft ईमेल पता पुनर्निर्देशित न हो (अक्सर तब होता है जब आप डोमेन नाम कॉन्फ़िगर करते हैं, जबकि मुख्य पता अभी भी @outlook.com, @office365 आदि Microsoft डोमेन पर होता है)।
- अपने Azure Portal पर जाएँ: https://portal.azure.com/#blade/Microsoft_AAD_RegisteredApps/ApplicationsListBlade
ऐप को एक directory (tenant) के अंदर पंजीकृत करना होगा। Microsoft अब directory के बाहर नया ऐप बनाने नहीं देता।
- यदि आपके पास पहले से कंपनी Microsoft 365 / Azure directory है, तो पोर्टल (ऊपर दाएँ) को उस पर स्विच करें और आगे बढ़ें।
- यदि आपके पास केवल व्यक्तिगत खाता है (@outlook.com, @hotmail.com, @live.com) और "these applications are associated with the account ... but are not contained within any directory" दिखता है, तो directory अभी नहीं है। उसी Microsoft खाते से मुफ़्त Azure खाता बनाएँ: https://azure.microsoft.com/free/ - Azure को मुफ़्त आज़माएँ। इससे बिना लागत Default Directory बनता है।
- Microsoft कार्ड केवल पहचान सत्यापन के लिए माँगता है; लगभग 1 USD अस्थायी होल्ड लगता है और वापस हो जाता है। directory या ऐप पंजीकरण का शुल्क नहीं लगता।
- directory (Microsoft Entra ID Free) और उसमें पंजीकृत कोई भी ऐप 30-दिन / $200 Azure ट्रायल क्रेडिट से स्वतंत्र चलते रहते हैं। वह क्रेडिट उन सशुल्क Azure संसाधनों के लिए है जिन्हें आप यहाँ नहीं इस्तेमाल कर रहे। हमारे ऐप के लिए कोई भुगतान आवश्यक नहीं है।
- यदि पूरी directory बहुत लंबे समय तक पूरी तरह अनुपयोगी रहे (Microsoft की सीमा लगभग 200 दिन बिना गतिविधि), तो Microsoft चेतावनी ईमेल भेज सकता है और अंत में उसे बंद कर सकता है। चूँकि Odoo हर सिंक पर इस ऐप को कॉल करता है, सक्रिय कनेक्शन directory को सक्रिय रखता है — यह तभी मायने रखता है जब आप महीनों तक सिंक पूरी तरह रोक दें।
- जब आप वास्तविक directory में हों ("Microsoft Services" नहीं), वहाँ App registrations खोलें।
- 'New registration' पर क्लिक करें
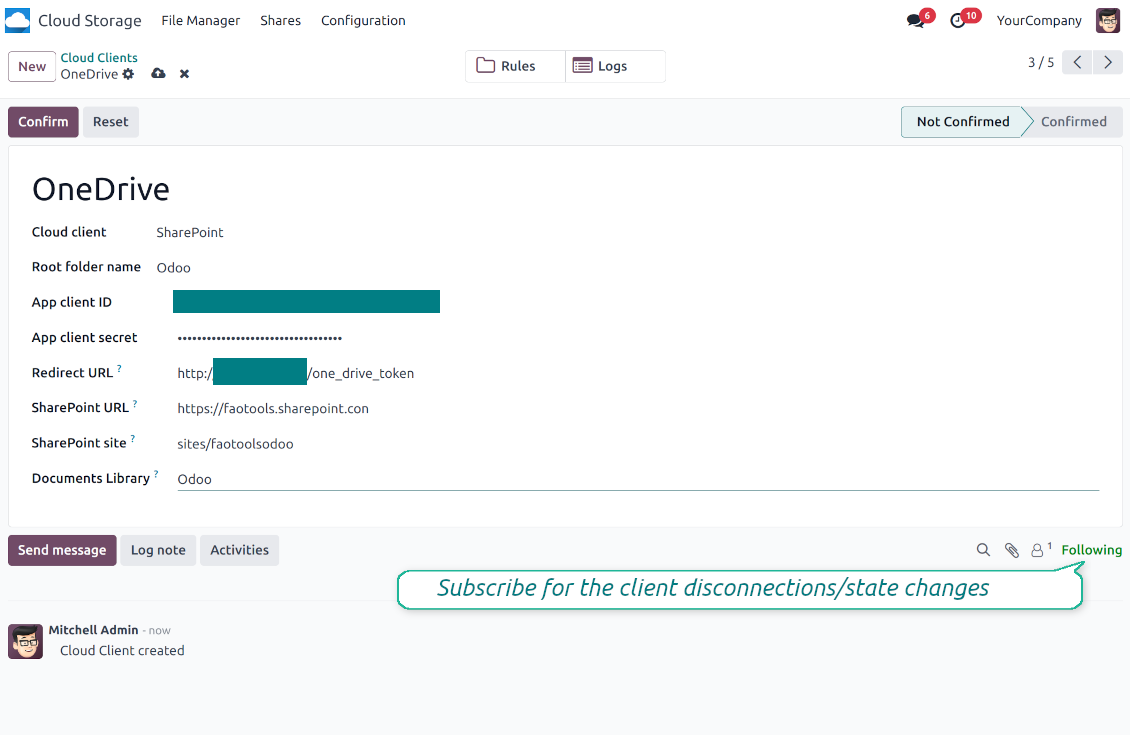
- Introduce a new name for the application and assign the redirect URI as [YOURODOOSITENAME]/one_drive_token (e.g. https://odootools.com/one_drive_token). As the supported account types choose 'Accounts in any organizational directory (Any Azure AD directory - Multitenant) and personal Microsoft accounts (e.g. Skype, Xbox)'.
- Certificates & secrets पर जाएँ - 'New Client Secret' पर क्लिक करें। secret मान कहीं सहेज लें
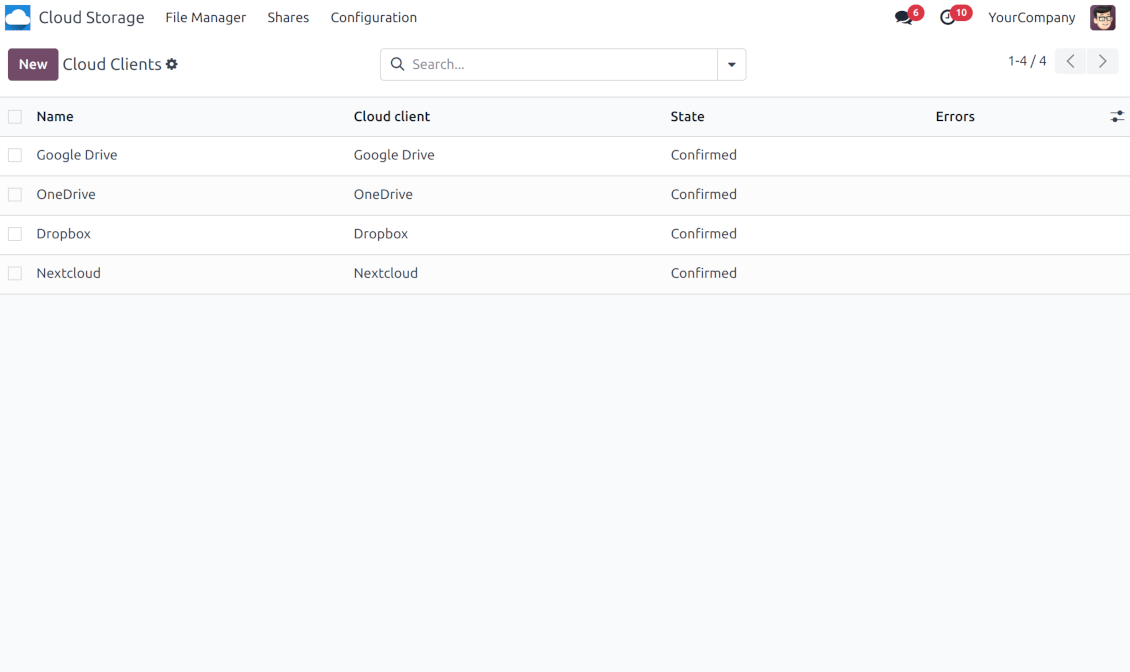
- Odoo Cloud Storage > कॉन्फ़िगरेशन > Cloud Clients पर जाएँ और 'Create' दबाएँ
- संदर्भ के रूप में ऐसा नाम दें जो सभी उपयोगकर्ताओं को स्पष्ट हो
- Cloud client के रूप में आपके सॉफ़्टवेयर के अनुसार 'OneDrive' या 'SharePoint' चुनें
- Root folder नाम में वह शीर्षक दें जो सभी सिंक फ़ोल्डरों का पैरेंट OneDrive directory होगा। उदाहरण: 'Odoo' या 'OdooERP'
- 'Application Client ID' को 'App client ID' में कॉपी करें
- सीक्रेट मान को फ़ील्ड 'App client secret' में कॉपी करें
- पहले जनरेट किया गया रीडायरेक्ट URL डालें
- यदि आप SharePoint उपयोग करते हैं:
- अपनी SharePoint साइट पर जाएँ और एक नई दस्तावेज़ लाइब्रेरी (ड्राइव) तैयार करें। मौजूदा में से एक इस्तेमाल कर सकते हैं, जैसे 'Documents'। Odoo फ़ोल्डर बाद में वहीं रखा जाएगा और उसे दूसरी लाइब्रेरी में ले जाना असंभव होगा
- SharePoint URL प्रकार https://[URL]/ का होना चाहिए। अंतिम '/' आवश्यक है - साइट नाम शामिल नहीं होना चाहिए। उदाहरण, https://odootools.sharepoint.com/
- SharePoint साइट root (मूल SharePoint साइट), my_site_name (तब इसे sites/my_site_name माना जाता है) या sites/my_site_name होनी चाहिए ('sites' की जगह 'teams' आदि हो सकता है)। आरंभ या अंत में '/' नहीं होना चाहिए। उदाहरण, sites/odootools
- Documents Library के रूप में SharePoint में बनाई गई उपयोग करें
- 'Confirm' दबाएँ। Odoo आपको Microsoft लॉगिन पृष्ठ पर भेजता है। सिस्टम में जाँचें, सभी शर्तें स्वीकार करें और मांगी गई सभी अनुमतियाँ दें. If Microsoft shows an account already signed in and says it does not exist in tenant 'Microsoft Services' (or any other unrelated tenant), do not click that row. Click 'Use another account' and sign in with the Microsoft account that owns the app's directory
- लॉगिन के बाद OneDrive आपको वापस Odoo पर भेजता है। OneDrive - Odoo सिंक तैयार है
- नया cloud client उन फ़ोल्डर नियमों और/या मैन्युअल फ़ोल्डरों पर लागू करें जिन्हें उस OneDrive या SharePoint इंस्टेंस से सिंक करना है
- सिंक की निर्धारित जॉब शुरू होने की प्रतीक्षा करें। केवल परीक्षण के लिए: Cloud Storage > कॉन्फ़िगरेशन > कॉन्फ़िगरेशन > बटन 'Launch sync' से एकीकरण मैन्युअल चलाएँ।
यह भी देखें कॉन्फ़िगरेशन वीडियो
Azure एप्लिकेशन बनाएँ
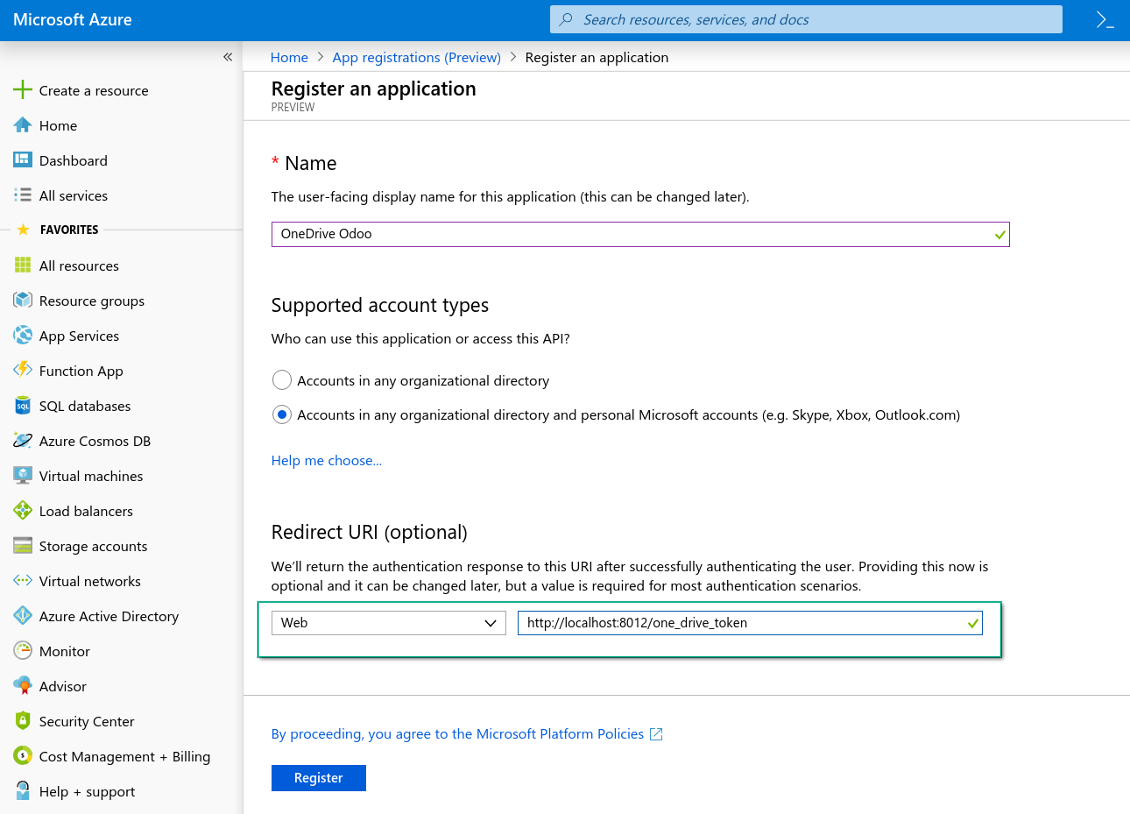
नया OneDrive वेब प्लेटफ़ॉर्म और रीडायरेक्ट URL
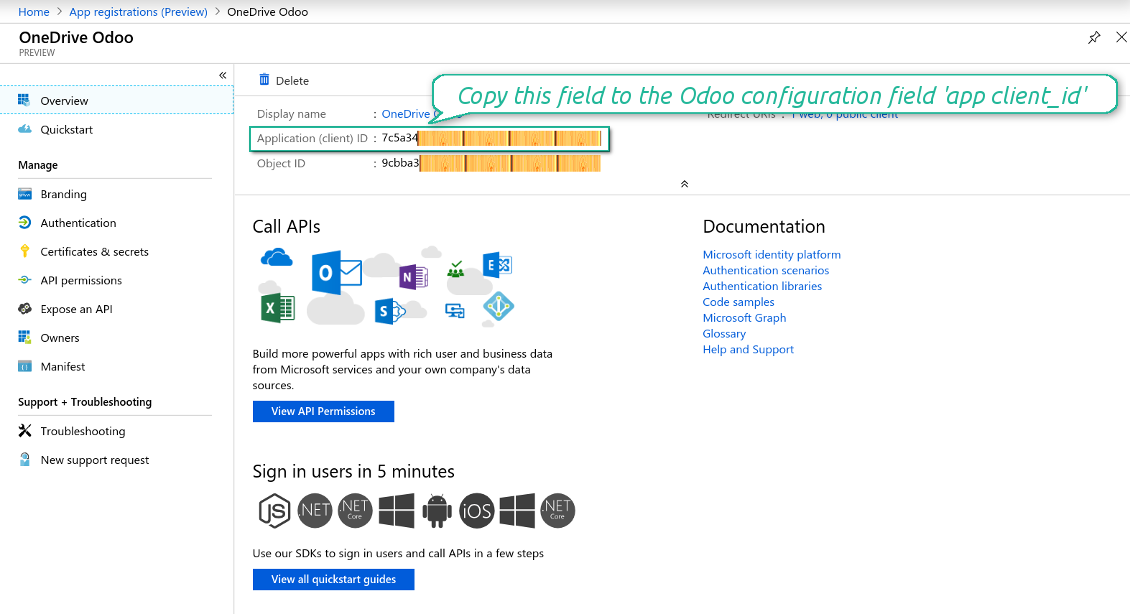
Azure ऐप्लिकेशन के लिए नई सीक्रेट जनरेट करें
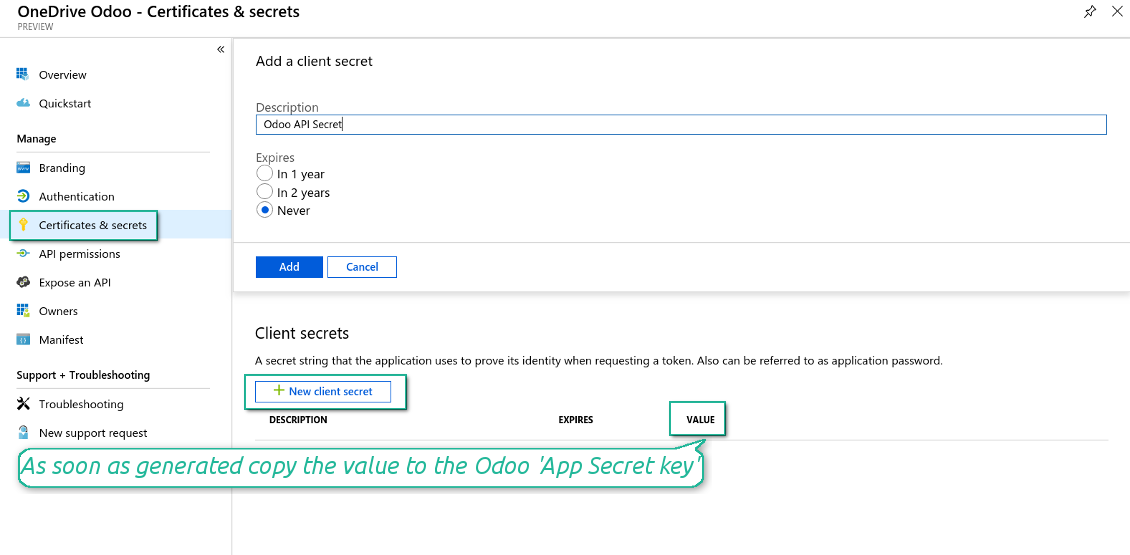
Odoo में कॉन्फ़िगरेशन कुंजी दर्ज करें
Google Drive एकीकरण सेट अप करना
- विकल्प 'Google Drive Sync' चालू करें (cloud Storage > Configuration > Configuration)। वैकल्पिक ऐड-ऑन Google Drive Odoo Integration आवश्यक है
- URL से Google Cloud Console पर जाएँ https://console.cloud.google.com
- प्रोजेक्ट चुनें या बनाएँ
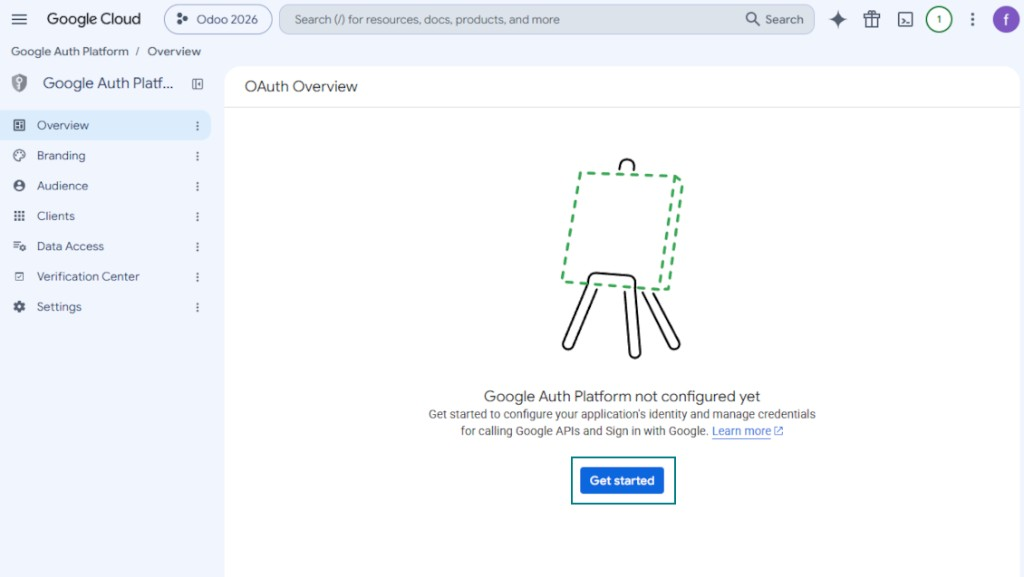
- प्रोजेक्ट चुनने के बाद कंसोल Google Auth Platform खोलता है। 'Get Started' दबाएँ
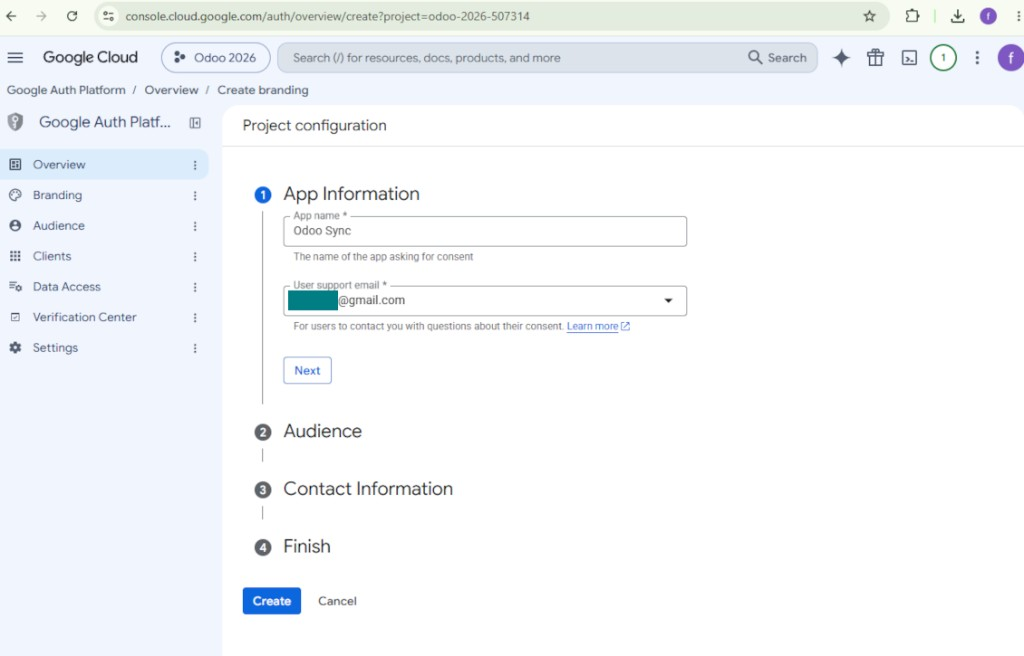
- ऐप जानकारी जोड़ें
- ऐप नाम के रूप में कोई उपयुक्त चुनें
- उपयोगकर्ता सहायता ईमेल के रूप में अपना पता चुनें
- 'Next' दबाएँ
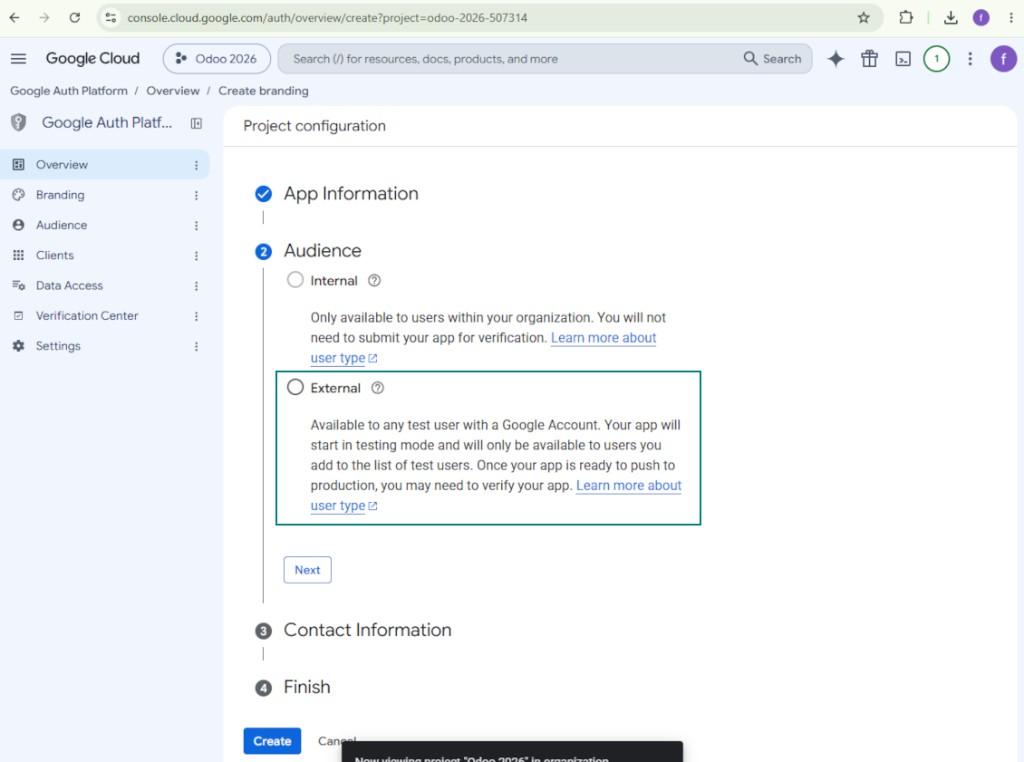
- ऑडियंस के रूप में 'External' चुनें और 'Next' दबाएँ। नोट: यह ऐप आप अपने Odoo कनेक्शन के लिए ही इस्तेमाल करेंगे
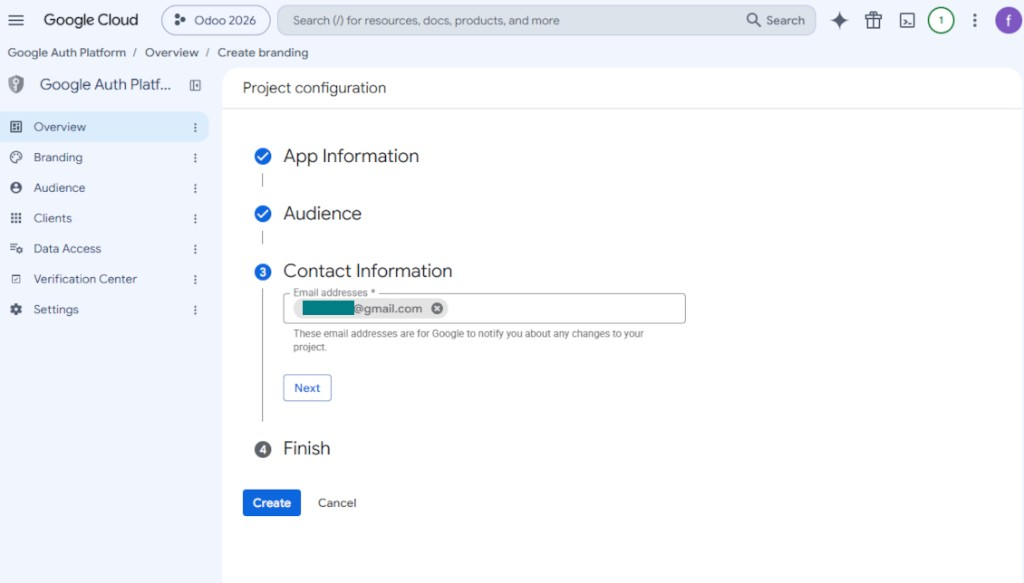
- संपर्क जानकारी में अपना Google या Google Workspace ईमेल पता दर्ज करें और 'Next' दबाएँ
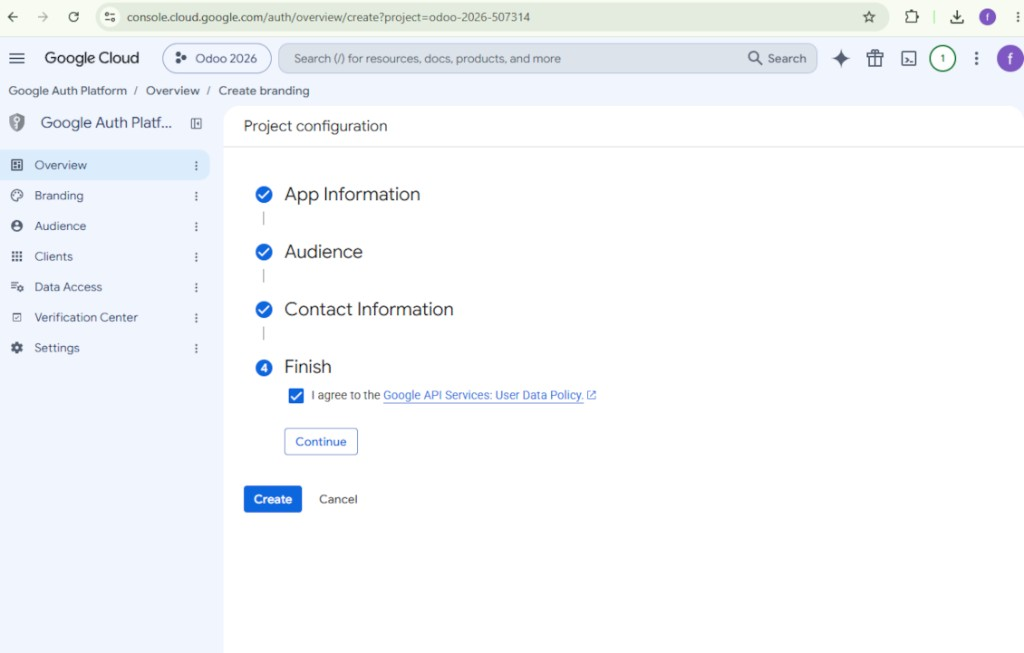
- Google API Services User Data Policy से सहमत हों, 'Continue' दबाएँ, फिर 'Create' दबाएँ
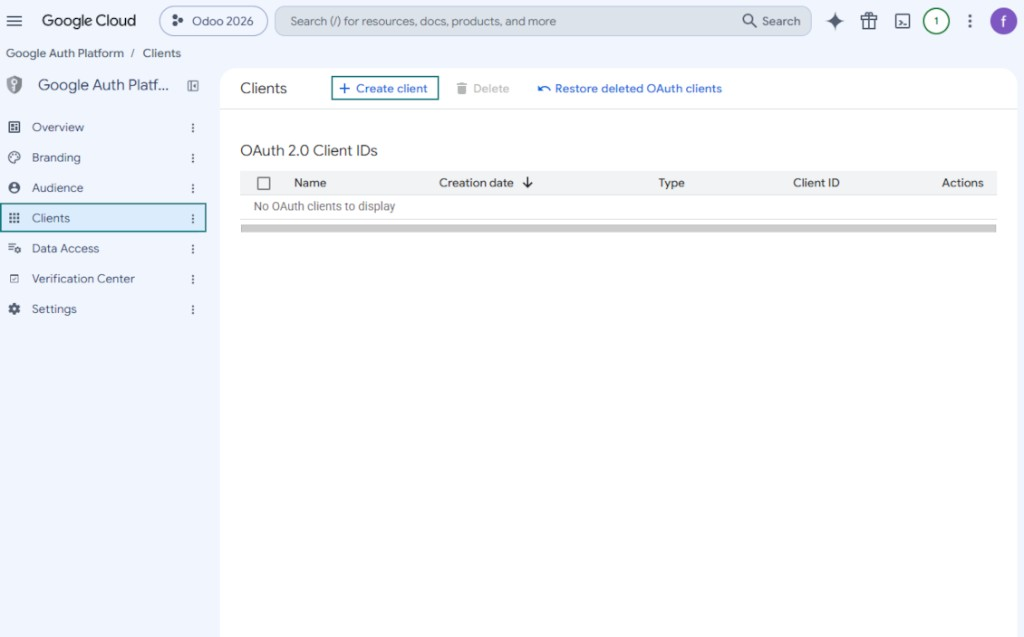
- 'Clients' पर जाएँ और 'Create client' दबाएँ
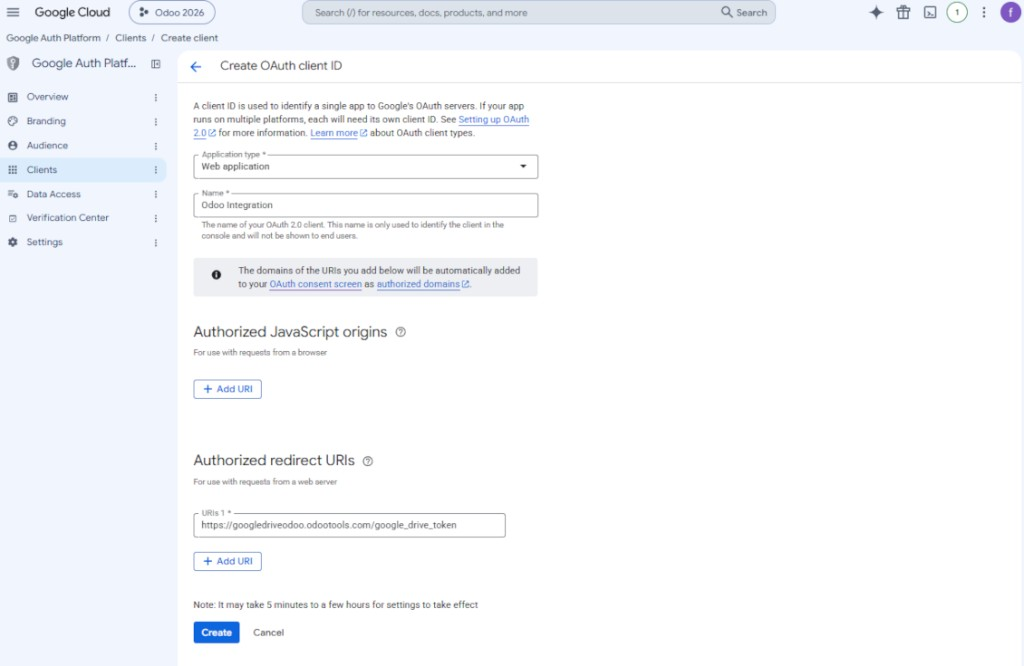
- एप्लिकेशन प्रकार के रूप में 'Web application' चुनें
- नाम के रूप में कोई उपयुक्त चुनें
- अधिकृत रीडायरेक्ट URI के रूप में, [YOURODOOSITENAME]/google_drive_token प्रारूप में लिंक जोड़ें (उदा. https://odootools.com/google_drive_token)।
- 'Create' दबाएँ
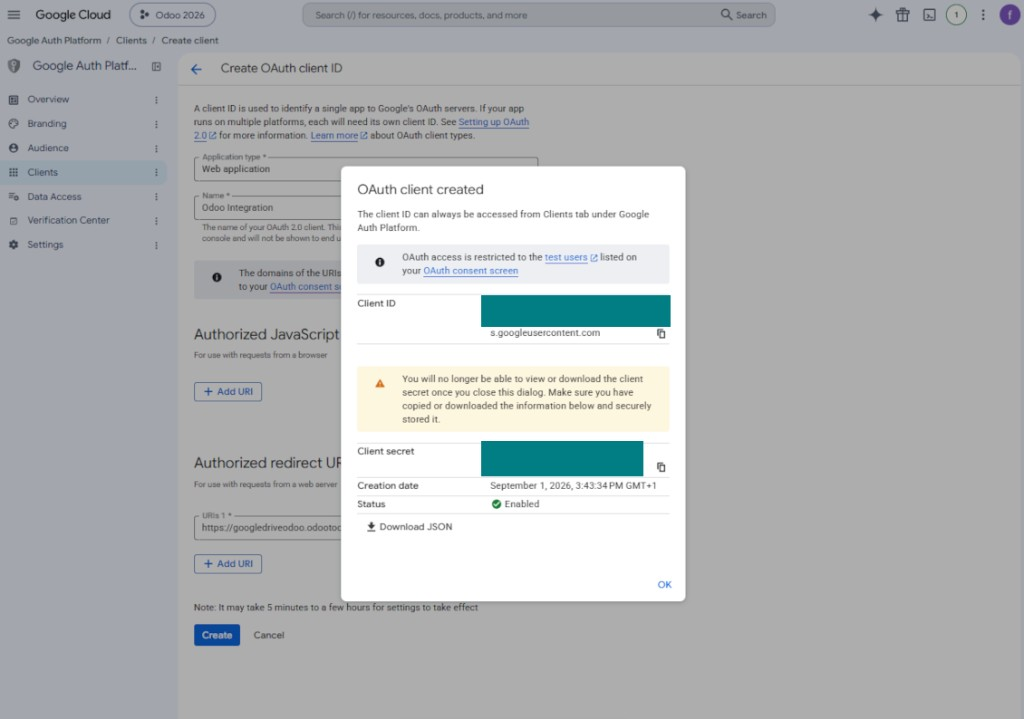
- 'Client ID' और 'Client secret' कॉपी कर सुरक्षित रखें। Client secret केवल एक बार दिखता है
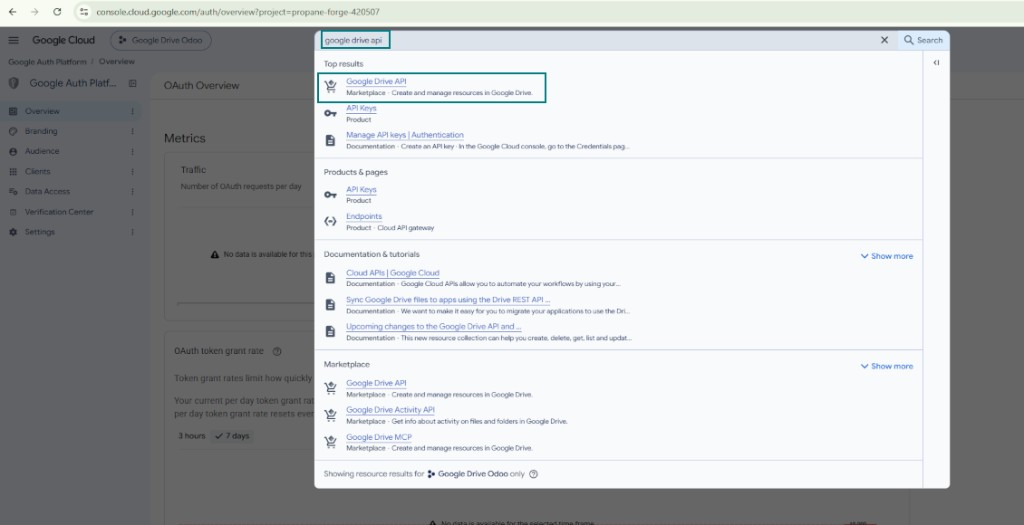
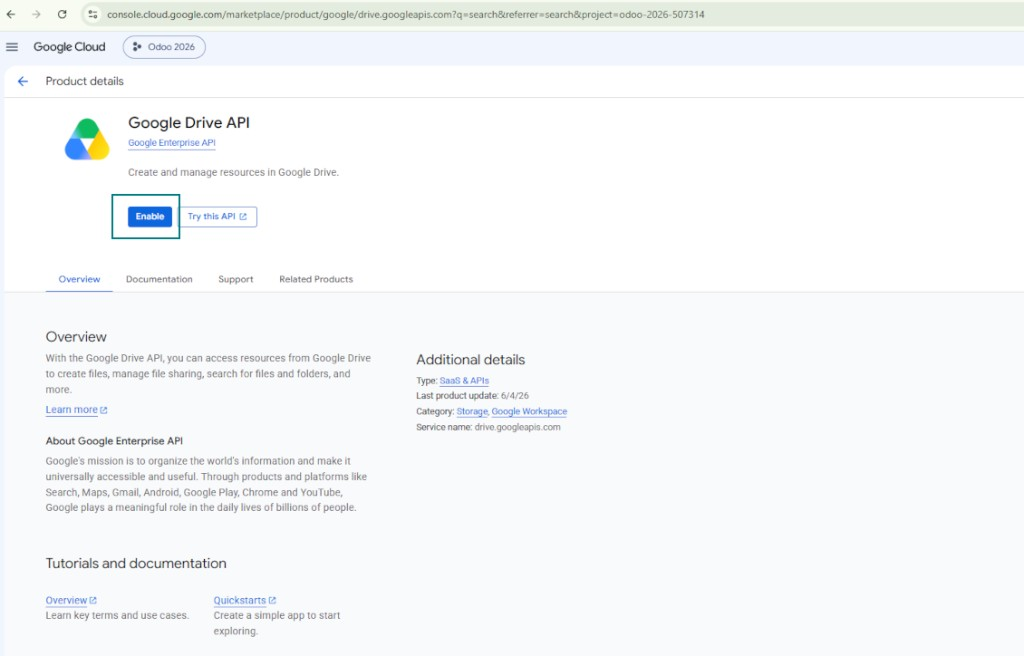
- इस प्रोजेक्ट के लिए Google Drive API सक्षम करें: ऊपर के खोज बॉक्स में 'Google Drive API' लिखें, मिला उत्पाद खोलें, और 'Enable' दबाएँ
- 'Audience' पर जाएँ और अपना ईमेल पता परीक्षण उपयोगकर्ता के रूप में जोड़ें
- ऐप प्रकाशित करें। नहीं तो ऐप परीक्षण स्थिति में रहता है और उसका टोकन हर 7 दिन में समाप्त होता है
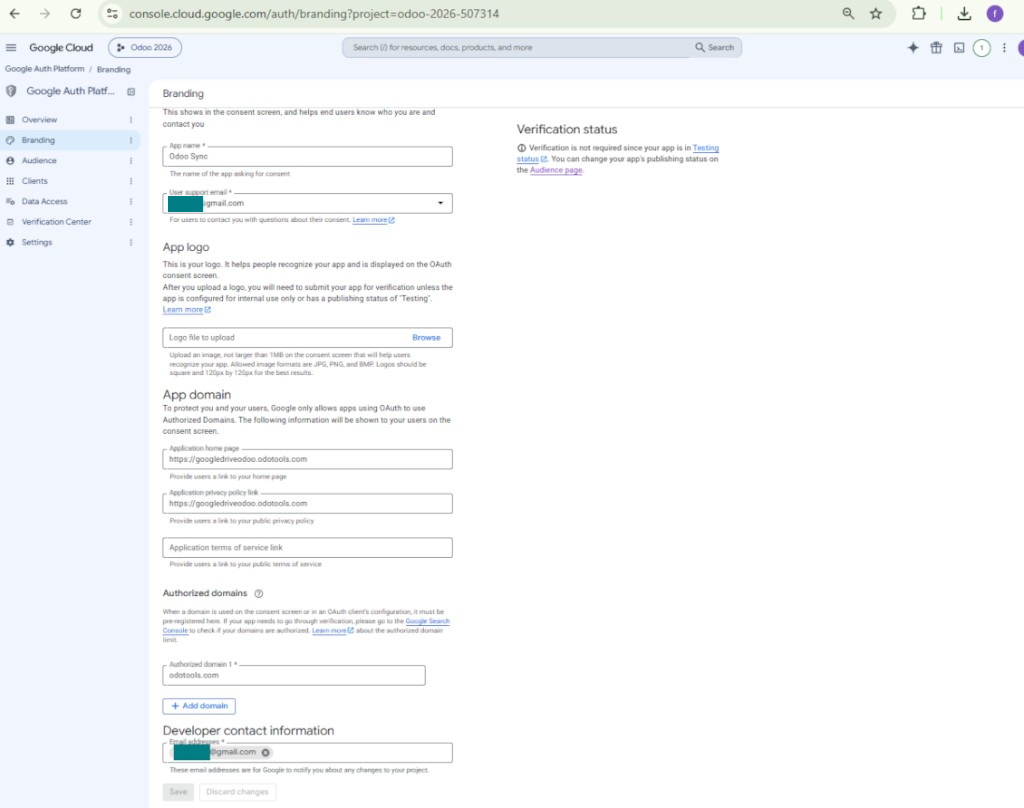
- 'Branding' खोलें और एप्लिकेशन होम पेज तथा गोपनीयता नीति लिंक भरें (उदाहरण के लिए आपकी Odoo वेबसाइट के लिंक)। उन लिंक के डोमेन authorized domains के रूप में जोड़ें
- 'Audience' खोलें और 'Publish app' दबाएँ
- ऐप लोगो अपलोड न करें। इससे एक लंबी और जटिल Google सत्यापन प्रक्रिया शुरू होगी जिसकी वास्तव में आपको आवश्यकता नहीं है
- Odoo Cloud Storage > कॉन्फ़िगरेशन > Cloud Clients पर जाएँ और 'Create' दबाएँ
- संदर्भ के रूप में ऐसा नाम दें जो सभी उपयोगकर्ताओं को स्पष्ट हो
- Cloud क्लाइंट के रूप में 'Google Drive' चुनें
- Root folder नाम में वह शीर्षक दें जो सभी सिंक फ़ोल्डरों का पैरेंट Google Drive directory होगा। उदाहरण: 'Odoo' या 'OdooERP'
- चरण 9 से 'Client ID' को फ़ील्ड 'App client ID' में कॉपी करें
- चरण 9 से 'Client secret' को फ़ील्ड 'App client secret' में कॉपी करें
- चरण 9 में दर्ज किया गया रीडायरेक्ट URL डालें
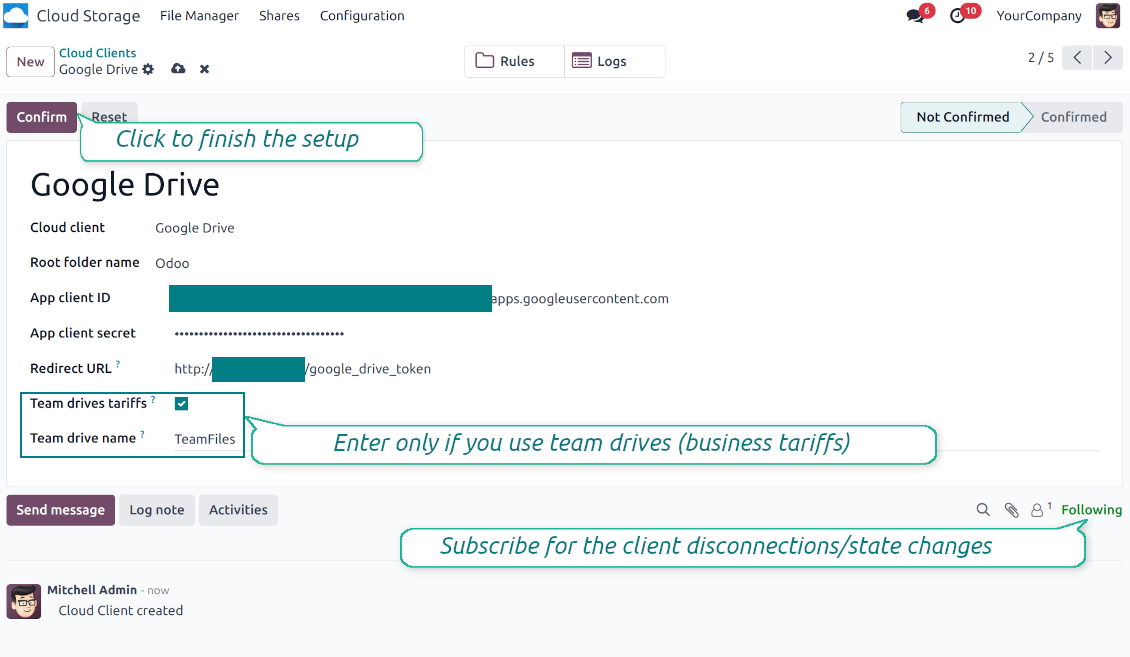
- अगर टीम ड्राइव उपयोग करते हैं, संबंधित बॉक्स टिक करें। सुनिश्चित करें कि आप वाकई टीम ड्राइव उपयोग करते हैं। अपने Google Drive की बाईं साइडबार में आइटम 'Team Drives' मिलना चाहिए। यह सुविधा केवल बिज़नेस और enterprise टैरिफ पर उपलब्ध है
- अगर विकल्प 'Team Drive' चालू है, उसका नाम दर्ज करें। Google Drive में जैसा दिखता है वैसा ही बिल्कुल होना चाहिए। सुनिश्चित करें कि आपके उपयोगकर्ता के पास सभी Google ड्राइव पर पूरे अधिकार हैं (आमतौर पर वही उपयोगकर्ता जो टीम Google Drive कॉन्फ़िगर करता है)
- 'Confirm' दबाएँ। Odoo आपको Google लॉगिन पृष्ठ पर भेजता है। सिस्टम में जाँचें, सभी शर्तें स्वीकार करें और मांगी गई सभी अनुमतियाँ दें
- लॉगिन के बाद Google आपको वापस Odoo पर भेजता है। Google Drive - Odoo सिंक तैयार है
- नया cloud client उन फ़ोल्डर नियमों और/या मैन्युअल फ़ोल्डरों पर लागू करें जिन्हें उस Google Drive से सिंक करना है
- सिंक की निर्धारित जॉब शुरू होने की प्रतीक्षा करें। केवल परीक्षण के लिए: Cloud Storage > कॉन्फ़िगरेशन > कॉन्फ़िगरेशन > बटन 'Launch sync' से एकीकरण मैन्युअल चलाएँ।
यह भी देखें कॉन्फ़िगरेशन वीडियो, नोट: वीडियो का Google console हिस्सा पुराना है; इसके बजाय ऊपर दिए चरणों का पालन करें
Google Auth Platform खोलें
ऐप जानकारी जोड़ें
बाहरी ऑडियंस चुनें
संपर्क जानकारी जोड़ें
नीतियों से सहमत हों और ऐप बनाएँ
OAuth क्लाइंट बनाएँ
वेब एप्लिकेशन क्लाइंट कॉन्फ़िगर करें
क्लाइंट ID और क्लाइंट सीक्रेट कॉपी करें
Google Drive API खोजें
Google Drive API सक्षम करें
ऐप प्रकाशित करने के लिए ब्रांडिंग भरें
Google ऐप क्रेडेंशियल Odoo में दर्ज करें
Amazon S3 सेट अप करना
- विकल्प 'Amazon S3 Sync' चालू करें (Cloud Storage > कॉन्फ़िगरेशन > कॉन्फ़िगरेशन)। वैकल्पिक ऐड-ऑन Amazon S3 Odoo Integration आवश्यक है
- Amazon S3 Console खोलें: https://console.aws.amazon.com/s3/
- नया बकेट बनाएँ या मौजूदा चुनें। सटीक बकेट नाम कॉपी करें: इसे Odoo में फ़ील्ड 'Bucket' में डालना चाहिए
- बकेट विवरण खोलें और उसका AWS Region कॉपी करें। Odoo में फ़ील्ड 'Region' में डालें (उदाहरण, eu-west-1 या us-east-1)
- AWS IAM Console खोलें: https://console.aws.amazon.com/iam/
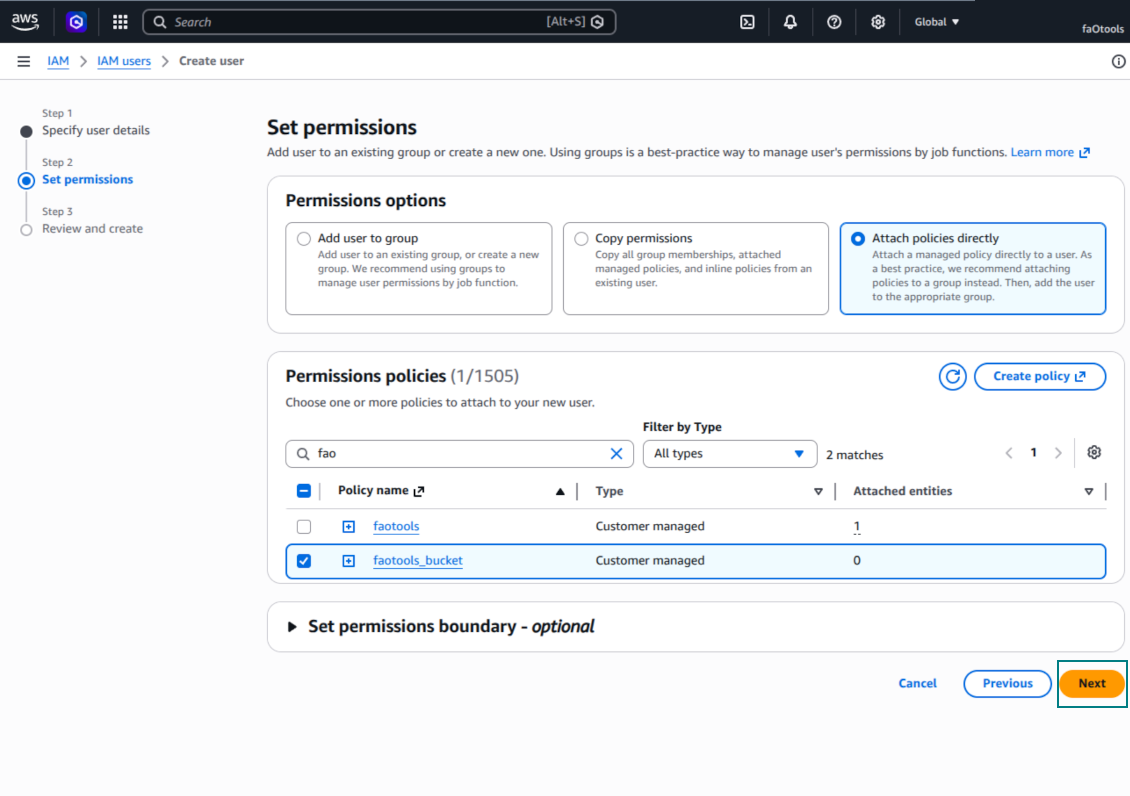
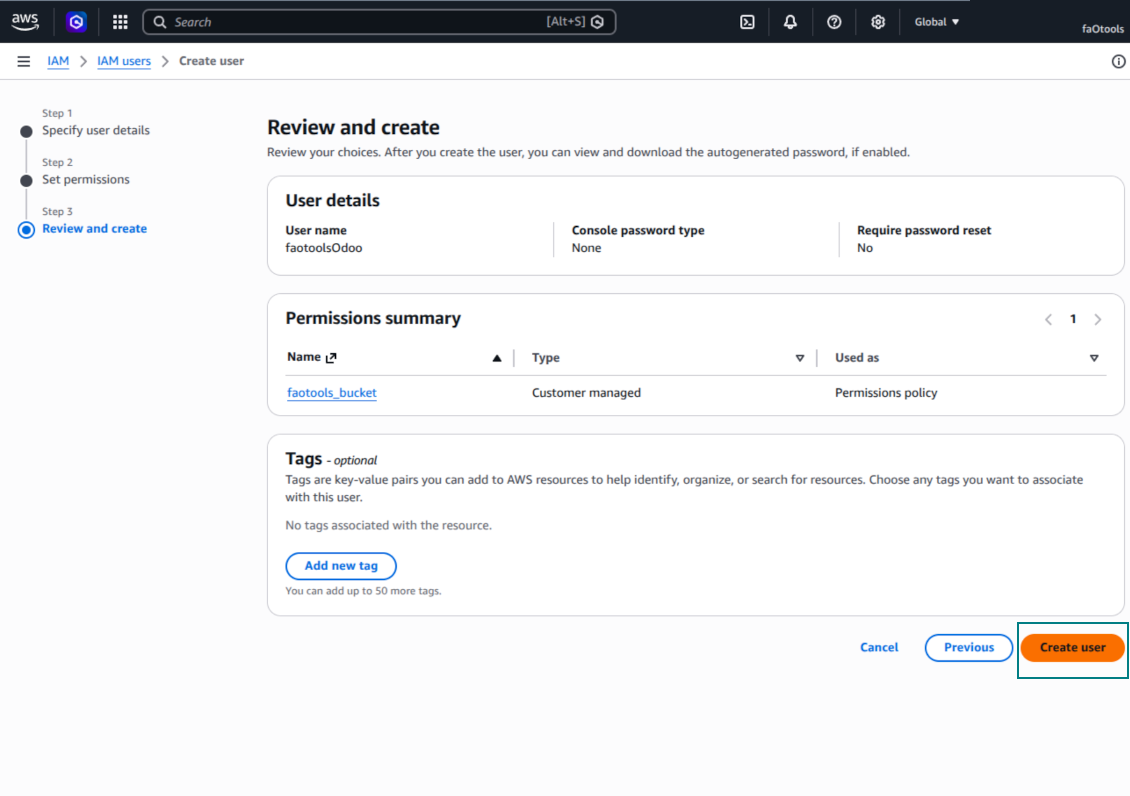
- नया IAM उपयोगकर्ता बनाएँ या मौजूदा तकनीकी उपयोगकर्ता चुनें। इस उपयोगकर्ता के पास चयनित बकेट में ऑब्जेक्ट सूचीबद्ध, पढ़ने, बनाने, लिखने, कॉपी और हटाने के पूर्ण अधिकार होने चाहिए। आप पूर्ण अधिकार वाला एडमिन चुन सकते हैं, या नई नीति बना सकते हैं (नीचे देखें)
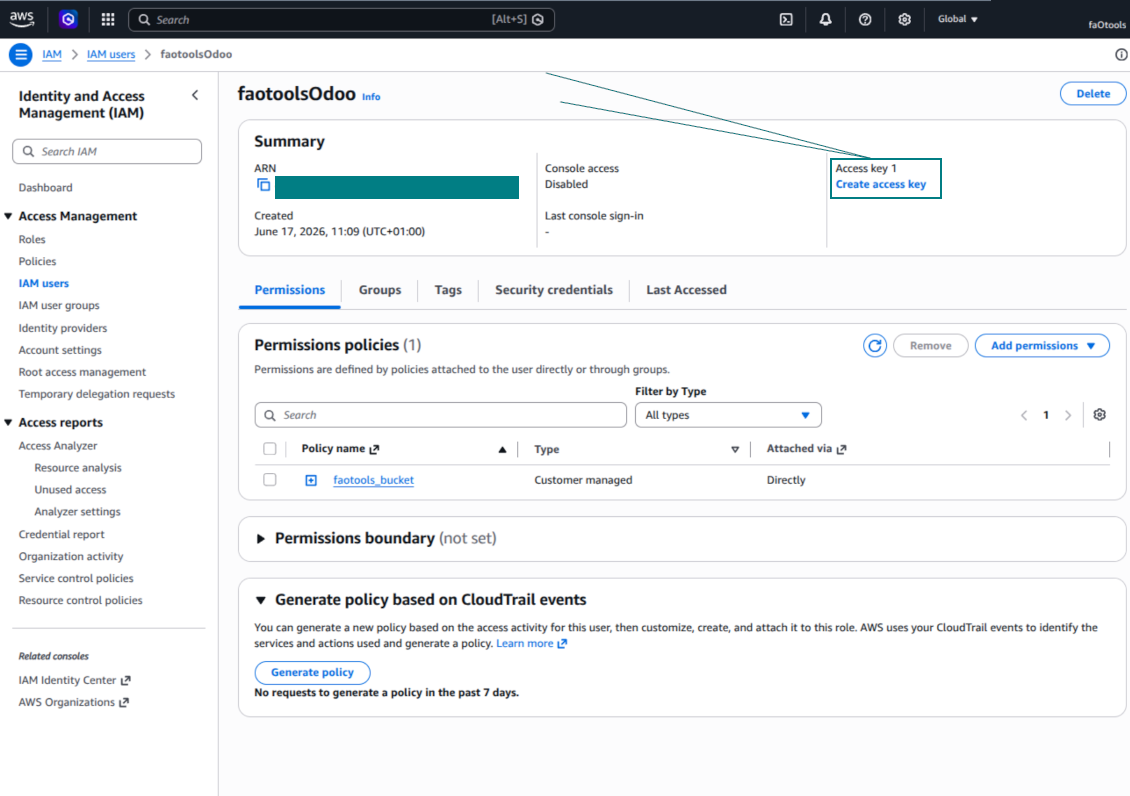
- IAM उपयोगकर्ता फ़ॉर्म में टैब 'Security credentials' खोलें और 'Create access key' दबाएँ
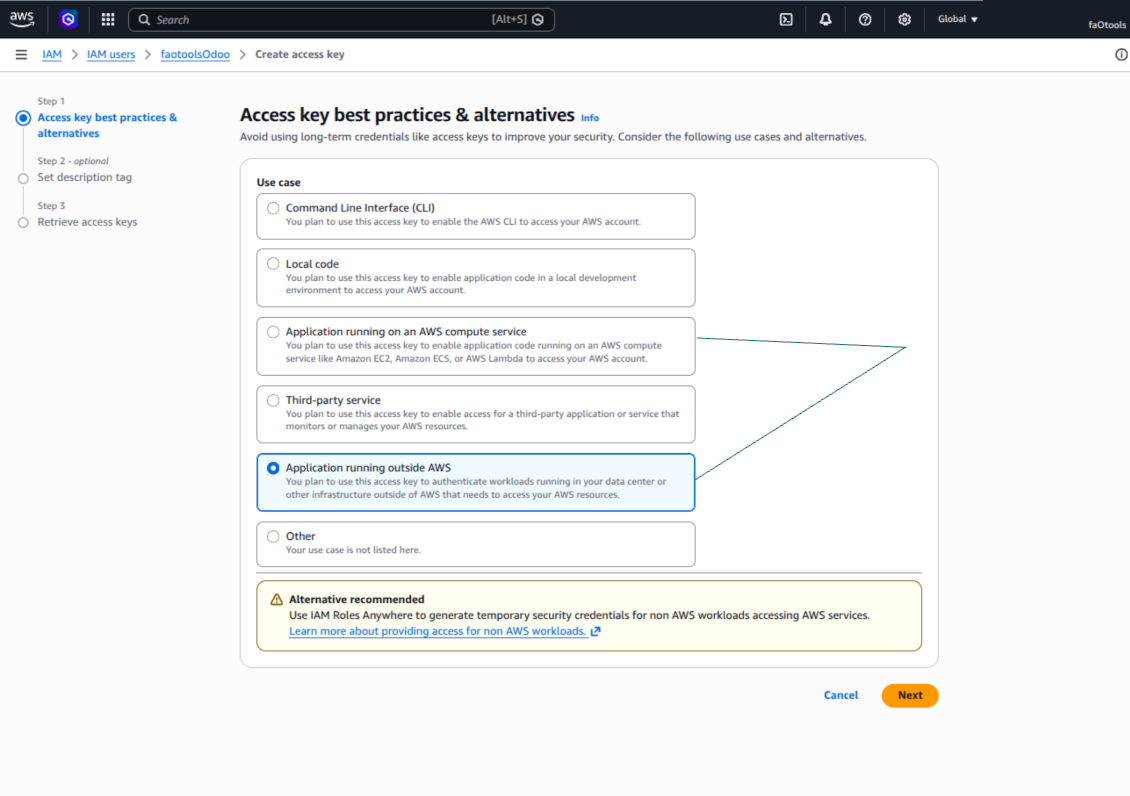
- पृष्ठ 'Access key best practices & alternatives' पर Application running outside AWS चुनें। जब आपका Odoo सर्वर AWS के बाहर, Odoo.sh, अपने सर्वर या अन्य होस्टिंग से एक्सेस कुंजी से S3 से जुड़ता है तो यही सही विकल्प है। यदि Odoo AWS EC2 इंस्टेंस पर है, तो Application running on an AWS compute service चुन सकते हैं, पर Odoo में कॉपी होने वाले फ़ील्ड वही रहते हैं
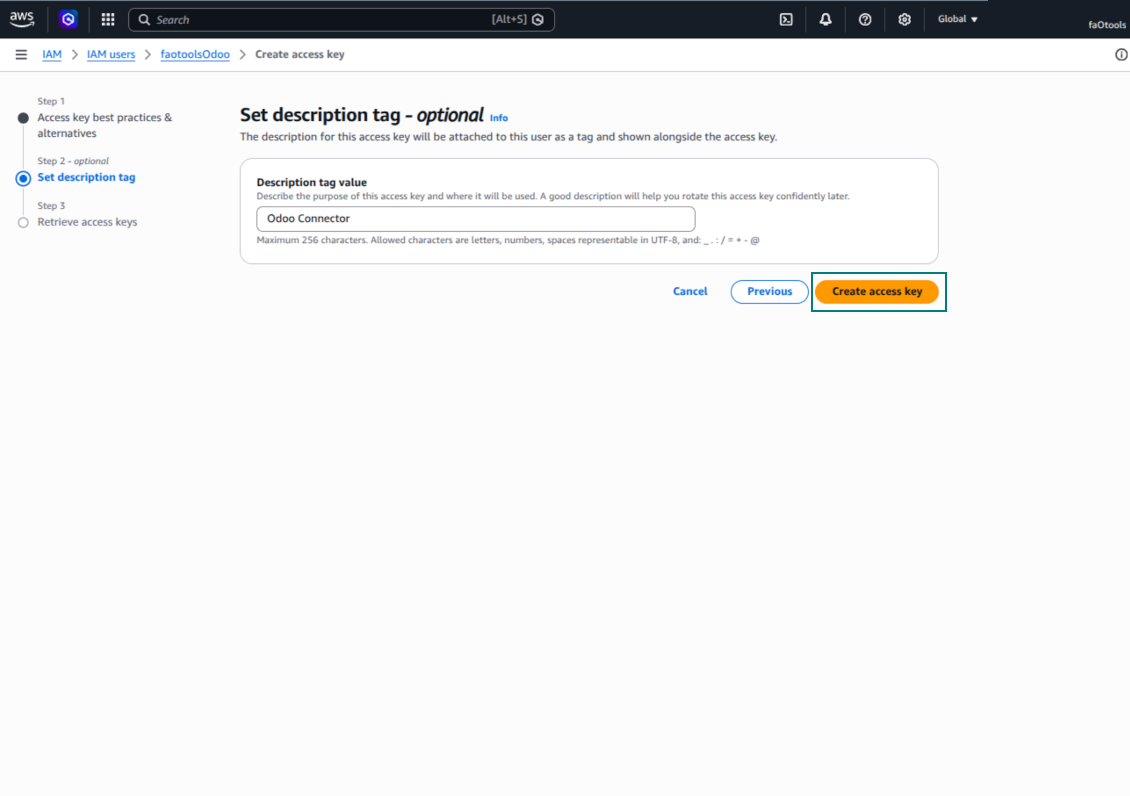
- 'Next' दबाएँ। अगले चरण में वैकल्पिक रूप से Odoo S3 Sync जैसा विवरण टैग लिखें, फिर 'Create access key' दबाएँ
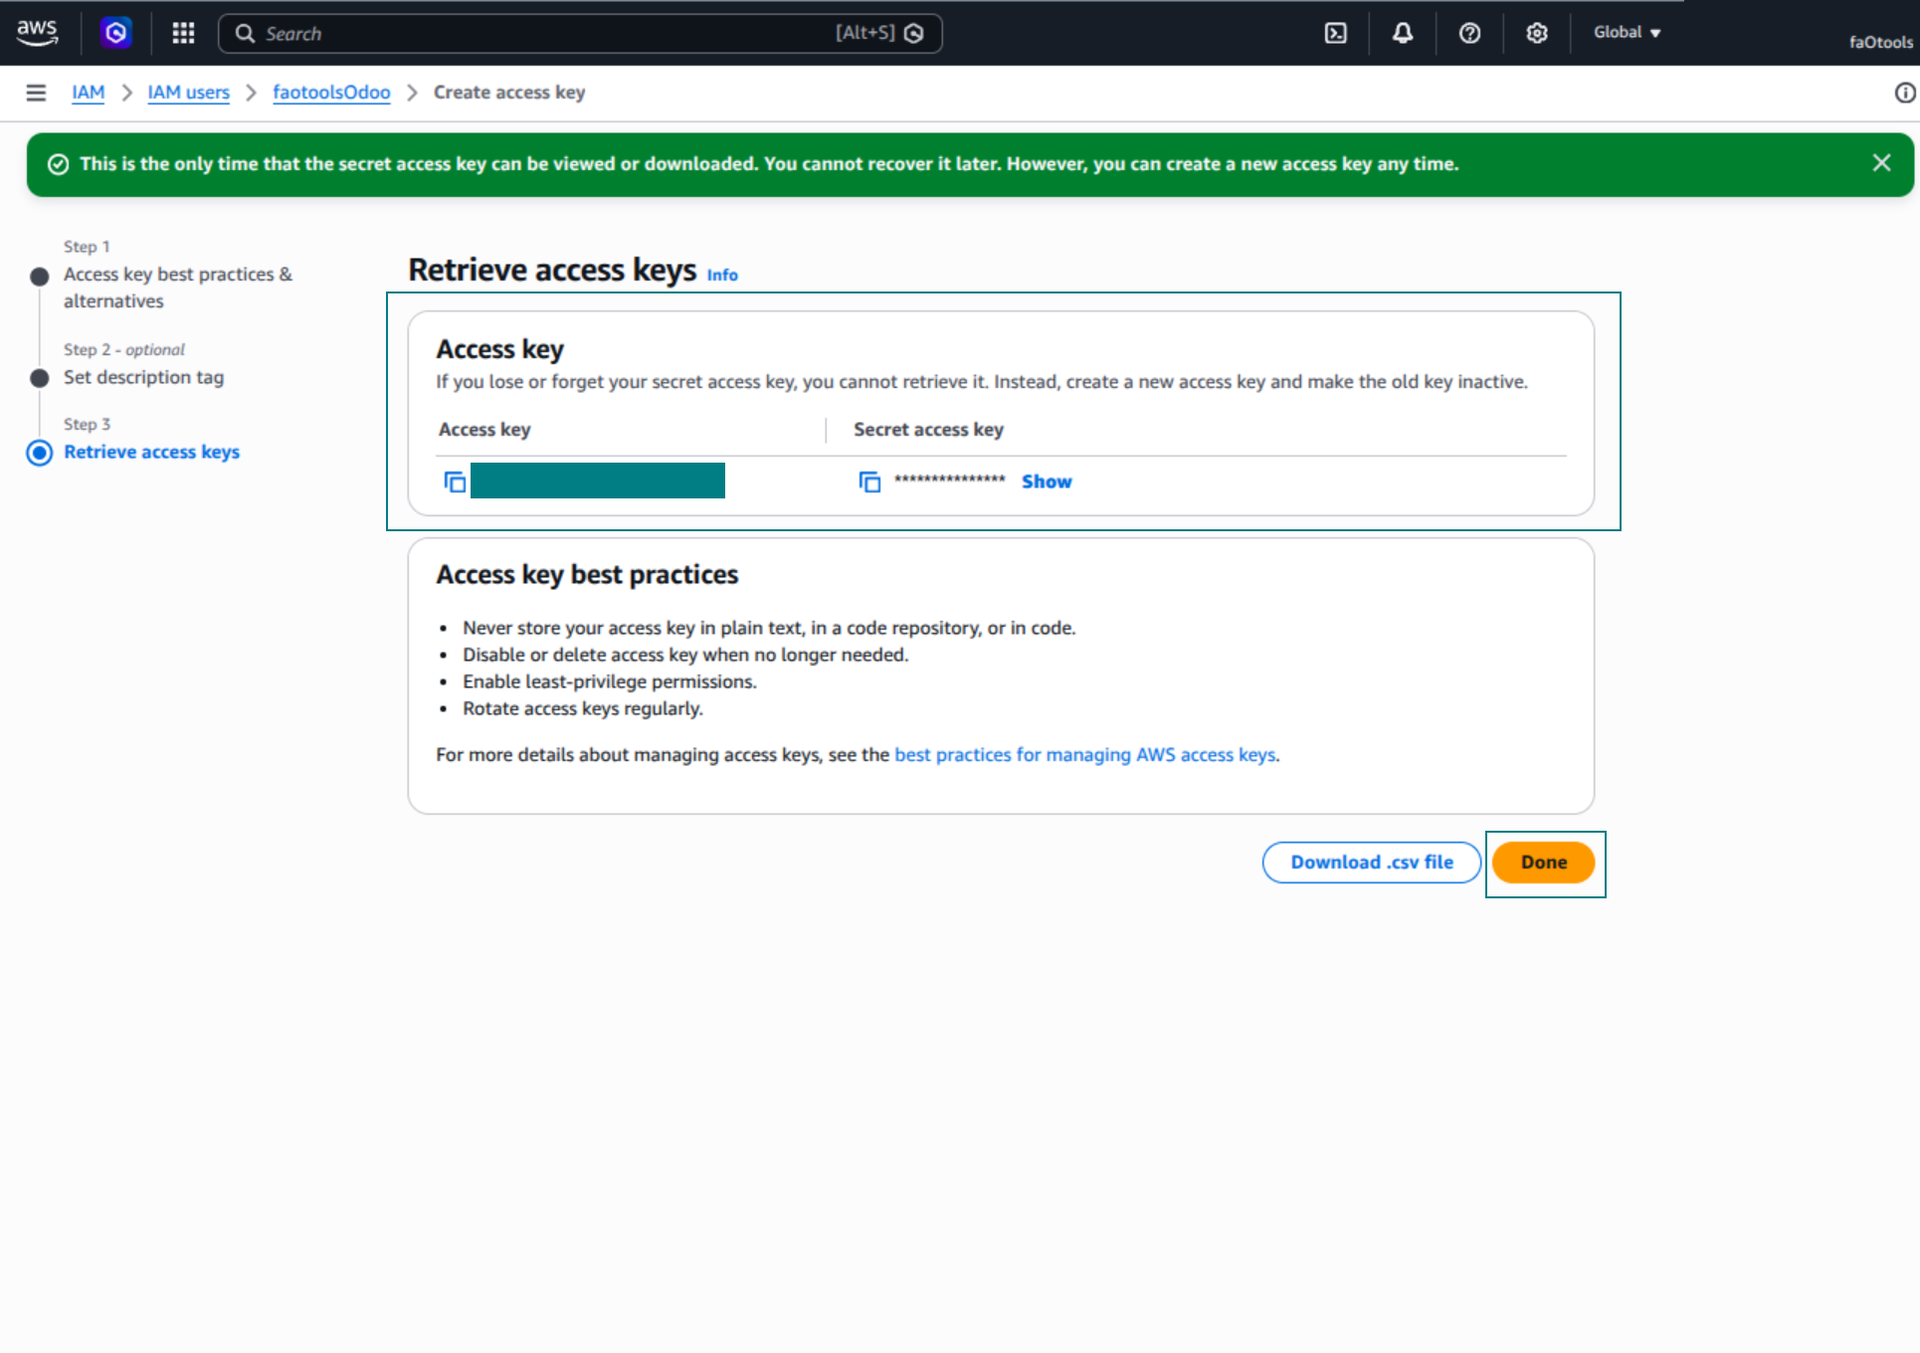
- अंतिम AWS पृष्ठ पर Access key या Access key ID को Odoo फ़ील्ड 'Access Key' में कॉपी करें
- Secret access key को Odoo फ़ील्ड 'Secret Key' में कॉपी करें। महत्वपूर्ण: AWS गुप्त कुंजी केवल एक बार दिखाता है, इसलिए विंडो बंद करने से पहले सहेजें
- अगर AWS S3 की जगह S3-संगत प्रदाता उपयोग करते हैं, उस प्रदाता के एडमिन पैनल से एंडपॉइंट URL कॉपी कर Odoo के फ़ील्ड 'Amazon S3 endpoint URL' में डालें। जैसे MinIO अक्सर https://minio.example.com या http://localhost:9000 उपयोग करता है; LocalStack आमतौर पर http://localhost:4566
- Odoo Cloud Storage > Configuration > Cloud Clients पर जाएँ और 'Create' दबाएँ
- संदर्भ के रूप में, ऐसा नाम दें जो सभी उपयोगकर्ताओं को स्पष्ट हो
- Cloud क्लाइंट के रूप में 'Amazon S3' चुनें
- Root folder नाम में वह शीर्षक दें जो सभी सिंक फ़ोल्डरों का पैरेंट S3 prefix होगा। उदाहरण: 'Odoo' या 'OdooERP'
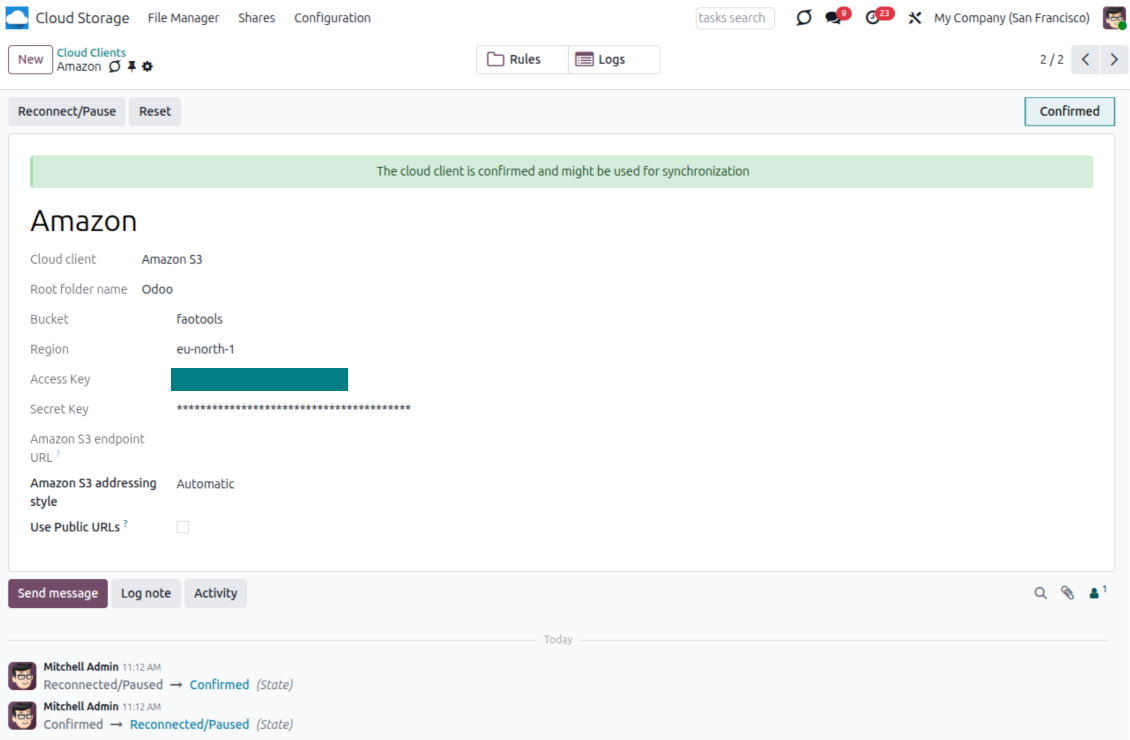
- फ़ील्ड 'Bucket', 'Region', 'Access Key', 'Secret Key' भरें, और ज़रूरत हो तो 'Amazon S3 endpoint URL' तथा एड्रेसिंग स्टाइल भी
- चुनें कि Odoo अस्थायी presigned URL इस्तेमाल करे या सार्वजनिक बकेट/CDN URL। निजी बकेट के लिए presigned URL चालू रखें और उनका जीवनकाल सेकंड में सेट करें
- 'Confirm' दबाएँ। Odoo bucket पहुँच जाँचता है और रूट फ़ोल्डर उपसर्ग बनाता या सत्यापित करता है। Amazon S3 - Odoo सिंक्रनाइज़ेशन करने के लिए तैयार है
- नया cloud client उन फ़ोल्डर नियमों और/या मैन्युअल फ़ोल्डरों पर लागू करें जिन्हें उस Amazon S3 बकेट से सिंक करना है
- सिंक की निर्धारित जॉब शुरू होने की प्रतीक्षा करें। केवल परीक्षण के लिए: Cloud Storage > कॉन्फ़िगरेशन > कॉन्फ़िगरेशन > बटन 'Launch sync' से एकीकरण मैन्युअल चलाएँ।
उपयोगी AWS दस्तावेज़: S3 बकेट बनाना: https://docs.aws.amazon.com/AmazonS3/latest/userguide/creating-bucket.html, IAM एक्सेस कुंजियों का प्रबंधन: https://docs.aws.amazon.com/IAM/latest/UserGuide/id_credentials_access-keys.html.
बकेट नीति का उदाहरण
    {
    "Version": "2012-10-17",
    "Statement": [
        {
            "Sid": "ListObjectsInBucket",
            "Effect": "Allow",
            "Action": [
                "s3:ListBucket"
            ],
            "Resource": "arn:aws:s3:::NAME_OF_YOUR_BUCKET"
        },
        {
            "Sid": "AllObjectActions",
            "Effect": "Allow",
            "Action": [
                "s3:GetObject",
                "s3:PutObject",
                "s3:DeleteObject"
            ],
            "Resource": "arn:aws:s3:::NAME_OF_YOUR_BUCKET/*"
        }
    ]
}
नया AWS IAM उपयोगकर्ता बनाएँ
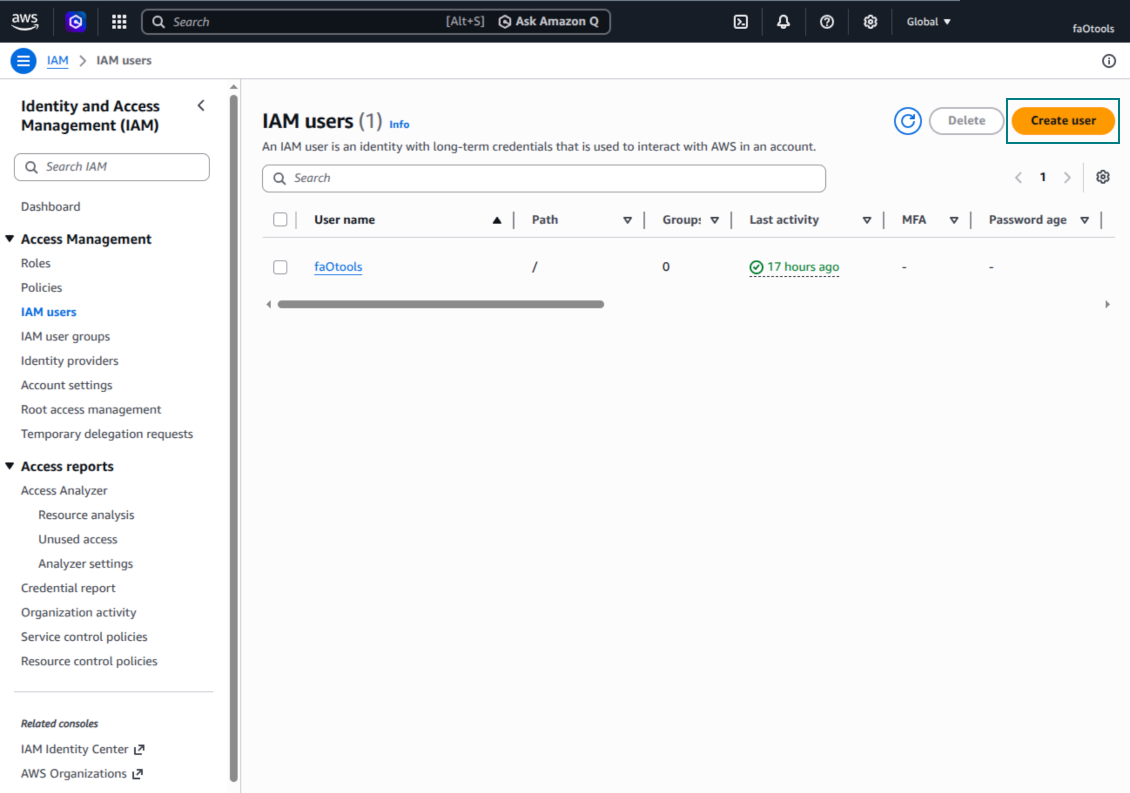
IAM उपयोगकर्ता नाम निर्दिष्ट करें
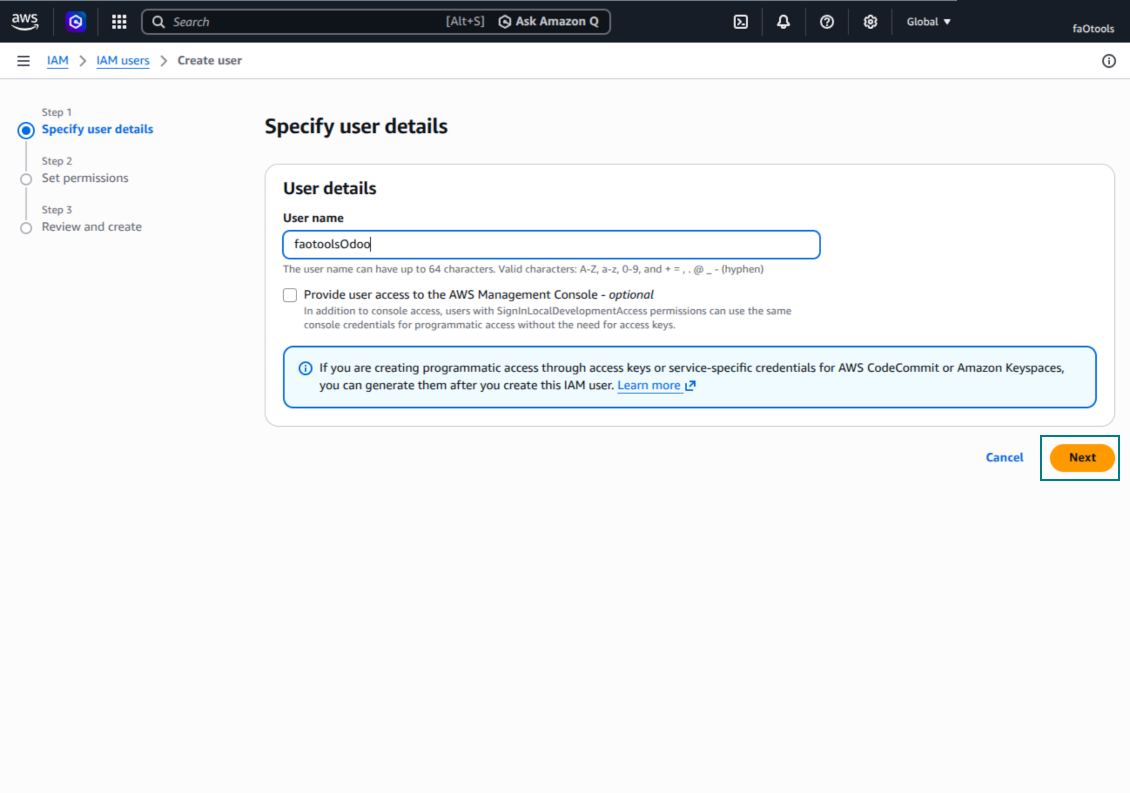
अनुमति नीतियाँ सीधे संलग्न करें
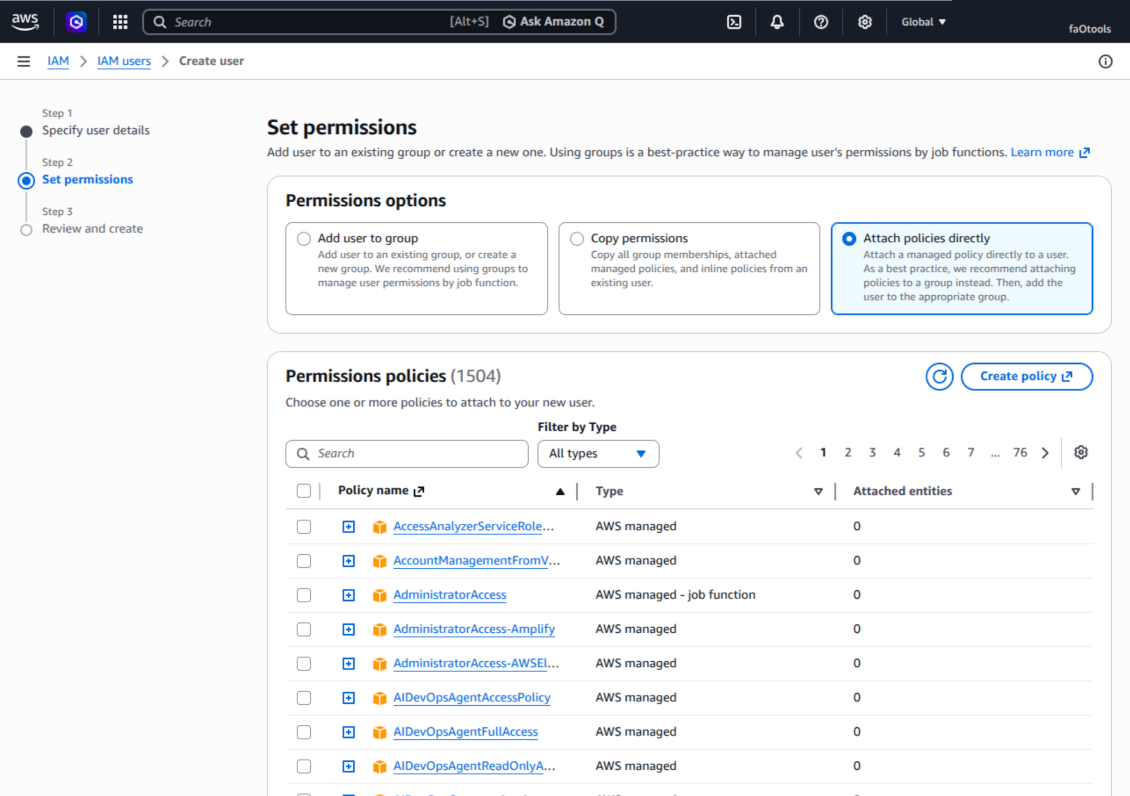
Amazon S3 बकेट नीति JSON उदाहरण
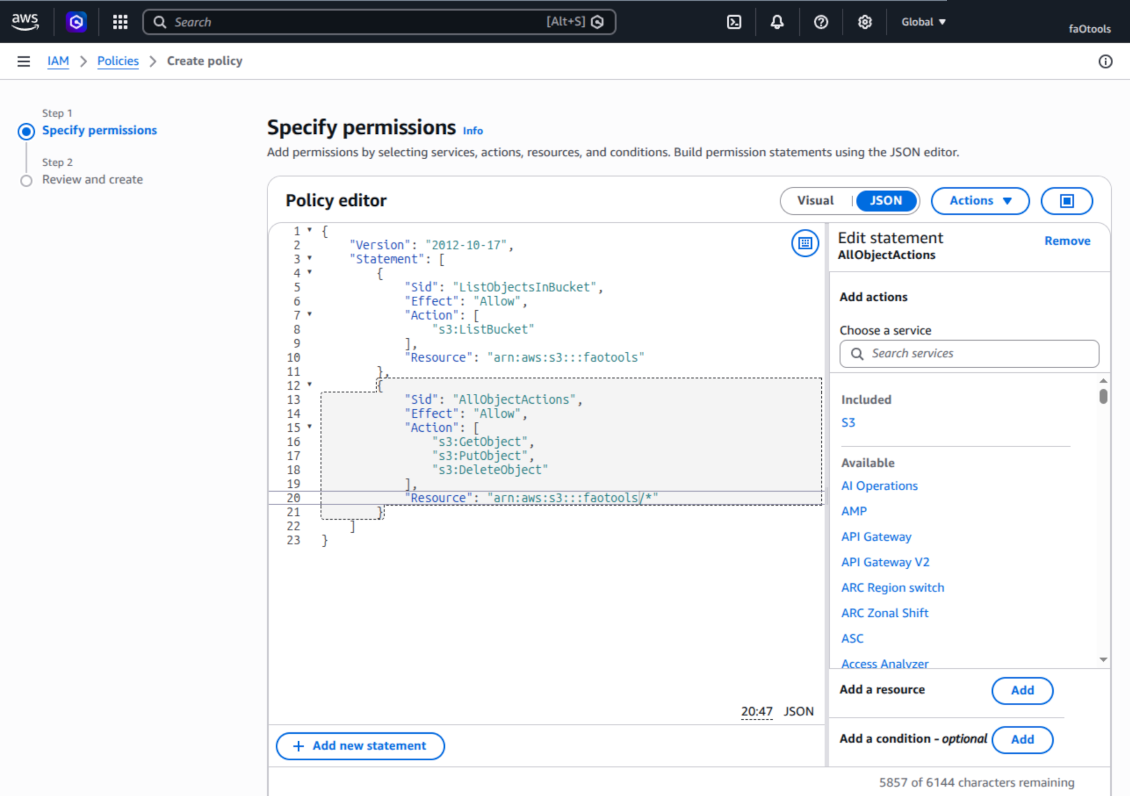
S3 नीति की समीक्षा करें और नाम दें
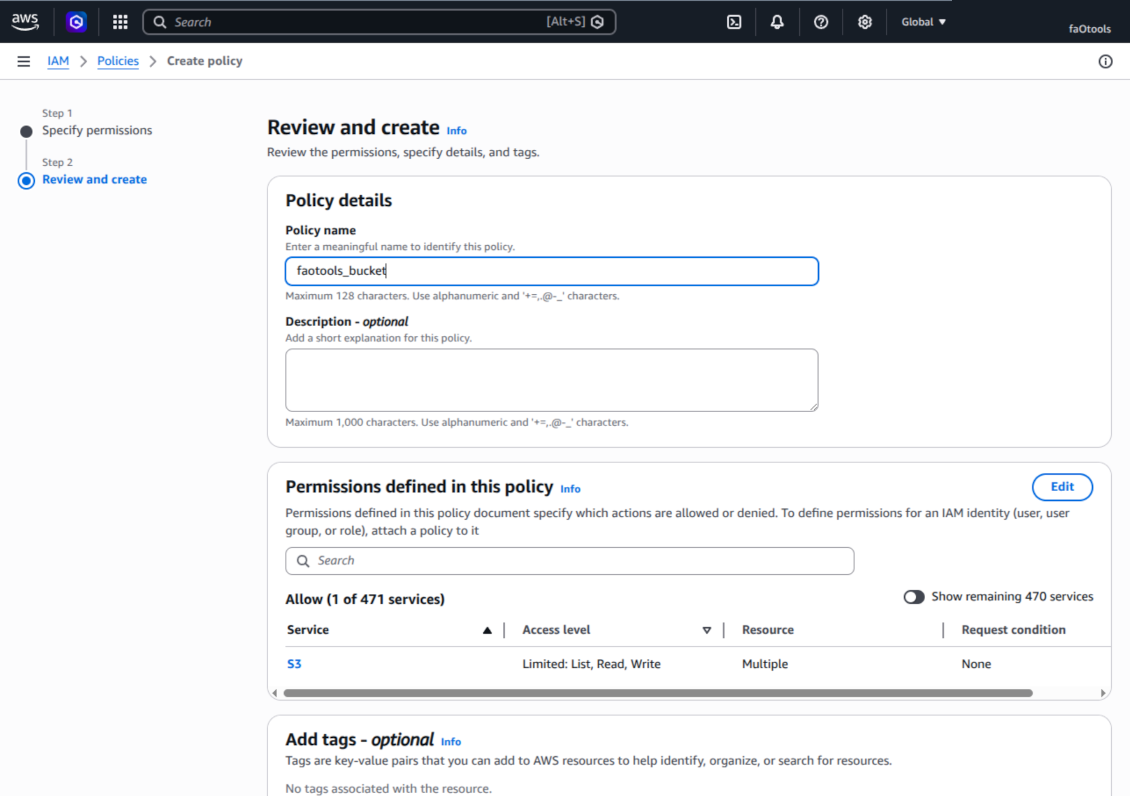
उपयोगकर्ता के लिए बकेट नीति चुनें
IAM उपयोगकर्ता की समीक्षा करें और बनाएँ
उपयोगकर्ता के लिए एक्सेस कुंजी बनाएँ
एक्सेस कुंजी उपयोग मामला चुनें
एक्सेस कुंजी विवरण टैग सेट करें
एक्सेस कुंजी और सीक्रेट प्राप्त करें
Odoo में Amazon S3 क्लाइंट कॉन्फ़िगर करें
Nextcloud या/और ownCloud एकीकरण सेट अप करना
कॉन्फ़िगरेशन और लॉग इन
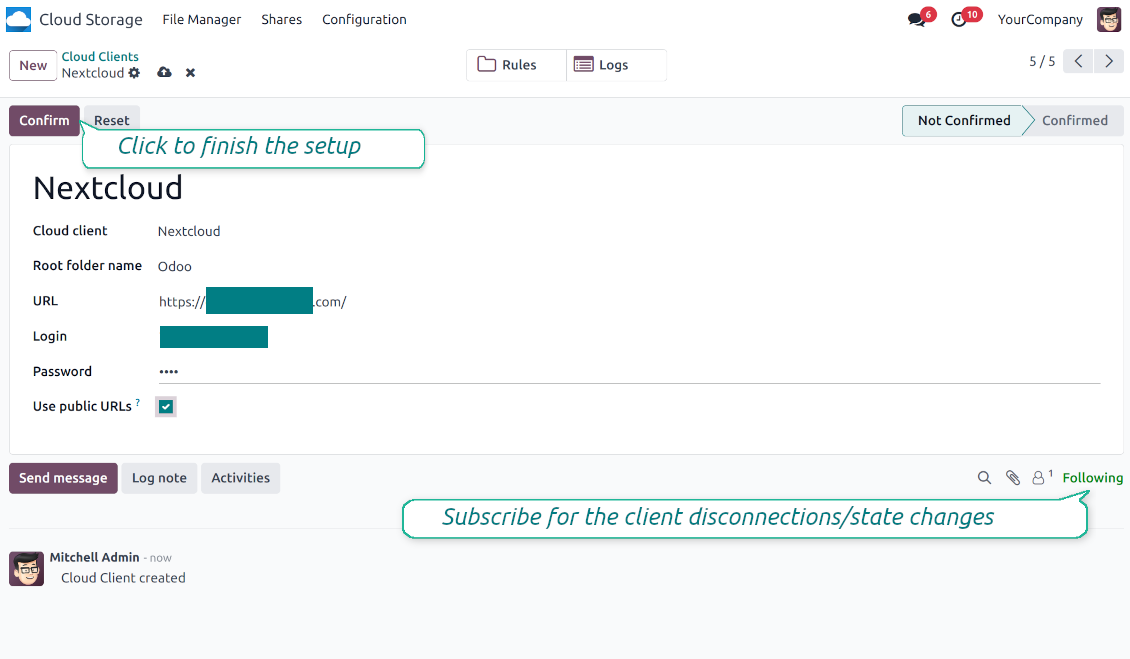
- विकल्प 'onwCloud / Nextcloud Sync' चालू करें (cloud Storage > Configuration > Configuration)। वैकल्पिक ऐड-ऑन ownCloud / Nextcloud Odoo Integration आवश्यक है
- Odoo Cloud Storage > कॉन्फ़िगरेशन > Cloud Clients पर जाएँ और 'Create' दबाएँ
- संदर्भ के रूप में ऐसा नाम दें जो सभी उपयोगकर्ताओं को स्पष्ट हो
- Cloud client के रूप में आपके सॉफ़्टवेयर के अनुसार 'Nextcloud' या 'ownCloud' चुनें
- Root folder नाम में वह शीर्षक दें जो सभी सिंक फ़ोल्डरों का पैरेंट directory होगा। उदाहरण: 'Odoo' या 'OdooERP'
- अपना ownCloud / Nextcloud पूरा URL दर्ज करें
- एक ownCloud / Nextcloud उपयोगकर्ता चुनें जिसके पास रूट निर्देशिका में फ़ाइलें और फ़ोल्डर पढ़ने, बनाने, लिखने और हटाने के पूर्ण अधिकार हों
- इस उपयोगकर्ता का लॉगिन और पासवर्ड फ़ील्ड 'लॉगिन' और 'पासवर्ड' में दर्ज करें
- सार्वजनिक या आंतरिक URL लागू करें, चुनें (नीचे देखें)
- 'पुष्टि करें' दबाएँ। Odoo सिंक तैयार है
- नया cloud client उन फ़ोल्डर नियमों और/या मैन्युअल फ़ोल्डरों पर लागू करें जिन्हें उस Nextcloud या ownCloud इंस्टेंस से सिंक करना है
- सिंक की निर्धारित जॉब शुरू होने की प्रतीक्षा करें। केवल परीक्षण के लिए: Cloud Storage > कॉन्फ़िगरेशन > कॉन्फ़िगरेशन > बटन 'Launch sync' से एकीकरण मैन्युअल चलाएँ।
आंतरिक और सार्वजनिक URL
डिफ़ॉल्ट रूप से Odoo से ownCloud / Nextcloud के लिंक आंतरिक हैं: केवल अधिकृत उपयोगकर्ता पहुँच सकते हैं। वैकल्पिक रूप से लिंक सार्वजनिक करें (सेटिंग 'Use Public URLs')। तब URL 'साझा' होंगे और सभी प्रत्यक्ष लिंक से आइटम खोलेंगे।
यदि साझा (सार्वजनिक) URL उपयोग करने का निर्णय लें तो सावधानी बरतें। बाहरी उपयोगकर्ताओं को लिंक शायद ही पता चलें, फिर भी कुछ उपयोगकर्ता क्रियाओं के परिणामस्वरूप उपलब्ध होने की हल्की संभावना है। इसके अलावा साझा लिंक बनाना तेज़ नहीं है और सिंक धीमा कर सकता है।
यह भी देखें कॉन्फ़िगरेशन वीडियो
ownCloud / Nextcloud क्रेडेंशियल दर्ज करें
NAS सेट अप करना (Synology, QNAP, TrueNAS आदि)
- विकल्प 'NAS Sync' चालू करें (Cloud Storage > Configuration > Configuration)। वैकल्पिक ऐड-ऑन NAS Odoo Integration आवश्यक है
- अपना NAS WebDAV एंडपॉइंट तैयार करें:
- Synology: DSM में WebDAV Server स्थापित और सक्षम करें और जहाँ संभव हो HTTPS चुनें
- QNAP: लक्ष्य साझा फ़ोल्डर के लिए WebDAV चालू करें और जहाँ संभव हो HTTPS इस्तेमाल करें
- TrueNAS CORE: WebDAV सेवा चालू करें; TrueNAS SCALE: WebDAV ऐप स्थापित और कॉन्फ़िगर करें, क्योंकि आधुनिक SCALE रिलीज़ में मूल WebDAV हटा दिया गया है
- सामान्य WebDAV: सुनिश्चित करें कि PROPFIND, MKCOL, PUT, GET, MOVE और DELETE उपलब्ध हैं
- यदि Odoo स्थानीय NAS नेटवर्क के बाहर होस्ट है, तो WebDAV एंडपॉइंट को सुरक्षित रूप से पहुँच योग्य बनाएँ। मान्य TLS प्रमाणपत्र वाले रिवर्स प्रॉक्सी, WireGuard, Tailscale या Cloudflare Tunnel जैसे VPN/सुरक्षित टनल, या Synology QuickConnect या QNAP myQNAPcloud जैसे विक्रेता रिले को प्राथमिकता दें। व्यवस्थापक इंटरफ़ेस को Internet पर न खोलें
- लक्ष्य साझा फ़ोल्डर के अंदर ही पूर्ण अधिकारों वाला समर्पित NAS उपयोगकर्ता बनाएँ: पढ़ना, बनाना, लिखना, स्थानांतरित करना और हटाना। व्यवस्थापक खाता उपयोग न करें
- Odoo Cloud Storage > Configuration > Cloud Clients पर जाएँ और 'Create' दबाएँ
- संदर्भ के रूप में, ऐसा नाम दें जो सभी उपयोगकर्ताओं को स्पष्ट हो
- Cloud क्लाइंट के रूप में 'Synology NAS', 'QNAP NAS', 'TrueNAS' या 'WebDAV NAS' चुनें
- Root folder नाम में वह शीर्षक दें जो सभी सिंक फ़ोल्डरों का पैरेंट NAS directory होगा। उदाहरण: 'Odoo' या 'OdooERP'
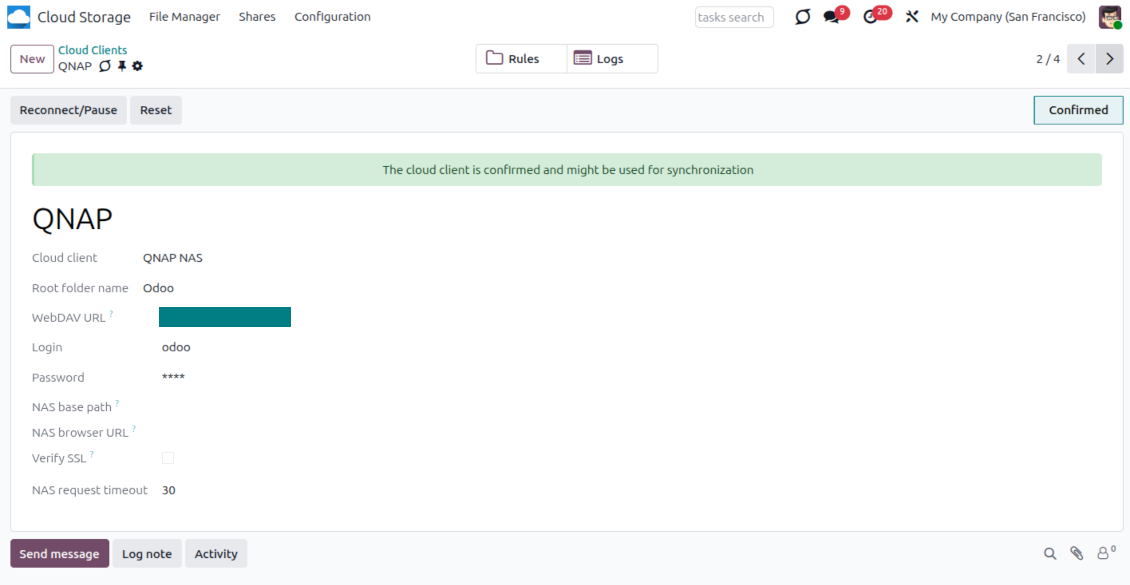
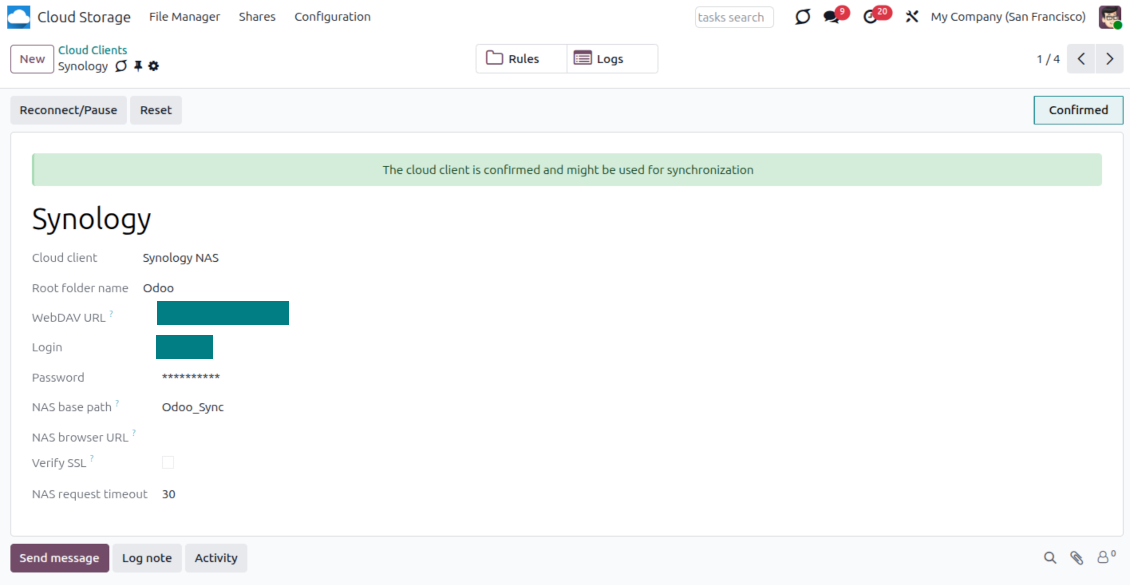
- पूरा WebDAV URL, लॉगिन और पासवर्ड दर्ज करें। वैकल्पिक रूप से आधार पथ तय करें यदि Odoo को मौजूदा शेयर या निर्देशिका के अंदर रूट फ़ोल्डर बनाना हो
- सार्वजनिक HTTPS एंडपॉइंट के लिए 'Verify SSL' चालू रखें। इसे केवल स्व-हस्ताक्षरित प्रमाणपत्र वाले विश्वसनीय निजी एंडपॉइंट के लिए बंद करें
- यदि NAS फ़ाइलें कच्चे WebDAV URL के बजाय विक्रेता file station URL से खुलनी चाहिए, तो वैकल्पिक रूप से ब्राउज़र बेस URL निर्धारित करें
- 'Confirm' दबाएँ। Odoo WebDAV कनेक्शन जाँचता है और रूट निर्देशिका बनाता या ढूँढता है। NAS - Odoo सिंक्रनाइज़ेशन करने के लिए तैयार है
- नया cloud client उन फ़ोल्डर नियमों और/या मैन्युअल फ़ोल्डरों पर लागू करें जिन्हें उस NAS स्टोरेज से सिंक करना है
- सिंक की निर्धारित जॉब शुरू होने की प्रतीक्षा करें। केवल परीक्षण के लिए: Cloud Storage > कॉन्फ़िगरेशन > कॉन्फ़िगरेशन > बटन 'Launch sync' से एकीकरण मैन्युअल चलाएँ।
NAS पूर्व-विन्यास
NAS सिस्टम आमतौर पर स्थानीय नेटवर्क से फ़ाइलें दिखाते हैं। यदि आपका Odoo सर्वर उस नेटवर्क के बाहर होस्ट है, तो WebDAV एंडपॉइंट सुरक्षित चैनल से Odoo तक पहुँच योग्य होना चाहिए। अनुशंसित विकल्प हैं मान्य HTTPS प्रमाणपत्र वाला रिवर्स प्रॉक्सी, VPN या सुरक्षित टनल जैसे WireGuard, Tailscale या Cloudflare Tunnel, अथवा विक्रेता रिले जैसे Synology QuickConnect या QNAP myQNAPcloud। सादा पोर्ट फ़ॉरवर्डिंग संभव है, पर इसे सबसे कम पसंदीदा विकल्प मानें।
एक साझा फ़ोल्डर पर न्यूनतम अधिकारों वाला समर्पित NAS उपयोगकर्ता उपयोग करें: पढ़ना, बनाना, अपडेट, स्थानांतरण और हटाना। प्रशासक खाते से बचें। सार्वजनिक एंडपॉइंट हमेशा HTTPS और मान्य TLS प्रमाणपत्र इस्तेमाल करें। कनेक्टर में विश्वसनीय स्व-हस्ताक्षरित प्रमाणपत्रों के लिए "Verify SSL" विकल्प है, पर सामान्यतः चालू रहना चाहिए।
QNAP क्रेडेंशियल दर्ज करें
Synology क्रेडेंशियल दर्ज करें
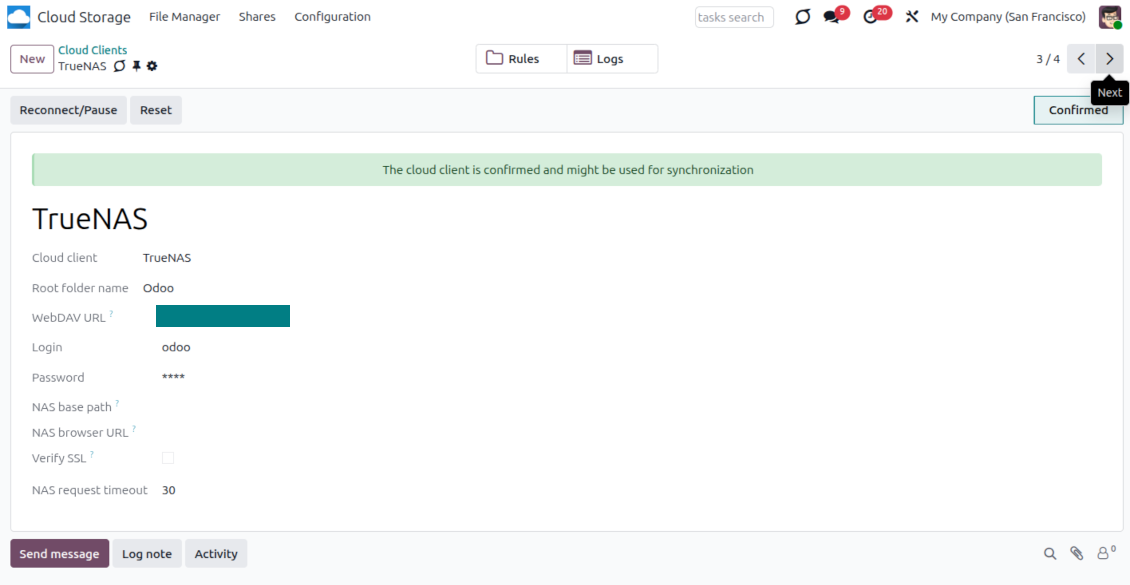
TrueNAS क्रेडेंशियल दर्ज करें
Box सेट अप करना
- विकल्प 'Box Sync' चालू करें (cloud Storage > कॉन्फ़िगरेशन > कॉन्फ़िगरेशन)। वैकल्पिक ऐड-ऑन Box Odoo Integration आवश्यक है
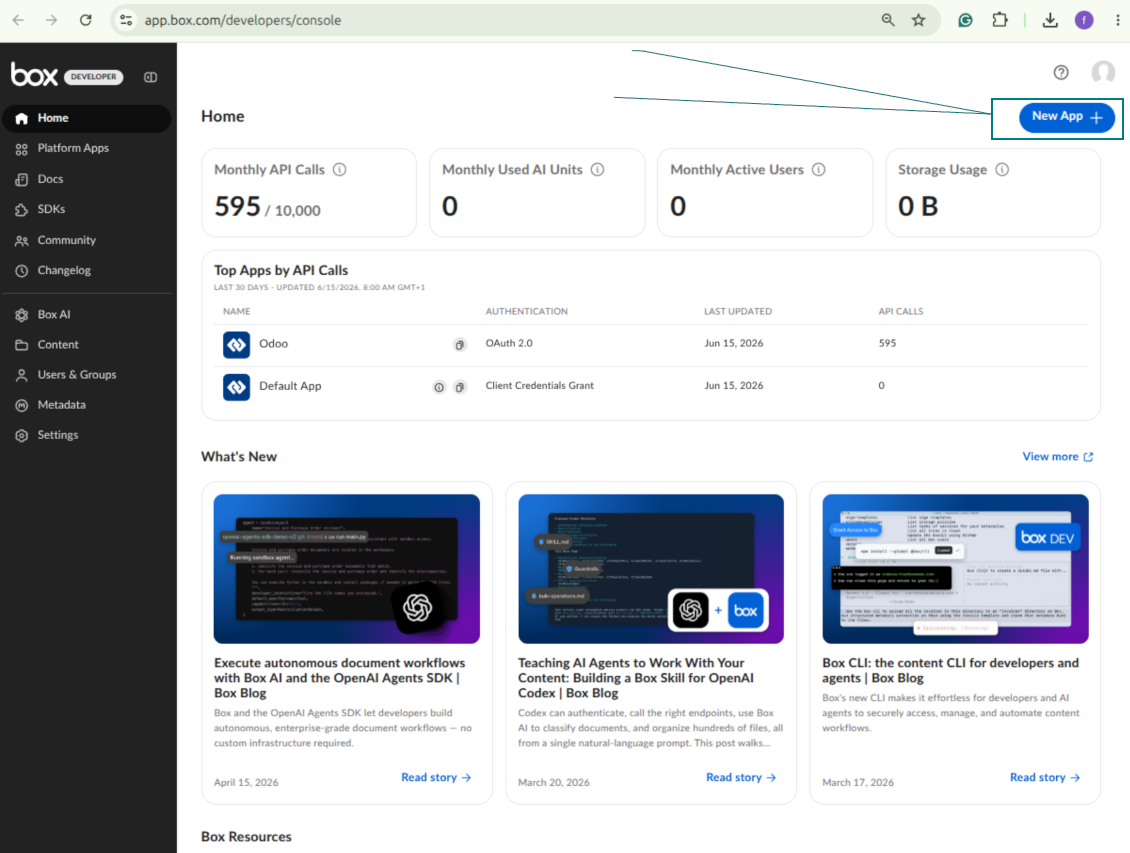
- Box डेवलपर खाता बनाएँ या खोलें और Box Developer Console पर जाएँ: https://app.box.com/developers/console
- एक Custom App बनाएँ और प्रमाणीकरण विधि के रूप में OAuth 2.0 (Authorization Code Grant) चुनें
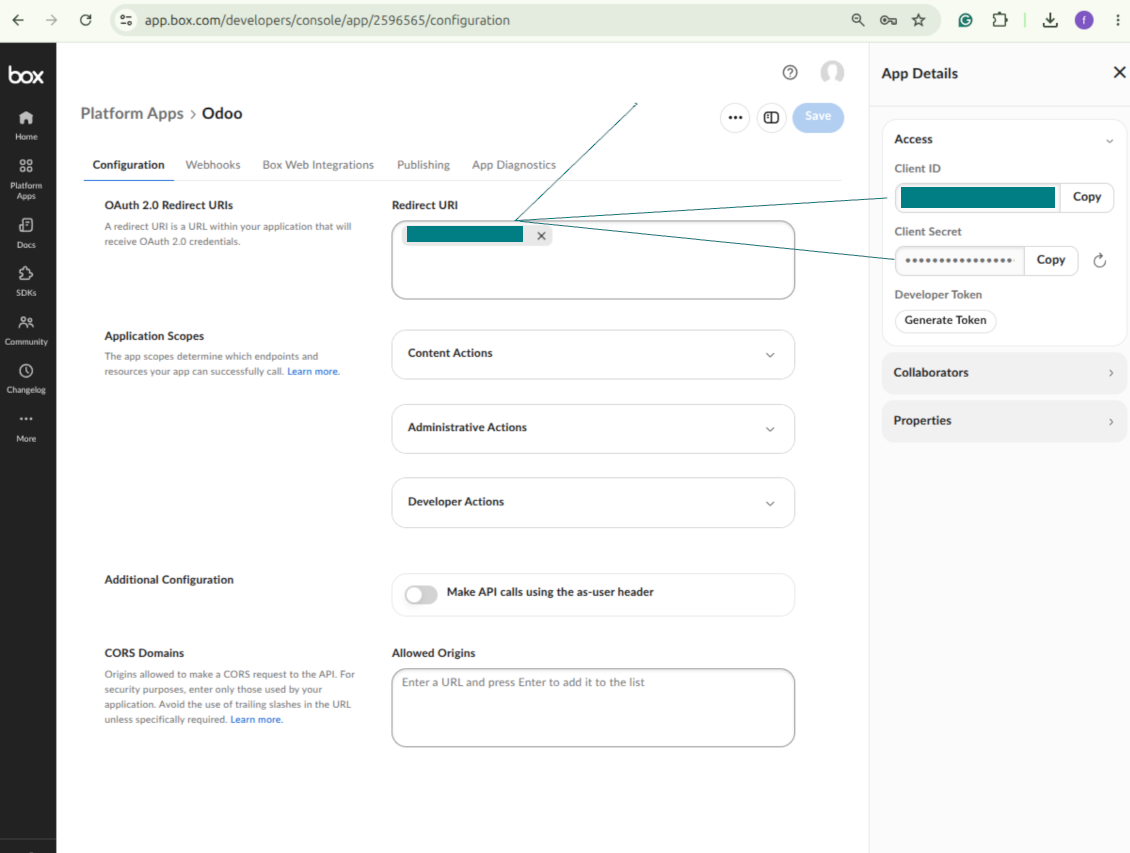
- Add the redirect URI as [YOURODOOSITENAME]/box_token (e.g. https://faotools.com/box_token). A valid SSL certificate (https) is required
- ऐप को फ़ाइलें और फ़ोल्डर पढ़ने-लिखने की पहुँच दें। असंबंधित अनुमतियाँ न दें
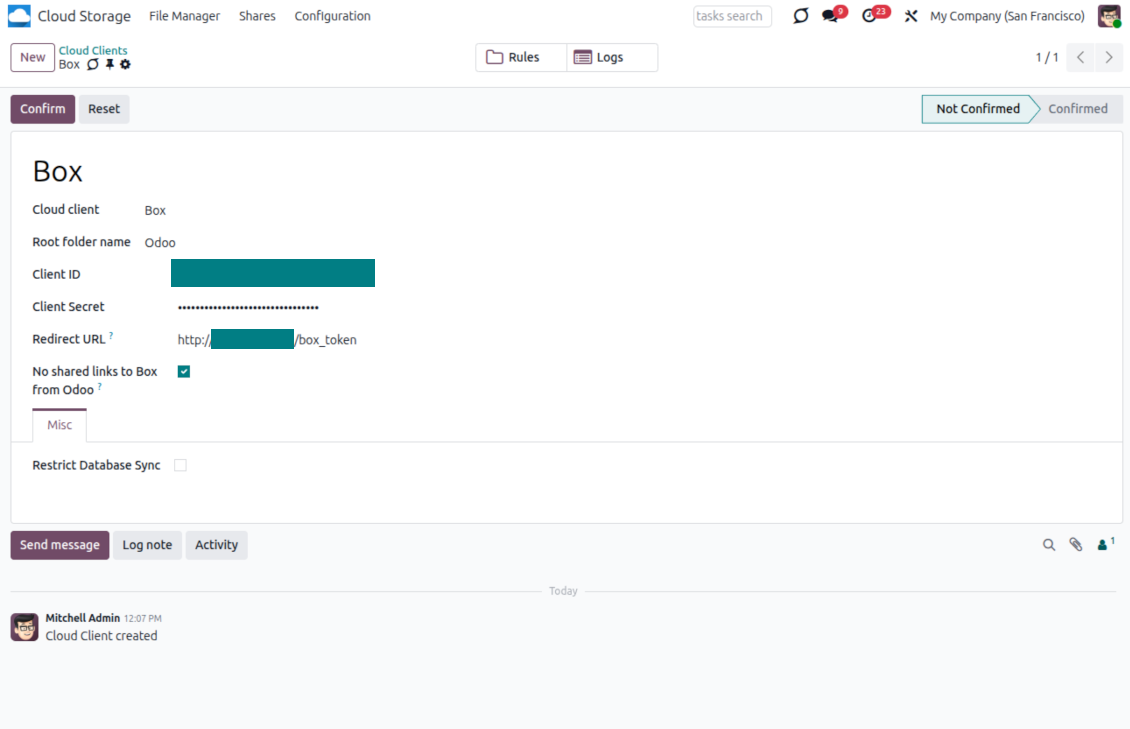
- Odoo Cloud Storage > Configuration > Cloud Clients पर जाएँ और 'Create' दबाएँ
- संदर्भ के रूप में, ऐसा नाम दें जो सभी उपयोगकर्ताओं को स्पष्ट हो
- Cloud क्लाइंट के रूप में 'Box' चुनें
- Root folder नाम में वह शीर्षक दें जो सभी सिंक फ़ोल्डरों का पैरेंट Box directory होगा। उदाहरण: 'Odoo' या 'OdooERP'
- Box Client ID को फ़ील्ड 'Client ID' में कॉपी करें
- Box Client Secret को फ़ील्ड 'Client Secret' में कॉपी करें
- पहले जनरेट किया गया रीडायरेक्ट URL डालें
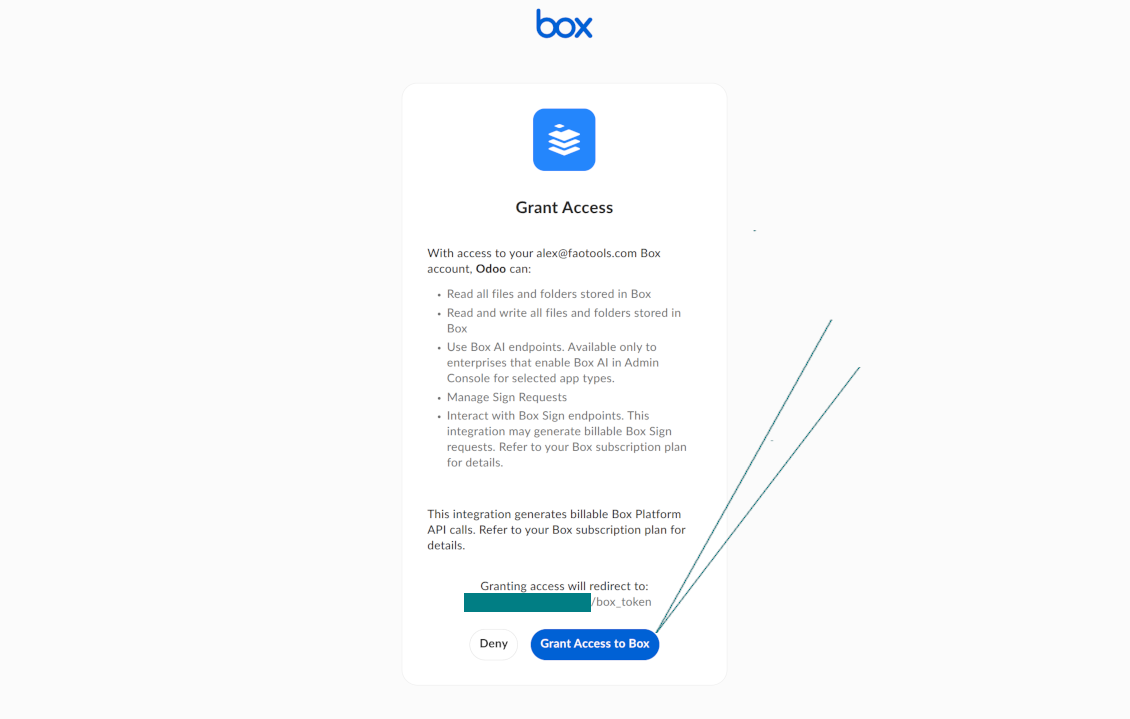
- 'Confirm' दबाएँ। Odoo आपको Box लॉगिन पृष्ठ पर भेजता है। सिस्टम में जाँचें, सभी शर्तें स्वीकार करें और मांगी गई सभी अनुमतियाँ दें
- लॉगिन के बाद Box आपको वापस Odoo पर भेजता है। Box - Odoo सिंक तैयार है
- नया cloud client उन फ़ोल्डर नियमों और/या मैन्युअल फ़ोल्डरों पर लागू करें जिन्हें उस Box खाते से सिंक करना है
- सिंक की निर्धारित जॉब शुरू होने की प्रतीक्षा करें। केवल परीक्षण के लिए: Cloud Storage > कॉन्फ़िगरेशन > कॉन्फ़िगरेशन > बटन 'Launch sync' से एकीकरण मैन्युअल चलाएँ।
नया Box डेवलपर ऐप बनाएँ
Box OAuth क्रेडेंशियल कॉपी करें
Odoo में Box क्लाउड क्लाइंट कॉन्फ़िगर करें
Odoo को Box की पहुँच दें
MinIO सेट अप करना
- चल रहा MinIO सर्वर तैयार करें
- MinIO Console खोलें
- नया बकेट बनाएँ या मौजूदा चुनें। सटीक बकेट नाम कॉपी करें: इसे Odoo में फ़ील्ड 'Bucket' में डालना चाहिए
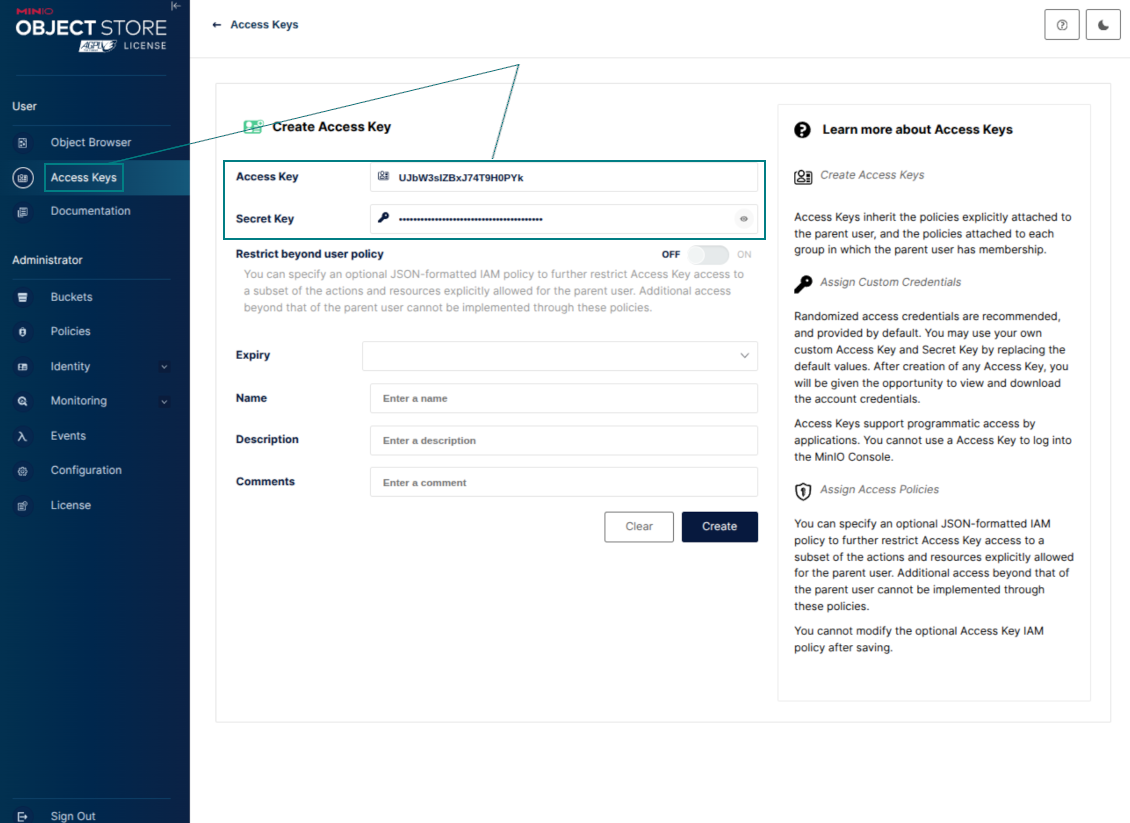
- Odoo के लिए एक्सेस क्रेडेंशियल बनाएँ। MinIO में access key / secret key जोड़ी या ऐसा सेवा खाता उपयोग करें जिसके पास चयनित बकेट में ऑब्जेक्ट सूचीबद्ध करने, पढ़ने, बनाने, लिखने, कॉपी करने और हटाने के अधिकार हों
- MinIO Access Key को Odoo फ़ील्ड 'Access Key' में कॉपी करें
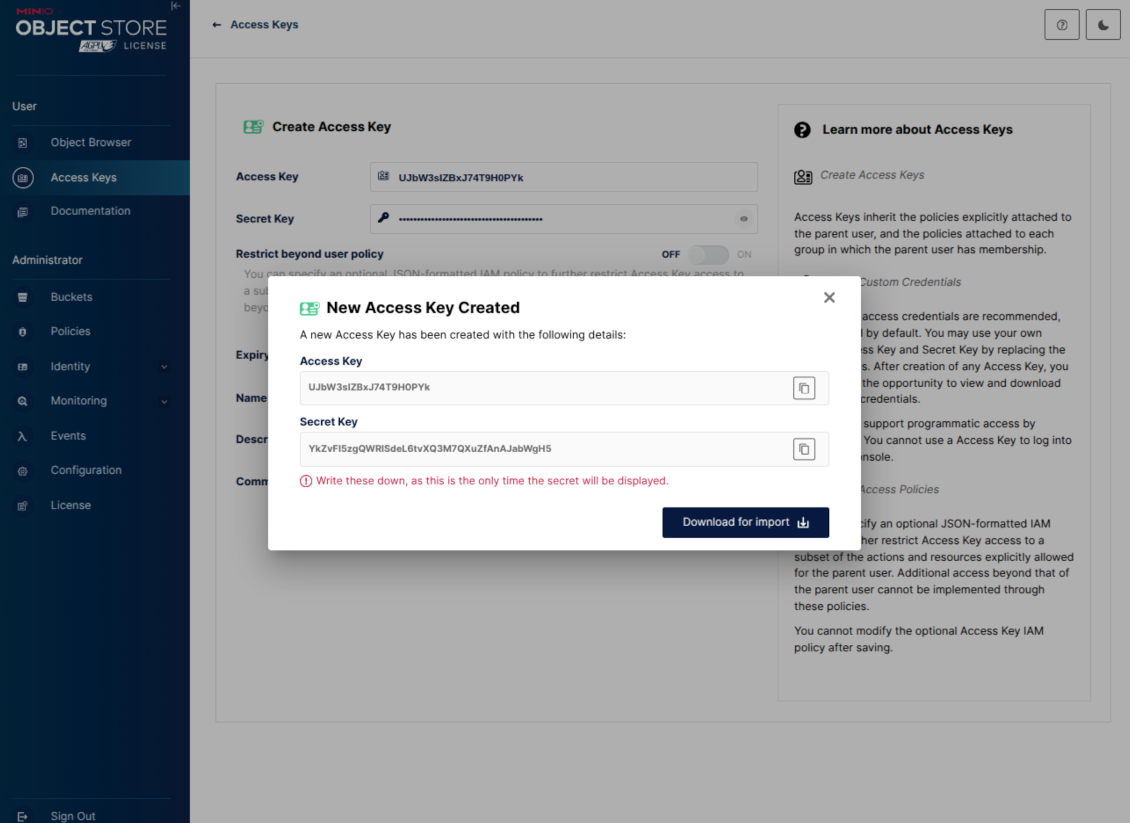
- MinIO Secret Key को Odoo फ़ील्ड 'Secret Key' में कॉपी करें। महत्वपूर्ण: यदि MinIO इसे केवल एक बार दिखाता है तो MinIO पृष्ठ बंद करने से पहले गुप्त कुंजी सहेजें
- MinIO S3 API एंडपॉइंट URL को Odoo में फ़ील्ड 'Amazon S3 endpoint URL' में कॉपी करें। उदाहरण के लिए स्थानीय सर्वर आमतौर पर http://localhost:9000 उपयोग करता है, जबकि प्रोडक्शन सर्वर https://minio.example.com उपयोग कर सकता है
- Odoo Cloud Storage > Configuration > Cloud Clients पर जाएँ और 'Create' दबाएँ
- संदर्भ के रूप में, ऐसा नाम दें जो सभी उपयोगकर्ताओं को स्पष्ट हो
- Cloud क्लाइंट के रूप में 'MinIO' चुनें
- Root folder नाम में वह शीर्षक दें जो सभी सिंक फ़ोल्डरों का पैरेंट MinIO object prefix होगा। उदाहरण: 'Odoo' या 'OdooERP'
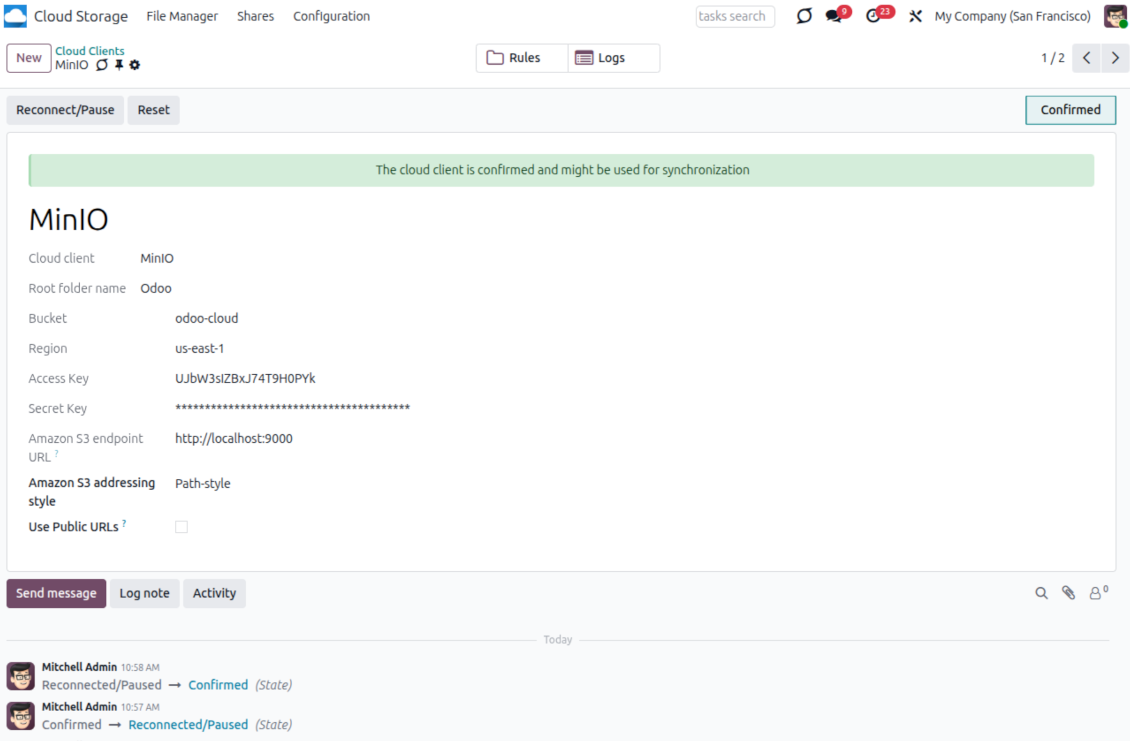
- फ़ील्ड 'Bucket', 'Access Key', 'Secret Key' और 'Amazon S3 endpoint URL' भरें। 'Region' MinIO के लिए वैकल्पिक है; खाली होने पर Odoo S3-संगत साइन के लिए us-east-1 उपयोग करता है
- एड्रेसिंग शैली Path-style रखें। MinIO एंडपॉइंट के लिए यही अनुशंसित विकल्प है, खासकर जब MinIO होस्ट बकेट-विशिष्ट DNS नाम न देता हो
- चुनें कि Odoo सीधे सार्वजनिक MinIO URL इस्तेमाल करे या नहीं। «Use Public URLs» तभी चालू करें जब बकेट, प्रीफ़िक्स, रिवर्स प्रॉक्सी या CDN सार्वजनिक रूप से पढ़ने योग्य हो। निजी MinIO बकेट के लिए इसे बंद रखें
- 'Confirm' दबाएँ। Odoo bucket पहुँच जाँचता है और रूट फ़ोल्डर उपसर्ग बनाता या सत्यापित करता है। MinIO - Odoo सिंक्रनाइज़ेशन करने के लिए तैयार है
- नया cloud client उन फ़ोल्डर नियमों और/या मैन्युअल फ़ोल्डरों पर लागू करें जिन्हें उस MinIO बकेट से सिंक करना है
- सिंक की निर्धारित जॉब शुरू होने की प्रतीक्षा करें। केवल परीक्षण के लिए: Cloud Storage > कॉन्फ़िगरेशन > कॉन्फ़िगरेशन > बटन 'Launch sync' से एकीकरण मैन्युअल चलाएँ।
Useful MinIO documentation: https://min.io/docs/minio/linux/administration/identity-access-management.html, https://min.io/docs/minio/linux/reference/minio-server/minio-server.html.
MinIO एक्सेस कुंजी बनाएँ
नई MinIO क्रेडेंशियल कॉपी करें
Odoo में MinIO क्लाउड क्लाइंट कॉन्फ़िगर करें
Dropbox एकीकरण सेट अप करना
Python निर्भरता
उपकरण बाहरी लाइब्रेरी 'dropbox' पर निर्भर है। Odoo सर्वर पर इस कमांड से स्थापित करें:
pip3 install dropbox
कॉन्फ़िगरेशन और लॉग इन
- विकल्प 'Dropbox Sync' चालू करें (cloud Storage > कॉन्फ़िगरेशन > कॉन्फ़िगरेशन)। वैकल्पिक ऐड-ऑन Dropbox Odoo Integration आवश्यक है
- Follow the URL https://www.dropbox.com/developers/apps/create
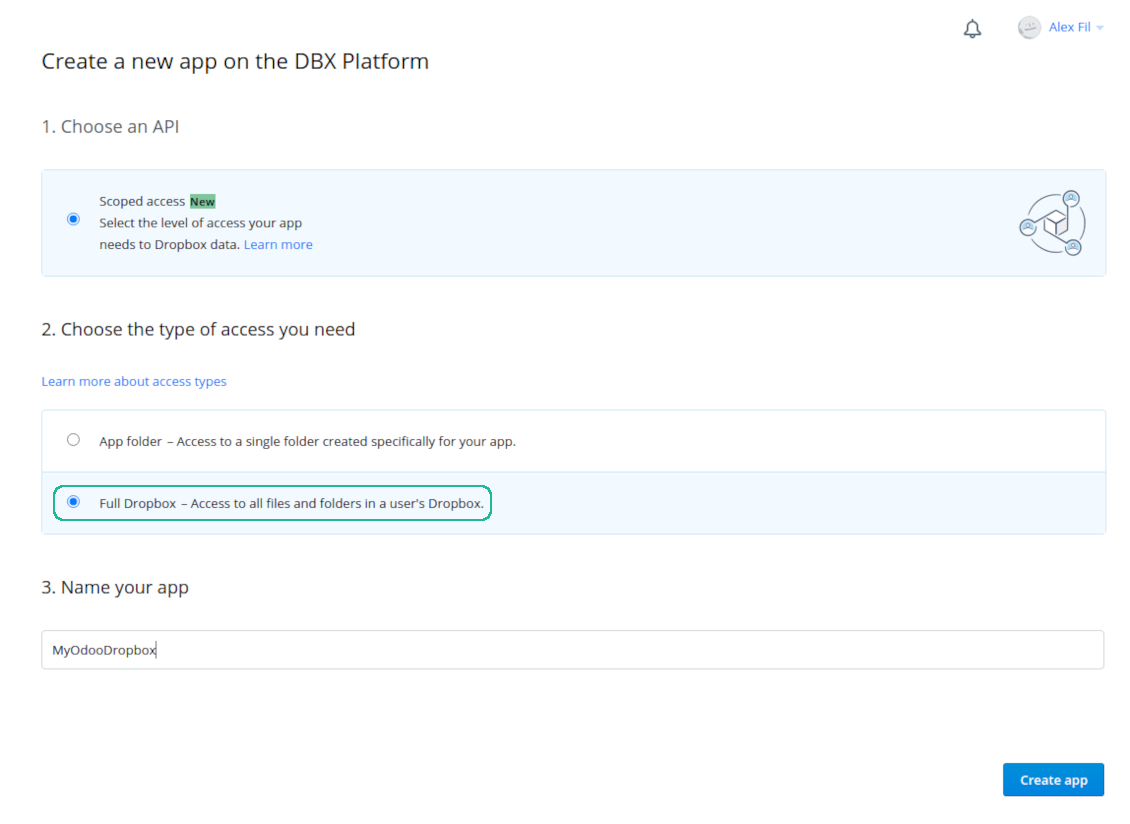
- API को 'Scoped access' के रूप में चुनें
- एक्सेस प्रकार 'Full Dropbox' चुनें
- ऐप के लिए कोई उपयुक्त नाम चुनें और 'Create app' बटन दबाएँ
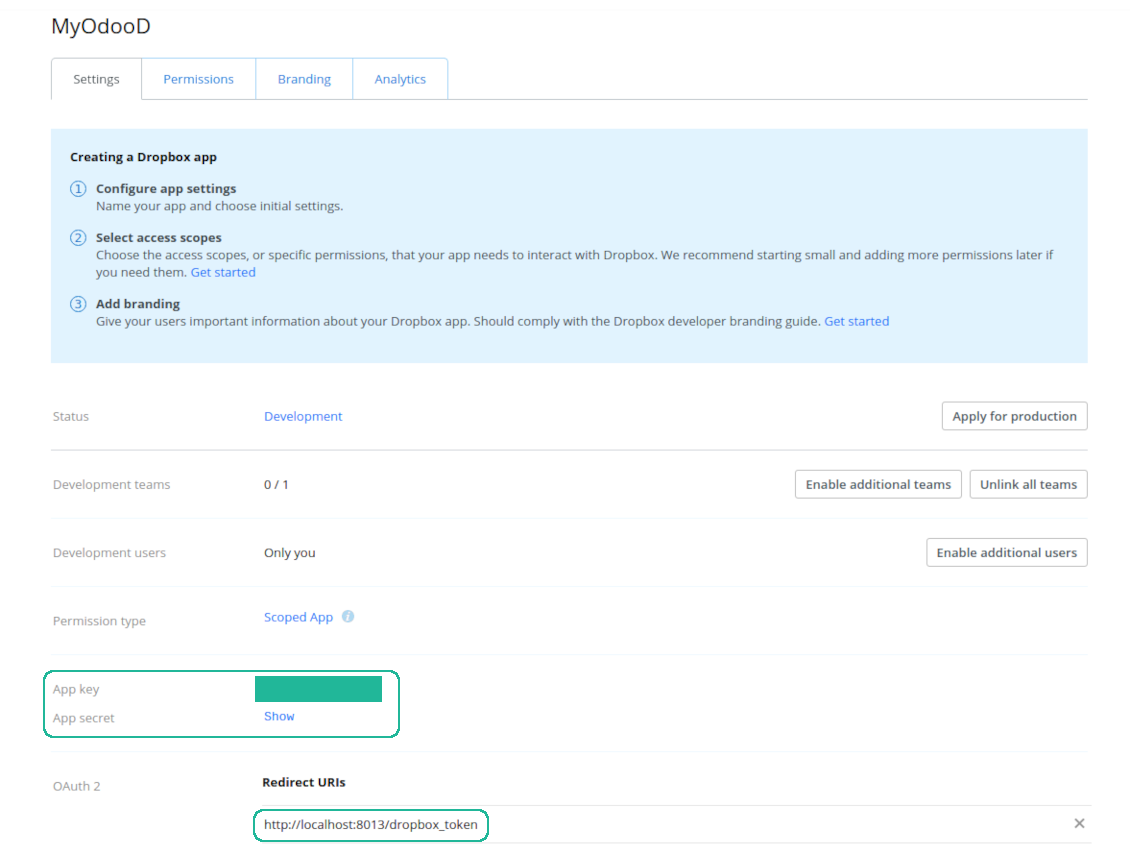
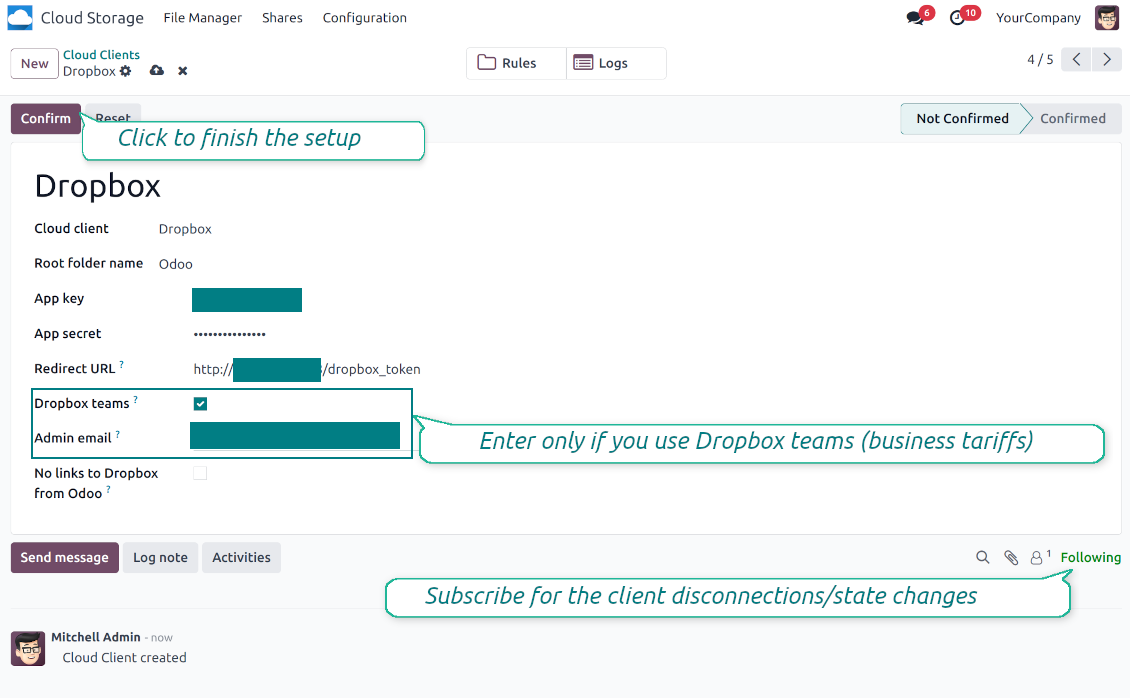
- Add the redirect URI as [YOURODOOSITENAME]/dropbox_token (e.g. https://faotools.com/dropbox_token). A valid SSL certificate (https) is required
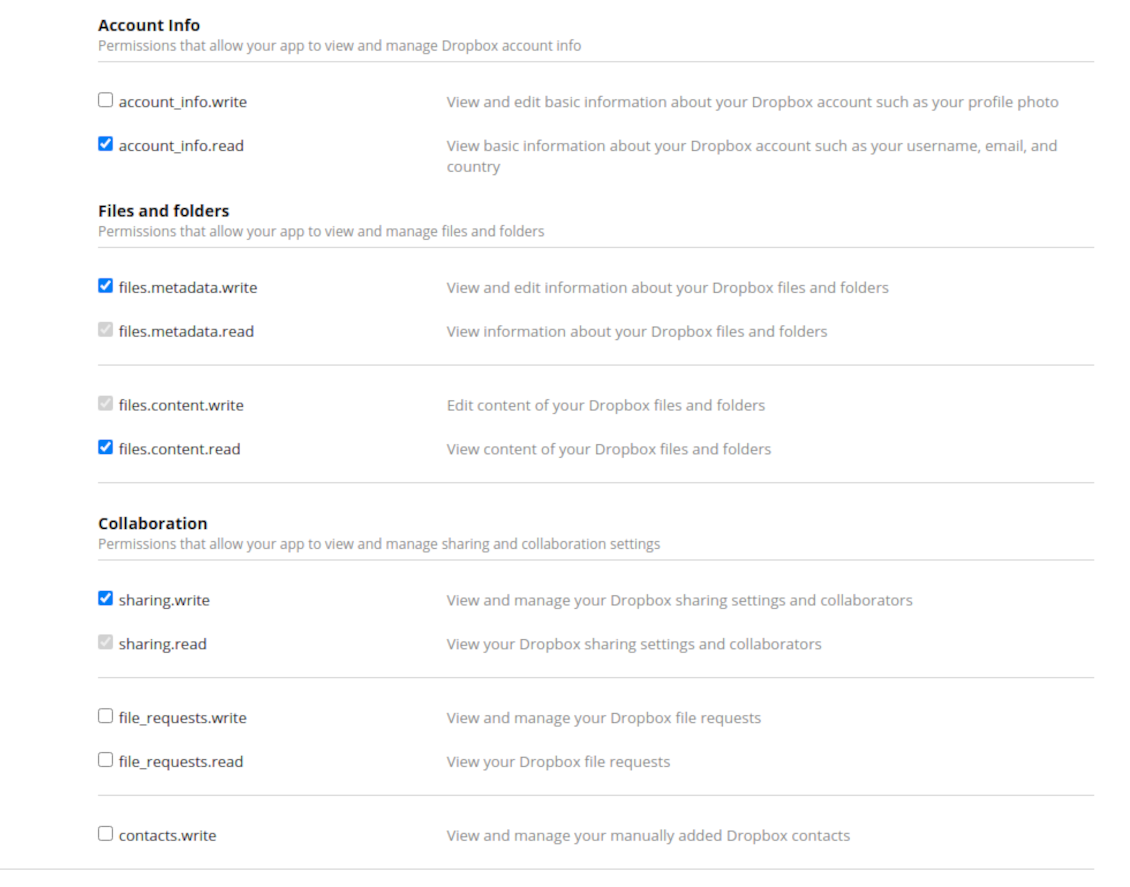
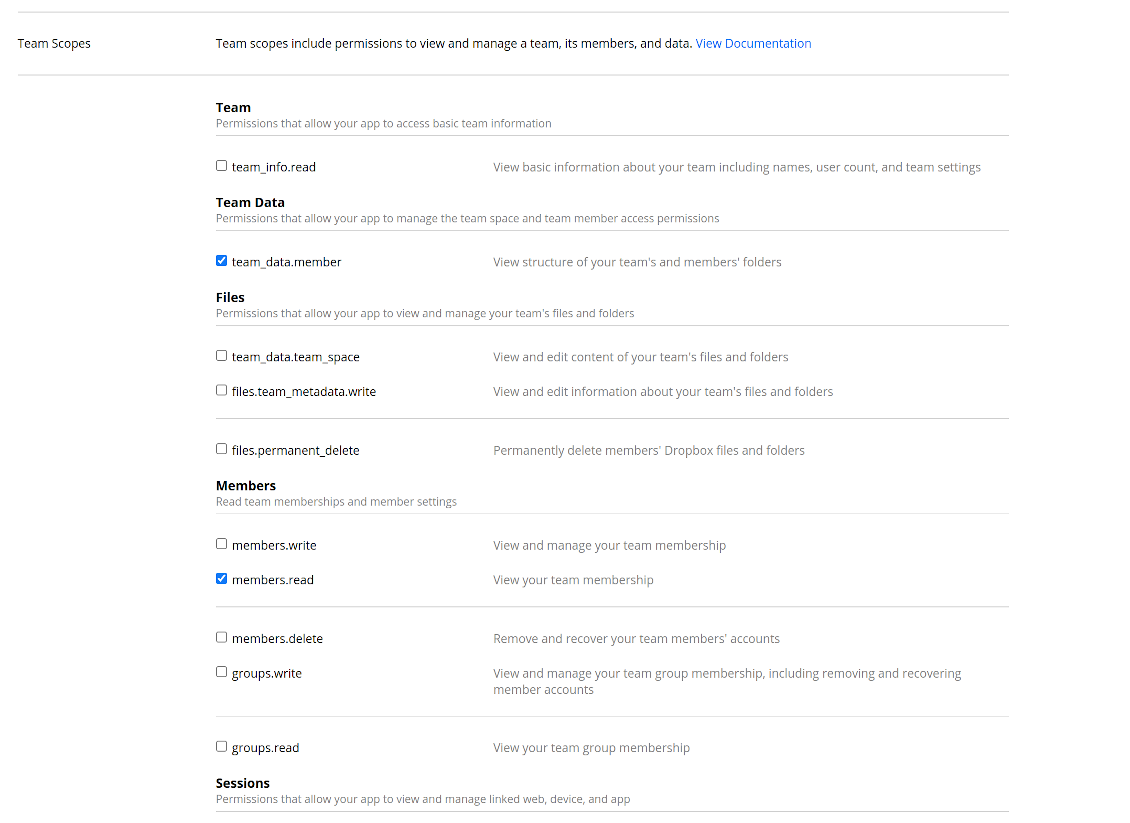
- ऐप को अनुमतियाँ दें: 'Account Info (Read)', 'Files and folders Metadata (Write)', 'Files Content (Write)', 'Collaboration (Write)'। टीम DropBox के लिए 'Team Data Members', 'Members (Read)' भी असाइन करें। सुनिश्चित करें कि कोई अन्य अनुमति असाइन न हो।
- ऐप जमा करें
- Odoo Cloud Storage > कॉन्फ़िगरेशन > Cloud Clients पर जाएँ और 'Create' दबाएँ
- संदर्भ के रूप में ऐसा नाम दें जो सभी उपयोगकर्ताओं को स्पष्ट हो
- Cloud क्लाइंट के रूप में 'Dropbox' चुनें
- Root folder नाम में वह शीर्षक दें जो सभी सिंक फ़ोल्डरों का पैरेंट Google Drive directory होगा। उदाहरण: 'Odoo' या 'OdooERP'
- 'App key' को 'App key' में कॉपी करें
- 'App Secret' को फ़ील्ड 'App secret' में कॉपी करें
- पहले जनरेट किया गया रीडायरेक्ट URL डालें
- यदि आप Dropbox टीम ड्राइव उपयोग करते हैं
- संबंधित बॉक्स चुनें
- Dropbox उपयोगकर्ता का ईमेल सेट करें। इस उपयोगकर्ता फ़ोल्डर में सभी Odoo संबंधित आइटम बनते हैं और उसके बाद ही अन्य उपयोगकर्ताओं से साझा होते हैं। इसी उपयोगकर्ता के अंतर्गत सभी फ़ाइल और फ़ोल्डर बनते, बदलते, हटते और मिटते हैं
- 'Confirm' दबाएँ। Odoo आपको Dropbox लॉगिन पृष्ठ पर भेजता है। सिस्टम में जाँचें, सभी शर्तें स्वीकार करें और मांगी गई सभी अनुमतियाँ दें
- लॉगिन के बाद Dropbox आपको वापस Odoo पर भेजता है। Dropbox - Odoo सिंक तैयार है
- नया cloud client उन फ़ोल्डर नियमों और/या मैन्युअल फ़ोल्डरों पर लागू करें जिन्हें उस Dropbox इंस्टेंस से सिंक करना है
- सिंक की निर्धारित जॉब शुरू होने की प्रतीक्षा करें। केवल परीक्षण के लिए: Cloud Storage > कॉन्फ़िगरेशन > कॉन्फ़िगरेशन > बटन 'Launch sync' से एकीकरण मैन्युअल चलाएँ।
Dropbox URL
Dropbox मौजूदा फ़ाइलों और फ़ोल्डरों के लिए लिंक बनाने का अपना तरीका रखता है। विशेष रूप से आंतरिक या निजी URL की अवधारणा नहीं है। इसके बजाय प्रत्येक Dropbox आइटम तथाकथित साझा URL पा सकता है। ऐसे साझा लिंक सार्वजनिक या केवल टीम के होते हैं। बाद वाली सुविधा केवल Dropbox business खाते पर उपलब्ध है।
यह उपकरण साझा लिंक की यांत्रिकी पर निर्भर है। अर्थात प्रत्येक अनुलग्नक लिंक या तो सार्वजनिक है (सभी व्यक्तिगत Dropbox खाते) या केवल टीम के लिए (सभी व्यावसायिक Dropbox खाते)।
कभी-कभी इसे पूरी तरह सुरक्षित नहीं माना जाता। बाहरी उपयोगकर्ताओं को वेबसाइट URL शायद ही पता हों, फिर भी कुछ क्रियाओं से वे उपलब्ध हो सकते हैं। साथ ही, साझा लिंक बनाना बहुत तेज़ नहीं है और सिंक धीमा कर सकता है। इसलिए साझा URL बंद करने की सुविधा जोड़ी गई है।
If checked, all Dropbox URLs in Odoo will be of type https://www.dropbox.com/home/Odoo/[PATH]. Such links will not work in many cases. Thus, if you need to open Dropbox files/folders from Odoo, be careful with the setting 'No links to Dropbox from Odoo'.
यह भी देखें कॉन्फ़िगरेशन वीडियो
Dropbox ऐप बनाएँ
Dropbox ऐप सेट अप: रीडायरेक्शन URL
व्यक्तिगत खातों के लिए Dropbox अनुमतियाँ
व्यवसाय खातों के लिए Dropbox अनुमतियाँ
Dropbox एकीकरण के लिए Odoo सेट अप करें
के बारे में अक्सर पूछे जाने वाले प्रश्न Cloud Storage Solutions Odoo v.18
सिंक किए गए फ़ील्ड कहाँ संग्रहीत होते हैं? क्या वे Odoo और क्लाउड में डुप्लिकेट होते हैं?
ऐप मानता है कि अटैचमेंट की बाइनरी सामग्री Odoo सर्वर के बजाय Cloud Client में रखी जाती है। इसलिए Odoo में ऐसे अटैचमेंट URL प्रकार के हो जाते हैं, और आप उन्हें किसी भी समय अटैचमेंट बॉक्स या Cloud Client से खोल सकते हैं।
सेटअप के बाद कोई मैन्युअल कार्रवाई नहीं चाहिए, क्योंकि सिंक पूरी तरह स्वचालित है। तय करें कि कौन से Odoo दस्तावेज़ प्रकार सिंक हों और प्रत्येक के लिए संबंधित मॉडल सेट करें (ग्राहक, विक्रय या खरीद आदेश, टास्क, प्रोजेक्ट आदि)।
क्या मैं एक ही दस्तावेज़ प्रकार के लिए कुछ फ़ोल्डर रख सकता हूँ? उदाहरण के लिए, आंतरिक प्रोजेक्ट और ग्राहक प्रोजेक्ट?
हाँ, आप कर सकते हैं। इसके लिए प्रत्येक के लिए नियम बनाएँ, फिर फ़िल्टर लागू करें: उदाहरण के लिए प्रोजेक्ट के प्रकार से।
फ़िल्टर परस्पर-अनन्य रखें ताकि दस्तावेज़ निश्चित रूप से असाइन हो। उदाहरण: 'ग्राहक पर आपूर्तिकर्ता नहीं', 'आपूर्तिकर्ता पर ग्राहक नहीं'। वरना किसी खास दस्तावेज़ का फ़ोल्डर एक मॉडल से दूसरे पर कूदेगा।
क्या सिंक को रीयल-टाइम बनाना संभव है?
नहीं। रीयल-टाइम सिंक से बचने के हमारे ठोस कारण हैं:
प्रदर्शन संबंधी समस्याएँ। यदि सिंक रीयल-टाइम हो, तो हर फ़ाइल अपलोड पर लोडिंग स्क्रीन आएगी।
संघर्ष संबंधी समस्याएँ। यदि 2 उपयोगकर्ता एक साथ किसी आइटम को बदलें, तो अनसुलझी स्थितियाँ हो सकती हैं। नियमित जॉब में हम बाद में ठीक कर सकते हैं; रीयल-टाइम में इसे कतार के रूप में सहेजना पड़ेगा, जो उपयोगकर्ताओं के लिए और भ्रमित करने वाला होगा।
कार्यक्षमता संबंधी समस्याएँ। खासकर आइटम का नाम बदलना और पुनर्गठन। बैकवर्ड सिंक में टूल निर्देशिका तर्क पर सख्ती से निर्भर करता है, और हर सिंक में 100% आइटम जाँचे जाते हैं। यदि हर अपडेट के बाद हो, तो प्रति सेकंड हज़ारों अनुरोध होंगे। नहीं तो: बदलाव खो जाएँगे।
क्या मैं क्लाउड में डिफ़ॉल्ट फ़ोल्डर के नाम बदल सकता हूँ?
किसी भी दस्तावेज़ प्रकार के लिए मॉडलों की निर्देशिकाओं (बिक्री आदेश, अवसर, आपूर्तिकर्ता आदि) को अपना नाम दे सकते हैं।
ऑब्जेक्ट फ़ोल्डरों (SO-001, John Smith आदि) के लिए टूल इस दस्तावेज़ प्रकार का प्रदर्शन नाम बनाने की Odoo विधि पर निर्भर करता है। फिर भी नाम अभिव्यक्ति परिभाषित करके बदल सकते हैं। Odoo ईमेल टेम्पलेट वाली ही वाक्य रचना उपयोग होती है।
क्या मैं सिंक जॉब की आवृत्ति बदल सकता हूँ?
नहीं, संस्करण 15 से निर्धारित जॉब नहीं बदलने चाहिए। सबसे स्थिर और तेज़ कनेक्शन के लिए वे हर 15 मिनट चलने हेतु अनुकूलित हैं।
सुनिश्चित करें कि आपके Odoo सर्वर टाइमआउट कम से कम 15 मिनट (900 सेकंड) हों।
यदि कुछ समय के लिए सिंक रोकना हो, तो किसी खास cloud client फ़ॉर्म पर करें।
क्या मैं अटैचमेंट कुछ क्लाउड क्लाइंट से सिंक कर सकता हूँ
हाँ, संस्करण 15 से कई कनेक्शन सेट किए जा सकते हैं। इस तरह कुछ फ़ोल्डर एक cloud client से और कुछ दूसरे से सिंक होते हैं।
ध्यान दें कि एक ही फ़ोल्डर को एक साथ कई cloud storages से सिंक नहीं किया जा सकता।
हम अपने क्लाउड में विशेष संपादक उपयोग करते हैं (जैसे OnlyOffice, Office 365 आदि)। क्या फ़ाइलें उसी संपादक में खुलेंगी?
हाँ, आपके cloud client कॉन्फ़िगरेशन पर निर्भर करता है।
क्या मुझे केवल Cloud Storage Solution ऐप चाहिए?
संस्करण 15 से ऐप अकेले चलकर अटैचमेंट को फ़ोल्डर में व्यवस्थित कर फ़ाइल मैनेजर इंटरफ़ेस दे सकता है।
लेकिन यदि लक्ष्य किसी क्लाउड क्लाइंट से कनेक्शन है, तो कम से कम एक वैकल्पिक क्लाइंट ऐप इंस्टॉल करना होगा।
फ़ोल्डर नियम बदलने पर क्या होता है?
फ़ोल्डर नियम बदलने पर फ़ोल्डरों की सूची भी बदलती है। यदि फ़ोल्डर नियमों की शर्तों से मेल नहीं खाता, उसे हटा दिया जाता है। यदि फ़ाइलें सिंक हो चुकी हैं, उलटा सिंक उन्हें Odoo में लौटाता है और Cloud Client से हटाता है।
यदि दस्तावेज़ का ऑब्जेक्ट फ़ोल्डर नियम की शर्तों से मेल नहीं खाता, उसका फ़ोल्डर नहीं बनेगा। बाद में मेल खाए तो संबंधित फ़ोल्डर बनेगा।
क्या मैं केवल सीधा सिंक रख सकता हूँ, या क्लाउड से सिंक बंद कर सकता हूँ?
हाँ। क्लाउड क्लाइंट पर सेटिंग पृष्ठ खोलें और क्लाउड से सिंक बंद करें चालू करें।
सिंक एक तरफ़ा रहता है। Odoo में किए बदलाव फिर भी क्लाउड स्टोरेज पर भेजे जाते हैं। क्लाउड स्टोरेज में बनाई, नाम बदली या हटाई गई फ़ाइलें और फ़ोल्डर Odoo में नहीं दिखते, और वहाँ हटाए फ़ोल्डर वापस नहीं आते।
जमा बदलाव, मिटाने सहित, अगले सिंक पर लागू करने के लिए विकल्प को फिर से बंद करें।
यह सेटिंग संस्करण 18 से उपलब्ध है। क्लाइंट को अलग करने, रीसेट करने या निष्क्रिय करने पर रिवर्स सिंक तब भी चलता है, जब तक आप उसे भी बंद न करें।
आपके टूल की अपडेट नीतियाँ क्या हैं?
वर्तमान Odoo Apps Store नीतियों के अनुसार:
- संस्करण 12.0 और उससे पहले के लिए खरीदा प्रत्येक मॉड्यूल 12.0 तक सभी संस्करणों तक पहुँच देता है।
- संस्करण 13.0 से प्रत्येक मॉड्यूल संस्करण अलग खरीदना होता है।
- संस्करण चाहे जो हो, खरीद से उस प्रमुख संस्करण के सभी अपडेट और बग ठीक करने का अधिकार मिलता है।
ध्यान दें कि faOtools टीम इन नीतियों को नियंत्रित नहीं करती। सभी प्रश्नों के लिए सीधे Odoo Apps Store प्रतिनिधियों से संपर्क करें।
आपका ऐप Odoo.sh पर कैसे इंस्टॉल करूँ?
सबसे सीधा तरीका Odoo स्टोर की अंतर्निहित वर्कफ़्लो का उपयोग करना है:
1. मॉड्यूल का पृष्ठ खोलें और Deploy on odoo.sh बटन पर क्लिक करें
2. उसके बाद आपको GitHub पृष्ठ पर भेजा जाएगा। अपने खाते में लॉग इन करें, फिर 'Create a new repo' पर क्लिक करें या मौजूदा का उपयोग करें। सुनिश्चित करें कि रिपॉज़िटरी निजी हो। OPL-1 लाइसेंस के तहत ऐप प्रकाशित करना अनुमति नहीं है। ज़रूरत हो तो Odoo.sh प्रोजेक्ट के लिए नया repo बनाएँ
3. फिर odoo.sh पर जाएँ और Deploy बटन पर क्लिक करें। पॉप-अप विंडो में निर्णय जमा करें और 'Continue.' पर क्लिक करें। इससे इंस्टॉलेशन शुरू होगा।
ये चरण प्रोजेक्ट की production शाखा पर ऐप इंस्टॉल करेंगे। अन्य शाखाओं पर ऐप तैनात करने या मॉड्यूल अपडेट करने के लिए ये क्रियाएँ करें:
1. Odoo स्टोर से ऐप का स्रोत कोड अपलोड करें
2. मॉड्यूल को आवश्यक GitHub रिपॉज़िटरी में commit करें। सुनिश्चित करें कि ऐप के कोई फ़ोल्डर/फ़ाइल अनदेखी न हों (यानी repo के .gitignore में न हों)। रिपॉज़िटरी odoo.sh अपने आप बनाता है और डिफ़ॉल्ट रूप से कुछ ज़रूरी चीजें शामिल हो सकती हैं (जैसे /lib)। मॉड्यूल की सभी निर्देशिकाएँ, उपनिर्देशिकाएँ और फ़ाइलें बिना अपवाद अपलोड करें
3. odoo.sh प्रोजेक्ट की लक्ष्य शाखा Deploy करें या, अगर सेटिंग्स ऐसा मानती हैं, स्वतः बनने तक प्रतीक्षा करें।
अपने सर्वर पर आपका ऐप कैसे इंस्टॉल करूँ?
2. Odoo सर्वर पुनः प्रारंभ करें;
3. डेवलपर मोड चालू करें (तकनीकी सेटिंग्स);
4. ऐप सूची अपडेट करें (ऐप्स मेनू);
5. ऐप खोजें और 'Activate'/'Install' दबाएँ;
6. ऐप पृष्ठ पर दिशानिर्देश हों तो उनका पालन करें।
आपके ऐप में अतिरिक्त ऐड-ऑन हैं। क्या बाद में खरीद सकता हूँ?
हाँ, ज़रूर। साथ ही Odoo सभी निर्भरताएँ कार्ट में अपने आप जोड़ता है, इसलिए दोहरी भुगतान से बचने के लिए पहले खरीदे टूल हटा दें।
मैंने आपका ऐप Odoo.sh पर डिप्लॉय किया और टेस्ट में चेतावनी/त्रुटि दिख रही है
लाल/नारंगी चेतावनी ऐप की सुविधाओं को प्रभावित नहीं करती। खेद है कि कभी-कभी हमारे मॉड्यूल मानक स्वचालित परीक्षण पास नहीं करते, क्योंकि वे ऐसा व्यवहार मानते हैं जो ऐप के लक्ष्यों से टकराता है। उदाहरण के लिए हम मूल्य गणना बदलते हैं, जबकि मानक Odoo मॉड्यूल परीक्षण अंतिम मूल्य की तुलना मानक एल्गोरिदम से करते हैं।
सबसे पहले तैनात डेटाबेस की सुविधाएँ जाँचें। क्या सब सही काम कर रहा है?
यदि फिर भी मानते हैं कि चेतावनी वास्तविक सुविधाओं को प्रभावित करती है, तो संपर्क करें और पूर्ण इंस्टॉलेशन लॉग तथा तैनात मॉड्यूलों की पूरी सूची (कोर और तृतीय-पक्ष सहित) भेजें।
क्या मैं ऐप आपकी कंपनी से सीधे खरीद सकता हूँ?
नहीं, हम उपकरण केवल आधिकारिक Odoo ऐप स्टोर.
मुझे छूट चाहिए
खेद है, हमारे पास व्यक्तिगत कीमतें देने के तकनीकी साधन नहीं हैं।
क्या मैं ऐप अपने Odoo Online (SaaS) डेटाबेस पर इंस्टॉल कर सकता हूँ?
नहीं, तृतीय-पक्ष ऐप Odoo Online पर नहीं चल सकते। दुर्भाग्य से Odoo SaaS यह संभावना रोकता है।
आपके टूल की अन्य ऐप पर निर्भरता है। क्या मुझे वे खरीदनी चाहिए?
हाँ, सही काम के लिए टूल को निर्भरता में चिह्नित सभी मॉड्यूल चाहिए। ऐप पृष्ठ पर दी गई कीमत में आवश्यक निर्भरताएँ पहले से शामिल हैं।
मॉड्यूल की कीमत अमेरिकी डॉलर में क्या है? यह क्यों बदली?
हमारे मॉड्यूल की कीमत यूरो में है। Odoo स्टोर आंतरिक विनिमय दर से अन्य मुद्राओं में बदलता है। इसलिए अमेरिकी डॉलर में कीमत दर अपडेट होने पर बदल सकती है।
अंग्रेज़ी के अलावा अन्य भाषाओं में ऐप और वेबसाइट का शब्द AI-सहायता से है और आधिकारिक Odoo अनुवादों से मेल खाता है। यदि आपको कोई गलती दिखे, अनुवाद शुद्धता का टिकट भेजें और हम इसे ठीक करेंगे।
Odoo डेमो डेटाबेस (लाइव पूर्वावलोकन)
इस ऐप के लिए हम मुफ़्त व्यक्तिगत डेमो डेटाबेस दे सकते हैं।
हमसे संपर्क करने के लिए फ़ोन नंबर या क्रेडिट कार्ड की आवश्यकता नहीं है। केवल एक छोटी ईमेल साइन-अप करनी है, जिसमें 30 सेकंड से अधिक नहीं लगता।
आपके अनुरोध पर हम एक व्यक्तिगत लाइव पूर्वावलोकन डेटाबेस तैयार करेंगे, जहाँ आप लगभग दो सप्ताह परीक्षण और धारणाएँ जाँच सकते हैं।
बग रिपोर्टिंग
यदि आपको बग या असंगत व्यवहार मिले तो हमसे संपर्क करें। हम खरीद के 60 दिनों के भीतर सुधार देने की गारंटी देते हैं और इस अवधि के बाद भी टूल सुधारने में रुचि रखते हैं।
हमसे संपर्क करने के लिए फ़ोन नंबर या क्रेडिट कार्ड की आवश्यकता नहीं है। केवल एक छोटी ईमेल साइन-अप करनी है, जिसमें 30 सेकंड से अधिक नहीं लगता।
अपने अनुरोध में जितना संभव हो उतना विवरण शामिल करें: स्क्रीनशॉट, Odoo सर्वर लॉग, समस्या को दोहराने का पूरा वर्णन आदि। आमतौर पर किसी मुद्दे की कार्य योजना तैयार करने (यदि बग पुष्टि हो) या आगे क्या करना है इसके दिशानिर्देश देने (अन्यथा) में कुछ कार्यदिवस लगते हैं।
सार्वजनिक सुविधा अनुरोध और मॉड्यूल विचार (निःशुल्क विकास)
हम अपने टूल सुधारने के लिए दृढ़ता से प्रेरित हैं और किसी भी प्रतिक्रिया के आभारी होंगे। यदि आपकी आवश्यकताएँ सार्वजनिक उपयोग की हैं और कुशलता से लागू की जा सकती हैं, तो टीम उन्हें हमारी कार्य सूची में शामिल करेगी।
ऐसी कार्य सूची नियमित रूप से संसाधित होती है और अतिरिक्त शुल्क नहीं लगती। यद्यपि हम समय सीमा और अंतिम डिज़ाइन का वादा नहीं कर सकते, यह बिना निवेश और जोखिम के वांछित सुविधाएँ पाने का अच्छा तरीका हो सकता है।
हमसे संपर्क करने के लिए फ़ोन नंबर या क्रेडिट कार्ड की आवश्यकता नहीं है। केवल एक छोटी ईमेल साइन-अप करनी है, जिसमें 30 सेकंड से अधिक नहीं लगता।
18.0.1.4.54
- The issue of the sync queue stopping with a recursion error when a large number of tasks is planned at once has been fixed.
- Tasks of a paused or not connected cloud client now wait for the client instead of being failed and canceled.
18.0.1.4.53
- क्लाउड क्लाइंट के लिए क्लाउड से सिंक बंद करने की सुविधा जोड़ी गई है।
- क्लाउड क्लाइंट के लिए रिवर्स सिंक बंद करने की सुविधा जोड़ी गई है।
- रिवर्स क्लाइंट हटाए जाने के बाद सिंक कतार के अवरुद्ध रहने की समस्या ठीक कर दी गई है।
18.0.1.4.52
- The issue of folder lookup failing when the document id was a recordset has been fixed.
18.0.1.4.51
- Optimized folder sync by searching only attachments of updated records instead of all model attachments.
18.0.1.4.50
- The feature to requeue failed tasks has been added.
18.0.1.4.49
- Support for Amazon S3, MinIO S3, Synology, QNAP, TrueNAS, other NAS/WebDAB, and BOX has been added.
18.0.1.4.48
- The feature to control the maximum number of folders per rule has been added.
18.0.1.4.47
- The issue with attachments linked to documents disappearing from the attachment box has been fixed.
18.0.1.4.46
- The issue fix text break in folder titles has been fixed.
18.0.1.4.45
- The issue with the non-synced invoice report has been fixed.
18.0.1.4.44
- असिंक्रोनस फ़ोल्डर जाँच को अनुकूलित किया गया है।
18.0.1.4.43
- नए चयनित फ़ोल्डर खोज की समस्या ठीक कर दी गई है।
18.0.1.4.42
- रिकॉर्ड के बीच स्विच करते समय फ़ोल्डर ट्री के न रीफ़्रेश होने की समस्या ठीक कर दी गई है।
18.0.1.4.41
- चयनित अटैचमेंट हटाने के लिए डबल क्लिक की आवश्यकता वाली समस्या ठीक कर दी गई है।
18.0.1.4.40
- बैकअप हटाने की कतार अब first-in, first-out है।
18.0.1.4.39
- ऐप को गतिशील भागों के समर्थन हेतु नई डोमेन तर्क के अनुरूप अनुकूलित किया गया है।
18.0.1.4.38
- कॉन्फ़िगरेशन पृष्ठ पर filestore मूल्यांकन जोड़ा गया है।
- cloud client सिंक को किसी खास डेटाबेस नाम तक सीमित करने की सुविधा जोड़ी गई है।
18.0.1.4.37
- बैकअप निर्माण को लॉक करने की सुविधा जोड़ी गई है।
18.0.1.4.36
- अननुवादित चेतावनियों की समस्या ठीक कर दी गई है।
18.0.1.4.35
- वर्तमान डेटाबेस बैकअप को चुने हुए क्लाउड क्लाइंट पर स्वचालित और मैन्युअल सिंक करने की सुविधा जोड़ी गई है। बैकअप शेड्यूल और रखने का समय कॉन्फ़िगर करें। बैकअप filestore और manifest के साथ या बिना हो सकते हैं।
18.0.1.4.34
- फ़ोल्डर रीफ़्रेश के दौरान Python लाइब्रेरी गलत आयात होने की त्रुटि ठीक की गई है।
18.0.1.4.33
- डोमेन अब Python लाइब्रेरी के उपयोग का समर्थन करता है, जिनमें datetime ('date', 'datetime', 'time', 'timedelta', 'timezone', 'tzinfo', 'MAXYEAR', 'MINYEAR'), time ('time', 'strptime', 'strftime') शामिल हैं। context_today (datetime.now का संक्षिप्त) और relativedelta भी लागू किए जा सकते हैं।
18.0.1.4.32
- Email Marketing मॉड्यूल के साथ संगतता हाल के Odoo 18 अद्यतनों के अनुसार ठीक की गई है।
18.0.1.4.31
- हटाने के बाद अटैचमेंट अचयनित हो जाते हैं।
18.0.1.4.30
- सिंक किए गए अटैचमेंट के URL पहले से गणना किए जा सकते हैं।
18.0.1.4.29
- क्लाउड क्लाइंट के आधार पर बने फ़ोल्डरों का sequence बढ़ता है।
18.0.1.4.28
- Kanban दृश्य नए Odoo 18 XML सिद्धांतों के अनुसार अनुकूलित किए गए हैं।
- निष्क्रिय रिकॉर्ड के लिए Archived रिबन नियमों, फ़ोल्डरों, टैग और शेयर के फ़ॉर्म व्यू में जोड़ा गया है।
18.0.1.4.27
- इंटरफ़ेस को कोर अटैचमेंट सूची दृश्य के परिवर्तन दर्शाने के लिए अद्यतन किया गया है।
18.0.1.4.26
- कुछ फ़ोल्डरों में लिंक न जोड़ने की समस्या ठीक कर दी गई है।
18.0.1.4.25
- ऐप संस्करण 18 के लिए प्रकाशित है।
17.0.1.4.25
- वर्कस्पेस से जुड़े पैरेंट के लिए चाइल्ड फ़ोल्डर न बनने की समस्या ठीक कर दी गई है।
17.0.1.4.24
- पहले सिंक किए गए चाइल्ड फ़ोल्डर अपडेट न होने की समस्या ठीक कर दी गई है।
17.0.1.4.23
- नियम-संबंधित फ़ोल्डरों की ब्लॉकिंग तिथियाँ साफ़ करने की सुविधा जोड़ी गई है।
17.0.1.4.22
- Odoo संदेश लिखते समय मौजूदा अटैचमेंट (सिंक किए गए सहित) चुनने की सुविधा जोड़ी गई है।
- URL अटैचमेंट जोड़ने की सुविधा अटैचमेंट बॉक्स और फ़ाइल प्रबंधक इंटरफ़ेस में जोड़ी गई है।
17.0.1.4.21
- नोट लॉग करने के बाद ऑटो-स्क्रॉल की समस्या ठीक कर दी गई है।
17.0.1.4.20
- लॉग को उनकी तिथि और समय से फ़िल्टर करने की सुविधा जोड़ी गई है।
- अब कॉन्फ़िगरेशन पृष्ठ पर निर्यात किए जाने वाले लॉग की संख्या निर्धारित की जा सकती है।
17.0.1.4.19
- विफलता पर पुनः प्रयास संख्या अब कॉन्फ़िगर की जा सकती है और मानक तथा reverse/move कार्यों में भिन्न हो सकती है।
17.0.1.4.17
- कार्यों की पैरेंट ब्लॉकिंग व्यवस्था अनुकूलित की गई है ताकि सबसे अधिक प्राथमिकता वाला कार्य पहले चले।
17.0.1.4.15
- आइटम स्थानांतरित करने वाले सिंक संचालन के लिए अवरोधन तंत्र निर्दिष्ट किया गया है।
17.0.1.4.13
- नियम से जुड़ी मध्यवर्ती फ़ोल्डर की पहुँच उस नियम मॉडल से नहीं, बल्कि पैरेंट फ़ोल्डर पहुँच से तय होती है।
17.0.1.4.12
- URL की अधिकतम आकार सीमा 4096 कर दी गई है।
17.0.1.4.11
- रिवर्स सिंक अनुकूलित किया गया है। आपसी ब्लॉकिंग से अटके कार्य हटा दिए गए हैं।
17.0.1.4.10
- एक साथ रिवर्स और बैकवर्ड सिंक्रोनाइज़ेशन की समस्याएँ ठीक कर दी गई हैं।
17.0.1.4.9
- पुनर्व्यवस्थित और स्थानांतरित फ़ोल्डरों को संसाधित करने वाला एल्गोरिद्म अनुकूलित किया गया है।
17.0.1.4.8
- पोर्टल के माध्यम से टैग और फ़ोल्डर बनाने की समस्या ठीक कर दी गई है।
17.0.1.4.7
- टैग/फ़ोल्डर शीर्षक से पोर्टल शेयर खोज ठीक की गई है।
17.0.1.4.6
- सामूहिक क्रिया "Slideshow" जोड़ी गई है। इससे बैकएंड उपयोगकर्ता चुने गए छवि अटैचमेंट के लिए स्लाइडशो शुरू कर सकते हैं।
- साझा सेटिंग में विकल्प "Allow slideshow" जोड़ा गया है। चालू होने पर पोर्टल/सार्वजनिक उपयोगकर्ता साझा के पोर्टल इंटरफ़ेस में अभी मिले छवि अटैचमेंट के लिए स्लाइडशो चला सकते हैं।
- रिवर्स सिंक एल्गोरिदम अनुकूलित किया गया है।
17.0.1.4.5
- अटके कार्यों के लिए विशेष पूर्व-विफलता जाँच जोड़ी गई हैं। यदि कार्य cron को पूरी तरह रोक दे (जैसे मेमोरी सीमा त्रुटि), तो अगला cron दूसरे कार्य से जारी रहेगा।
17.0.1.4.4
- फ़ाइल प्रबंधक इंटरफ़ेस के अटैचमेंट कार्ड पर मानक Odoo पूर्वावलोकन जोड़ा गया है। Kanban दृश्य में संबंधित पूर्वावलोकन खोलने के लिए थंबनेल पर क्लिक करें। समर्थित फ़ाइल प्रकार और व्यवहार अटैचमेंट बॉक्स के समान हैं।
- अटैचमेंट फ़ॉर्म Kanban के 3-बिंदु मेनू से खोले जा सकते हैं। यहाँ अटैचमेंट के रंग भी बदले जा सकते हैं।
- सिंक लॉग स्तर संदेशों के स्तर के अनुसार रंगीन होते हैं।
- लॉगिंग सिस्टम को अनुकूलित किया गया है ताकि जॉब विफल होकर थ्रेड पूरी तरह बंद कर दे तब भी संदेश लिखे जाएँ।
17.0.1.4.3
- फ़ाइल प्रबंधक इंटरफ़ेस की पहली लोडिंग पर गलत फ़ोल्डर चयन की त्रुटि ठीक की गई है।
17.0.1.4.2
- नियमों की सिंक आवृत्ति के आधार पर फ़ोल्डरों को प्राथमिकता देने की सुविधा जोड़ी गई है।
17.0.1.4.1
- मॉड्यूल संरचना नवीनतम फ़ाइल प्रबंधक इंटरफ़ेस, drag-and-drop और पोर्टल-साझाकरण सुविधाओं के अनुसार अपडेट की गई है
17.0.1.3.14
- स्पष्ट रूप से दिए गए res_model और res_id से अटैचमेंट डुप्लिकेट करना ठीक किया गया (HR Expenses संगतता)।
17.0.1.3.13
- फ़ाइल प्रबंधक इंटरफ़ेस में अब फ़ोल्डरों का बहु-चयन संभव है।
- अटैचमेंट अपलोड करने वाला वर्तमान फ़ोल्डर बटन "अपलोड" के शीर्षक पर दिखाया जाता है।
- अटैचमेंट/फ़ोल्डर साझा करने की सुविधा जोड़ी गई है। किसी भी फ़ाइल, निर्देशिका या टैग को खास पोर्टल भागीदारों के साथ या सार्वजनिक रूप से साझा करें। वैकल्पिक रूप से अपलोड, ट्री नेविगेशन तथा टैग और फ़ोल्डर बनाना अनुमति दें।
- किसी विशिष्ट टैग के सभी अटैचमेंट डाउनलोड करने की सुविधा जोड़ी गई है। टैग से नेविगेशन वैकल्पिक हो गया है।
17.0.1.3.12
- स्थानीय पीसी से फ़ाइलें खींचकर छोड़कर अपलोड करने की सुविधा जोड़ी गई है।
- अब बाएँ नेविगेशन पैनल पर अटैचमेंट छोड़कर फ़ोल्डर और टैग अपडेट किए जा सकते हैं।
17.0.1.3.11
- टैग के सामूहिक अपडेट में त्रुटियाँ ठीक की गई हैं।
- नए रिकॉर्ड के लिए गलत फ़ोल्डर की समस्या ठीक कर दी गई है।
- जब कोई अन्य फ़ोल्डर नहीं होता तो नेविगेशन पैनल में फ़ोल्डर न बन पाने की स्थिति ठीक कर दी गई है।
- सिंक लॉग इंटरफ़ेस प्राप्त उत्तरों की HTML सामग्री दिखाने के लिए अनुकूलित किया गया है।
17.0.1.3.10
- वह दुर्लभ मामला कवर किया गया है जब फ़ोल्डर का प्रारंभिक सेटअप 8 बार विफल हो चुका हो, फिर भी उसे सिंक करना चाहिए।


The tool to build a deep and structured knowledge base for internal and external use. Knowledge System. KMS. Wiki-like revisions.
398€
The tool to set up KPI targets and control their fulfillment by periods. KPI dashboards. Dashboard designer. KPI charts

The tool for time-based service management from booking appointments to sales and reviews
398€
The tool to manage your Odoo from your favorite AI chats through MCP. Claude. Any MCP-supporting AI.

The tool to automatically synchronize Odoo attachments with OneDrive files in both ways
487€
The tool to automatically synchronize Odoo attachments with Google Drive files in both ways
487€
The tool to automatically synchronize Odoo attachments with ownCloud/Nextcloud files in both ways
487€
The tool to automatically synchronize Odoo attachments with NAS Solutions in both ways. Synology, QNAP, TrueNAS and any other WebDav-supporting NAS solutions
487€