About Smart Alerts
The Odoo app "Smart Alerts" helps you always remember all important details while working with Odoo documents.
Smart alerts inform or warn users in the most convenient place: when they work with document forms. With smart alerts, you will be able to:
Prepare warnings for any Odoo document types
Flexible configuration of document types for catchy reminders
Choose among four types of colorful alerts
Make user group-specific warnings
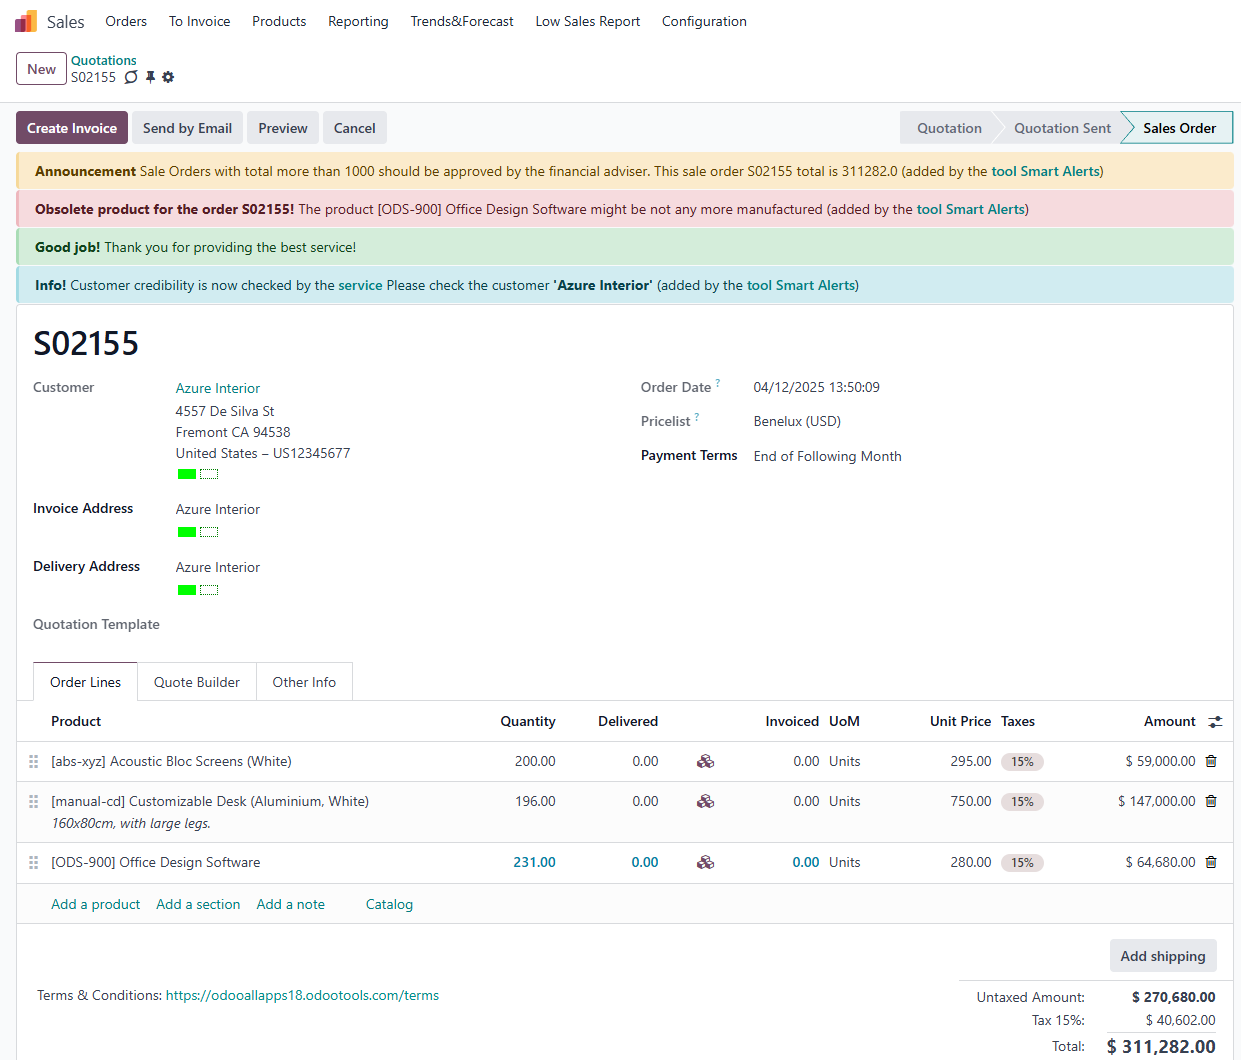
Find smart alerts above a document form. Alerts are positioned above the form view to capture the attention of any user who opens this document. Such warnings are updated each time a form is reloaded: when you open a record, when you save a document, when you switch to the next record, etc.
Include linked object properties in the warning title and content. To that goal, apply the same syntax used in Odoo email templates. For example, {{ object.amount_total }} to show the total sum of a quotation.
Alerts may be translated and then shown in the current user's language. The tool is also compatible with multi-company environments: each branch will have its own alert list.
Managing Smart Alerts
There are four alert types, each with a distinct color: Danger (red), Warning (orange), Info (blue), and Success (green). You can't add other colors, but you can edit alert titles. You can add many alerts of the same type.
How to create a smart alert:
1. Open the Smart Alerts app
2. Click 'New'
3. Write an Alert title (the title will be bold before the alert text)
4. Fill the field 'Alert text' (will be seen)
5. Choose a document type where you want to see your alerts
6. Choose a type of alert
7. Choose user groups that will see the alert, or leave the field empty if you want everyone to see it
8. If you have several companies, choose the company to show alerts. Otherwise, alerts would be shown to all companies
9. Add some filters to automatically add alerts to matching documents and do not show for others.
How to edit a smart alert:
1. Open the Smart Alerts app
2. Click on the alert you want to change
3. Change anything the way you like.

How to delete a smart alert:
1. Open the Smart Alerts app
2. On the left side, tick the empty squares of the alerts you want to delete
3. Above will appear a gear sign
4. Click it and choose an action
5. Available actions are export, archive, unarchive, duplicate, and delete.
To provide more contextual information, you can dynamically reference the linked object properties in the warning title and content. To achieve this, utilize the same syntax as the one used for the Odoo email template, which allows you to embed object fields seamlessly. For instance, you can include the total sum of a quotation by referencing it as {{ object.amount_total }} in your alert messages. Similarly, if you want to display the customer's name associated with the quotation, you could use {{ object.partner_id.name }}. This flexibility allows you to craft informative alerts tailored to each situation, ensuring users receive relevant, actionable notifications.
Smart alerts can be added to all stored models in your Odoo instance. A model can be selected as the document type for smart alerts once the related module is installed. For instance, if you install the Odoo CRM application, you can configure warnings for opportunities or sales teams.
Remember that smart alert admins may select only models they can access. For example, if Abigail Peterson is a sales manager, she can work with quotations. As a smart alerts admin, she can add alerts to those quotations. However, John Brown, who is only a project user, cannot do that; he can configure warnings for tasks or projects.
This logic applies equally to custom apps and their linked models. Implementing a new class in your database would make it immediately available for smart alerts. Make sure you grant the appropriate access rights to your model. The principle is still the same: only those who can access its objects can configure warnings for that model. So, the model you want to use should have at least one class that can access it, for example, Odoo administrators.
Using Smart Alerts and Interfaces
Prepare alerts for any Odoo document type: sale orders, opportunities, contacts, pickings, and any existing in your database.
Alerts are positioned above a form view to catch the eye of any user who opens this document. Such warnings are updated each time a form is reloaded: when you open a record, save a document, switch to the next record, etc.
There might be an unlimited number of warnings for each document.
HTML tags. Fields 'Warning text' and 'Alert title' support simple HTML tags. You can make text or part of the text bold, write in italics, or add a link.
Here are some examples of simple HTML tags:
The alert title is always in bold.
How to add HTML code:
1. Open the Smart Alerts app
2. Click 'New'
3. Write an Alert title (the title will be in bold before the alert text)
4. If you want your title to be in italics as well, add <i> before your title and </i> after it
5. Write your text in the field 'Alert text'
6. If you want to underline several words, write <u> before them and </u> after them
7. Edit the text the way you like.
You can apply a simple HTML code to the whole text or some words.
You can add several codes to different words in one sentence or several codes to one word, so that it is in bold and italics.
Rules for Assigning Smart Alerts
Creating automatic rules lets you apply smart alerts to all documents that match the specified conditions. If you delete an automatic rule, the matching records list will change. If you edit it, the list of marked documents will change.
Flexible restrict documents for alerts. You can apply filters by any storable field. For example, make announcements only for quotations (not sale orders), warn of invoices with a total between 500 and 1000, pay attention only to suppliers (not customers), etc.
Here, we provide some examples of automatic rules. Use:
To state that some products are no longer available (document type = Sales order).
This is to alert you that these tasks should be completed first (document type = Projects).
This is to show that this meeting will be long (document type = Event).
To remember not to accept orders from this client (document type = Contact).
To find all leads for services, not products (document type = Leads/Opportunities).
It is possible to set a complex color code classifier so that documents match all or any of the rules.
How to add complex automatic rules:
1. Open the Smart Alerts app
2. Click 'New'
3. Write an Alert title (the title will be bold before the alert text)
4. Fill the field 'Alert text' (will be seen)
5. Choose the document type where you want to see your alerts
6. Choose a type of alert
7. Choose user groups that will see the alert, or leave the field empty if you want everyone to see it
8. If you have several companies, choose the company to show alerts; otherwise, it will be shown to all companies
9. Click 'New Rule'
10. Choose filter options by scrolling or typing the beginning in the search field and choosing the filter options
11. Click on '+' on the right side of the rule you wrote
12. You will see one more line where you can add new filter options
13. Now you have more than one rule and can choose ANY or ALL button above, so only documents that match ANY of the rules or ALL rules will be shown
14. Click on the second button on the right side near '+' to add an even more complex rule
15. Here, you can also choose to filter documents that match ALL or ANY rules
16. If you choose ALL or ANY both times, your rules will stand in one line, and only one button will remain.
Open the Smart Alerts app, choose an alert, click on an automatic rule, and push the button 'Records' to see Odoo documents that match the rule terms.
User Rights in Smart Alerts
Generally, smart alerts are shown to all user groups. However, you can show your alerts only for some specific groups by editing your alerts in the field 'Show only for user groups'.
The right to configure alerts belongs to the special user group - 'Smart Alerts Admin', and you can assign employees to add and edit smart alerts.
To let the user configure smart alerts:
1. Go to general settings
2. Click 'Manage users'
3. Choose the user
4. Scroll down and find the section 'Productivity'
5. In the field 'Smart Alerts' choose the option 'Smart Alerts Admin'
6. After that, the user will see the Smart Alerts app in the menu and will be able to create and manage any related ones to their company.
About Smart Alerts
The Odoo app "Smart Alerts" helps you always remember all important details while working with Odoo documents.
Smart alerts inform or warn users in the most convenient place: when they work with document forms. With smart alerts, you will be able to:
Prepare warnings for any Odoo document types
Flexible configuration of document types for catchy reminders
Choose among four types of colorful alerts
Make user group-specific warnings
Find smart alerts above a document form. Alerts are positioned above the form view to capture the attention of any user who opens this document. Such warnings are updated each time a form is reloaded: when you open a record, when you save a document, when you switch to the next record, etc.
Include linked object properties in the warning title and content. To that goal, apply the same syntax used in Odoo email templates. For example, {{ object.amount_total }} to show the total sum of a quotation.
Alerts may be translated and then shown in the current user's language. The tool is also compatible with multi-company environments: each branch will have its own alert list.
Managing Smart Alerts
There are four alert types, each with a distinct color: Danger (red), Warning (orange), Info (blue), and Success (green). You can't add other colors, but you can edit alert titles. You can add many alerts of the same type.
How to create a smart alert:
1. Open the Smart Alerts app
2. Click 'New'
3. Write an Alert title (the title will be bold before the alert text)
4. Fill the field 'Alert text' (will be seen)
5. Choose a document type where you want to see your alerts
6. Choose a type of alert
7. Choose user groups that will see the alert, or leave the field empty if you want everyone to see it
8. If you have several companies, choose the company to show alerts. Otherwise, alerts would be shown to all companies
9. Add some filters to automatically add alerts to matching documents and do not show for others.
How to edit a smart alert:
1. Open the Smart Alerts app
2. Click on the alert you want to change
3. Change anything the way you like.
How to delete a smart alert:
1. Open the Smart Alerts app
2. On the left side, tick the empty squares of the alerts you want to delete
3. Above will appear a gear sign
4. Click it and choose an action
5. Available actions are export, archive, unarchive, duplicate, and delete.
To provide more contextual information, you can dynamically reference the linked object properties in the warning title and content. To achieve this, utilize the same syntax as the one used for the Odoo email template, which allows you to embed object fields seamlessly. For instance, you can include the total sum of a quotation by referencing it as {{ object.amount_total }} in your alert messages. Similarly, if you want to display the customer's name associated with the quotation, you could use {{ object.partner_id.name }}. This flexibility allows you to craft informative alerts tailored to each situation, ensuring users receive relevant, actionable notifications.
Smart alerts can be added to all stored models in your Odoo instance. A model can be selected as the document type for smart alerts once the related module is installed. For instance, if you install the Odoo CRM application, you can configure warnings for opportunities or sales teams.
Remember that smart alert admins may select only models they can access. For example, if Abigail Peterson is a sales manager, she can work with quotations. As a smart alerts admin, she can add alerts to those quotations. However, John Brown, who is only a project user, cannot do that; he can configure warnings for tasks or projects.
This logic applies equally to custom apps and their linked models. Implementing a new class in your database would make it immediately available for smart alerts. Make sure you grant the appropriate access rights to your model. The principle is still the same: only those who can access its objects can configure warnings for that model. So, the model you want to use should have at least one class that can access it, for example, Odoo administrators.
Using Smart Alerts and Interfaces
Prepare alerts for any Odoo document type: sale orders, opportunities, contacts, pickings, and any existing in your database.
Alerts are positioned above a form view to catch the eye of any user who opens this document. Such warnings are updated each time a form is reloaded: when you open a record, save a document, switch to the next record, etc.
There might be an unlimited number of warnings for each document.
HTML tags. Fields 'Warning text' and 'Alert title' support simple HTML tags. You can make text or part of the text bold, write in italics, or add a link.
Here are some examples of simple HTML tags:
The alert title is always in bold.
How to add HTML code:
1. Open the Smart Alerts app
2. Click 'New'
3. Write an Alert title (the title will be in bold before the alert text)
4. If you want your title to be in italics as well, add <i> before your title and </i> after it
5. Write your text in the field 'Alert text'
6. If you want to underline several words, write <u> before them and </u> after them
7. Edit the text the way you like.
You can apply a simple HTML code to the whole text or some words.
You can add several codes to different words in one sentence or several codes to one word, so that it is in bold and italics.
Rules for Assigning Smart Alerts
Creating automatic rules lets you apply smart alerts to all documents that match the specified conditions. If you delete an automatic rule, the matching records list will change. If you edit it, the list of marked documents will change.
Flexible restrict documents for alerts. You can apply filters by any storable field. For example, make announcements only for quotations (not sale orders), warn of invoices with a total between 500 and 1000, pay attention only to suppliers (not customers), etc.
Here, we provide some examples of automatic rules. Use:
To state that some products are no longer available (document type = Sales order).
This is to alert you that these tasks should be completed first (document type = Projects).
This is to show that this meeting will be long (document type = Event).
To remember not to accept orders from this client (document type = Contact).
To find all leads for services, not products (document type = Leads/Opportunities).
It is possible to set a complex color code classifier so that documents match all or any of the rules.
How to add complex automatic rules:
1. Open the Smart Alerts app
2. Click 'New'
3. Write an Alert title (the title will be bold before the alert text)
4. Fill the field 'Alert text' (will be seen)
5. Choose the document type where you want to see your alerts
6. Choose a type of alert
7. Choose user groups that will see the alert, or leave the field empty if you want everyone to see it
8. If you have several companies, choose the company to show alerts; otherwise, it will be shown to all companies
9. Click 'New Rule'
10. Choose filter options by scrolling or typing the beginning in the search field and choosing the filter options
11. Click on '+' on the right side of the rule you wrote
12. You will see one more line where you can add new filter options
13. Now you have more than one rule and can choose ANY or ALL button above, so only documents that match ANY of the rules or ALL rules will be shown
14. Click on the second button on the right side near '+' to add an even more complex rule
15. Here, you can also choose to filter documents that match ALL or ANY rules
16. If you choose ALL or ANY both times, your rules will stand in one line, and only one button will remain.
Open the Smart Alerts app, choose an alert, click on an automatic rule, and push the button 'Records' to see Odoo documents that match the rule terms.
User Rights in Smart Alerts
Generally, smart alerts are shown to all user groups. However, you can show your alerts only for some specific groups by editing your alerts in the field 'Show only for user groups'.
The right to configure alerts belongs to the special user group - 'Smart Alerts Admin', and you can assign employees to add and edit smart alerts.
To let the user configure smart alerts:
1. Go to general settings
2. Click 'Manage users'
3. Choose the user
4. Scroll down and find the section 'Productivity'
5. In the field 'Smart Alerts' choose the option 'Smart Alerts Admin'
6. After that, the user will see the Smart Alerts app in the menu and will be able to create and manage any related ones to their company.