About KnowSystem: Knowledge Base System
KnowSystem is a universal knowledge management tool that might be configured to any business goal and any set of Odoo apps: for helpdesk, marketing, IT, HR, project management, so on and so on. Typical use cases are:
Helpdesk - once faced a challenge, its solution might be recorded in KnowSystem for repeated usage by co-workers and for self-service by clients
Sales and CRM - salesperson helper to find information about products, offers, frequently asked customer questions
Project management - to keep and easily retrieve knowledge of existing solutions, tools, hints, and experiments
HR - to prepare instructions, guidelines, learning tours and training, and any codified knowledge of routine in your company
Marketing - to organize Odoo online library of product use cases, expert knowledge, and well-structured documentation
Legal issues - systematize your policies, contract and approval managements, keep the full classifier of trademarks, licenses Informational technologies - share easy-reached manuals and configuration guidelines.
The app provides:
Single view KMS navigation
Reference of articles in messages
Wiki-like revisions
View statistics
Applied in any functional area
Documentation builder, Website and portal, Custom fields, and multilanguage support
Concepts and terms
Here you can find all terms and add-ons icons that were used through all documentation.
Article - the main KMS object, which represents the formatted text of specific knowledge applied to a certain functional/business area, that might be restricted to a specific user group.
Article template - a ready sample of an article, that you can edit to create a new one with preserved formatting.
Article revision - a version of an article, kept in history and can be restored.
KnowSystem section - articles' storage, which is used for convenient navigation over articles and managing access to internal user groups. Each article should have a single linked section. Sections support hierarchy: each might have subsections and a parent section. If a user group has access to a parent section, then it has access to all its subsections as well.
KnowSystem tag - is a KMS object to distinguish articles for comfortable navigation, granting portal access for articles, and mapping other Odoo objects with articles. Each article may have a few tags or not have any. Tags support hierarchy: each might have subtags and a parent tag.
Learning tour - a set of articles united by a common topic and ordered with the purpose to navigate users through a particular subject and control their progress as they move forward.
Documentation section () - is a central Odoo Documentation Builder object aimed to organize website documentation for a specific topic. It represents a set of ordered articles that would be shown structured on a single documentation page. Each article might be attributed to a few documentation sections. Do not confuse with the KnowSystem section which is used for KMS navigation.
Documentation category () - a combination of documentation sections, that are similar in a way.
Documentation version () - a special Odoo Documentation Builder object, which allows you to prepare single documentation for a few versions, with a slightly or significantly different set of articles.
Article type () - a KMS object, that aims to distinguish articles to apply different custom attributes to different articles. Used also for navigating over articles in a Single View Interface and website KnowSystem.
Article custom field () - an extra field, that you can add to an article, that may contain different types of information of your choice.
Article attachment - a document that is assigned to an article.
Internal user - a user who has access to the Odoo backend and its functional apps. Such a user is assumed to always access the knowledge base.
Portal user () - a registered user who has access to the Odoo portal, but cannot access the Odoo backend. This kind of user will only be able to have access to the website knowledge base if you allow that.
Public user () - any website visitor, who hasn't logged into Odoo. Can access only published interfaces of KMS.
Single View Interface - the functional interface for internal users to navigate through articles, update those conveniently, and manage KnowSystem sections, tags, types (), and tours from a single view.
Mass action - an action that can be applied to several articles at once, can be found in the right navigation panel of the Single View Interface.
Article form view - an article's interface for internal users, which aims to comfortably extract and update a knowledge piece, collaborate in teams, control statistics, etc.
KMS website interface () - the interface introduced for portal and public users to navigate through articles conveniently. It can look differently for different portal users based on the articles, sections, tags, and types () that they have access to.
Documentation navigation () - the website interface of a documentation section introduced to conveniently get deeper into a certain topic and go through a set of preordered articles.
Documentation categories page () - the website interface to navigate through documentation sections.
Backend editor - a KMS tool to prepare articles in Odoo backend. Assumes a number of ready building blocks and simple HTML styles. Primarily used for internal (Odoo backend) use, including printing and referencing in messages.
Website editor () - an interface editing tool to prepare articles using the Odoo advanced website builder, including its building blocks and sophisticated styles. It is perfect for constructing the website/portal KMS and documentation section. Isn't supposed to be used for internal knowledge.
Code editor - special article editing mode, that implies changing the source code of an article directly. Orients for advanced users to apply custom HTML changes. The code editor might be turned on right from an article's backend, or, alternatively, the backend editor might be fully replaced () by a code editor through the app configuration.
Add-ons icons
Features introduced by add-ons are marked with these signs.
KnowSystem: Website and Portal
The module lets you publish articles on the website, share them with portal users, and use the website builder to update articles.
Odoo Documentation Builder
The module lets you design website documentation pages based on knowledge base articles.
KnowSystem: Custom Fields
The module lets you add and show custom fields for articles (backend).
KnowSystem: Custom Fields for Website and Portal
The module shows custom fields on the website and portal pages (frontend). Free, but requires KnowSystem: Custom Fields.
KnowSystem: eCommerce
The module lets you prepare FAQ/documentation for Odoo eCommerce product pages.
KnowSystem: Multi Languages
The module lets you translate articles, sections, and tags to install in Odoo languages.
Single-view knowledge navigation
The innovative single view interface is implemented in the knowledge base system. This allows you to manage articles, and see the preview from the same interface, without opening the article. When you open the app and click on an article, you see that your interface is divided into three parts: the main part with articles in the middle and two functional parts with sets of control elements on the sides of it.
Navigation and Sorting
The left navigation panel provides you with the opportunity to sort articles according to various criteria, select all found articles, manage sections, tags, types (), and learning tours.
You can sort articles by views, likes(difference between likes and dislikes), title, created date, write date, section, and author. If you click on the 'Arrow' icon on the right side of the sorting criteria, then the sorting will be reversed.
To sort articles:
1. Open KnowSystem
2. Choose the sorting criterion
3. Click on the 'Arrows' sign to see the reversed sorting
You can search articles with the help of the search bar at the right top of the page. There are various search options:
1. By contents (in headline and articles' body)
2. By type ()
3. By author
4. By section
5. By tag
6. Documentation sections ()
You can filter articles by sections, tags, and types (). Find a particular section or a tag quickly with the help of the section and tag search bars. To see all articles of one or several sections put a tick in the box by it. As sections and tags have a hierarchy: if you choose a parent section or a parent tag, you will see its subsections and subtags as well. You can do the same with tags and types () and choose different variations of them. You can edit sections, tags, and types (), work with tours or launch them right from the same interface, by clicking on them with the right side of your mouse. Read more in 'Managing sections', 'Managing tags', 'Managing types' 'Learning tours'.
Click on a checkbox in the top right corner of an article to choose it. If you click on the 'Select all found' button, you will see the short auto preview of all these articles and possible Mass actions in the right navigation panel of the interface.
Articles Preview
The main part shows the articles list, where you can see their titles, tags, the date of creation, last edit, author's photo, and preview text. If an article has no preview text, it will be generated automatically as the plain text extracted from the beginning of an article. It might contain special symbols since the preview would represent an abstract of pure HTML.
To write your own preview text:
1. Start creating or editing an article
2. Find the field preview text and write your preview
3. Click 'Save'
For preview text, you can use pure HTML tags. In particular, you can add pictures (however, be cautious: advanced HTML might spoil the preview appearance).
Add an article to favorites or remove it from favorites by clicking on a star in the right bottom corner. Put a like or a dislike to an article - you can always change it later by clicking on the green button.
Manage activities right from an article's card, for example, plan a revision of an article.
If an article is used in a documentation section (), then it is marked by a paperclip icon on the kanban card.
Select articles by ticking a box on the top right corner (you can also add all found articles by applying 'Select all' in the left navigation panel). When you switch between filters or apply a new search, the selection will not be cleared and that is very convenient when you want to open, print, or do another action on various articles at once.
The right navigation panel, the one to the right side, appears as you add any article to the selection.
Mass actions on selected articles
As you choose articles by clicking on the box in the top right corner of an article, the right navigation panel appears. There you will see the list of all chosen articles. Click on an article's title to remove it from the list. Remove all articles by clicking on the icon () on the right side of 'Selected articles'.
On the right navigation panel, you can update selected articles in a batch. The available mass actions include:
Update section, tags, type () of all chosen articles. Switch article's state to archived or restored. Publish or unpublish articles ().
Click to add to learning tour all chosen articles. You will be redirected to tours settings, to manage the order of articles.
Click to save all chosen articles in one pdf file. To make sure your file looks good for printing, avoid using style 'Header 1' throughout the article.
Click to duplicate all chosen articles.
Click to follow all chosen articles.
Add to favorites all chosen articles.
Click to archive all chosen articles. You can always restore them, to see all archived articles choose the filter 'Archived'.
Managing KnowSystem sections
KnowSystem section is a supreme KMS object, an articles' storage, which is used for convenient navigation over articles and managing access to internal user groups. Each article should have a single linked section. Sections serve to fulfill the following tasks:
1. To unite articles (you can add only one section to an article)
2. To restrict rights to articles (see. Access rights)
3. To navigate through articles and find them quickly, by putting a tick for the required section
Sections have a hierarchy. You can set a parent section and some subsections while editing or creating a section. You can also change the hierarchy by Drag&Drop. If a user group has access to the parent section, it would have access to all included sections (see. Access rights). It is also possible to print all available articles by a section (see KnowSystem in use).
If you have a lot of sections and sub-sections, then you may find it difficult to navigate through them and select the ones you need quickly. Thus, for extra convenience, the special search bar above the sections list was introduced. Just start typing the word and click 'Enter' or the search button and the matching results will be shown and marked red. Click the button 'Reset' on the right side of the search bar to empty the search.
You can create and edit sections right from the single view interface and from the separate menu Configuration > Sections.
To add a new section through the single-view interface just click '...add new section' and write the title. Right click on a section to see all available actions:
1. Create (click to start creating a new section)
2. Rename (click to change section's name)
3. Edit (click to edit a section)
4. Print (click to print all articles in a section and its subsections if any)
5. Archive (click to archive a section, its articles will remain active)
How to edit sections:
1. In the KnowSystem menu right click on a section, then choose 'Edit', or go to Configurations > Sections, choose the section and click 'Edit'.
2. Set the hierarchy by choosing the parent and sub-sections
3. Click the tab 'Restrict access' to set the groups of people that will be able to see the section and articles in it. Access to the parent section allows reading all articles in it and in its' sub-sections (see. Access rights)
4. Add the description to the section
5. Click 'Save'.
Managing tags
KnowSystem tag is a critical KMS tool. A tag is a colorful mark on an article, that attracts attention. One article can have multiple tags. Tags serve for:
1. Quick search and easy navigation
2. Attaching tags to partners, to give access to articles with a certain tag (see. Access rights)
3. Creating a clear, understandable knowledge base
4. Filter articles, for quick access all over Odoo
Tags also have a hierarchy. If you'll put a tick for the parent tag, you will see the articles from all tags that it includes. You can also print all available articles by the tag.
If you have a lot of tags and sub-tags, then you may find it difficult to navigate through them and select the ones you need quickly. Thus, for extra convenience, the special search bar above the tags list was introduced. Just start typing the word and click 'Enter' or the search button and the matching results will be shown and marked red. Click the button 'Reset' on the right side of the search bar to empty the search.
You can create and edit tags right from the single view interface and the separate menu Configuration > Tags.
To add a tag through the single-view interface just click '...add new tag' and write the title. Click on a tag with the right button of your mouse to see all available actions:
1. Create (click to start creating a new tag)
2. Rename (click to change tag's name)
3. Edit (click to edit a tag)
4. Print (click to print all articles in a tag and its subtags if any)
5. Archive (click to archive a tag; its articles will remain active)
How to edit tags:
1. In the KnowSystem menu right click on a tag, then choose 'Edit' or go to Configurations > Tags, choose a required record and click 'Edit'.
2. Set the hierarchy by choosing a parent tag
3. Put a tick in the box 'Show tag on Website' (), if you want to have these tags on the website
4. Choose allowed partners that will be able to see articles with these tags. Access to the parent tag allows reading all articles with it and with its' sub-tags (see. Access rights)
5. Choose the website () to show your tags on, if you don't choose any and you have a tick 'Show tag on Website', it will be shown on all your sites
6. Remove the tick from the box 'Active', if you want to archive the tag
7. In the tag 'Applied to', you can put a tick in the box 'Apply to all documents', then your tag would appear in all documents: sales orders, contacts, etc. Click 'Add a line' to add filters, to show the tag only to documents that match all the criteria.
8. Click 'Save&New' to add more filters to another model, otherwise 'Save&Close'
9. Add the description to the tag
10. Click 'Save'
To grant access to articles by tags for particular Odoo and portal users:
1. Start creating or editing a tag, choose a particular contact or contacts in the field 'Allowed partners, and click 'Save'
2. Open contacts, click on any profile card, and start editing it, in the field 'KnowSystem' tags choose the tag, click 'Save'
You can assign KnowSystem tags to partners, so they will see the articles under this tags, right as you edit a contacts card. To that goal use the field 'KnowSystem tags'.
You can choose 'Apply to all documents' if you want to be able to reach articles with this tag through the KnowSystem icon in the forms of other documents from anywhere in the Odoo. Or you can add filters to tags, to find suitable articles very fast. The articles will be accessible only if the document matches any of the set to the tag filters (see. KnowSystem in use).
Article types
Article types is an organizing instrument introduced by an optional add-on KnowSystem: Custom fields (). Types serve to fulfill the following tasks:
1. To show properties only for suitable types. Thus, the set of attributes for 'user guidelines' and 'technical specifications' might be different (see. KnowSystem: Custom fields)
2. To organize articles and navigate through articles (an article may have only one type)
Types also support hierarchy. You can set parent types and subtypes while editing or creating a section or by Drag&Drop.
Create and edit types right from the single view interface or from the separate menu in Configuration > Types.
To add a type through the single-view interface just click '...add new type' and write the title or click on a type with the right side of the mouse to see all available actions:
1. Create (click to start creating a new type)
2. Rename (click to change type's name)
3. Edit (click to edit a type)
4. Archive (click to archive a type, its articles will remain active)
To edit types:
1. In the KnowSystem menu click on a type with the right side of the mouse, then choose 'Edit', or go to Configurations > Article types, choose the section, and click 'Edit'.
2. Write the title
3. Choose a parent type
4. If you remove the tick from the box 'Active', then the type will be archived
5. If you want the type to be visible on your site, tick the box 'Visible on the current website' ()
6. If you have several sites, you can choose one to show the type, or leave the field 'Website' () empty to show on all sites
7. Click 'Save'.
Learning tours
Organizing a tour is a good way to combine all articles that a person needs in order to reach something. For example, you can organize a tour for newcomers, so they could learn all the nuances of working in your company. Learning tours allow you to:
1. Combine articles in a particular order with the possibility to move through them with the help of extra buttons '<Back' and '>Forward'
2. Restrict access to tours to particular user groups
3. Track users' progress and invite particular users to complete a tour
4. Add a description page before articles
You can manage learning tours in two interfaces: in the single view interface and in the separate menu Configuration > Tours.
Creating a tour
How to add a learning tour:
1. Start creating a tour through a single view interface by clicking on '...add a new tour', or by going to Configuration > Tours and clicking 'Create'
2. In the single-view interface choose all the articles that you need by ticking the box in the top right corner of an article. In the left navigation panel choose the mass actions 'Add to tour'
3. Choose an existing tour and click 'Save&Close'
4. Click 'Add a line' to add some more articles to your tour. Choose an article and click 'Save&New' to add one more, or 'Save&Close' if you have already added the ones you need
5. Click on the tab 'Restrict access' to choose groups of users that will have the access to the tour, if you leave the field empty, all internal users would see the tour. If you choose one group, then only this group will be able to start the tour
6. Click on the tab 'Description' to add some words about the tour. The page with this description would be the first one your users see as they open the tour
7. Click 'Save&Close' and you will be automatically redirected to the tour page, where you can see all the articles that you added
8. Click 'Edit'
9. Drag&drop to change the sequence of the articles, press bin on the right side of an article to delete it from this tour

It is also possible to click '...add new tour' in the left navigation panel of the interface and add articles to the tour manually one by one.
You can always edit your tours, either by clicking on it with the right side of the mouse or by going to Configuration > Tours.
In the editing mode you can also see the user's progress, just click on the tab 'Users Progress'. Here you can also invite separate users to complete the tour by clicking 'Add a line' and choosing a user.

Completing a tour
To begin a tour. Open the KnowSystem single view interface, find tours in the left navigation panel of it, and click on a required one.
If a user doesn't have access rights to one or several articles in the tour, then he or she will not see those articles in the tour. Thus the same tour may look differently for different users.
To start a learning tour:
1. Open a tour from the KnowSystem app
2. Click 'Start a tour'
3. Move through the articles. When you return to the previous article you do not lose your progress. You can close a tour and continue it again later. Then, you will start from the same place, where you stopped
4. At the end of a tour, you see a congratulation alert 'Good job! The tour is over.'
How to create an article
There are two user groups that can create an article. Those are KnowSystem Admin and KnowSystem Editor.
To create an article:
1. Open the KnowSystem app
2. Click 'Create'
3. Introduce title and preview text
4. Optionally add the published title ( the title, that will be visible on the website)
5. Add tags, section, type (), and choose the website to show the article on ( the article will not be visible on the site until you publish it. If you leave the field empty, then the article will be seen on all your websites after publishing)
6. Attach files, if you want
7. Now you can fill the body of the article in the Backend builder, use building blocks, change styles
8. Click 'Save'
An article may have two titles, an article's title, and a published title. If an article has a published title, then it will be used in:
1. Pdf's name. If you download a single article, which has a published title, the title will be used as the file's name.
2. Article name in pdfs. If an article has a published title, then it will be used in generated pdf instead of the article's title.
3. Article title on portal/website (). If an article has a published title, then this title will be shown on the portal/website both in the list of articles and as you open a particular article instead of the article's title.
4. Article header in documentation navigation + content (). If an article has a published title, then it will be used as the article's headers and in the navigation list instead of the article's title.
The article's title is the title, which is used in the backend. If an article doesn't have a published title, then the article's title will be used in all cases.
You can also create an article from a template, to avoid losing time on adjusting blocks and styles (see Creating an article from a template).
There are three ways to edit an article. You can do that in the Backend builder, Website builder (), and HTML editor. It is up to you which one to choose, according to your needs and preferences.
Backend builder
The default one
- Basic styles
- Safe for printing and email referencing
- Looks less attractive on the site
- Easy to use
Website builder
Open the article and click 'Edit on Website'
- Advanced styles
- May display incorrectly when added to emails
- Perfect for site
- Easy to use
HTML
Click </> to switch between backend builder and HTML code. Or fully replace backend builder ().
- Any simple and advanced HTML styles
- Can add article's text to emails, when only simple styles are used
- Difficult to use
Backend builder
A backend builder is an editor that you see when you create or edit an article internally. It provides you with a set of simple and safe-for-the-backend blocks, which are compatible with printing and messaging layouts. There are three types of blocks: text blocks, special blocks, and image blocks. Each block has a grey intro box, where you see what it looks like.
The available text blocks are:
1. Title + text
2. Text
3. Title + Subtitle
4. Comparisons
5. Columns
6. Color Boxes
The available special blocks are:
1. Card
2. Alert
3. Code
4. Tagline
5. References
6. Separator
The available picture blocks are:
1. Image + Text
2. Text + Image
3. Image
4. Banner
5. Columns
6. Images List
Drag and drop building blocks to update an article's body. As you save the article the styles change to the ones that are safe for reading in the backend, printing, and adding to messages.

In the backend builder, you can choose text styles, make text bold, italic, underlined, change font size, remove font style, add ordered and unordered lists, add checklists, align paragraphs, add tables, links, pictures, switch to the code view, and undo and redo actions.
In the backend builder, you can also switch to the raw code view to update articles' HTML at any moment, by clicking on the </> sign in the top right corner of the blocks panel.
To make sure the sub-titles look good while printing, avoid using the style 'Header 1' in the article's body.
Website builder
The website builder is introduced by an optional KnowSystem add-on KnowSystem: Website and Portal (). It allows you to apply advanced styles and complex widgets by using Odoo's built-in website editor to make website-friendly articles. Numerous snippets, animations, style templates, and options will help you to prepare nice-looking portal knowledge pages. Avoid using that for internal or printing purposes: advanced styles often contradict printing and composer layouts.
How to edit an article in the website builder:
1. Open the article you want to edit
2. Click the button 'Edit on Website'
3. Add blocks, choose various styles, and write an article
4. Click 'Save'
You can also start creating an article, write the title, text, add tags, a section, a type (), and choose the website to show the article on, click 'Save', and fill the article's body in the website builder, the same way as in 'How to create an article'. If you entered the published title in the backend builder, then, as you open the article through the website builder – you will see the published title. Even if the article is not published.
The backend builder and website builder have different purposes. Choose the backend builder, if you want to create articles for internal use, that you will be able to print and refer to when sending an email or a message. Choose the website builder, if you want to publish your articles on a website, share, or give access to some partners. In the website builder, the choice of blocks and styles is wider. You can also animate icons and some boxes to catch the reader's attention. It is possible to change the font's color and its background color.
The set of available blocks depends on the modules and themes installed in your Odoo system. For writing articles available all the same blocks as when you create a website. For example, Title, Text, Numbers, Picture, Text - Image, Image - Text, Columns, Accordion, Alert, etc.
There are a lot of tools to make your articles stand out by customizing building blocks. Try various styles, fonts, and font colors. Use the command '/' to call the additional instruments panel.
If you primarily use the website builder to edit articles, you might be interested to replace the backend builder with an HTML editor permanently. For that go to Configuration > Configuration, find the section 'KnowSystem options', and put a tick to the box 'Turn off Backend Editor' (see. Code editor).

You can turn off the website builder in settings and publish articles made in the backend builder instead. In this case, articles will be less colorful, but you will preserve the opportunity to print them and add them to an email's body.
To turn off the website builder, go to Configuration > Configuration, section KnowSystem Options, and remove the tick from 'Edit on Website'. After that articles would be available on your website in read-only mode only.
Code editor
Code editor allows you to apply any simple and advanced HTML styles but requires certain technical knowledge. Articles that are written with the help of simple HTML might be compatible with printing and messaging layouts. Switch to raw code from the backend builder from time to time or replace it fully with the code editor, if you have the add-on KnowSystem: Website and Portal installed ().
You can switch to the raw code view to update articles' HTML at any moment, by clicking on the </> sign in the backend builder.
Optionally replace the backend editor with an XML editor to rely fully on the website builder () and edit only raw code in the backed. Introduce any HTML tags and styles, including bootstrap-ready elements and even iframes.
Creating an article from a template
Creating an article from a template is a fast and convenient way to create new articles while keeping uniform styles. You can prepare new knowledge templates or save any existing article as a template.
You can use any article as a template and use it for further articles. For that, open any article, in the head menu of it find the 'Actions' button, choose 'Make template', write the reference, change it the way you want, and click 'Save'.
You can also create a template in the configuration menu. To create a template, open the KnowSystem app, go to Configuration > Templates, click 'Create', write a reference title, fill the main body and click 'Save'.
Use backend articles' templates only for articles in backend to make sure styles are displayed correctly.
To create an article from a template:
1. Open the KnowSystem app
2. Click 'Create from template'
3. Choose a template
4. Click 'Create'
5. After that, the body of an article will be filled with the values of a template
6. Continue creating an article (see How to create an article)
Interaction with an article
As you open an article, you see the header with available actions above the title. To change something in the article, click 'Edit' or 'Edit on Website' (). Here as in the KnowSystem menu, you can create a new article from scratch and from a template.
As you click on the 'Discuss' button, you would see the article's message thread. Any internal user that has the access to the article can take part in discussing it. Here you can see, the notifications stating that the article was revised and other people's comments. Click 'Send message' to open the message typing field, add smiles, attach files or open the message wizard to change text style.
You can also add a Log note or schedule an activity connected with an article, e.g. to revise it. All followers might receive notifications about revisions of an article (see Article revision and history of changes). Click 'Follow' to become a follower of the article, or unfollow, if it is not relevant. You can add followers, by clicking on a 'Person' icon, and selecting the recipients of the invitation.
As you click on the 'Revisions' button, you would see the list of editions with information about the date and the person who changed the article. You can click the button ' Observe' by any revision in the list, to see how the article used to look. If you like some variant more or the article was spoiled, you can click 'Restore this revision' and confirm your choice in the pop-up window to back up an article. Keep in mind, that this action will be written as a new revision and you still will be able to return to any previous state of the article (see Article revision and history of changes).
As you click on the 'Info' button, you see all the available information about the article, including:
1. The list of contributors that took part in creating and revising the article
2. The time of publishing and last revision
3. Article's statistics, such as views and the number of times the article was referred in emails and was viewed by each person
4. Documentation sections (), where the article is used
5. People who liked, disliked, or added the article to favorites
6. At the bottom of the page, you can also see the links, that lead to the article. If the box 'Published' () is ticked, then you see two links: Website URL and Internal link
7. Share button ()
You can share the link to the article with any user neglecting the access rights (). For that click on the 'Share' button at the bottom of the info page. The link with a special token would be generated. Copy the link and send it to a user. Anyone with the link will be able to see the article even if it is not published ().
Click on the 'Star' sign, to add the article to favorites, put a like or dislike to the article. You can always change your mind and put a like instead of dislike or vice versa. The chosen icon will be grey, to change the answer click on the one that is green. Click 'Save as PDF' to start the instant download of the article. Click 'Actions' to: restrict access, (un)publish the article (), make a template, add it to a tour, duplicate, archive, or delete the article.
KnowSystem import and export
If you already have articles in some KMS systems you can add them to KnowSystem. Use the 'Import' tool above the articles view to import an electronic table with such articles. Take into account that the body of an article should be pure HTML.
To import your articles to KnowSystem:
1. Click 'Favourites' at the top of the page, the above articles list
2. Choose 'Import records'
3. Click 'Load file' and choose a file with articles
4. Choose the columns for import
5. Click 'Import'
6. Upon finishing you will see a message stating that a certain number of records is imported
If you create articles in KnowSystem and want to move to some other app or just to have an extra file with articles for extra security, use the mass actions button 'Export'. It would generate a table which might be also used for import. You can choose various fields for export, and save files in .xlsx or .csv format.
To export articles:
1. Choose the articles for export, by ticking the box in the article's right top corner or clicking 'Select all found'
2. Click 'Export' in the right navigation panel mass actions
3. Choose the article's fields for export (by default there are: article title, article, preview summary, section, and tags)
4. Tick the box 'I want to update data' if you want the file to be import-compatible
Article revisions and history of changes
The history of article revisions is kept in Odoo in a similar way it's done in Wikipedia. If one of the users breaks something, it takes 2 clicks to recover a proper knowledge version. A revision is created when an article or an important detail (title, content, section, tags, attachments) is changed. Not significant modifications do not lead to creating a new revision. Revisions help to restore only important details.
As you click on the Revisions button you see a pop-up window with all the revisions of the article. You can find out who and when changed something in an article. There are 5 columns, where changes are stated - in contents you see how many signs were added, if they are green or deleted if they are red and with a minus; the other columns show previous state, for example, the previous title, or a deleted tag.
To restore a revision of an article:
1. Open an article
2. Click 'Revisions'
3. You see all the revisions of this article
4. Click observe to see any of those
5. Click 'Restore this revision'
After restoring, you can always return back to the previous variant of an article, as a new revision is created.
Only KnowSystem Admin can restore and delete revisions.

You can translate your articles into various languages(). Then you will see the sign of the language, for example, 'EN', in the title and preview text of an article while editing. Click on the icon to manually translate it. Odoo users, who have a different platform language will see the manual translation of the title and the preview text. You can edit the article in your default language and the changes will be applied only to the article in this language. The same article in other languages will remain the same. Revisions of the same article in different languages are kept in one list, but it is impossible to restore an article to one of the versions of the article in another language.

There is a separate menu, where you can see and manage all revisions. For that, go to Configuration > Revisions. There you can see the list of revisions, group them (for example by an article), search, restore a revision and delete the ones you don't need.
To restore a revision, just open it, click the button 'Restore the revision' and confirm your decision.
To delete one or several revisions, you need to select them by ticking the box on the left side, then click on the gear icon 'Action' and choose the option 'Delete'. After that, the deleted revisions will be deleted permanently.
For security purposes, in order to access the menu 'Revisions', a user should be a 'KnowSystem Administrator'.
KnowSystem in use
Observe article content right from any Odoo object: there is no need to always switch to the KnowSystem advanced interface. All articles are available in a pop-up window with convenient navigation. Click on the KnowSystem icon above a document form or in the systray to access the articles. Send KnowSystem articles in messages by updating a message body or attaching a pdf file. Print all articles in a tag or section.
Set tags for the KnowSystem quick access. You can choose 'Apply to all documents' in the tag's settings if you want to be able to reach articles with this tag throughout the KnowSystem icon in the forms of other documents from anywhere in the Odoo. Or you can add filters to tags, to find suitable articles very fast. The articles will be accessible only if the document matches any of the set to the tag filters. Add filters to tags, to show particular articles only when they match ALL or ANY of them.
Documents by tags
Link knowledge tags to Odoo document types in order to simplify the search of articles. You can either choose to apply a tag to all available documents or choose a particular model and add filters.
As you apply a tag to all documents, the tag will be added by default to all quick search forms regardless of the interface and document type the user is working with. To apply a tag to all documents:
1. Start editing or creating a tag
2. Find the tab 'Applied to' and tick the box 'Apply to all documents'
3. Click 'Save'
As you apply a tag to one or several documents' modules, the tag will be added by default to the quick search forms according to the document type the user is working with. To apply a tag only to a particular document's models:
1. Start editing or creating a tag
2. Find the tab 'Applied to' and click 'Add a line'
3. In the pop-up window choose a model and click 'Save&New' to add one more, otherwise 'Save&Close'
4. Click 'Save'
You can also add filters to each chosen model. So, the order of the articles with this tag will also depend on particular documents' objects. For example, assign helpdesk tickets to the tag 'odoo/helpdesk': the latter would be entered by default for support requests objects.
How to add some filters to a document's model:
1. Start creating or editing a tag
2. Find the tab 'Applied to'
3. Click 'Add a line'
4. Choose a model
5. Click 'Add filter'
6. Choose filter options, by scrolling or typing the beginning in the search field and choose the filter options
7. Click on '+' on the right side of the rule you wrote to add one more filter, otherwise click 'Save&Close'
8. If you have more than one rule you can choose the ANY or ALL button above, so only documents that match ANY of the rules or ALL rules will be shown
10. Click on the '...' button, on the right side near '+' to add an even more complex rule
11. Here you can also choose to filter documents that match ALL or ANY rules
12. If you choose ALL or ANY both times, your rules will stand in one line and only one button will remain
Push the button 'Records' to see Odoo documents that match the rule terms.

Here are some examples of useful simple filters:
Total > = 1000 (Will show articles with this tag, if the order total is more than 1000 to understand how to work with such orders)
Product type = Storable product (Will show articles with this tag, if a product is storable to show articles about this kind of products and what to do with them)
Country > Country name = United States (Will show articles with this tag, if the contact's card states that he is from United States to keep articles and company policy about working with US companies)
Billing Status = Waiting Bills (Will show articles with this tag, if there are some pending bills)
Is Won = Won (Will show articles with this tag, if the opened opportunity has a status won)
Quick search from any interface
You can easily access KnowSystem from anywhere in Odoo. Quickly observe articles related to a current document discussion. Instantly reference one or a few ones. To add the quick entry for Knowledge base from any Odoo form view, go to Configuration > Configuration, find KnowSystem options, put a tick in the box 'Articles by Documents', and click 'Save'.
To see the KnowSystem icon () in the Odoo systray near activities and messages, go to Configuration > Configuration, find KnowSystem options, and put a tick in the box 'KnowSystem in systray' and click 'Save'.
As you click on the KnowSystem icon in the systray or above the document form you see a pop-up window with articles. Search articles by tags, section, or content in a few clicks for a quick overview. Click on an article to read it.

As you see your documents in the tree view and want to open quick access to KnowSystem, which will show you only filtered to chosen objects articles, click on the KnowSystem article icon that is located above the view. If you click on the KnowSystem icon in systray, it would show all tags that are applied to the particular model regardless of the chosen records.
Knowledge for messaging
To let users reference/cite Knowledge records in Odoo messages, go to configurations, and turn on the option 'Articles in Email Composers'. Click 'Send message' and open the full composer. Use the command '/' to call the additional instruments panel and scroll down to find the button 'KNOWSYSTEM'.
In the pop-up window, you can search articles by tags, sections, and contents. Here tags are always applied to the particular object, from which you compose a message.
Click on an article to read it, and click 'Close' to return to the message composer. Click '+' at the right top corner of an article to choose an article. Open the tab 'Chosen articles' to remove some articles or to read them. There are three types of citing an article. You can:
1. Update the message body with knowledge content (it is added to the end of a current message)
2. Attach a PDF version of the referenced article
3. Share a public knowledge link with your colleagues or partners (the link is added as a clickable title of an article).
The type of link, that is added, can be regulated in the KnowSystem configuration. For that, choose the type of the link to generate in the field 'Share URL type'. The link can be either 'Internal URL' (link to the article in backend available only for internal users), 'Website URL' (link to the article in portal available for internal and portal users), or 'Shared with the token' (a link to the article in portal available for anyone).
In order for the articles to be parsed correctly, it is necessary to use only backend styles. Some too complicated styles may be displayed incorrectly.
Articles in Activities
Similar to sharing articles in messages, the module can be used to link to articles in activities. This way, you will be able, for example, to share a link to the article to explain how to fulfill a certain activity.
To let users reference/cite Knowledge records in activities, go to configurations, and turn on the option 'Articles in Activities'. Click on any activity icon and choose the option 'Schedule Activity'. Use the command '/' to call the additional instruments panel and scroll down to find the button 'KNOWSYSTEM'.
In the pop-up window, you can search articles by tags, sections, and contents. Here tags are always applied to the particular object, from which you compose click the activity icon.
Click on an article to read it, and click 'Close' to return to the composer. Click '+' at the right top corner of an article to choose an article. Open the tab 'Chosen articles' to remove some articles or to read them. There are two types of citing an article. You can:
1. Update the body of the activity with knowledge content (the text of the article is added to the activity body)
2. Share a public knowledge link with your colleagues or partners (the link is added as a clickable title of an article).
The type of link, that is added, can be regulated in the KnowSystem configuration. For that, choose the type of the link to generate in the field 'Share URL type'. The link can be either 'Internal URL' (link to the article in backend available only for internal users), 'Website URL' (link to the article in portal available for internal and portal users), or 'Shared with the token' (a link to the article in portal available for anyone).
In order for the articles to be parsed correctly, it is necessary to use only backend styles. Some too complicated styles may be displayed incorrectly.
Knowledge for printing
In KnowSystem you can print one article or several articles at once. To print a single article just open an article and click 'Save as PDF'.
To print articles from the single view interface:
1. Choose one or several articles by putting a tick in the box in the top right corner of an article
2. In the right navigation panel, mass actions choose 'Save as PDF', and the downloading will start automatically
3. You can also 'Select all found' articles and print them all at once in the same way.
It is also possible to print all articles with a specific tag or of a definite section. To print all articles in a tag or a section click on it with the right side of the mouse and choose 'Print'. If a tag or a section has subtags or subsections, the articles from there will also be printed.
Attach your articles to emails and messages as pdf, so the recipient will be able to print them.
For the correct mass print use Backend builder styles and avoid using Headline 1 in the body of an article.
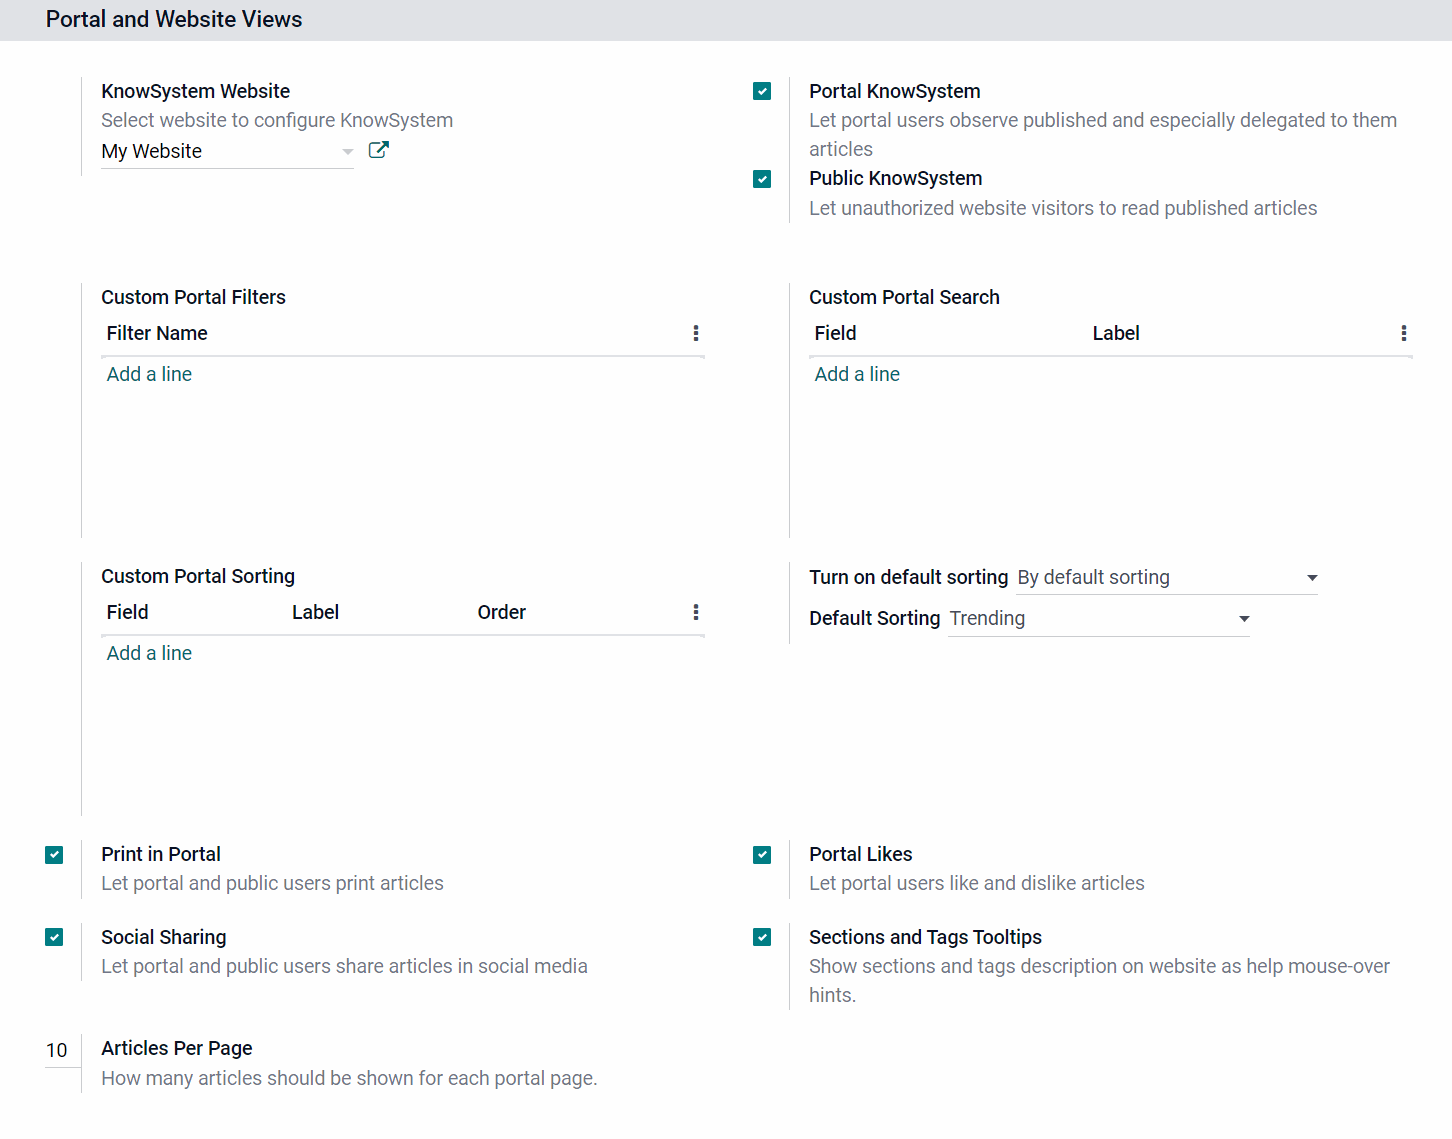
You can allow portal and public users to print published articles (). For that go to Configuration > Configuration, find the section 'Portal and Website Views' and tick 'Print in Portal' (). After that, as a user opens an article there will be the printer icon near the article's title, which will redirect straight to the printing wizard.

Flexibly configure the printed layout of the articles. For that, go to KnowSystem Configurations > KnowSystem Options and turn on the feature Custom Layout. If the option is enabled, you will be able to select/create your own Layout. By default, the special layout created by the module is used.
As you enable the option, the "Edit layout" button becomes visible. It allows you to edit the previously selected layout. Keep in mind, that if the standard module layout is used, then the app will open the form to inherit the view and apply the changes. Otherwise, the view itself will be opened. There you can change the footer and header, and change the basic settings, for example, to hide/show page numbers, and logo, add your own elements or change the order.
Regardless of the checkbox, the 'Edit report' button will be visible. Click on it to open a form where you can inherit the printing form itself and apply the changes. For example, stylize the title or add a static part that will be located after the title.
Regardless of the checkbox, the 'Edit Paper Format' button will be visible. Click on it to change the page size (A4 > A3), page orientation (landscape/portrait), margins, etc.
If the option 'Custom Layout' is disabled, then the styles for printing are applied from settings as for other Odoo printings. To change them, go to General Settings > Business Documents > Documents Layout.
Optionally, you can turn on the option to print articles without titles for the best printing layout. For example, it is useful, to avoid situations, when the article's title is printed on one page and the body of the article on the other one. For that go to Configuration > Configuration, find the section 'KnowSystem Options', and tick 'Print without titles'. After that only articles' content will be printed.
eCommerce Product FAQ
In case, you have an e-shop, it might be a good idea to show articles with the answers to frequently asked questions, so the clients could get the information he/she needs without contacting the company. With the help of the add-on, you can add a link (button) to the product's page. The button either redirects the clients to the related articles on the KnowSystem page or shows the list of articles in a pop-up accordion. The button is added on the products page to the right side below the description. To add a FAQ button:
1. Go to KnowSystem Configuration page
2. Find the section 'eCommerce FAQ Options'
3. In the field FAQ Website, choose the website to which you want to add the FAQ button
4. In the field FAQ view choose the way to show the FAQ: KnowSystem portal link, Pop-up accordion.
5. In the field 'FAQ button text', define how the FAQ entry on the product eCommerce page should look like
6. Click 'Save'.
If the FAQ is added as a link to the KnowSystem page, then as soon as the user clicks on it, he/she is redirected to the full KnowSystem page, with the related sections and tags applied, and related to the product articles shown. This way the navigation is restricted by articles linked to the current product/website. For example, if the section 'Tech' was chosen as a global FAQ for all the products, and the article 'How to assemble the table' was chosen as a related-to-the-current-product article, then in KnowSystem the user will see all the articles related to the section Tech and its subsections and the article 'How to assemble the table'. However, the user still can reset the selection of the articles and see other available KnowSystem articles.
If the FAQ is added as a link to the accordion, then as soon as the user clicks on it, the pop-up accordion will appear with the clickable titles of available articles. If the user clicks on any article's title, the accordion will expand and show its body. To hide the article's body, the user should click again on the article's title. To close the accordion, click on the cross in the top right corner.
The text of the button may be customized. For that, it is also possible to use simple HTML tags. Just write the text in the field 'FAQ button text'. By default, the button's title is 'Frequently Asked Questions'. If you work in a multi-language environment, you can also add the translation to the button's text. So, when a user opens the website in a different language, he/she would see the button's name in that language, if it is supported.
The set of articles can be configured on three levels: per website, per separate product and per products attributes. To add articles to a particular website, choose some sections, tags or articles in the section 'Global FAQ' on the KnowSystem configuration page. This way, any product on the website will contain those articles. In case some sections or tags are chosen, the articles from their children will also be shown in the FAQ.
Global FAQ is particularly useful if you have some articles, that relate to all of the products. For example, you can add the company policy, delivery information, purchase/refund instructions to the global FAQ.
You can also add certain sections, tags, articles to the separate product templates. This way, certain articles will be shown, only if you click on the FAQ button from that product's page.
To show articles for particular products:
1. Open the product's template
2. Go to the tab 'KnowSystem
3. Click 'Add a line'
4. Choose the particular articles to show, or add articles in a batch by choosing the related sections or tags
5.Click 'Save'
You can also select the articles that will be shown, only if a particular product's value is selected. For that, in the field 'Applied only if the product has all the values' choose the product's value/values. This way you create a rule to show the chosen-in-the-line articles only if this value is applied.
It is possible to add several rules, i.e. several groups of sections, tags and articles. As a result, all articles found according to any of the rules will be shown on the page of this particular product. For example, we have a product 'Table' with attribute values black, white, steel, wood. The assembly instruction is different for the steel and wood kind of tables, so we create two lines - one with the article related to value steel and one related to article wood.
The application of each of the rules can be limited by several attribute values. Only products having all the specified values will have articles on the subject. i.e. the user must first select the correct value on the page of the online store. For example, there are also some important peculiarities of coloring the steel table in white, so we created another line and chose two values (white, steel), so the article will be seen only if both values will be selected.
All items found by any criteria as well as the items found by global criteria would be linked to the template. For example, from the product 'Table' with the selected values black, wood will be seen the global articles related to the company's policy, and the assembly-instruction-wooden-table article .
For a specific product, the FAQ button can be hidden from the store. For that:
1. Open a particular product and go to the tab 'KnowSystem'
2. Tick the box 'Do not show eCommerce FAQ'
3. Click 'Save'.
To fully hide the FAQ button, choose the option 'Do not show' as the FAQ view on the configuration page.
You can define own sections, tags, and articles for a specific attribute. For example, show additional articles for all products with the attribute 'Legs'. It is possible to add several rules, i.e. several groups of sections, tags and articles. As a result, on the page of each product from which you can select this attribute, all articles found by any of the rules will be displayed.
To add own articles to a product attribute:
1. Open a particular attribute
2. Find the tab 'KnowSystem'
3. Click 'Add a line'
4. Choose the particular articles to show, or add articles in a batch by choosing the related sections or tags
5. Click 'Save'
Attribute rules can be limited by the selected value on the product page, i.e., the user must first select these values on the product page in order for FAQs to be recalculated. For example, we have an attribute value 'Custom legs', for which two more articles are required 'Custom order guidelines:legs' and 'Custom order prices:legs'.
To add own section, tag, articles to the attribute value, as you add FAQ rules to the attribute, in the field 'Applied only if the product has all the values' choose the product's value/values. The chosen-in-the-line articles will be shown only if this value is applied.
This way, in order to generate FAQ for a particular product, the module will take into consideration the sections, tags and articles from three levels:
1. Per website (global)
2. Per product
3. Per attribute/attribute valurs.
So, you can configure the FAQ flexibly. Some articles can be reused several times for different products, and some can be customized individually for specific ones.
Different users may see different sets of articles in the FAQ. Articles are shown only if a user can access those articles. Thus, in order to make articles available for the website users, it is necessary to publish them.
KnowSystem access rights
Access to articles is managed in a different way for different types of users. There are 3 types of users:
1. Odoo user or internal user
2. Portal user or registered user ()
3. Public user ()
By default, all articles are available to any internal user, if you don't restrict access only to particular user groups. You can restrict access either to particular sections, including subsections or to particular articles.
On the website (), public users see only published articles. Portal users can also see the articles they have access to. To give access to a particular user add this user or several users to the field 'Allowed partners' as you edit a tag and add this tag to articles that you want to allow the user to see.
Rights to administrate the Odoo knowledge management system belong to 2 user roles: KnowSystem Editor and KnowSystem Administrator. If you want a user to be able to create articles, he or she should belong to one of those groups.
Sections, tags, and types access for internal users
Different users may see different sets of navigation menu: sections, tags, and types ().
KnowSystem considers user groups that are defined per section. If the user groups are not defined, a section is considered 'global' and each internal user may read articles in it.
To grant access to a section for the whole user group:
1. Start creating or editing a section
2. Open the tab 'Restrict access'
3. Choose user groups that will see all articles in this section and its' sub-sections
Rights for a knowledge section are defined not only according to this section but also according to all its parents. For example, if a user can't access 'Sales', he/she would not be able to access 'Sales / CRM disregarding whether 'CRM' is available for his/her user group.
Internal users can see sections, even those that are empty if they have access to them.
Tags and types () are visible for all internal users disregarding their settings.
Internal access for articles
In KnowSystem articles' access for internal users is defined on 2 levels: per section and per article. In order to be able to read an article, a user should have both: access to an article and its' section.
To manage user groups for an article:
1. Open or start creating an article
2. Click 'Actions' in the right corner above the article's form and choose 'Restrict access'
3. Choose user groups that will see the article
If the user groups are not defined, an article is considered 'global' and each internal user may read it (if he/she has an access to its section).
Access to edit articles
Rights to administrate Odoo knowledge management system belong to 2 user roles: KnowSystem Editor and KnowSystem Administrator. If you want a user to be able to create articles, he or she should belong to one of those groups. If an internal user has access to see an article and belongs to one of the stated groups, then he can also edit it.
All article versions are stored in revision, so there is always a way to return to one of the previous ones. Only KnowSystem Admin can restore and delete revisions (see. Article revision and history of changes). Thus, it helps to make the editing process more secure.
Public users access
Public users () - website visitors - may access KMS interfaces only if you explicitly allowed that. Thus, you can switch off the option 'Public KnowSystem' (
) to fully disable knowledge base for such users.
Public users () would see only those KMS objects, which are published and available for a website they are visiting.
Only sections that contain available for this user articles would be shown (thus, there would not be a filter by a section which would result in an empty list of articles).
An article would be available for a public user if its section and itself are published.
To publish () an article:
1. Chose one or several articles and choose 'Publish' in mass actions in the right navigation panel of the interface
2. Open an article, click 'Actions' in the functional line above the article title, and choose 'Publish'
You can share the link to an article with any user neglecting the access rights (). For that click on the 'Share' button at the bottom of the info page. The link with a special token will be generated. Copy the link and send it to a user. Anyone with the link will be able to see the article even if it is not published.
To make a tag visible on a website ():
1. Start creating or editing a tag
2. Tick the box 'Show Tag on Website'
3. If you leave the field 'Website' empty, then the tag will be seen on all available websites

To make a type () visible on a website (
):
1. Start creating or editing article type
2. Tick the box 'Visible on current website'
3. If you leave the field 'Website' empty, then this type would be seen on all available websites

Portal users access
Portal users () have the same access rights as public users (
), but you can also grant extra rights for particular partners. To that goal knowledge tags are used. You can assign those tags in two ways:
1. Start creating or editing a tag, choose a particular contacts in the field 'Allowed partners, and click 'Save'
2. Open contacts, find a particular user, start editing the profile card, in the field 'KnowSystem' tags choose the tag, click 'Save'
Thus, a portal user would have access to all published articles (see above) and all articles which have partner-related tags.
For example, create tag 'premium', 'standard', 'free' to manage knowledge base tariffs and assign the tags to corresponding articles. Or create a tag with a country to assign it to all articles available to the partners from it.

User rights comparison

KnowSystem Admin
Can read, create, edit, and delete any articles, sections, tags, article types (), and tours. May configure Misc options.

KnowSystem Editor
Can read, create, edit, and archive related to them articles, sections, and any tags. Can also delete related to them tours. Can read any article type ().

Odoo user
Can read related to them user groups articles, sections, and tours. Can read any tags and article types (). May like/dislike, add to favorites, and take part in discussions.

Portal user (/16) )
)
Can read published and partner-related-by-tags articles. Can also read published sections, tags, and article types (). May like/dislike articles.

Public user ()
Can read published articles, sections, tags, and article types ().
Configuration page
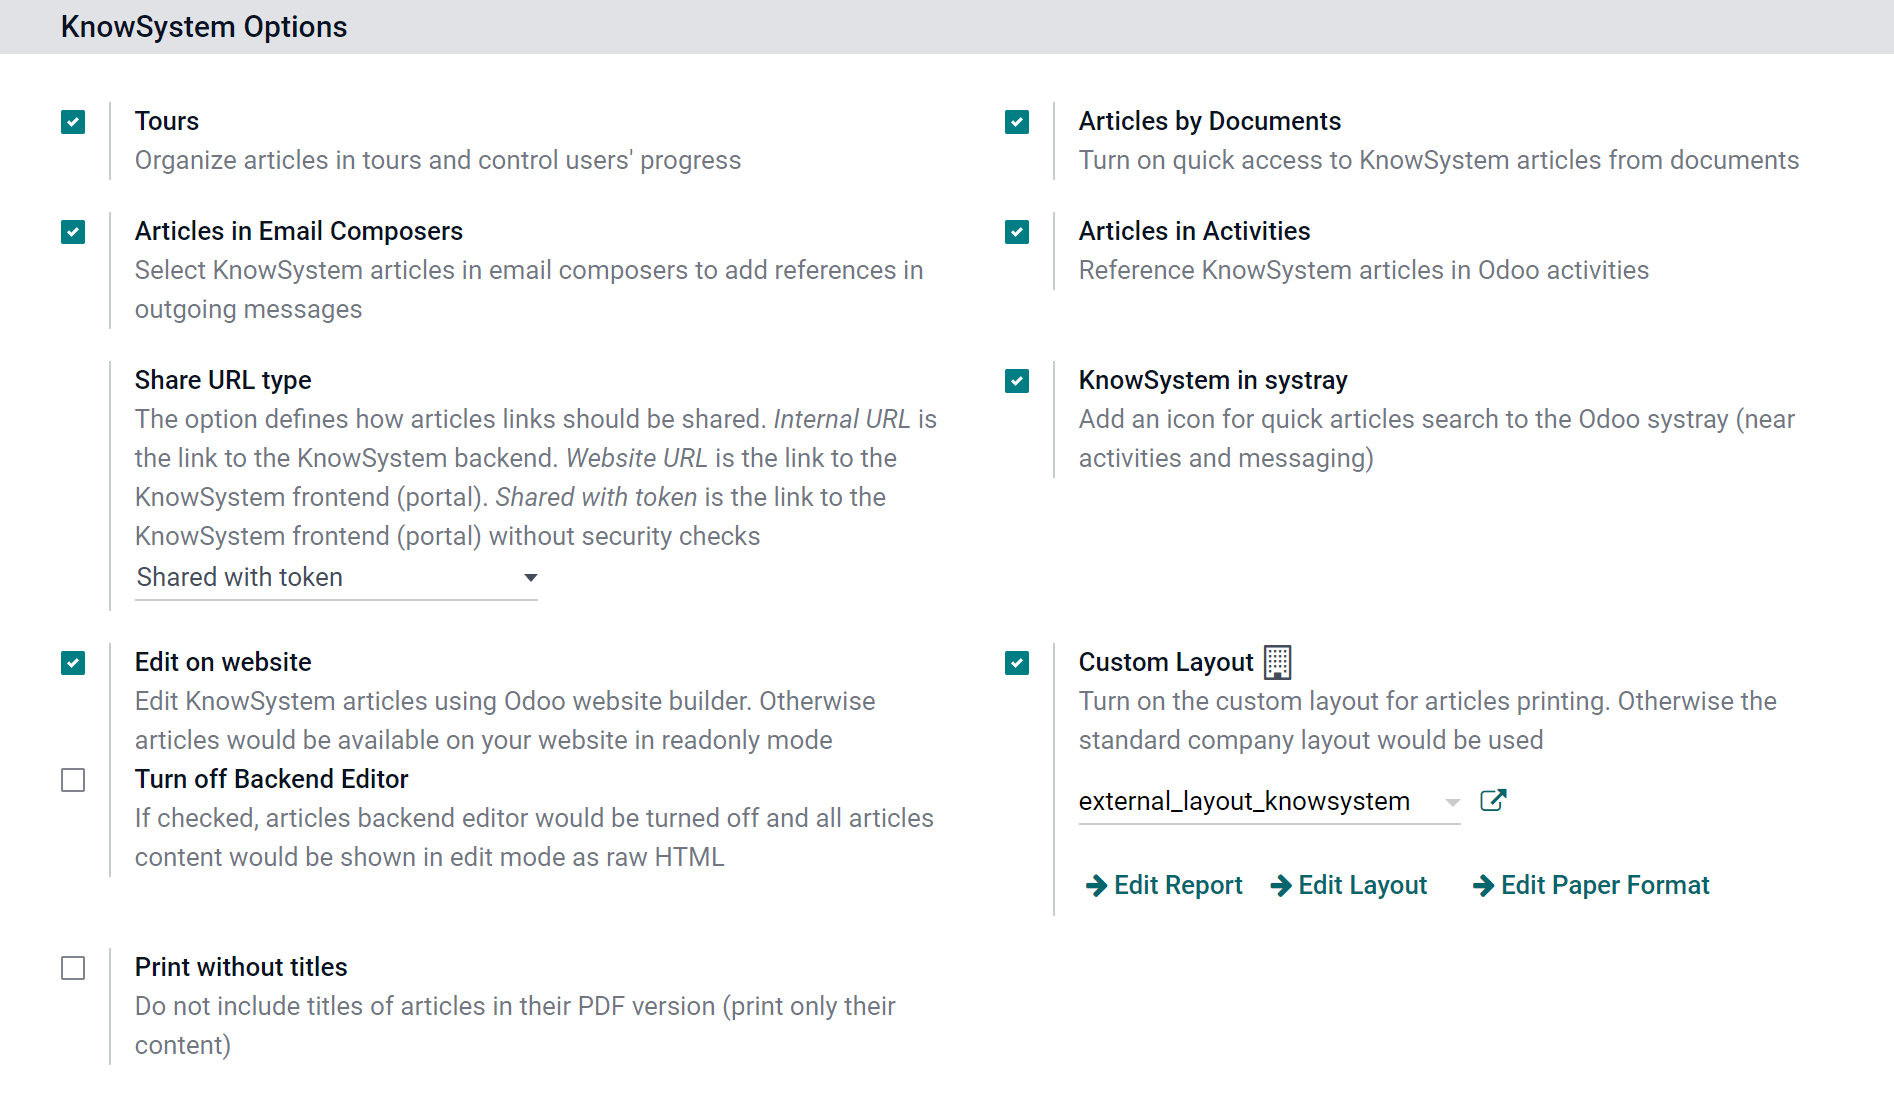
KnowSystem has a configuration page, where you can turn on and off some add-ons' features and make necessary changes to make your work convenient.
Tours: allow you to organize learning tours, combining the articles of your choice. You can easily set the order of articles by drag&drop. Write notes to learners, that they will see on the first page of the tour. Track learners' progress (see. Managing learning tours).
Articles in Email Composers: add a KnowSystem icon in the email composers, so you can choose articles to add to emails. You can either update the email body or attach an article as a pdf (see. Quick access to KnowSystem).
Articles by Documents: adds a KnowSystem icon above all documents' forms, so you can read an article without opening the KnowSystem app. You can also set different filters to documents' tags to see them in the first place when you access the KnowSystem from the matching documents (see. Quick access to KnowSystem).
Articles in Activities: adds a KnowSystem icon to the activities composers, so you can choose articles to add to the body of the activity. You can either update the activity body with an article or share a link to the article (see. Quick access to KnowSystem).
Share URL type: allows choosing the type of generated link. Can be either 'Internal URL' (link to the article in backend available only for internal users), 'Website URL' (link to the article in portal available for internal and portal users), or 'Shared with token' (a link to the article in portal available for anyone).
KnowSystem in systray: adds a KnowSystem icon in the backend header, so you will be able to see it from any place and easily access articles (see. Quick access to KnowSystem).
Edit on website (): adds a button 'Edit on Website' to articles and allows you to edit your articles using Odoo standard Website builder (see. Website builder).
Turn off Backend Editor (): turns off the default Backend builder, showing the HTML code, that you can edit, instead (see. How to create an article and Code editor).
Custom Layout: turns on the custom layout for articles printing. Otherwise the standard company layout is used. As you enable the option, the "Edit layout" button becomes visible (see Knowledge for printing).
Print without titles: allows printing only content of the articles, without titles, for a better printing layout.
In the Extra Options section, you can see all the available add-ons and their pages. From here you can turn them on and off.
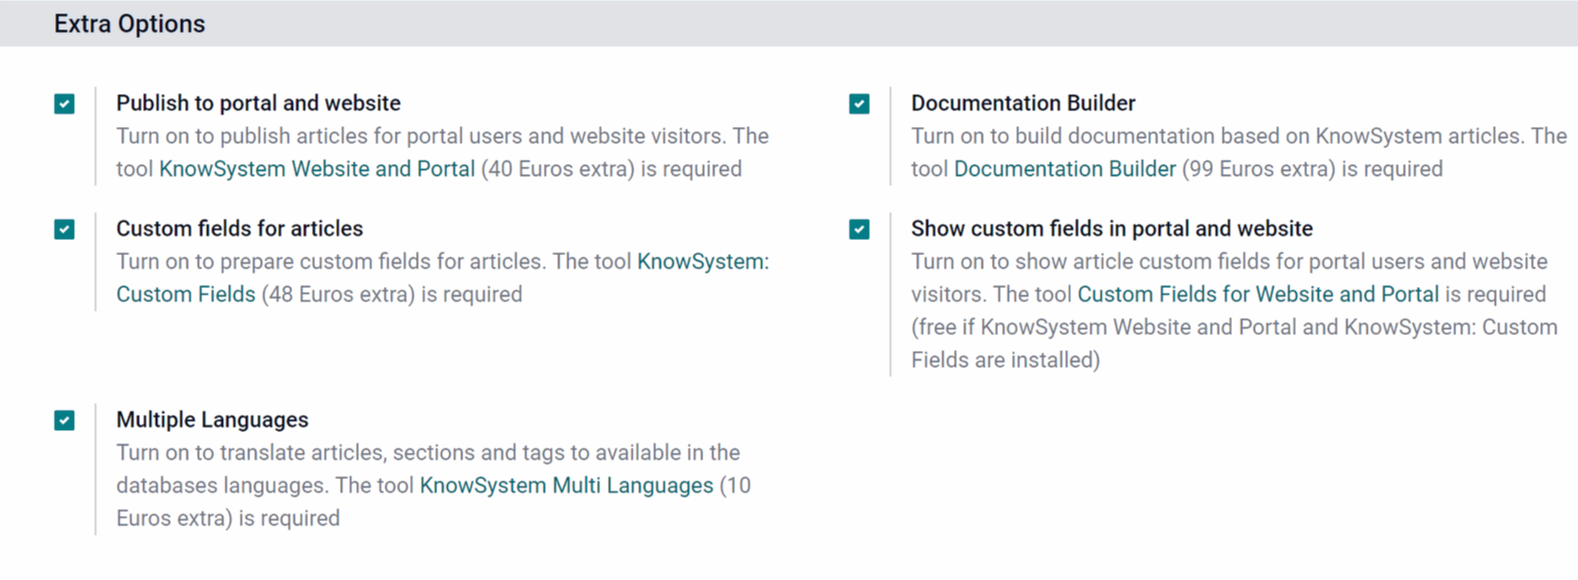
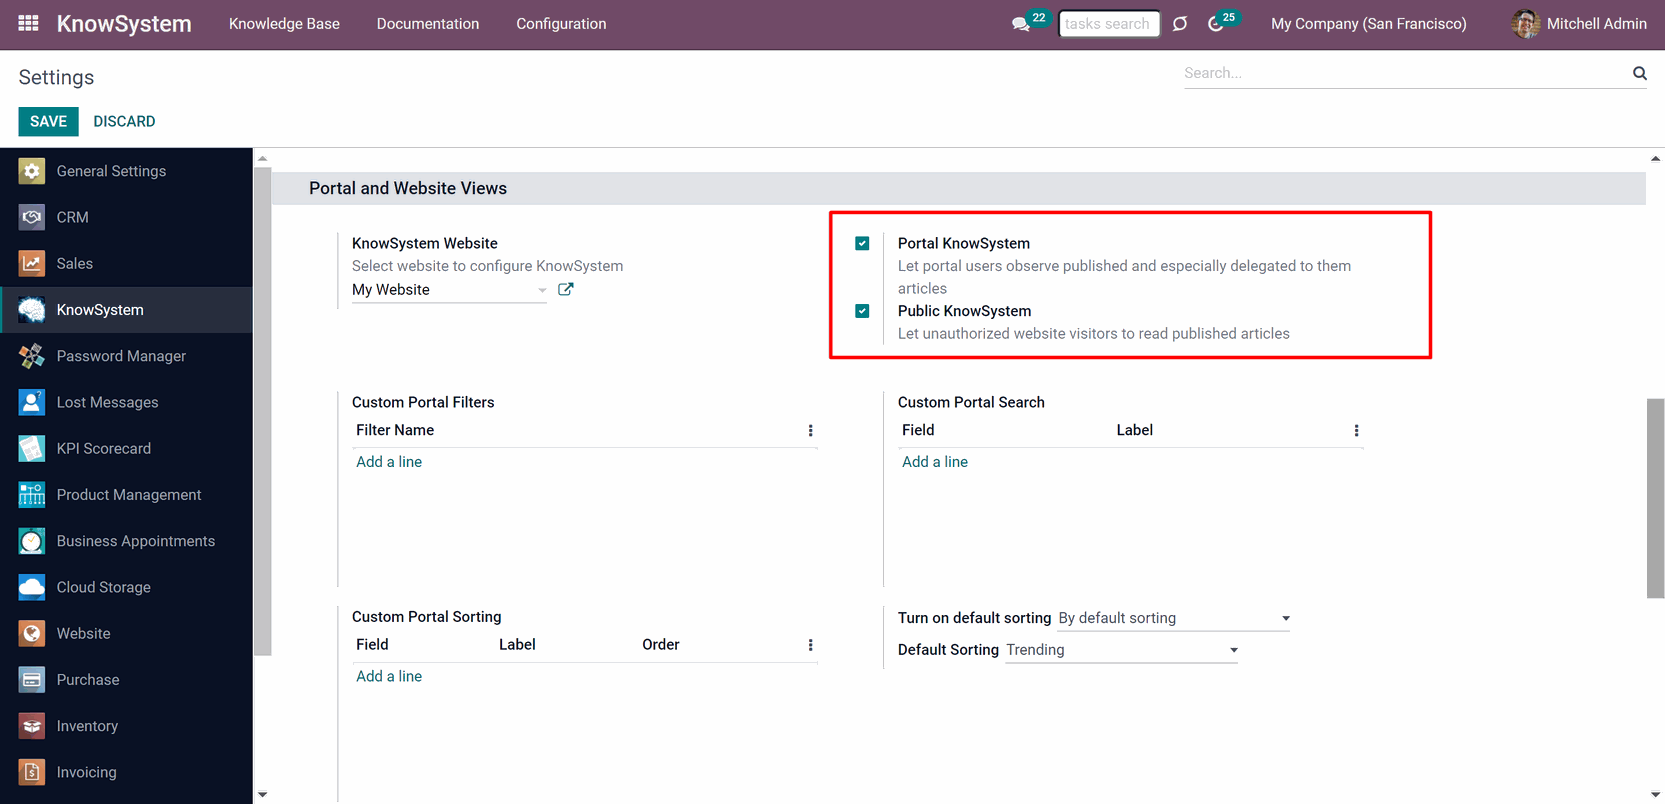
The add-on Portal and Website Views () has its' own configuration section. The extension supports multi-websites, and it is required to apply them for each of your sites separately. To switch between sites' settings, select the website to configure in 'KnowSystem Website'. Here you also have a website link button ( ), that forwards you to the chosen website to see the result, but make sure you clicked 'Save' in the left corner at the top of the page.
Portal KnowSystem (): allows you to show the articles to portal users. You can give access to some articles, by assigning tags and stating the 'Allowed partners', or add KnowSystem tags to partners on the contact card (see. Managing tags).
Public KnowSystem (): allows you to publish your articles for all website visitors to see (see. Access Rights).
Custom Portal Filters (): allows you to set options to filter articles on the portal. You can add portal filters to various models, set action, and choose a person for which the filter will be available. You can also add automatic rules to filter objects.
Custom Portal Search (): allows you to set search options to find articles on the portal. You can add a field and name it, so it will be possible to search for the keywords in it on the portal.
Custom Portal Sorting (): allows you to add custom sorting criteria for portal/website KnowSystem. You can add sorting criteria based on a particular field, name them, and set either ascending or descending order.
Turn on default sorting (): allows applying one of the sorting options by default as a user opens the KnowSystem page on the website.
Default Sorting/Custom Default Sorting (): allows choosing a particular sorting option either default or a custom one as a user opens the KnowSystem page on the website.
Print in Portal (): adds a possibility for portal and public users with access to the article to print it.
Portal Likes (): gives portal users an opportunity to like and dislike articles.
Social Sharing (): adds a social share bar, for quick sharing through various social media.
Sections and Tags Tooltips (): shows sections and tags description on the website as a user hovers over any of those.
Articles Per Page (): choose the number of articles that are shown per page.
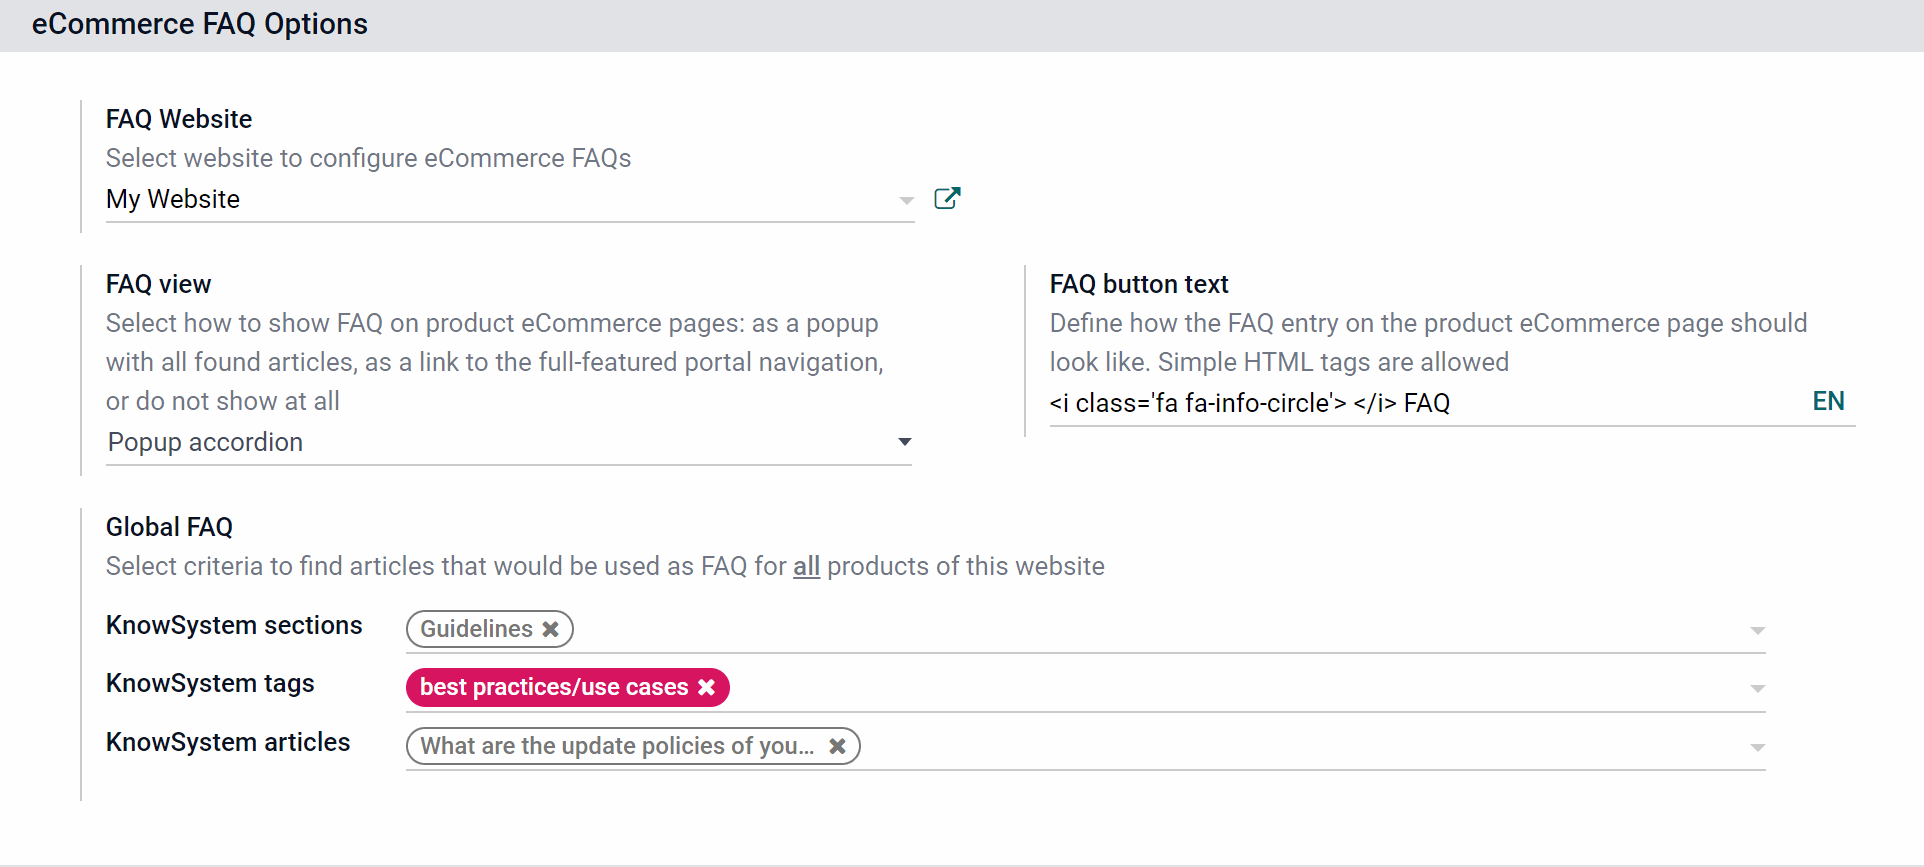
The add-on KnowSystem: eCommerce () has its' own configuration section. The extension supports multi-websites, and it is required to apply them for each of your sites separately. To switch between sites' settings, select the website to configure in 'FAQ Website'. Here you also have a website link button ( ), that forwards you to the chosen website to see the result, but make sure you clicked 'Save' in the left corner at the top of the page.
FAQ view (): choose the way the FAQ will be shown: as a popup with all found articles, as a link to the full-featured portal navigation, or do not show it at all (see eCommerce Product FAQ).
FAQ button text (): write your own text, which will be used as the button's text. By default, the button's name is 'Frequently asked questions'. You can use simple HTML (see eCommerce Product FAQ).
Global FAQ(): select criteria to find articles that would be used as FAQ for all products of this website (see eCommerce Product FAQ).
KnowSystem sections (): choose the sections, to add all the related articles to the global FAQ. The articles from the sub-sections will be also shown in FAQ.
KnowSystem tags (): choose the tags, to add all the related articles to the global FAQ. The articles from the sub-tags will be also shown in FAQ.
KnowSystem articles (): choose the articles for the global FAQ.
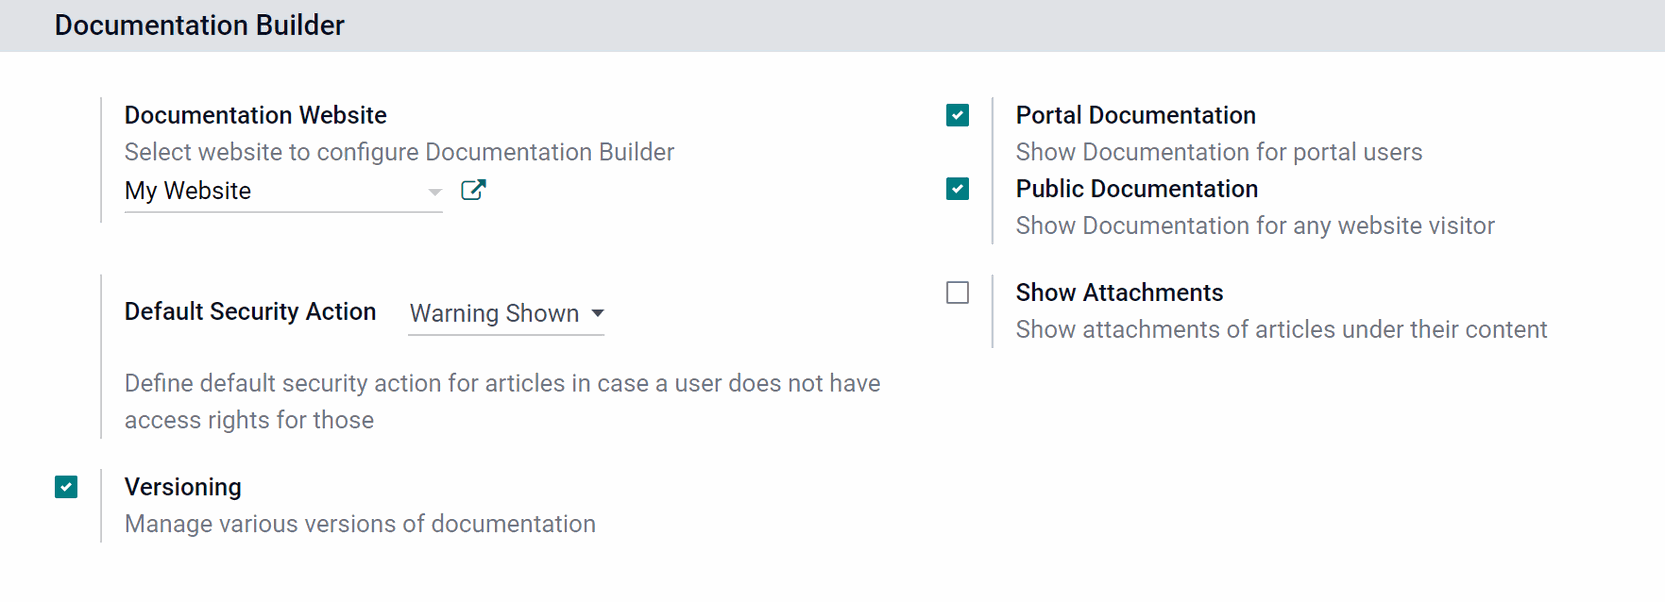
The add-on Odoo Documentation Builder () has its' own configuration section. The extension supports multi-websites, and it is required to apply them for each of your sites separately. To switch between sites' settings, select the website to configure in 'Documentation Website'. Here you also have a website link button ( ), that forwards you to the chosen website to see the result, but make sure you clicked 'Save' in the left corner at the top of the page.
Portal Documentation (): turns on portal documentation.
Public Documentation (): turns on public documentation.
Default Security Action (): in the case when a user doesn't have access to only one or several articles of documentation, you can choose to either hide it, show a warning, that the user has no access to it, or neglect access rights and show it anyway if a user has the access to the documentation itself (see. Odoo Documentation Builder: access rights).
Show Attachments (): includes article attachments to a documentation page. Otherwise, only the articles' content will be shown.
Versioning (): allows you to introduce some changes in documentation for particular versions and leave the rest that refers to all versions to avoid double work. It adds a field, to state to which version an article refers (see. Odoo Documentation Builder: versioning).
KnowSystem: Website and Portal
KnowSystem: Website and Portal is an optional add-on () that allows you to add your articles to the portal and on your websites. The extension allows you to use the standard Odoo Website builder that provides with a wide variety of templates and tools for editing articles, making them presentable and user friendly, and customize your articles in the same way as website pages.
The main features of the app are:
Publish articles on your website /32)
Give access to articles to portal users by tags /32)
Edit your articles in Website builder /32)
Print, like, or share articles /32)
Turn on/off KnowSystem for portal users to let them observe published and especially delegated to them articles. Go to Configuration > Configuration, find section Portal and Website Views and tick the box 'Portal KnowSystem'.
Turn on/off KnowSystem for public users to let unauthorized website visitors read published articles. Go to Configuration > Configuration, find section Portal and Website Views and tick the box 'Public KnowSystem'.
Website and Portal: navigation & settings
All features described in this article are related to the add-on KnowSystem: Website and Portal ().
To open the KnowSystem website interface in the frontend:
1. Open the app Website
2. Click 'Go to Website'
3. Open the top menu KnowSystem
Portal users might also access knowledge base through the tab 'Knowsystem' in their account, which redirects portal users to the page with articles (see Website and Portal: public & portal users).
All entries would lead to the same page '/knowsystem'.
The website KnowSystem interface consists of KnowSystem Navigator, Search Panel, and Articles list. The mandatory elements are the search panel and article list.
Optional elements that you can turn on/ off to customize the page:
1. KnowSystem Navigator
2. Custom Types Navigator ()
3. KnowSystem Center Introduction
4. KnowSystem Left Introduction
5. KnowSystem Tags
To turn on/off optional elements:
1. Click 'Customize' in the systray of the website KnowSystem page
2. Click on the slider button
Turn on the central or left introduction, to write some information about the page. The content of the introduction can be edited, click 'Edit' at the right top corner of the page and add some building blocks. The available blocks are the same as in the website editor (see 'Website editor'). The introduction and articles' cards also support building blocks, including ones with pictures.
The KnowSystem Navigator (left navigation panel) can be fully turned off, in this case, all other optional elements will be turned off too. The KnowSystem Navigator allows you to see articles by sections, by tags (KnowSystem Tags), and by Types ( Custom Types Navigator). Put a tick in the section, tag, or type () box to see its articles.

A section is seen on a website, only when it contains at least one article. If the parent section contains no articles, but its subsection does, only the subsection would be visible on the website.
A tag is seen on a website, only when it is published and the optional element 'KnowSystem Tags' is turned on. To make a tag visible on a website :
1. Start creating or editing a tag
2. Tick the box 'Show Tag on Website'
3. If you leave the field 'Website' empty, then the tag will be seen on all available websites
A type () is seen on a website, only when it is published and the optional element 'Custom Types Navigator' is turned on. To make a type () visible on a website:
1. Start creating or editing a type
2. Tick the box 'Visible on current website'
3. If you leave the field 'Website' empty, then the type will be seen on all available websites
It is possible to Filter articles by various criteria. By default, there is only one filter option 'All', but you can add custom filters that you want. To add custom filters:
1. In the KnowSystem app, go to Configuration > Configuration
2. Scroll to the section 'Portal and Website Views'
3. Find 'Custom Portal Filters'
4. Click 'Add a line'
5. Click 'Create'
6. Add the Filter name and click '+Add Filter'
7. Click 'Save&Close'
For example, create a filter 'Favourite', to filter articles by likes - e.g. when it has more than 8 likes.
Navigate through articles with the help of the search panel. The available sorting options are:
1. Trending (to see the most viewed articles at the top)
2. Title (to see articles in alphabetical order)
3. Section (to see the articles in the same order as the listed sections)
4. Likes (to see the articles depending on the number of likes and dislikes)
There are various search options available. Click on an arrow near the search field, to change the search option. You can search:
1. In content
2. In titles only
3. By section
You can also add custom search options that you want. To add custom search options:
1. In the KnowSystem app, go to Configuration > Configuration
2. Scroll to the section 'Portal and Website Views'
3. Find 'Custom Portal Search'
4. Click 'Add a line'
5. Click 'Create'
6. Choose the field, which will be checked for matches, while searching
7. The field 'Label' (the search title, which will be shown in the search options) will be generated automatically, but you can change it
7. Click 'Save&Close'
For example, add a search option 'Preview Summary' to search for matches in articles' previews only.

In case, the searching or filtering result has no matches you see the warning 'There are no articles found. Clear search'. If you click 'Edit' in the top right corner from here, then you will be able to customize the warning. The phrase 'Clear search' contains a link, that redirects to the KnowSystem page and therefore clears the searching parameters.
It is possible to sort articles by various criteria. By default, the available options are:
1. Trending (by the views)
2. Title (by the alphabet)
3. Section (by the sections order)
4. Likes (by the difference between likes and dislikes)
Simultaneously, you can add custom sorting options that you need. To add custom sorting options:
1. In the KnowSystem app, go to Configuration > Configuration
2. Scroll to the section 'Portal and Website Views'
3. Find 'Custom Portal Sorting'
4. Click 'Add a line'
5. Click 'Create'
6. Choose the field, that will be considered for sorting
7. Type the sorting name
8. Choose the sorting order (ascending or descending)
9. Click 'Save&Close'
In the configuration, you can also turn on the default sorting, i.e. the one that will be applied as a user opens KnowSystem on the website. You can choose from the default options or the custom ones that you have created. For that, the fields 'Turn on default sorting', 'Default Sorting', or 'Custom Default Sorting' were introduced.
Keep in mind, that if some sorting criterion is not available for a user (e.g. likes, when the setting 'Portal Likes' is turned off or when custom default sorting is not present in the table 'Custom Portal Sorting'), then the standard sorting criterion 'Views' will be applied.
One of the main parts of the interface alongside the navigation and search panel is the articles list itself. Here you can see all the available article cards. An article's card shows:
1. Title
2. Preview text
3. Likes and dislikes (if not turned off through the configuration)
4. Tags
If an article has a published title, then this title will be shown on the portal/website both in the list of articles, and as you open a particular article instead of the article's title (see How to create an article).
The article's preview text on the site is the same as on the backend. To edit preview text from the frontend click on the button 'Edit' in the top right corner of the page with the articles list and click on the preview text to edit it. Here you can also add various building blocks, right to the article's card.
To open an article click on the article's title.
Also, in the top right corner of an article's card, you can see an article's likes and dislikes, if you turned them on on the configuration page. Only registered and internal users can like or dislike an article. Public users can only see the number of likes and dislikes. To like or dislike an article:
1. Open an article
2. Scroll down till the end of the article and find 'Like' and 'Dislike' icons
3. Click on any, and it will be recorded
4. You can always change your decision and put, for example, like instead of dislike, by clicking on a related icon
To move through pages with article cards use the pages list at the bottom. Starting from the second page, the page navigator appears above the article list as well. You can set the number of articles per page:
1. Open the KnowSystem app, go to Configuration > Configuration
2. Scroll down to the section Portal and Website Views
3. Find the line 'Articles per page' and type the number of articles, that you want to show on a single page.
It is also possible to pin an article If you want some articles to be shown in the first place, no matter what page a person is at.
To pin an article:
1. Open the KnowSystem app in the backend
2. Open an article
3. Click 'Edit'
4. Tick the box 'Website pinned' on the right side, above the article's body
5. Click 'Save'

Website and portal: article page & website builder
All features described in this article are related to the add-on KnowSystem: Website and Portal ().
It is possible to edit an article right from its website page, just click 'Edit' in the top right corner, to open the website builder. Or, you can return to editing in the backend. To see this option, click on the down arrow on the right side of the 'Edit' button.
See a mobile preview by clicking on the phone icon in systray, to make sure an article looks good in both portrait and landscape modes. From the systray, you can also publish and unpublish articles.
Optionally, you can:
1. Allow partners to print knowledge pieces, like, or share articles. Go to Configuration > Configuration find the Portal and Website Views section and put a tick by 'Print in Portal'. Then, by the article's headline, a printing icon will appear.
2. Allow partners to share articles. Go to Configuration > Configuration find the Portal and Website Views section and put a tick by 'Social sharing'. Then at the bottom, you will see social media icons.
3. Allow partners to like and dislike articles. Go to Configuration > Configuration find the Portal and Website Views section and put a tick by 'Portal likes'. Then at the bottom, you will see icons like and dislike.
From an article's view, you can also switch back and forth between articles. Click on the arrows in the top right corner of an article.
To return back to the main articles' menu without losing the searching criteria, use the tool breadcrumbs on the left top corner of an article. For example, click on the previous step 'KnowSystem' to return to the main articles menu.
Website and Portal: public & portal users
All features described in this article are related to the add-on KnowSystem: Website and Portal ().
KnowSystem for public and for portal users can be turned on or off, depending on your goals.
Turn on/off KnowSystem for portal users to let portal users observe published and especially delegated-to-them articles. Go to Configuration > Configuration, find the section Portal and Website Views and tick the box 'Portal KnowSystem'. After that, portal users will be able to read published and partner-related-by-tags articles and related-to-those sections, read published tags and article types (). They may also like/dislike articles.
Turn on/off KnowSystem for public users to let unauthorized website visitors read published articles. Go to Configuration > Configuration, find the section Portal and Website Views and tick the box 'Public KnowSystem'. After that public users will be able to read published articles, sections, tags, and article types ().
The app supports multi websites, and therefore it is required to set the configuration for each available site separately. For example, you can turn on the KnowSystem Portal, KnowSystem Public, and allow printing on one website, but turn on only KnowSystem Portal on the other, or make it unavailable at all.
Here are all the options, that can be configured for each website:
1. Turn on/off Portal KnowSystem
2. Turn on/off Public KnowSystem
3. Add Custom Portal Filters
4. Add Custom Portal Search
5. Add Custom Portal Sorting
6. Turn on/off default sorting
7. Turn on/off Print in Portal
8. Turn on/off Portal Likes
9. Turn on/off Social Sharing
10. Turn on/off Section and Tags Tooltips
11. Set the number of articles per page
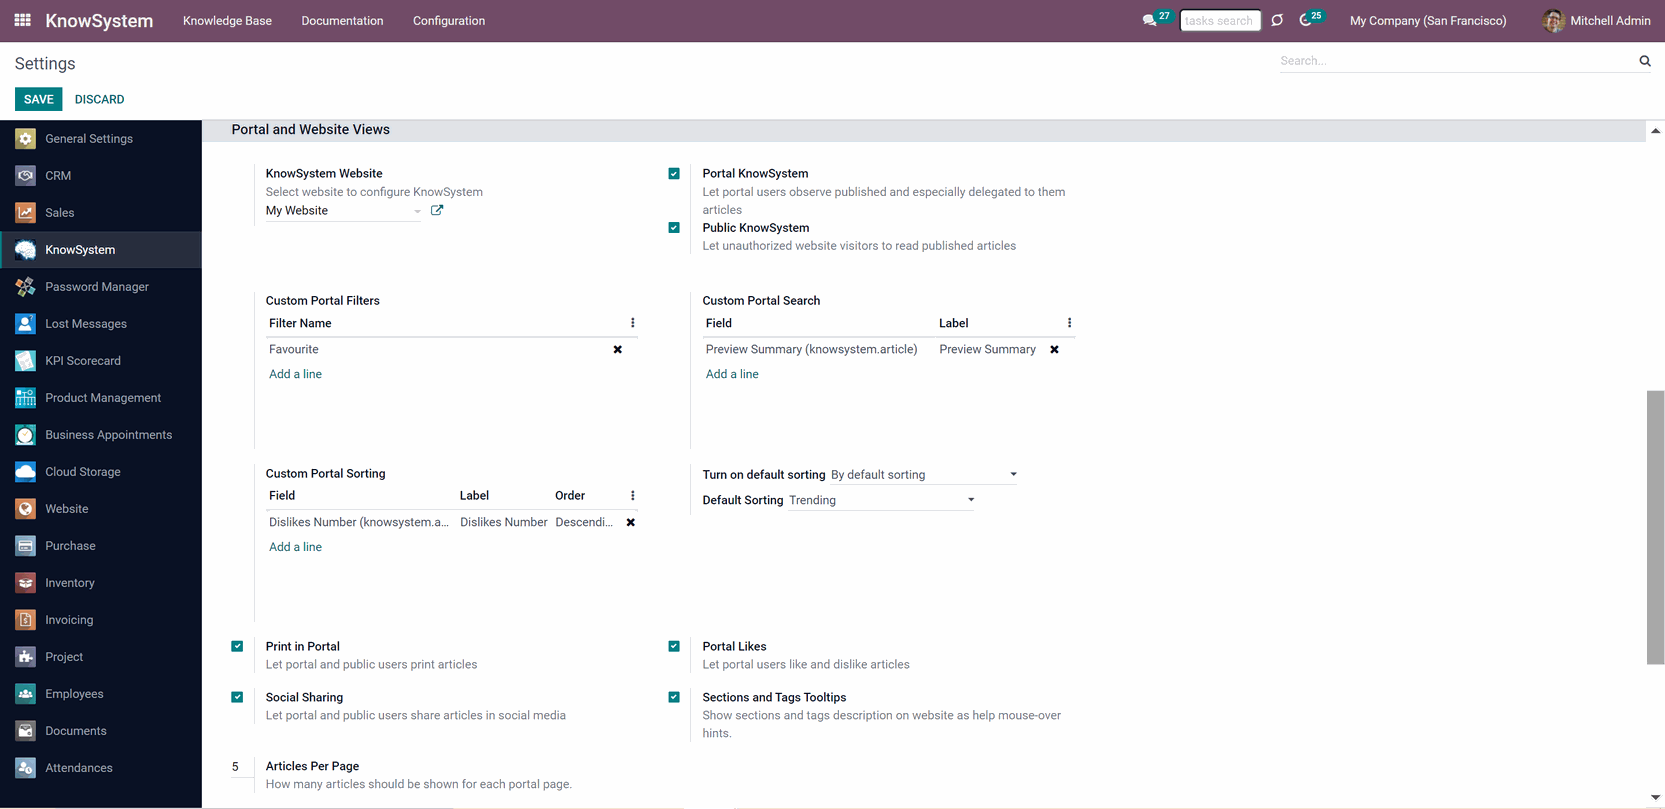
Odoo Documentation Builder
Odoo Documentation Builder is an add-on () to KnowSystem, that allows combining articles in advanced documentation to cover certain aspects of organizational or functional knowledge. The extension also depends on the add-on KnowSystem: Website and Portal (
).
Each KMS article might be used several times for different documentations. You can add an unlimited number of documentation pages structured by categories. The idea is to have a single documentation website page that fully covers a definite issue or aspect. You can also modify the appearance of pages: show or hide introductions and footers, turn on/off the search bar and table of contents, add or remove preview images and texts.
You can turn on the option 'Portal Documentation' and 'Public Documentation' to make the documentation available for portal and public users respectively. The app generates website pages automatically. To update this documentation set you should only add or remove a required knowledge article.
Indicate to which version an article relates to. Share documentation categories and sections. Publish required documents to make them available for everybody, assign KnowSystem tags - to grant access for chosen Odoo partners. Define what to do if a documentation user does not have access to included articles: to neglect restrictions, not to show that knowledge pieces, or to show a security warning. The app fully supports standard Odoo features including multi websites.
Combine articles /32)
Publish and share documentation
Modify documentation pages /32)
Introduce versioning /32)
Documentation Builder: managing documentation
All features described in this article are related to the add-on Odoo Documentation Builder ().
A documentation category is a tool, that helps you to structure your documentation. A category unites documentation sections. There are two ways to create a new category:
1. Go to Documentation > Documentations Categories and click create
2. Go to Documentation > Documentation Sections and click on + 'Add a column'
Drag&drop categories to change their sequence.
A Documentation section is a set of articles that together create documentation on a particular topic or for a particular object. There are two ways of creating a documentation section. You can go to Documentation > Documentations Sections, click create and add articles one by one, or you can add all required articles at once from the single view interface.
To add articles to a documentation section:
1. Go to Documentation > Documentations Sections and click create
2. Write a title of the section and manually translate it into other installed languages (), if you want
3. Choose a category and versions (see Documentation Builder: versioning)
4. Open KnowSystem and choose the articles by putting a tick in the top right corner of the articles
5. In the right navigation panel choose the mass action 'Add to documentation'
6. In the pop-up window choose the documentation section, to which you want to add articles
7. Choose a security action that will apply to all chosen articles (see Documentation Builder: access rights)
8. Click 'Save&Close' and you will be redirected to the documentation section card
9. Click 'Edit'
10. Click 'Add a line' to add one more article, that you can choose in the pop-up window.
11. Choose a security action for it
12. Click on the tab 'Settings' to add preview text and tags. From here you can also choose 'Header level for navigation', which is the number of headers that will be shown in the navigation panel, as a person reads a documentation section
13. Click 'Save'
The tags that you add to a documentation section, are the same tags that are applied to articles. Add a tag for quick search and easy navigation or to share a knowledge piece with the assigned-to-the-tag partners (see Managing tags).

You can publish the document section as you open it, and it isn't necessary to turn on the editing mode. It is possible to share document sections with any users, even when it hasn't been published yet. Click on the 'Share' button in the top right corner of a document section and a link with a special token will be created (see Documentation Builder: access rights).
Drag&drop documentation sections to change the category.
From the backend, you can track, what articles are used in documentation. Such articles are marked by a paperclip icon on the kanban card. To find out in what documentation sections the article is used, click on the 'Info' button as you open an article and find the field 'Documentation sections'.
You can also filter the articles, that are used in documentation by applying the filter 'Used in documentation'.
To find all articles of a particular section, type the section's name and choose the searching criterion 'Documentation sections'.
Documentation Builder: customization
All features described in this article are related to the add-on Odoo Documentation Builder ().
As you turn on the 'Public Documentation' (in Configuration>Configuration> Documentation Builder), the page 'Docs' appears on the website and the tab Docs appears in the portal if the option 'Portal Documentation' is turned on. Both entries lead to the same page '/docs'. There you can see all published documentation categories and documentation sections.

Portal users, if allowed, see a new tab 'Documentation' which redirects them to the page with documentation (see Documentation Builder: Access rights).
If an article has a published title, then it will be used as the article's headers and in the navigation list instead of the article's title (see How to create an article).
Categories
On a website, the documentation is kept under the menu 'Docs'. Here you see documentation sections divided by categories. In the top left corner in systray click 'Customize' and click on the slider button to change the page's look.
The customization options are:
1. Cover Image
2. Preview Text
3. Introduction
4. Search bar
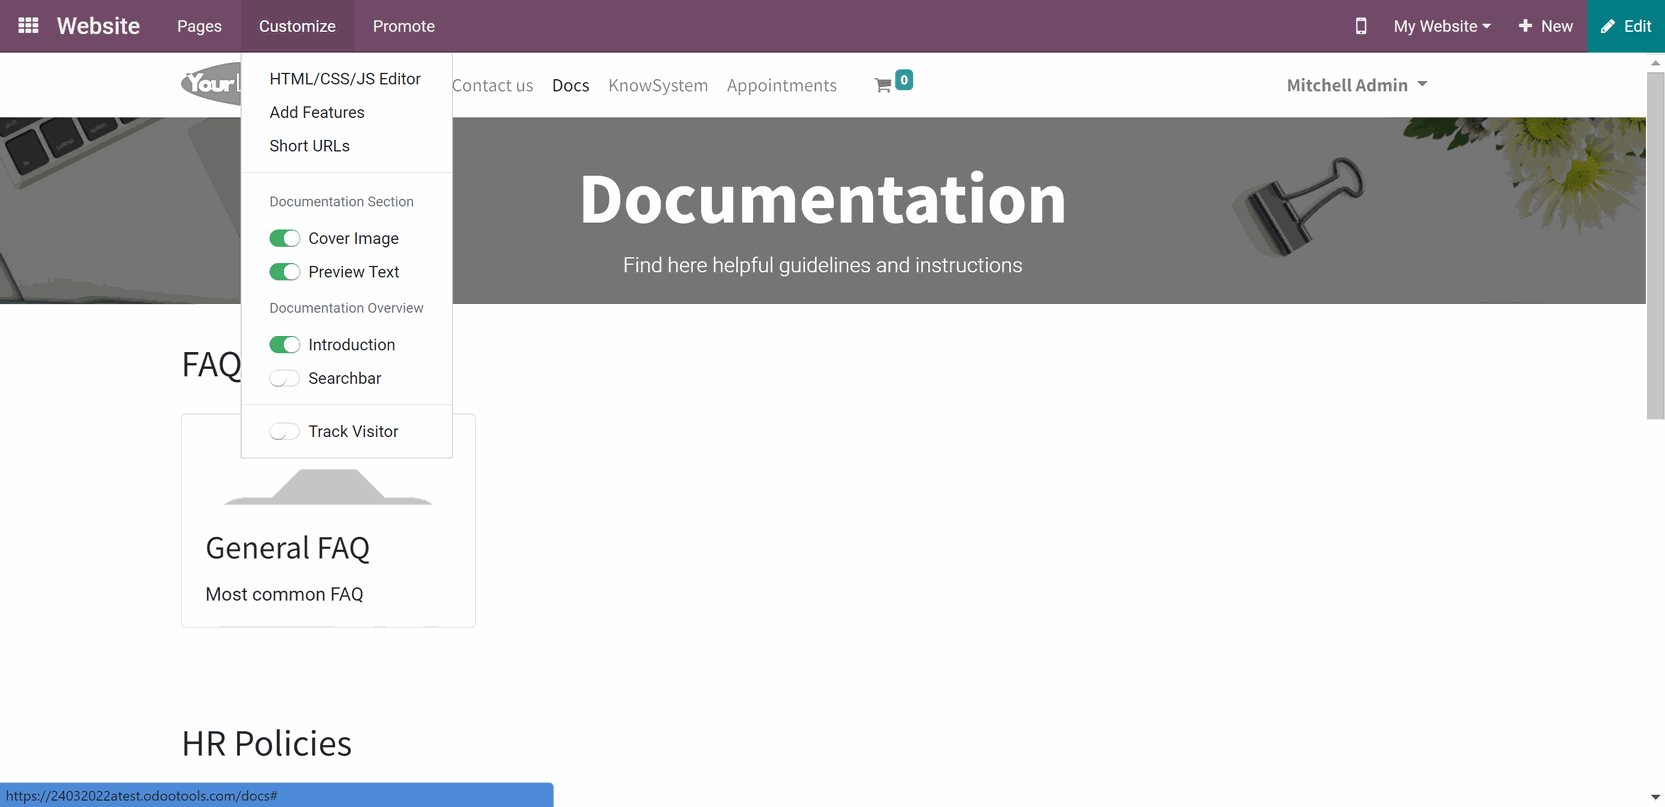
Turn on the Introduction, to add an introductory block above the documentation. In this block, you can write some information about the page, so the visitors could understand what is it for. Click 'Edit' at the top right corner of the page to add and edit some building blocks and make the page more appealing.
Turn on the search bar for documentation. With the help of the search bar, you can search documentation sections by the matches in the title. The found documentation sections are shown together with their category. If there are no matches found, you see the alert 'No documentation found. You can click 'Edit' to change the alert text and customize it. To reset the search click on the cross on the right side of the search bar.
Turn on the documentation preview text to show the text on the document section's card. You can add a preview text in two ways:
1. In the backend as you create or edit a documentation section in the tab 'Settings'
2. In the frontend, by clicking on the 'Edit' button in the top right corner and clicking on a documentation section at the place where the preview text should be
Turn on the cover image to see pictures on a document section's card. You can add pictures in two ways:
1. In the backend as you create or edit a documentation section, click on the 'Pen' icon in the photo section
2. In the frontend, by clicking on the 'Edit' button in the top right corner and clicking twice above the title on a documentation section card
There are various types of cover images that you can add to a documentation section. It can be .jpeg, .png and even .gif.
Sections
Click on any documentation section on a website to open it. In the top left corner in systray click 'Customize' and click on the slider button to change the page's look.
The available customization options are:
1. Footer
2. Introduction
3. Navigation
4. Searchbar, including Searchbar printing, Searchbar search, and Searchbar versioning (see Documentation Builder: versioning)
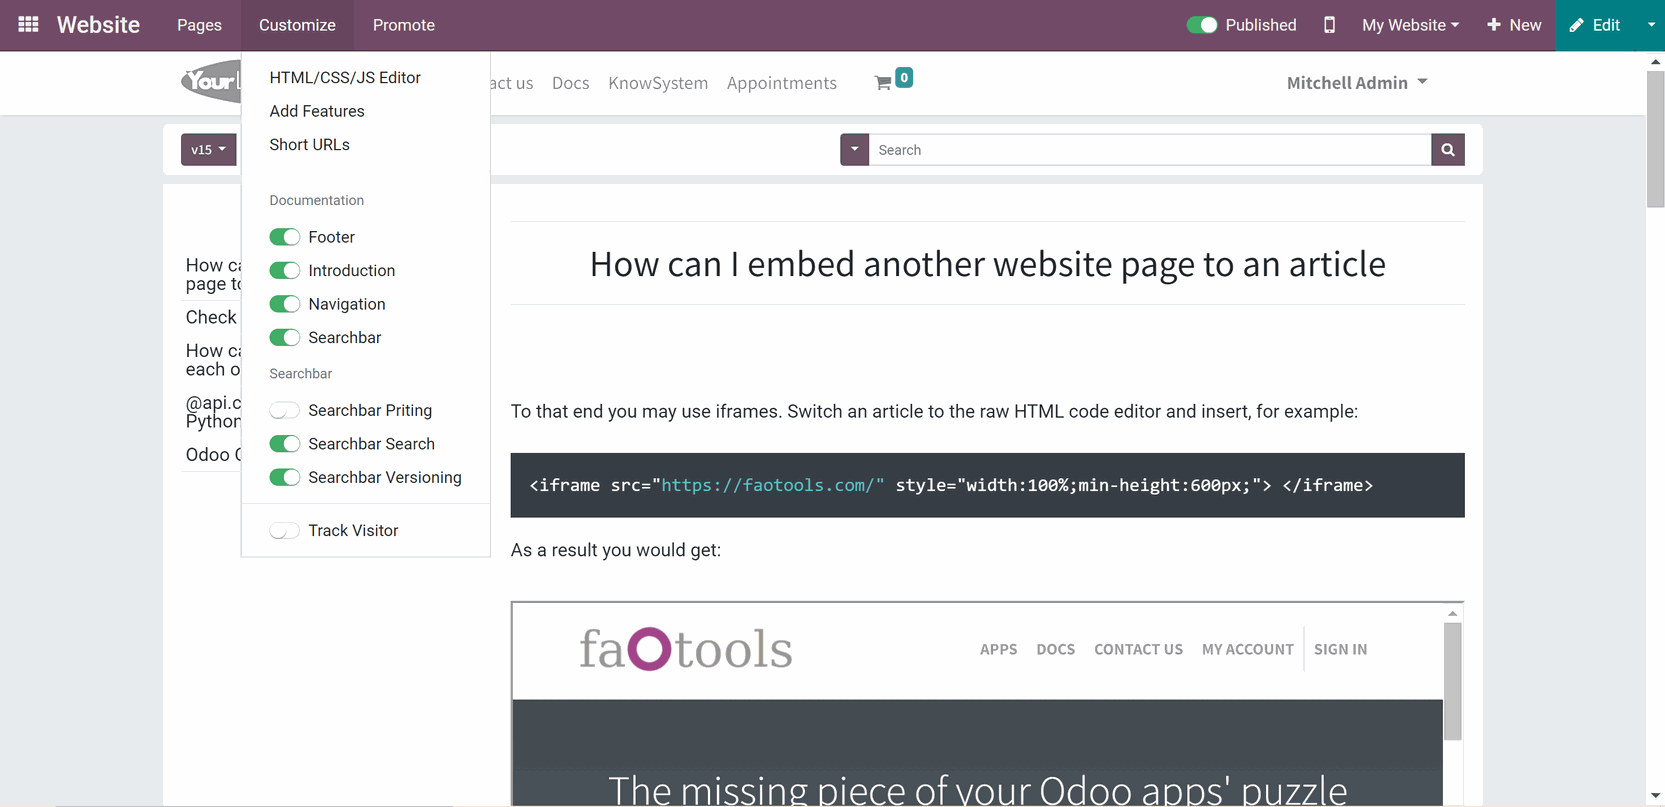
Adding Introduction and Footer allows you to add some building blocks before the documentation section and after it. You can add as many building blocks as you want and edit them the same way you edit the documentation section.
Don't add blocks with pictures (apart from background) in the Introduction or Footer of a documentation section, as it might affect the location of search bar and table of contents.
Add Navigation (Table of contents) to move between the documentation section's articles conveniently. As you scroll down the page, the Navigation panel follows you and marks bold the content that you are at. To hide the Navigation panel click on the icon . Click to show it.
The table of contents consists of various Header levels. The article's title is marked as Header 1. To see other Header levels in the Navigation panel click on the 'Arrow' icon that appears near contents that have other Header levels.
It is up to you to decide how many Header levels do you want to see in the Navigation panel. To set the number of shown headers:

1. In the backend start creating or editing a documentation section
2. Open the tab 'Settings'
3. In the line 'Header Level for Navigation' put a number from 0 - 6
4. Click 'Save'
To assign a header to a title or subtitle:
1. Choose the text line
2. Click on the 'Style' icon on the editing tools panel
3. Assign a Header level
4. Click 'Save'
In case the documentation consists of many articles with plenty of media content it may take some time to fully load the page. The table of content is loaded on the first place, so a person can start reading and browsing through the articles even before the loading is complete.
In the mobile version of documentation, in the searchbar there is a button to call the table of contents. The articles in the list are presented as clickable titles, so, as the user clicks on a title, the table of content gets hidden and the user is moved to the related article of the documentation.
Another customization option is a Searchbar. As you turn on the Searchbar three other options, that you can turn on/off, appear. Those are Searchbar printing, Searchbar search, and Searchbar versioning (see Documentation Builder: versioning).
The Searchbar search helps to conveniently search through a documentation section. There are three search options:
1. Default Search (case insensitive, searches both in documentation section's body and headers)
2. Case Sensitive Search (minds the letter case, for example, 'A' does not equal 'a')
3. Search in Headers only (only in lines with applied Header level style)
As you apply search parameters, all matches will be counted and you can browse through them using the back and forth arrow icons in the search form. The search form will follow you as you look through the matching results. Click on the cross icon to reset the search.
To be able to print the documentation with all the included articles, turn on the option 'Searchbar printing'. After that, the button 'Save as PDF' will appear on the left side of the search bar. Click on it to start downloading.
Keep in mind, that the website styles may not be parsed correctly for printing, so, for the best printing layout, it is better to use the backend styles.
To be able to switch between versions, first of all, you need to turn on the feature. From the KnowSystem app, go to Configuration > Configuration, scroll down to the section 'Documentation Builder', and tick the box 'Versioning'. Then, create some versions and apply them to some articles in a documentation section (see Documentation Builder: versioning). After that, you will be able to switch between versions and therefore will have a different set of articles in one documentation section.
To switch between versions click on the version on the left side of the search panel and choose the other one. As you choose one of the versions of a documentation section, only the articles for this version and the ones that go to any version are displayed.

All articles in a documentation section go one by one and are divided by the eye-catching Header 1. A person can see an article in a documentation section only if he/she has access to it. There are three options for how to deal with access rights of documentation section's articles: to skip an article, to show a warning instead, or to neglect access rights (see Documentation Builder: access rights).
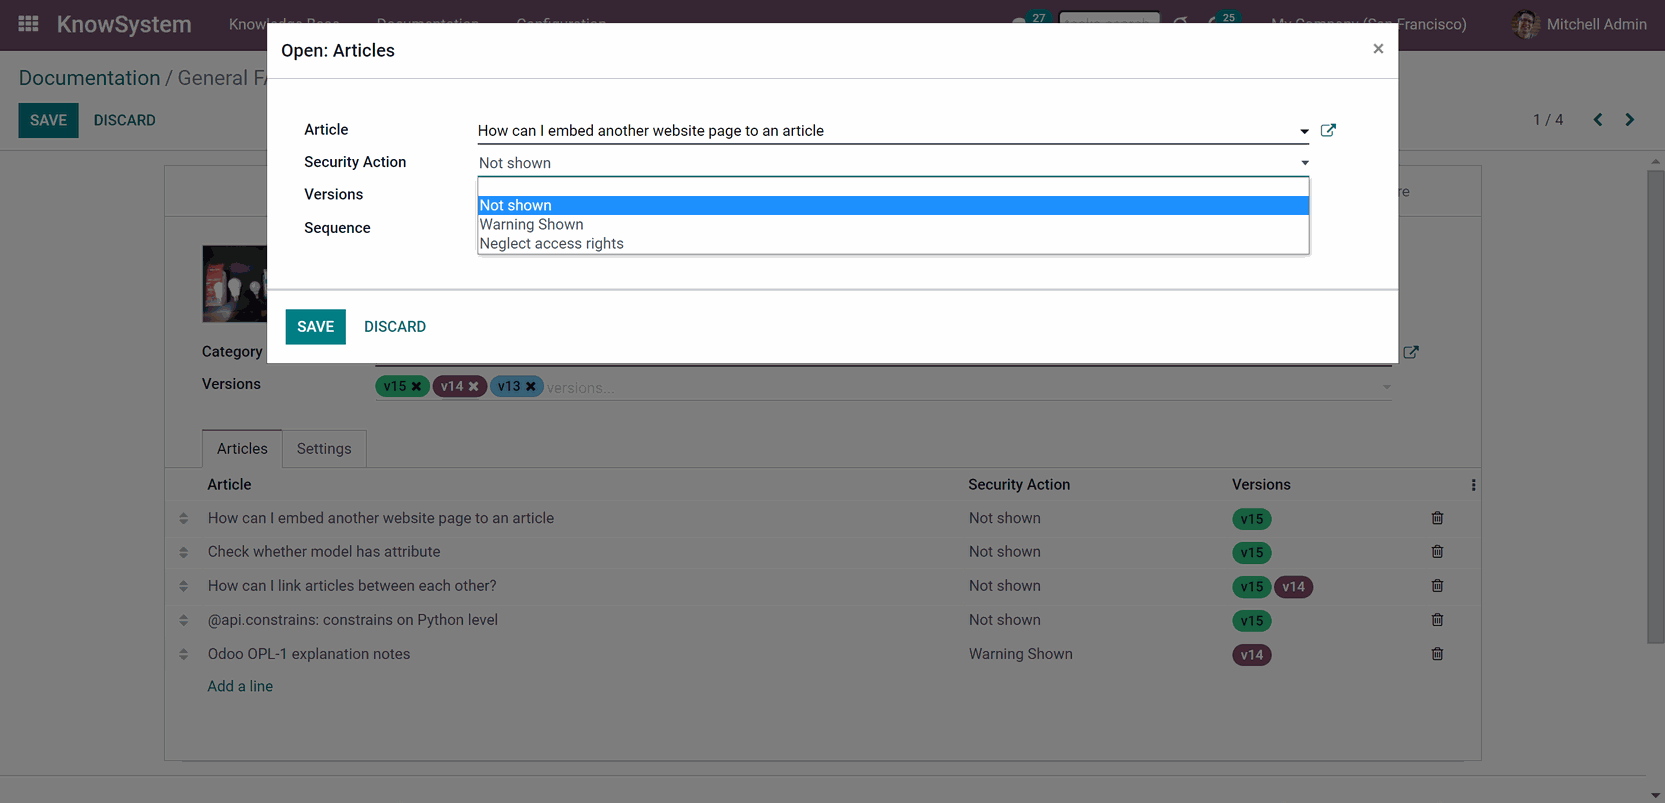
If you want to make articles' attachments visible under their content, you can turn on the option 'Show Attachments' in the KnowSystem Configuration, the section Documentation Builder.
The documentation section's body can be edited right from the frontend. It might be convenient to edit the whole documentation section instead of editing all articles separately. To edit a documentation section, just open one and click on the 'Edit' button in the top right corner. Edit the documentation section in the same way as you edit separate articles with the help of the website builder (see Website builder).
Documentation Builder: versioning
All features described in this article are related to the add-on Odoo Documentation Builder ().
Apply versioning for documentation to avoid double work in preparing specifications, user manuals, or software guidelines. As you create a document section you will be able to choose the versions to which it might refer and state the versions for each article. For example, the whole documentation sections might be applicable to v.14 and v.15 and some articles only to v.15. To create a new version:
1. Go to Documentation > Documentation Versioning
2. Click 'Create'
3. Write a title
4. Click 'Save'

Documentation may look differently depending on the version. Apply versions to a documentation section. For that start creating or editing a section and in the field 'versions' choose available ones or create a new one and click save. In the editing mode, you can assign versions to particular articles. Click on an article and choose one or several versions. You can choose only among those versions, which you applied to the documentation section of the article. If you won't assign any versions to an article, then it will be shown on all versions that are applied to its documentation section.
You can switch between the documentation section's versions, as you click on the version title in the left top corner. After that, the list of articles will change and you will see only the ones that are assigned to the version you chose.
Documentation Builder: access rights
All features described in this article are related to the add-on Odoo Documentation Builder ().
The app lets flexibly share documentation categories and sections. Public users can see only published documentation categories and sections. Portal users have the same access rights as public users, but you can also grant extra rights to particular partners. Assign KnowSystem tags for documentation sections to grant access to chosen Odoo partners (see Managing tags).
To turn on/off Documentation Builder for portal users go to Configuration > Configuration, find the section Documentation Builder and tick the box 'Portal KnowSystem'.
To turn on/off Documentation Builder for public users go to Configuration > Configuration, find the section Documentation Builder and tick the box 'Public KnowSystem'.

To publish a documentation category go to Documentation > Documentation Categories, open any category, and click 'Publish' or 'Unpublish' in the top right corner of the category's form.
To publish or unpublish a documentation section just open any section and click 'Publish' or 'Unpublish' in the top right corner of the section's form. There is no need to start editing a section to do that, as the buttons above the form are available even in the read-only mode.
To assign a tag to a documentation section start creating or editing it, click on the tab 'Settings', find the field 'Tags', and add some.
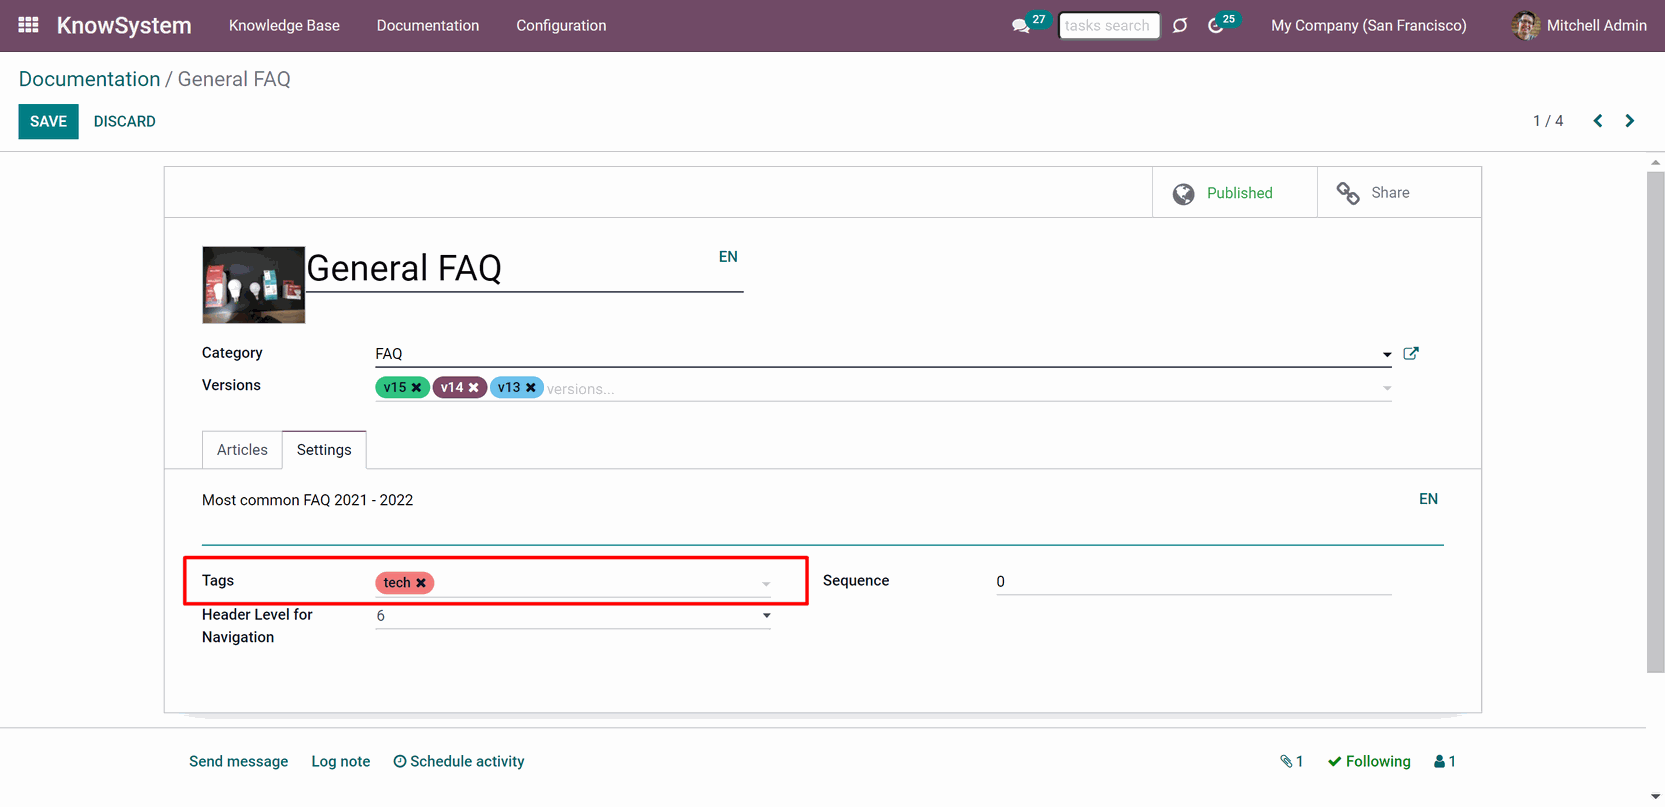
Depending on user rights documentation section might look different. Define what to do if a documentation user does not have access to included articles: to neglect restrictions, not to show that knowledge pieces (omit them), or show a security warning.
To choose the security action for an article in a documentation section:
1. Go to Documentation > Sections
2. Start editing a documentation section
3. Click on an article
4. Choose the security action
5. Click 'Save&Close'

To choose a security action for all included in a documentation section articles:
1. In the single view interface start choosing articles by ticking the box in the top right corner
2. In the right navigation panel choose the mass action 'Add to documentation'
3. Choose the documentation section or start typing a new title to create a new one
4. Choose a security action, that will be applied to all selected articles
To choose default security action for all articles in all documentation sections:
1. Go to Configuration > Configuration
2. Find the section 'Documentation Builder'
3. Find the field 'Default security action' and choose the action
4. Click 'Save'
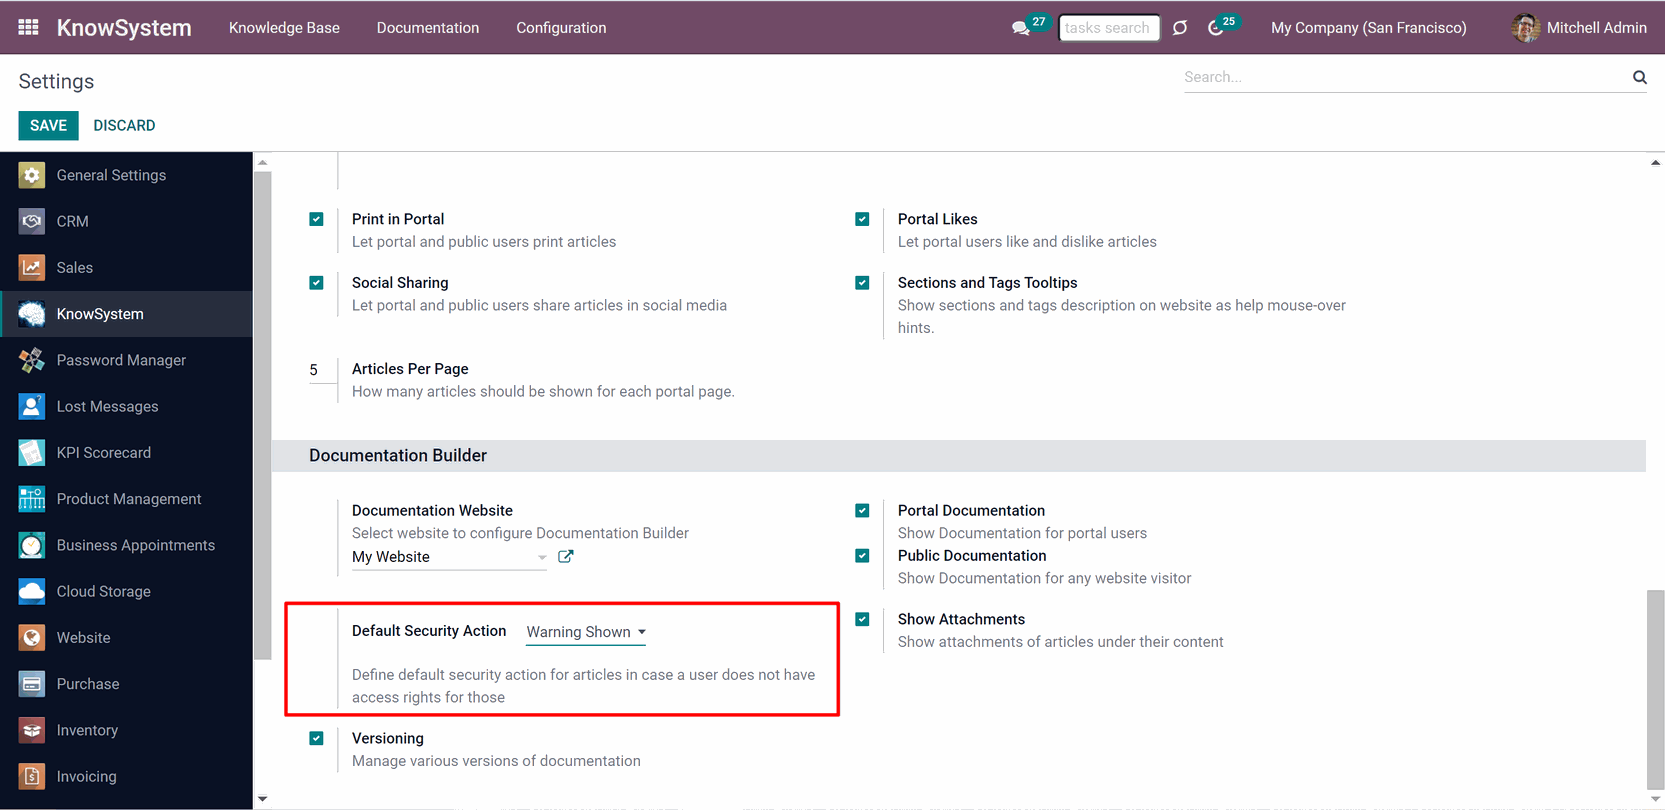
KnowSystem: Custom Fields
KnowSystem: Custom Fields is an add-on () to KnowSystem that allows you to add custom fields to articles. The add-on doesn't work without the core module: Custom Fields: Core. You can place your custom fields in the backend article's form, or on the website, if you have: KnowSystem: Website and Portal (), and KnowSystem: Custom Fields for Website and Portal (see. KnowSystem: Custom Fields for Website and Portal).
In order to show a new property for knowledge base articles, go to Configuration > Custom article fields, click 'Create' to add a new field, and enter details. It is possible to add custom fields of the following types:
1. Single-line text (char)
2. Simple text without formatting (text)
3. Rich text (HTML-formatted text)
4. Integer or float numbers
5. Drop-down choice with your own options (selection)
6. Checkbox (boolean)
7. Date or date and time
8. Binary (a file to upload)
9. Reference to another Odoo document (e.g. for sale order, contact; many2one)
The tool lets you comfortably select an interface position of a custom field from a closed list of options. In the backend form of view you can place your custom fields: after article, to the left column, or to the right column.
Distinguish knowledge articles by types in order to show properties only for suitable ones. Thus set of attributes for 'user guidelines' and 'technical specifications' might be different.
Mark a custom field required to force users to enter values. In this case, a user will not be able to save an article, if the field left empty. For that, tick the box 'Required to enter a value' as you create or edit a custom field.
Custom knowledge system fields might be imported and exported (see KnowSystem import and export).
The rights to create custom fields belong only to KnowSystem administrators.
Extra fields for article's forms
Various form placement
Require to enter a value
Import and export custom fields

KnowSystem: Custom Fields for Website and Portal
KnowSystem: Custom fields for Website and Portal is a free KnowSystem add-on () that lets you show custom fields on the website. The add-on doesn't work without the core modules: KnowSystem: Website and Portal (), KnowSystem: Custom fields (), and Custom Fields: Core. The available fields types for your website articles are the same as in the backend (see KnowSystem: Custom fields).
To set a custom field, go to Configuration > Custom article fields and click 'Create'. To make a custom field visible on the website, choose its 'Portal Page Placement': at the end, left column, right column. You can also leave the field empty if you want to have a custom field only in the backend.
KnowSystem: eCommerce
KnowSystem: eCommerce is a KnowSystem add-on () that allows adding the product FAQ or documentation entry to all eCommerce product pages. The add-on also requires the extension KnowSystem: Website and Portal ().
Add a clickable button to the product's pages. The text of the button can be customized. You can change it in any way, including applying HTML tags. By default, it is 'Frequently asked questions'.
The button can either redirect users to the KMS portal interface or call the pop-up accordion. In the first case, the related to the article filters and tags will be applied. However, the user still can remove the choice and see all available articles. In the second case, the user sees the list of clickable article titles in the pop-up accordion. This way, the user can read articles, without leaving the page.
It is possible to select some global articles and they will be added to all available products sold in the e-shop. To select articles in a batch, you can choose the related section or tag and all included articles will be considered as FAQ. The articles from the sub-sections/sub-tags will also be shown.
Add some more articles/sections/tags to particular products. Optionally, show articles for specific sets of attribute values and hide them for others. For example, to have different FAQs for steel and aluminum tables.
Define its own knowledge for Odoo attributes or attribute values disregarding selected products. For instance, introduce additional documentation for all variants that have 'legs' or 'custom legs'.
Different users may see different sets of articles in the FAQ. Articles are shown on Odoo product pages only if a user can access those articles. Thus, website visitors would see only published ones.
Optionally, hide the FAQ for specific products or for a particular website. For that, tick the box 'Do not show eCommerce FAQ'.
Add a customizable button to redirect to/show FAQ
Select the articles to show per product/attribute value/website
Hide the button for particular products/websites
Articles are shown according to the access rights
In case, you have an e-shop, it might be a good idea to show articles with the answers to frequently asked questions, so the clients could get the information he/she needs without contacting the company. With the help of the add-on, you can add a link (button) to the product's page. The button either redirects the clients to the related articles on the KnowSystem page or shows the list of articles in a pop-up accordion. The button is added on the products page to the right side below the description (see eCommerce Product FAQ).
The text of the button may be customized. For that, it is also possible to use simple HTML tags. Just write the text in the field 'FAQ button text'. By default, the button's title is 'Frequently Asked Questions'. If you work in a multi-language environment, you can also add the translation to the button's text. So, when a user opens the website in a different language, he/she would see the button's name in that language, if it is supported.
The set of articles can be configured on three levels: per website, per separate product and per products attributes. To add articles to a particular website, choose some sections, tags or articles in the section 'Global FAQ' on the KnowSystem configuration page. This way, any product on the website will contain those articles. In case some sections or tags are chosen, the articles from their children will also be shown in the FAQ.
Global FAQ is particularly useful if you have some articles, that relate to all of the products. For example, you can add the company policy, delivery information, purchase/refund instructions to the global FAQ.
You can also add certain sections, tags, articles to the separate product templates. This way, certain articles will be shown, only if you click on the FAQ button from that product's page.
You can also select the articles that will be shown, only if a particular product's value is selected. For that, in the field 'Applied only if the product has all the values' choose the product's value/values. This way you create a rule to show the chosen-in-the-line articles only if this value is applied.
It is possible to add several rules, i.e. several groups of sections, tags and articles. As a result, all articles found according to any of the rules will be shown on the page of this particular product. For example, we have a product 'Table' with attribute values black, white, steel, wood. The assembly instruction is different for the steel and wood kind of tables, so we create two lines - one with the article related to value steel and one related to article wood.
The application of each of the rules can be limited by several attribute values. Only products having all the specified values will have articles on the subject. i.e. the user must first select the correct value on the page of the online store. For example, there are also some important peculiarities of coloring the steel table in white, so we created another line and chose two values (white, steel), so the article will be seen only if both values will be selected.
All items found by any criteria as well as the items found by global criteria would be linked to the template. For example, from the product 'Table' with the selected values black, wood will be seen the global articles related to the company's policy, and the assembly-instruction-wooden-table article .
For a specific product, the FAQ button can be hidden from the store. For that, tick the box 'Do not show eCommerce FAQ' from the tab KnowSystem on the product cart.
To fully hide the FAQ button, choose the option 'Do not show' as the FAQ view on the configuration page.
You can define own sections, tags, and articles for a specific attribute. For example, show additional articles for all products with the attribute 'Legs'. It is possible to add several rules, i.e. several groups of sections, tags and articles. As a result, on the page of each product from which you can select this attribute, all articles found by any of the rules will be displayed.
Attribute rules can be limited by the selected value on the product page, i.e., the user must first select these values on the product page in order for FAQs to be recalculated. For example, we have an attribute value 'Custom legs', for which two more articles are required 'Custom order guidelines:legs' and 'Custom order prices:legs'.
To add own section, tag, articles to the attribute value, as you add FAQ rules to the attribute, in the field 'Applied only if the product has all the values' choose the product's value/values. The chosen-in-the-line articles will be shown only if this value is applied.
This way, in order to generate FAQ for a particular product, the module will take into consideration the sections, tags and articles from three levels.
Different users may see different sets of articles in the FAQ. Articles are shown only if a user can access those articles. Thus, in order to make articles available for the website users, it is necessary to publish them.
KnowSystem: Multi Languages
KnowSystem: Multi Languages is a KnowSystem add-on () that lets you translate articles into installed in Odoo languages. In such a way users might read and edit articles in a language from their preferences. The language switch sign is added to such fields as: title and preview text as you edit an article. Click on the language icon to manually translate to another language. You can also translate sections', tags' and tours' titles. The fields will be shown in the preferred user's language.
The work with articles in multi-language is not easy as it implies preparing an own body for each article for each language, what almost equals writing a brand new article.
Manually translate articles, titles, and preview text
Add translation for sections', tags' and learning tours' titles
Copy from another translation
See revisions independently for different languages
If you want to have only the title and preview text translated, there is no need to copy-paste the body as it will be in the default language if no other changes are made.
Click on the language icon to manually translate the field to another language. The language switch sign is added to such fields as:
1. Title and preview text as you edit an article.
2. Sections', tags' and tours' titles
In order to see the fields translated, you need to switch to the preferred language.
To update knowledge body translation you should change your user preferences to a required language, in which you want to apply changes. Then, go to an article and introduce changes as you just editing an article. All changes performed with an article will be applied to the version only in the currently preferred language. The article in the default language will not be changed.
Multi-language regime implies that all articles should be kept updated in all Odoo languages.
Article content also might be copied from another language.
To copy the content of article of one language to article in another language:
1. Change the preferred language in user's settings
2. Open an article and start editing it
3. In the left bottom corner of the article's body click on the button 'Copy from another translation'
4. Confirm your choice
5. Click 'Save'
The revisions of translated articles are kept separately depending on the article's language. You can't switch between revisions of the same article in different languages and, for example, restore a revision of an article in French to the article in German (see Article revision and history of changes).
About KnowSystem: Knowledge Base System
KnowSystem is a universal knowledge management tool that might be configured to any business goal and any set of Odoo apps: for helpdesk, marketing, IT, HR, project management, so on and so on. Typical use cases are:
Helpdesk - once faced a challenge, its solution might be recorded in KnowSystem for repeated usage by co-workers and for self-service by clients
Sales and CRM - salesperson helper to find information about products, offers, frequently asked customer questions
Project management - to keep and easily retrieve knowledge of existing solutions, tools, hints, and experiments
HR - to prepare instructions, guidelines, learning tours and training, and any codified knowledge of routine in your company
Marketing - to organize Odoo online library of product use cases, expert knowledge, and well-structured documentation
Legal issues - systematize your policies, contract and approval managements, keep the full classifier of trademarks, licenses Informational technologies - share easy-reached manuals and configuration guidelines.
The app provides:
Single view KMS navigation
Reference of articles in messages
Wiki-like revisions
View statistics
Applied in any functional area
Documentation builder, Website and portal, Custom fields, and multilanguage support
Concepts and terms
Here you can find all terms and add-ons icons that were used through all documentation.
Article - the main KMS object, which represents the formatted text of specific knowledge applied to a certain functional/business area, that might be restricted to a specific user group.
Article template - a ready sample of an article, that you can edit to create a new one with preserved formatting.
Article revision - a version of an article, kept in history and can be restored.
KnowSystem section - articles' storage, which is used for convenient navigation over articles and managing access to internal user groups. Each article should have a single linked section. Sections support hierarchy: each might have subsections and a parent section. If a user group has access to a parent section, then it has access to all its subsections as well.
KnowSystem tag - is a KMS object to distinguish articles for comfortable navigation, granting portal access for articles, and mapping other Odoo objects with articles. Each article may have a few tags or not have any. Tags support hierarchy: each might have subtags and a parent tag.
Learning tour - a set of articles united by a common topic and ordered with the purpose to navigate users through a particular subject and control their progress as they move forward.
Documentation section () - is a central Odoo Documentation Builder object aimed to organize website documentation for a specific topic. It represents a set of ordered articles that would be shown structured on a single documentation page. Each article might be attributed to a few documentation sections. Do not confuse with the KnowSystem section which is used for KMS navigation.
Documentation category () - a combination of documentation sections, that are similar in a way.
Documentation version () - a special Odoo Documentation Builder object, which allows you to prepare single documentation for a few versions, with a slightly or significantly different set of articles.
Article type () - a KMS object, that aims to distinguish articles to apply different custom attributes to different articles. Used also for navigating over articles in a Single View Interface and website KnowSystem.
Article custom field () - an extra field, that you can add to an article, that may contain different types of information of your choice.
Article attachment - a document that is assigned to an article.
Internal user - a user who has access to the Odoo backend and its functional apps. Such a user is assumed to always access the knowledge base.
Portal user () - a registered user who has access to the Odoo portal, but cannot access the Odoo backend. This kind of user will only be able to have access to the website knowledge base if you allow that.
Public user () - any website visitor, who hasn't logged into Odoo. Can access only published interfaces of KMS.
Single View Interface - the functional interface for internal users to navigate through articles, update those conveniently, and manage KnowSystem sections, tags, types (), and tours from a single view.
Mass action - an action that can be applied to several articles at once, can be found in the right navigation panel of the Single View Interface.
Article form view - an article's interface for internal users, which aims to comfortably extract and update a knowledge piece, collaborate in teams, control statistics, etc.
KMS website interface () - the interface introduced for portal and public users to navigate through articles conveniently. It can look differently for different portal users based on the articles, sections, tags, and types () that they have access to.
Documentation navigation () - the website interface of a documentation section introduced to conveniently get deeper into a certain topic and go through a set of preordered articles.
Documentation categories page () - the website interface to navigate through documentation sections.
Backend editor - a KMS tool to prepare articles in Odoo backend. Assumes a number of ready building blocks and simple HTML styles. Primarily used for internal (Odoo backend) use, including printing and referencing in messages.
Website editor () - an interface editing tool to prepare articles using the Odoo advanced website builder, including its building blocks and sophisticated styles. It is perfect for constructing the website/portal KMS and documentation section. Isn't supposed to be used for internal knowledge.
Code editor - special article editing mode, that implies changing the source code of an article directly. Orients for advanced users to apply custom HTML changes. The code editor might be turned on right from an article's backend, or, alternatively, the backend editor might be fully replaced () by a code editor through the app configuration.
Add-ons icons
Features introduced by add-ons are marked with these signs.
KnowSystem: Website and Portal
The module lets you publish articles on the website, share them with portal users, and use the website builder to update articles.
Odoo Documentation Builder
The module lets you design website documentation pages based on knowledge base articles.
KnowSystem: Custom Fields
The module lets you add and show custom fields for articles (backend).
KnowSystem: Custom Fields for Website and Portal
The module shows custom fields on the website and portal pages (frontend). Free, but requires KnowSystem: Custom Fields.
KnowSystem: eCommerce
The module lets you prepare FAQ/documentation for Odoo eCommerce product pages.
KnowSystem: Multi Languages
The module lets you translate articles, sections, and tags to install in Odoo languages.
Single-view knowledge navigation
The innovative single view interface is implemented in the knowledge base system. This allows you to manage articles, and see the preview from the same interface, without opening the article. When you open the app and click on an article, you see that your interface is divided into three parts: the main part with articles in the middle and two functional parts with sets of control elements on the sides of it.
Navigation and Sorting
The left navigation panel provides you with the opportunity to sort articles according to various criteria, select all found articles, manage sections, tags, types (), and learning tours.
You can sort articles by views, likes(difference between likes and dislikes), title, created date, write date, section, and author. If you click on the 'Arrow' icon on the right side of the sorting criteria, then the sorting will be reversed.
To sort articles:
1. Open KnowSystem
2. Choose the sorting criterion
3. Click on the 'Arrows' sign to see the reversed sorting
You can search articles with the help of the search bar at the right top of the page. There are various search options:
1. By contents (in headline and articles' body)
2. By type ()
3. By author
4. By section
5. By tag
6. Documentation sections ()
You can filter articles by sections, tags, and types (). Find a particular section or a tag quickly with the help of the section and tag search bars. To see all articles of one or several sections put a tick in the box by it. As sections and tags have a hierarchy: if you choose a parent section or a parent tag, you will see its subsections and subtags as well. You can do the same with tags and types () and choose different variations of them. You can edit sections, tags, and types (), work with tours or launch them right from the same interface, by clicking on them with the right side of your mouse. Read more in 'Managing sections', 'Managing tags', 'Managing types' 'Learning tours'.
Click on a checkbox in the top right corner of an article to choose it. If you click on the 'Select all found' button, you will see the short auto preview of all these articles and possible Mass actions in the right navigation panel of the interface.
Articles Preview
The main part shows the articles list, where you can see their titles, tags, the date of creation, last edit, author's photo, and preview text. If an article has no preview text, it will be generated automatically as the plain text extracted from the beginning of an article. It might contain special symbols since the preview would represent an abstract of pure HTML.
To write your own preview text:
1. Start creating or editing an article
2. Find the field preview text and write your preview
3. Click 'Save'
For preview text, you can use pure HTML tags. In particular, you can add pictures (however, be cautious: advanced HTML might spoil the preview appearance).
Add an article to favorites or remove it from favorites by clicking on a star in the right bottom corner. Put a like or a dislike to an article - you can always change it later by clicking on the green button.
Manage activities right from an article's card, for example, plan a revision of an article.
If an article is used in a documentation section (), then it is marked by a paperclip icon on the kanban card.
Select articles by ticking a box on the top right corner (you can also add all found articles by applying 'Select all' in the left navigation panel). When you switch between filters or apply a new search, the selection will not be cleared and that is very convenient when you want to open, print, or do another action on various articles at once.
The right navigation panel, the one to the right side, appears as you add any article to the selection.
Mass actions on selected articles
As you choose articles by clicking on the box in the top right corner of an article, the right navigation panel appears. There you will see the list of all chosen articles. Click on an article's title to remove it from the list. Remove all articles by clicking on the icon () on the right side of 'Selected articles'.
On the right navigation panel, you can update selected articles in a batch. The available mass actions include:
Update section, tags, type () of all chosen articles. Switch article's state to archived or restored. Publish or unpublish articles ().
Click to add to learning tour all chosen articles. You will be redirected to tours settings, to manage the order of articles.
Click to save all chosen articles in one pdf file. To make sure your file looks good for printing, avoid using style 'Header 1' throughout the article.
Click to duplicate all chosen articles.
Click to follow all chosen articles.
Add to favorites all chosen articles.
Click to archive all chosen articles. You can always restore them, to see all archived articles choose the filter 'Archived'.
Managing KnowSystem sections
KnowSystem section is a supreme KMS object, an articles' storage, which is used for convenient navigation over articles and managing access to internal user groups. Each article should have a single linked section. Sections serve to fulfill the following tasks:
1. To unite articles (you can add only one section to an article)
2. To restrict rights to articles (see. Access rights)
3. To navigate through articles and find them quickly, by putting a tick for the required section
Sections have a hierarchy. You can set a parent section and some subsections while editing or creating a section. You can also change the hierarchy by Drag&Drop. If a user group has access to the parent section, it would have access to all included sections (see. Access rights). It is also possible to print all available articles by a section (see KnowSystem in use).
If you have a lot of sections and sub-sections, then you may find it difficult to navigate through them and select the ones you need quickly. Thus, for extra convenience, the special search bar above the sections list was introduced. Just start typing the word and click 'Enter' or the search button and the matching results will be shown and marked red. Click the button 'Reset' on the right side of the search bar to empty the search.
You can create and edit sections right from the single view interface and from the separate menu Configuration > Sections.
To add a new section through the single-view interface just click '...add new section' and write the title. Right click on a section to see all available actions:
1. Create (click to start creating a new section)
2. Rename (click to change section's name)
3. Edit (click to edit a section)
4. Print (click to print all articles in a section and its subsections if any)
5. Archive (click to archive a section, its articles will remain active)
How to edit sections:
1. In the KnowSystem menu right click on a section, then choose 'Edit', or go to Configurations > Sections, choose the section and click 'Edit'.
2. Set the hierarchy by choosing the parent and sub-sections
3. Click the tab 'Restrict access' to set the groups of people that will be able to see the section and articles in it. Access to the parent section allows reading all articles in it and in its' sub-sections (see. Access rights)
4. Add the description to the section
5. Click 'Save'.
Managing tags
KnowSystem tag is a critical KMS tool. A tag is a colorful mark on an article, that attracts attention. One article can have multiple tags. Tags serve for:
1. Quick search and easy navigation
2. Attaching tags to partners, to give access to articles with a certain tag (see. Access rights)
3. Creating a clear, understandable knowledge base
4. Filter articles, for quick access all over Odoo
Tags also have a hierarchy. If you'll put a tick for the parent tag, you will see the articles from all tags that it includes. You can also print all available articles by the tag.
If you have a lot of tags and sub-tags, then you may find it difficult to navigate through them and select the ones you need quickly. Thus, for extra convenience, the special search bar above the tags list was introduced. Just start typing the word and click 'Enter' or the search button and the matching results will be shown and marked red. Click the button 'Reset' on the right side of the search bar to empty the search.
You can create and edit tags right from the single view interface and the separate menu Configuration > Tags.
To add a tag through the single-view interface just click '...add new tag' and write the title. Click on a tag with the right button of your mouse to see all available actions:
1. Create (click to start creating a new tag)
2. Rename (click to change tag's name)
3. Edit (click to edit a tag)
4. Print (click to print all articles in a tag and its subtags if any)
5. Archive (click to archive a tag; its articles will remain active)
How to edit tags:
1. In the KnowSystem menu right click on a tag, then choose 'Edit' or go to Configurations > Tags, choose a required record and click 'Edit'.
2. Set the hierarchy by choosing a parent tag
3. Put a tick in the box 'Show tag on Website' (), if you want to have these tags on the website
4. Choose allowed partners that will be able to see articles with these tags. Access to the parent tag allows reading all articles with it and with its' sub-tags (see. Access rights)
5. Choose the website () to show your tags on, if you don't choose any and you have a tick 'Show tag on Website', it will be shown on all your sites
6. Remove the tick from the box 'Active', if you want to archive the tag
7. In the tag 'Applied to', you can put a tick in the box 'Apply to all documents', then your tag would appear in all documents: sales orders, contacts, etc. Click 'Add a line' to add filters, to show the tag only to documents that match all the criteria.
8. Click 'Save&New' to add more filters to another model, otherwise 'Save&Close'
9. Add the description to the tag
10. Click 'Save'
To grant access to articles by tags for particular Odoo and portal users:
1. Start creating or editing a tag, choose a particular contact or contacts in the field 'Allowed partners, and click 'Save'
2. Open contacts, click on any profile card, and start editing it, in the field 'KnowSystem' tags choose the tag, click 'Save'
You can assign KnowSystem tags to partners, so they will see the articles under this tags, right as you edit a contacts card. To that goal use the field 'KnowSystem tags'.
You can choose 'Apply to all documents' if you want to be able to reach articles with this tag through the KnowSystem icon in the forms of other documents from anywhere in the Odoo. Or you can add filters to tags, to find suitable articles very fast. The articles will be accessible only if the document matches any of the set to the tag filters (see. KnowSystem in use).
Article types
Article types is an organizing instrument introduced by an optional add-on KnowSystem: Custom fields (). Types serve to fulfill the following tasks:
1. To show properties only for suitable types. Thus, the set of attributes for 'user guidelines' and 'technical specifications' might be different (see. KnowSystem: Custom fields)
2. To organize articles and navigate through articles (an article may have only one type)
Types also support hierarchy. You can set parent types and subtypes while editing or creating a section or by Drag&Drop.
Create and edit types right from the single view interface or from the separate menu in Configuration > Types.
To add a type through the single-view interface just click '...add new type' and write the title or click on a type with the right side of the mouse to see all available actions:
1. Create (click to start creating a new type)
2. Rename (click to change type's name)
3. Edit (click to edit a type)
4. Archive (click to archive a type, its articles will remain active)
To edit types:
1. In the KnowSystem menu click on a type with the right side of the mouse, then choose 'Edit', or go to Configurations > Article types, choose the section, and click 'Edit'.
2. Write the title
3. Choose a parent type
4. If you remove the tick from the box 'Active', then the type will be archived
5. If you want the type to be visible on your site, tick the box 'Visible on the current website' ()
6. If you have several sites, you can choose one to show the type, or leave the field 'Website' () empty to show on all sites
7. Click 'Save'.
Learning tours
Organizing a tour is a good way to combine all articles that a person needs in order to reach something. For example, you can organize a tour for newcomers, so they could learn all the nuances of working in your company. Learning tours allow you to:
1. Combine articles in a particular order with the possibility to move through them with the help of extra buttons '<Back' and '>Forward'
2. Restrict access to tours to particular user groups
3. Track users' progress and invite particular users to complete a tour
4. Add a description page before articles
You can manage learning tours in two interfaces: in the single view interface and in the separate menu Configuration > Tours.
Creating a tour
How to add a learning tour:
1. Start creating a tour through a single view interface by clicking on '...add a new tour', or by going to Configuration > Tours and clicking 'Create'
2. In the single-view interface choose all the articles that you need by ticking the box in the top right corner of an article. In the left navigation panel choose the mass actions 'Add to tour'
3. Choose an existing tour and click 'Save&Close'
4. Click 'Add a line' to add some more articles to your tour. Choose an article and click 'Save&New' to add one more, or 'Save&Close' if you have already added the ones you need
5. Click on the tab 'Restrict access' to choose groups of users that will have the access to the tour, if you leave the field empty, all internal users would see the tour. If you choose one group, then only this group will be able to start the tour
6. Click on the tab 'Description' to add some words about the tour. The page with this description would be the first one your users see as they open the tour
7. Click 'Save&Close' and you will be automatically redirected to the tour page, where you can see all the articles that you added
8. Click 'Edit'
9. Drag&drop to change the sequence of the articles, press bin on the right side of an article to delete it from this tour
It is also possible to click '...add new tour' in the left navigation panel of the interface and add articles to the tour manually one by one.
You can always edit your tours, either by clicking on it with the right side of the mouse or by going to Configuration > Tours.
In the editing mode you can also see the user's progress, just click on the tab 'Users Progress'. Here you can also invite separate users to complete the tour by clicking 'Add a line' and choosing a user.
Completing a tour
To begin a tour. Open the KnowSystem single view interface, find tours in the left navigation panel of it, and click on a required one.
If a user doesn't have access rights to one or several articles in the tour, then he or she will not see those articles in the tour. Thus the same tour may look differently for different users.
To start a learning tour:
1. Open a tour from the KnowSystem app
2. Click 'Start a tour'
3. Move through the articles. When you return to the previous article you do not lose your progress. You can close a tour and continue it again later. Then, you will start from the same place, where you stopped
4. At the end of a tour, you see a congratulation alert 'Good job! The tour is over.'
How to create an article
There are two user groups that can create an article. Those are KnowSystem Admin and KnowSystem Editor.
To create an article:
1. Open the KnowSystem app
2. Click 'Create'
3. Introduce title and preview text
4. Optionally add the published title ( the title, that will be visible on the website)
5. Add tags, section, type (), and choose the website to show the article on ( the article will not be visible on the site until you publish it. If you leave the field empty, then the article will be seen on all your websites after publishing)
6. Attach files, if you want
7. Now you can fill the body of the article in the Backend builder, use building blocks, change styles
8. Click 'Save'
An article may have two titles, an article's title, and a published title. If an article has a published title, then it will be used in:
1. Pdf's name. If you download a single article, which has a published title, the title will be used as the file's name.
2. Article name in pdfs. If an article has a published title, then it will be used in generated pdf instead of the article's title.
3. Article title on portal/website (). If an article has a published title, then this title will be shown on the portal/website both in the list of articles and as you open a particular article instead of the article's title.
4. Article header in documentation navigation + content (). If an article has a published title, then it will be used as the article's headers and in the navigation list instead of the article's title.
The article's title is the title, which is used in the backend. If an article doesn't have a published title, then the article's title will be used in all cases.
You can also create an article from a template, to avoid losing time on adjusting blocks and styles (see Creating an article from a template).
There are three ways to edit an article. You can do that in the Backend builder, Website builder (), and HTML editor. It is up to you which one to choose, according to your needs and preferences.
Backend builder
The default one
- Basic styles
- Safe for printing and email referencing
- Looks less attractive on the site
- Easy to use
Website builder
Open the article and click 'Edit on Website'
- Advanced styles
- May display incorrectly when added to emails
- Perfect for site
- Easy to use
HTML
Click </> to switch between backend builder and HTML code. Or fully replace backend builder ().
- Any simple and advanced HTML styles
- Can add article's text to emails, when only simple styles are used
- Difficult to use
Backend builder
A backend builder is an editor that you see when you create or edit an article internally. It provides you with a set of simple and safe-for-the-backend blocks, which are compatible with printing and messaging layouts. There are three types of blocks: text blocks, special blocks, and image blocks. Each block has a grey intro box, where you see what it looks like.
The available text blocks are:
1. Title + text
2. Text
3. Title + Subtitle
4. Comparisons
5. Columns
6. Color Boxes
The available special blocks are:
1. Card
2. Alert
3. Code
4. Tagline
5. References
6. Separator
The available picture blocks are:
1. Image + Text
2. Text + Image
3. Image
4. Banner
5. Columns
6. Images List
Drag and drop building blocks to update an article's body. As you save the article the styles change to the ones that are safe for reading in the backend, printing, and adding to messages.
In the backend builder, you can choose text styles, make text bold, italic, underlined, change font size, remove font style, add ordered and unordered lists, add checklists, align paragraphs, add tables, links, pictures, switch to the code view, and undo and redo actions.
In the backend builder, you can also switch to the raw code view to update articles' HTML at any moment, by clicking on the </> sign in the top right corner of the blocks panel.
To make sure the sub-titles look good while printing, avoid using the style 'Header 1' in the article's body.
Website builder
The website builder is introduced by an optional KnowSystem add-on KnowSystem: Website and Portal (). It allows you to apply advanced styles and complex widgets by using Odoo's built-in website editor to make website-friendly articles. Numerous snippets, animations, style templates, and options will help you to prepare nice-looking portal knowledge pages. Avoid using that for internal or printing purposes: advanced styles often contradict printing and composer layouts.
How to edit an article in the website builder:
1. Open the article you want to edit
2. Click the button 'Edit on Website'
3. Add blocks, choose various styles, and write an article
4. Click 'Save'
You can also start creating an article, write the title, text, add tags, a section, a type (), and choose the website to show the article on, click 'Save', and fill the article's body in the website builder, the same way as in 'How to create an article'. If you entered the published title in the backend builder, then, as you open the article through the website builder – you will see the published title. Even if the article is not published.
The backend builder and website builder have different purposes. Choose the backend builder, if you want to create articles for internal use, that you will be able to print and refer to when sending an email or a message. Choose the website builder, if you want to publish your articles on a website, share, or give access to some partners. In the website builder, the choice of blocks and styles is wider. You can also animate icons and some boxes to catch the reader's attention. It is possible to change the font's color and its background color.
The set of available blocks depends on the modules and themes installed in your Odoo system. For writing articles available all the same blocks as when you create a website. For example, Title, Text, Numbers, Picture, Text - Image, Image - Text, Columns, Accordion, Alert, etc.
There are a lot of tools to make your articles stand out by customizing building blocks. Try various styles, fonts, and font colors. Use the command '/' to call the additional instruments panel.
If you primarily use the website builder to edit articles, you might be interested to replace the backend builder with an HTML editor permanently. For that go to Configuration > Configuration, find the section 'KnowSystem options', and put a tick to the box 'Turn off Backend Editor' (see. Code editor).
You can turn off the website builder in settings and publish articles made in the backend builder instead. In this case, articles will be less colorful, but you will preserve the opportunity to print them and add them to an email's body.
To turn off the website builder, go to Configuration > Configuration, section KnowSystem Options, and remove the tick from 'Edit on Website'. After that articles would be available on your website in read-only mode only.
Code editor
Code editor allows you to apply any simple and advanced HTML styles but requires certain technical knowledge. Articles that are written with the help of simple HTML might be compatible with printing and messaging layouts. Switch to raw code from the backend builder from time to time or replace it fully with the code editor, if you have the add-on KnowSystem: Website and Portal installed ().
You can switch to the raw code view to update articles' HTML at any moment, by clicking on the </> sign in the backend builder.
Optionally replace the backend editor with an XML editor to rely fully on the website builder () and edit only raw code in the backed. Introduce any HTML tags and styles, including bootstrap-ready elements and even iframes.
Creating an article from a template
Creating an article from a template is a fast and convenient way to create new articles while keeping uniform styles. You can prepare new knowledge templates or save any existing article as a template.
You can use any article as a template and use it for further articles. For that, open any article, in the head menu of it find the 'Actions' button, choose 'Make template', write the reference, change it the way you want, and click 'Save'.
You can also create a template in the configuration menu. To create a template, open the KnowSystem app, go to Configuration > Templates, click 'Create', write a reference title, fill the main body and click 'Save'.
Use backend articles' templates only for articles in backend to make sure styles are displayed correctly.
To create an article from a template:
1. Open the KnowSystem app
2. Click 'Create from template'
3. Choose a template
4. Click 'Create'
5. After that, the body of an article will be filled with the values of a template
6. Continue creating an article (see How to create an article)
Interaction with an article
As you open an article, you see the header with available actions above the title. To change something in the article, click 'Edit' or 'Edit on Website' (). Here as in the KnowSystem menu, you can create a new article from scratch and from a template.
As you click on the 'Discuss' button, you would see the article's message thread. Any internal user that has the access to the article can take part in discussing it. Here you can see, the notifications stating that the article was revised and other people's comments. Click 'Send message' to open the message typing field, add smiles, attach files or open the message wizard to change text style.
You can also add a Log note or schedule an activity connected with an article, e.g. to revise it. All followers might receive notifications about revisions of an article (see Article revision and history of changes). Click 'Follow' to become a follower of the article, or unfollow, if it is not relevant. You can add followers, by clicking on a 'Person' icon, and selecting the recipients of the invitation.
As you click on the 'Revisions' button, you would see the list of editions with information about the date and the person who changed the article. You can click the button ' Observe' by any revision in the list, to see how the article used to look. If you like some variant more or the article was spoiled, you can click 'Restore this revision' and confirm your choice in the pop-up window to back up an article. Keep in mind, that this action will be written as a new revision and you still will be able to return to any previous state of the article (see Article revision and history of changes).
As you click on the 'Info' button, you see all the available information about the article, including:
1. The list of contributors that took part in creating and revising the article
2. The time of publishing and last revision
3. Article's statistics, such as views and the number of times the article was referred in emails and was viewed by each person
4. Documentation sections (), where the article is used
5. People who liked, disliked, or added the article to favorites
6. At the bottom of the page, you can also see the links, that lead to the article. If the box 'Published' () is ticked, then you see two links: Website URL and Internal link
7. Share button ()
You can share the link to the article with any user neglecting the access rights (). For that click on the 'Share' button at the bottom of the info page. The link with a special token would be generated. Copy the link and send it to a user. Anyone with the link will be able to see the article even if it is not published ().
Click on the 'Star' sign, to add the article to favorites, put a like or dislike to the article. You can always change your mind and put a like instead of dislike or vice versa. The chosen icon will be grey, to change the answer click on the one that is green. Click 'Save as PDF' to start the instant download of the article. Click 'Actions' to: restrict access, (un)publish the article (), make a template, add it to a tour, duplicate, archive, or delete the article.
KnowSystem import and export
If you already have articles in some KMS systems you can add them to KnowSystem. Use the 'Import' tool above the articles view to import an electronic table with such articles. Take into account that the body of an article should be pure HTML.
To import your articles to KnowSystem:
1. Click 'Favourites' at the top of the page, the above articles list
2. Choose 'Import records'
3. Click 'Load file' and choose a file with articles
4. Choose the columns for import
5. Click 'Import'
6. Upon finishing you will see a message stating that a certain number of records is imported
If you create articles in KnowSystem and want to move to some other app or just to have an extra file with articles for extra security, use the mass actions button 'Export'. It would generate a table which might be also used for import. You can choose various fields for export, and save files in .xlsx or .csv format.
To export articles:
1. Choose the articles for export, by ticking the box in the article's right top corner or clicking 'Select all found'
2. Click 'Export' in the right navigation panel mass actions
3. Choose the article's fields for export (by default there are: article title, article, preview summary, section, and tags)
4. Tick the box 'I want to update data' if you want the file to be import-compatible
Article revisions and history of changes
The history of article revisions is kept in Odoo in a similar way it's done in Wikipedia. If one of the users breaks something, it takes 2 clicks to recover a proper knowledge version. A revision is created when an article or an important detail (title, content, section, tags, attachments) is changed. Not significant modifications do not lead to creating a new revision. Revisions help to restore only important details.
As you click on the Revisions button you see a pop-up window with all the revisions of the article. You can find out who and when changed something in an article. There are 5 columns, where changes are stated - in contents you see how many signs were added, if they are green or deleted if they are red and with a minus; the other columns show previous state, for example, the previous title, or a deleted tag.
To restore a revision of an article:
1. Open an article
2. Click 'Revisions'
3. You see all the revisions of this article
4. Click observe to see any of those
5. Click 'Restore this revision'
After restoring, you can always return back to the previous variant of an article, as a new revision is created.
Only KnowSystem Admin can restore and delete revisions.
You can translate your articles into various languages(). Then you will see the sign of the language, for example, 'EN', in the title and preview text of an article while editing. Click on the icon to manually translate it. Odoo users, who have a different platform language will see the manual translation of the title and the preview text. You can edit the article in your default language and the changes will be applied only to the article in this language. The same article in other languages will remain the same. Revisions of the same article in different languages are kept in one list, but it is impossible to restore an article to one of the versions of the article in another language.
There is a separate menu, where you can see and manage all revisions. For that, go to Configuration > Revisions. There you can see the list of revisions, group them (for example by an article), search, restore a revision and delete the ones you don't need.
To restore a revision, just open it, click the button 'Restore the revision' and confirm your decision.
To delete one or several revisions, you need to select them by ticking the box on the left side, then click on the gear icon 'Action' and choose the option 'Delete'. After that, the deleted revisions will be deleted permanently.
For security purposes, in order to access the menu 'Revisions', a user should be a 'KnowSystem Administrator'.
KnowSystem in use
Observe article content right from any Odoo object: there is no need to always switch to the KnowSystem advanced interface. All articles are available in a pop-up window with convenient navigation. Click on the KnowSystem icon above a document form or in the systray to access the articles. Send KnowSystem articles in messages by updating a message body or attaching a pdf file. Print all articles in a tag or section.
Set tags for the KnowSystem quick access. You can choose 'Apply to all documents' in the tag's settings if you want to be able to reach articles with this tag throughout the KnowSystem icon in the forms of other documents from anywhere in the Odoo. Or you can add filters to tags, to find suitable articles very fast. The articles will be accessible only if the document matches any of the set to the tag filters. Add filters to tags, to show particular articles only when they match ALL or ANY of them.
Documents by tags
Link knowledge tags to Odoo document types in order to simplify the search of articles. You can either choose to apply a tag to all available documents or choose a particular model and add filters.
As you apply a tag to all documents, the tag will be added by default to all quick search forms regardless of the interface and document type the user is working with. To apply a tag to all documents:
1. Start editing or creating a tag
2. Find the tab 'Applied to' and tick the box 'Apply to all documents'
3. Click 'Save'
As you apply a tag to one or several documents' modules, the tag will be added by default to the quick search forms according to the document type the user is working with. To apply a tag only to a particular document's models:
1. Start editing or creating a tag
2. Find the tab 'Applied to' and click 'Add a line'
3. In the pop-up window choose a model and click 'Save&New' to add one more, otherwise 'Save&Close'
4. Click 'Save'
You can also add filters to each chosen model. So, the order of the articles with this tag will also depend on particular documents' objects. For example, assign helpdesk tickets to the tag 'odoo/helpdesk': the latter would be entered by default for support requests objects.
How to add some filters to a document's model:
1. Start creating or editing a tag
2. Find the tab 'Applied to'
3. Click 'Add a line'
4. Choose a model
5. Click 'Add filter'
6. Choose filter options, by scrolling or typing the beginning in the search field and choose the filter options
7. Click on '+' on the right side of the rule you wrote to add one more filter, otherwise click 'Save&Close'
8. If you have more than one rule you can choose the ANY or ALL button above, so only documents that match ANY of the rules or ALL rules will be shown
10. Click on the '...' button, on the right side near '+' to add an even more complex rule
11. Here you can also choose to filter documents that match ALL or ANY rules
12. If you choose ALL or ANY both times, your rules will stand in one line and only one button will remain
Push the button 'Records' to see Odoo documents that match the rule terms.
Here are some examples of useful simple filters:
Total > = 1000 (Will show articles with this tag, if the order total is more than 1000 to understand how to work with such orders)
Product type = Storable product (Will show articles with this tag, if a product is storable to show articles about this kind of products and what to do with them)
Country > Country name = United States (Will show articles with this tag, if the contact's card states that he is from United States to keep articles and company policy about working with US companies)
Billing Status = Waiting Bills (Will show articles with this tag, if there are some pending bills)
Is Won = Won (Will show articles with this tag, if the opened opportunity has a status won)
Quick search from any interface
You can easily access KnowSystem from anywhere in Odoo. Quickly observe articles related to a current document discussion. Instantly reference one or a few ones. To add the quick entry for Knowledge base from any Odoo form view, go to Configuration > Configuration, find KnowSystem options, put a tick in the box 'Articles by Documents', and click 'Save'.
To see the KnowSystem icon () in the Odoo systray near activities and messages, go to Configuration > Configuration, find KnowSystem options, and put a tick in the box 'KnowSystem in systray' and click 'Save'.
As you click on the KnowSystem icon in the systray or above the document form you see a pop-up window with articles. Search articles by tags, section, or content in a few clicks for a quick overview. Click on an article to read it.
As you see your documents in the tree view and want to open quick access to KnowSystem, which will show you only filtered to chosen objects articles, click on the KnowSystem article icon that is located above the view. If you click on the KnowSystem icon in systray, it would show all tags that are applied to the particular model regardless of the chosen records.
Knowledge for messaging
To let users reference/cite Knowledge records in Odoo messages, go to configurations, and turn on the option 'Articles in Email Composers'. Click 'Send message' and open the full composer. Use the command '/' to call the additional instruments panel and scroll down to find the button 'KNOWSYSTEM'.
In the pop-up window, you can search articles by tags, sections, and contents. Here tags are always applied to the particular object, from which you compose a message.
Click on an article to read it, and click 'Close' to return to the message composer. Click '+' at the right top corner of an article to choose an article. Open the tab 'Chosen articles' to remove some articles or to read them. There are three types of citing an article. You can:
1. Update the message body with knowledge content (it is added to the end of a current message)
2. Attach a PDF version of the referenced article
3. Share a public knowledge link with your colleagues or partners (the link is added as a clickable title of an article).
The type of link, that is added, can be regulated in the KnowSystem configuration. For that, choose the type of the link to generate in the field 'Share URL type'. The link can be either 'Internal URL' (link to the article in backend available only for internal users), 'Website URL' (link to the article in portal available for internal and portal users), or 'Shared with the token' (a link to the article in portal available for anyone).
In order for the articles to be parsed correctly, it is necessary to use only backend styles. Some too complicated styles may be displayed incorrectly.
Articles in Activities
Similar to sharing articles in messages, the module can be used to link to articles in activities. This way, you will be able, for example, to share a link to the article to explain how to fulfill a certain activity.
To let users reference/cite Knowledge records in activities, go to configurations, and turn on the option 'Articles in Activities'. Click on any activity icon and choose the option 'Schedule Activity'. Use the command '/' to call the additional instruments panel and scroll down to find the button 'KNOWSYSTEM'.
In the pop-up window, you can search articles by tags, sections, and contents. Here tags are always applied to the particular object, from which you compose click the activity icon.
Click on an article to read it, and click 'Close' to return to the composer. Click '+' at the right top corner of an article to choose an article. Open the tab 'Chosen articles' to remove some articles or to read them. There are two types of citing an article. You can:
1. Update the body of the activity with knowledge content (the text of the article is added to the activity body)
2. Share a public knowledge link with your colleagues or partners (the link is added as a clickable title of an article).
The type of link, that is added, can be regulated in the KnowSystem configuration. For that, choose the type of the link to generate in the field 'Share URL type'. The link can be either 'Internal URL' (link to the article in backend available only for internal users), 'Website URL' (link to the article in portal available for internal and portal users), or 'Shared with the token' (a link to the article in portal available for anyone).
In order for the articles to be parsed correctly, it is necessary to use only backend styles. Some too complicated styles may be displayed incorrectly.
Knowledge for printing
In KnowSystem you can print one article or several articles at once. To print a single article just open an article and click 'Save as PDF'.
To print articles from the single view interface:
1. Choose one or several articles by putting a tick in the box in the top right corner of an article
2. In the right navigation panel, mass actions choose 'Save as PDF', and the downloading will start automatically
3. You can also 'Select all found' articles and print them all at once in the same way.
It is also possible to print all articles with a specific tag or of a definite section. To print all articles in a tag or a section click on it with the right side of the mouse and choose 'Print'. If a tag or a section has subtags or subsections, the articles from there will also be printed.
Attach your articles to emails and messages as pdf, so the recipient will be able to print them.
For the correct mass print use Backend builder styles and avoid using Headline 1 in the body of an article.
You can allow portal and public users to print published articles (). For that go to Configuration > Configuration, find the section 'Portal and Website Views' and tick 'Print in Portal' (). After that, as a user opens an article there will be the printer icon near the article's title, which will redirect straight to the printing wizard.
Flexibly configure the printed layout of the articles. For that, go to KnowSystem Configurations > KnowSystem Options and turn on the feature Custom Layout. If the option is enabled, you will be able to select/create your own Layout. By default, the special layout created by the module is used.
As you enable the option, the "Edit layout" button becomes visible. It allows you to edit the previously selected layout. Keep in mind, that if the standard module layout is used, then the app will open the form to inherit the view and apply the changes. Otherwise, the view itself will be opened. There you can change the footer and header, and change the basic settings, for example, to hide/show page numbers, and logo, add your own elements or change the order.
Regardless of the checkbox, the 'Edit report' button will be visible. Click on it to open a form where you can inherit the printing form itself and apply the changes. For example, stylize the title or add a static part that will be located after the title.
Regardless of the checkbox, the 'Edit Paper Format' button will be visible. Click on it to change the page size (A4 > A3), page orientation (landscape/portrait), margins, etc.
If the option 'Custom Layout' is disabled, then the styles for printing are applied from settings as for other Odoo printings. To change them, go to General Settings > Business Documents > Documents Layout.
Optionally, you can turn on the option to print articles without titles for the best printing layout. For example, it is useful, to avoid situations, when the article's title is printed on one page and the body of the article on the other one. For that go to Configuration > Configuration, find the section 'KnowSystem Options', and tick 'Print without titles'. After that only articles' content will be printed.
eCommerce Product FAQ
In case, you have an e-shop, it might be a good idea to show articles with the answers to frequently asked questions, so the clients could get the information he/she needs without contacting the company. With the help of the add-on, you can add a link (button) to the product's page. The button either redirects the clients to the related articles on the KnowSystem page or shows the list of articles in a pop-up accordion. The button is added on the products page to the right side below the description. To add a FAQ button:
1. Go to KnowSystem Configuration page
2. Find the section 'eCommerce FAQ Options'
3. In the field FAQ Website, choose the website to which you want to add the FAQ button
4. In the field FAQ view choose the way to show the FAQ: KnowSystem portal link, Pop-up accordion.
5. In the field 'FAQ button text', define how the FAQ entry on the product eCommerce page should look like
6. Click 'Save'.
If the FAQ is added as a link to the KnowSystem page, then as soon as the user clicks on it, he/she is redirected to the full KnowSystem page, with the related sections and tags applied, and related to the product articles shown. This way the navigation is restricted by articles linked to the current product/website. For example, if the section 'Tech' was chosen as a global FAQ for all the products, and the article 'How to assemble the table' was chosen as a related-to-the-current-product article, then in KnowSystem the user will see all the articles related to the section Tech and its subsections and the article 'How to assemble the table'. However, the user still can reset the selection of the articles and see other available KnowSystem articles.
If the FAQ is added as a link to the accordion, then as soon as the user clicks on it, the pop-up accordion will appear with the clickable titles of available articles. If the user clicks on any article's title, the accordion will expand and show its body. To hide the article's body, the user should click again on the article's title. To close the accordion, click on the cross in the top right corner.
The text of the button may be customized. For that, it is also possible to use simple HTML tags. Just write the text in the field 'FAQ button text'. By default, the button's title is 'Frequently Asked Questions'. If you work in a multi-language environment, you can also add the translation to the button's text. So, when a user opens the website in a different language, he/she would see the button's name in that language, if it is supported.
The set of articles can be configured on three levels: per website, per separate product and per products attributes. To add articles to a particular website, choose some sections, tags or articles in the section 'Global FAQ' on the KnowSystem configuration page. This way, any product on the website will contain those articles. In case some sections or tags are chosen, the articles from their children will also be shown in the FAQ.
Global FAQ is particularly useful if you have some articles, that relate to all of the products. For example, you can add the company policy, delivery information, purchase/refund instructions to the global FAQ.
You can also add certain sections, tags, articles to the separate product templates. This way, certain articles will be shown, only if you click on the FAQ button from that product's page.
To show articles for particular products:
1. Open the product's template
2. Go to the tab 'KnowSystem
3. Click 'Add a line'
4. Choose the particular articles to show, or add articles in a batch by choosing the related sections or tags
5.Click 'Save'
You can also select the articles that will be shown, only if a particular product's value is selected. For that, in the field 'Applied only if the product has all the values' choose the product's value/values. This way you create a rule to show the chosen-in-the-line articles only if this value is applied.
It is possible to add several rules, i.e. several groups of sections, tags and articles. As a result, all articles found according to any of the rules will be shown on the page of this particular product. For example, we have a product 'Table' with attribute values black, white, steel, wood. The assembly instruction is different for the steel and wood kind of tables, so we create two lines - one with the article related to value steel and one related to article wood.
The application of each of the rules can be limited by several attribute values. Only products having all the specified values will have articles on the subject. i.e. the user must first select the correct value on the page of the online store. For example, there are also some important peculiarities of coloring the steel table in white, so we created another line and chose two values (white, steel), so the article will be seen only if both values will be selected.
All items found by any criteria as well as the items found by global criteria would be linked to the template. For example, from the product 'Table' with the selected values black, wood will be seen the global articles related to the company's policy, and the assembly-instruction-wooden-table article .
For a specific product, the FAQ button can be hidden from the store. For that:
1. Open a particular product and go to the tab 'KnowSystem'
2. Tick the box 'Do not show eCommerce FAQ'
3. Click 'Save'.
To fully hide the FAQ button, choose the option 'Do not show' as the FAQ view on the configuration page.
You can define own sections, tags, and articles for a specific attribute. For example, show additional articles for all products with the attribute 'Legs'. It is possible to add several rules, i.e. several groups of sections, tags and articles. As a result, on the page of each product from which you can select this attribute, all articles found by any of the rules will be displayed.
To add own articles to a product attribute:
1. Open a particular attribute
2. Find the tab 'KnowSystem'
3. Click 'Add a line'
4. Choose the particular articles to show, or add articles in a batch by choosing the related sections or tags
5. Click 'Save'
Attribute rules can be limited by the selected value on the product page, i.e., the user must first select these values on the product page in order for FAQs to be recalculated. For example, we have an attribute value 'Custom legs', for which two more articles are required 'Custom order guidelines:legs' and 'Custom order prices:legs'.
To add own section, tag, articles to the attribute value, as you add FAQ rules to the attribute, in the field 'Applied only if the product has all the values' choose the product's value/values. The chosen-in-the-line articles will be shown only if this value is applied.
This way, in order to generate FAQ for a particular product, the module will take into consideration the sections, tags and articles from three levels:
1. Per website (global)
2. Per product
3. Per attribute/attribute valurs.
So, you can configure the FAQ flexibly. Some articles can be reused several times for different products, and some can be customized individually for specific ones.
Different users may see different sets of articles in the FAQ. Articles are shown only if a user can access those articles. Thus, in order to make articles available for the website users, it is necessary to publish them.
KnowSystem access rights
Access to articles is managed in a different way for different types of users. There are 3 types of users:
1. Odoo user or internal user
2. Portal user or registered user ()
3. Public user ()
By default, all articles are available to any internal user, if you don't restrict access only to particular user groups. You can restrict access either to particular sections, including subsections or to particular articles.
On the website (), public users see only published articles. Portal users can also see the articles they have access to. To give access to a particular user add this user or several users to the field 'Allowed partners' as you edit a tag and add this tag to articles that you want to allow the user to see.
Rights to administrate the Odoo knowledge management system belong to 2 user roles: KnowSystem Editor and KnowSystem Administrator. If you want a user to be able to create articles, he or she should belong to one of those groups.
Sections, tags, and types access for internal users
Different users may see different sets of navigation menu: sections, tags, and types ().
KnowSystem considers user groups that are defined per section. If the user groups are not defined, a section is considered 'global' and each internal user may read articles in it.
To grant access to a section for the whole user group:
1. Start creating or editing a section
2. Open the tab 'Restrict access'
3. Choose user groups that will see all articles in this section and its' sub-sections
Rights for a knowledge section are defined not only according to this section but also according to all its parents. For example, if a user can't access 'Sales', he/she would not be able to access 'Sales / CRM disregarding whether 'CRM' is available for his/her user group.
Internal users can see sections, even those that are empty if they have access to them.
Tags and types () are visible for all internal users disregarding their settings.
Internal access for articles
In KnowSystem articles' access for internal users is defined on 2 levels: per section and per article. In order to be able to read an article, a user should have both: access to an article and its' section.
To manage user groups for an article:
1. Open or start creating an article
2. Click 'Actions' in the right corner above the article's form and choose 'Restrict access'
3. Choose user groups that will see the article
If the user groups are not defined, an article is considered 'global' and each internal user may read it (if he/she has an access to its section).
Access to edit articles
Rights to administrate Odoo knowledge management system belong to 2 user roles: KnowSystem Editor and KnowSystem Administrator. If you want a user to be able to create articles, he or she should belong to one of those groups. If an internal user has access to see an article and belongs to one of the stated groups, then he can also edit it.
All article versions are stored in revision, so there is always a way to return to one of the previous ones. Only KnowSystem Admin can restore and delete revisions (see. Article revision and history of changes). Thus, it helps to make the editing process more secure.
Public users access
Public users () - website visitors - may access KMS interfaces only if you explicitly allowed that. Thus, you can switch off the option 'Public KnowSystem' (
) to fully disable knowledge base for such users.
Public users () would see only those KMS objects, which are published and available for a website they are visiting.
Only sections that contain available for this user articles would be shown (thus, there would not be a filter by a section which would result in an empty list of articles).
An article would be available for a public user if its section and itself are published.
To publish () an article:
1. Chose one or several articles and choose 'Publish' in mass actions in the right navigation panel of the interface
2. Open an article, click 'Actions' in the functional line above the article title, and choose 'Publish'
You can share the link to an article with any user neglecting the access rights (). For that click on the 'Share' button at the bottom of the info page. The link with a special token will be generated. Copy the link and send it to a user. Anyone with the link will be able to see the article even if it is not published.
To make a tag visible on a website ():
1. Start creating or editing a tag
2. Tick the box 'Show Tag on Website'
3. If you leave the field 'Website' empty, then the tag will be seen on all available websites
To make a type () visible on a website (
):
1. Start creating or editing article type
2. Tick the box 'Visible on current website'
3. If you leave the field 'Website' empty, then this type would be seen on all available websites
Portal users access
Portal users () have the same access rights as public users (
), but you can also grant extra rights for particular partners. To that goal knowledge tags are used. You can assign those tags in two ways:
1. Start creating or editing a tag, choose a particular contacts in the field 'Allowed partners, and click 'Save'
2. Open contacts, find a particular user, start editing the profile card, in the field 'KnowSystem' tags choose the tag, click 'Save'
Thus, a portal user would have access to all published articles (see above) and all articles which have partner-related tags.
For example, create tag 'premium', 'standard', 'free' to manage knowledge base tariffs and assign the tags to corresponding articles. Or create a tag with a country to assign it to all articles available to the partners from it.
User rights comparison
KnowSystem Admin
Can read, create, edit, and delete any articles, sections, tags, article types (), and tours. May configure Misc options.
KnowSystem Editor
Can read, create, edit, and archive related to them articles, sections, and any tags. Can also delete related to them tours. Can read any article type ().
Odoo user
Can read related to them user groups articles, sections, and tours. Can read any tags and article types (). May like/dislike, add to favorites, and take part in discussions.
Portal user ()
Can read published and partner-related-by-tags articles. Can also read published sections, tags, and article types (). May like/dislike articles.
Public user ()
Can read published articles, sections, tags, and article types ().
Configuration page
KnowSystem has a configuration page, where you can turn on and off some add-ons' features and make necessary changes to make your work convenient.
Tours: allow you to organize learning tours, combining the articles of your choice. You can easily set the order of articles by drag&drop. Write notes to learners, that they will see on the first page of the tour. Track learners' progress (see. Managing learning tours).
Articles in Email Composers: add a KnowSystem icon in the email composers, so you can choose articles to add to emails. You can either update the email body or attach an article as a pdf (see. Quick access to KnowSystem).
Articles by Documents: adds a KnowSystem icon above all documents' forms, so you can read an article without opening the KnowSystem app. You can also set different filters to documents' tags to see them in the first place when you access the KnowSystem from the matching documents (see. Quick access to KnowSystem).
Articles in Activities: adds a KnowSystem icon to the activities composers, so you can choose articles to add to the body of the activity. You can either update the activity body with an article or share a link to the article (see. Quick access to KnowSystem).
Share URL type: allows choosing the type of generated link. Can be either 'Internal URL' (link to the article in backend available only for internal users), 'Website URL' (link to the article in portal available for internal and portal users), or 'Shared with token' (a link to the article in portal available for anyone).
KnowSystem in systray: adds a KnowSystem icon in the backend header, so you will be able to see it from any place and easily access articles (see. Quick access to KnowSystem).
Edit on website (): adds a button 'Edit on Website' to articles and allows you to edit your articles using Odoo standard Website builder (see. Website builder).
Turn off Backend Editor (): turns off the default Backend builder, showing the HTML code, that you can edit, instead (see. How to create an article and Code editor).
Custom Layout: turns on the custom layout for articles printing. Otherwise the standard company layout is used. As you enable the option, the "Edit layout" button becomes visible (see Knowledge for printing).
Print without titles: allows printing only content of the articles, without titles, for a better printing layout.
In the Extra Options section, you can see all the available add-ons and their pages. From here you can turn them on and off.
The add-on Portal and Website Views () has its' own configuration section. The extension supports multi-websites, and it is required to apply them for each of your sites separately. To switch between sites' settings, select the website to configure in 'KnowSystem Website'. Here you also have a website link button ( ), that forwards you to the chosen website to see the result, but make sure you clicked 'Save' in the left corner at the top of the page.
Portal KnowSystem (): allows you to show the articles to portal users. You can give access to some articles, by assigning tags and stating the 'Allowed partners', or add KnowSystem tags to partners on the contact card (see. Managing tags).
Public KnowSystem (): allows you to publish your articles for all website visitors to see (see. Access Rights).
Custom Portal Filters (): allows you to set options to filter articles on the portal. You can add portal filters to various models, set action, and choose a person for which the filter will be available. You can also add automatic rules to filter objects.
Custom Portal Search (): allows you to set search options to find articles on the portal. You can add a field and name it, so it will be possible to search for the keywords in it on the portal.
Custom Portal Sorting (): allows you to add custom sorting criteria for portal/website KnowSystem. You can add sorting criteria based on a particular field, name them, and set either ascending or descending order.
Turn on default sorting (): allows applying one of the sorting options by default as a user opens the KnowSystem page on the website.
Default Sorting/Custom Default Sorting (): allows choosing a particular sorting option either default or a custom one as a user opens the KnowSystem page on the website.
Print in Portal (): adds a possibility for portal and public users with access to the article to print it.
Portal Likes (): gives portal users an opportunity to like and dislike articles.
Social Sharing (): adds a social share bar, for quick sharing through various social media.
Sections and Tags Tooltips (): shows sections and tags description on the website as a user hovers over any of those.
Articles Per Page (): choose the number of articles that are shown per page.
The add-on KnowSystem: eCommerce () has its' own configuration section. The extension supports multi-websites, and it is required to apply them for each of your sites separately. To switch between sites' settings, select the website to configure in 'FAQ Website'. Here you also have a website link button ( ), that forwards you to the chosen website to see the result, but make sure you clicked 'Save' in the left corner at the top of the page.
FAQ view (): choose the way the FAQ will be shown: as a popup with all found articles, as a link to the full-featured portal navigation, or do not show it at all (see eCommerce Product FAQ).
FAQ button text (): write your own text, which will be used as the button's text. By default, the button's name is 'Frequently asked questions'. You can use simple HTML (see eCommerce Product FAQ).
Global FAQ(): select criteria to find articles that would be used as FAQ for all products of this website (see eCommerce Product FAQ).
KnowSystem sections (): choose the sections, to add all the related articles to the global FAQ. The articles from the sub-sections will be also shown in FAQ.
KnowSystem tags (): choose the tags, to add all the related articles to the global FAQ. The articles from the sub-tags will be also shown in FAQ.
KnowSystem articles (): choose the articles for the global FAQ.
The add-on Odoo Documentation Builder () has its' own configuration section. The extension supports multi-websites, and it is required to apply them for each of your sites separately. To switch between sites' settings, select the website to configure in 'Documentation Website'. Here you also have a website link button ( ), that forwards you to the chosen website to see the result, but make sure you clicked 'Save' in the left corner at the top of the page.
Portal Documentation (): turns on portal documentation.
Public Documentation (): turns on public documentation.
Default Security Action (): in the case when a user doesn't have access to only one or several articles of documentation, you can choose to either hide it, show a warning, that the user has no access to it, or neglect access rights and show it anyway if a user has the access to the documentation itself (see. Odoo Documentation Builder: access rights).
Show Attachments (): includes article attachments to a documentation page. Otherwise, only the articles' content will be shown.
Versioning (): allows you to introduce some changes in documentation for particular versions and leave the rest that refers to all versions to avoid double work. It adds a field, to state to which version an article refers (see. Odoo Documentation Builder: versioning).
KnowSystem: Website and Portal
KnowSystem: Website and Portal is an optional add-on () that allows you to add your articles to the portal and on your websites. The extension allows you to use the standard Odoo Website builder that provides with a wide variety of templates and tools for editing articles, making them presentable and user friendly, and customize your articles in the same way as website pages.
The main features of the app are:
Publish articles on your website
Give access to articles to portal users by tags
Edit your articles in Website builder
Print, like, or share articles
Turn on/off KnowSystem for portal users to let them observe published and especially delegated to them articles. Go to Configuration > Configuration, find section Portal and Website Views and tick the box 'Portal KnowSystem'.
Turn on/off KnowSystem for public users to let unauthorized website visitors read published articles. Go to Configuration > Configuration, find section Portal and Website Views and tick the box 'Public KnowSystem'.
Website and Portal: navigation & settings
All features described in this article are related to the add-on KnowSystem: Website and Portal ().
To open the KnowSystem website interface in the frontend:
1. Open the app Website
2. Click 'Go to Website'
3. Open the top menu KnowSystem
Portal users might also access knowledge base through the tab 'Knowsystem' in their account, which redirects portal users to the page with articles (see Website and Portal: public & portal users).
All entries would lead to the same page '/knowsystem'.
The website KnowSystem interface consists of KnowSystem Navigator, Search Panel, and Articles list. The mandatory elements are the search panel and article list.
Optional elements that you can turn on/ off to customize the page:
1. KnowSystem Navigator
2. Custom Types Navigator ()
3. KnowSystem Center Introduction
4. KnowSystem Left Introduction
5. KnowSystem Tags
To turn on/off optional elements:
1. Click 'Customize' in the systray of the website KnowSystem page
2. Click on the slider button
Turn on the central or left introduction, to write some information about the page. The content of the introduction can be edited, click 'Edit' at the right top corner of the page and add some building blocks. The available blocks are the same as in the website editor (see 'Website editor'). The introduction and articles' cards also support building blocks, including ones with pictures.
The KnowSystem Navigator (left navigation panel) can be fully turned off, in this case, all other optional elements will be turned off too. The KnowSystem Navigator allows you to see articles by sections, by tags (KnowSystem Tags), and by Types ( Custom Types Navigator). Put a tick in the section, tag, or type () box to see its articles.
A section is seen on a website, only when it contains at least one article. If the parent section contains no articles, but its subsection does, only the subsection would be visible on the website.
A tag is seen on a website, only when it is published and the optional element 'KnowSystem Tags' is turned on. To make a tag visible on a website :
1. Start creating or editing a tag
2. Tick the box 'Show Tag on Website'
3. If you leave the field 'Website' empty, then the tag will be seen on all available websites
A type () is seen on a website, only when it is published and the optional element 'Custom Types Navigator' is turned on. To make a type () visible on a website:
1. Start creating or editing a type
2. Tick the box 'Visible on current website'
3. If you leave the field 'Website' empty, then the type will be seen on all available websites
It is possible to Filter articles by various criteria. By default, there is only one filter option 'All', but you can add custom filters that you want. To add custom filters:
1. In the KnowSystem app, go to Configuration > Configuration
2. Scroll to the section 'Portal and Website Views'
3. Find 'Custom Portal Filters'
4. Click 'Add a line'
5. Click 'Create'
6. Add the Filter name and click '+Add Filter'
7. Click 'Save&Close'
For example, create a filter 'Favourite', to filter articles by likes - e.g. when it has more than 8 likes.
Navigate through articles with the help of the search panel. The available sorting options are:
1. Trending (to see the most viewed articles at the top)
2. Title (to see articles in alphabetical order)
3. Section (to see the articles in the same order as the listed sections)
4. Likes (to see the articles depending on the number of likes and dislikes)
There are various search options available. Click on an arrow near the search field, to change the search option. You can search:
1. In content
2. In titles only
3. By section
You can also add custom search options that you want. To add custom search options:
1. In the KnowSystem app, go to Configuration > Configuration
2. Scroll to the section 'Portal and Website Views'
3. Find 'Custom Portal Search'
4. Click 'Add a line'
5. Click 'Create'
6. Choose the field, which will be checked for matches, while searching
7. The field 'Label' (the search title, which will be shown in the search options) will be generated automatically, but you can change it
7. Click 'Save&Close'
For example, add a search option 'Preview Summary' to search for matches in articles' previews only.
In case, the searching or filtering result has no matches you see the warning 'There are no articles found. Clear search'. If you click 'Edit' in the top right corner from here, then you will be able to customize the warning. The phrase 'Clear search' contains a link, that redirects to the KnowSystem page and therefore clears the searching parameters.
It is possible to sort articles by various criteria. By default, the available options are:
1. Trending (by the views)
2. Title (by the alphabet)
3. Section (by the sections order)
4. Likes (by the difference between likes and dislikes)
Simultaneously, you can add custom sorting options that you need. To add custom sorting options:
1. In the KnowSystem app, go to Configuration > Configuration
2. Scroll to the section 'Portal and Website Views'
3. Find 'Custom Portal Sorting'
4. Click 'Add a line'
5. Click 'Create'
6. Choose the field, that will be considered for sorting
7. Type the sorting name
8. Choose the sorting order (ascending or descending)
9. Click 'Save&Close'
In the configuration, you can also turn on the default sorting, i.e. the one that will be applied as a user opens KnowSystem on the website. You can choose from the default options or the custom ones that you have created. For that, the fields 'Turn on default sorting', 'Default Sorting', or 'Custom Default Sorting' were introduced.
Keep in mind, that if some sorting criterion is not available for a user (e.g. likes, when the setting 'Portal Likes' is turned off or when custom default sorting is not present in the table 'Custom Portal Sorting'), then the standard sorting criterion 'Views' will be applied.
One of the main parts of the interface alongside the navigation and search panel is the articles list itself. Here you can see all the available article cards. An article's card shows:
1. Title
2. Preview text
3. Likes and dislikes (if not turned off through the configuration)
4. Tags
If an article has a published title, then this title will be shown on the portal/website both in the list of articles, and as you open a particular article instead of the article's title (see How to create an article).
The article's preview text on the site is the same as on the backend. To edit preview text from the frontend click on the button 'Edit' in the top right corner of the page with the articles list and click on the preview text to edit it. Here you can also add various building blocks, right to the article's card.
To open an article click on the article's title.
Also, in the top right corner of an article's card, you can see an article's likes and dislikes, if you turned them on on the configuration page. Only registered and internal users can like or dislike an article. Public users can only see the number of likes and dislikes. To like or dislike an article:
1. Open an article
2. Scroll down till the end of the article and find 'Like' and 'Dislike' icons
3. Click on any, and it will be recorded
4. You can always change your decision and put, for example, like instead of dislike, by clicking on a related icon
To move through pages with article cards use the pages list at the bottom. Starting from the second page, the page navigator appears above the article list as well. You can set the number of articles per page:
1. Open the KnowSystem app, go to Configuration > Configuration
2. Scroll down to the section Portal and Website Views
3. Find the line 'Articles per page' and type the number of articles, that you want to show on a single page.
It is also possible to pin an article If you want some articles to be shown in the first place, no matter what page a person is at.
To pin an article:
1. Open the KnowSystem app in the backend
2. Open an article
3. Click 'Edit'
4. Tick the box 'Website pinned' on the right side, above the article's body
5. Click 'Save'
Website and portal: article page & website builder
All features described in this article are related to the add-on KnowSystem: Website and Portal ().
It is possible to edit an article right from its website page, just click 'Edit' in the top right corner, to open the website builder. Or, you can return to editing in the backend. To see this option, click on the down arrow on the right side of the 'Edit' button.
See a mobile preview by clicking on the phone icon in systray, to make sure an article looks good in both portrait and landscape modes. From the systray, you can also publish and unpublish articles.
Optionally, you can:
1. Allow partners to print knowledge pieces, like, or share articles. Go to Configuration > Configuration find the Portal and Website Views section and put a tick by 'Print in Portal'. Then, by the article's headline, a printing icon will appear.
2. Allow partners to share articles. Go to Configuration > Configuration find the Portal and Website Views section and put a tick by 'Social sharing'. Then at the bottom, you will see social media icons.
3. Allow partners to like and dislike articles. Go to Configuration > Configuration find the Portal and Website Views section and put a tick by 'Portal likes'. Then at the bottom, you will see icons like and dislike.
From an article's view, you can also switch back and forth between articles. Click on the arrows in the top right corner of an article.
To return back to the main articles' menu without losing the searching criteria, use the tool breadcrumbs on the left top corner of an article. For example, click on the previous step 'KnowSystem' to return to the main articles menu.
Website and Portal: public & portal users
All features described in this article are related to the add-on KnowSystem: Website and Portal ().
KnowSystem for public and for portal users can be turned on or off, depending on your goals.
Turn on/off KnowSystem for portal users to let portal users observe published and especially delegated-to-them articles. Go to Configuration > Configuration, find the section Portal and Website Views and tick the box 'Portal KnowSystem'. After that, portal users will be able to read published and partner-related-by-tags articles and related-to-those sections, read published tags and article types (). They may also like/dislike articles.
Turn on/off KnowSystem for public users to let unauthorized website visitors read published articles. Go to Configuration > Configuration, find the section Portal and Website Views and tick the box 'Public KnowSystem'. After that public users will be able to read published articles, sections, tags, and article types ().
The app supports multi websites, and therefore it is required to set the configuration for each available site separately. For example, you can turn on the KnowSystem Portal, KnowSystem Public, and allow printing on one website, but turn on only KnowSystem Portal on the other, or make it unavailable at all.
Here are all the options, that can be configured for each website:
1. Turn on/off Portal KnowSystem
2. Turn on/off Public KnowSystem
3. Add Custom Portal Filters
4. Add Custom Portal Search
5. Add Custom Portal Sorting
6. Turn on/off default sorting
7. Turn on/off Print in Portal
8. Turn on/off Portal Likes
9. Turn on/off Social Sharing
10. Turn on/off Section and Tags Tooltips
11. Set the number of articles per page
Odoo Documentation Builder
Odoo Documentation Builder is an add-on () to KnowSystem, that allows combining articles in advanced documentation to cover certain aspects of organizational or functional knowledge. The extension also depends on the add-on KnowSystem: Website and Portal (
).
Each KMS article might be used several times for different documentations. You can add an unlimited number of documentation pages structured by categories. The idea is to have a single documentation website page that fully covers a definite issue or aspect. You can also modify the appearance of pages: show or hide introductions and footers, turn on/off the search bar and table of contents, add or remove preview images and texts.
You can turn on the option 'Portal Documentation' and 'Public Documentation' to make the documentation available for portal and public users respectively. The app generates website pages automatically. To update this documentation set you should only add or remove a required knowledge article.
Indicate to which version an article relates to. Share documentation categories and sections. Publish required documents to make them available for everybody, assign KnowSystem tags - to grant access for chosen Odoo partners. Define what to do if a documentation user does not have access to included articles: to neglect restrictions, not to show that knowledge pieces, or to show a security warning. The app fully supports standard Odoo features including multi websites.
Combine articles
Publish and share documentation
Modify documentation pages
Introduce versioning
Documentation Builder: managing documentation
All features described in this article are related to the add-on Odoo Documentation Builder ().
A documentation category is a tool, that helps you to structure your documentation. A category unites documentation sections. There are two ways to create a new category:
1. Go to Documentation > Documentations Categories and click create
2. Go to Documentation > Documentation Sections and click on + 'Add a column'
Drag&drop categories to change their sequence.
A Documentation section is a set of articles that together create documentation on a particular topic or for a particular object. There are two ways of creating a documentation section. You can go to Documentation > Documentations Sections, click create and add articles one by one, or you can add all required articles at once from the single view interface.
To add articles to a documentation section:
1. Go to Documentation > Documentations Sections and click create
2. Write a title of the section and manually translate it into other installed languages (), if you want
3. Choose a category and versions (see Documentation Builder: versioning)
4. Open KnowSystem and choose the articles by putting a tick in the top right corner of the articles
5. In the right navigation panel choose the mass action 'Add to documentation'
6. In the pop-up window choose the documentation section, to which you want to add articles
7. Choose a security action that will apply to all chosen articles (see Documentation Builder: access rights)
8. Click 'Save&Close' and you will be redirected to the documentation section card
9. Click 'Edit'
10. Click 'Add a line' to add one more article, that you can choose in the pop-up window.
11. Choose a security action for it
12. Click on the tab 'Settings' to add preview text and tags. From here you can also choose 'Header level for navigation', which is the number of headers that will be shown in the navigation panel, as a person reads a documentation section
13. Click 'Save'
The tags that you add to a documentation section, are the same tags that are applied to articles. Add a tag for quick search and easy navigation or to share a knowledge piece with the assigned-to-the-tag partners (see Managing tags).
You can publish the document section as you open it, and it isn't necessary to turn on the editing mode. It is possible to share document sections with any users, even when it hasn't been published yet. Click on the 'Share' button in the top right corner of a document section and a link with a special token will be created (see Documentation Builder: access rights).
Drag&drop documentation sections to change the category.
From the backend, you can track, what articles are used in documentation. Such articles are marked by a paperclip icon on the kanban card. To find out in what documentation sections the article is used, click on the 'Info' button as you open an article and find the field 'Documentation sections'.
You can also filter the articles, that are used in documentation by applying the filter 'Used in documentation'.
To find all articles of a particular section, type the section's name and choose the searching criterion 'Documentation sections'.
Documentation Builder: customization
All features described in this article are related to the add-on Odoo Documentation Builder ().
As you turn on the 'Public Documentation' (in Configuration>Configuration> Documentation Builder), the page 'Docs' appears on the website and the tab Docs appears in the portal if the option 'Portal Documentation' is turned on. Both entries lead to the same page '/docs'. There you can see all published documentation categories and documentation sections.
Portal users, if allowed, see a new tab 'Documentation' which redirects them to the page with documentation (see Documentation Builder: Access rights).
If an article has a published title, then it will be used as the article's headers and in the navigation list instead of the article's title (see How to create an article).
Categories
On a website, the documentation is kept under the menu 'Docs'. Here you see documentation sections divided by categories. In the top left corner in systray click 'Customize' and click on the slider button to change the page's look.
The customization options are:
1. Cover Image
2. Preview Text
3. Introduction
4. Search bar
Turn on the Introduction, to add an introductory block above the documentation. In this block, you can write some information about the page, so the visitors could understand what is it for. Click 'Edit' at the top right corner of the page to add and edit some building blocks and make the page more appealing.
Turn on the search bar for documentation. With the help of the search bar, you can search documentation sections by the matches in the title. The found documentation sections are shown together with their category. If there are no matches found, you see the alert 'No documentation found. You can click 'Edit' to change the alert text and customize it. To reset the search click on the cross on the right side of the search bar.
Turn on the documentation preview text to show the text on the document section's card. You can add a preview text in two ways:
1. In the backend as you create or edit a documentation section in the tab 'Settings'
2. In the frontend, by clicking on the 'Edit' button in the top right corner and clicking on a documentation section at the place where the preview text should be
Turn on the cover image to see pictures on a document section's card. You can add pictures in two ways:
1. In the backend as you create or edit a documentation section, click on the 'Pen' icon in the photo section
2. In the frontend, by clicking on the 'Edit' button in the top right corner and clicking twice above the title on a documentation section card
There are various types of cover images that you can add to a documentation section. It can be .jpeg, .png and even .gif.
Sections
Click on any documentation section on a website to open it. In the top left corner in systray click 'Customize' and click on the slider button to change the page's look.
The available customization options are:
1. Footer
2. Introduction
3. Navigation
4. Searchbar, including Searchbar printing, Searchbar search, and Searchbar versioning (see Documentation Builder: versioning)
Adding Introduction and Footer allows you to add some building blocks before the documentation section and after it. You can add as many building blocks as you want and edit them the same way you edit the documentation section.
Don't add blocks with pictures (apart from background) in the Introduction or Footer of a documentation section, as it might affect the location of search bar and table of contents.
Add Navigation (Table of contents) to move between the documentation section's articles conveniently. As you scroll down the page, the Navigation panel follows you and marks bold the content that you are at. To hide the Navigation panel click on the icon . Click to show it.
The table of contents consists of various Header levels. The article's title is marked as Header 1. To see other Header levels in the Navigation panel click on the 'Arrow' icon that appears near contents that have other Header levels.
It is up to you to decide how many Header levels do you want to see in the Navigation panel. To set the number of shown headers:
1. In the backend start creating or editing a documentation section
2. Open the tab 'Settings'
3. In the line 'Header Level for Navigation' put a number from 0 - 6
4. Click 'Save'
To assign a header to a title or subtitle:
1. Choose the text line
2. Click on the 'Style' icon on the editing tools panel
3. Assign a Header level
4. Click 'Save'
In case the documentation consists of many articles with plenty of media content it may take some time to fully load the page. The table of content is loaded on the first place, so a person can start reading and browsing through the articles even before the loading is complete.
In the mobile version of documentation, in the searchbar there is a button to call the table of contents. The articles in the list are presented as clickable titles, so, as the user clicks on a title, the table of content gets hidden and the user is moved to the related article of the documentation.
Another customization option is a Searchbar. As you turn on the Searchbar three other options, that you can turn on/off, appear. Those are Searchbar printing, Searchbar search, and Searchbar versioning (see Documentation Builder: versioning).
The Searchbar search helps to conveniently search through a documentation section. There are three search options:
1. Default Search (case insensitive, searches both in documentation section's body and headers)
2. Case Sensitive Search (minds the letter case, for example, 'A' does not equal 'a')
3. Search in Headers only (only in lines with applied Header level style)
As you apply search parameters, all matches will be counted and you can browse through them using the back and forth arrow icons in the search form. The search form will follow you as you look through the matching results. Click on the cross icon to reset the search.
To be able to print the documentation with all the included articles, turn on the option 'Searchbar printing'. After that, the button 'Save as PDF' will appear on the left side of the search bar. Click on it to start downloading.
Keep in mind, that the website styles may not be parsed correctly for printing, so, for the best printing layout, it is better to use the backend styles.
To be able to switch between versions, first of all, you need to turn on the feature. From the KnowSystem app, go to Configuration > Configuration, scroll down to the section 'Documentation Builder', and tick the box 'Versioning'. Then, create some versions and apply them to some articles in a documentation section (see Documentation Builder: versioning). After that, you will be able to switch between versions and therefore will have a different set of articles in one documentation section.
To switch between versions click on the version on the left side of the search panel and choose the other one. As you choose one of the versions of a documentation section, only the articles for this version and the ones that go to any version are displayed.
All articles in a documentation section go one by one and are divided by the eye-catching Header 1. A person can see an article in a documentation section only if he/she has access to it. There are three options for how to deal with access rights of documentation section's articles: to skip an article, to show a warning instead, or to neglect access rights (see Documentation Builder: access rights).
If you want to make articles' attachments visible under their content, you can turn on the option 'Show Attachments' in the KnowSystem Configuration, the section Documentation Builder.
The documentation section's body can be edited right from the frontend. It might be convenient to edit the whole documentation section instead of editing all articles separately. To edit a documentation section, just open one and click on the 'Edit' button in the top right corner. Edit the documentation section in the same way as you edit separate articles with the help of the website builder (see Website builder).
Documentation Builder: versioning
All features described in this article are related to the add-on Odoo Documentation Builder ().
Apply versioning for documentation to avoid double work in preparing specifications, user manuals, or software guidelines. As you create a document section you will be able to choose the versions to which it might refer and state the versions for each article. For example, the whole documentation sections might be applicable to v.14 and v.15 and some articles only to v.15. To create a new version:
1. Go to Documentation > Documentation Versioning
2. Click 'Create'
3. Write a title
4. Click 'Save'
Documentation may look differently depending on the version. Apply versions to a documentation section. For that start creating or editing a section and in the field 'versions' choose available ones or create a new one and click save. In the editing mode, you can assign versions to particular articles. Click on an article and choose one or several versions. You can choose only among those versions, which you applied to the documentation section of the article. If you won't assign any versions to an article, then it will be shown on all versions that are applied to its documentation section.
You can switch between the documentation section's versions, as you click on the version title in the left top corner. After that, the list of articles will change and you will see only the ones that are assigned to the version you chose.
Documentation Builder: access rights
All features described in this article are related to the add-on Odoo Documentation Builder ().
The app lets flexibly share documentation categories and sections. Public users can see only published documentation categories and sections. Portal users have the same access rights as public users, but you can also grant extra rights to particular partners. Assign KnowSystem tags for documentation sections to grant access to chosen Odoo partners (see Managing tags).
To turn on/off Documentation Builder for portal users go to Configuration > Configuration, find the section Documentation Builder and tick the box 'Portal KnowSystem'.
To turn on/off Documentation Builder for public users go to Configuration > Configuration, find the section Documentation Builder and tick the box 'Public KnowSystem'.
To publish a documentation category go to Documentation > Documentation Categories, open any category, and click 'Publish' or 'Unpublish' in the top right corner of the category's form.
To publish or unpublish a documentation section just open any section and click 'Publish' or 'Unpublish' in the top right corner of the section's form. There is no need to start editing a section to do that, as the buttons above the form are available even in the read-only mode.
To assign a tag to a documentation section start creating or editing it, click on the tab 'Settings', find the field 'Tags', and add some.
Depending on user rights documentation section might look different. Define what to do if a documentation user does not have access to included articles: to neglect restrictions, not to show that knowledge pieces (omit them), or show a security warning.
To choose the security action for an article in a documentation section:
1. Go to Documentation > Sections
2. Start editing a documentation section
3. Click on an article
4. Choose the security action
5. Click 'Save&Close'
To choose a security action for all included in a documentation section articles:
1. In the single view interface start choosing articles by ticking the box in the top right corner
2. In the right navigation panel choose the mass action 'Add to documentation'
3. Choose the documentation section or start typing a new title to create a new one
4. Choose a security action, that will be applied to all selected articles
To choose default security action for all articles in all documentation sections:
1. Go to Configuration > Configuration
2. Find the section 'Documentation Builder'
3. Find the field 'Default security action' and choose the action
4. Click 'Save'
KnowSystem: Custom Fields
KnowSystem: Custom Fields is an add-on () to KnowSystem that allows you to add custom fields to articles. The add-on doesn't work without the core module: Custom Fields: Core. You can place your custom fields in the backend article's form, or on the website, if you have: KnowSystem: Website and Portal (), and KnowSystem: Custom Fields for Website and Portal (see. KnowSystem: Custom Fields for Website and Portal).
In order to show a new property for knowledge base articles, go to Configuration > Custom article fields, click 'Create' to add a new field, and enter details. It is possible to add custom fields of the following types:
1. Single-line text (char)
2. Simple text without formatting (text)
3. Rich text (HTML-formatted text)
4. Integer or float numbers
5. Drop-down choice with your own options (selection)
6. Checkbox (boolean)
7. Date or date and time
8. Binary (a file to upload)
9. Reference to another Odoo document (e.g. for sale order, contact; many2one)
The tool lets you comfortably select an interface position of a custom field from a closed list of options. In the backend form of view you can place your custom fields: after article, to the left column, or to the right column.
Distinguish knowledge articles by types in order to show properties only for suitable ones. Thus set of attributes for 'user guidelines' and 'technical specifications' might be different.
Mark a custom field required to force users to enter values. In this case, a user will not be able to save an article, if the field left empty. For that, tick the box 'Required to enter a value' as you create or edit a custom field.
Custom knowledge system fields might be imported and exported (see KnowSystem import and export).
The rights to create custom fields belong only to KnowSystem administrators.
Extra fields for article's forms
Various form placement
Require to enter a value
Import and export custom fields
KnowSystem: Custom Fields for Website and Portal
KnowSystem: Custom fields for Website and Portal is a free KnowSystem add-on () that lets you show custom fields on the website. The add-on doesn't work without the core modules: KnowSystem: Website and Portal (), KnowSystem: Custom fields (), and Custom Fields: Core. The available fields types for your website articles are the same as in the backend (see KnowSystem: Custom fields).
To set a custom field, go to Configuration > Custom article fields and click 'Create'. To make a custom field visible on the website, choose its 'Portal Page Placement': at the end, left column, right column. You can also leave the field empty if you want to have a custom field only in the backend.
KnowSystem: eCommerce
KnowSystem: eCommerce is a KnowSystem add-on () that allows adding the product FAQ or documentation entry to all eCommerce product pages. The add-on also requires the extension KnowSystem: Website and Portal ().
Add a clickable button to the product's pages. The text of the button can be customized. You can change it in any way, including applying HTML tags. By default, it is 'Frequently asked questions'.
The button can either redirect users to the KMS portal interface or call the pop-up accordion. In the first case, the related to the article filters and tags will be applied. However, the user still can remove the choice and see all available articles. In the second case, the user sees the list of clickable article titles in the pop-up accordion. This way, the user can read articles, without leaving the page.
It is possible to select some global articles and they will be added to all available products sold in the e-shop. To select articles in a batch, you can choose the related section or tag and all included articles will be considered as FAQ. The articles from the sub-sections/sub-tags will also be shown.
Add some more articles/sections/tags to particular products. Optionally, show articles for specific sets of attribute values and hide them for others. For example, to have different FAQs for steel and aluminum tables.
Define its own knowledge for Odoo attributes or attribute values disregarding selected products. For instance, introduce additional documentation for all variants that have 'legs' or 'custom legs'.
Different users may see different sets of articles in the FAQ. Articles are shown on Odoo product pages only if a user can access those articles. Thus, website visitors would see only published ones.
Optionally, hide the FAQ for specific products or for a particular website. For that, tick the box 'Do not show eCommerce FAQ'.
Add a customizable button to redirect to/show FAQ
Select the articles to show per product/attribute value/website
Hide the button for particular products/websites
Articles are shown according to the access rights
In case, you have an e-shop, it might be a good idea to show articles with the answers to frequently asked questions, so the clients could get the information he/she needs without contacting the company. With the help of the add-on, you can add a link (button) to the product's page. The button either redirects the clients to the related articles on the KnowSystem page or shows the list of articles in a pop-up accordion. The button is added on the products page to the right side below the description (see eCommerce Product FAQ).
The text of the button may be customized. For that, it is also possible to use simple HTML tags. Just write the text in the field 'FAQ button text'. By default, the button's title is 'Frequently Asked Questions'. If you work in a multi-language environment, you can also add the translation to the button's text. So, when a user opens the website in a different language, he/she would see the button's name in that language, if it is supported.
The set of articles can be configured on three levels: per website, per separate product and per products attributes. To add articles to a particular website, choose some sections, tags or articles in the section 'Global FAQ' on the KnowSystem configuration page. This way, any product on the website will contain those articles. In case some sections or tags are chosen, the articles from their children will also be shown in the FAQ.
Global FAQ is particularly useful if you have some articles, that relate to all of the products. For example, you can add the company policy, delivery information, purchase/refund instructions to the global FAQ.
You can also add certain sections, tags, articles to the separate product templates. This way, certain articles will be shown, only if you click on the FAQ button from that product's page.
You can also select the articles that will be shown, only if a particular product's value is selected. For that, in the field 'Applied only if the product has all the values' choose the product's value/values. This way you create a rule to show the chosen-in-the-line articles only if this value is applied.
It is possible to add several rules, i.e. several groups of sections, tags and articles. As a result, all articles found according to any of the rules will be shown on the page of this particular product. For example, we have a product 'Table' with attribute values black, white, steel, wood. The assembly instruction is different for the steel and wood kind of tables, so we create two lines - one with the article related to value steel and one related to article wood.
The application of each of the rules can be limited by several attribute values. Only products having all the specified values will have articles on the subject. i.e. the user must first select the correct value on the page of the online store. For example, there are also some important peculiarities of coloring the steel table in white, so we created another line and chose two values (white, steel), so the article will be seen only if both values will be selected.
All items found by any criteria as well as the items found by global criteria would be linked to the template. For example, from the product 'Table' with the selected values black, wood will be seen the global articles related to the company's policy, and the assembly-instruction-wooden-table article .
For a specific product, the FAQ button can be hidden from the store. For that, tick the box 'Do not show eCommerce FAQ' from the tab KnowSystem on the product cart.
To fully hide the FAQ button, choose the option 'Do not show' as the FAQ view on the configuration page.
You can define own sections, tags, and articles for a specific attribute. For example, show additional articles for all products with the attribute 'Legs'. It is possible to add several rules, i.e. several groups of sections, tags and articles. As a result, on the page of each product from which you can select this attribute, all articles found by any of the rules will be displayed.
Attribute rules can be limited by the selected value on the product page, i.e., the user must first select these values on the product page in order for FAQs to be recalculated. For example, we have an attribute value 'Custom legs', for which two more articles are required 'Custom order guidelines:legs' and 'Custom order prices:legs'.
To add own section, tag, articles to the attribute value, as you add FAQ rules to the attribute, in the field 'Applied only if the product has all the values' choose the product's value/values. The chosen-in-the-line articles will be shown only if this value is applied.
This way, in order to generate FAQ for a particular product, the module will take into consideration the sections, tags and articles from three levels.
Different users may see different sets of articles in the FAQ. Articles are shown only if a user can access those articles. Thus, in order to make articles available for the website users, it is necessary to publish them.
KnowSystem: Multi Languages
KnowSystem: Multi Languages is a KnowSystem add-on () that lets you translate articles into installed in Odoo languages. In such a way users might read and edit articles in a language from their preferences. The language switch sign is added to such fields as: title and preview text as you edit an article. Click on the language icon to manually translate to another language. You can also translate sections', tags' and tours' titles. The fields will be shown in the preferred user's language.
The work with articles in multi-language is not easy as it implies preparing an own body for each article for each language, what almost equals writing a brand new article.
Manually translate articles, titles, and preview text
Add translation for sections', tags' and learning tours' titles
Copy from another translation
See revisions independently for different languages
If you want to have only the title and preview text translated, there is no need to copy-paste the body as it will be in the default language if no other changes are made.
Click on the language icon to manually translate the field to another language. The language switch sign is added to such fields as:
1. Title and preview text as you edit an article.
2. Sections', tags' and tours' titles
In order to see the fields translated, you need to switch to the preferred language.
To update knowledge body translation you should change your user preferences to a required language, in which you want to apply changes. Then, go to an article and introduce changes as you just editing an article. All changes performed with an article will be applied to the version only in the currently preferred language. The article in the default language will not be changed.
Multi-language regime implies that all articles should be kept updated in all Odoo languages.
Article content also might be copied from another language.
To copy the content of article of one language to article in another language:
1. Change the preferred language in user's settings
2. Open an article and start editing it
3. In the left bottom corner of the article's body click on the button 'Copy from another translation'
4. Confirm your choice
5. Click 'Save'
The revisions of translated articles are kept separately depending on the article's language. You can't switch between revisions of the same article in different languages and, for example, restore a revision of an article in French to the article in German (see Article revision and history of changes).