About Security User Roles
Security User Roles is a tool for managing users from a role perspective, not based on security rights. It is simple to start, easy to maintain, and safe to administer.
The module allows batch management of security settings. So, instead of configuring each person's rights, you can configure roles and assign them to multiple users simultaneously.
You can assign security roles in any combination to reflect employee Odoo rights. You can also leave roles empty to manually administer specific users.
Updating a security role is enough to change the rights of multiple users. This process takes a few seconds to apply policy changes or to reflect the installed apps.
Security roles are managed in the same way as standard Odoo users. You may even create roles based on existing users or, vice versa, a user based on a role.
The app lets you configure advanced rules to automatically add or remove users from roles. For example, you can temporarily grant rights to a substitute employee or block access for vacation time.
The tool works with access groups introduced by any modules: Odoo standard, third-party, or custom ones. The logic and settings available here are the same as when configuring users.
Quickly to assign
Dynamic updates
Multiple roles per user
All modules access groups
Managing Security User Roles
The module makes it easier to assign access rights by combining them into a specific user role, which can then be assigned to various people. This way, instead of configuring rights for each person, you may configure roles and assign them to all related users. For example, fifty salespeople with similar rights can be managed simultaneously. Merely configure and apply the role 'Salesperson' to each of them.
To create a user role:
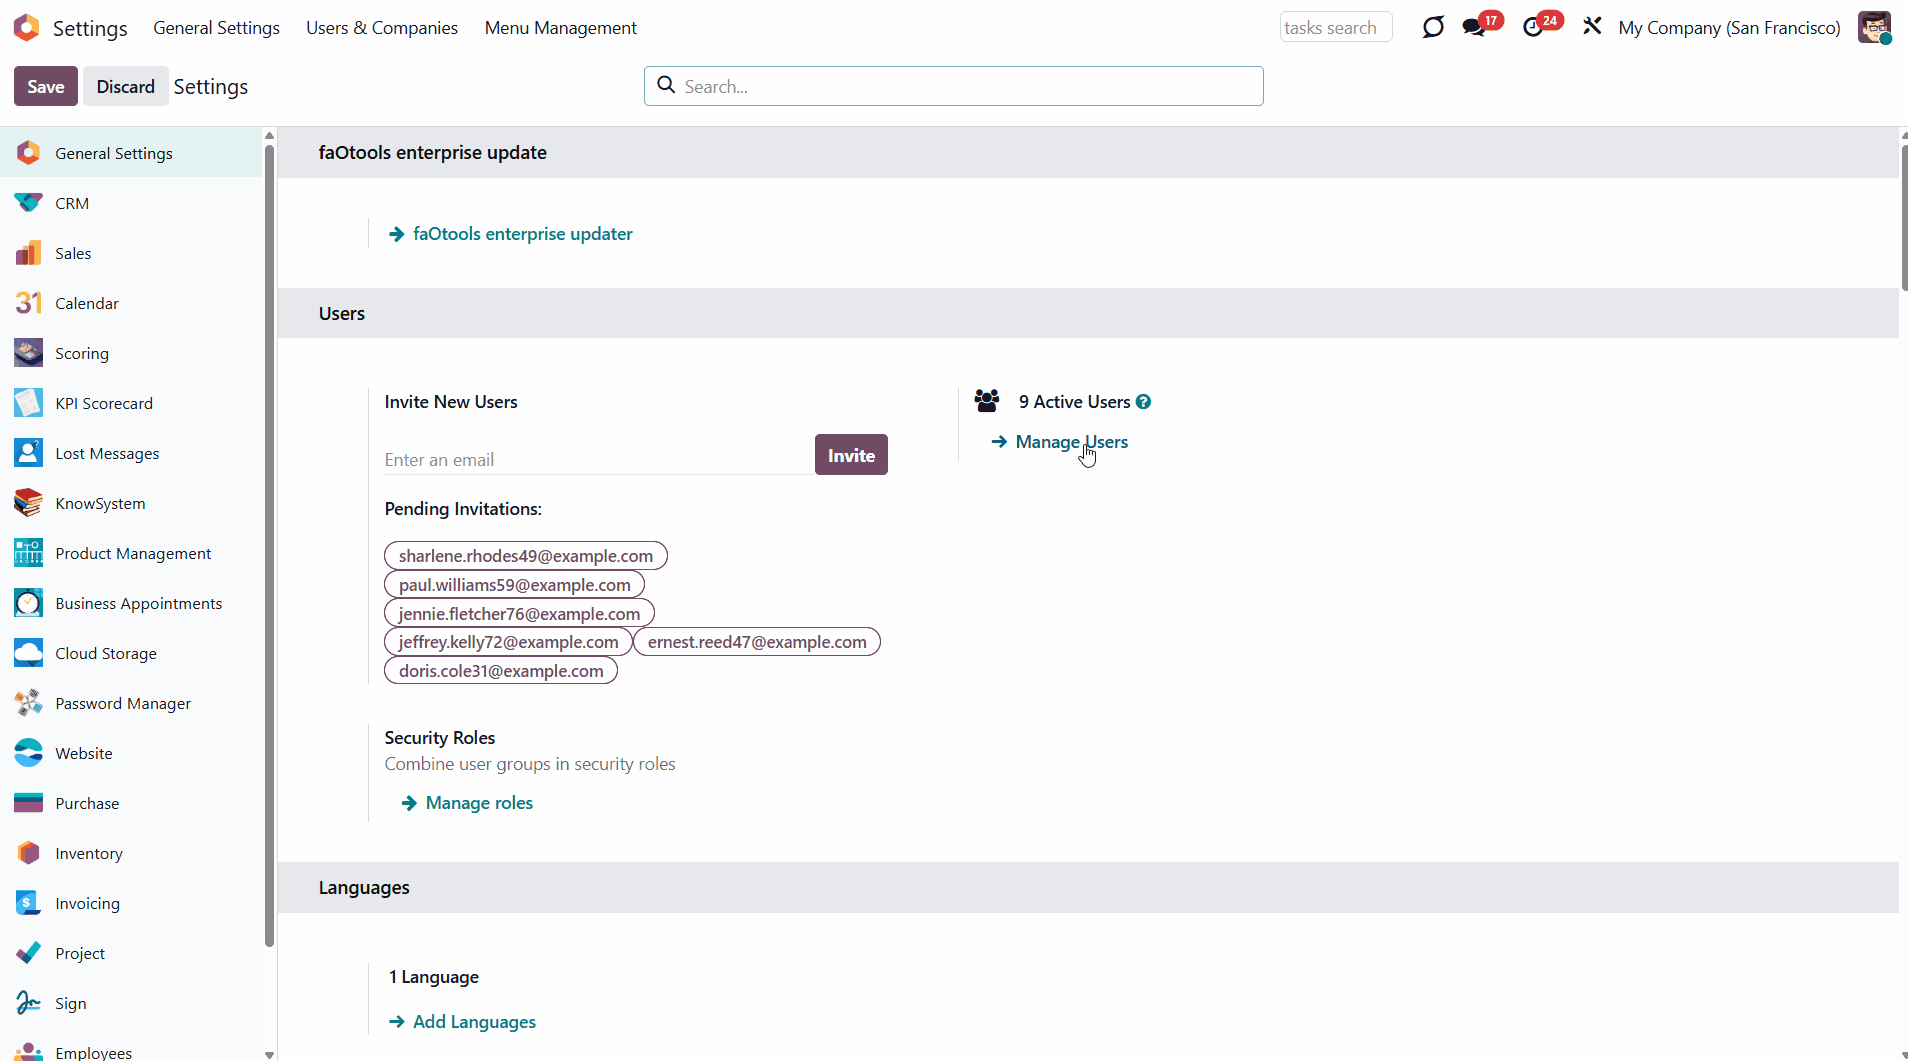
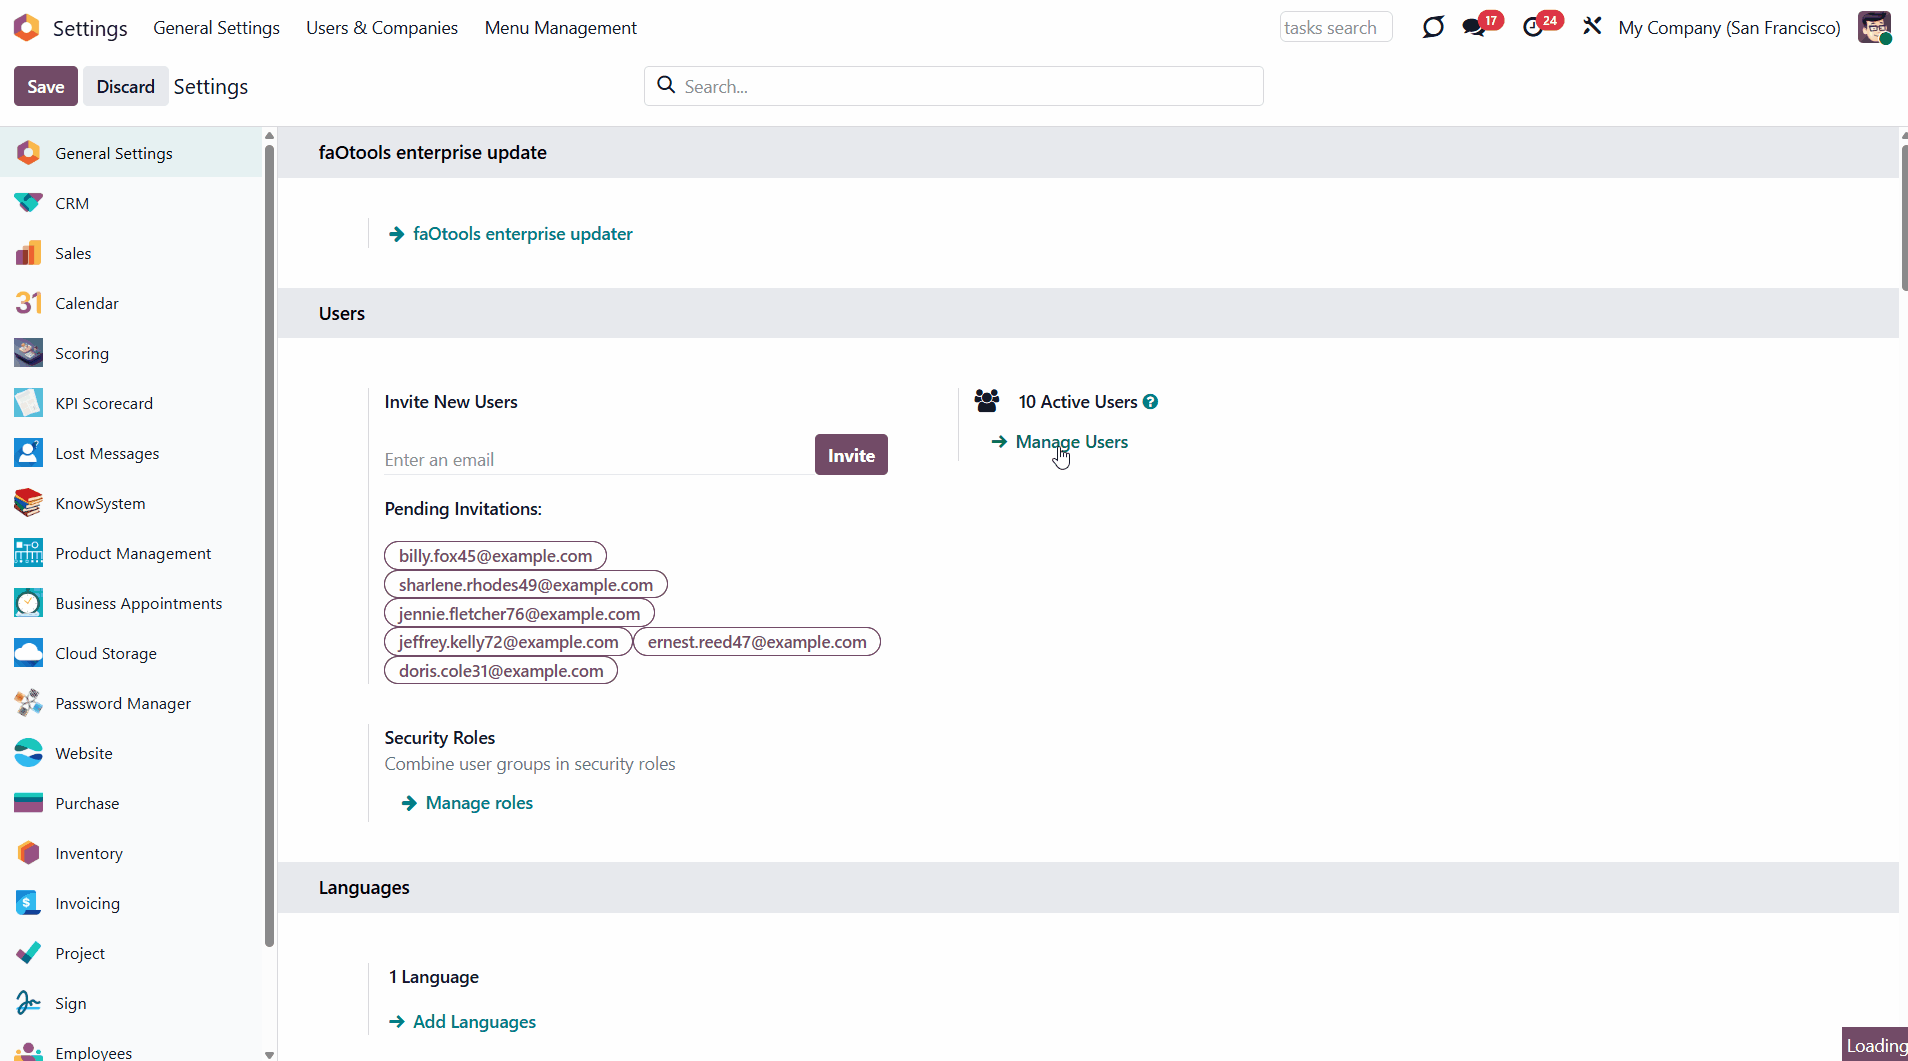
1. Go to General Settings
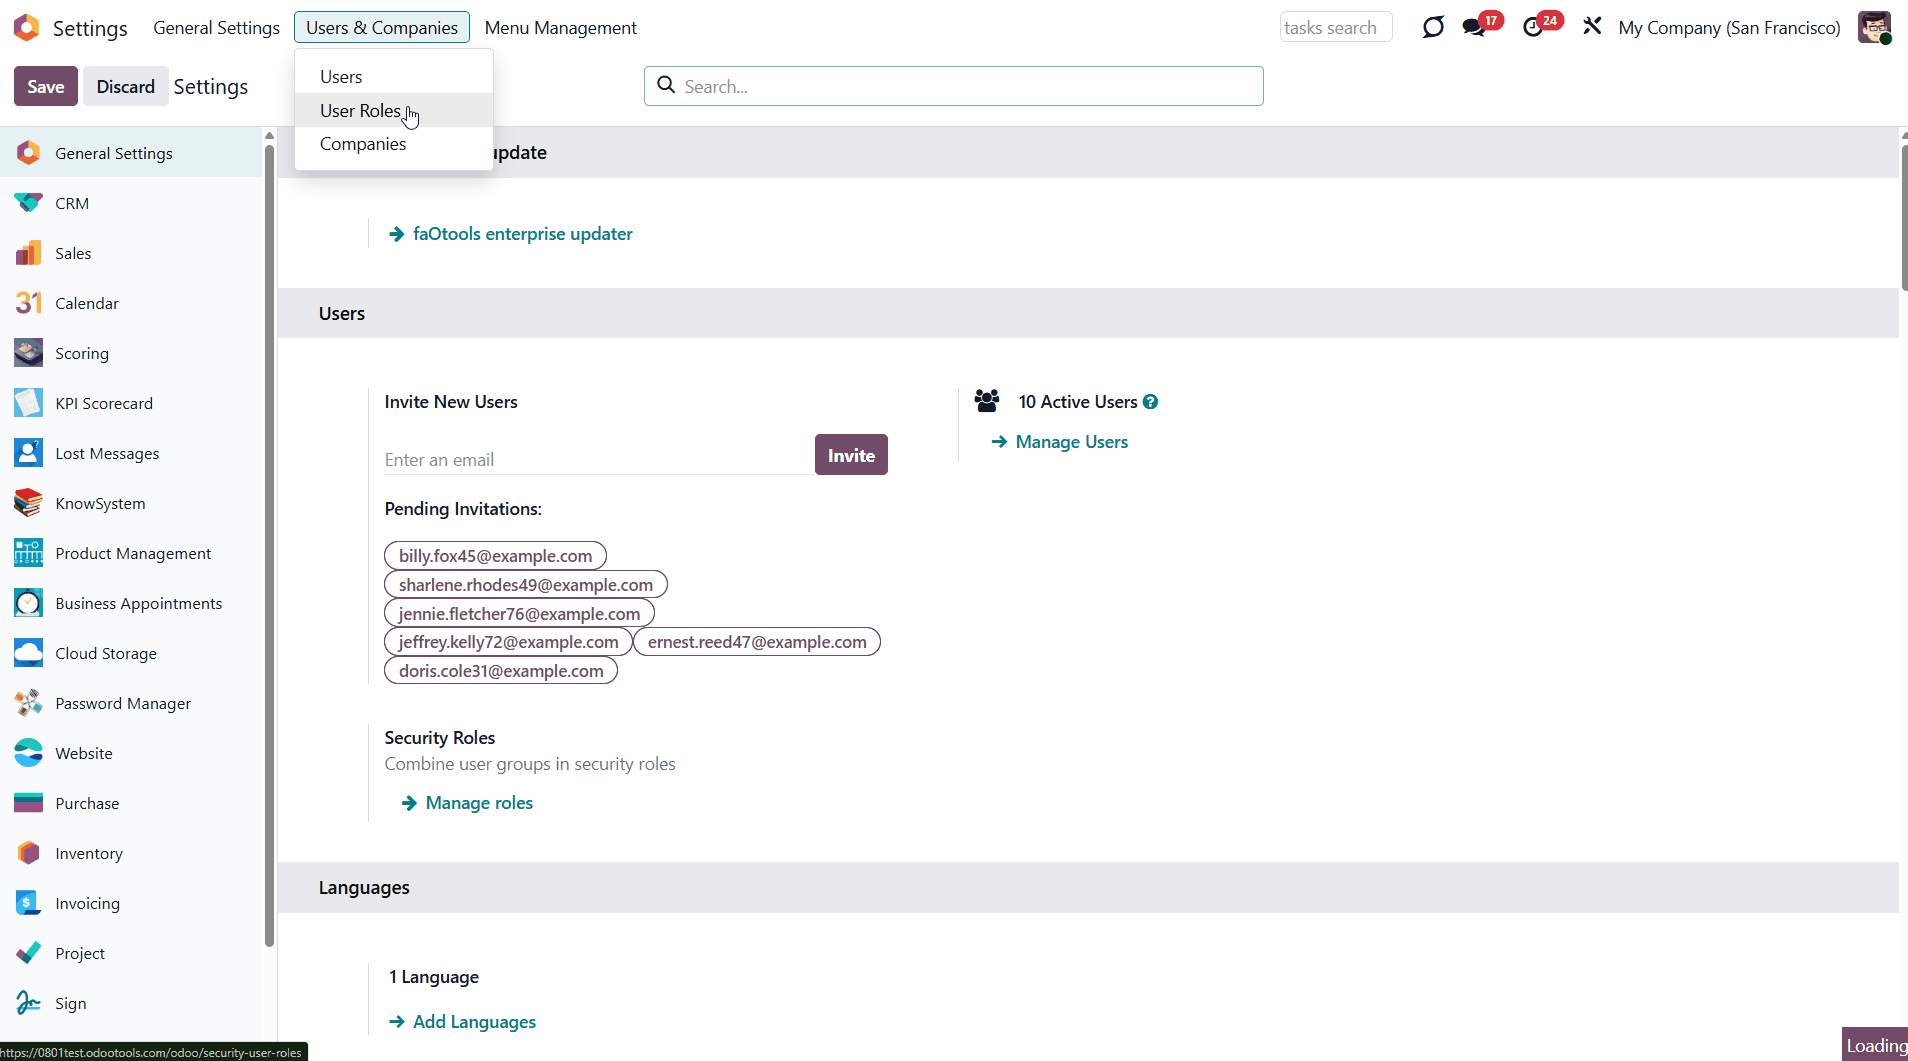
2. Find the 'Users' section and click 'Manage Roles'. Or, in the systray, click on the button 'Users&Companies' and then choose the option 'User Roles'
3. Click the button 'New'
4. White the role reference
5. Choose the related users
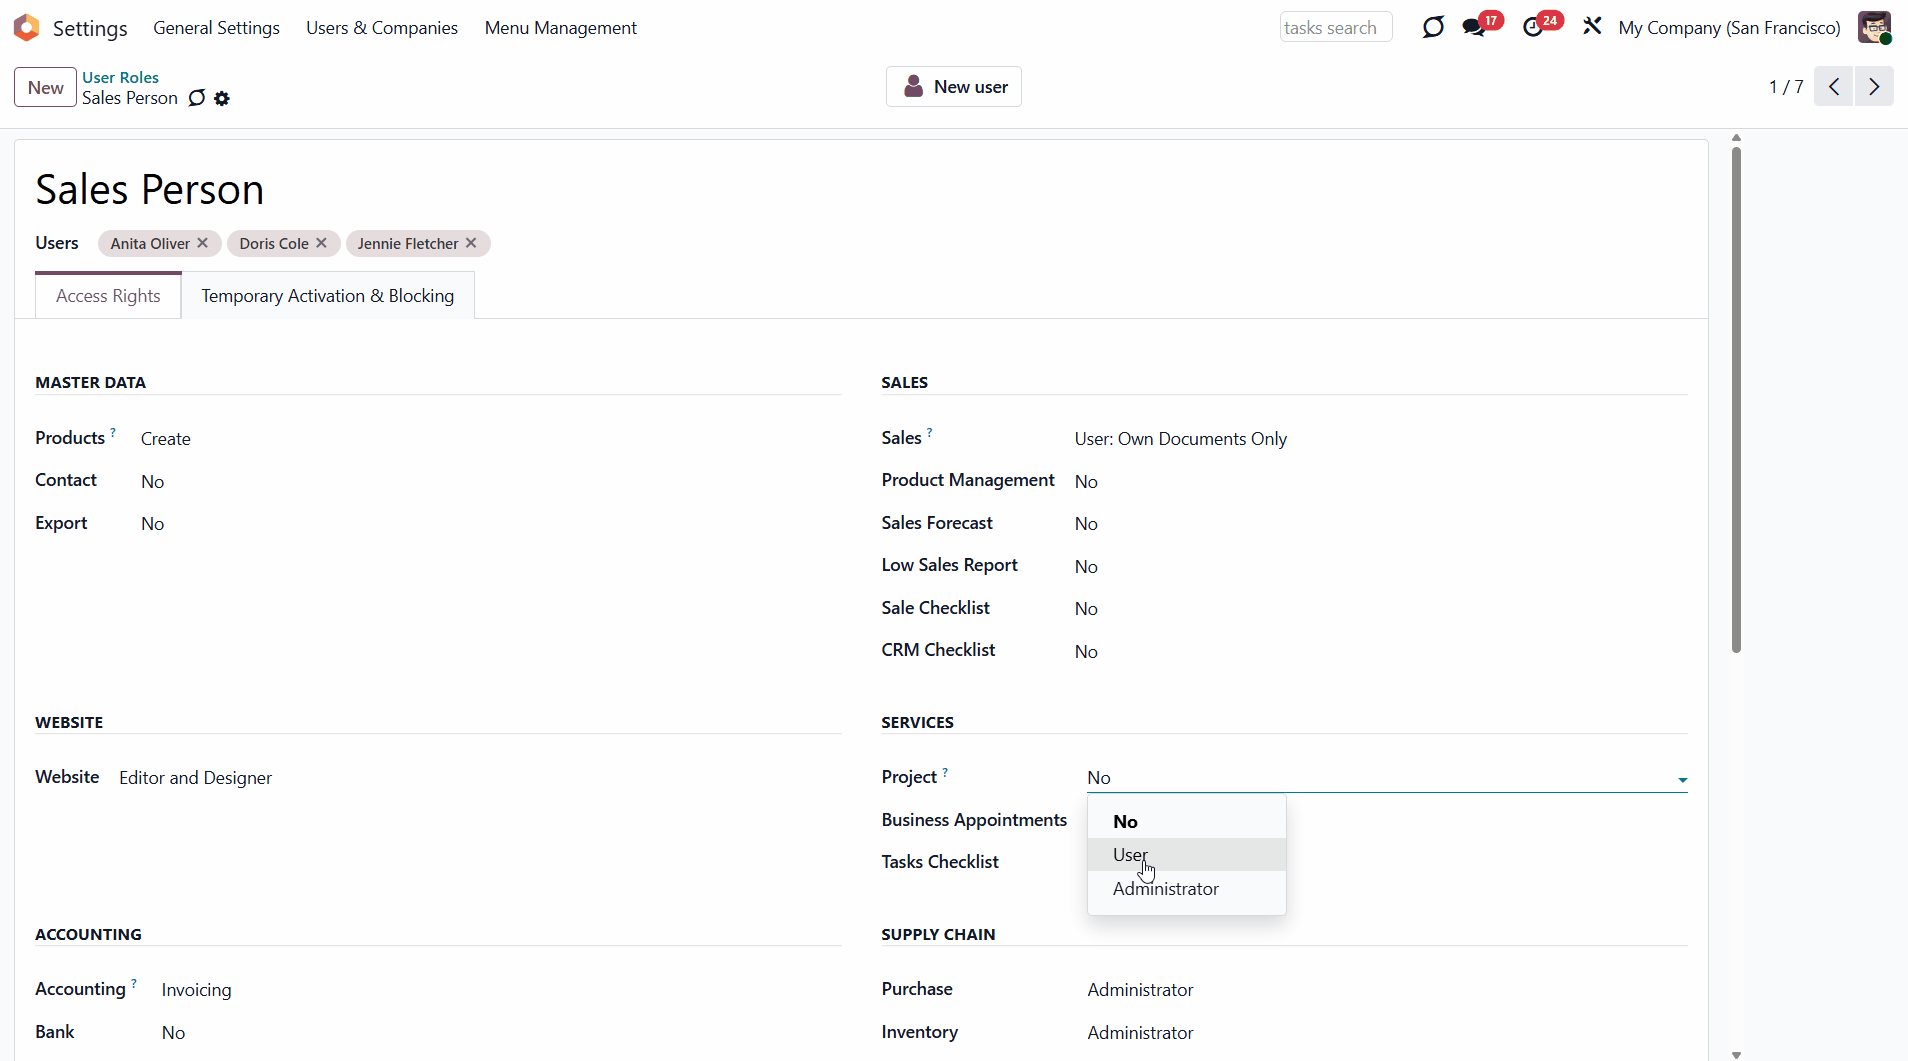
6. Set the access rights
7. Optionally, temporarily activate or deactivate specific user roles in the Temporary Activation & Blocking tab.
After that, the role will be assigned to the selected users (if any), and their rights will be recalculated.
It is possible to create a security role based on an existing user. This way, you can significantly save time if some users have already been created and their access is set. For that:
1. Go to General Settings
2. Click 'Manage users'
3. Open a user
4. Push the Create Role button in the top right corner.
After that, the security role card with the user access rights set will be opened in editing mode. You can introduce some changes before saving (without affecting the user card used as a template).
For example, a sales manager, Abigail Peterson, has administrative rights in purchases and projects. Since we want two more sales managers with the same access, we have created the role 'Sales +' and assigned it to two other users, rather than manually configuring their access rights.
If you need to create a new user with a specific security group, you can do so right from the security group card. Just click the 'New User' button in the top-right corner of the security group card.
You can add some extra users to the security role by editing it or assigning the role in the 'Roles' field while creating or editing a user. Odoo will automatically add the required security groups when the changes are saved.
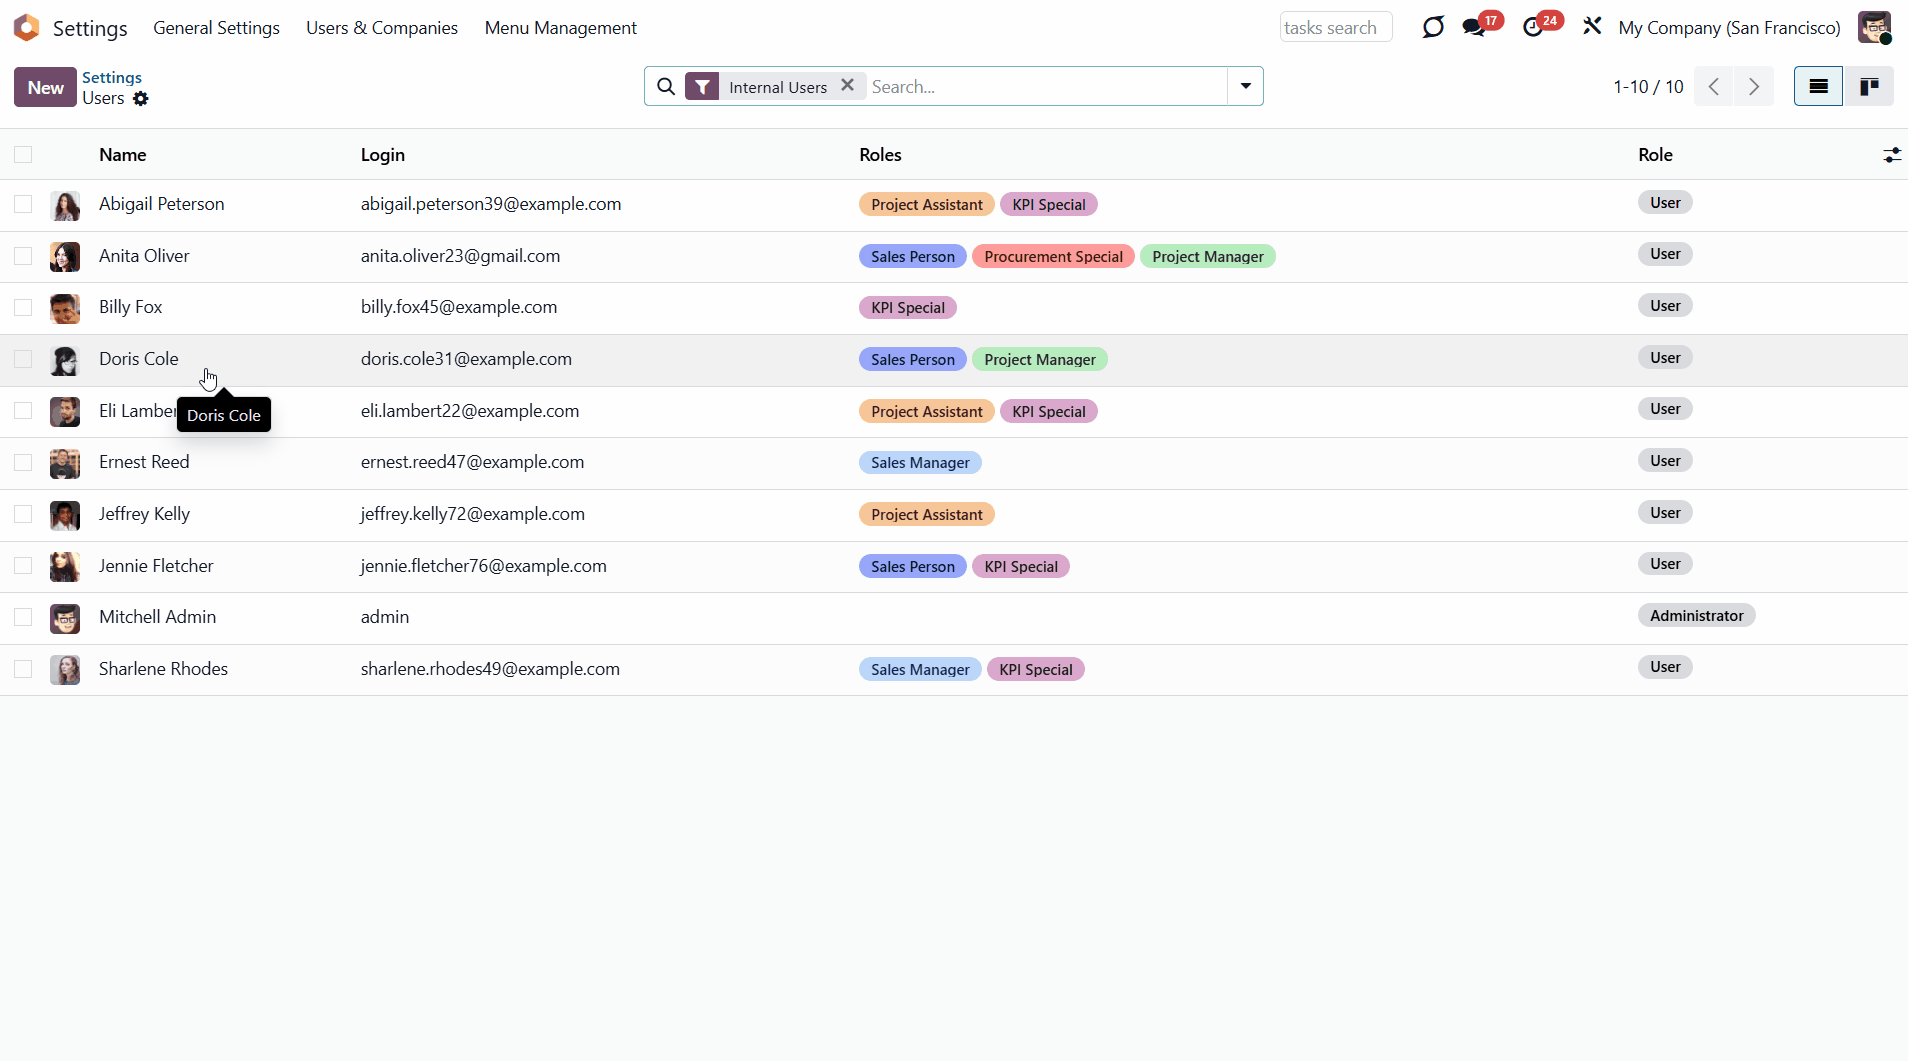
It is possible to add several security roles to a user. In this case, the rights from both security roles will be assigned. For example, the user Jennie Fletcher has the role 'Sales Person' assigned to them. The role adds the 'Administrator' user group to Sales and Project rights. If we add a security role, 'KPI Special', which changes KPI Management rights, Jennie will have the following user groups assigned: Sales: Administrator, Projects: Administrator, and KPI Management: KPI Manager.
If another security role is assigned that grants the same right, the highest right in the hierarchy will be assigned. For example, our user Jennie Fletcher has two security groups assigned: 'Sales Manager' and 'KPI Special'. They both change the same access right, 'Project'. The role 'Sales Manager' changes it to a 'User', and the role 'KPI Special' changes it to 'Administrator'. The role 'Administrator' is higher in the hierarchy and will be assigned to the user.
This way, you can assign security roles in any combination to reflect employee Odoo rights. You can also leave roles empty to manually administer specific users.
The module doesn't forbid changing user rights after assigning a role (since users might be without roles). However, note that the current user groups will be recalculated upon the following role update, the assignment or removal of a user role. For a user with assigned security roles, it is preferable to avoid assigning individual access groups.
For example, if we add the role 'Project Manager' to the user Doris Cole, assign some extra roles from the section 'Productivity', and then add one more role, 'KPI Special', then the rights will be recalculated, and our changes in the section 'Other' will be removed.
To change the rights of multiple users, update the security role that is linked to all of them. It takes a few seconds to reflect policy changes or installed apps. For example, we changed the 'Project' access right of the 'Project Manager' security group from 'Administrator' to 'User', which affected all related user cards.
This way, you can significantly save time on the initial setup of user groups and on subsequent user updates, since you only need to change the role, not each user.
When a role is assigned to a user, the system recalculates access rights but does not modify the user notification preference by default. This means the value selected in the Notification field on the user Preferences tab (either 'Handle by Emails' or 'Handle in Odoo') remains unchanged.
However, one assigned role should include the 'Receive notifications in Odoo' option. In that case, the system will enforce in-Odoo notifications by automatically updating the user's notification setting to 'Handle in Odoo'. It allows administrators to ensure that members of specific roles always receive notifications inside Odoo, regardless of their personal settings. The 'Receive notifications in Odoo' option is visible only in developer mode.
The app lets you configure advanced rules to automatically add/remove role users. For example, you can temporarily grant rights to a substitute employee or block access for vacation time (see Temporary User Blocking and Activation).
Security User Roles Interfaces
The module provides a convenient interface for managing existing user roles, creating new ones, assigning them to users, and defining advanced rules for temporarily assigning or removing them.
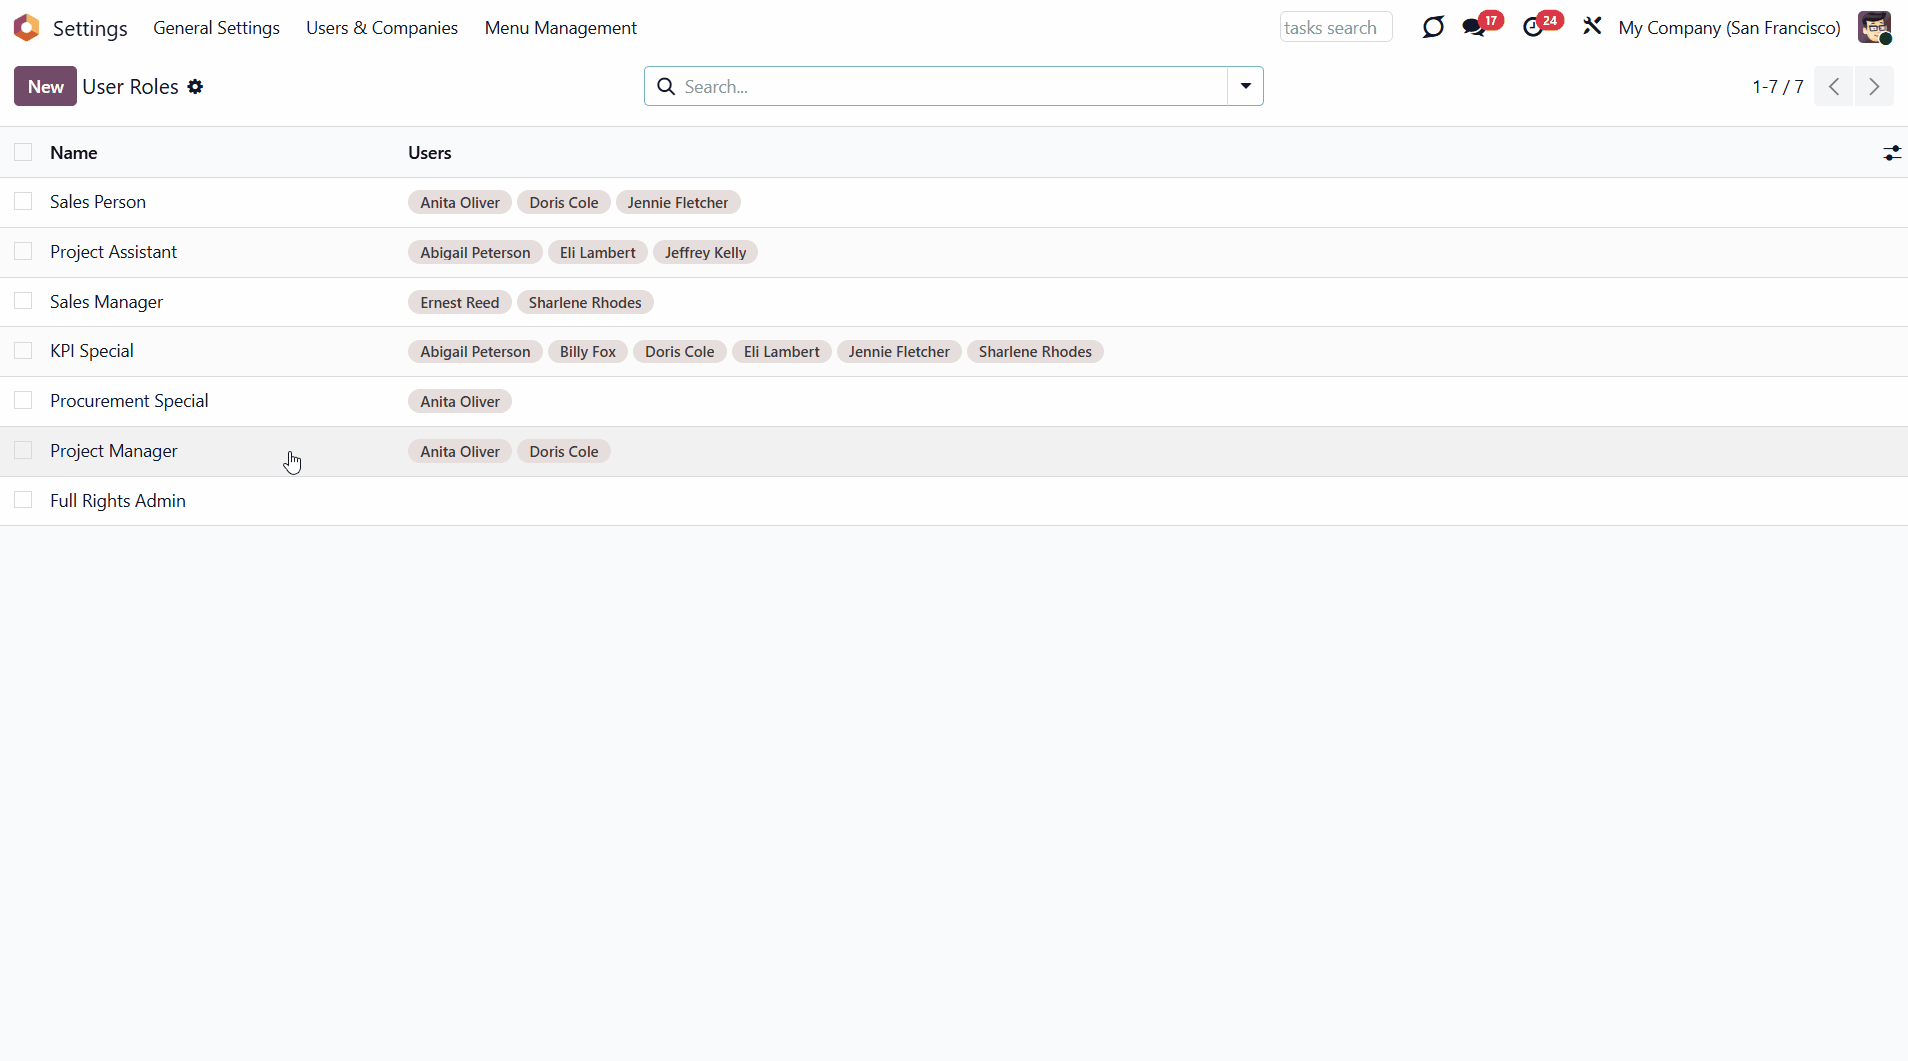
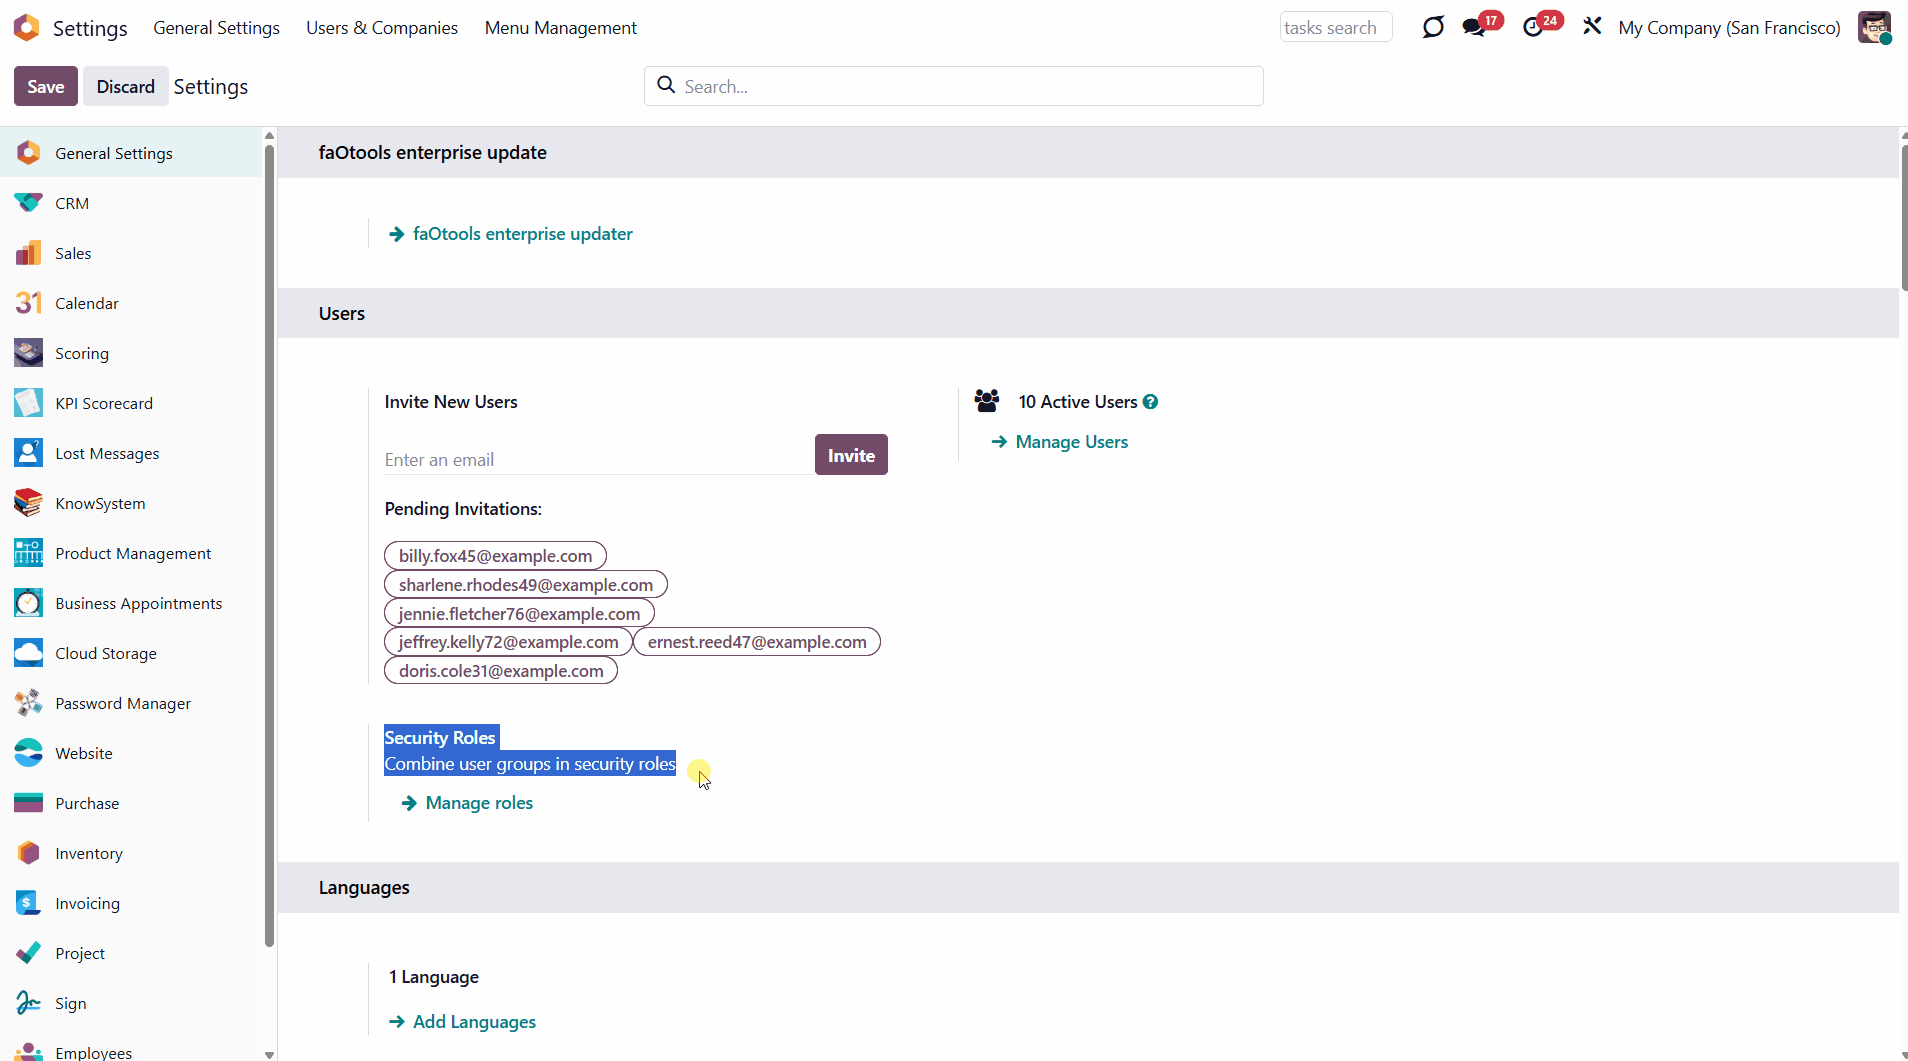
You can access the interface in two ways. In General Settings, click the option Users & Companies > User Roles in the systray. Alternatively, in General Settings, click the button 'Manage Roles' in the Users section.
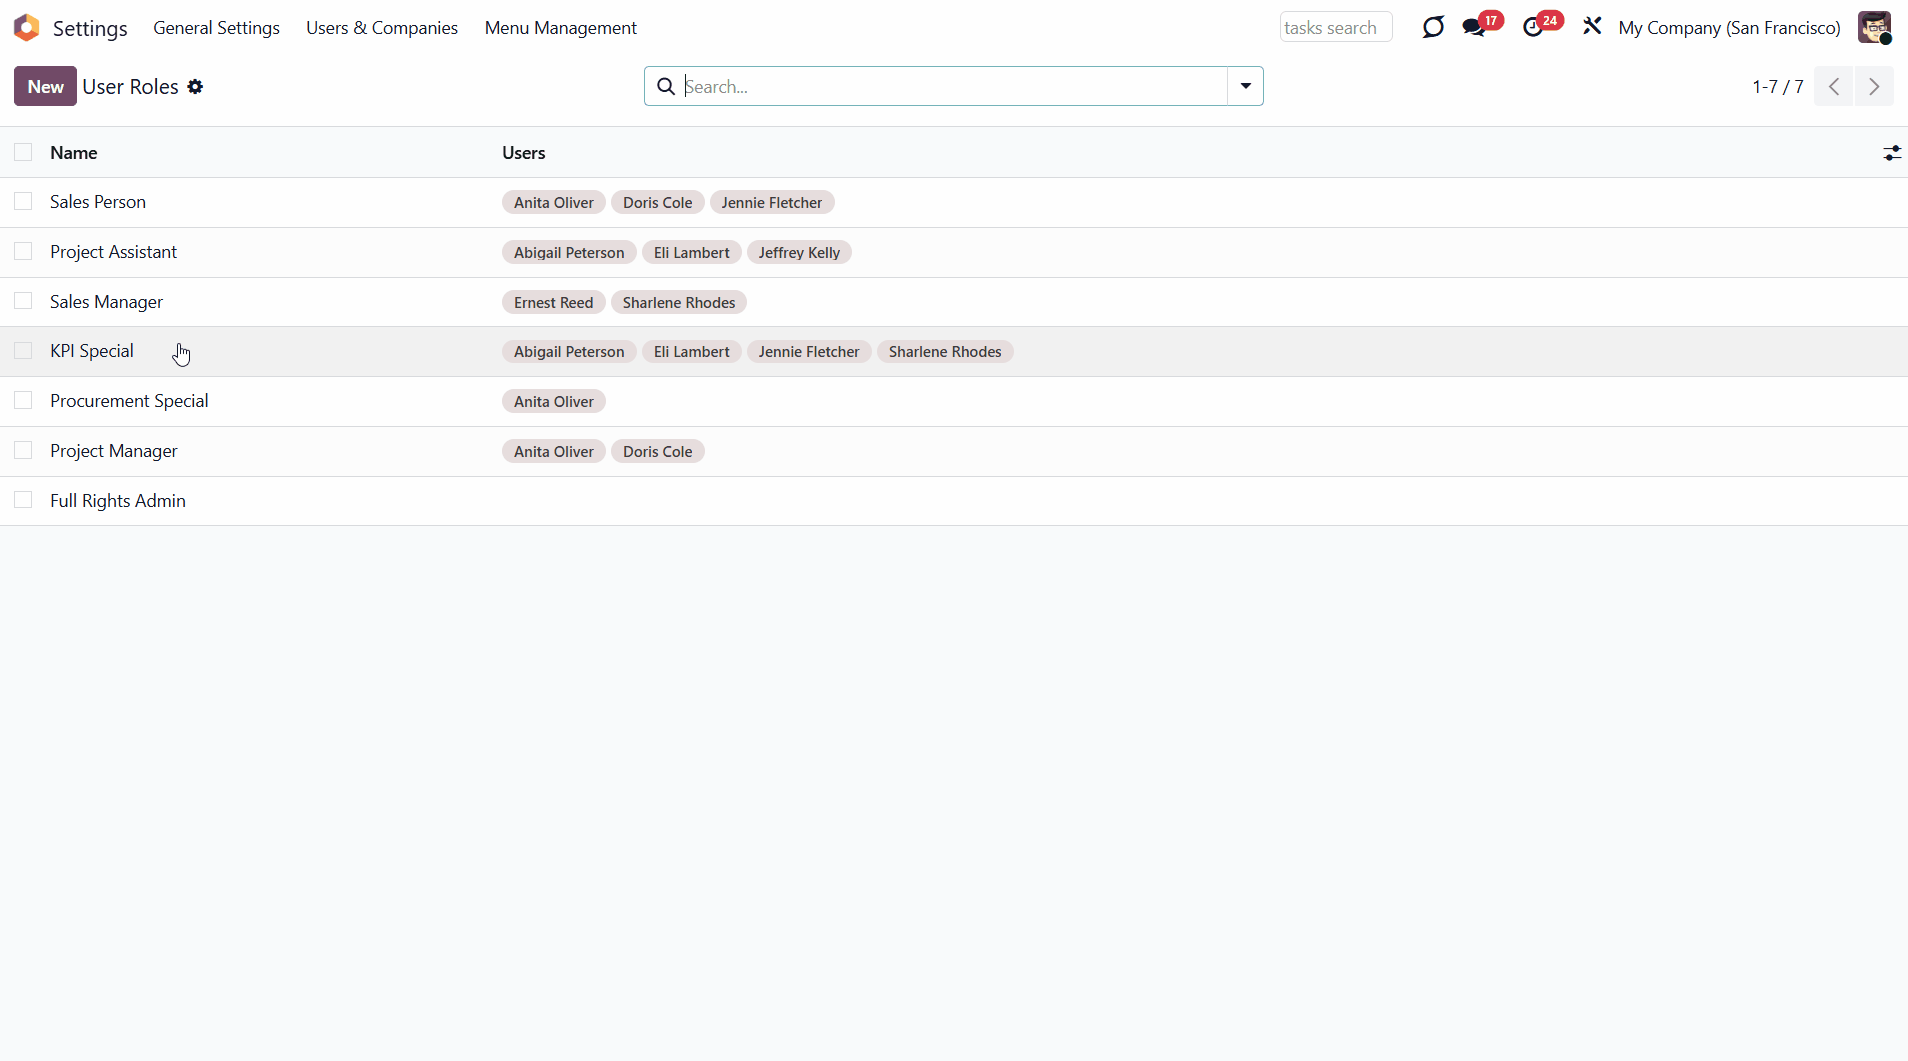
There, you will find a list of created user roles and the users assigned to them. You can use the search, filtering, and grouping options to find the required ones. For example, you can search for user roles by the related user, enter a name in the search bar, and choose the 'Users' search option.
To edit any user role, click on it and introduce the changes. To archive or delete user groups, select them one by one by ticking the box next to each group, then click the gear 'Actions' above and choose 'Archive' or 'Delete'.
The assigned security roles are displayed in the 'Roles' column when you open the 'Users' menu in the Kanban view.
The roles are highlighted in different colors. To change a role's color, click it on the user's card and choose a different color.
If you don't want to highlight the security role using color, tick the 'Hide in kanban' option.
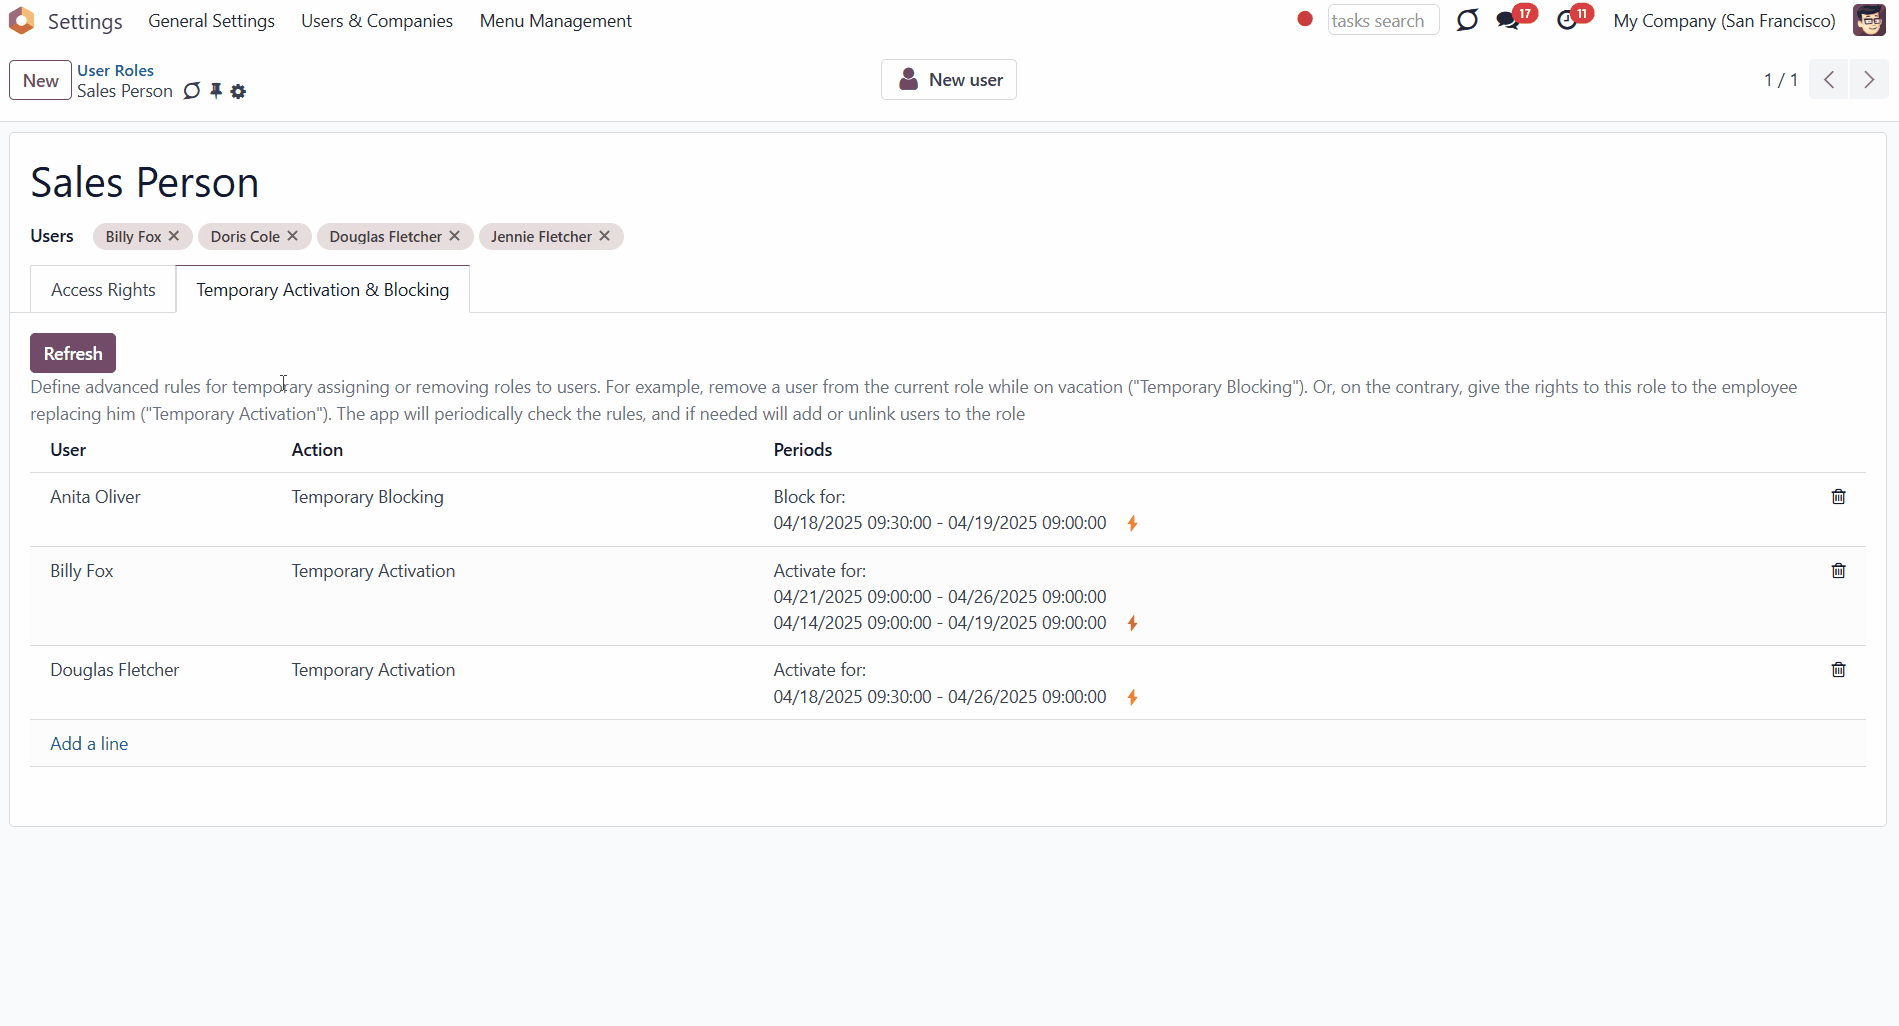
Temporary User Blocking and Activation
The module allows you to set up advanced rules to temporarily assign a user to a role or block a user for a specific period. This way, once set, there will be no need to remember to change the security role later. The module will do that for you. To that goal:
1. Go to General Settings > Users & Companies > User Roles
2. Open a user role
3. Go to the tab 'Temporary Activation and Blocking'
4. Click 'Add a line'
5. Choose a user
6. Choose the action
7. Set the period
8. Optionally, click 'Add a line' to add another period for the rule
9. Click Save&Close.
When you block a user for a period, it means they do not have the security role assigned for that time. During other intervals, this user is reassigned to this role. Such rules can be used for vacations and different types of time off.
When you activate a user for a period, it means they have the security role assigned only during that period. At other times, such a user does not have this role and access rights. For instance, it might be essential for substitute or short-term employees.
Remember that the rule should be unique per user and role. Otherwise, a warning will appear when saving. If you want to specify multiple periods for a single action for the same user, add them to the same rule.
Each rule might have a few blocking or activating periods. For example, you may assign a few blocking periods during times when a user is on vacation. If any of those are suitable now, the rule would be activated. In case of temporary activation, the role will be assigned to the user; in case of temporary blocking, the role will be removed from the user.
As the security role is activated/deactivated for a specific period, the list of users and roles on the user card is updated accordingly.
If the rule is active, it is marked by the lightning icon in the 'Period' column; otherwise, it is inactive and no longer affects user roles.
The app periodically checks the rules and blocks/activates users for roles when the rules assume that role. You may change the frequency of checks under the menu Settings > Technical > Automation > Scheduled Jobs > the action '[Security User Roles] Activate/Block Users for Roles'.
To manually check a particular security role, click the 'Refresh' button in the 'Temporary Activation and Blocking' tab.

About Security User Roles
Security User Roles is a tool for managing users from a role perspective, not based on security rights. It is simple to start, easy to maintain, and safe to administer.
The module allows batch management of security settings. So, instead of configuring each person's rights, you can configure roles and assign them to multiple users simultaneously.
You can assign security roles in any combination to reflect employee Odoo rights. You can also leave roles empty to manually administer specific users.
Updating a security role is enough to change the rights of multiple users. This process takes a few seconds to apply policy changes or to reflect the installed apps.
Security roles are managed in the same way as standard Odoo users. You may even create roles based on existing users or, vice versa, a user based on a role.
The app lets you configure advanced rules to automatically add or remove users from roles. For example, you can temporarily grant rights to a substitute employee or block access for vacation time.
The tool works with access groups introduced by any modules: Odoo standard, third-party, or custom ones. The logic and settings available here are the same as when configuring users.
Quickly to assign
Dynamic updates
Multiple roles per user
All modules access groups
Managing Security User Roles
The module makes it easier to assign access rights by combining them into a specific user role, which can then be assigned to various people. This way, instead of configuring rights for each person, you may configure roles and assign them to all related users. For example, fifty salespeople with similar rights can be managed simultaneously. Merely configure and apply the role 'Salesperson' to each of them.
To create a user role:
1. Go to General Settings
2. Find the 'Users' section and click 'Manage Roles'. Or, in the systray, click on the button 'Users&Companies' and then choose the option 'User Roles'
3. Click the button 'New'
4. White the role reference
5. Choose the related users
6. Set the access rights
7. Optionally, temporarily activate or deactivate specific user roles in the Temporary Activation & Blocking tab.
After that, the role will be assigned to the selected users (if any), and their rights will be recalculated.
It is possible to create a security role based on an existing user. This way, you can significantly save time if some users have already been created and their access is set. For that:
1. Go to General Settings
2. Click 'Manage users'
3. Open a user
4. Push the Create Role button in the top right corner.
After that, the security role card with the user access rights set will be opened in editing mode. You can introduce some changes before saving (without affecting the user card used as a template).
For example, a sales manager, Abigail Peterson, has administrative rights in purchases and projects. Since we want two more sales managers with the same access, we have created the role 'Sales +' and assigned it to two other users, rather than manually configuring their access rights.
If you need to create a new user with a specific security group, you can do so right from the security group card. Just click the 'New User' button in the top-right corner of the security group card.
You can add some extra users to the security role by editing it or assigning the role in the 'Roles' field while creating or editing a user. Odoo will automatically add the required security groups when the changes are saved.
It is possible to add several security roles to a user. In this case, the rights from both security roles will be assigned. For example, the user Jennie Fletcher has the role 'Sales Person' assigned to them. The role adds the 'Administrator' user group to Sales and Project rights. If we add a security role, 'KPI Special', which changes KPI Management rights, Jennie will have the following user groups assigned: Sales: Administrator, Projects: Administrator, and KPI Management: KPI Manager.
If another security role is assigned that grants the same right, the highest right in the hierarchy will be assigned. For example, our user Jennie Fletcher has two security groups assigned: 'Sales Manager' and 'KPI Special'. They both change the same access right, 'Project'. The role 'Sales Manager' changes it to a 'User', and the role 'KPI Special' changes it to 'Administrator'. The role 'Administrator' is higher in the hierarchy and will be assigned to the user.
This way, you can assign security roles in any combination to reflect employee Odoo rights. You can also leave roles empty to manually administer specific users.
The module doesn't forbid changing user rights after assigning a role (since users might be without roles). However, note that the current user groups will be recalculated upon the following role update, the assignment or removal of a user role. For a user with assigned security roles, it is preferable to avoid assigning individual access groups.
For example, if we add the role 'Project Manager' to the user Doris Cole, assign some extra roles from the section 'Productivity', and then add one more role, 'KPI Special', then the rights will be recalculated, and our changes in the section 'Other' will be removed.
To change the rights of multiple users, update the security role that is linked to all of them. It takes a few seconds to reflect policy changes or installed apps. For example, we changed the 'Project' access right of the 'Project Manager' security group from 'Administrator' to 'User', which affected all related user cards.
This way, you can significantly save time on the initial setup of user groups and on subsequent user updates, since you only need to change the role, not each user.
When a role is assigned to a user, the system recalculates access rights but does not modify the user notification preference by default. This means the value selected in the Notification field on the user Preferences tab (either 'Handle by Emails' or 'Handle in Odoo') remains unchanged.
However, one assigned role should include the 'Receive notifications in Odoo' option. In that case, the system will enforce in-Odoo notifications by automatically updating the user's notification setting to 'Handle in Odoo'. It allows administrators to ensure that members of specific roles always receive notifications inside Odoo, regardless of their personal settings. The 'Receive notifications in Odoo' option is visible only in developer mode.
The app lets you configure advanced rules to automatically add/remove role users. For example, you can temporarily grant rights to a substitute employee or block access for vacation time (see Temporary User Blocking and Activation).
Security User Roles Interfaces
The module provides a convenient interface for managing existing user roles, creating new ones, assigning them to users, and defining advanced rules for temporarily assigning or removing them.
You can access the interface in two ways. In General Settings, click the option Users & Companies > User Roles in the systray. Alternatively, in General Settings, click the button 'Manage Roles' in the Users section.
There, you will find a list of created user roles and the users assigned to them. You can use the search, filtering, and grouping options to find the required ones. For example, you can search for user roles by the related user, enter a name in the search bar, and choose the 'Users' search option.
To edit any user role, click on it and introduce the changes. To archive or delete user groups, select them one by one by ticking the box next to each group, then click the gear 'Actions' above and choose 'Archive' or 'Delete'.
The assigned security roles are displayed in the 'Roles' column when you open the 'Users' menu in the Kanban view.
The roles are highlighted in different colors. To change a role's color, click it on the user's card and choose a different color.
If you don't want to highlight the security role using color, tick the 'Hide in kanban' option.
Temporary User Blocking and Activation
The module allows you to set up advanced rules to temporarily assign a user to a role or block a user for a specific period. This way, once set, there will be no need to remember to change the security role later. The module will do that for you. To that goal:
1. Go to General Settings > Users & Companies > User Roles
2. Open a user role
3. Go to the tab 'Temporary Activation and Blocking'
4. Click 'Add a line'
5. Choose a user
6. Choose the action
7. Set the period
8. Optionally, click 'Add a line' to add another period for the rule
9. Click Save&Close.
When you block a user for a period, it means they do not have the security role assigned for that time. During other intervals, this user is reassigned to this role. Such rules can be used for vacations and different types of time off.
When you activate a user for a period, it means they have the security role assigned only during that period. At other times, such a user does not have this role and access rights. For instance, it might be essential for substitute or short-term employees.
Remember that the rule should be unique per user and role. Otherwise, a warning will appear when saving. If you want to specify multiple periods for a single action for the same user, add them to the same rule.
Each rule might have a few blocking or activating periods. For example, you may assign a few blocking periods during times when a user is on vacation. If any of those are suitable now, the rule would be activated. In case of temporary activation, the role will be assigned to the user; in case of temporary blocking, the role will be removed from the user.
As the security role is activated/deactivated for a specific period, the list of users and roles on the user card is updated accordingly.
If the rule is active, it is marked by the lightning icon in the 'Period' column; otherwise, it is inactive and no longer affects user roles.
The app periodically checks the rules and blocks/activates users for roles when the rules assume that role. You may change the frequency of checks under the menu Settings > Technical > Automation > Scheduled Jobs > the action '[Security User Roles] Activate/Block Users for Roles'.
To manually check a particular security role, click the 'Refresh' button in the 'Temporary Activation and Blocking' tab.