About Cloud Storage Solutions
Cloud Storage Solutions is an Odoo app for organizing attachments, managing folder trees, and synchronizing Odoo with the cloud storage solution(s) of your choice. The app introduces automatic algorithms to prepare document directories and integrate them with the workflows of Google Drive, OneDrive/SharePoint, Nextcloud/ownCloud, and Dropbox.
Decide which Odoo document types should have their folder trees. Flexibly create folder rules. Any Odoo model can be chosen.
Manage folders and attachments from a single view. Conveniently navigate through them. Search for and download files one by one or in batches.
Organize files of any Odoo object in a set of subfolders. Instantly access folders and files in the attachments box and synced cloud interfaces.
Share files, directories, and tags with particular partners or with an access URL. Let users download whole shares and separate items, upload attachments, and add folders or tags.
The module allows you to prepare directories and send them to the cloud client of your choice (Google Drive, OneDrive/SharePoint, Nextcloud/ownCloud, and Dropbox). You can have as many connections as you need. A separate add-on for each client is required.
Rely on auto-synchronization between Odoo and cloud solutions based on scheduled jobs. No manual interaction is required.
You can control sync logs right in Odoo. You can export and share those in case of any issues, and you can be notified of any client disconnections.
Set up rules to prepare folders based on Odoo Enterprise workspaces (). All features (including sharing, downloading, and signing) would work even after sync.
Files manager interface
Automatic regular bilateral sync
Multi synchronization
Files and folders portal sharing
Concepts and Terms
Here, you can find terms and add-ons icons used throughout all documentation.
Odoo model – a document type in Odoo (for example, Sale Order, Project, Contact).
Odoo object – an Odoo record within an Odoo model (for example, S00032, Project XYZ, Abigail Peterson).
Folder - a key object in cloud storage solutions that represents a virtual location for attachments and other sub-folders.
Folder rules – the configurations, based on which the module generates folders by checking the settings and fields of models and objects.
Model-related rule – a folder rule based on an Odoo model (for example, Sale Order, Purchase Order, Project, Contacts, Leads/Opportunities). The model-related folder rules state from what model the information should be extracted.
Workspace-related rule () - a folder rule used to sync the files from the module Documents, which generates folders according to the workspace structure.
Single View Interface – the functional interface for internal users to manage folders and files.
Automatic folder – a rule-based folder generated regularly, based on the scheduled job 'Prepare Cloud Folders'.
Manual folder – a folder that a user created. Unlike automatic folder settings, each folder should be set manually. Usually serve as subfolders to automatic folders.
Tag - a special object to categorize attachments, make them easily searchable, and provide a colorful visual mark for a file's quick identification.
(Portal) Share - a special Odoo object for combining attachments and sharing them with specific portal users or publicly through the access URL.
Attachment – a special Odoo object that serves to organize and store files in Odoo.
Attachments box – the standard Odoo interface for Odoo object form views, where attachments are displayed (available for downloading and uploading).
Default folder – manual folders with or without default attachments that would be auto-generated for a specific Odoo object folder, as soon as an object-related folder is created for the first time. Further folder refreshes will not generate default folders with default attachments.
Prioritization – a feature that allows checking specific 'unimportant' folders more frequently and, therefore, prioritizes other folders' checks. It is set separately for each folder rule.
Cloud client - external software that might be used to organize cloud storage, such as Google Drive, OneDrive/SharePoint, ownCloud/Nextcloud, or Dropbox.
Direct sync - the sync from Odoo to the cloud client. For example, when you add files to the attachments box of an object or its folder, it is a direct sync that sends them to the cloud.
Backward sync – the sync from the cloud client to Odoo. For example, when you add files to one of the synced object’s folders in the cloud client, the backward sync fetches them and adds them to the related folders in Odoo.
Reverse sync – the sync that assumes getting back all items to Odoo and deleting the files from the cloud client. It occurs when a folder isn't synced anymore, when you want to change the cloud client for previously synced files and folders, or when the sync is fully stopped (the cloud is reset).
Sync logs - records that provide helpful information on the type of operations that were processed or completed. They help detect errors and investigate their causes.
Add-ons icons
These signs mark features introduced by add-ons.
Google Drive Odoo Integration
The connector, to synchronize Odoo folders and attachments with Google Drive.
ownCloud/Nextcloud Odoo Integration
The connector, to synchronize Odoo folders and attachments with Nextcloud and/or ownCloud.
OneDrive/SharePoint Odoo Integration
The connector, to synchronize Odoo folders and attachments with OneDrive or/and SharePoint.
DropBox Odoo Integration
The connector, to synchronize Odoo folders and attachments with DropBox.
Cloud Sync for Enterprise Documents
An optional add-on to prepare workspace-related folders and to sync Odoo documents (introduced by the enterprise app 'Documents') with clouds.
Folders in Cloud Storage Solutions
A folder is a key object in cloud storage solutions. It represents a virtual location for attachments and other sub-folders.
Folders serve for convenient file storing and organization as they support hierarchy and may contain subfolders. Creating an efficient folder structure simplifies the navigation between attachments. For example, you can add subfolders 'Invoices' and 'Projects' to the Odoo document 'Contacts' and then easily find all a person's invoices and attachments related to their projects.
With folders, you can conveniently navigate files, create easily accessible structures, restrict rights for a particular folder, create personal storage, and even sync some or all folders to one or several cloud clients (for example, Google Drive or OneDrive). You can read more about the folder’s features in articles: Folders in Cloud Storage Solutions, Folder Rules, Hierarchy of Folders, Synchronization Principles, and Access Rights.
Folders are associated with Odoo objects. You can add links between them by creating a folder rule, which will automatically create folders as matching objects appear (see Folder Rules). For example, select the model 'Task' to make Odoo add a folder for each project's task (Tasks > Task 1, Task 2, ...). Automatically created directories would contain all attachments associated with their linked objects. Folders are updated regularly based on the scheduled job (see Hierarchy Rules).
The folder rules allow you to create a specific folder structure, which is preserved when syncing with a cloud client of your choice. After making a rule, no further action is required; however, you can always change it. In this case, the folders will be recalculated.
You can create a rule that generates folders and manually create folders or subfolders. Manual folders and subfolders can be added from the Files Manager interface and an object's attachments box. They may even be synced from the cloud (see the Files Manager Interface and Synchronization Principles).
Manually created folders are handy when you need a particular folder that cannot be extracted from an Odoo database. They can serve as personal storage. Specify the users who might access it, place it anywhere in the folder’s tree, and add any files. For example, configure the folder so a user can access 'Office design', but not 'Office design/Commercial contracts' (see Access Rights).
Automatic and manual folders may contain attachments. An Odoo attachment is a way to organize and store files in Odoo. Attachments can be added through the attachments box of a particular Odoo object, its messages thread, or to the related object’s folder in the Files Manager. As automatic folders are generated, the associated attachments are also added, so you can access them both from the Files Manager interface and attachments boxes (see Attachments Box).
Both automatic and manual folders, their attachments, and manually uploaded files can be synced with cloud clients. Read more about their sync in the articles Folder Rules, Files Manager Interface, and Attachments Box.
You can assign a particular cloud client to each automatic and manual folder. For example, you have a manual folder 'Important documents', and an automatic folder related to the sale order 'S0003'. You can sync the 'Important documents' folder with OneDrive and the 'S0003' folder with Google Drive. Thus, in OneDrive, you will see the structure Odoo > Sale Orders >Important Documents, and in Google Drive, the structure Odoo > Sale Orders > S0003. To assign a cloud client to an automatic folder, specify the cloud client in folder rules. To assign it to a manually created folder, start editing the folder from the single-view interface.
You can sync a child folder without syncing its parent. For example, sync the folder 'Tasks' and don’t sync its parent folder 'Project'. However, keep in mind that a child and a parent folder cannot have different cloud clients assigned to them. Even if a folder rule originally had another cloud client assigned, when you choose a parent folder rule, the child's cloud client is changed to the parent’s. For example, you have the parent folder 'Project' and the child folder 'Tasks'. You have assigned Google Drive as a cloud client for the folder rule 'Project' and OneDrive for the folder rule 'Tasks'. Both folders will be synced to Google Drive regardless of the child's settings.
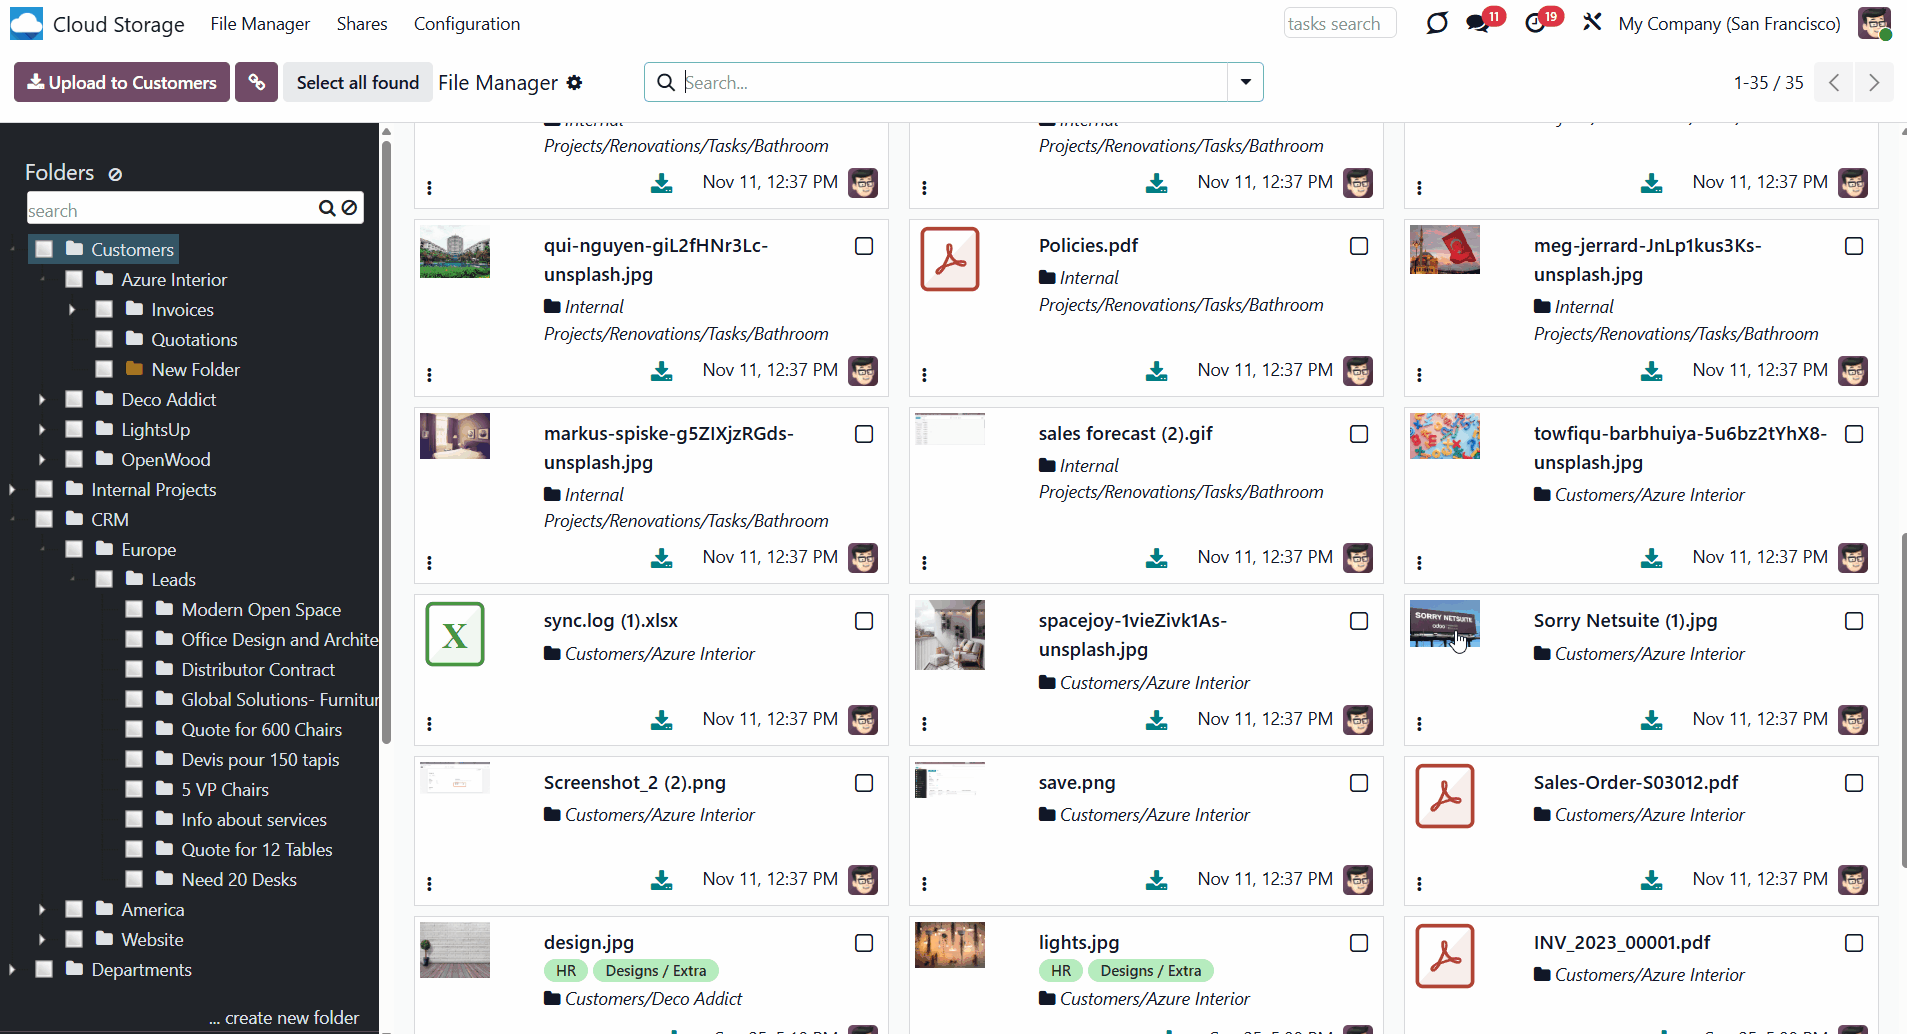
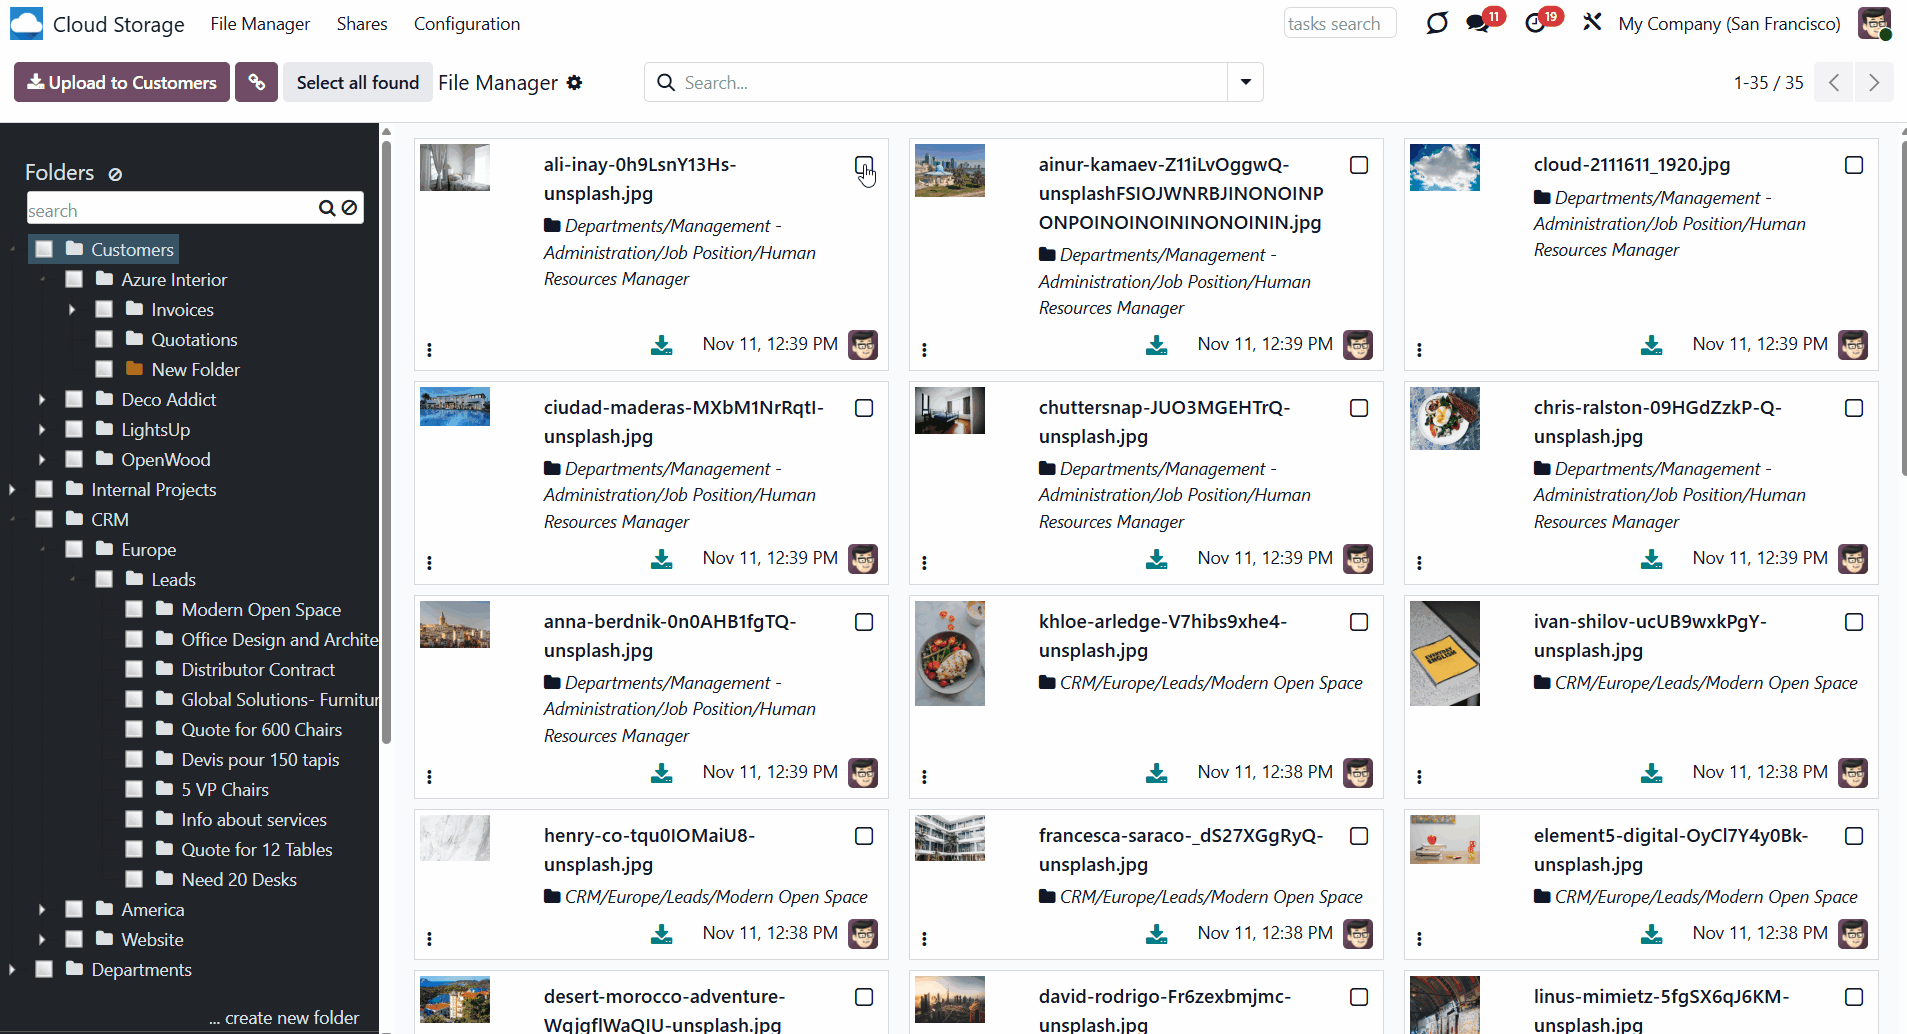
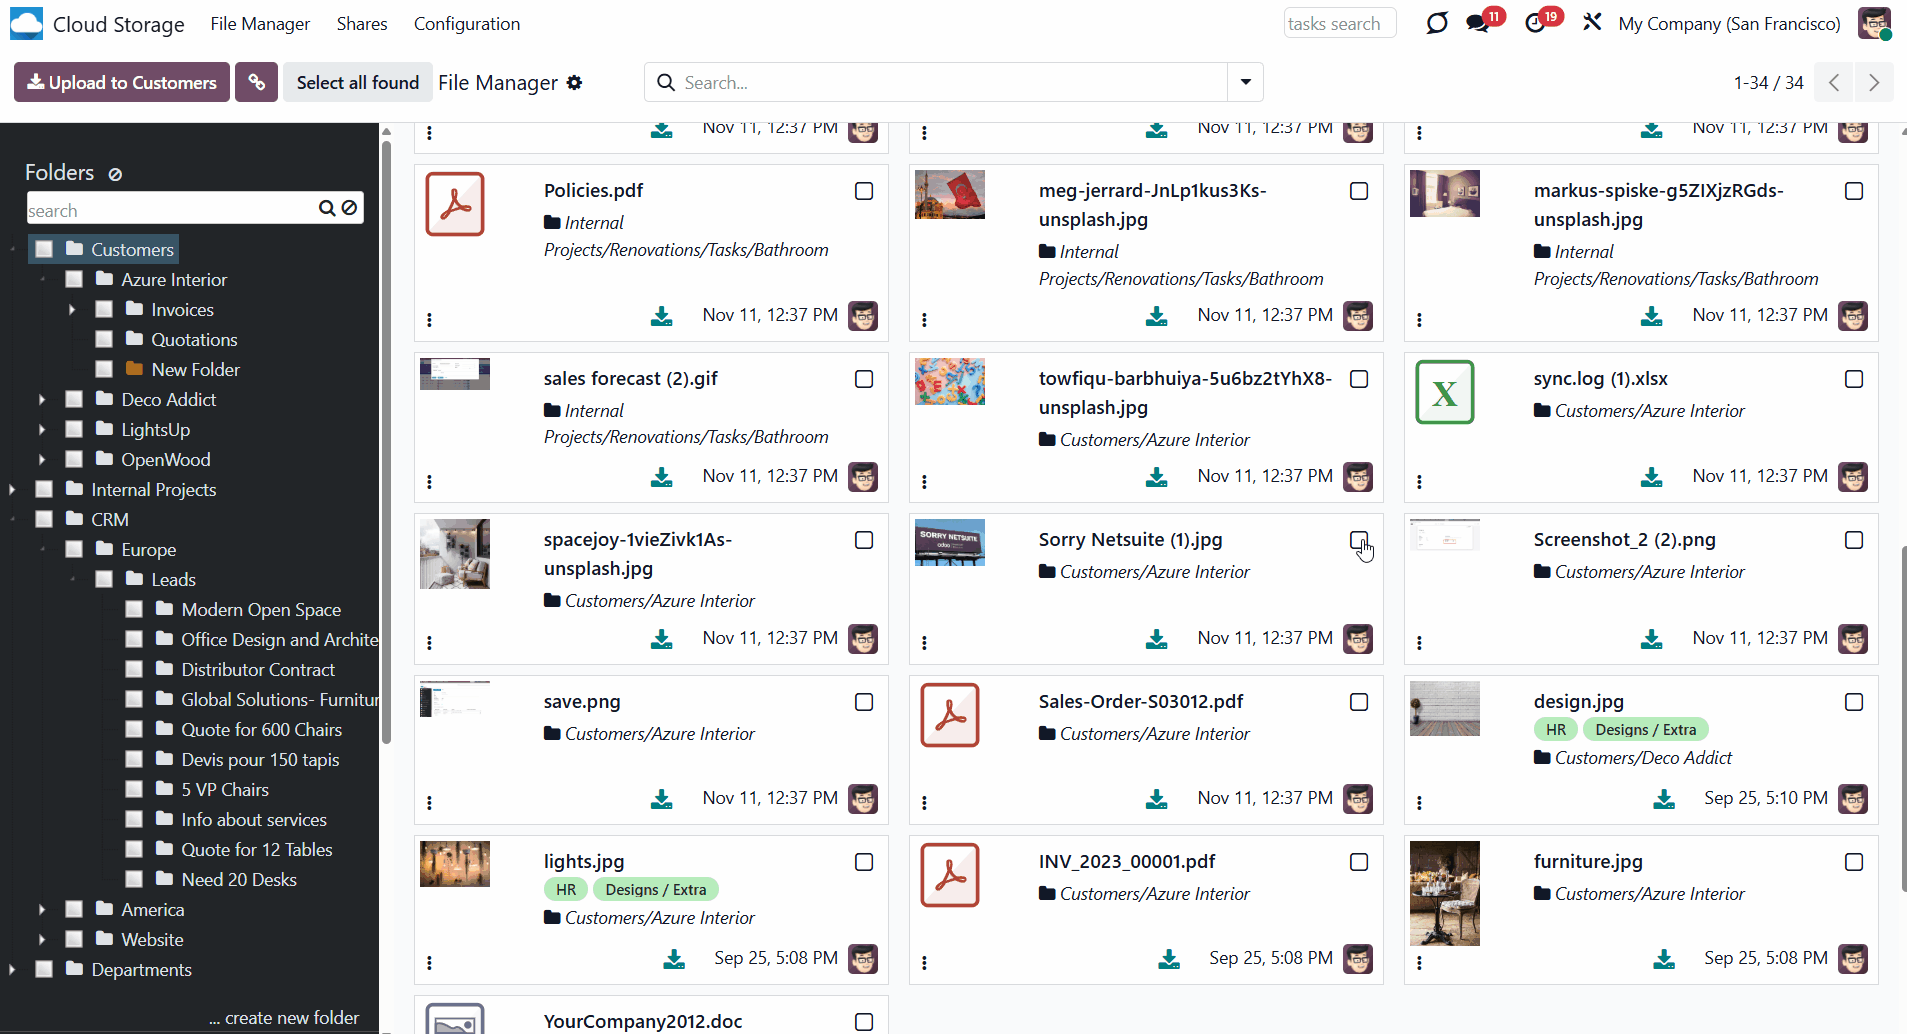
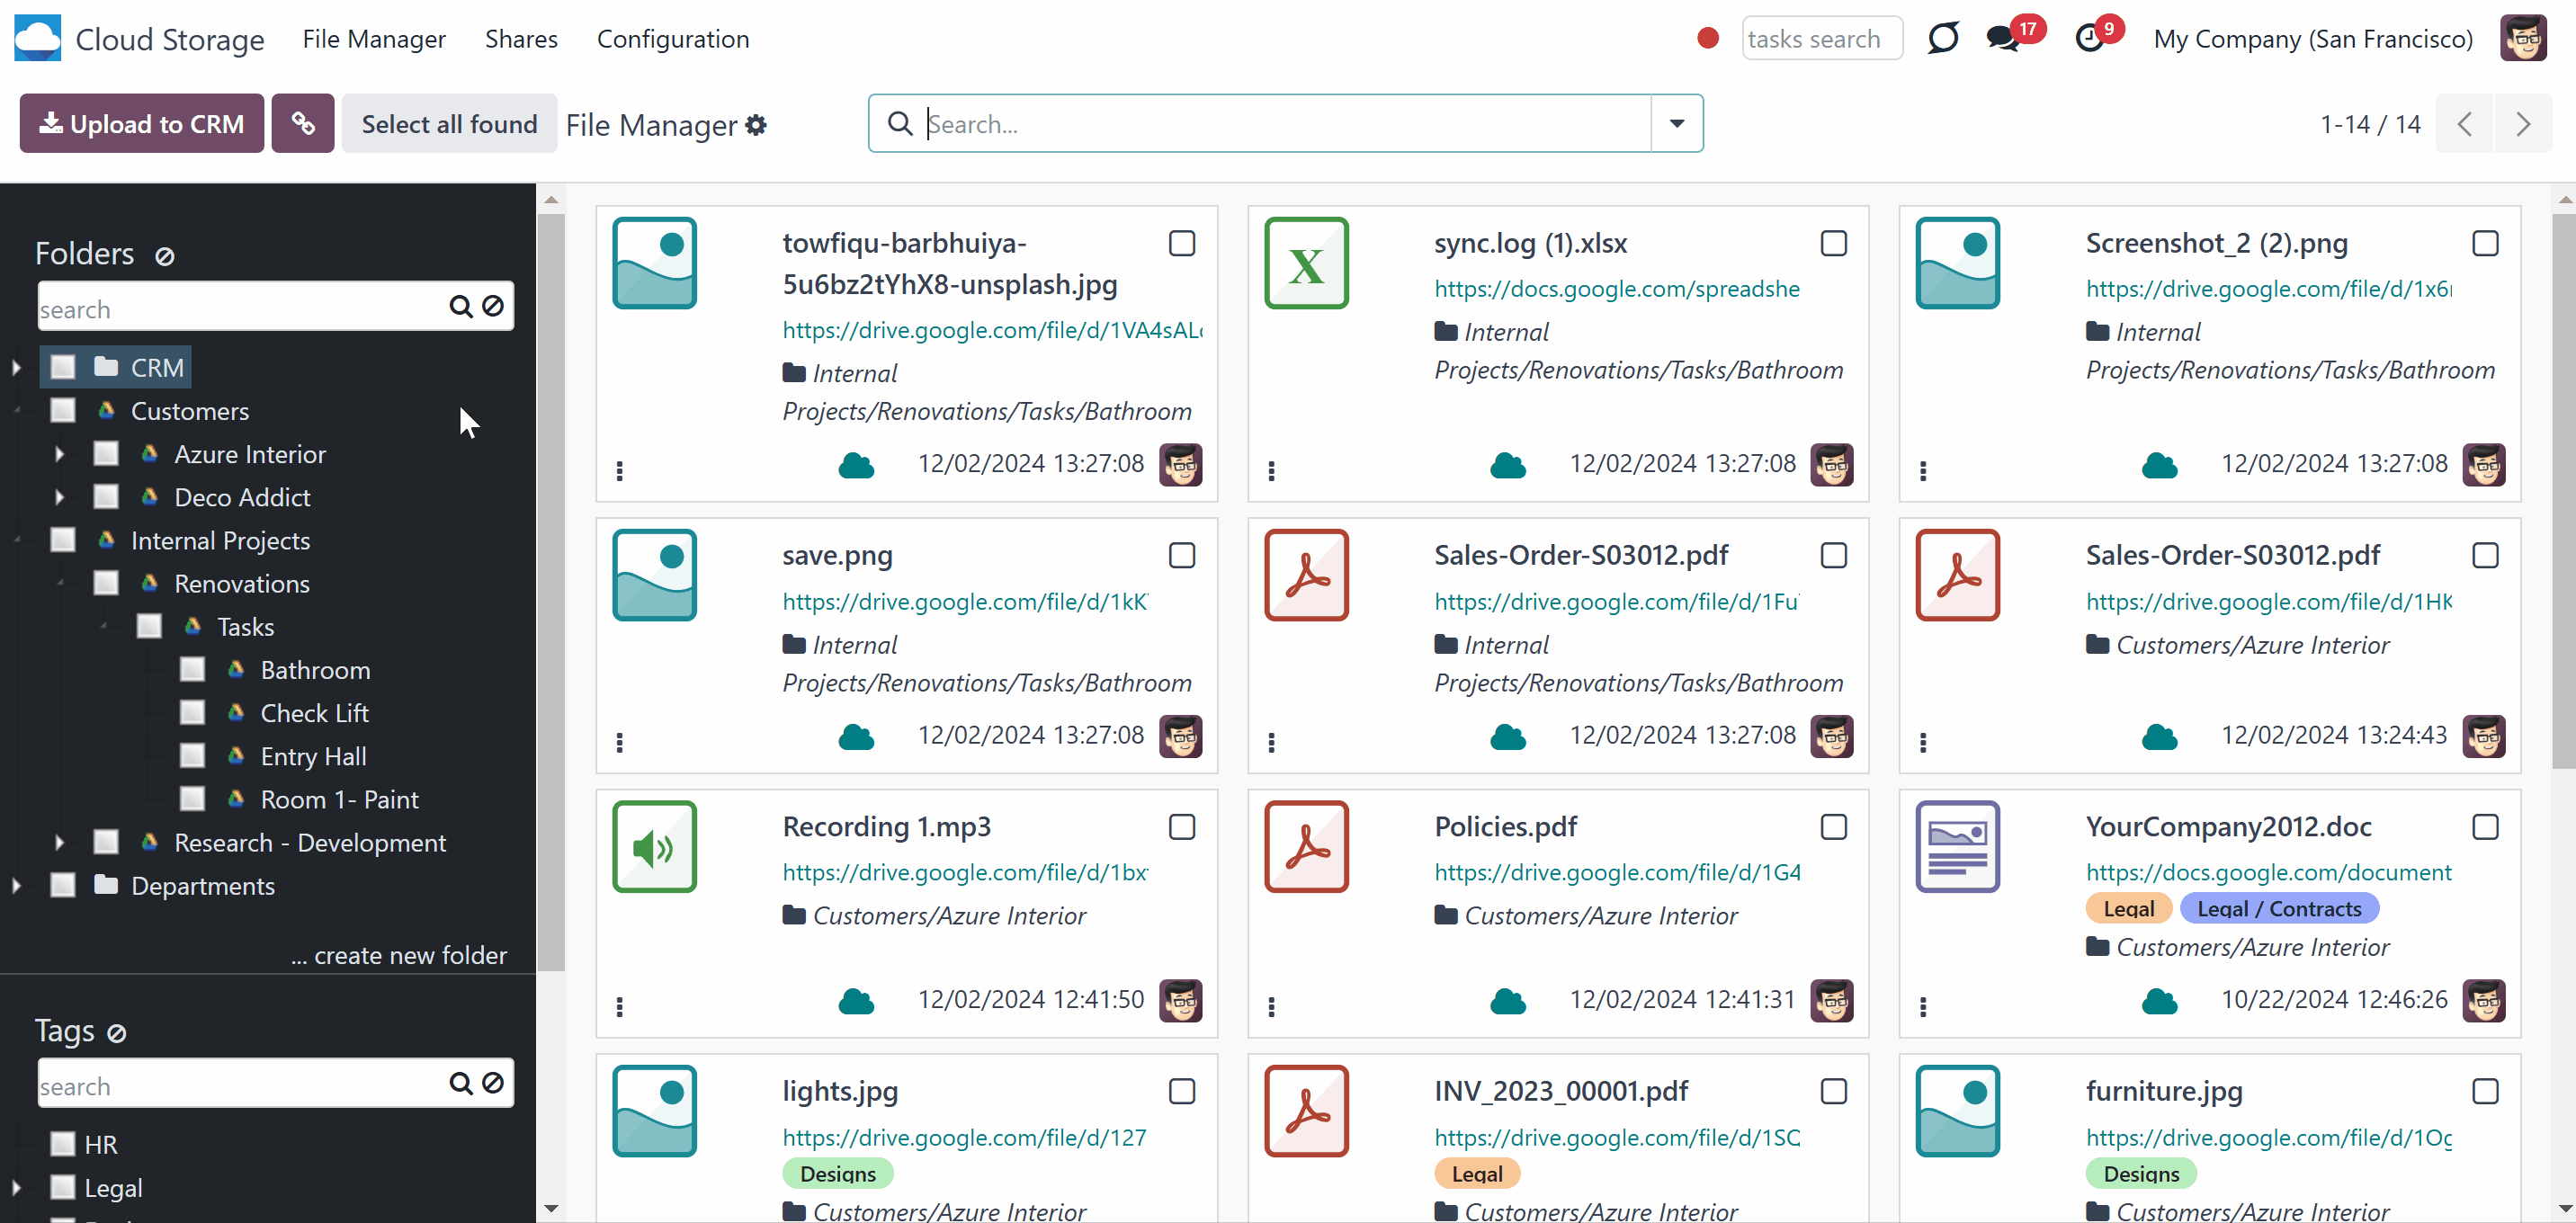
Files Manager Interface
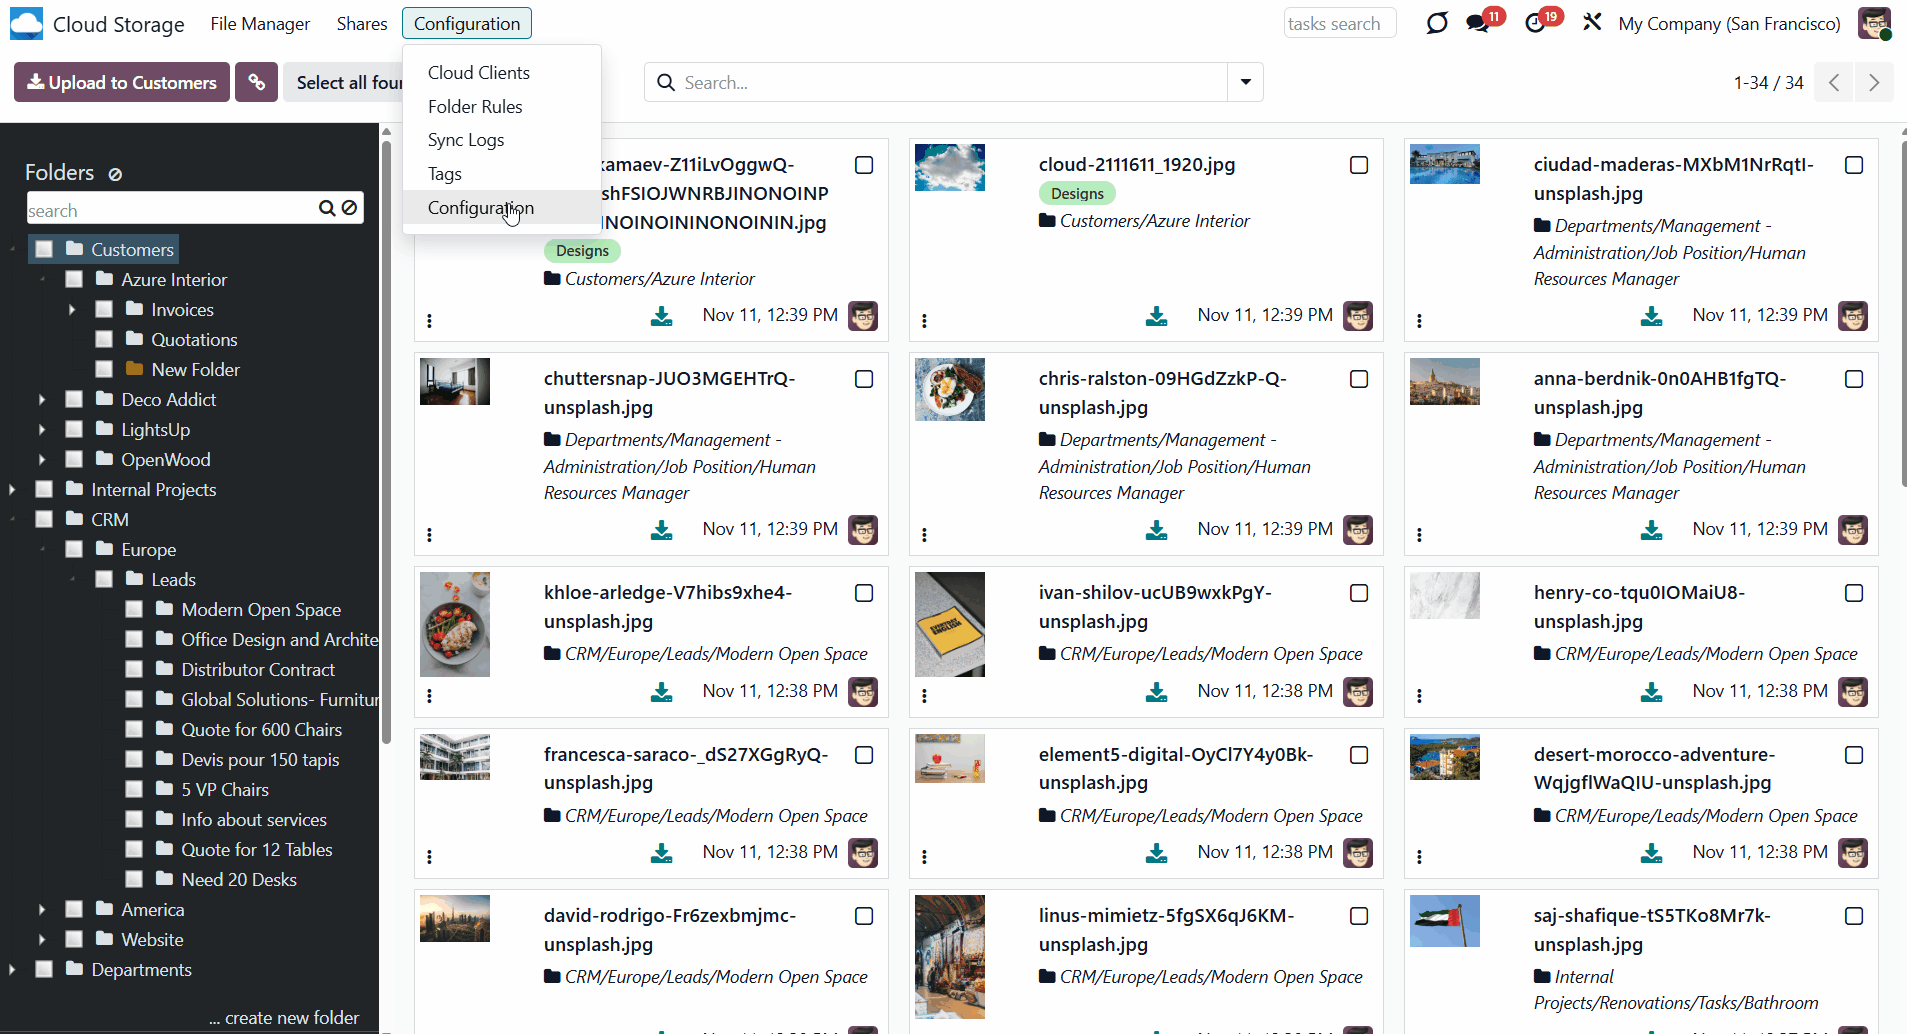
The module introduces a special menu that lets you view and manage the folder's structure. For that, the single-view interface was introduced.
The single-view interface is divided into three parts: a central part with attachments in the middle, and two functional parts with sets of control elements on the sides.
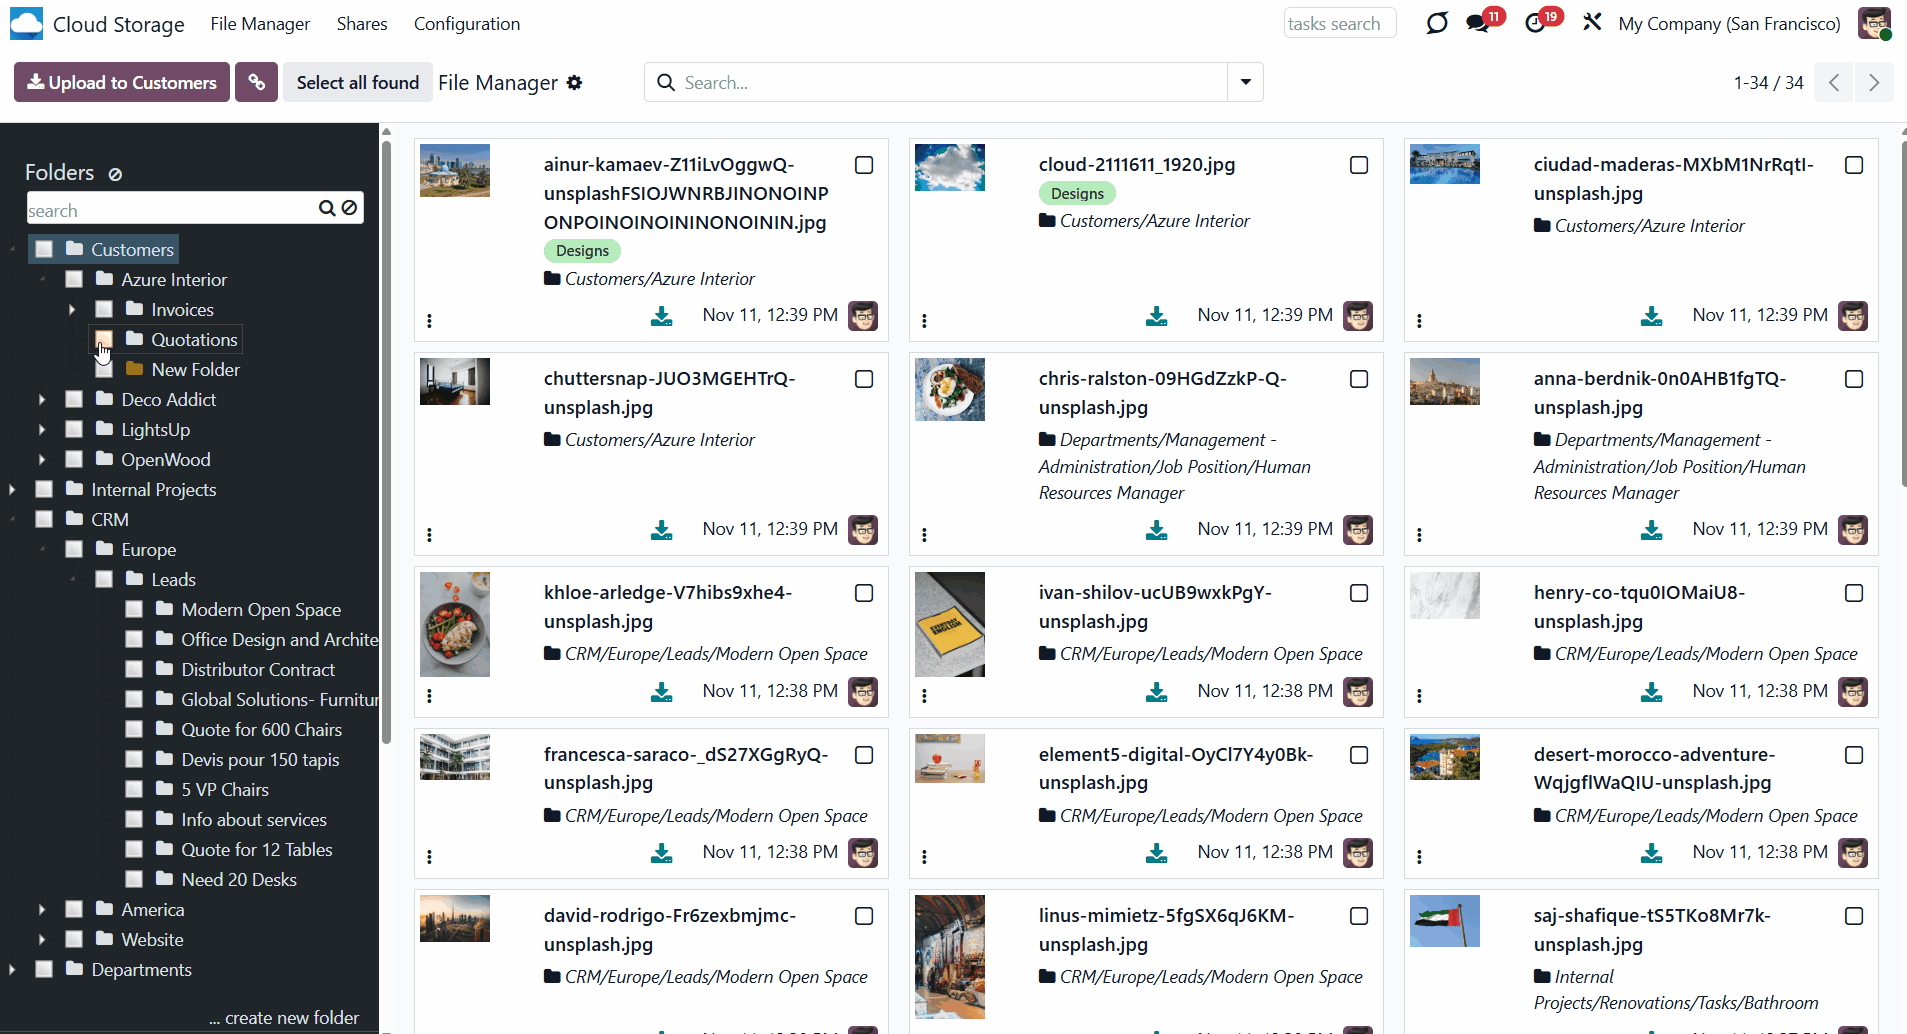
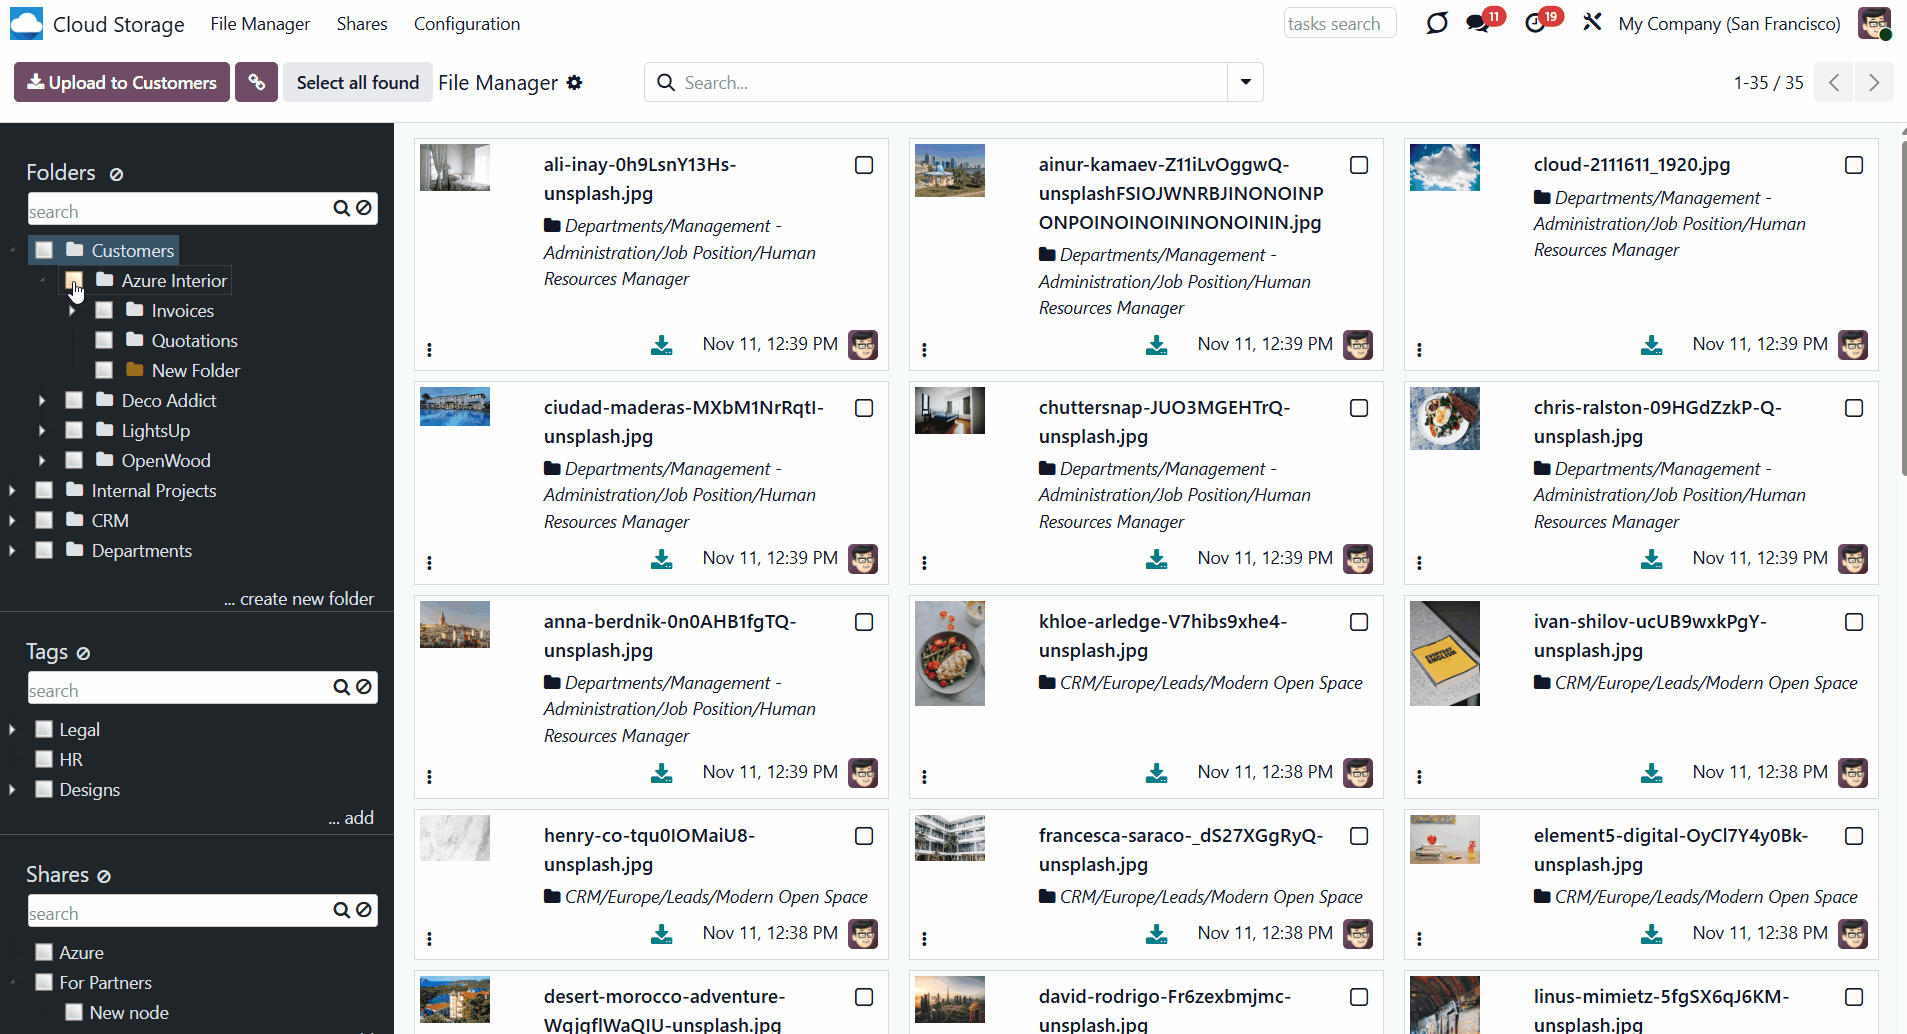
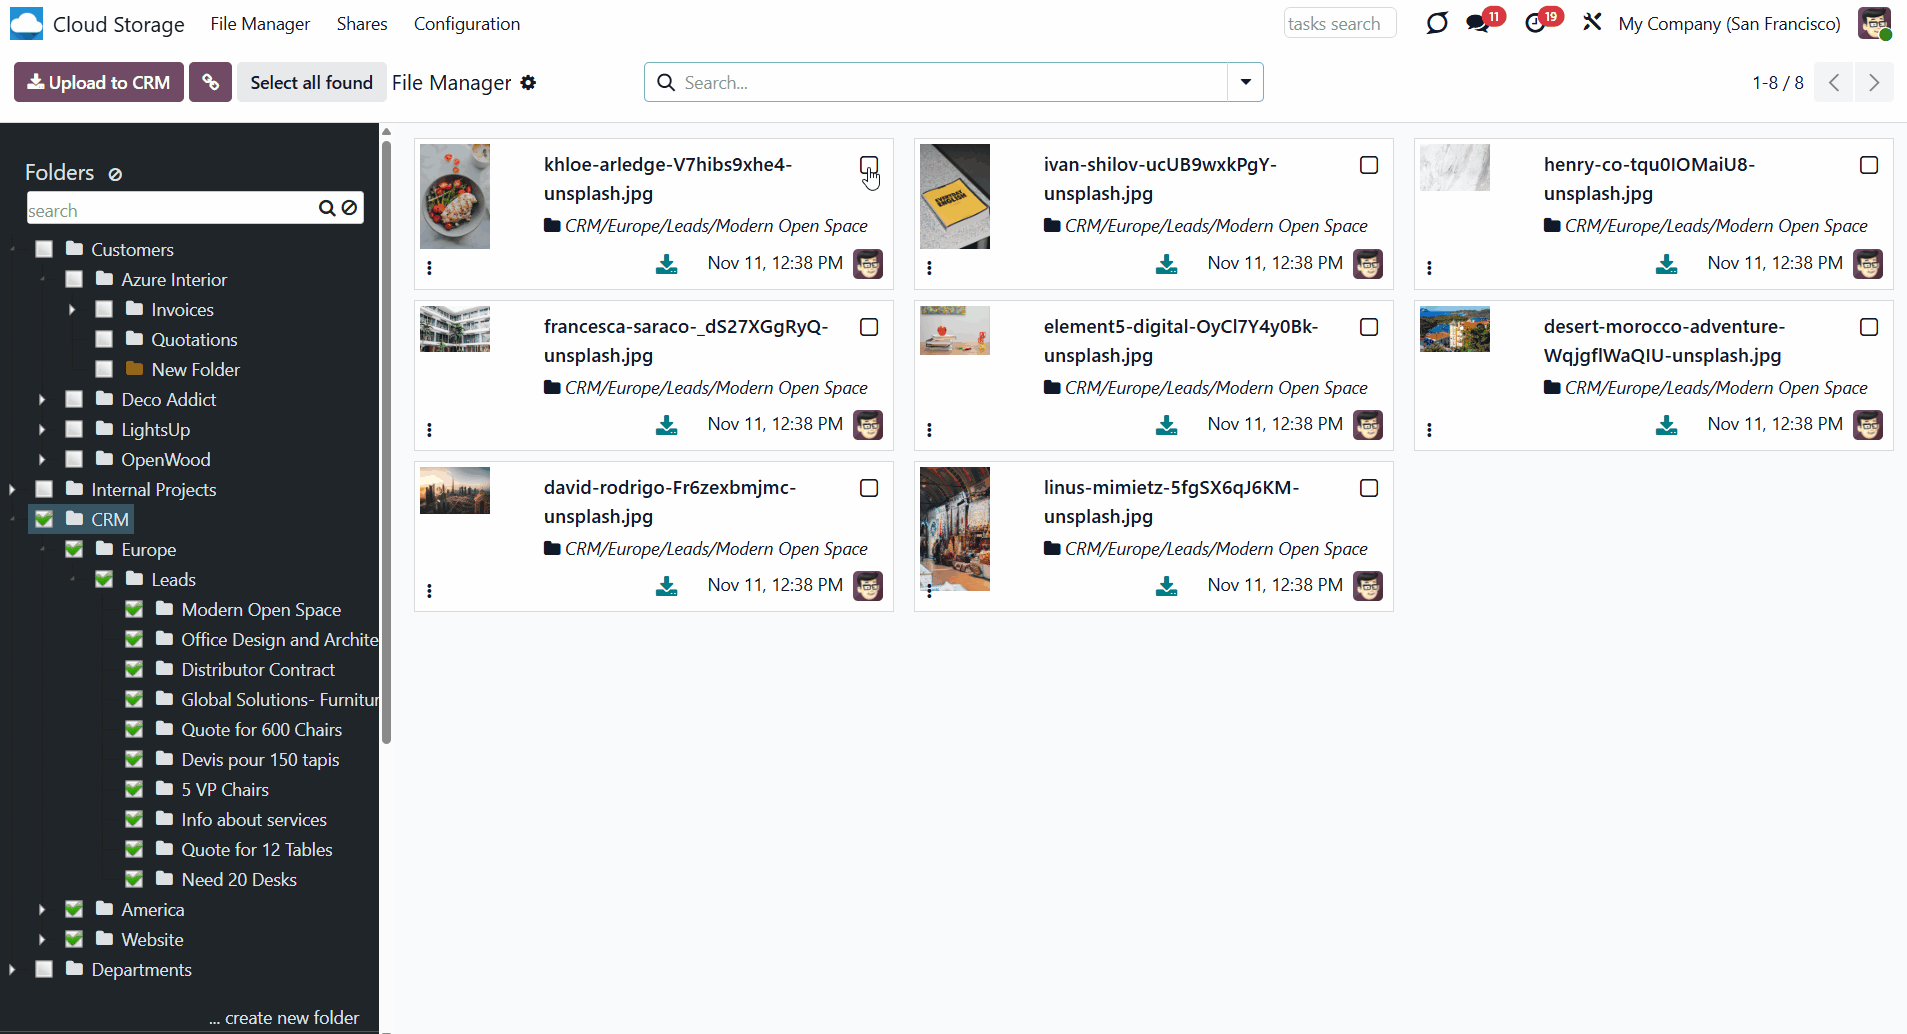
The left navigation panel lets you select folders, tags, and portal shares to find related attachments quickly.
As you create folder rules, the next scheduled job adds the related folders to the Files Manager interface. The folder rules sequence determines the order of the folders. The smaller the sequence, the higher the folder.
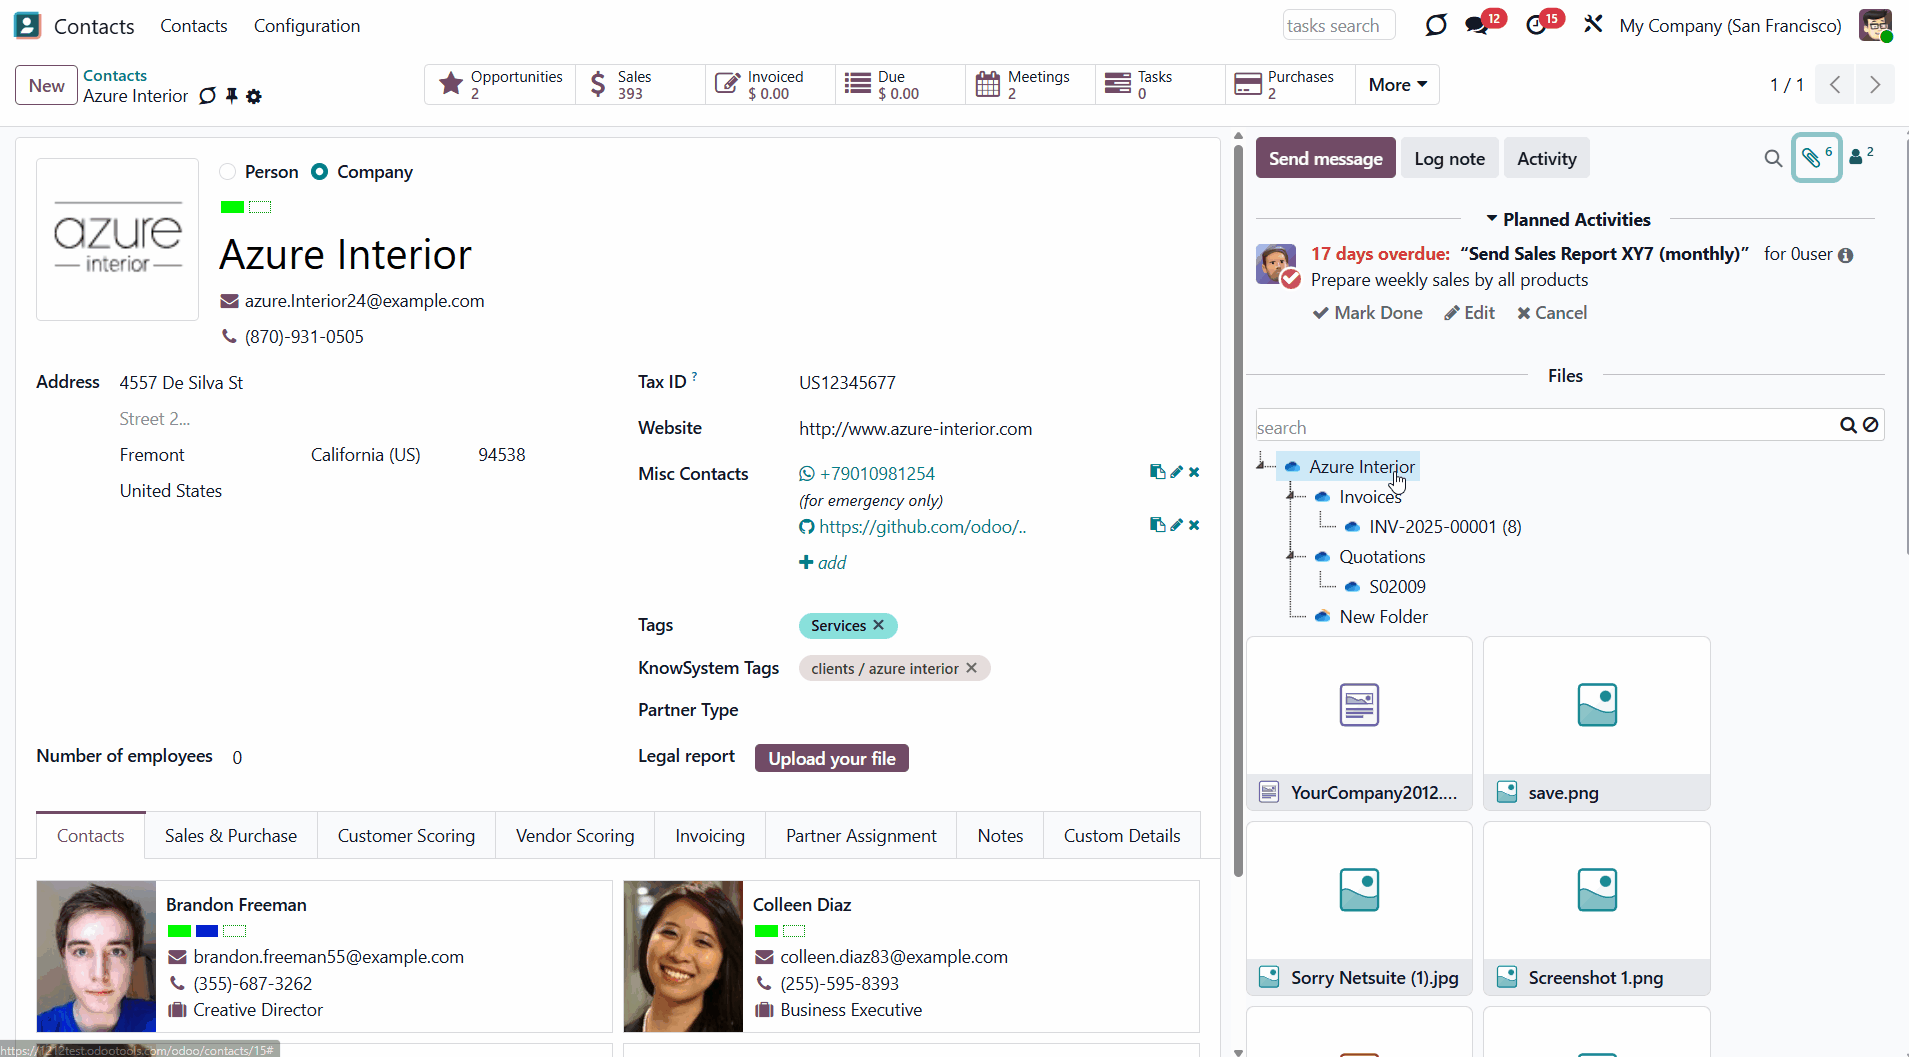
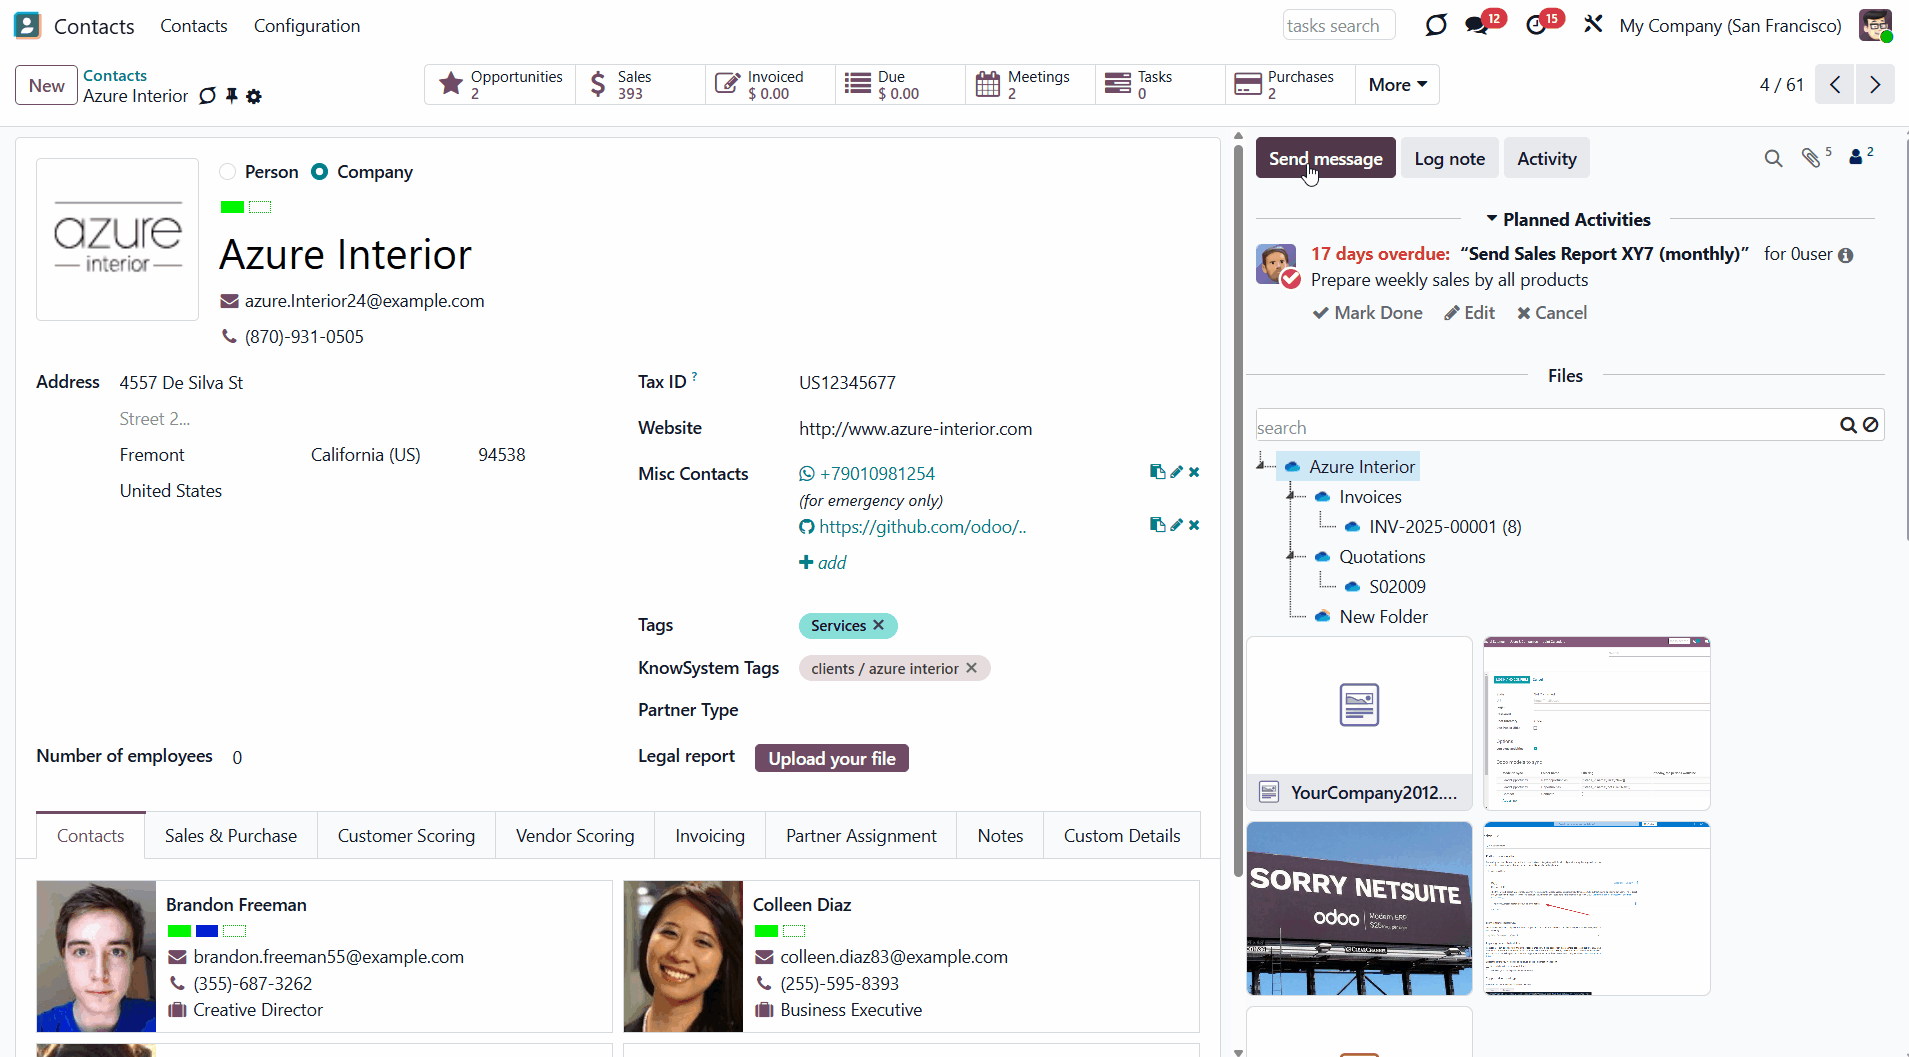
As you select one or several folders, the related attachments are shown in the central part of the interface. This way, you can simultaneously see the attachments of one or several folders. For example, if you select the folders 'Azure Interior' and 'Deco Addict' by checking the corresponding boxes, their attachments will be displayed.
To see all available attachments, clear the folder selection by clicking the 'Reset' button in the 'Folders' line. After the option is removed, all attachments from all folders are displayed. At the same time, the attachments may still be limited by the selected tags, shares, applied filters, and search parameters.
You can see and manage folders in the left navigation menu. From there, you can search for a particular folder, open a linked object, view its Configuration, create a new manual folder or subfolder, edit it, and change the order by drag-and-drop.
If you have many folders, you should use the search to find the one you need. For that, use the navigation input 'Search folder' on the left side of the single-view interface.
If a child folder is selected, its parents will be hierarchically highlighted by the border of dots around the element's name. Thus, it is always clear that a child folder is chosen (even if the structure itself is closed).
You can remove the folder selection by clicking on the 'Reset' icon next to 'Folders'. This is especially useful when searching for particular attachments in all available folders.
Even if none of the folders are selected, one is selected by default and highlighted in color. This way, even if none of the folders are selected, you will still be able to upload the attachments to that folder through the dynamic button 'Upload to...' (see below).
As you right-click on an automatically created folder, you see the following actions:
1. Download as Archive
2. Create Subfolder
3. Open the linked object
4. Settings
As you click 'Download as Archive', the folder's attachments download automatically. For example, you have a folder structure Contacts > Azure Interior > Sale Order 1, with attachments in each folder. If you click on the folder 'Azure Interior' and choose the option 'Download as Archive’, then the attachments of this particular folder will be downloaded. If you want to download the attachments from various folders, select them and use the mass action 'Download' (read below).
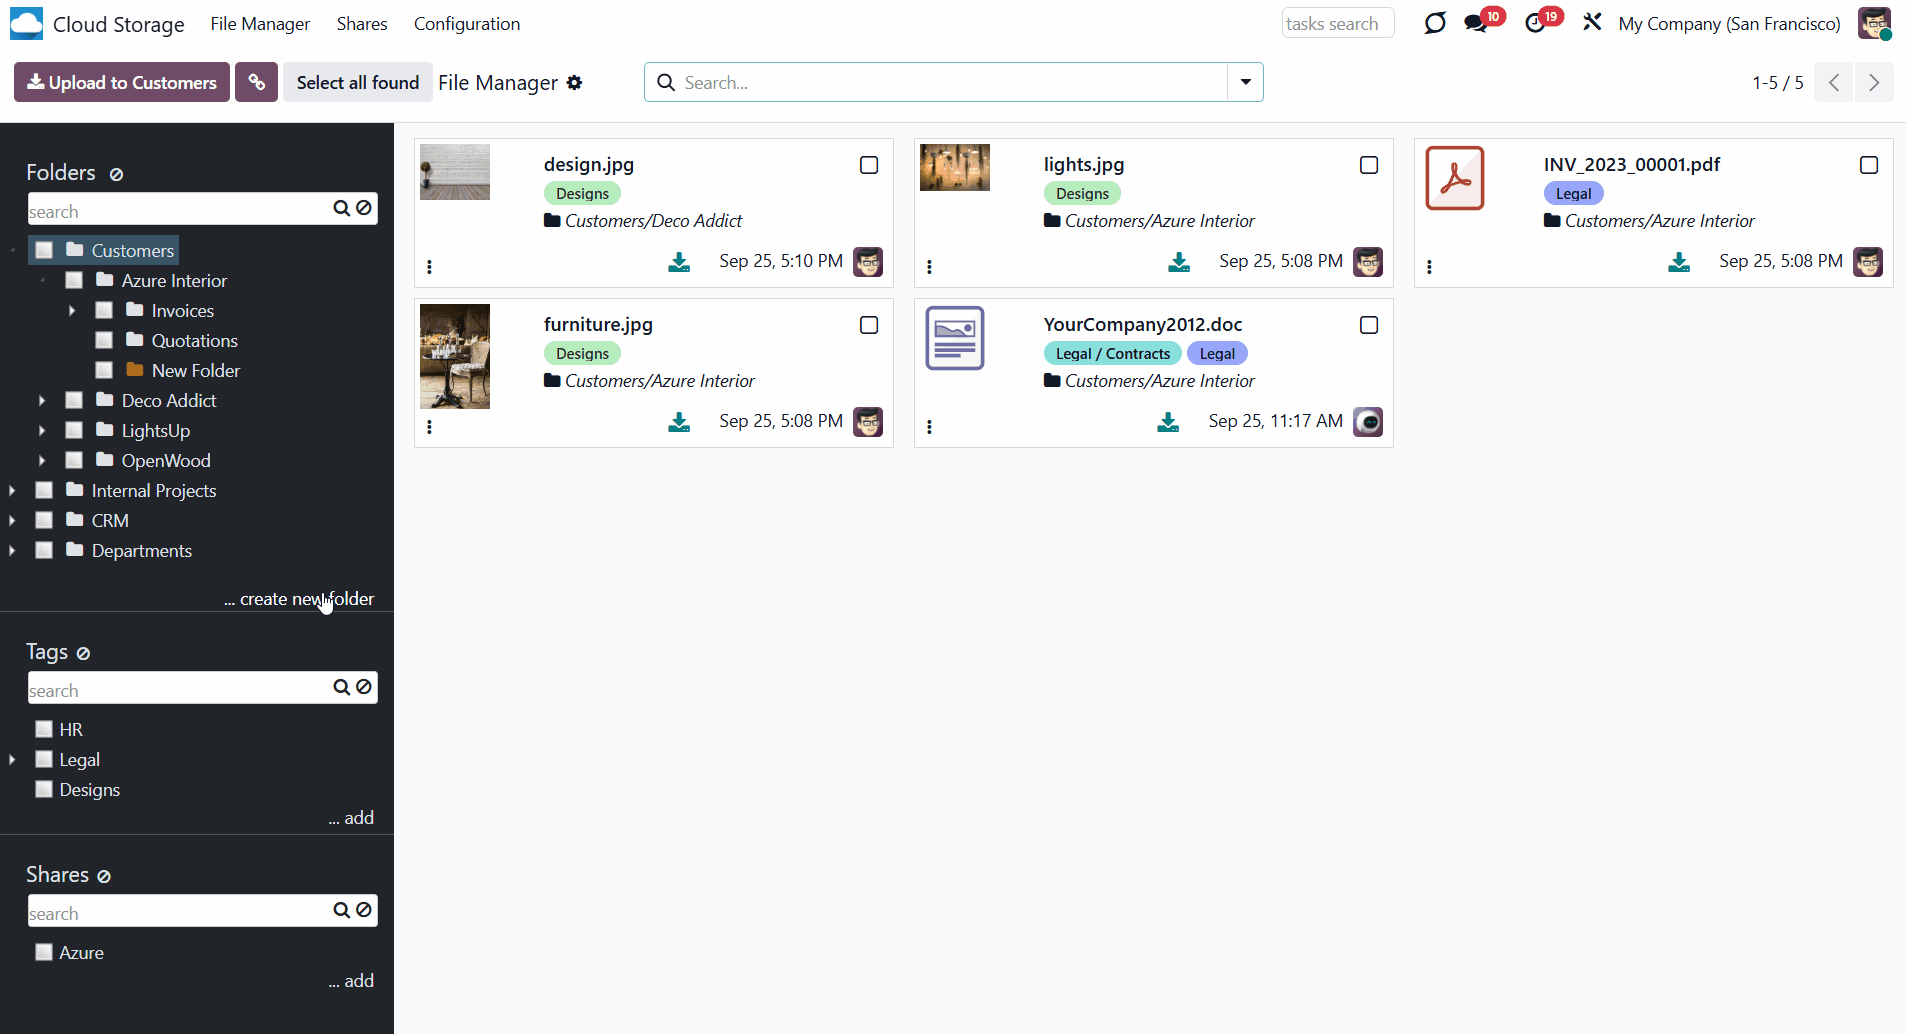
If you click 'Create a subfolder', then the child folder will appear in the folder's tree. Type the folder's name to finish creating the subfolder. You can create a subfolder for any folder. A subfolder cannot be a parent folder of an automatic folder. For example, you have a folder structure Contacts > Azure Interior > Sale Order 1. You can add a subfolder to each level of this structure: Contacts > Azure Interior, Jake Ruth > Sale Order 1, Sale Order 567 > For documents. In this example, 'Jake Ruth' is a subfolder of 'Contacts', 'Sale Order 567' is a subfolder of 'Azure Interior', and 'For documents' is a subfolder of 'Sale Order 1'.
Automatically generated folders are those created based on Odoo objects. Thus, it is possible to open a linked object in a folder. To open the related object, choose 'Open linked object'. For example, you have a folder structure Contacts > Azure Interior > Sale Order 1. If you right-click the 'Azure Interior' option and choose 'Open linked folder', the contact's card for Azure Interior will open in a pop-up window. Click Open the linked folder' by 'Sale Order 1' and the linked sale order will be opened in the pop-up window.
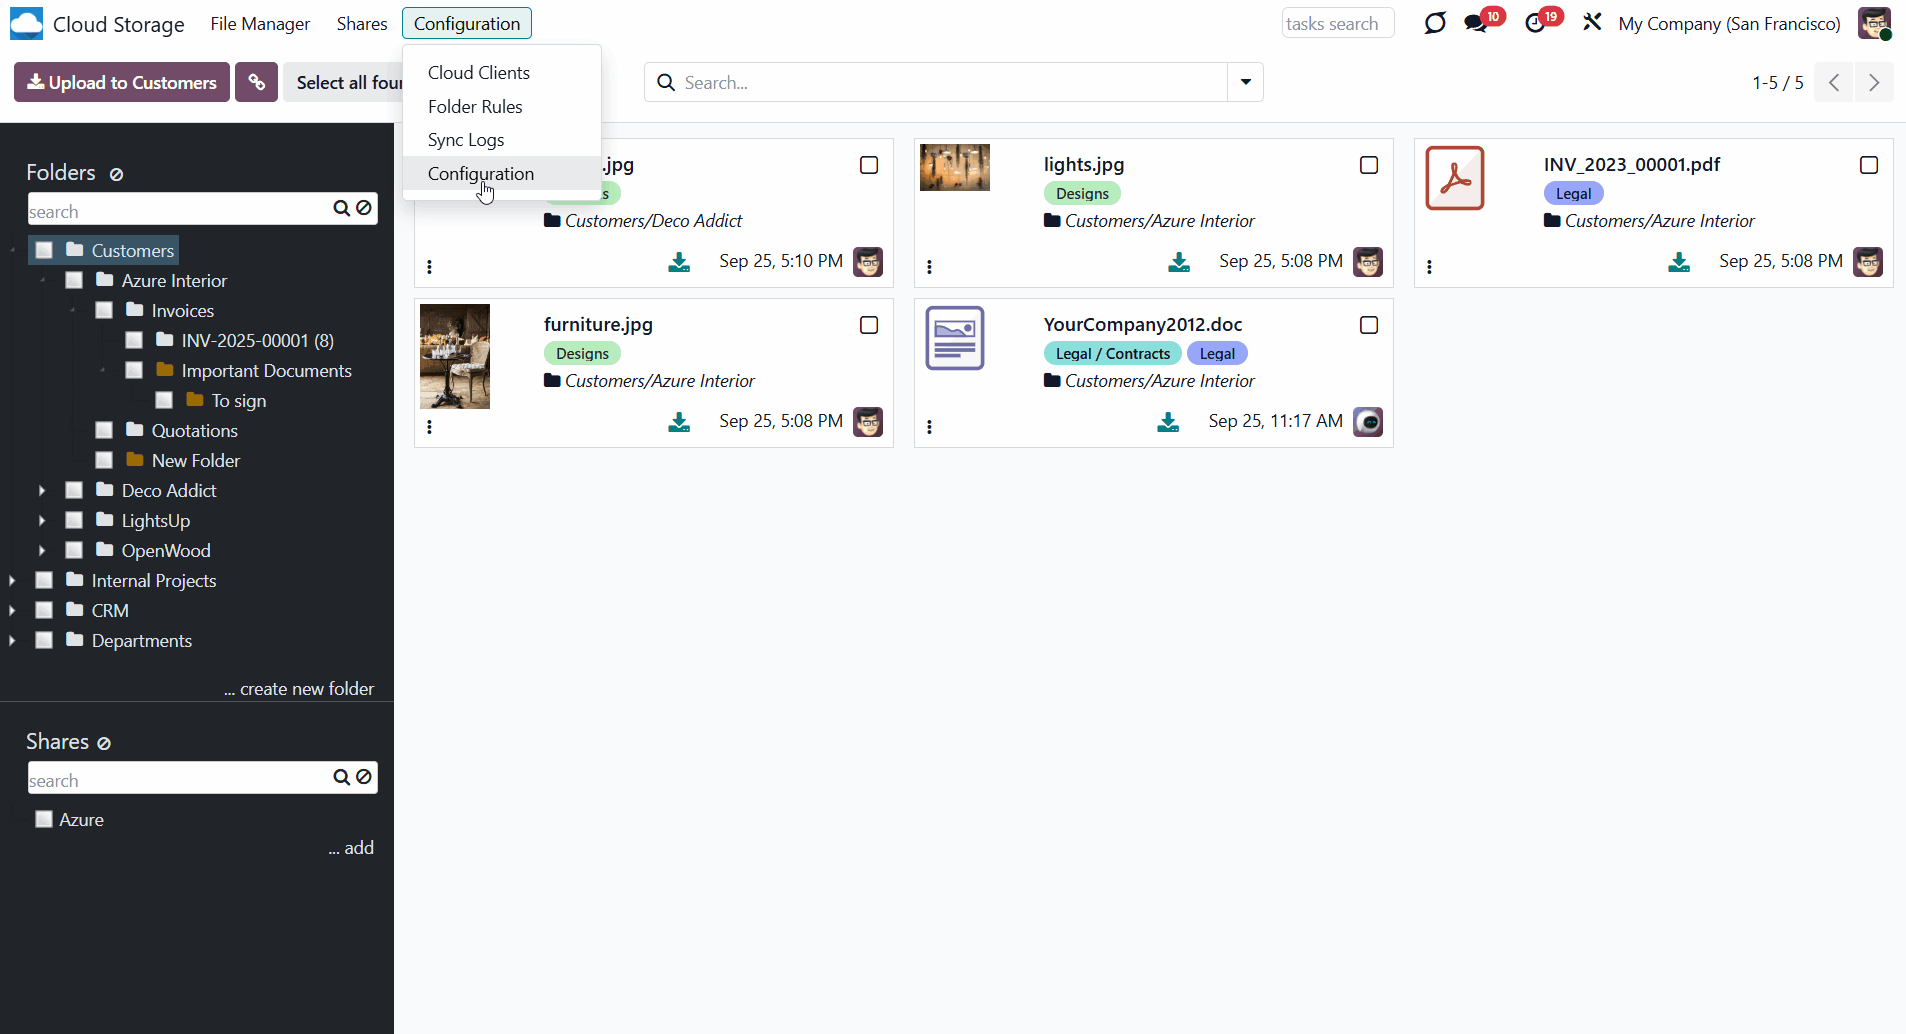
To see the automatic folder's settings, right-click on the folder and choose 'Settings'. The hierarchy and settings of automatic folder rules cannot be changed from the single-view menu. To change the rule's settings, go to Configuration> Folder Rules.
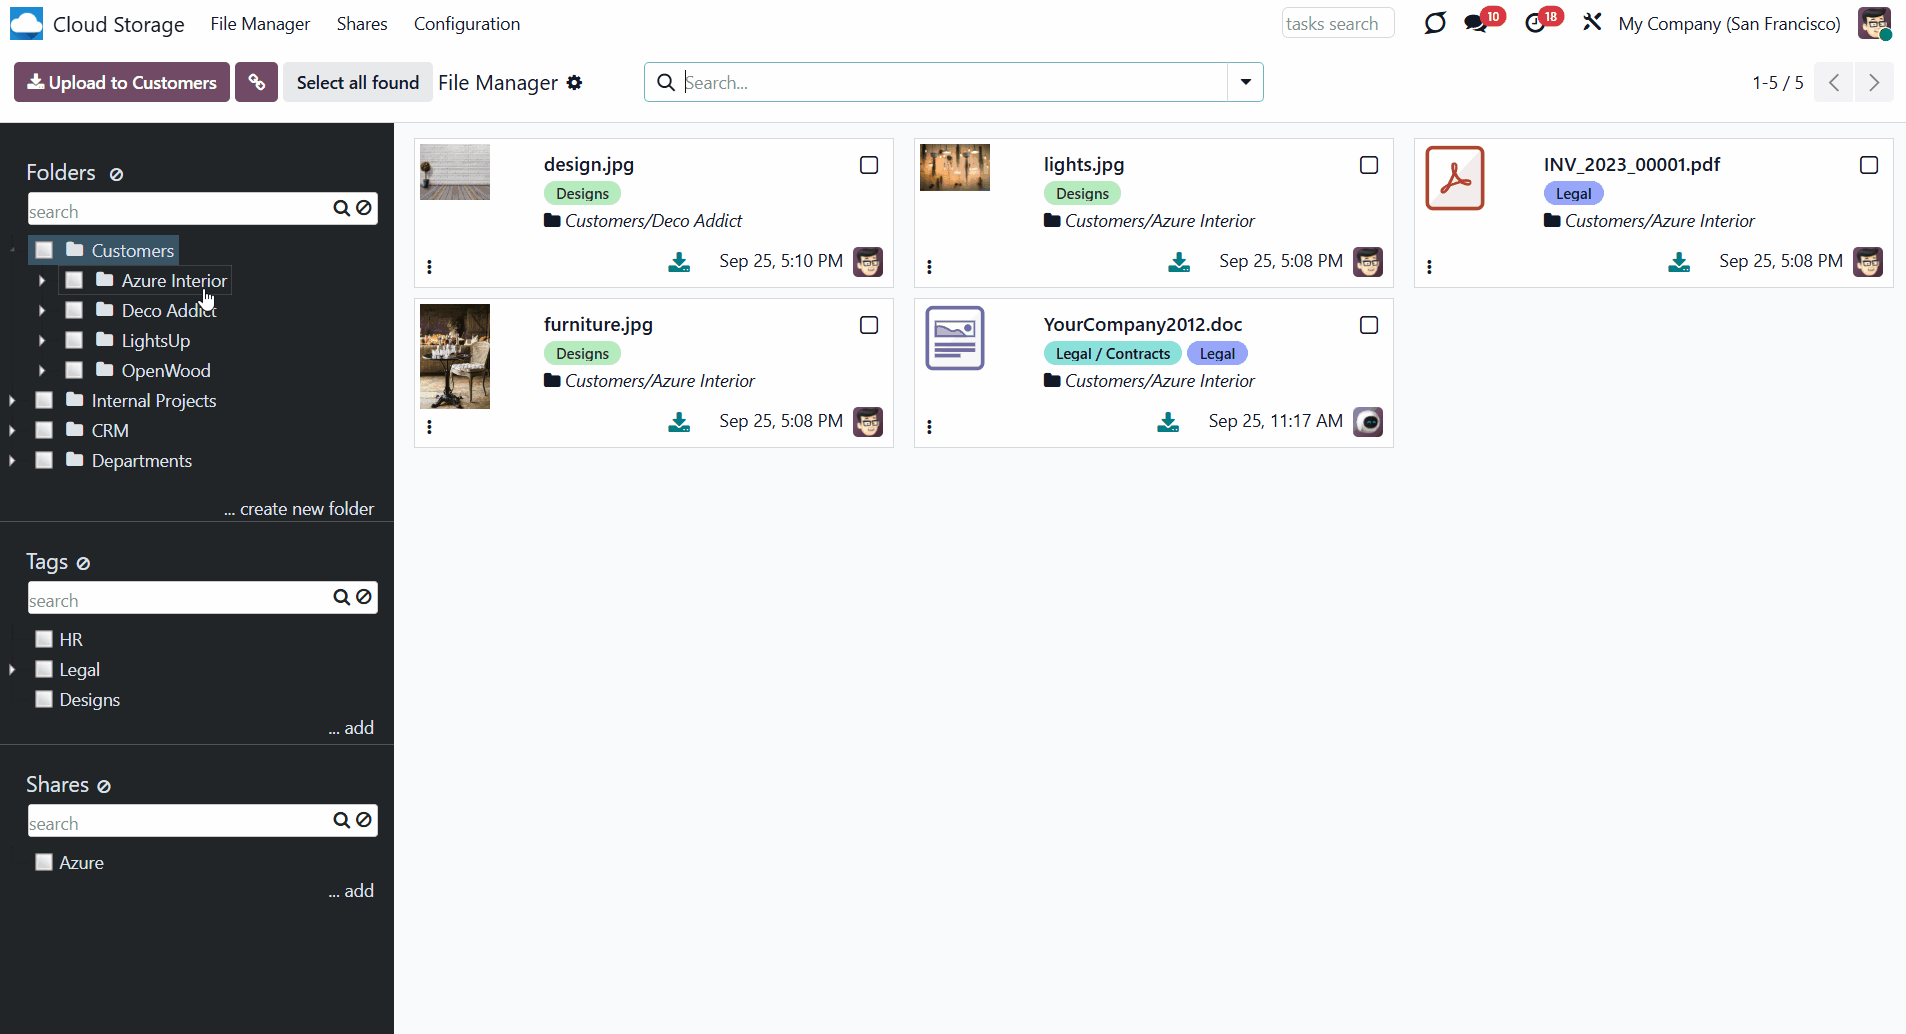
You can also create and manage manual folders from the single-view interface. To add a root folder manually, click the '...create new folder' button below the folder list and enter its title.
To add a subfolder:
1. Right-click on any folder
2. Choose the option 'Create subfolder'
3. Write the title
It is possible to change the hierarchy of a manual folder by drag and drop. However, assigning a manual folder as the parent of the automatic one is not possible. Also, you can't drag and drop automatic folders. Their hierarchy should be changed in the related folder rules, if necessary.
As you click on a manually created folder, you see the following actions:
1. Download as Archive - allows downloading the attachments of a particular manual folder
2. Create Subfolder - allows creating a subfolder within the manually created folder. You can create as many subfolders as you need
3. Rename - allows changing the name of a particular folder
4. Edit Settings - change properties of the manual folder, including name, parent folder, assign cloud client, limit access to a user or user groups, and add some notes
5. Archive - allows removing a folder from the folder tree. Later, it can be restored.
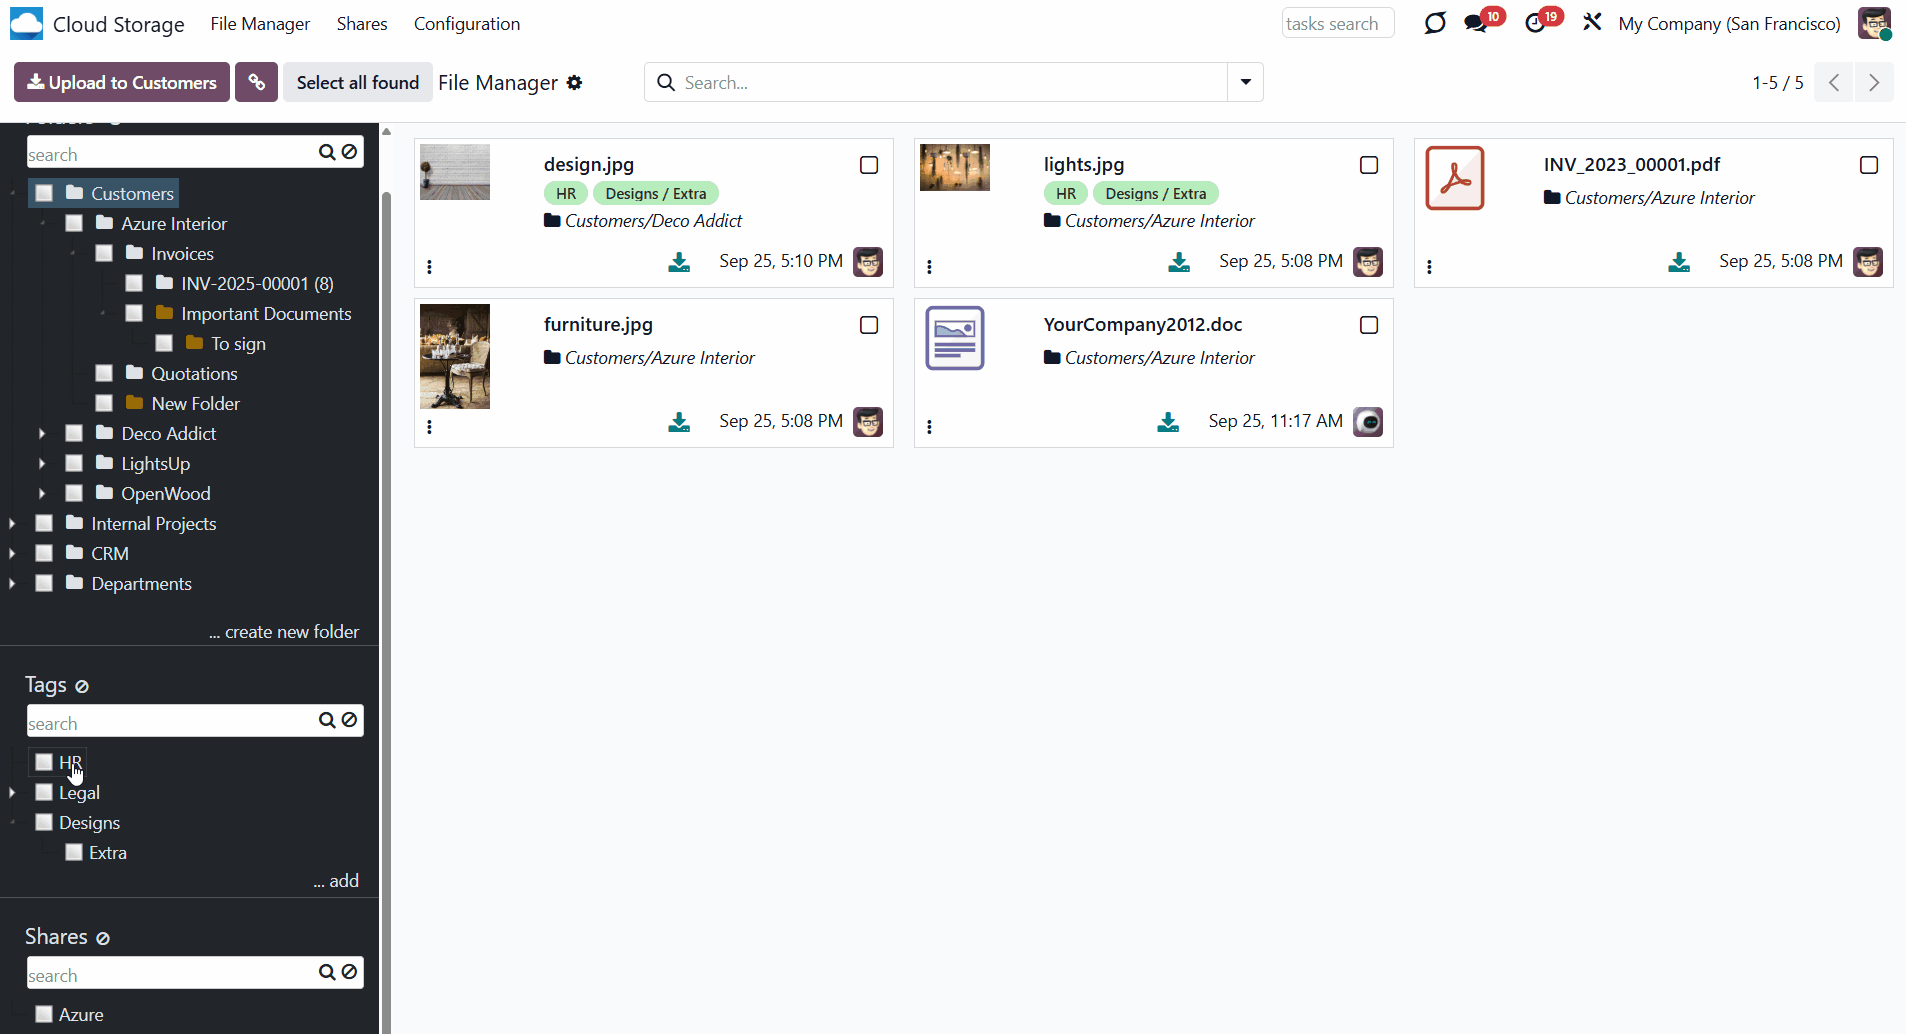
If enabled, the tags section is also visible in the left part of the interface. A tag is a special object that typically represents a keyword or phrase. It is added to attachments to categorize them, make them easily searchable, and provide a colorful visual mark for quick identification. For example, you can assign the 'Important' tag to the most essential attachments.
To create and manage tags, the 'Tags' option in the module's settings should be enabled. After that, the tree of tags will appear in the file manager Interface, and the separate Tags menu will appear when you click the Configurations option in the systray.
There are two ways to create tags: in the files manager interface and under the separate menu.
To create a tag in the files manager interface, click on the '...add' button in the 'Tags' section in the left part of the interface.
To create a tag through the separate menu:
1. Go to Configuration > Tags
2. Click 'New'
3. Type the tag's name
4. Choose the parent tag, if any
5. Optionally, add some notes in the tab 'Notes'.
Each attachment can have multiple tags. For example, you can assign the tags 'Important', 'Document', and 'For clients' to the same attachment 'Contract 2134'. This way, as you filter/search for attachments by tags, any attachment associated with any of the chosen tags will be shown.
As you select one or several tags, the related attachments are shown in the central part of the interface. This way, you can view the attachments for one or more tags simultaneously. For example, if you select tags 'Important' and 'Design' by checking the related box, the attachments related to either will be shown.
To see all available attachments, remove the choice of tags by clicking on the 'Reset' button in the line 'Tags'. After the option is removed, all attachments, regardless of assigned tags, are displayed. At the same time, attachments may still be limited by the selected folders and shares, as well as by the applied filters and search parameters.
You can see and manage tags in the left navigation menu. From there, you can search for a particular tag, create a new tag or sub-tag, edit it, and change the order by drag-and-drop.
If you have a lot of tags, you should use the search to find the one you need easily. For that, use the navigation input 'Search tag' on the left side of the single-view interface.
If a child tag is selected, its parents will be hierarchically highlighted by the border of dots around the element's name. Thus, it is always clear that a child tag is chosen (even if the structure itself is closed).
You can remove the tag selection by clicking on the 'Reset' icon next to 'Tags'. This is especially useful when you want to search for specific attachments, with or without assigned tags.
As you right-click on a tag, you see the following actions:
1. Download as Archive
2. Create
3. Rename
4. Edit
5. Archive
When you click 'Download as Archive,' the attachments with this tag are automatically downloaded. For example, you have tags 'Important', 'Design', and 'HR'. If you click the 'HR' tag and select 'Download as Archive,' the attachments with that tag will be downloaded. If you want to download attachments from multiple tags, select them and use the mass action 'Download' (see below).
If you click 'Create', then a sub-tag will appear in the tags' tree. Type the tag's name to finish creating it. For example, you have tags Important > Design > Images. You can add a sub-tag to each level of this structure: Important > Design, Design > Images.
To change a tag's name and settings, or archive it, right-click the tag and select the action. You can always restore the archived tags in the separate menu 'Tags'.
In the left part of the interface, you can also see the portal shares section, if enabled. A share is a special object that combines attachments and shares them with specific portal users or the public via an access URL. For example, you can create a share 'For customers', add separate attachments, or all attachments within one or several folders and tags, and allow specific clients to access it in the portal. You can find out how to create and manage shares in the article Sharing in Portal.
A single attachment can be added to different portal shares. For example, you can add the attachment 'Room Design' to shares 'For Clients', 'Azure Interior', and 'For Partners'.
As you select one or more shares, the related attachments appear in the central part of the interface. This way, you can simultaneously see the attachments of one or several portal shares. For example, if you select shares 'For Clients' and 'For Partners' by checking the related box, then the attachments related to either of these shares will be shown.
To see all available attachments, remove the choice of shares by clicking on the 'Reset' button in the line 'Shares'. After the option is removed, all attachments, regardless of assigned shares, are displayed. At the same time, attachments may still be limited by the selected folders, tags, applied filters, and search parameters.
You can see and manage shares in the left navigation menu. From there, you can search for a particular share, create a new share or sub-share, edit it, and change the order by drag-and-drop.
If you have many portal shares, you should use search to find the one you need. For that, use the navigation input 'Search share' on the left side of the single-view interface.
If a child's share is selected, its parents will be hierarchically highlighted by the border of dots around the element's name. Thus, it is always clear that a child's share is chosen (even if the structure itself is closed).
You can remove the share selection by clicking on the 'Reset' icon next to 'Shares'. This is especially useful when you don't want to limit the search by share and want to see all attachments.
In the files manager interface, right-clicking on a share displays the list of available actions. The article Sharing in Portal explains more about possible actions when sharing.
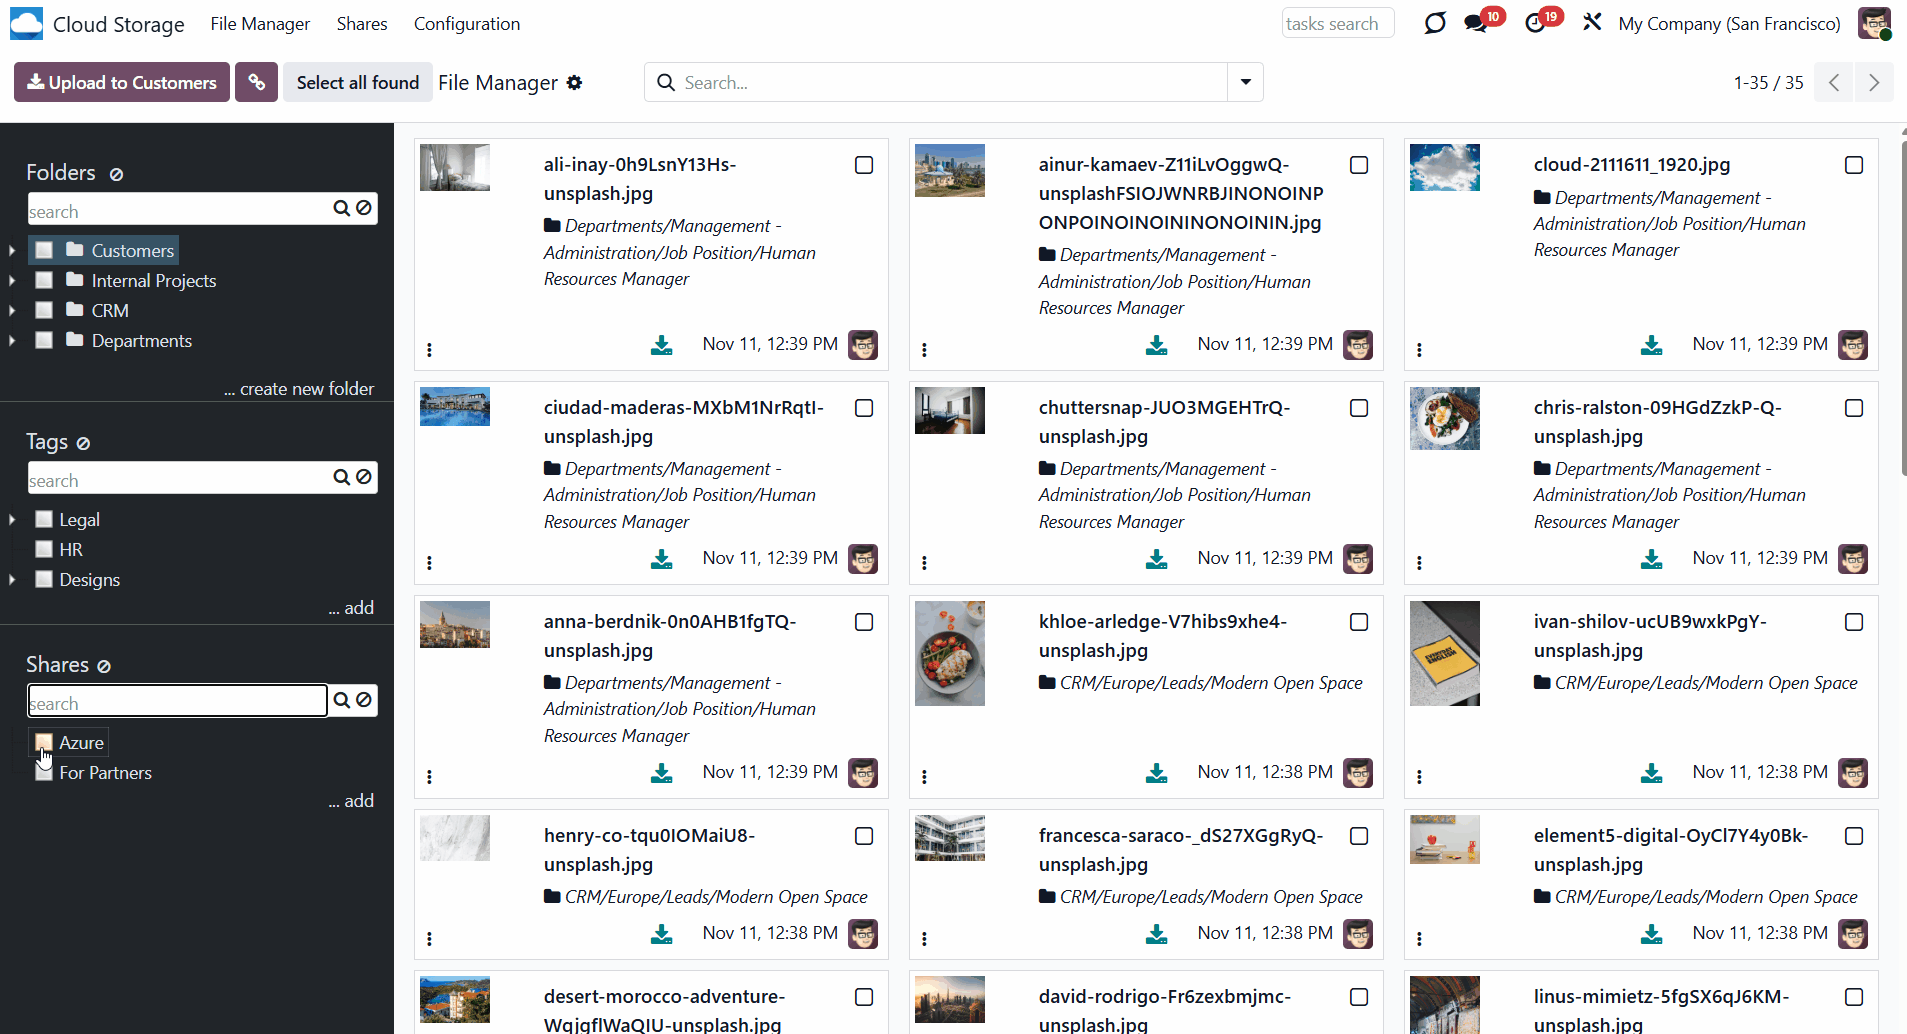
The attachment list is located in the central part of the interface. It is sorted according to the selected folders, tags, shares, and applied search and filter parameters.
If several folders/tags/shares are chosen, the attachments related to any of them will be shown. For example, if you select the folders 'Customers' and 'Projects', the attachments from both folders will be displayed.
If you choose a folder(s), a tag(s), and a share(s) at the same time, then only the attachments that match ALL the conditions will be shown. For example, if you select the folders 'Customers' and 'Projects', then tick the tag 'Legal', and select the share 'For Customers', then only the attachments from the folders 'Customers' and 'Projects' with the tag 'Legal', and within the share 'For Customers' will be shown.
Attachments can be uploaded to any folder manually through the single-view interface. That is why there is always a default folder selected and highlighted in color. When you open the Cloud Storage menu, it is the first folder in the list. When searching for a folder, it is the first visible one. In other cases, the currently selected folder is the last chosen folder.
To upload attachments, click on the dynamic button 'Upload to ...', or drag and drop the attachments to the central part of the interface. To avoid confusion, the target folder is specified on the button. This way, you can ensure the attachments are in the correct directory. For example, if the currently selected folder is 'Customers', then you will see the following button 'Upload to Customers' above the left functional interface.
To add a file of the URL type through the files manager, click the icon '' by the button 'Upload to...'. In the pop-up wizard, specify the name and the related link. Then, as you confirm the details, the app will create a URL attachment in the currently selected folder.
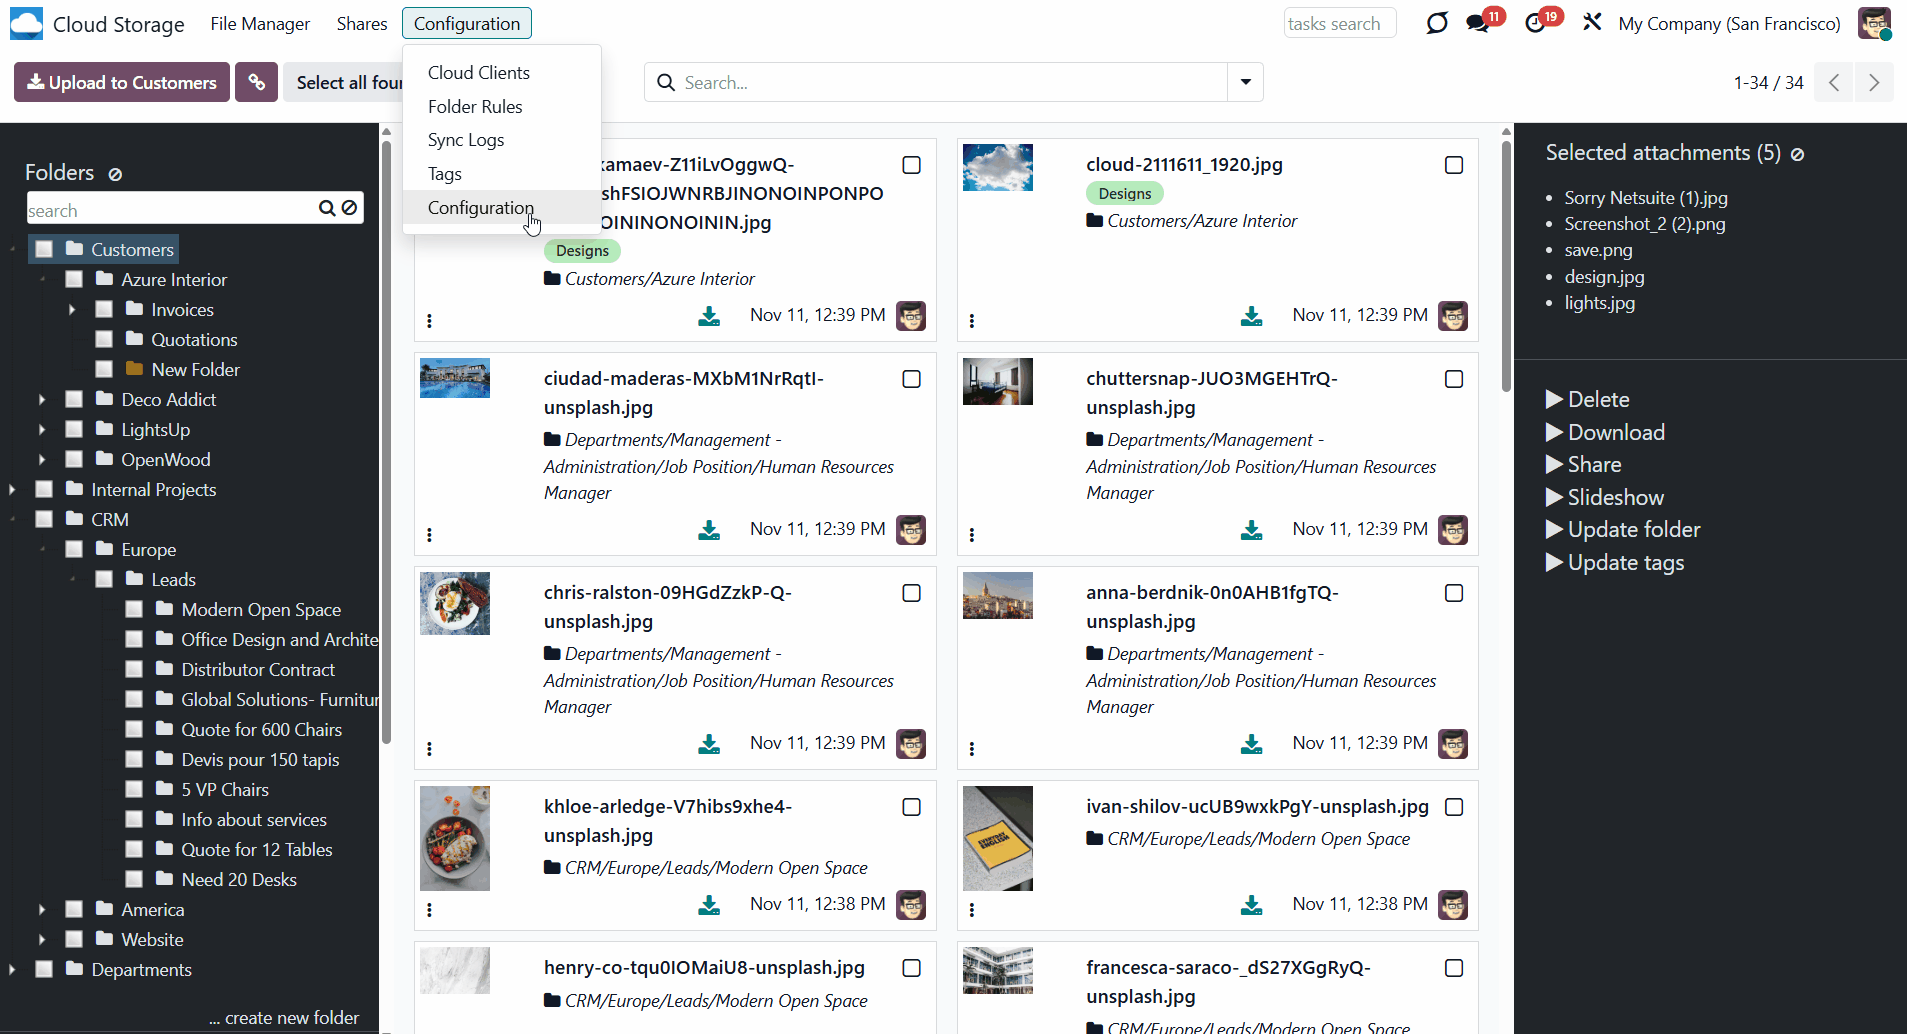
In the central part of the interface, you can select one or multiple attachments by clicking on the square in the top right corner. To select all found attachments, click the 'Select all found attachments' button.
To deselect one or more attachments, click their titles in the third functional interface or tap the square in the top-right corner of an attachment. To remove the selection, click the 'Reset' button in the right functional panel, next to the line 'Selected attachments'.
The selection will not be reset as you switch between folders and filters, use the search bar, or apply mass actions.
You can quickly change the folder of all selected attachments, assign a new tag, or share them in the portal by dragging and dropping them onto the related object in the left part of the interface. For example, drag and drop the selected attachments into the 'Design' tag, and they will be assigned to it immediately.
To find the particular attachments quickly, use the search bar above. You can search attachments by name, folder, tags, author (creator), and mime type (in developer mode). For that, start typing the word, choose one of the options, and click 'Search'. The search considers the selected folders, tags, and shares in the left functional interface. You can remove the selection or choose other options by clicking them, and previously chosen search criteria will not be removed. To reset the search, click the cross next to the search input.
Click the three dots in the bottom-left corner of an attachment to choose a color to highlight it, or click the 'Open' button to open the attachment's card. There, you can view and manage the information about the file, such as changing the attachment's name, moving it to another folder, changing tags, and finding the attachment's extension.
Click on the thumbnail of any attachment in the central functional interface to preview it. Here, the module relies on the standard Odoo behavior. Therefore, if an attachment can be previewed in Odoo, it can also be previewed in the Cloud Storage interface. This way, for example, you can preview the .jpeg and .pdf attachments, but cannot preview the attachments of the .xlsx type.
The right functional panel appears when you select one or multiple attachments. In the right functional panel, you will find a list of mass actions that let you execute actions on all selected attachments simultaneously. The available mass actions are:
1. Download - allows downloading all selected attachments. If there are two or more attachments to download, then they will be downloaded as a .zip
2. Update folder - allows moving the attachment to another folder. Start typing the folder's name to find the required one quickly
3. Update tags - allows adding/removing tags of all chosen attachments
4. Slideshow - allows watching the chosen images in a slideshow. You can pause the slideshow, set the time step to move between pictures, move to the next image, and return to the previous image
5. Share - allows sharing chosen attachments, related tags, and directories with particular partners or through the access URL
6. Delete - allows removing an attachment permanently.
The Slideshow mass action enhances the user experience by allowing users to preview selected images one by one conveniently. With the help of the slideshow mass action, users can easily navigate through their chosen images for a seamless viewing experience. For that:
1. On the configuration page of the module, add the mass action 'Slideshow' to the left functional interface
2. Select images by clicking on them, ticking the related checkbox, or using the button 'Select all found attachments'
3. In the left functional interface, apply the mass action 'Slideshow'.
Afterward, all selected attachments of the image types will be previewed individually. Click on the time selection to change it. This way, you can configure how long an image is displayed.
Use the arrow icons to move between images manually. Click the pause icon to pause the slideshow, and click the play icon to resume it. After reaching the last image, the slideshow restarts from the beginning. Click the cross icon in the top-right corner or press Esc to exit slideshow mode.
The list of mass actions can be edited. You can select the mass actions to display only the ones you need. To add a mass action:
1. Go to Configuration > Configuration
2. Find the section 'Mass actions'
3. Click 'Add a line'
4. Choose mass actions by ticking the box by the action, or tick the box above the action to select all available ones
5. Click 'Select'
6. Click 'Save'.
After saving the settings, the list of mass actions in the right navigation panel will be updated.
To deactivate a mass action you no longer need, click on a bin icon by the action.
In addition to the available actions, you can also prepare your own mass actions. Batch actions for attachments are based on Odoo Server Actions. This means you can add custom mass-editing operations.
To create a new mass action:
1. Go to configuration and find the section 'Mass Actions'
2. Click 'Add a line'
3. Click 'New'
4. Type the name of the action
5. Choose the model 'Attachment'
6. Specify what should be done in the section 'Action Details'
7. Create an action by clicking 'Add a line' in the tab 'Data to write' and choosing the related details
8. Optionally, in the field 'Allowed Groups', choose the security groups that will be able to see and apply the mass action
9. Click 'Save&Close'
10. Click 'Save'.
After that, it will appear in the list of available mass actions, from which it can be added to the right navigation panel. To update the attachments, choose them and click on the action.
Attachment box
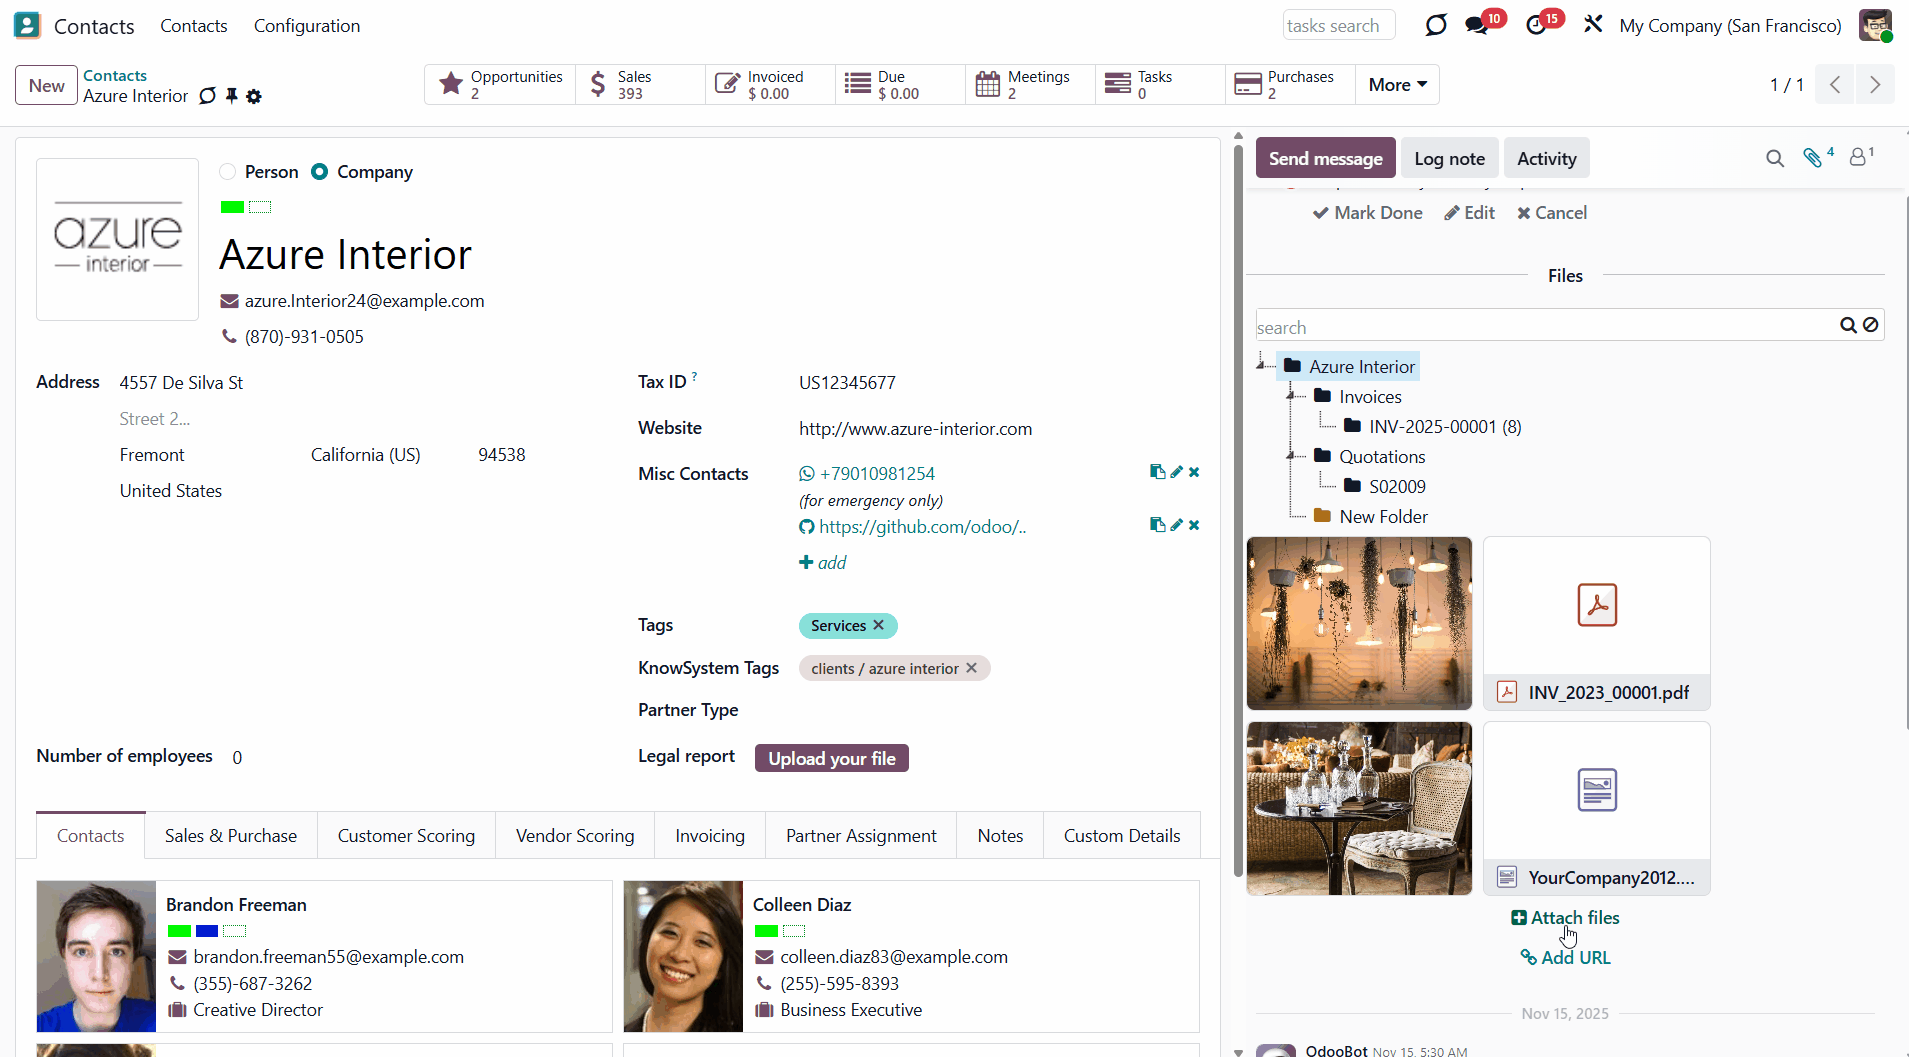
As you create folder rules, the attachment boxes for the related models will change after the scheduled folder refresh. The attachment box is the standard Odoo interface for storing attachments. To open the attachments box, go to any Odoo object’s form view, find the ‘Clip’ icon, and click on it. Here, you will see all the attachments for the objects that users can manage.
You can see the object's folder and its children in the attachments box, if available. You can navigate folders by clicking the arrow icons to view subfolders. Click on a folder to select it and see its attachments.
Even if you have a long list of folders, you can easily find the one you need with the help of the search bar. Start typing the folder's title, then click the 'Search' button on the right side of the field. If there is a match, the result will be marked red. To reset the search, click on the 'Reset' button on the right side of the search bar.
As you right-click a folder, the list of actions appears. The list of actions differs slightly between manual and automatic folders.
The available actions with the automatic folders are:
1. Download as Archive - allows downloading attachments of a chosen automatic folder
2. Create Subfolder - allows the creation of a subfolder in an automatic folder. The subfolder is added to the folder tree in the correct hierarchy. Type the folder's name to finish creating the subfolder
3. Open in File Manager - allows opening the related folder in the File Manager for quick access to the main folder tree. Above, you will see the breadcrumbs for quickly returning to the object
4. Settings - allows checking the folder settings. To change a folder's settings, adjust the associated folder rule.
The available actions with the manual folders are:
1. Download as Archive - allows downloading the attachments of a particular manual folder
2. Create Subfolder - allows creating a subfolder for the manually created folder. You can create as many subfolders as you need
3. Open in File Manager - allows opening the related folder in the File Manager for quick access to the main folder tree. Above, you will see the breadcrumbs for quickly opening the file manager
4. Rename - allows changing the name of a particular folder
5. Edit Settings - change properties of the manual folder, including name, parent folder, assign cloud client, limit access to a user or user groups, and add some notes
6. Archive - removing a folder from the folder tree. Later, it can be restored.
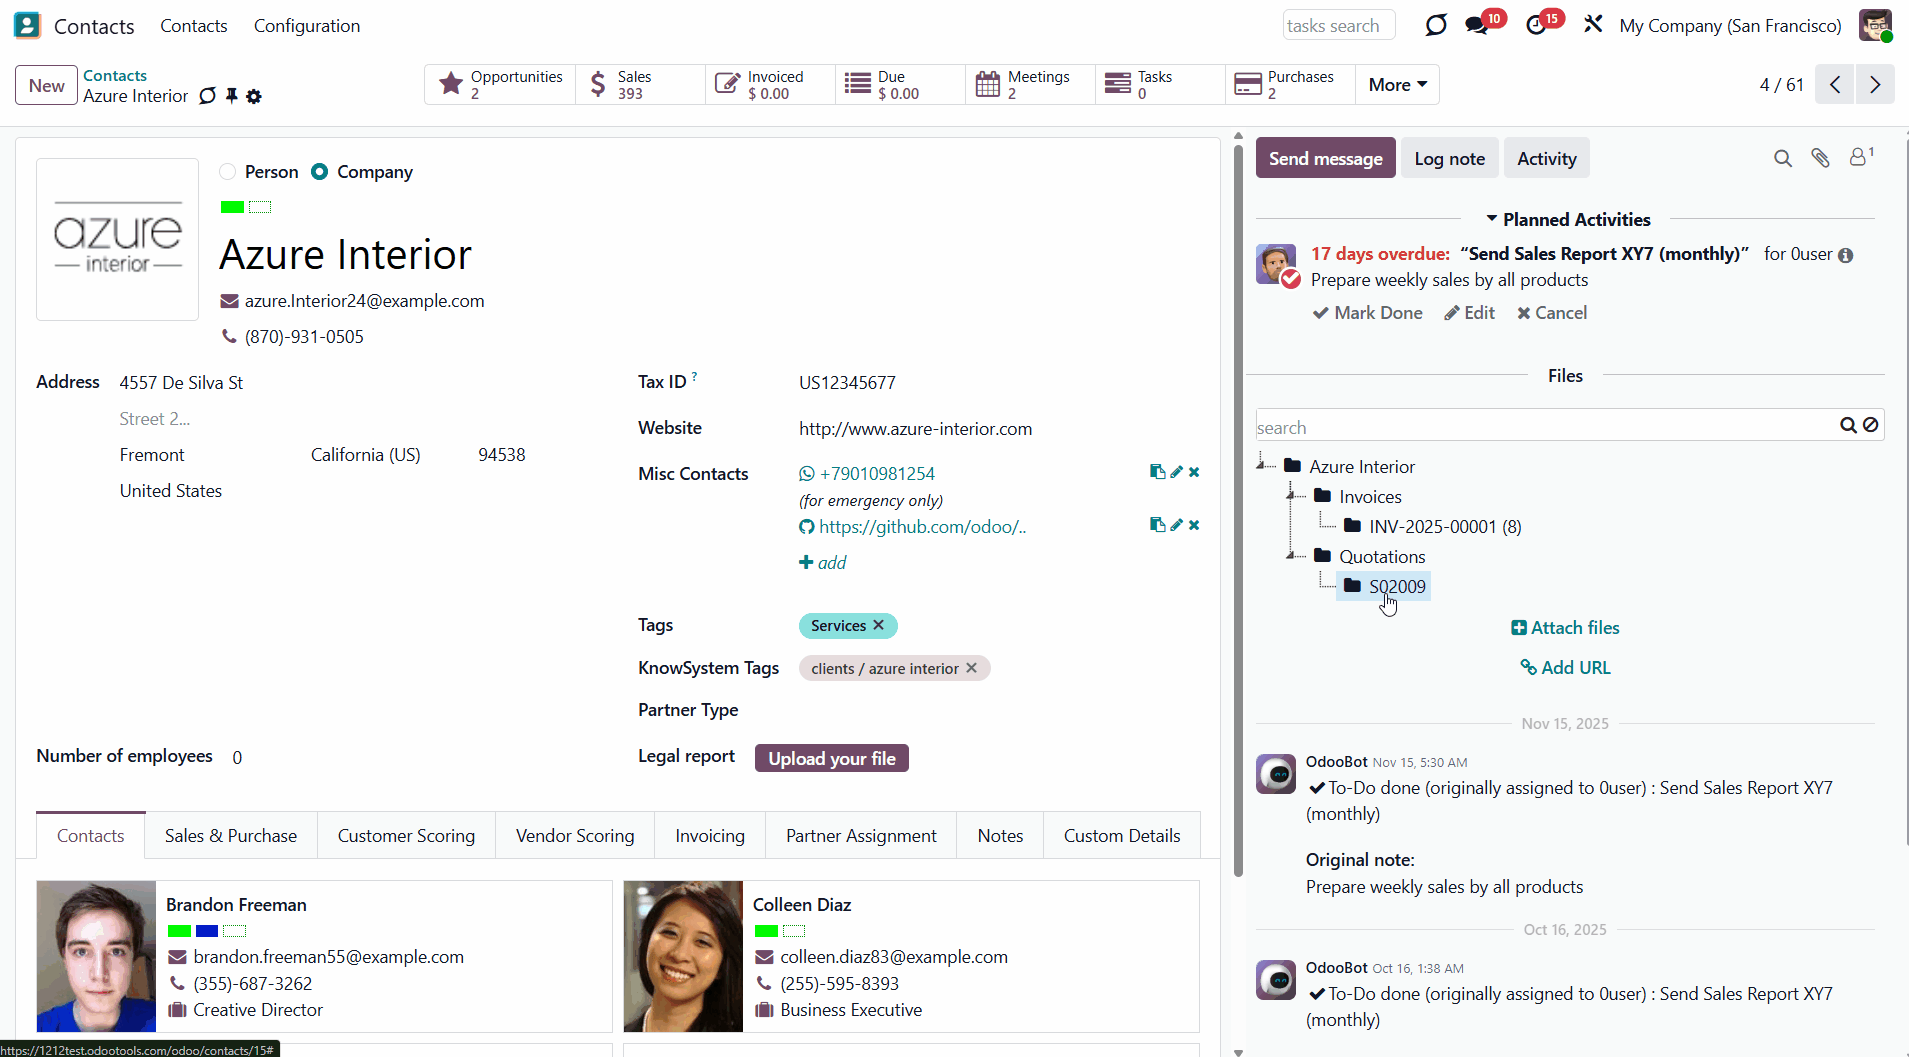
You can add files through the attachments box, message thread, or the Files Manager. To add a file through the attachments box, open the related object, click 'Attach files', and select the file to upload. To add files of the URL type, click 'Add URL' and enter the file name and associated link. Upon confirmation, the app creates a URL attachment in the current folder or the object, if no folder is chosen.
If an object has child folders, you can also add a file to another folder from the list. To do so, select the folder by clicking on it, then click 'Attach files' or 'Add URL'.
Another way to upload files to the attachments box is to drag and drop them. Pull the file to the attachments box and drop it when you see the uploading wizard.
After uploading, you will see the standard Odoo functional buttons on the attachment cards. These buttons let you perform specific actions on attachments. Depending on the file type, the buttons and their placement may differ.
For example, if you upload a picture, you will see its thumbnail. Click the image to see its preview. Below the preview window, you will see the 'Print' and 'Download' buttons. Click an arrow on either side to move between pictures and other files, with a preview function. To delete an image, click the 'Cross' icon in the top right corner of the thumbnail.
As for other extensions, some attachments have previews, for example, PDF, and some don't, for instance, Docs. If you upload a document, then the preview will not be available. On the document's card, you will find two buttons:
1. Delete - allows deleting the document
2. Download - allows downloading the document.
When a file is added to an object's message thread, it also goes to the attachments box. The files in the message thread share the same set of functional buttons. You can also open, download, and delete them without opening the attachments box.
To add a file through the Files Manager, open the Cloud Storage menu, click on the folder, click the 'Upload file' button, and choose the file. After that, you will be able to access the file from both the object's attachments box and the Files Manager, as they are interconnected.
Even if the Files Manager is hidden from the user, if they have access to an object, they can access the related folder from the attachments box. The other folders in the structure will be visible only if the user has access to them (see Access Rights). For example, our sales manager, Anita Oliver, doesn't have access to the Files Manager. As she opens a sales order 'S0010', in the attachments box, she sees the folder 'S0010' and the manual folders 'Related Documents' and 'Terms of Agreement', each with its related attachments. However, she can't see the related folder 'Projects' because she doesn't have the project manager's permission.
Synced files and folders will also be accessible from the attachments box. The cloud client icon will mark automatic folders, and manually created folders will have a ribbon on their icon (see Synchronization Principles).
By default, synced files would use app-specific thumbnails instead of standard small previews to avoid additional requests to the cloud client for each form opening. For example, you cannot preview the picture without clicking the attachment.
You can still preview attachments with the preview function in Odoo by clicking on them. Click the arrow icons on either side to move between the attachment previews.
From the attachments box, you can also open the Cloud Folder to view all synced files and folders associated with the object. For that, the 'Open in Cloud' button is introduced. Right-click a folder, then choose the action, and in a new tab, you will be redirected to the corresponding folder.
Even after the sync, a user might download attachments locally by clicking the 'Download' icon on the file. Downloading synced files from Odoo doesn't require logging in to the cloud client.
The standard Odoo preview would also work for standard Odoo attachments and synced attachments. Files that do not support the preview function in Odoo (e.g., .doc) will be opened in the cloud client.
If you click the remove button after submitting your decision in the pop-up window, the link will be removed from Odoo. After the next sync, the file will also be removed from Cloud Storage (see Synchronization Principles).
Optionally, the Show synced attachment preview setting can be enabled. When this option is enabled, image and GIF content for synced attachments will be retrieved and displayed when the attachments box is opened (for message attachments, when the message is displayed).
Please note that enabling this option may slow interface load times, as it requires additional requests to the cloud client. This setting is intended for cases where immediate visual previews are preferred over faster loading performance.
Adding Existing Attachments to Messages
Sometimes, specific files may need to be sent through messages. The required files may already exist in the instance, and sending them would require users to download them locally first, which isn't convenient and results in duplicates. The module solves this problem by allowing users to select existing attachments when composing an email, thereby simplifying file sharing.
To send the existing attachments, users need to open the full message composer and locate the 'Existing Attachments' field. This field lets users add attachments directly from the email composer.
When a user clicks the 'Search more' button, a pop-up window with various filters appears. Users can filter attachments by folders, tags, names (searches indexed content), and MIME type. Click on an attachment card to see its details. To add an attachment to the selection, click the plus icon in the top-right corner of the attachment.
Both synced and non-synced attachments can be selected. The attachments added as links cannot be selected. For example, we have added three binary files and two links to the attachments box. As a user composes a message, in the 'existing attachments' field, he can choose the three most recently added binary files, but cannot select the two attachments of the URL type. With one of the following scheduled jobs, the binary attachments were added to the cloud. As a user composes a message in the 'existing attachments' field, he can still choose those three attachments while they represent actual files, even after the sync.
The selected attachments will appear in the 'Selected Attachments' tab. To attach these files to the email, users can click 'Save&Close'. The attachments will be added to the message, along with any standard uploaded files, via the 'Attachments' icon.
After sending the message, the attachments added via the 'Existing Attachments' field will appear among the message attachments, but will not be automatically added to the attachment box. This prevents duplicates and allows users to send attachments from other objects without adding them to the attachments box. For example, you can add the project attachment when generating an email from the contact Azure Interior. This attachment will remain linked to the project, and if you delete it here in the contact's messages thread after sending, it will be removed from the project as well.
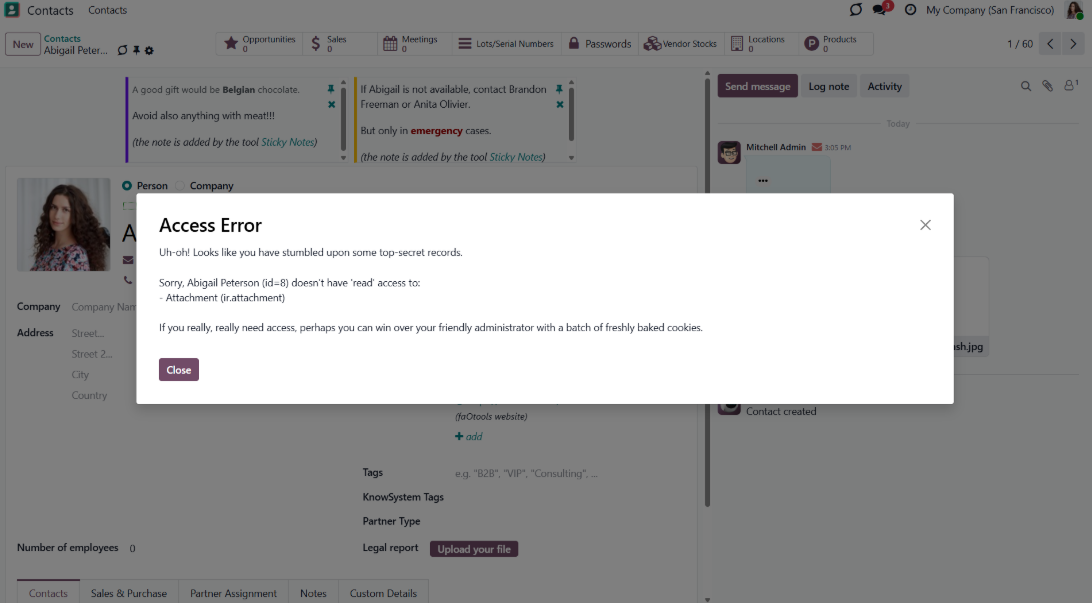
Users without access to an attachment cannot add it via the 'Existing Attachments' field. They will still see the attachment in the messages thread, but cannot delete it. For example, our sales manager, Abigail Peterson, doesn't have access to the 'Renovations' project, so she can preview but cannot delete the attachments that Mitchel sent in a message in the sale order S0001.
Automatic Folders
Folder rules are configurations that determine how the module generates folders by evaluating model and object settings and fields. The folder rules define a specific folder structure that is preserved during syncing with a cloud client of your choice.
Folder rules create folders for Odoo objects, establish a flexible folder structure, and prepare folders and any attachments for synchronization.
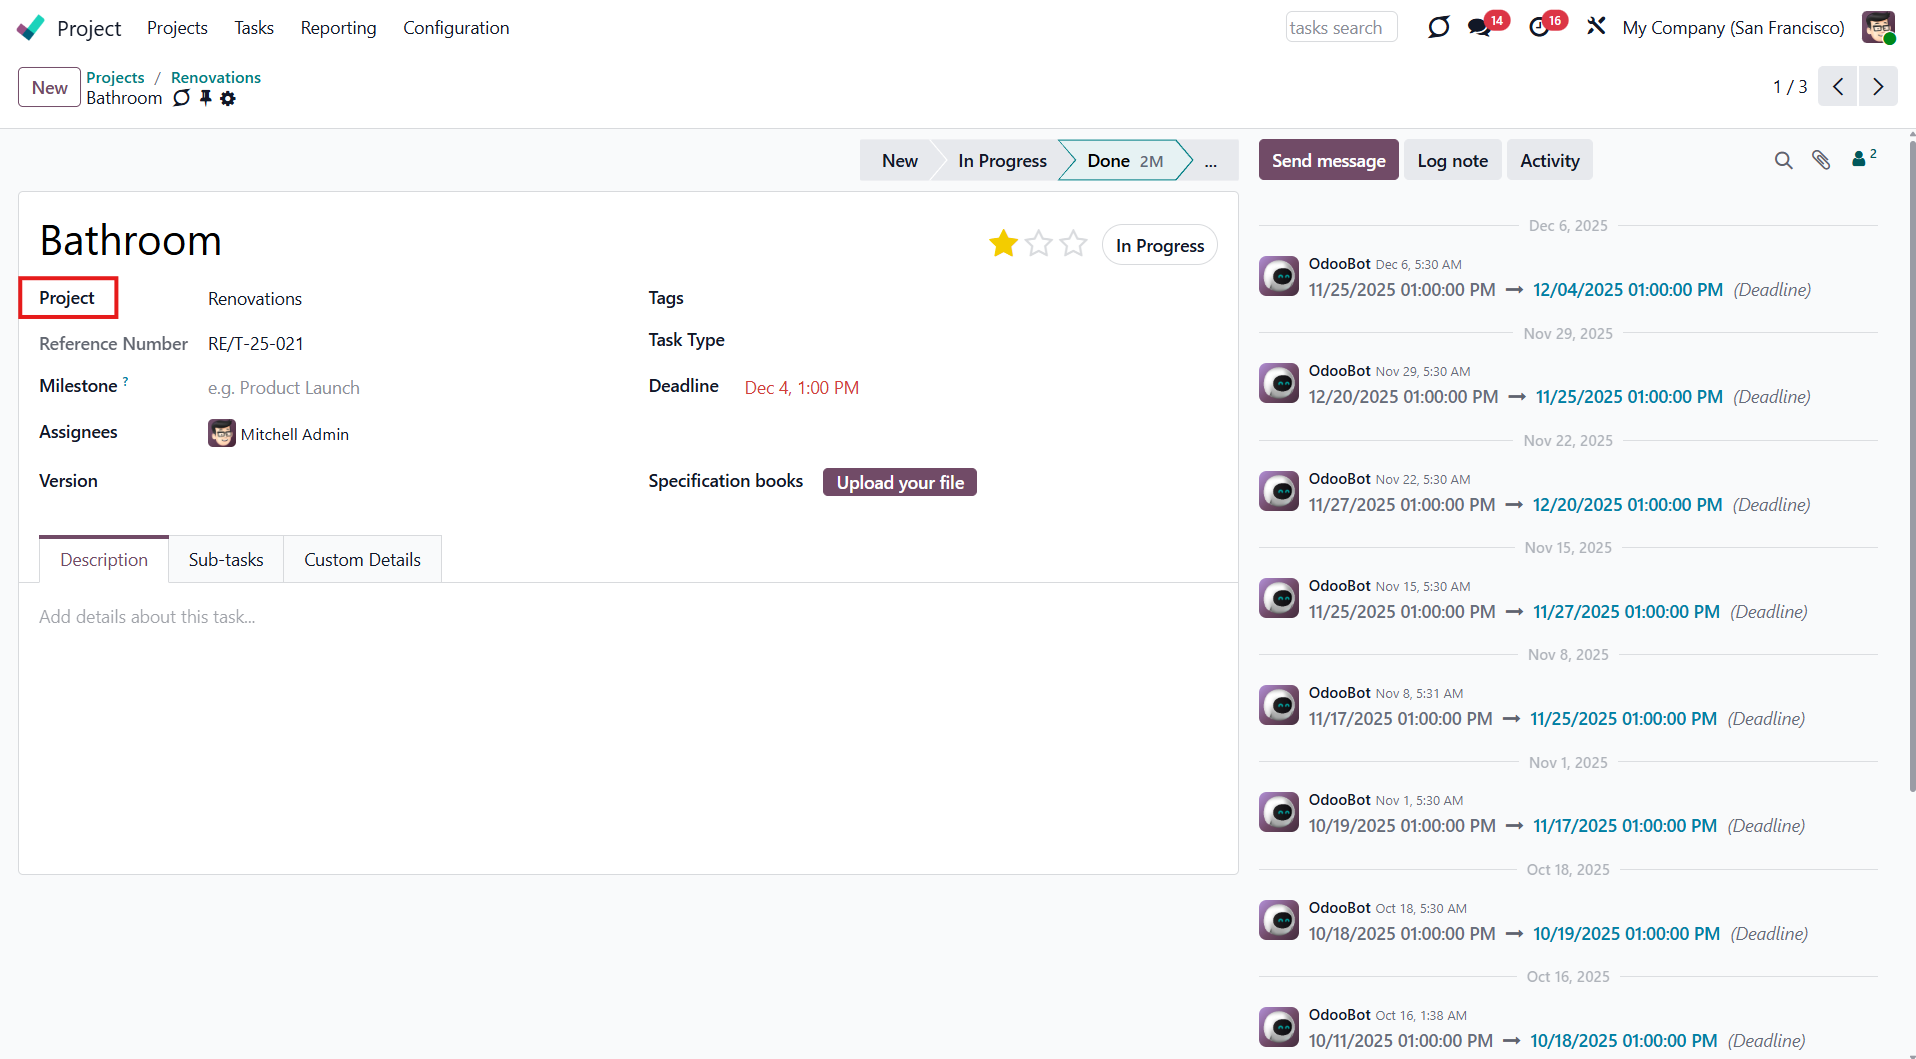
To configure a specific Odoo document type and generate related folders, create a new folder rule (Cloud Storage > Configuration > Folder rules). For example, create a folder rule 'Project', by clicking on the button 'New' in the folder rules' menu and choosing 'Project' in the field 'Model to sync'. Automatically created directories would contain all attachments associated with their linked objects.
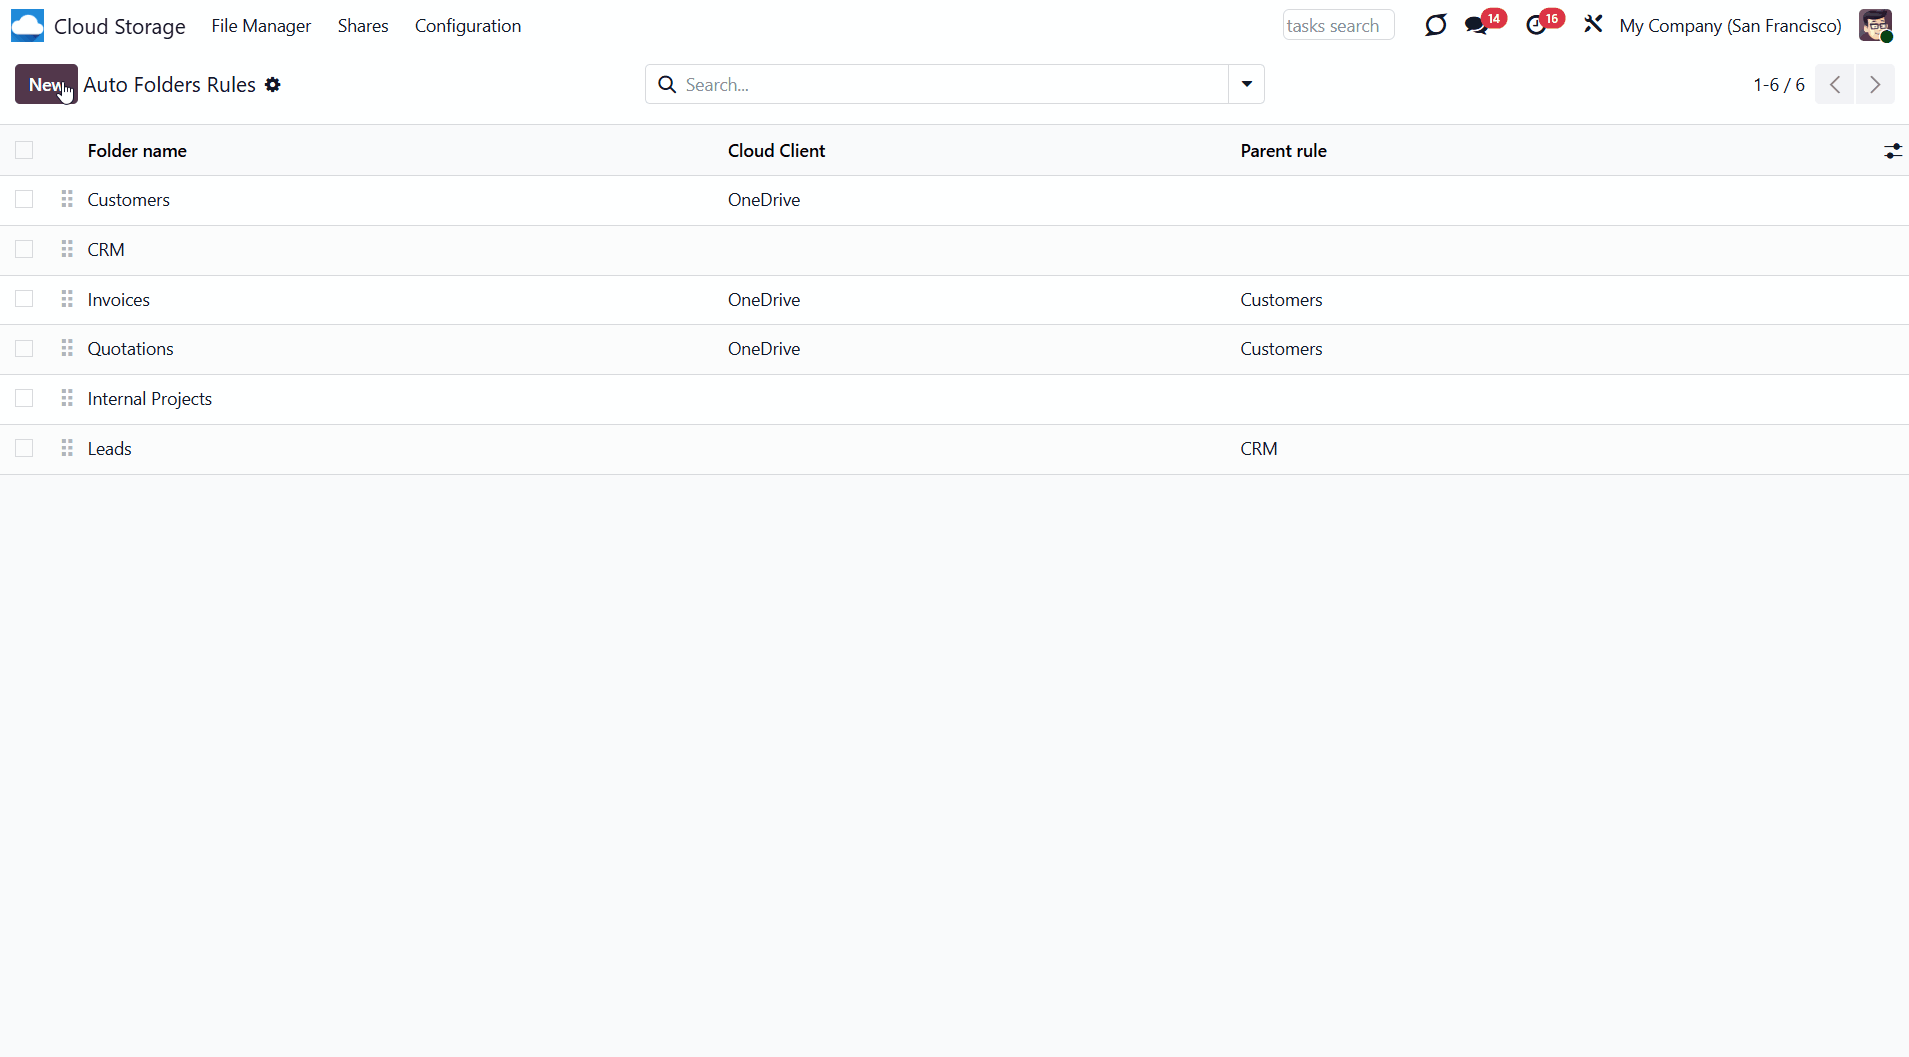
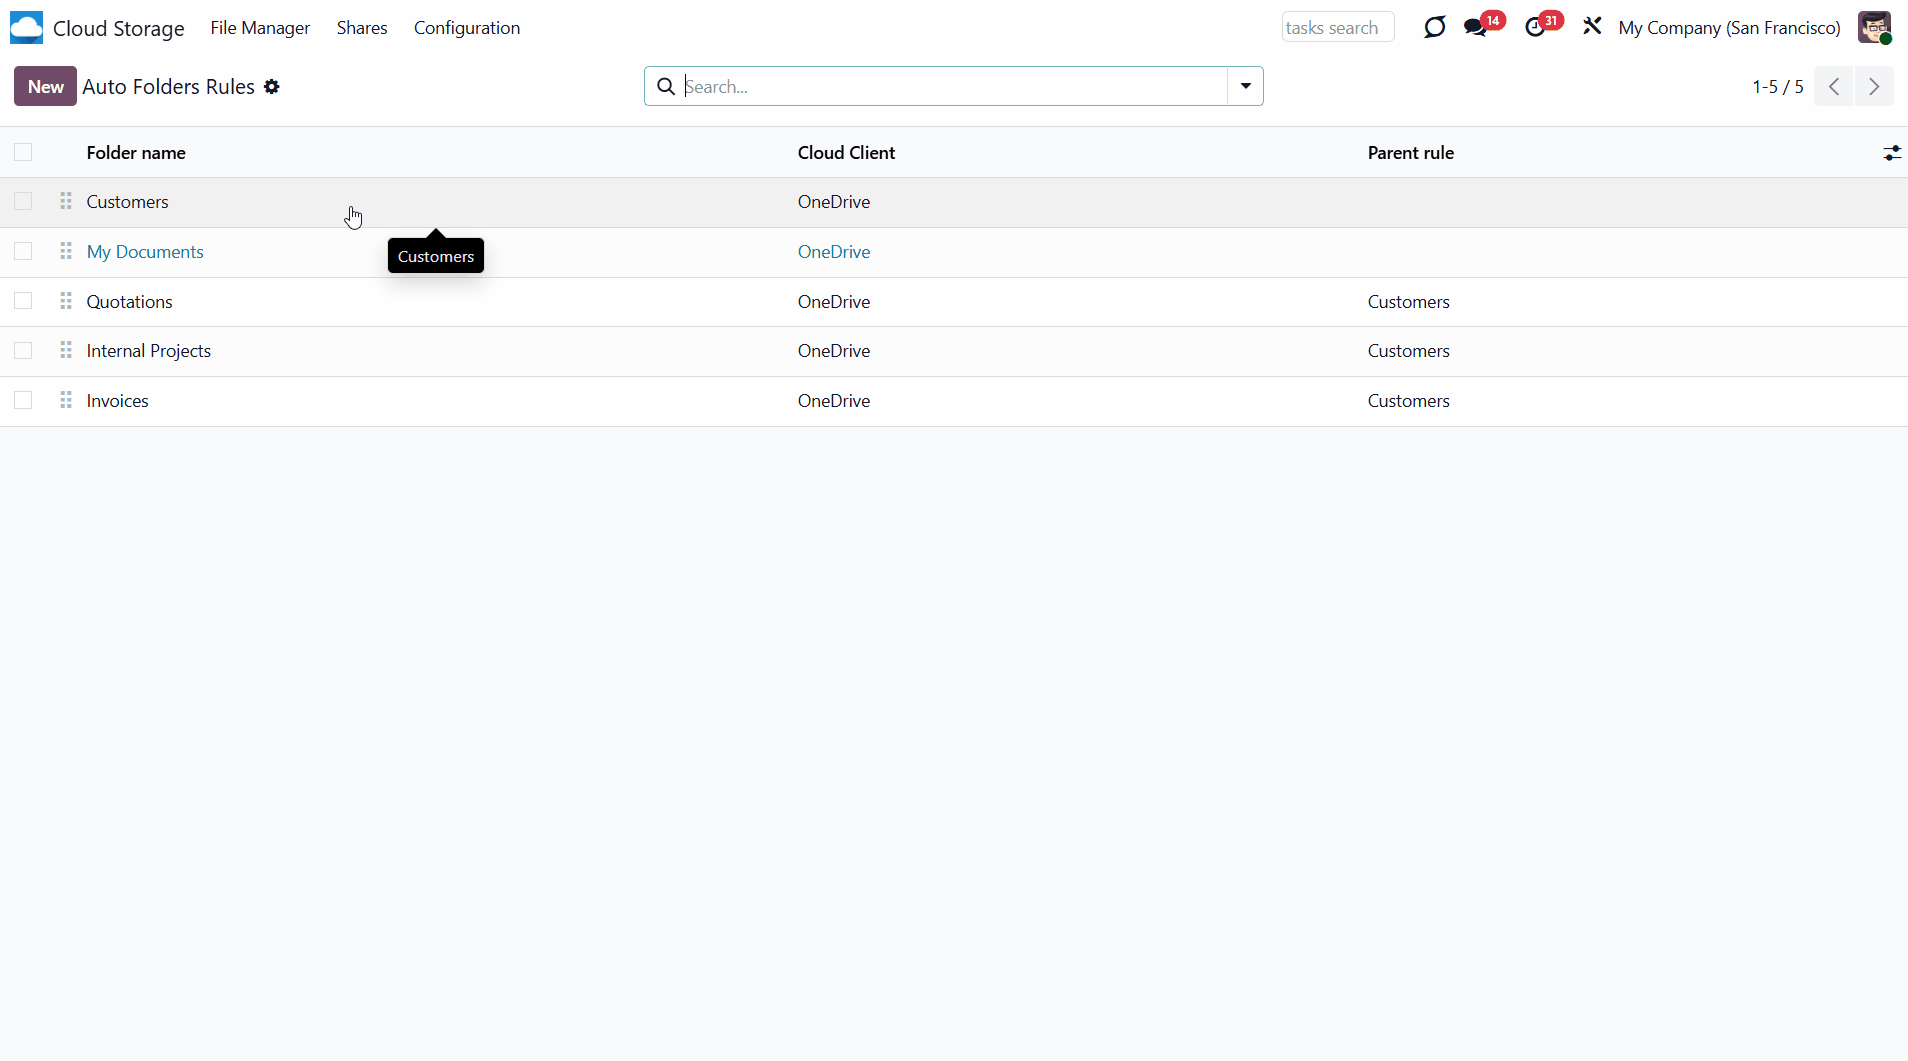
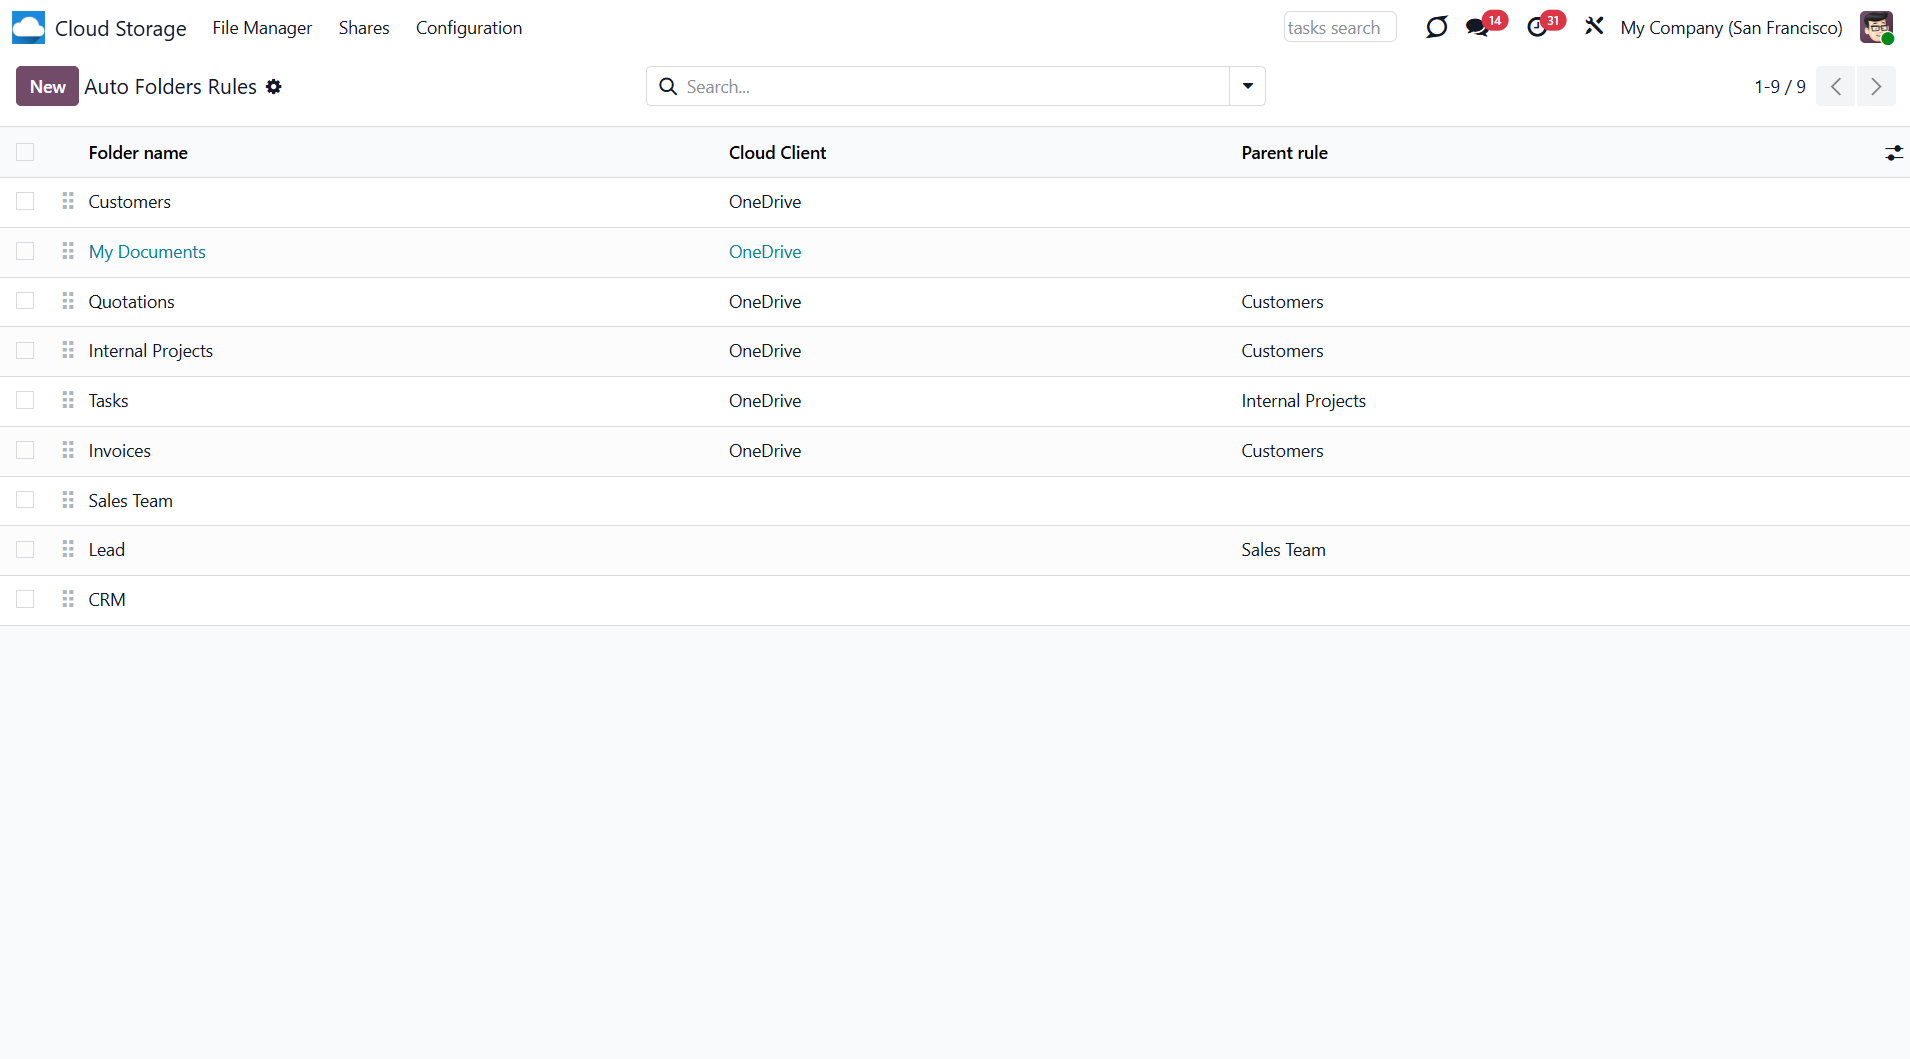
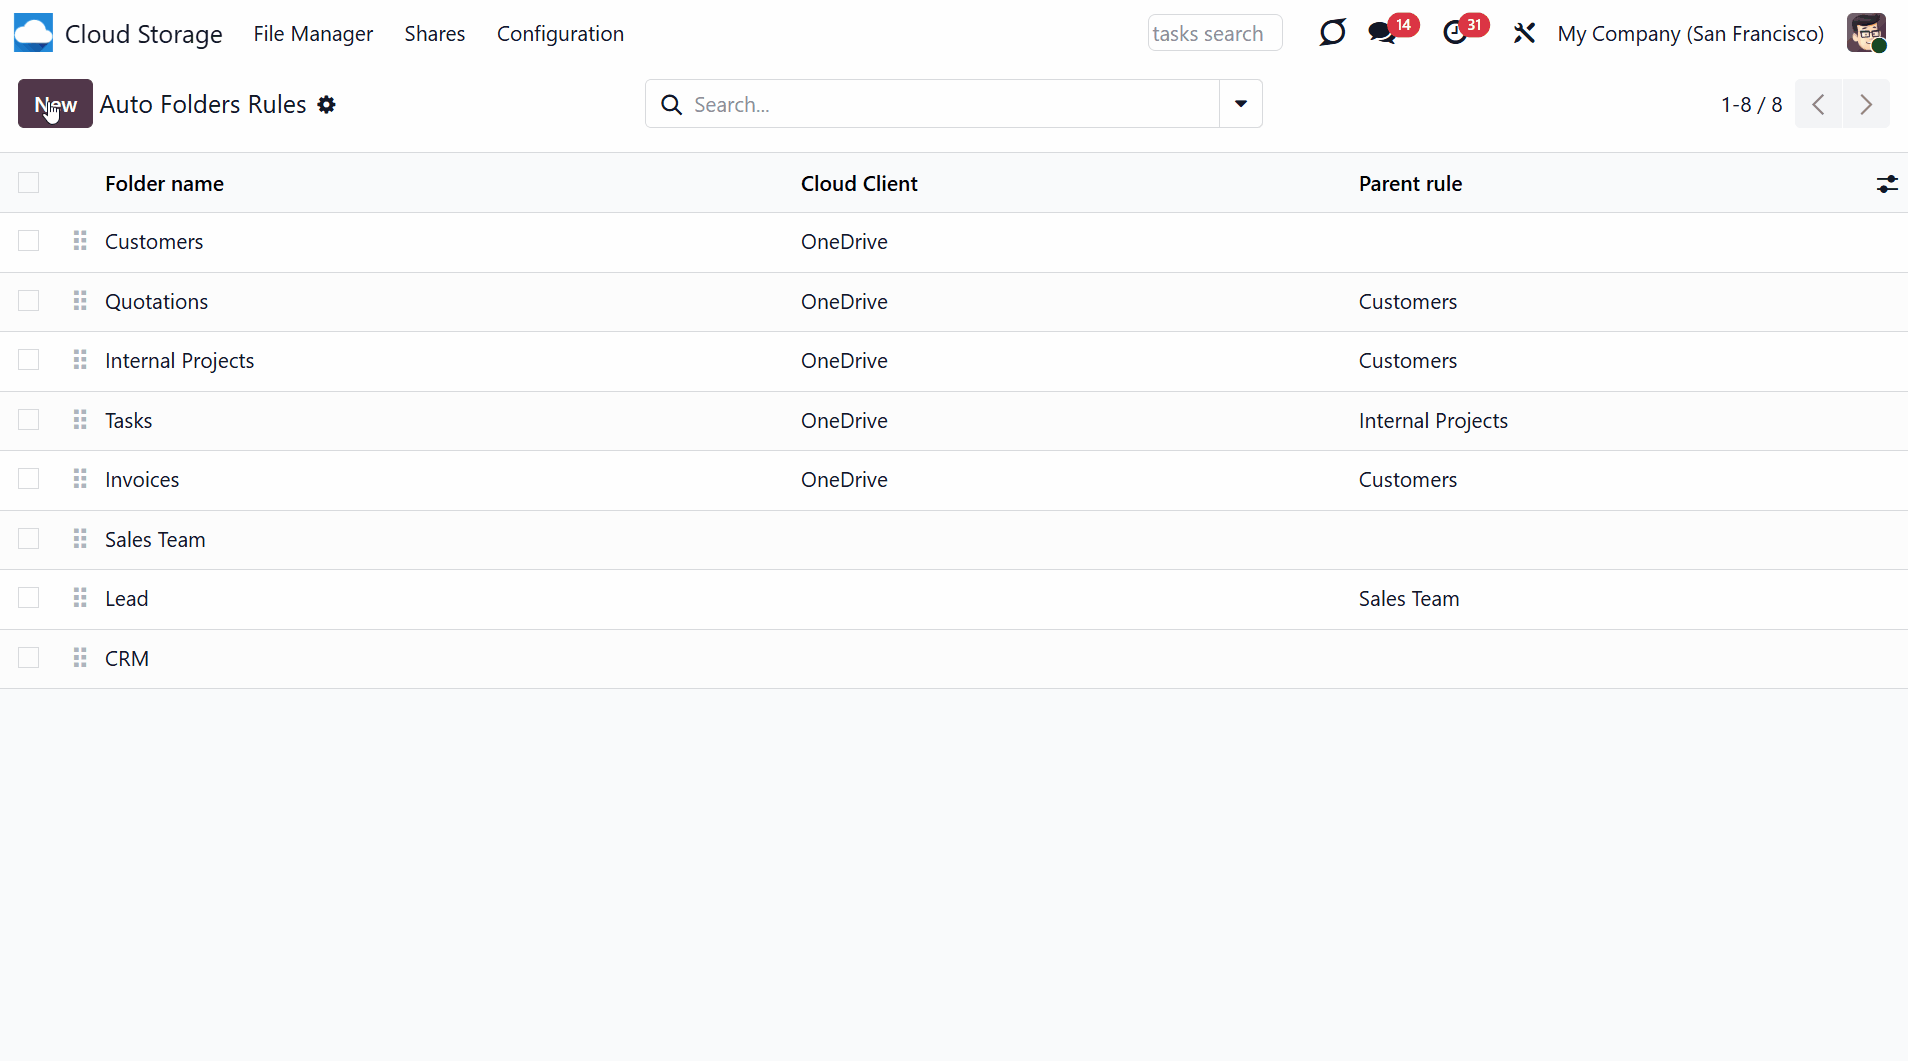
As you open the folder rules menu, you see a list of folder rules. From the columns on the right, you can find information about them without opening them. Here you see:
1. Folder name
2. Cloud client, if any
3. Parent rule, if any
Workspace-related folder rules can be created if the add-on Cloud Sync for Enterprise Documents is installed. These rules are marked by color (see Workspace-Related Rules).
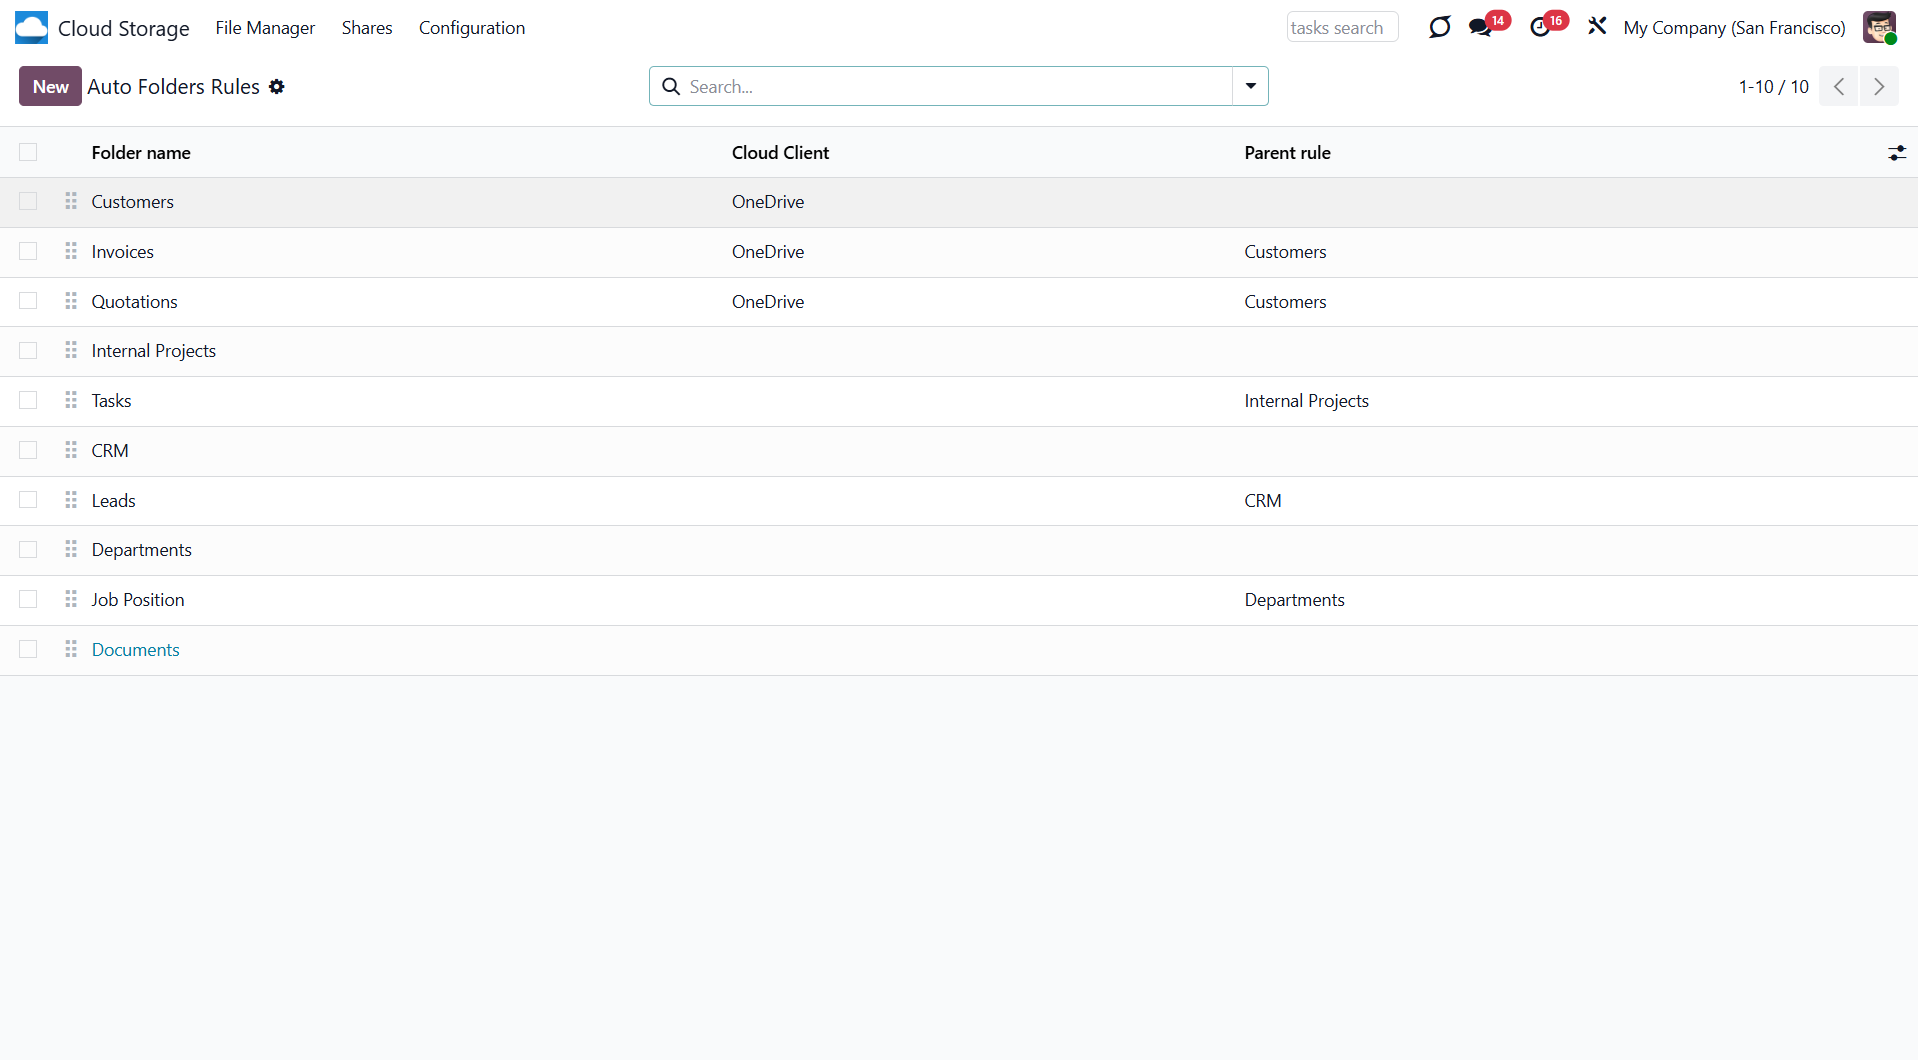
You can reorder folders by adjusting folder rules. Open the folder rules menu, then drag and drop to reorder the rules. The lower the sequence, the higher the folder for the related document will be. Keep in mind that the child's folder rules will not be higher than their parents', regardless of their sequence. For example, the folder rule 'Customers' is a parent one for the rule 'Invoices'. Thus, even if we drag and drop the 'Invoices' rule above the 'Customer' rule, it will not appear higher in the folder tree.
You can also archive folder rules from the folder rules menu. To do so, open any rule and click on the 'Gear' icon, or select several folder rules by ticking the box on the left side of the rules and selecting the action by clicking on the 'Gear' icon. If you archive the folder rule, the related folders will also be archived with the next scheduled job.
Folders are updated regularly. An automatic rule appears in the Files Manager only after the scheduled job 'Prepare Cloud Folders' runs. The folder rules are checked and updated every 15 minutes. If there are many objects, some folders might be created/refreshed by one of the following scheduled jobs.
It is possible to trigger the scheduled job manually by going to Cloud Storage > Configuration and clicking on the 'Launch Folder Update' button at the bottom of the page. However, we highly recommend using the button only for testing purposes (see Extra Notes).
To configure automatic folder rules, a user should belong to the security group 'Cloud Storage > Administration' (see Access Rights).
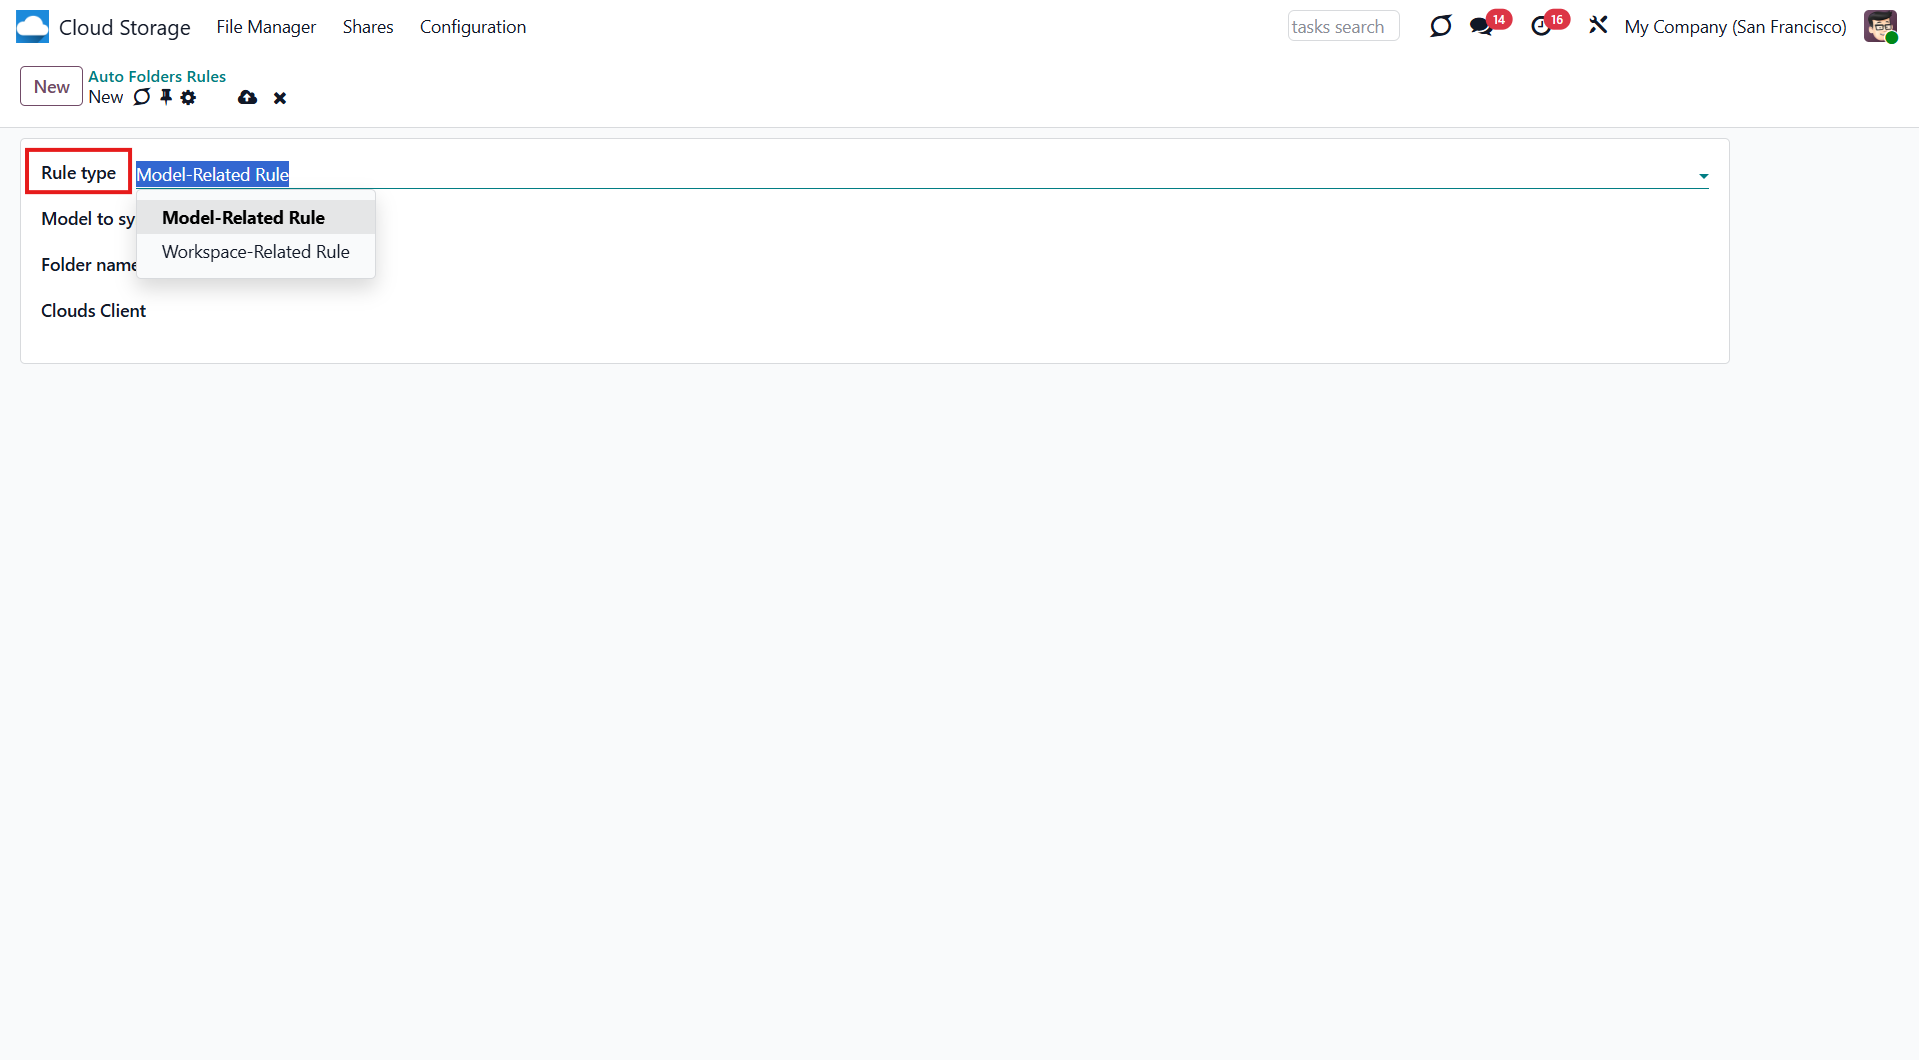
If you have the Cloud Sync for Enterprise Documents add-on, when you create an automatic folder rule, another field, 'Rule Type', appears. The available options are 'Model-Related Rule' and 'Workspace-Related Rule'. The first one relates to Odoo models (for example, Sale Order, Purchase Order, Lead/Opportunity, Project, Task) (see Model-Related Rules). The second relates to the Documents module (see Workspace-Related Rules).
Model-Related Rules
A model is an Odoo document type (for example, Sales Orders or Contacts). By selecting the model, we tell the module where to obtain the information needed to generate folders.
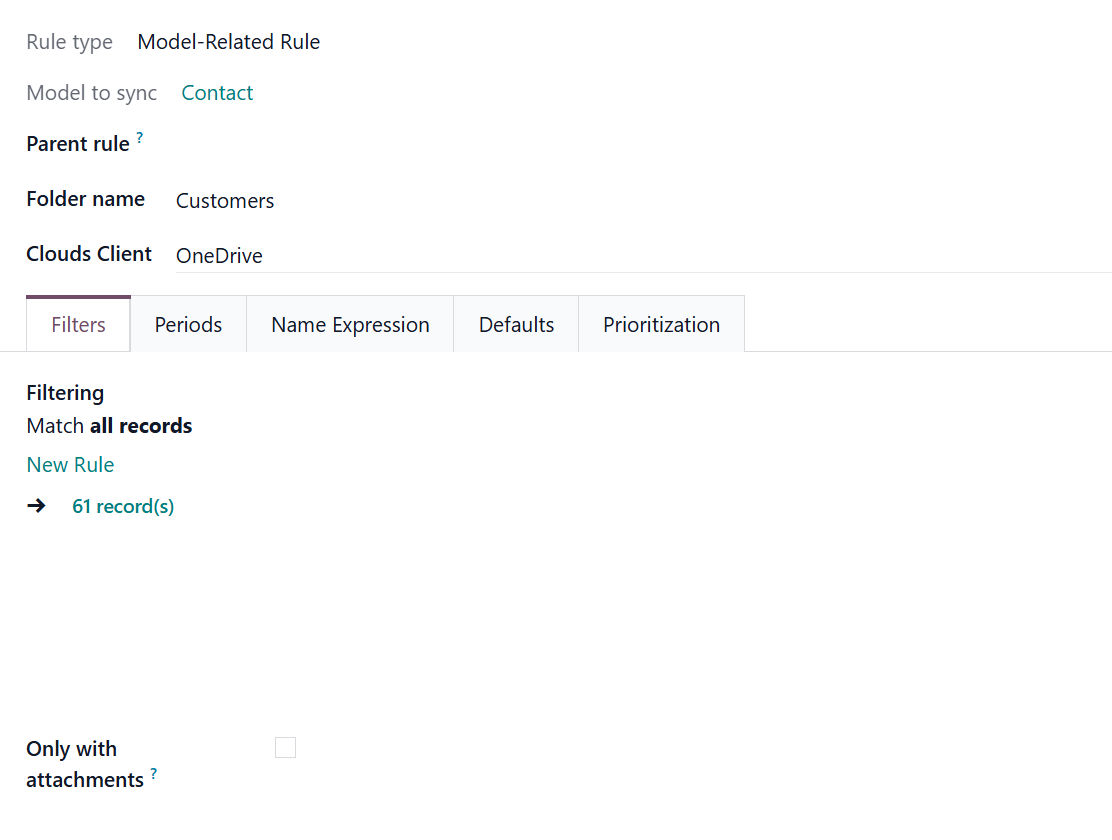
Model-Related Rule - a folder rule, which is based on an Odoo model. By creating a model-related rule, we define the criteria for creating folders.
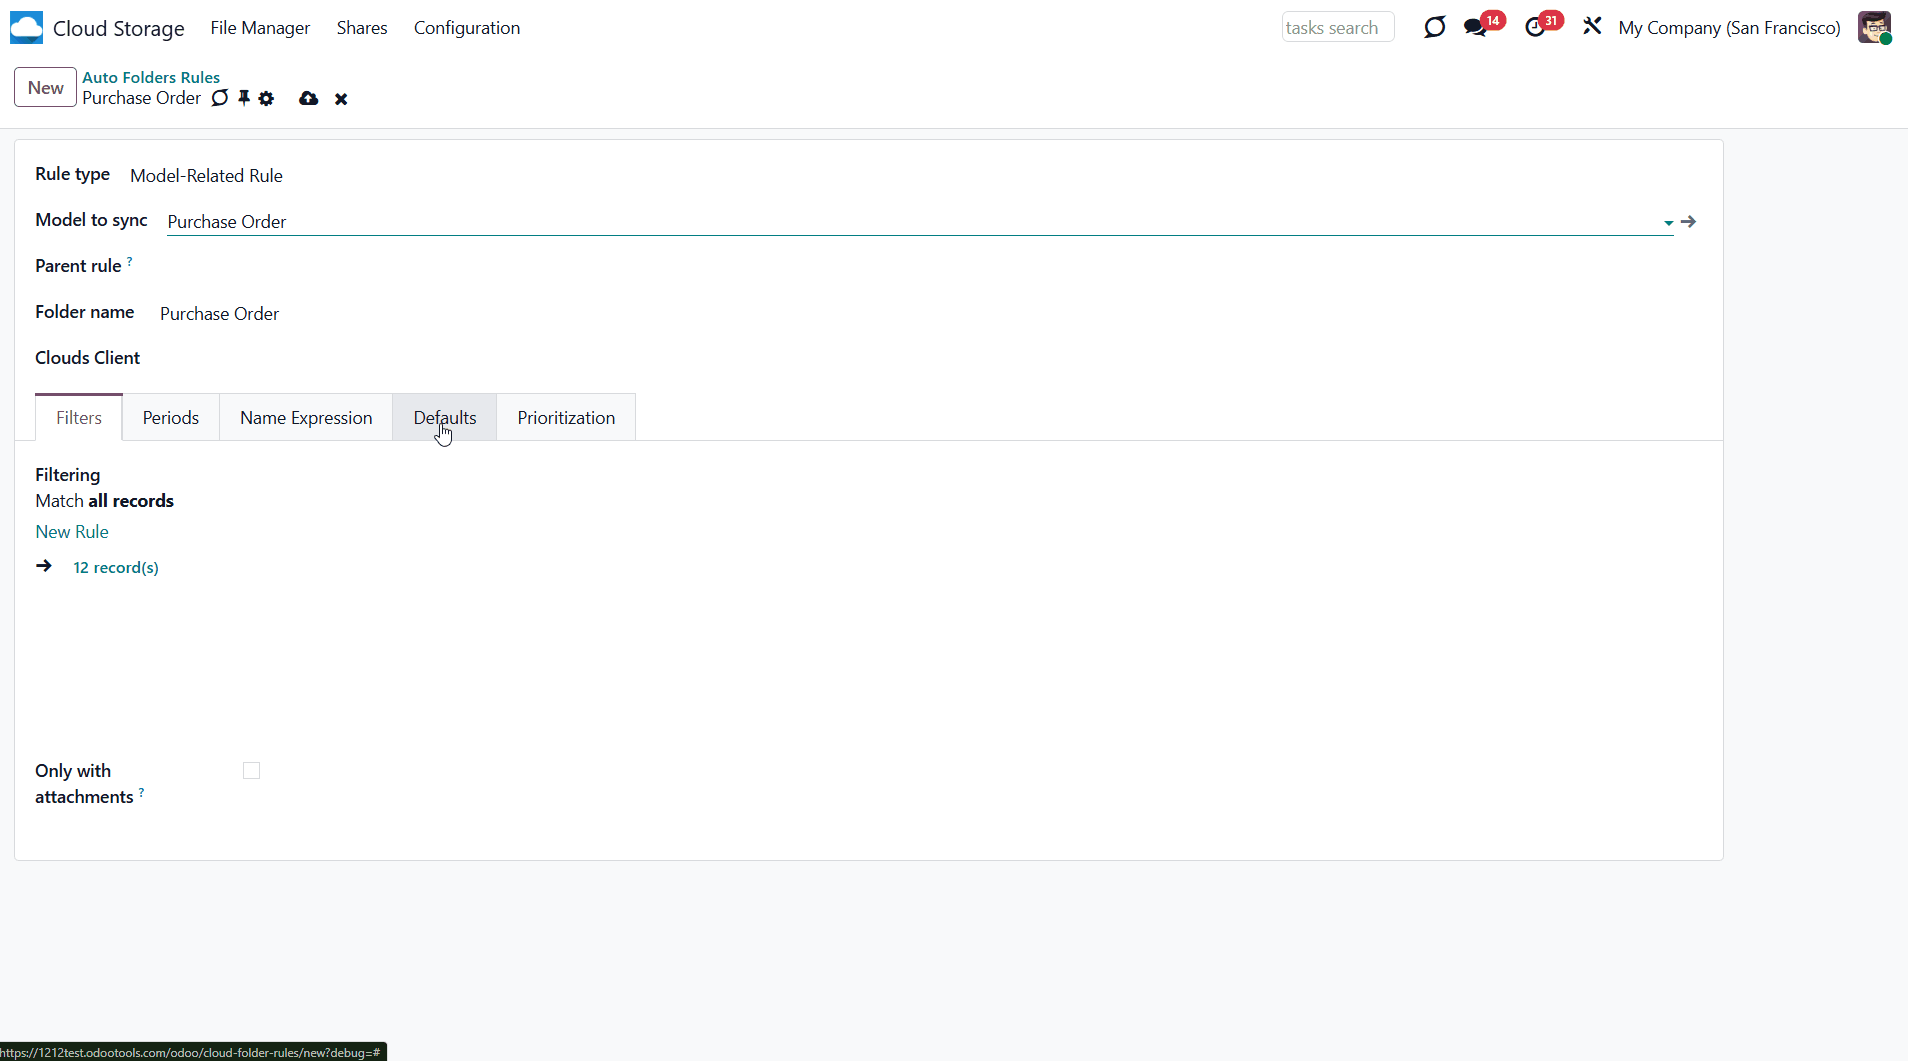
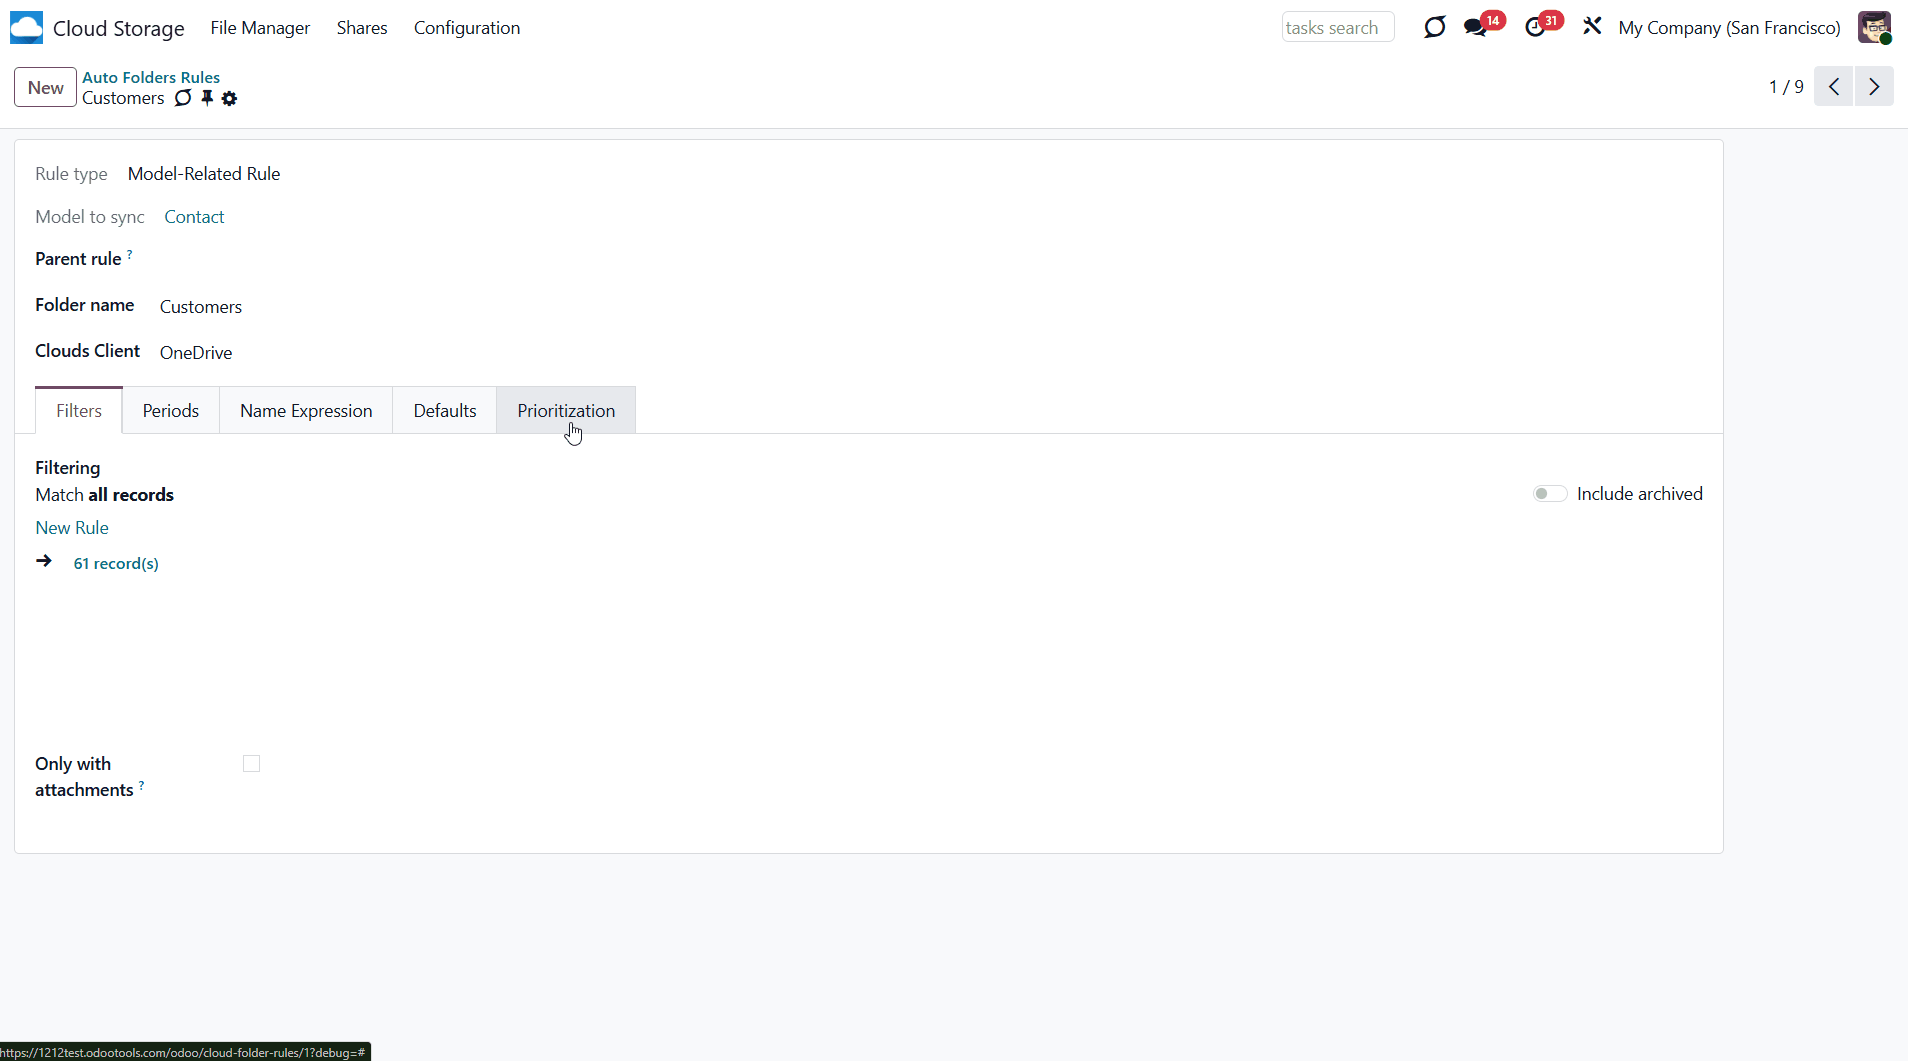
To set a model-related automatic folder rule:
1. Go to Cloud Storage > Configuration > Folder Rules
2. Click 'New'
3. Choose the rule type as 'Model-Related Rule' (If you have the add-on Cloud Sync for Enterprise Documents, otherwise it is applied by default as the only available one)
4. Choose the folder name. Avoid using the following symbols in folders' and files' names: *, ?, ", ', :, <, >, /, +, %, !, @, \, /. Upon saving the name, they will be replaced with '-'. It is done to avoid conflicts with file systems. The name should include fewer than 100 symbols
5. If there is at least one cloud client connected, then you may assign it to sync the folders with attachments, or leave the field empty if you don't want to sync them (see Synchronization Principles)
6. Choose the related model to sync and optionally set a 'Parent rule' (see Hierarchy Rules)
7. Optionally, limit the folders, which should be synced by applying filters and/or periods (see Filters & Periods)
8. Optionally, introduce an expression to extract folder names for directories (see Name Expressions)
9. Optionally, create a default folder structure, which will be added inside the objects-related folders with the first sync (see Default Folders).
The app lets you split models into a few folders based on selected filters. Use any document-storable field to distinguish a directory. Have a separate folder for individuals and companies, for European and American opportunities, for quotations and confirmed orders, for each project, etc. You can also limit documents by relative periods by using the date fields of linked documents. For example, leads registered in the last 3 months or invoices updated in the previous week (see Filters & Periods).
Define name expressions to specify titles of documents' cloud client folders. For instance, to include a project name in a task directory (see Name Expressions).
Prepare a hierarchy of default folders and files to be created when a document directory is synced to a cloud client for the first time (see Default Folders).
The folder rules are applied according to the scheduled job 'Prepare Cloud Folders'. They are checked and updated every 15 minutes (see Folder Rules).
If you change the rule, the changes will be applied with one of the following cron jobs. The folder list will update based on the new rule's settings.
Hierarchy of Rules
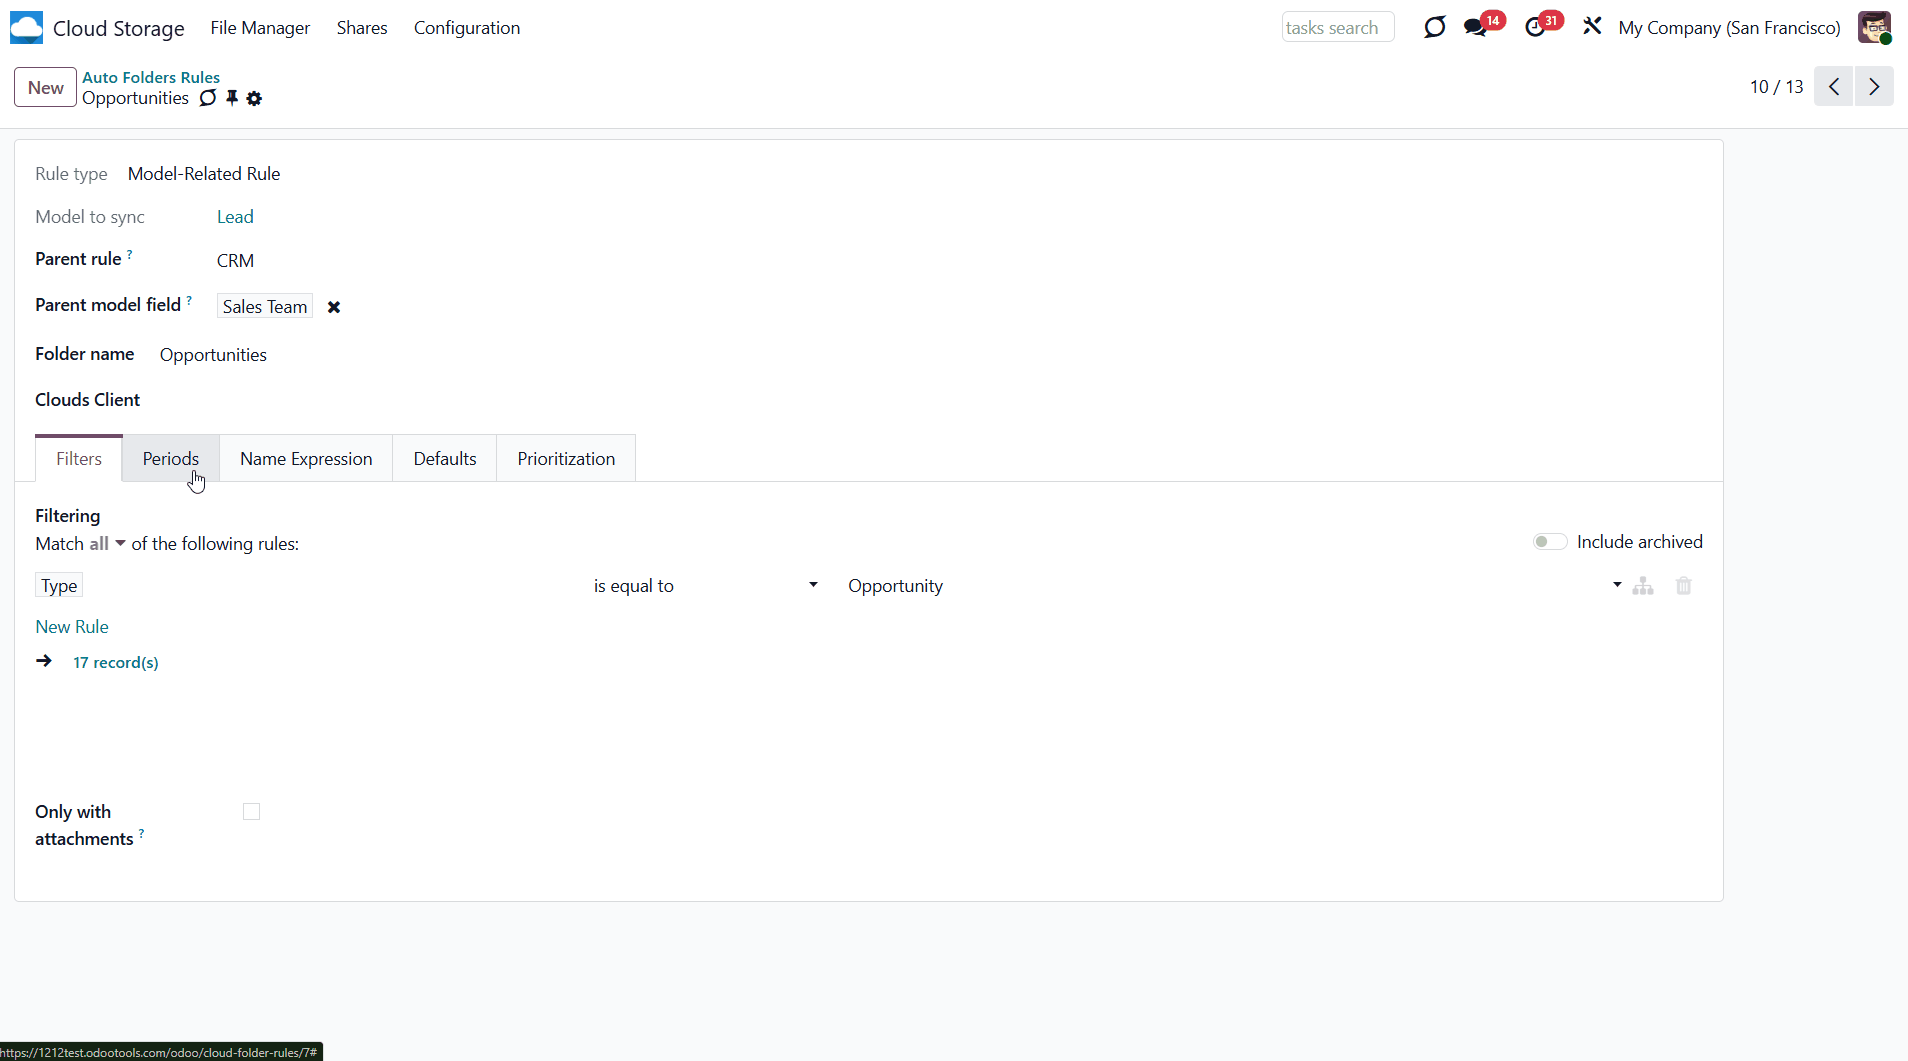
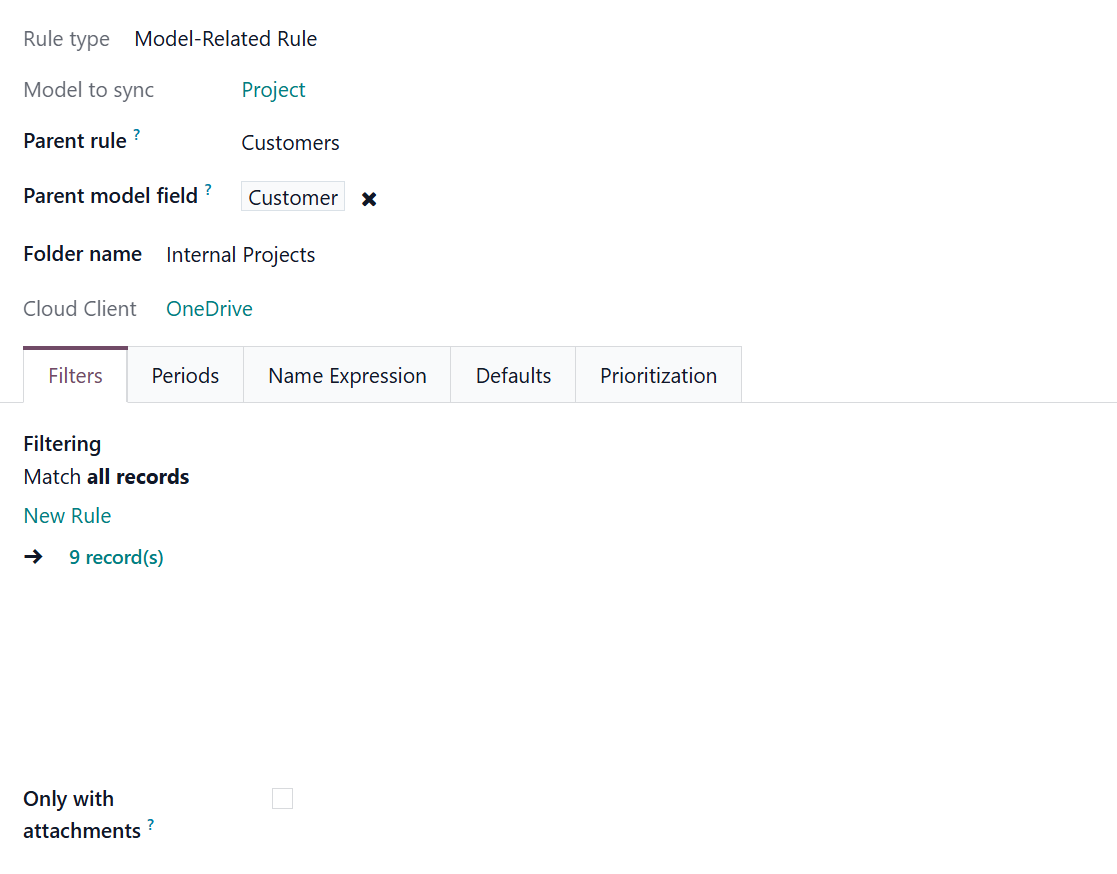
When you need to add objects of one model inside the objects of another one, you can specify the parent rule. For that, select the model in the 'Parent Rule' field and a related many2one field. This way, you can reflect your Odoo workflow logic, create a complex folder structure, and navigate folders conveniently. So, it will be easier to find the required attachments. For example, place tasks inside the related Project, and the Project inside the associated contacts to get the structure: Contacts > Azure > Projects > Software Design > Tasks > Prepare markup.
The many2one field can link the models. For example, if you want to store task folders within the related project's folders, the task card should include a many2one field that references the related project.
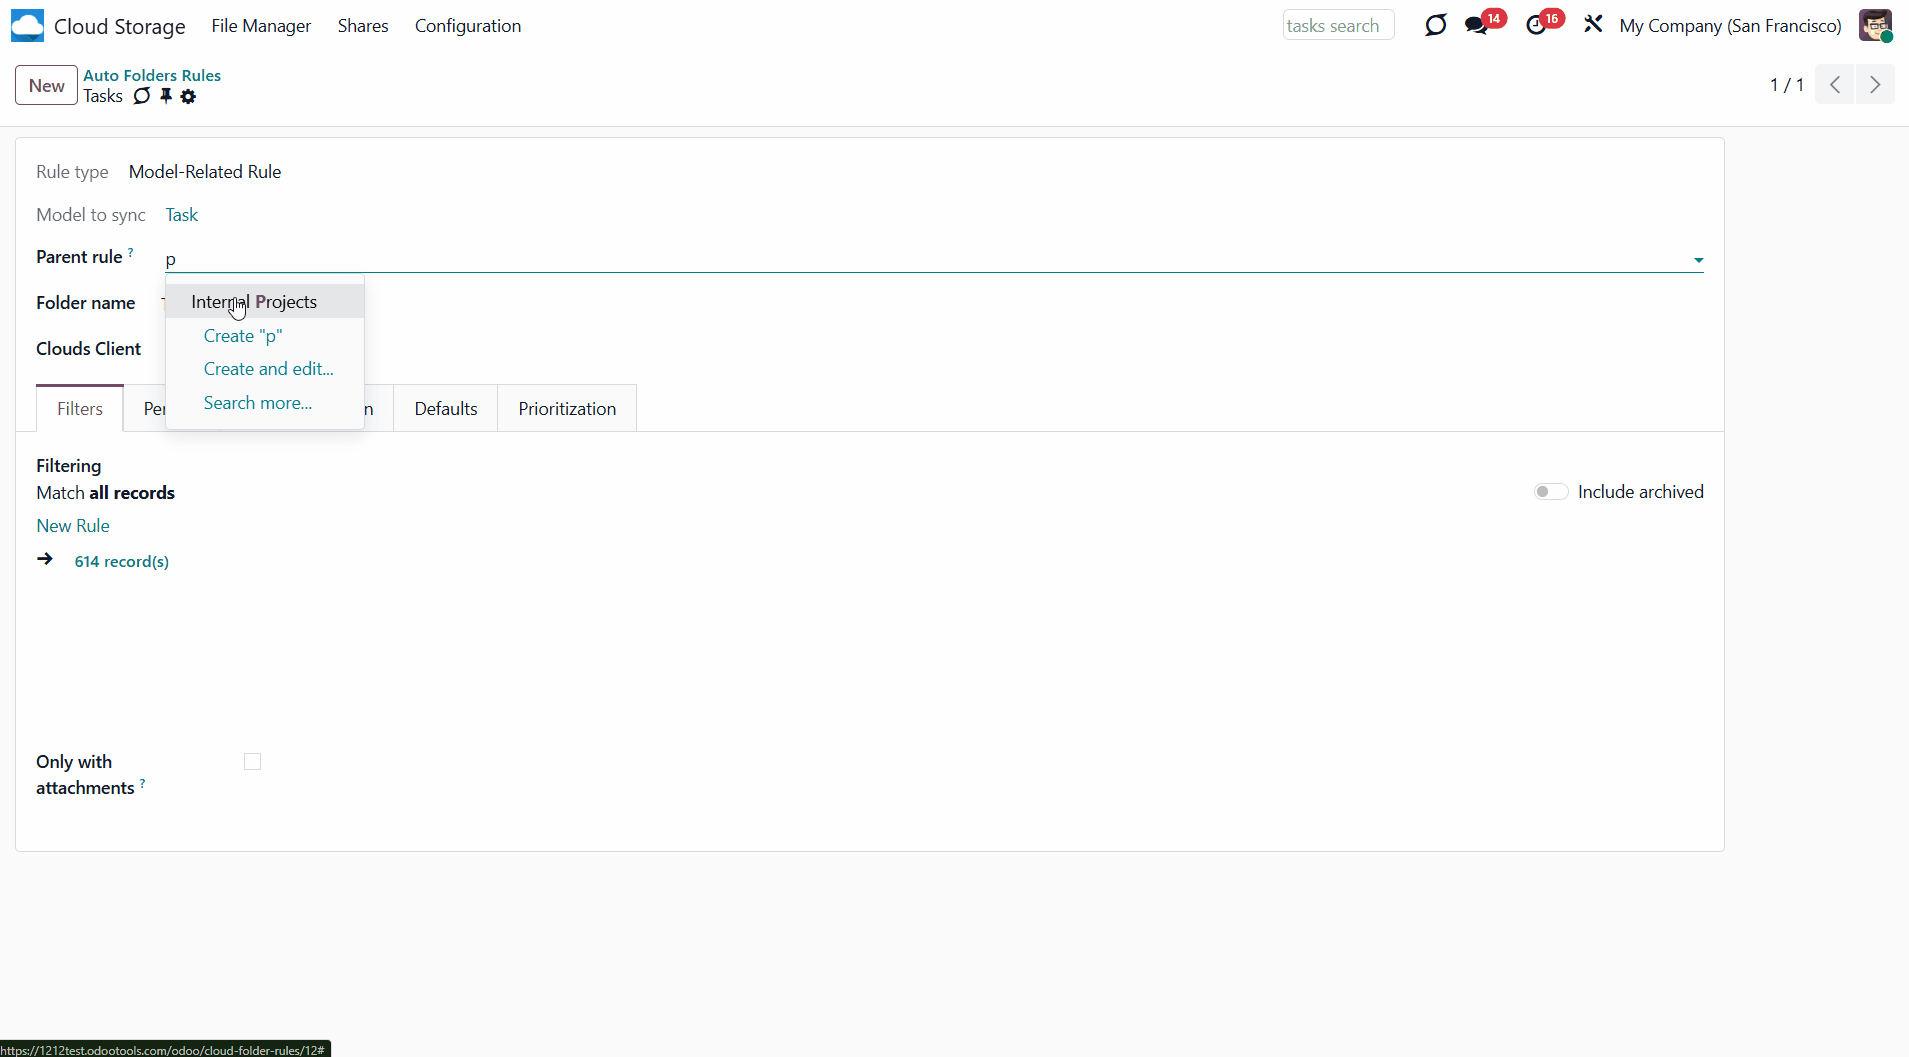
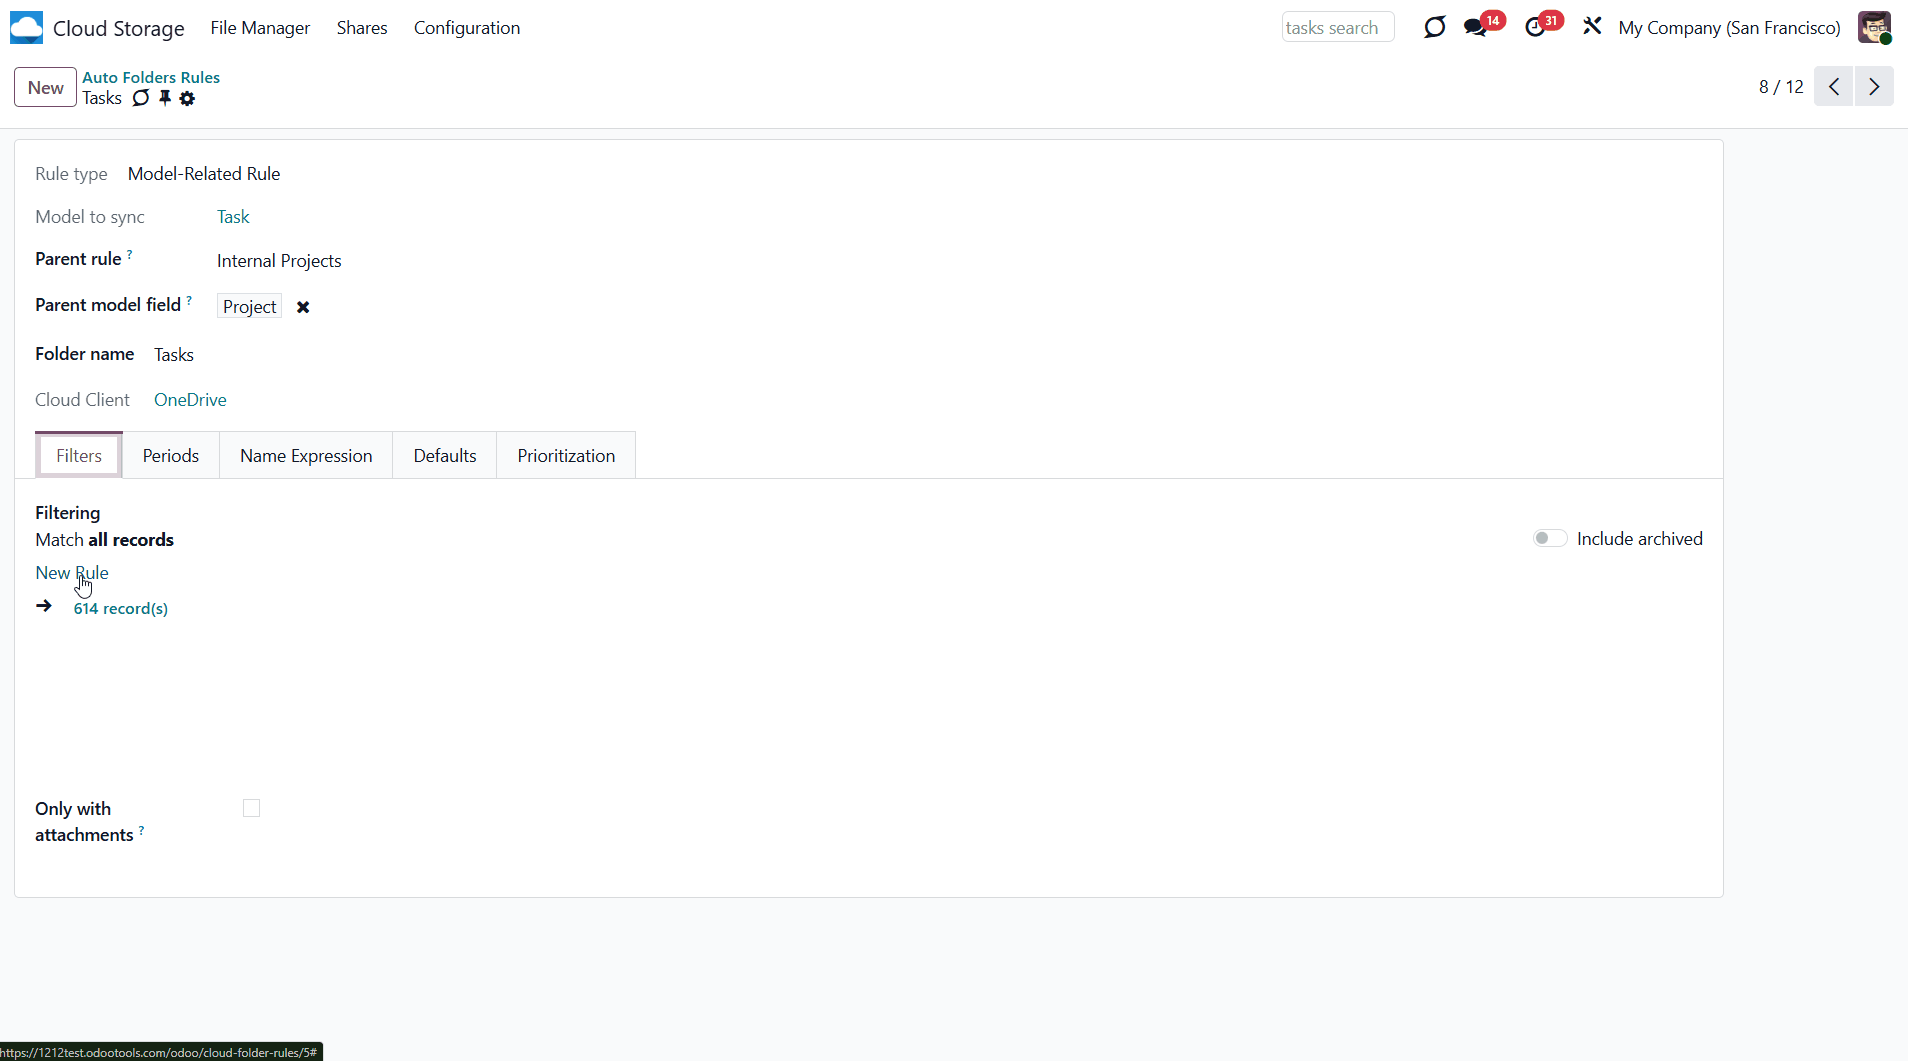
Let's create and assign a parent rule to the rule 'Tasks':
1. First, create a model-related folder rule, and choose 'Projects' as the 'Model to Sync'.
2. Start creating another model-related folder rule, choose 'Tasks' as the 'Model to Sync', choose the previously created folder rule 'Project' as a parent rule, and as the 'Parent Model Field' choose 'Project'.
As you create folder rules, the next scheduled job will reflect the structure in the Files Manager's Interface. For example, in the case above, the following structure will be generated: Project > Project XYZ...> Tasks > Task 1...
You can create a more complex structure by manually creating subfolders or adding default folders. For example, you have created folder rules 'Project' and 'Tasks'. Then, in the parent folder 'Project', you can add the manual subfolder 'Project managers' to store information or files related to the people responsible for the Project. To the 'Task' folder rule, add a default folder 'Documents to sign' containing the file 'Terms of agreement'. The folder will be created in all task folders, so you can share it with the client if necessary (see Default Folders).
The folder structure is also preserved in the objects' attachments boxes (see Attachments Box). Here you can view the object's folder hierarchy, switch between folders, and manually add folders. You can also see, upload, and manage attachments.
It isn't necessary to sync the entire folder structure to a cloud client. You can assign the client to specific folders. Keep in mind that the child folder cannot be synced to a different cloud client. Even if it has another one in its settings, it will be synced to the parent folder's client.
Filters & Periods
Create folders only for the specific objects of a particular model, and don't create any others to simplify access. For example, to have only the won opportunities folder or to divide sales orders by the salesperson or a particular period. Therefore, the app lets you limit the types of objects for which folders are created.
The list of the model's objects to sync can be limited by:
1. Filters
2. Periods.
With the help of filters, you can use any document-storable field to distinguish a directory. Have a separate folder for individuals and companies, for European and American opportunities, for quotations and confirmed orders, for each project, etc.
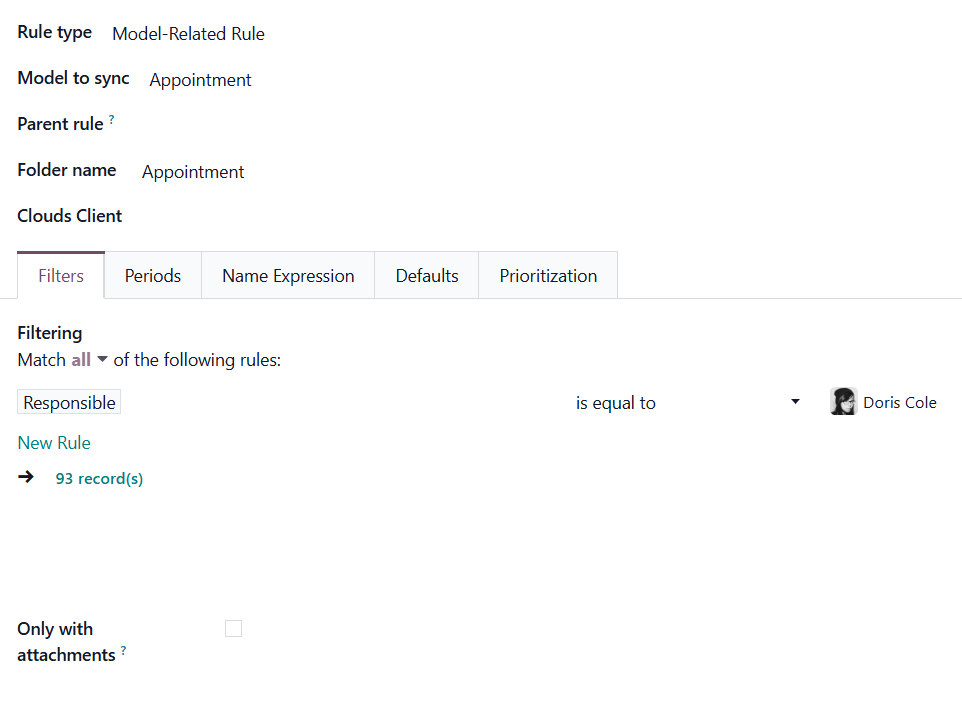
To add a filter:
1. Create a new folder rule or start editing an existing one
2. Click on the button 'New'
3. Set up the rule, for example, 'country contains US'
4. If any records match the filter, you will see their number on the right side (click on it to see the records to make sure the filter is correctly set)
5. Optionally, click on the 'New Rule' again to add one more rule, so only records that match 'ALL' or 'ANY' of the rules will be considered for sync.
Here are some useful examples of filters by models:
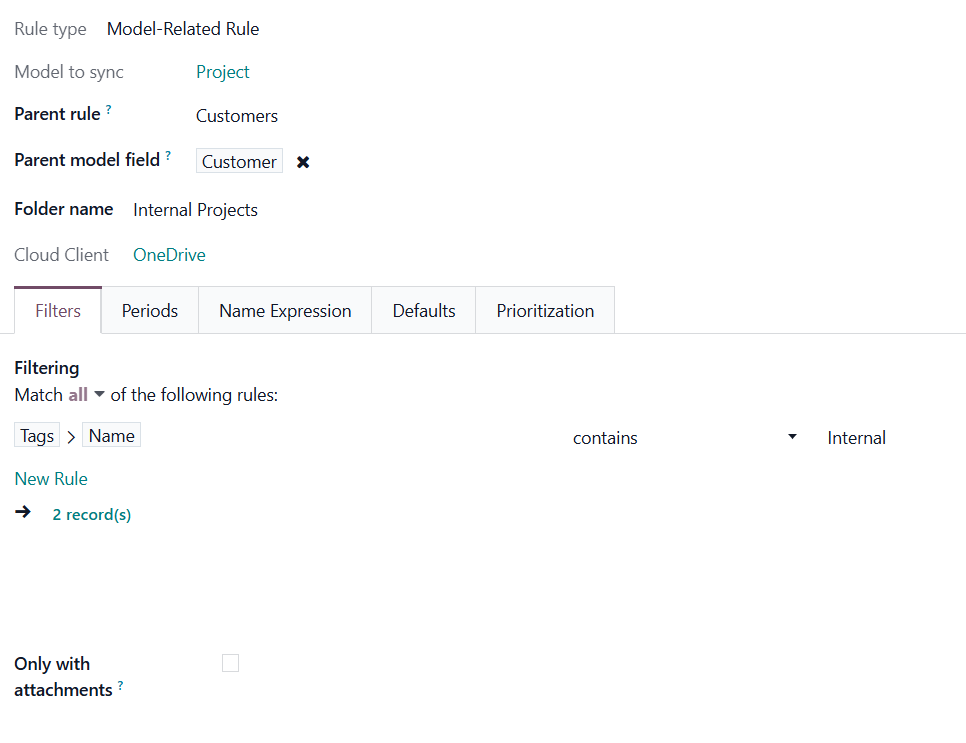
Generate folders for internal projects. To do so, add a tag 'Internal' to such projects and set up a filter Tags > Name contains Internal in the related folder rule.
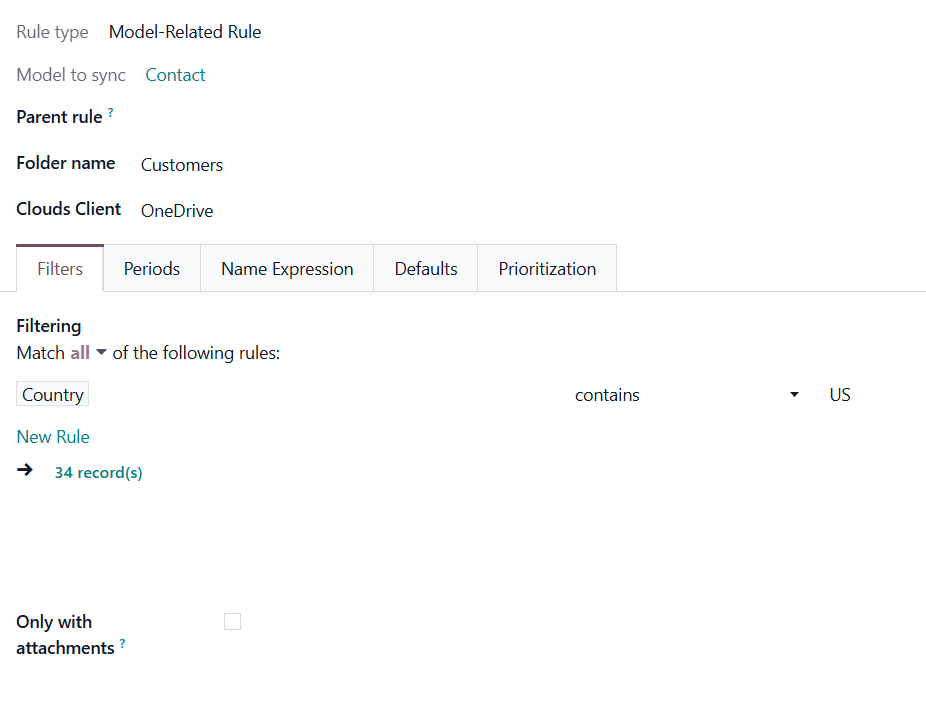
Generate folders for contacts of a particular country. For that, add a filter Country contains US.
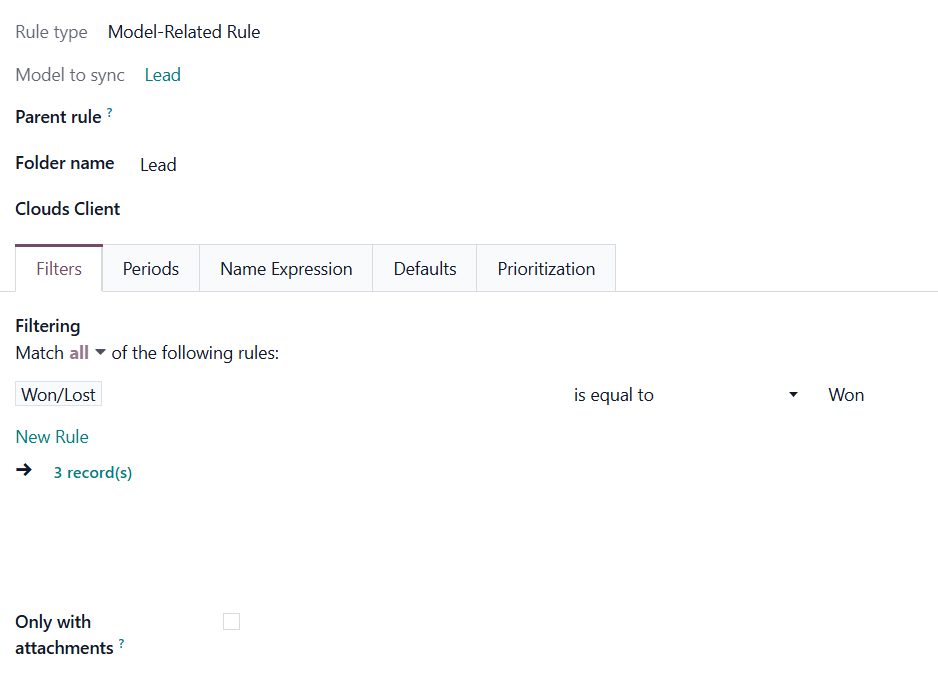
Generate folders for won leads. For that, add a filter Won/Lost is equal to Won.
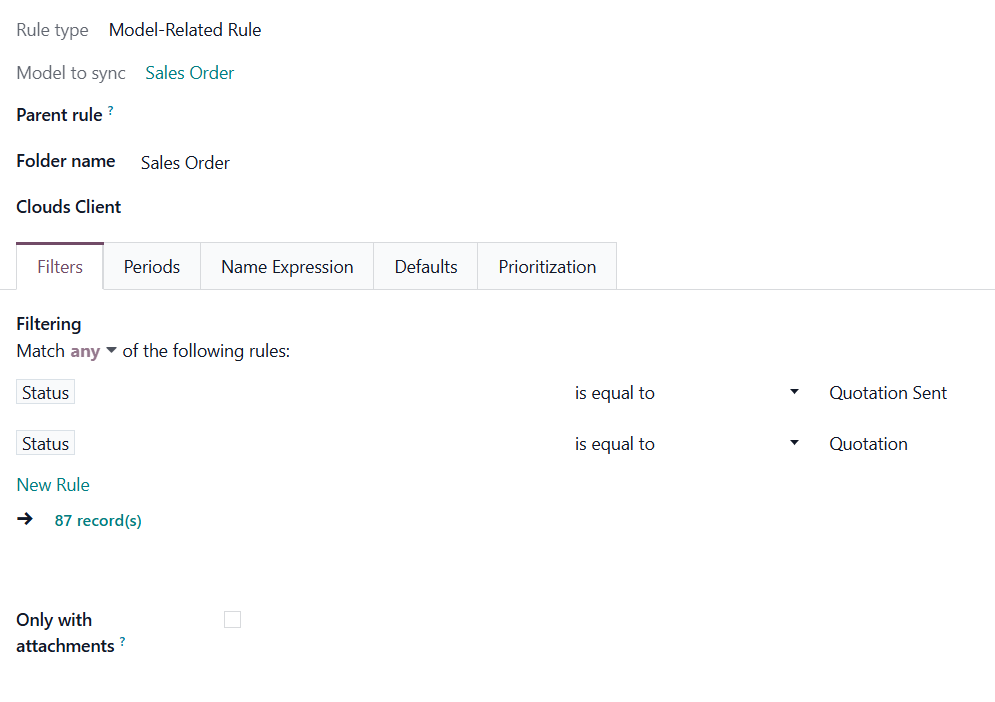
Generate folders for quotations. For that, add the filters: Status is equal to Quotation, Status is equal to Quotation Sent. Switch the filtering button to 'ANY'. Thus, if a record matches any of the filters, it will be considered by the rule.
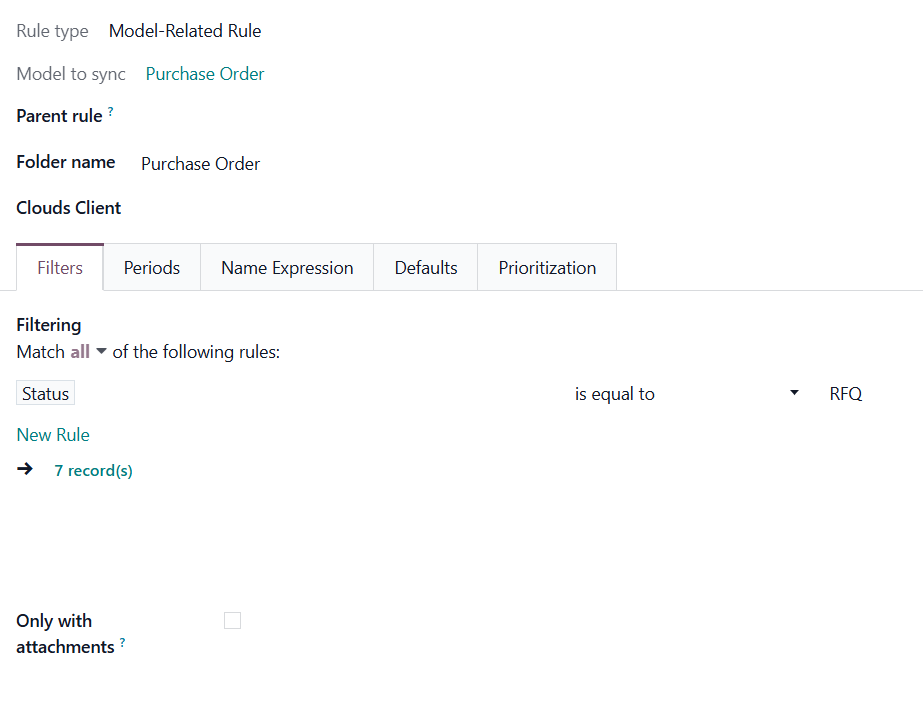
Generate folders for purchase orders with a particular status. For that, add a filter Status is equal to RFQ.
Generate folders for appointments of a particular responsible person. For that, add a filter Responsible is equal to Doris Cole.
Generate folders for articles with attachments. For that, enable the option 'Only with attachments'.

You can create as many auto folder rules as you want that refer to the same model. But try to make filters self-exclusive, so that a document is strictly distinguished. For instance, 'customer but not supplier', 'supplier but not customer'. Otherwise, a specific document folder will be added to the folder rule, with a smaller sequence number (such folder rules are higher in the list 'Auto Folders Rules'). For example, you have 2 Folder Rules: 'Sale Orders' and 'Cancelled Sale Orders'. The order S00001 was cancelled, and therefore, it meets the conditions of both. However, the folder rule 'Cancelled Sale Orders' has a smaller sequence because it was placed above 'Sale Orders'. Thus, the object S00001 will be added to the 'Cancelled Sale Orders' model.
It is also possible to limit the document folder list by relative periods by using the date fields of linked documents. For example, generate folders for only leads registered in the last three months or invoices updated in the previous week.
Periods are useful when you want to create a special folder for old objects or sync only the objects for a particular period. For example, you can create folders such as 'this year invoices', 'last year invoices', and 'archived invoices'. When a folder no longer matches any filters or periods, it will be removed from the Files Manager during the next folder refresh. If the folder has been synced before, the files will be returned to Odoo via the reverse sync.
To set the period of a folder rule:
1. Click on one of the folder rules or start creating a new one
2. Choose the tab 'Periods'
3. Click 'Add a line'
4. Choose the object's field, which will be considered to choose the object-related folders for sync
5. Choose to consider the next or the last period
6. Set interval and interval type
7. Tick the box 'Including current', to include the current period in the calculations (For example, today is 25/09/2020. For instance, in case 'last 2 months' is selected. If the box is not checked, Odoo would consider July and August. If checked, August and September.)
8. In the field 'Compared to', choose the option 'Today' if the set period should be calculated relative to today. Choose the option 'Past'/'Future' and set the period type and length in the fields 'Interval type' and 'Interval' to calculate the period relative to a particular moment in the past/future.
9. You can check the set periods below in the section 'If today, the periods would be...'
10. Optionally add some more periods.
Periods can be calculated relative to today (Current day), the past (Current day - compared period), and the future (Current day + Compared Period).
To calculate periods relative to today, when setting a folder rule period, choose the 'Today' option. For example, today is 03/09/2023, meaning the 'last 2 months' are July and August. The 'next 5 days' are 04/09-08/09/2023. The current period is also included if the 'Including current' flag is checked. For example, today is 03/09/2023, so the 'last 2 months', including the current, are August and September. The 'next 5 days', including the current, are 03/09 – 07/09/2023.
To calculate periods relative to the past, when you set a period for a folder rule, choose the 'Past' option. This way, we compare the set period not with the current day, but with the 'Current day' minus the 'Compared period'. It may be beneficial to keep older records in the cloud while having the most topical ones handy in Odoo. For example, you can set the period 'Created on in the last 5 years compared to the past 2 years'. For instance, if it is September 2023 and the option including current is ticked, then the objects created during the following period will be considered for the sync 01/01/2017 – 32/12/2021. If it isn't ticked, then 01/01/2016 – 32/12/2020. This way, when 2024 starts, the considered period will be changed to 01/01/2018 – 32/12/2022 or 01/01/2017 – 32/12/2021, respectively.
When the 'Future' option is selected, we compare the specified period to a future date. This way, we compare the set period not with the current day, but with the Current day + the Compared period. For example, you can set the period 'Expected Closing in the next 3 weeks compared to the future 2 weeks' to the folder rule 'Opportunities'. Then, if the option including current is ticked and today is 15th September 2023, the objects with expected closing in the following period will be considered for the sync 2023/09/18 – 2023/10/08. If it isn't ticked, then 2023/09/25 – 2023/10/15. As you set periods, folders for objects that match the periods are generated. If a cloud client is assigned to the folder rule, the folders with the attachments will be synced. Over time, as periods are calculated relative to the past, present, or future, particular objects may no longer match the period. Such objects are returned to the instance via the reversed sync. For example, we set the period for the folder rule 'Sales Orders' as 'Created on' in the last 2 months, including the current one. As of 15th September 2023, sales orders created in August and September are synced. When we create a new sale order, it is also synced, but its creation date is September. Then, in October, the sales orders created in August no longer fall within the set period; therefore, the related folders and files are returned to Odoo. Restrictions on periods are accumulated. If you added a few lines, then all period conditions should be satisfied. For example, the deadline should be within the last 2 months, AND the ending date should be within the previous year. However, if you added the same date field twice, the condition should satisfy ANY of those criteria. For example, the deadline should be within the last 2 months OR the next month, AND the end date should be within the previous year.
To ensure that the periods are correctly configured, please, consult the dynamic field 'If today, the periods would be...'.
Here are the results of the filters and periods' influence on folder rules:
1. If an object-related folder no longer relates to a folder rule after adding some filters or periods, then its folder will be archived. For example, you have a folder rule 'Contact' with the 'Country =US' filter, and the 40 records match this condition. Then, you were asked to change the country for one of the sales orders to Belgium, as the order needed to be sent directly to the partner's customer. This sales order no longer relates to the synced ones, as it does not match the filter. If the information related to the order folder has already been synced to the cloud client, it will be archived. The files will be returned to Odoo from the cloud client via reverse sync.
2. If an object didn't relate to a folder rule but later matched the conditions of one, then its folder will be created in the related directory. For example, we had a sales order with the country 'Belgium' and later changed it to 'US'. Thus, since it now matches the filter, the related-to-the-record folder will be generated in the Files Manager.
3. If you have two folder rules that relate to the same document (for example, Sale Order), then the object-related folder that relates to both of them will be added to the folder rule with the smaller sequence. For instance, we have folder rules 'Sale Orders' and 'Cancelled Sale Orders'. The order S00001 was cancelled, and therefore, it meets the conditions of both. However, the folder rule 'Cancelled Sale Orders' has a smaller sequence because it was placed above 'Sale Orders'. Thus, the object S00001 will be associated with the folder rule 'Cancelled Sale Orders'.
4. If an object matches the conditions of one folder rule and then matches the conditions of another one instead, then matches the conditions of one folder rule and then matches the conditions of another one instead, then the folder with files will be transferred to the correct directory with the next scheduled job. For example, we have folder rules 'Sale Orders' and 'Cancelled Sale Orders'. The folder rule 'Sale Orders' now has a complex filter 'Status = Quotation; Status =Quotation Sent; Status = Sales Order; Status =Locked', so all sales orders that aren't cancelled are included. One of the sale orders (S0003) was later cancelled. Thus, it matched the folder rule 'Cancelled Sale Orders' and was transferred to the related directory.
Using Filters and Periods will help minimize the resources spent refreshing folders and syncing (if you sync folders). It lets you focus only on the relevant objects.
Name Expressions
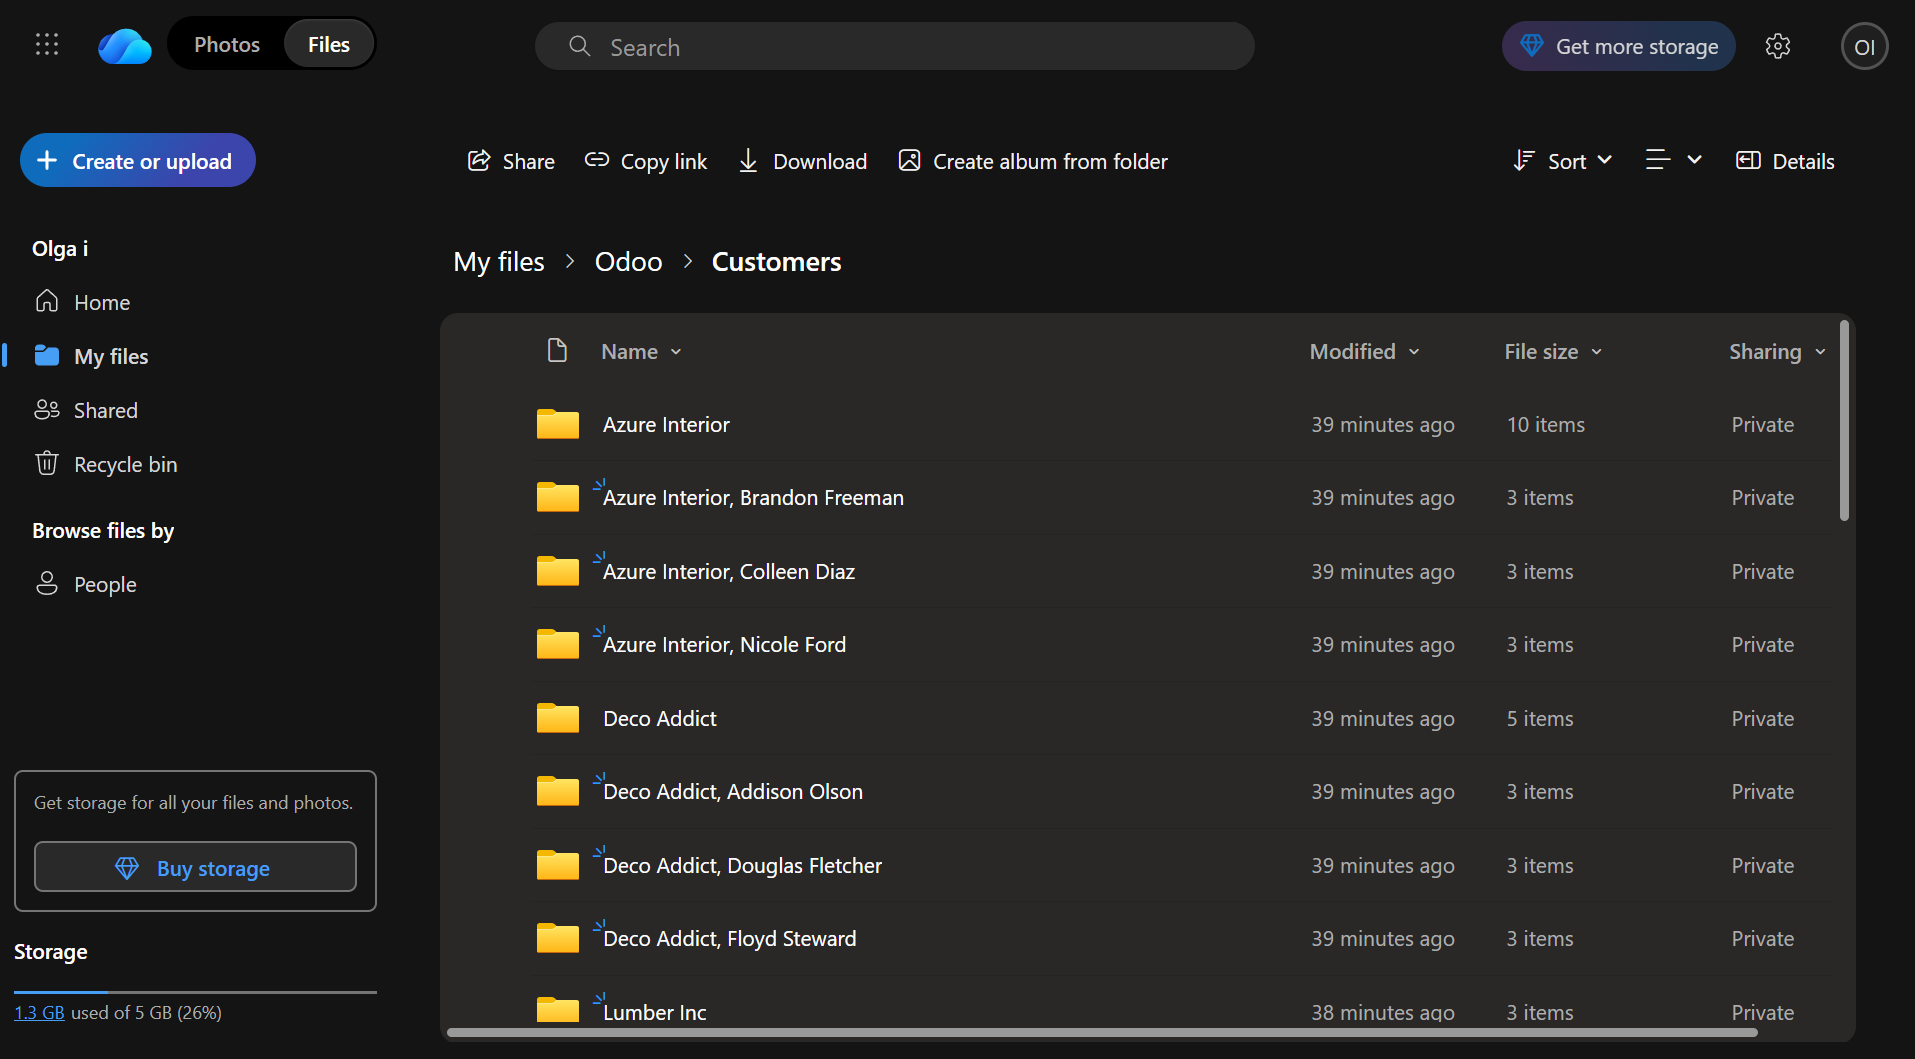
When folders are created, their titles are generated by default from the computed field Display Name (display_name). For example, the contact Anita Olivier will have the folder 'Azure Interior/Anita Olivier' generated. For different models, it may work differently. For Contacts with a company assigned, the company's name is added before the person's name. For example, the contact Addison Olson will have the folder Deco Addict, Addison Olson said, where 'Deco Addict' is the company she works for. But you can always change the way the names are generated.
If you want another logic for generating names for folders, then you can also use the value of object fields to develop them with the help of name expressions. This way, you can get the necessary information about an object without opening it. For example, if you create a folder rule 'Contact', you can add contacts' phone numbers to the folder's titles.
It is possible to define rules for folder names that include information from one or more fields. To that end, apply the special syntax (the same that is used in Odoo email templates).
To add an object's name:
1. Start creating a Folder rule or start editing an existing one
2. Open the tab Name Expression
3. Type the name using the syntax in the field 'Name Expression'.
An expression, created with the help of the syntax, starts and finishes with the double curly brackets {{}}. Everything that is not included in brackets will be written in the folder's name. For example, let's add a name expression to the Contacts table. Add the expression "Files of {{object.name}}, partner" in the field 'Name Expression'. After refreshing, the contact's folders will look like Files of Abigail Peterson, partner; Files of Anita Oliver, partner. The comma was also outside the brackets, so it will also be applied right after the parsed expression.
You can add a condition so that if the object has a particular field filled, the name will be taken from that field. The operator introduces the conditions 'and'. The field following the last 'and' will be used as a name if all the previous conditions are true. The action, which should be done otherwise, is introduced by the operator 'or'. For example, let's add the name expression "{{object.mobile and object.mobile or 'no mobile phone'}}" to Contacts. In this example, if a contact has a mobile phone, the field mobile phone should be used as the folder name. Otherwise, the information in the quotation marks will be used; in this case, there will be no phone. After refreshing, the contact's folders will look like -43454123453; no phone.
Avoid the following symbols in folders' and files' names: *, ?, ", ', :, <, >, /, +, %, !, @, \, /,. The folders refreshing will replace such symbols with '-'. It is done to avoid conflicts with file systems.
You can also create a complex expression containing information from several fields. In this case, each field should be written in separate curly brackets. Let's add a complex expression "{{object.name}} {{object.phone and object.phone or 'no phone'}}, {{object.mobile and object.mobile or 'no mobile'}}" to Contacts. In this complex expression, the first term represents an object's name, and the second and third are conditions that check whether the phone and mobile fields are filled. After refreshing the folders, the contact folders will look like this: Abigail Peterson 356745, no mobile; Anita Oliver no phone, -37854756231. Please pay attention to the fact that there isn't a comma after the name expression, so it wasn't added to the result.
If an expression is parsed successfully, the title of each object-related folder changes according to it.
If the expression cannot be parsed because of the syntax error, the standard сomputed field Display Name (display_name) will be used.
When a part of the title can be parsed, and the second one contains a condition, you should also add the operator 'or' to the condition to introduce what to write in the title if the condition is false. Otherwise, if the condition is not met, you will see 'False' in a folder's title.
You can change the syntax at any time, or revert to the default computed field Display Name.
If the folder name appears empty after rendering, the app will use the standard сomputed field Display Name to avoid folders without names.
Here are some useful examples of the names, created with the help of the syntax used in Odoo email templates:
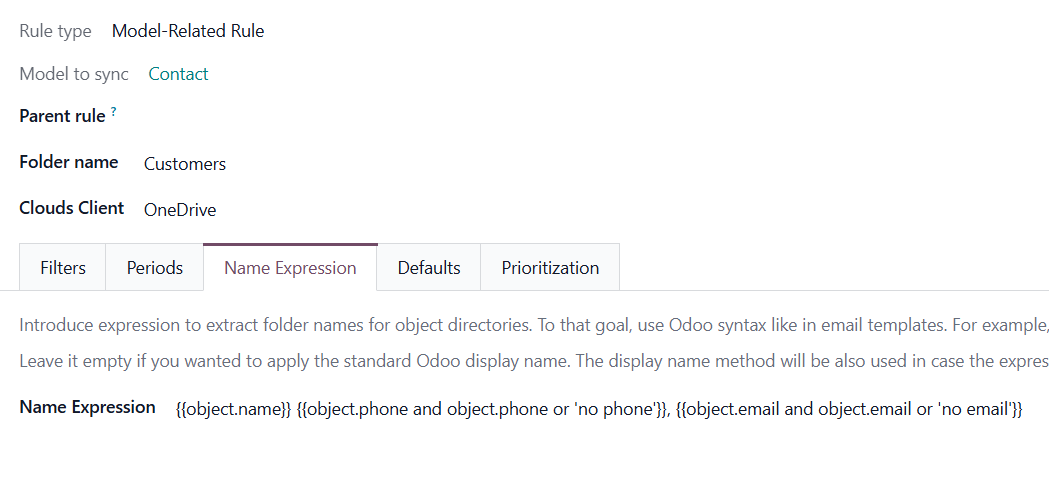
Name expression: {{object.name}} {{object.phone and object.phone or 'no phone'}}, {{object.email and object.email or 'no email'}}
Result examples: Anita Oliver, 34854325, anitao@test.com
Use this expression to include contact phone number and email in the folder's title.
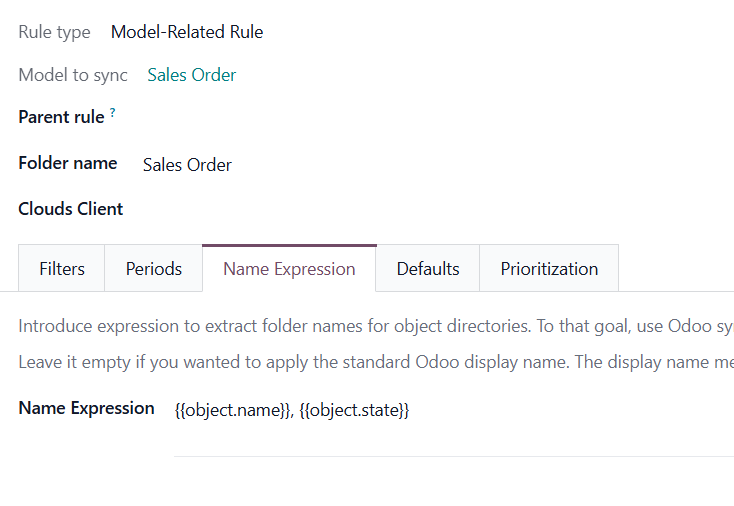
Name expression: {{object.name}}, {{object.state}}
Result examples: S03093, draft; S03094, sale
Use this expression to see the state of a sale order in the folder's title.
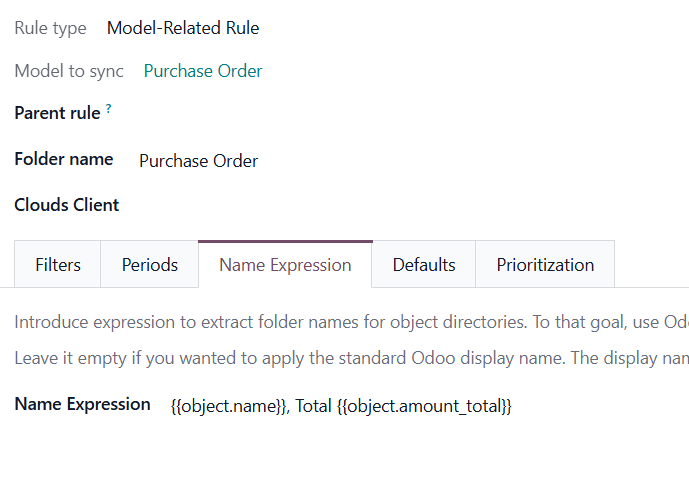
Name expression: {{object.name}}, Total {{object.amount_total}}
Result examples: P00001, Total 28700.0
Use this expression to see the total for a purchase order in the folder's title.
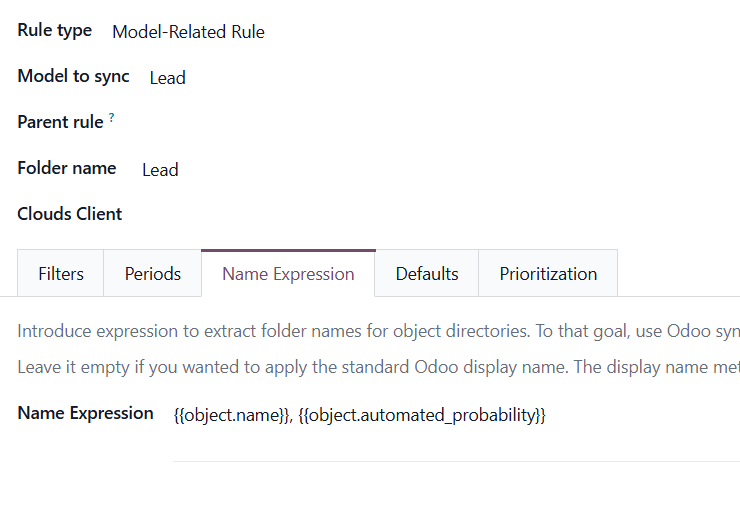
Name expression: {{object.name}}, {{object.automated_probability}}
Result examples: Table with chairs, 50.0
Use this expression to see the automated probability of a lead in the cloud client. The probability will change after sync as the lead will move in the pipeline.
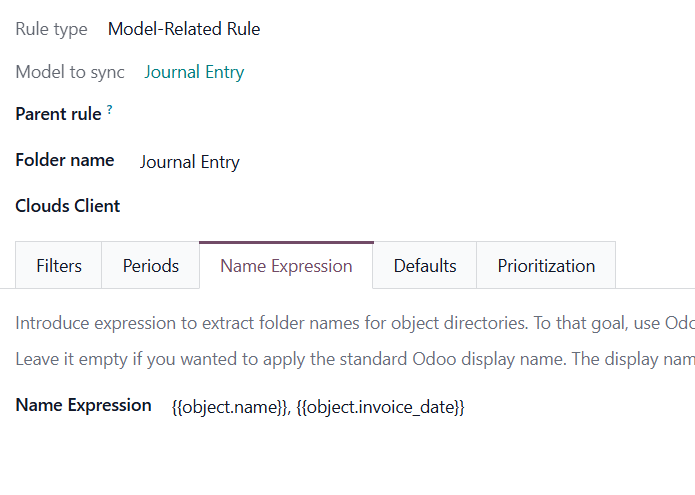
Name expression: {{object.name}}, {{object.invoice_date}}
Result examples: BILL-2018-09-0001, 2021-07-12
Use this expression to see the invoice date in the folder's title.
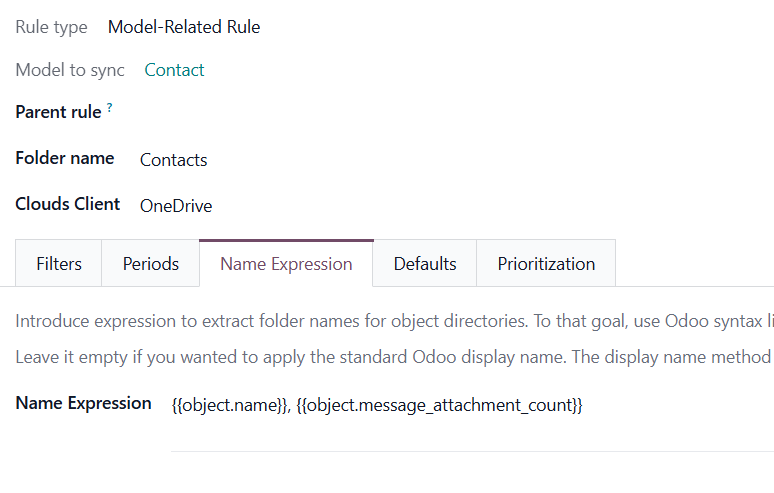
Name expression: {{object.name}}, {{object.message_attachment_count}}
Result examples: Abigail Peterson, 12
Use this expression to see how many attachments are in each object's folder without opening it. It can be used for any Folder rule.
Default folders
Default folders - manual folders with or without default attachments that would be auto-generated for a specific Odoo object folder, as soon as an object-related folder is created for the first time. Further folder refreshes will not generate default folders with default attachments.
This function creates the same folder structure in each object-related folder specified by the folder rule. For example, the folder rule based on the 'Sale Order' model was set. The default folder structure 'Documents to sign> Terms of agreement' was added. So, in the end, the structure will be 'Odoo > Sale Order > S00001, S0002... > Documents to sign> Terms of agreement'.
You can also add some files to any of the default folders, and when the first folders are refreshed, the folders with files will be added to all related objects. For example, you can create a default folder for employees with the documents for signing. Thus, when a new employee's card is made in Odoo, the next time the folders are refreshed, the default folder containing the files will be added to the related object's folder.
How to configure the default folder and attachment generation:
1. Start creating a folder rule and choose a model, or start editing an existing one if it hasn't been refreshed yet
2. Open the tab Default Folders
3. Click 'Create Root Subfolder'
4. Type the name of a folder
5. Optionally add some more folders
6. Optionally add some files by clicking on the button 'Upload Root File'
7. Move folders by drag&drop to change the hierarchy
8. Click on the folder with the right side of the mouse to create a folder inside the folder; to rename, edit, or delete it.
Prioritization of Folder Rule Checks
The module allows checking specific 'unimportant' folders less frequently, thereby prioritizing the checks of other folders. This way, users can ensure that their most crucial folders are checked regularly while less important folders are checked less frequently.
The prioritization is set separately for each folder rule. This way, you can enable it for some folder rules and turn it off for others. For example, check the folder rule 'Contacts' less frequently than the 'Leads/Opportunities' folder rule.
The frequency of checks is set in hours; however, you can also restrict monitoring for a very long period, with no limit on the number of hours.
To set the prioritization:
1. Start creating or editing a folder rule
2. Go to the tab 'Prioritization'
3. Enable the 'Restrict Monitoring' feature
4. In the field 'Do not check more frequently than once in?', set the number of hours to limit the frequency of checks.
When a folder is created, there are no restrictions initially. The pause time is applied immediately after the next check with the scheduled job 'Prepare Cloud Folders'. Any further changes to the monitoring settings will take effect only during the next check. For example, we set a 240-hour restriction on the folder on 1st April, which was applied within 15 minutes via the scheduled job 'Prepare Cloud Folders'. The next day, we decided to change the prioritization from 240 to 24 hours. After 240 hours, on 11th April, the folder was rechecked, and the new 24-hour restriction was applied. This way, the next check will be on 12th April.
The prioritization is calculated per folder; the module first checks the folder rule's prioritization. If no rule is assigned to a folder, the parent folder's rule is considered, and so on. It is important to note that the parent rule must not exceed the child rule, ensuring hierarchical structures are maintained within the folder management system.
For example, if a user has folder rules for 'Customers' and 'Projects' with a subfolder structure of 'Customers > Azure > Projects > Project 1', and the 'Customers' rule has a 2-hour restriction specified, then the 'Customers' and 'Azure' folders will be checked no more than once every 2 hours. Similarly, if the 'Projects' rule has a 4-hour restriction, then the 'Projects' and 'Project 1' folders will be checked every 4 hours, with the parent rule setting the limit for the child rule.

Sometimes, you may need to force the folders to check, especially if a long monitoring restriction was mistakenly assigned. In this case, the 'Clear next folders priority' button will be helpful.
Upon clicking this button, all connected folders, along with their child rules and subfolders, will be checked in the regular queue without any restrictions the next time the scheduled job 'Prepare cloud folders' takes place. This allows immediate implementation of any changes.
The button is useful when a long monitoring restriction is set, and it isn't possible to wait that long for the changes to take effect. By using the button, adjustments to monitoring restrictions can be applied without delay during the next check.
For example, we have a folder rule named Projects with a 100-hour monitoring restriction. We want to check the folder rule every 10 hours, and we cannot wait 100 hours for the new limitation to be applied. So, we changed the restriction to 10 hours and clicked the 'Clear next folders priority' button. This way, with the next scheduled job, 'prepare cloud folders ', the folder will be checked, and the new 10-hour monitoring restriction will be applied.
Due to the timeout, the operation may hang when there are many folders. In such cases, pressing the button again after a while is necessary.
Clicking on the button influences only the next check. After that, the blocking date will be recalculated based on the folder rule's prioritization settings.
Workspace-Related Rules
The add-on Cloud Sync for Enterprise Documents () introduces the possibility of generating folders for workspaces.
Workspace-Related Rule is a folder rule that syncs files from the Documents module and creates folders according to the workspace structure.
To force Odoo to prepare workspace-related directories, define folder rule(s) of the 'Workspace-Related rule' type. The tool would automatically create linked folders and sync them to the chosen cloud storage using one of the following scheduled jobs.
The folder rules for the workspace type are highlighted in blue in the folder rules menu.
To set a workspace-related automatic folder rule:
1. Go to Cloud Storage > Configuration > Folder Rules
2. Click 'New'
3. Choose the rule type as 'Workspace-Related Rule'
4. Choose the folder name. Avoid using the following symbols in folders' and files' names: *, ?, ", ', :, <, >, /, +, %, !, @, \, /. Upon saving the name, they will be replaced with '-'. It is done to avoid conflicts with file systems. The name should include fewer than 100 symbols
5. If there is more than one cloud client connected, then choose the one to which you want to sync the files, or leave the field empty if you don't want to sync the folder (see Synchronization Principles)
6. Optionally, limit the objects that should be synced by applying filters (see Filters & Periods).
It is not obligatory to reflect the whole DMS structure. Thus, it is possible to filter workspaces by any storable field. For example, add a folder for workspaces containing the keyword 'Internal'. The process of adding a filter to a Workspace-Related Rule is the same as that to a Model-Related Rule (see Filters &Periods).
For example, let's create a Workspace-Related Rule to sync only one's own documents. To do so, start by creating a folder rule, selecting the Workspace-Related Rule rule type, entering the folder name 'Documents', and choosing a cloud client, such as Google Drive. Then, click 'Add Filter' and set the filter 'Owner is in your_user'.
If a parent folder matches a filter, all its children will be added to the same rule.
Specific actions on workspaces and documents may yield different results depending on where the changes are introduced (in Odoo or a cloud client). Let's look at the most common ones.
The actions with workspaces in Odoo:
1. Adding a new workspace with the cloud client assigned.
If you add a new workspace and assign a cloud client, a related folder will be created in the cloud client with the next sync.
2. Renaming a workspace
If you rename a synced workspace, the related folder in the cloud client will also be renamed with the next sync.
3. Moving a workspace
If you move a synced workspace, for example, by changing the parent one, then the structure in the cloud client also changes accordingly with the next sync.
4. Deleting a workspace
If you delete a synced workspace in Odoo, it will also be deleted from the cloud with the next sync.
The actions with workspace-related folders in the cloud client:
1. Adding a new folder
If you create a folder in the cloud client, it is also added to Odoo as both a workspace folder and a folder in Files Manager. Files added to a workspace folder in the cloud client are also synced to Odoo. You can read more about the consequences of possible actions with folders and files in the article Synchronization Principles (see Synchronization Principles).
2. Renaming a folder
If you try to rename an object-related folder in the cloud client, the name will differ in Odoo and the Cloud until you rename the object in Odoo.
3. Moving a folder
If you move an object-related folder in the cloud client, the structure will differ between Odoo and the Documents module. The folder will not be restored to its previous location in the cloud, but it will remain synced.
4. Deleting a folder
If you delete an object-related folder from the cloud client, it will be recovered during the next sync, without its files. The broken links will remain in Odoo.
The actions with documents in Odoo:
1. Uploading a document
If you upload a document to a synced objects' folder, it will also be added to the corresponding folder in the cloud during the next sync.
2. Renaming a document
If you change the name of a synced document in Odoo, its name in the cloud client will be updated during the next sync.
3. Moving a document
If you move a document to another workspace in Odoo, it will be moved to the cloud during the next sync.
4. Deleting a document
If you delete a previously synced document from Odoo, it will also be deleted from the cloud with the next sync.
The actions with documents in the Cloud:
1. Uploading a document
If you upload a document to a synced folder in the cloud client, it will also be uploaded to the corresponding folder in Odoo during the next sync.
2. Renaming a document
If you rename a synced document in the cloud, it will be renamed in Odoo during the next sync.
3. Moving a document
If you move a synced document to another workspace in the cloud, it will be moved in Odoo accordingly with the next sync.
4. Deleting a document
If you delete a synced document from the cloud client, it will also be deleted from Odoo with the next sync.
Examples of Complex Structures
Here, you will find some possible structures that you can create in your Odoo instance:
To achieve the structure, first, create a folder rule called 'Contacts' and choose 'Contacts' as a 'Model to sync.'
After that you need to create a folder rule 'Projects' and choose 'Project' in the field 'Model to sync'. Then, choose the previously created parent rule 'Contacts', and as the parent model field, choose 'Customer.
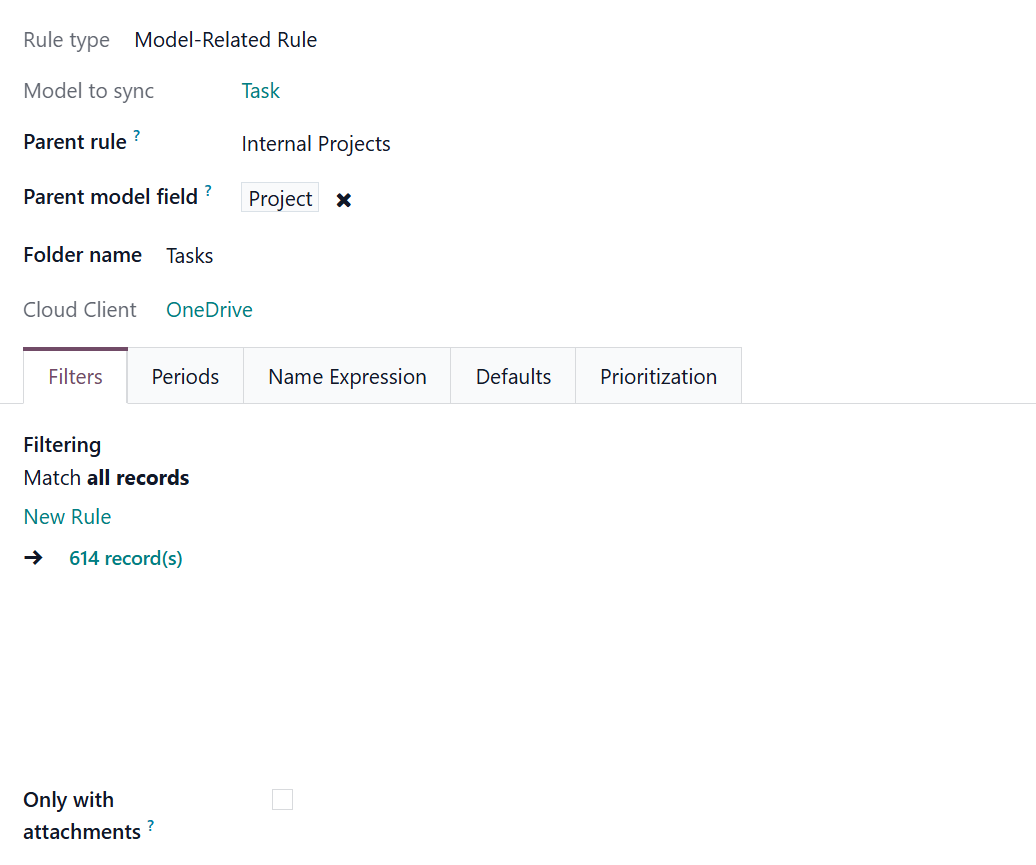
Finally, create a folder rule 'Tasks'. As a parent rule, choose 'Projects,' and as a parent model field, choose 'Project.'
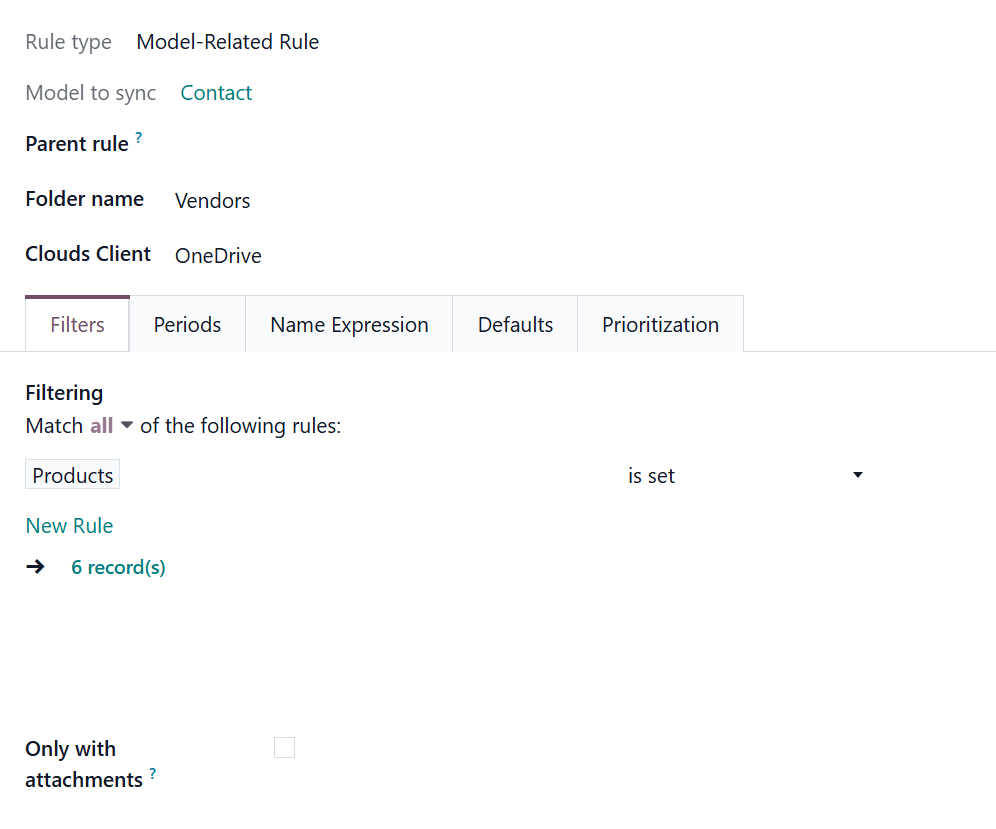
To achieve the structure, first, you need to create a folder rule 'Vendors' and choose 'Contacts' as a 'Model to sync'. Then, you need to add a filter so that only contacts with products are considered Vendors: Products is set.

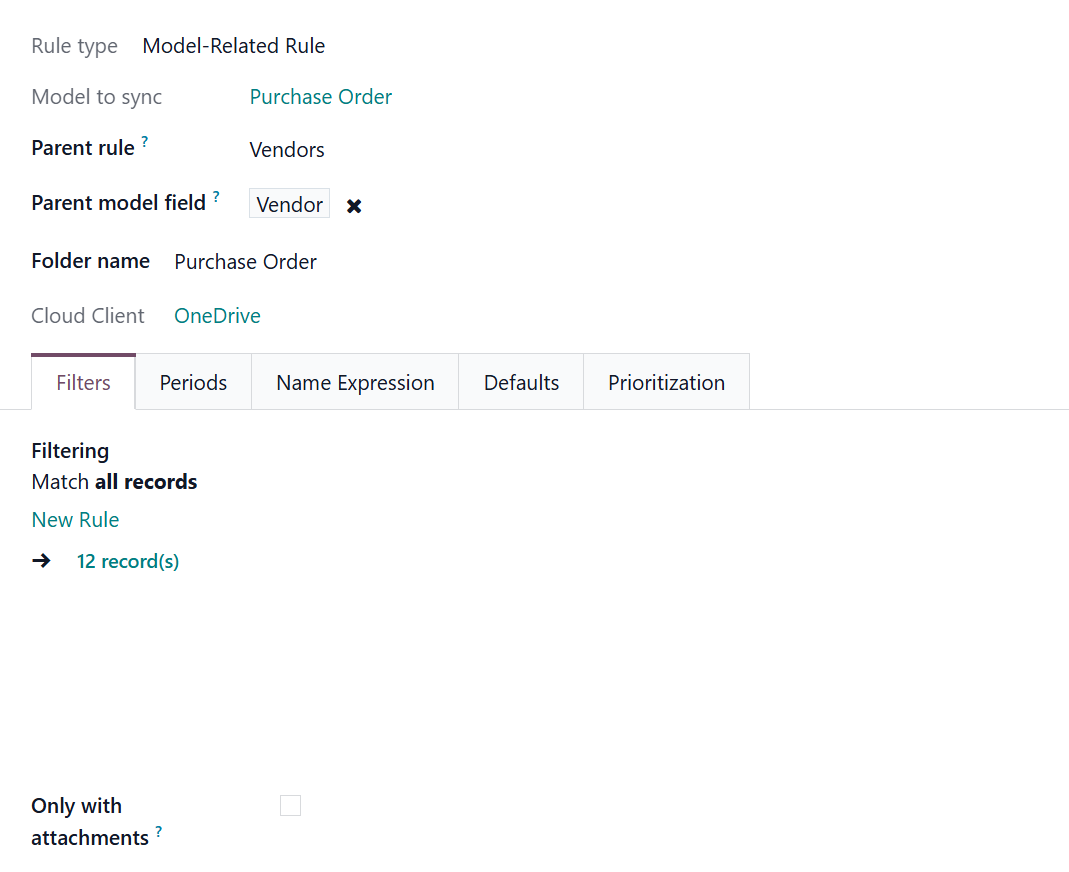
After that, you need to create a folder rule 'Purchase Order' and choose 'Purchase Order' in the field 'Model to sync'. Then, choose the previously created parent rule 'Vendors' and choose 'Vendor' as the parent model field.
In order to achieve the structure, firstly, you need to create a folder rule 'Vendors' and choose 'Contacts' as a 'Model to sync'. Then, you need to add a filter, so only contacts with products, would be considered as Vendors: Products is set.
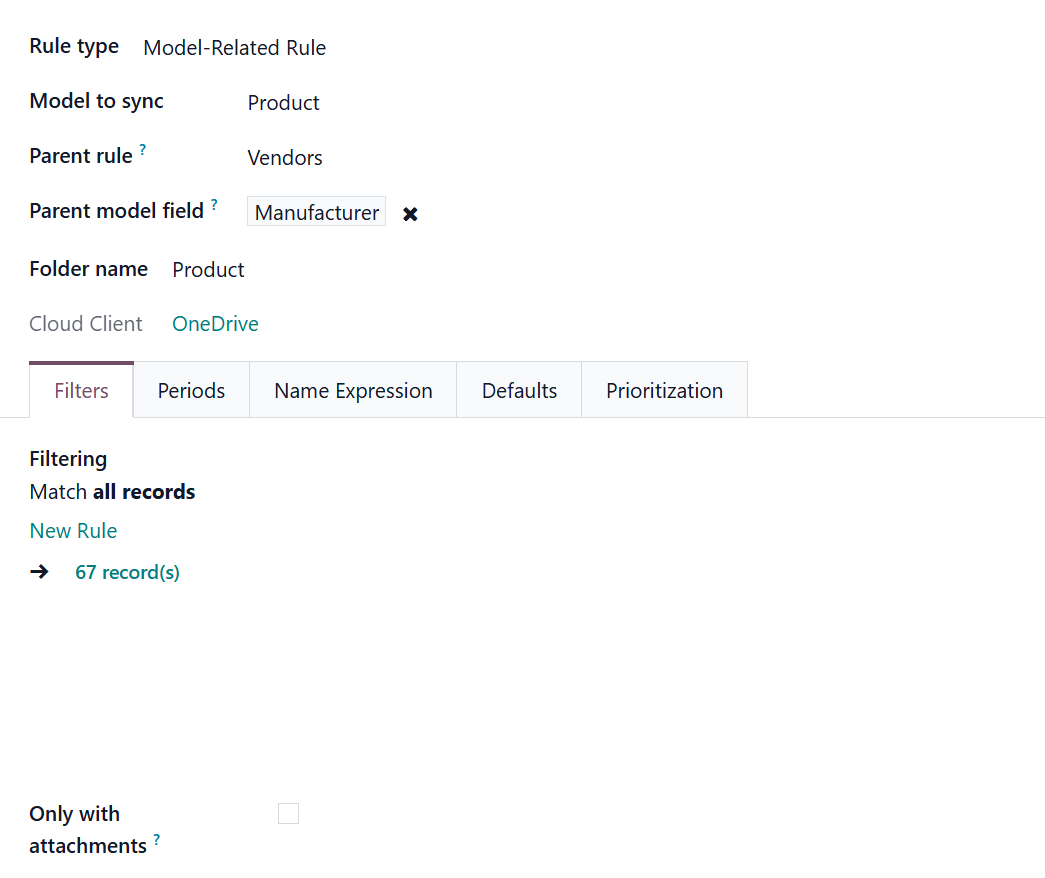
After that, you need to create a folder rule 'Products' and choose 'Product' in the field 'Model to sync'. Then, choose the previously created parent rule 'Vendors'. Here, we also need a parent model field of the many2one type, but there isn't such a field on the product template. So, we used the module Custom Fields for products and created a field 'Manufacturer'. In this case, we can add 'Manufacturer' as the parent model field.
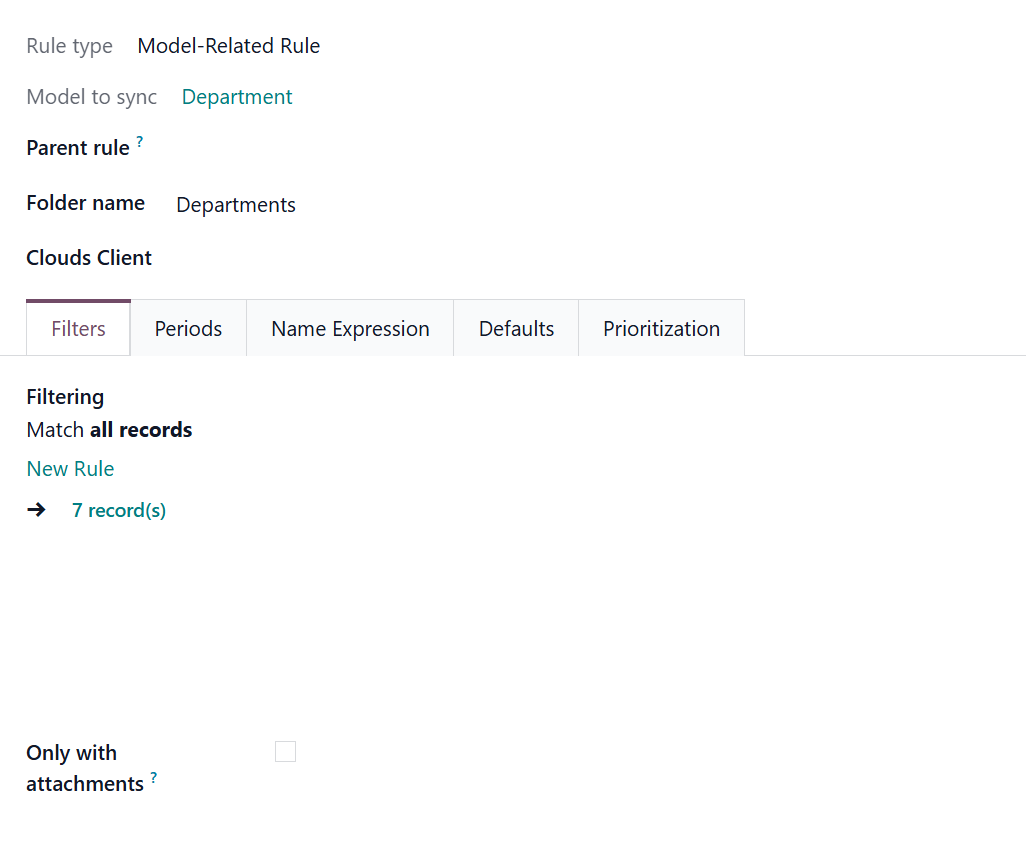
To achieve the structure, first create a folder rule called 'Departments' and choose 'Department' as a 'Model to sync'.
After that, you need to create a folder rule 'Employees' and choose 'Employee' in the field 'Model to sync'. Then, choose the previously created parent rule 'Departments' and choose 'Department' as the parent model field.
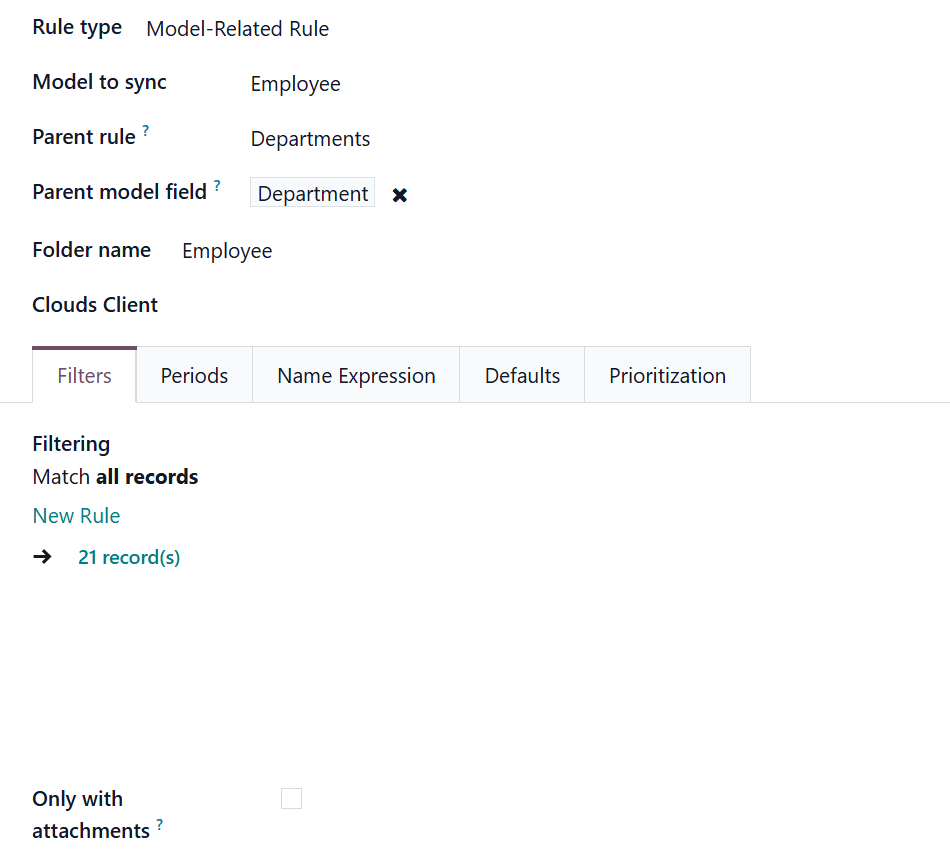
To achieve the structure, first, create a folder rule called 'Sales Team' and choose 'Sales Team' as a 'Model to sync.'
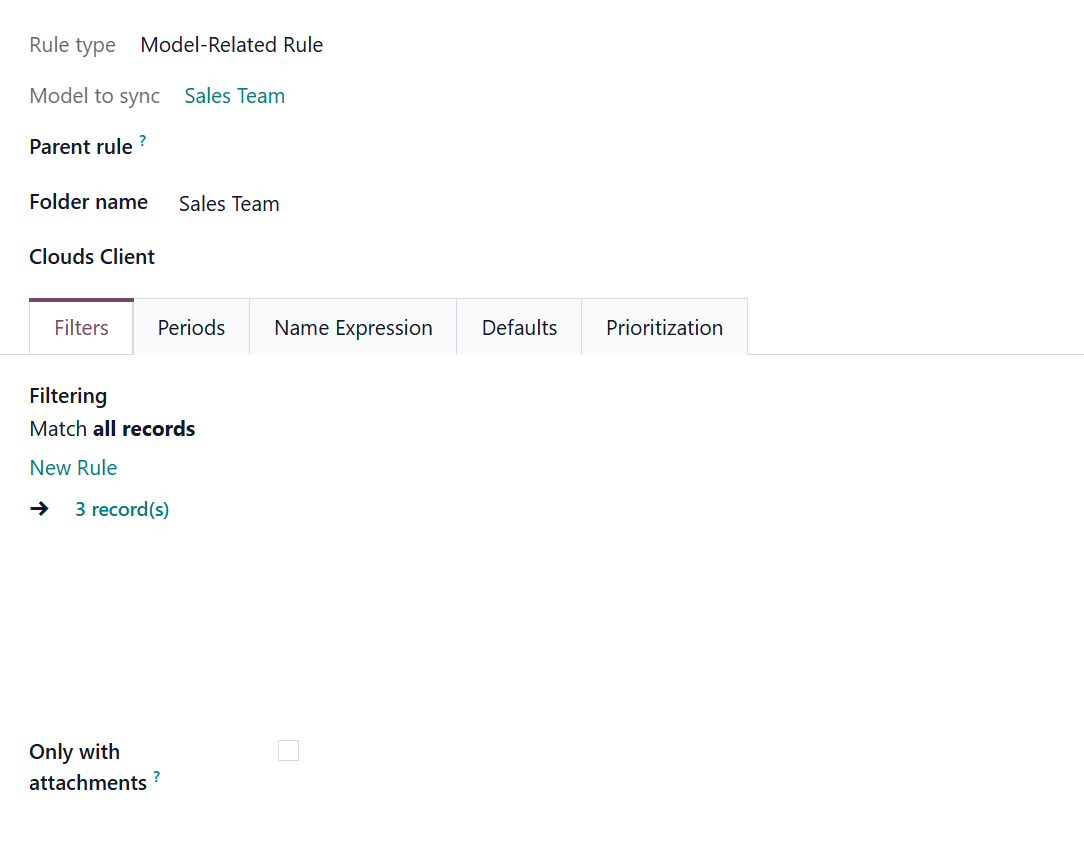
After that, you need to create a folder rule 'Lead' and choose 'Lead' in the field 'Model to sync'. Then, choose the previously created parent rule 'Sales Team' and choose 'Sales Team' as the parent model field.
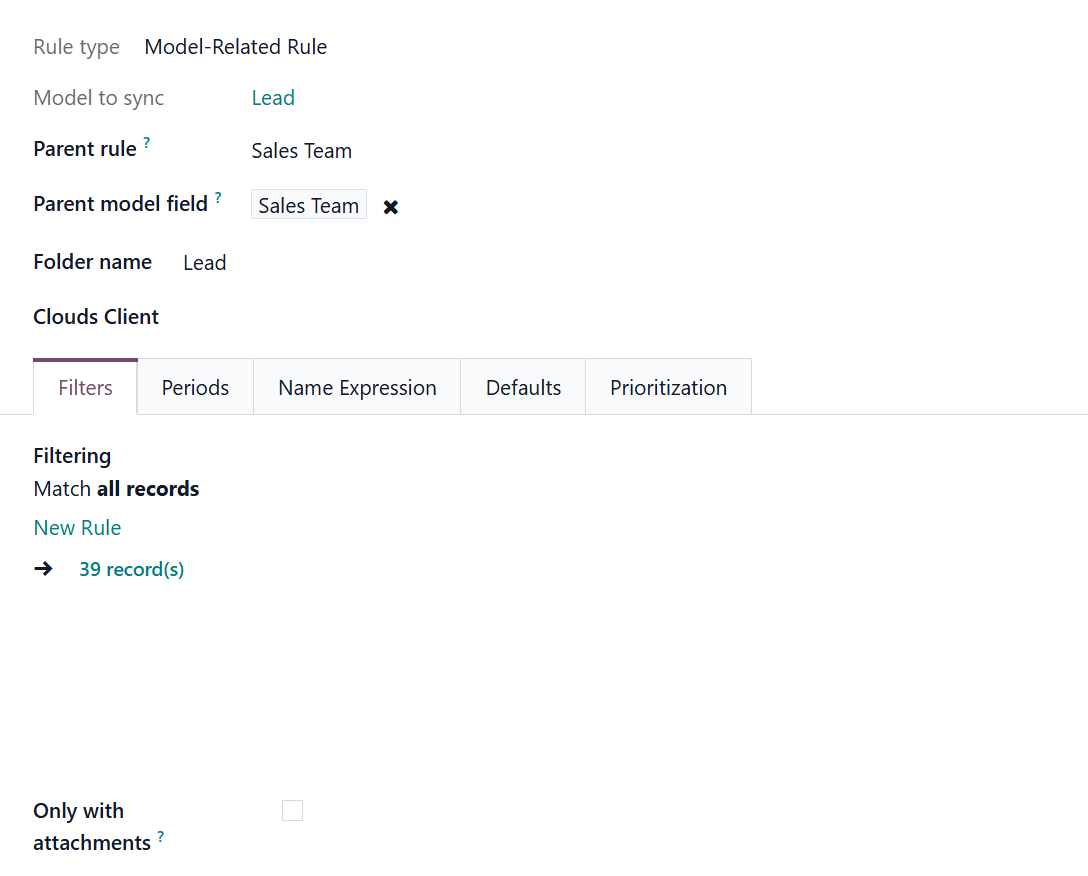
To achieve the structure, first, create a folder rule called 'Contacts' and choose 'Contacts' as a 'Model to sync'.
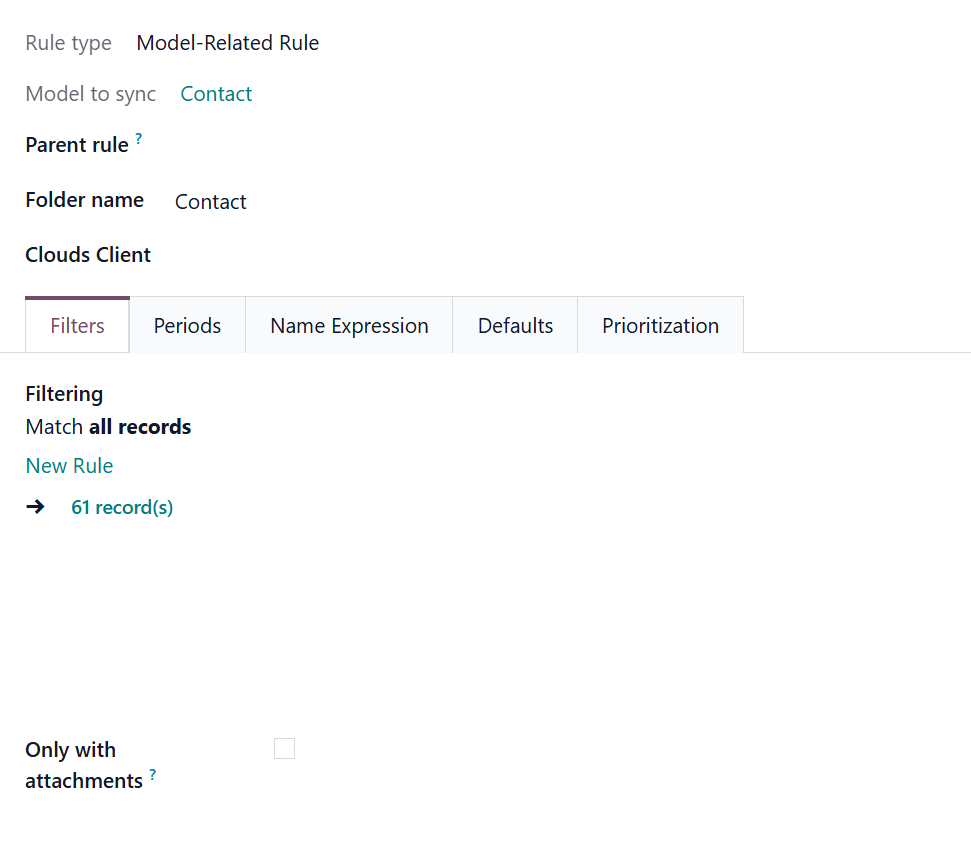
After that, you need to create a folder rule 'Sale Orders' and choose 'Sale Order' in the field 'Model to sync'. Then, choose the previously created parent rule 'Contacts' and choose 'Customer' as the parent model field.

Finally, create a folder rule for Universal Appointments. In the field 'Model to sync,' choose 'Appointments'. Then, as a parent rule, choose 'Sale Orders', and as a parent model field choose 'Sale Order'.
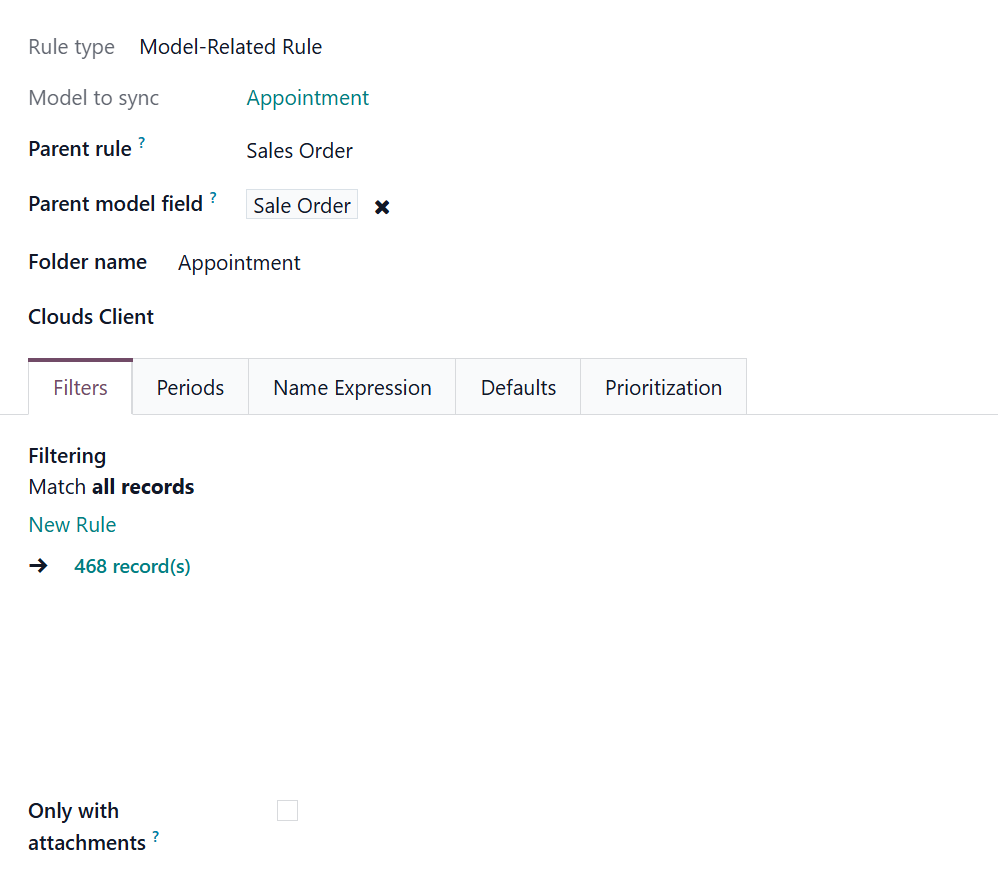
Synchronization Principles
Synchronization is fully automatic, and after setup, no manual actions are required. Just create some folder rules and configure a cloud client. Synchronization is a schedule-based process, so a particular time is required for the changes to be applied.
The connector works on a queue (first-in, first-out) principle. First, the application scans all folders. Based on these changes, the application creates a task queue. Then, the tasks are processed. Each sync, especially the very first one, might take quite a long time.
Synchronization doesn't occur in real time to avoid performance issues and functionality problems.
Synchronization is bilateral, meaning it occurs in both directions: from Odoo to the cloud client and back. Both types of sync work within a single process, and each serves a specific purpose.
If Odoo is unable to complete a task (for example, sending a file or folder), it will retry it after a period of time. The module will make several attempts. The time between attempts increases exponentially (the first attempt will be in 30, the second in 60…), but does not exceed 24 hours. If the task fails after the last attempt, it will not be attempted again to avoid excessive platform resource consumption.
It is possible to set the maximum number of attempts that the module will make to complete failed tasks. For that:
1. Open the Cloud Storage menu, and go to Configuration > Configuration
2. Find the section 'Settings'
3. In the field, Maximum Retries defines how many times a failed task should be retried
4. In the field Maximum Retries (Reverse and Move tasks), define how many times failed reverse and move tasks should be retried.
The number of failed task processing for reverse & move tasks is set separately, as these tasks can block other tasks and lead to longer wait times if not fulfilled. In cases where blocking reverse or move tasks cannot be fulfilled (e.g., related folders/files manually deleted in the cloud), users can set a lower number of attempts on the configuration page to cancel these tasks sooner. These changes will be applied during the next attempt. If the new number of attempts is lower than the current number of attempts for failed tasks, those tasks will be canceled.
If there are any active tasks, the application runs them before scanning the folders. The application searches for the oldest folder, if any.
The module typically operates on a FIFO basis, meaning it reflects the oldest changes first. First, folders that haven't synced for the longest time are checked, then those synced recently. Some prioritized operations may reorder tasks.
The module's sync logs enable real-time tracking of the queue, task creation, and operational fulfillment.
Synchronization is a two-way process, meaning it occurs in both directions: from Odoo to the cloud client and from the cloud back to Odoo. For example, if you add an attachment to the attachments box of a synced sale order S00345, then it will be sent during the next synchronization. If you add an attachment to a cloud client folder, it will be added to the related folder in the Odoo Files Manager, depending on the following job.
Direct synchronization:
1. Creates a Files Manager's folder structure in the cloud client
2. Uploads all the attachments of created folders from Odoo to the object-related folders within the special root folder 'Odoo'
3. Makes all synced Odoo attachments change their type to a link (URL), while binary content is removed with the next Odoo cleaner. No actual files would be stored on your Odoo server.
Binary content is stored in clouds, while Odoo provides direct access to synced items.
4. Checks whether a new folder for sync is added/renamed/archived. If so, the changes will be reflected in the Cloud
5. Checks whether attachments are added or deleted for synced folders. If so, they would be created or removed from the cloud client.
Backward sync:
1. Checks whether any items are added to a cloud client document folder. If so, the app would create URL attachments for those items in the Files Manager folder and, if any, the related object's attachments box
2. Checks whether any item is renamed in the cloud client. If so, a chained Odoo attachment should also be renamed
3. Checks whether any items are deleted/moved to a cloud document folder. If so, a linked Odoo attachment will also be unlinked or moved.
Another type of synchronization, reverse sync, was introduced to allow changing a cloud client or switching between them, or resetting the sync. It helps to:
1. Return previously synced files back to Odoo and delete them from the Cloud
2. Move files from one cloud client to another.
The types of files that should be synced directly can be limited. For example, don't sync .png pictures or .pdf files. For that, go to Cloud Storage >Configuration >Configuration. Find the field 'Non synced mimetypes' and enter comma-separated mimetypes without spaces that should not be synced. For example, "application/pdf, image/png".
If you choose not to sync a particular file type and then add it to the cloud client, the file will also be added to Odoo with the next sync, as the limitation doesn't affect backward sync.
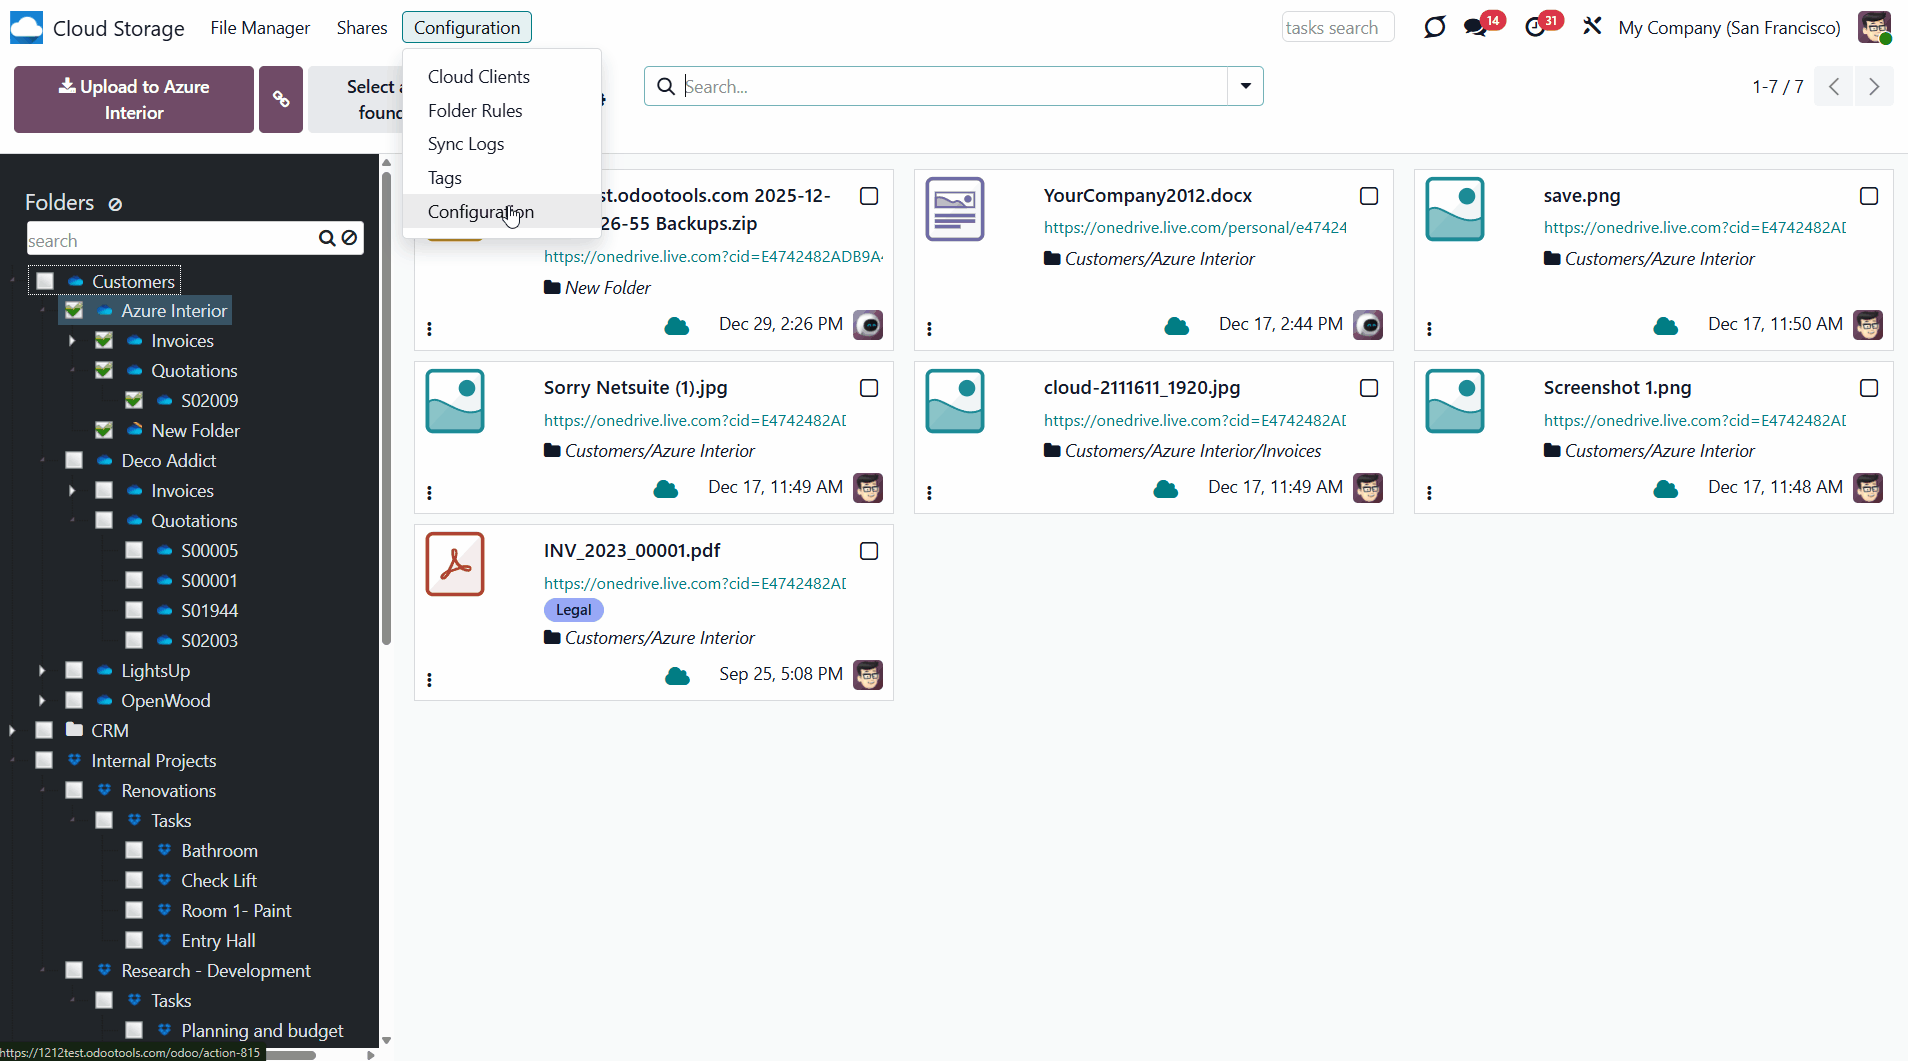
Note that if you disregard this setting, the following mime types will not be synced: "text/html," "text/css," "text/javascript," "application/javascript," "text/XML," "application/XML," and “odoo.spreadsheet.” Moreover, zero-size attachments and attachments that start with '/' will also not be taken into account.
Make sure you use the correct extension name. Odoo recognizes applications in its own way (with an intuitive extension). For example, 'pdf' is recognized as 'application/pdf', and the extension .mepx is recognized as application/zip. To check the extension of uploaded attachments:
1. Turn on the developer mode
2. Open the technical menu 'Attachments'
3. Click on any attachment
4. Check the extension of the file in the line 'Mime type'.
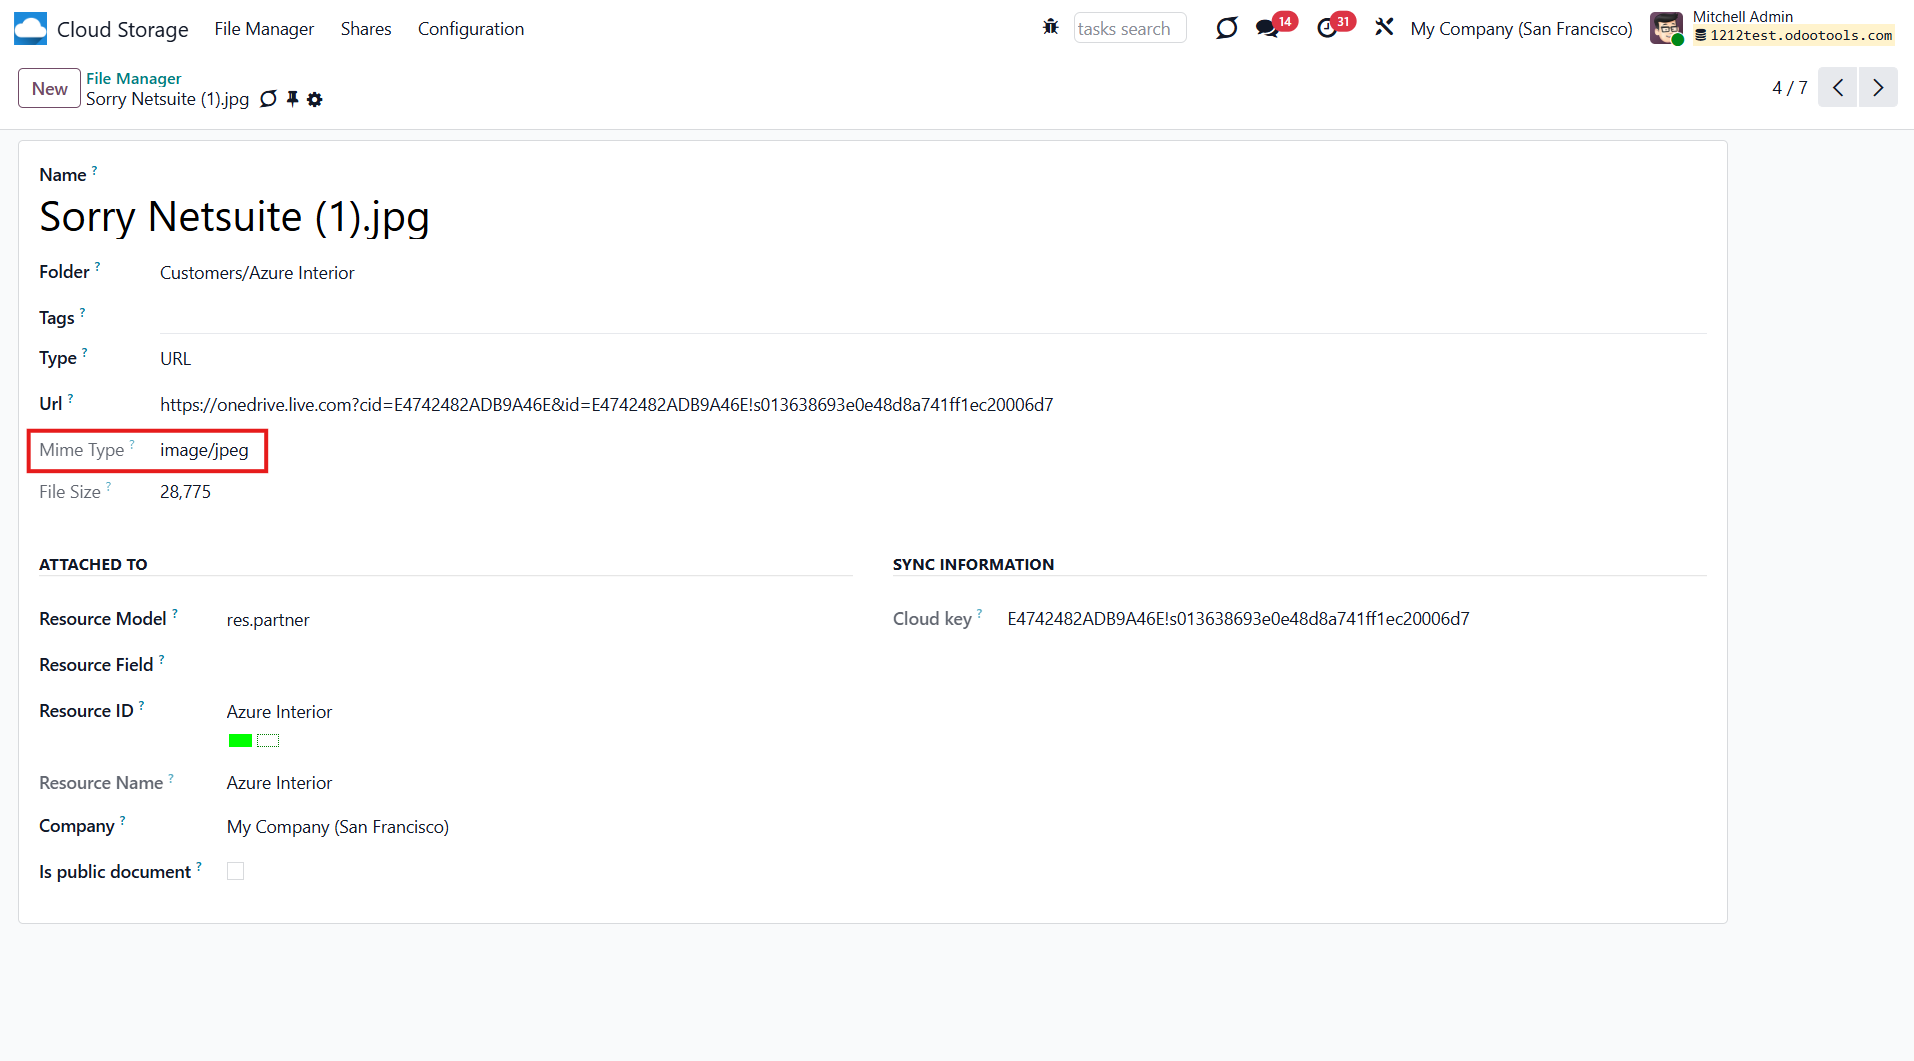
The tool relies on a single-user endpoint, meaning all sync processes are handled by a single cloud admin (app). Access rights for created folders/files are not automated. You should administer those rights in your cloud client.
The module doesn't provide the functionality to manage access rights to the synced files. You should administrate those rights in your cloud client.
Synchronization of Enterprise Documents has its own specific. Therefore, the special add-on 'Solutions for Enterprise Documents' is required. To sync files from Enterprise Documents, as you create a folder's rule, in the field 'Rule related type', you should choose the option 'Workspace related rule' and finish the setup as usual (see Workspace-Related Rules).
Folders Sync
As soon as folders appear, the same ones are created in the cloud client during the next sync. All folders are made inside the root folder 'Odoo'. The folder rule's folders serve as storage for object-related folders. Each Odoo folder will have its cloud folder. For example, Odoo > Customers > Azure Interior > files and folders related to the object.
Changes applied to a folder in Odoo take priority over those used in the cloud client.
The results of your actions will differ depending on where the changes are introduced (in Odoo or in a cloud client).
Let's look at the actions applied by Odoo and their consequences:
1. Create a folder to sync
If a cloud client is assigned to a folder via the folder's settings or a folder rule, the folder will be synced. For example, we created a folder rule 'Customers', and the related folders were generated in the Files Manager. As we assigned the cloud client 'Google Drive' to the folder rule, those folders were synced to the cloud.
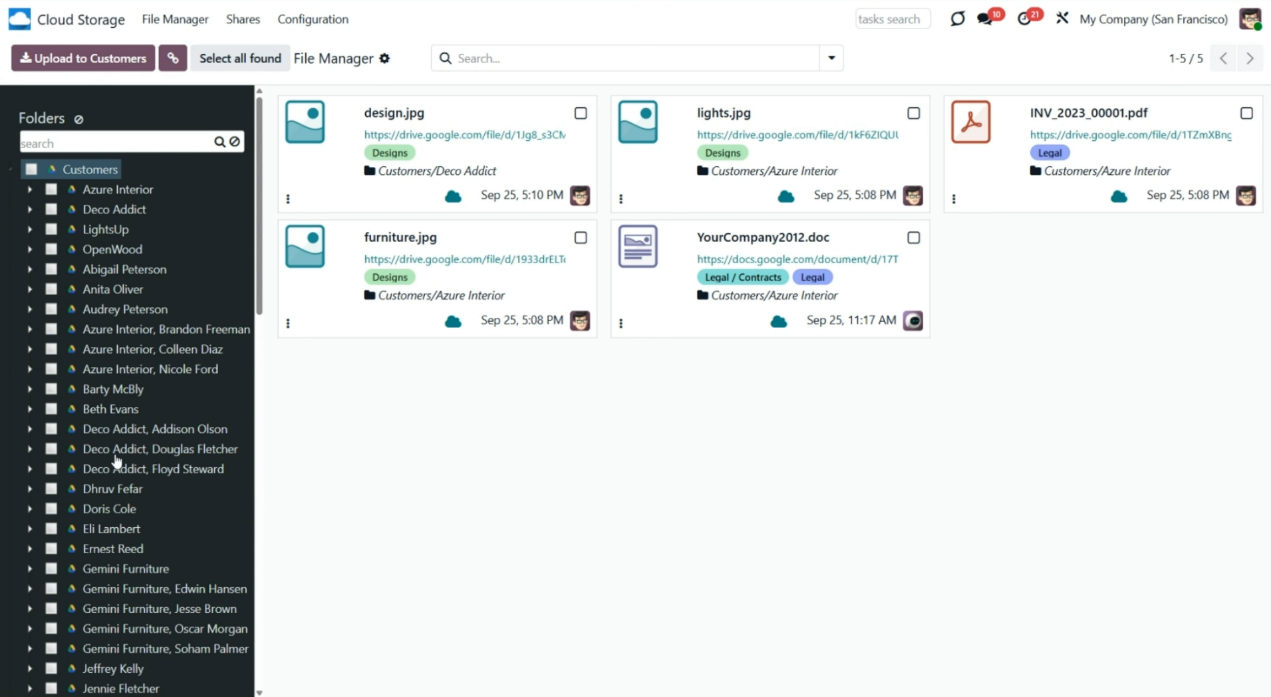
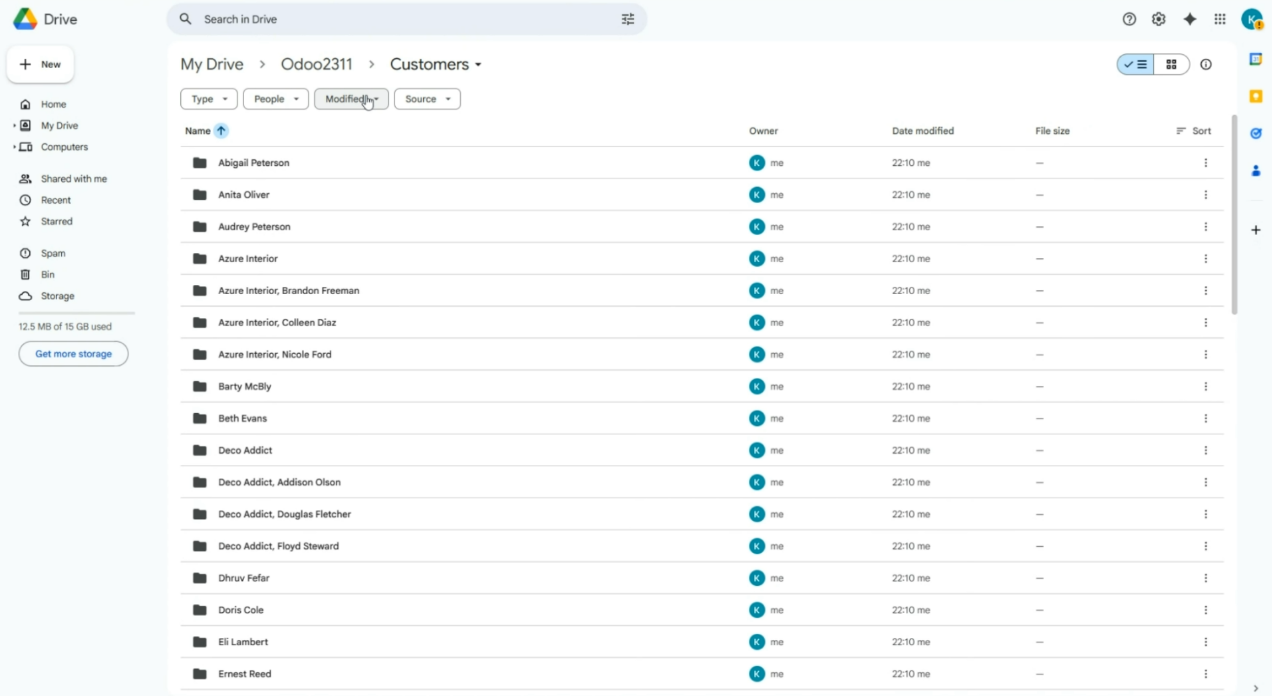
2. Move a folder/change the parent folder
If you move a folder, for example, by changing its folder rule's parent folder, it will be transferred to the cloud client as well. For instance, we have a folder rule 'Tasks' with a parent rule 'Projects'. If we clear the 'Parent rule' field, the folder rule will no longer be a child of 'Projects'; thus, the hierarchy will change, and the folder 'Tasks' will change its position in both the Files Manager and a cloud client.
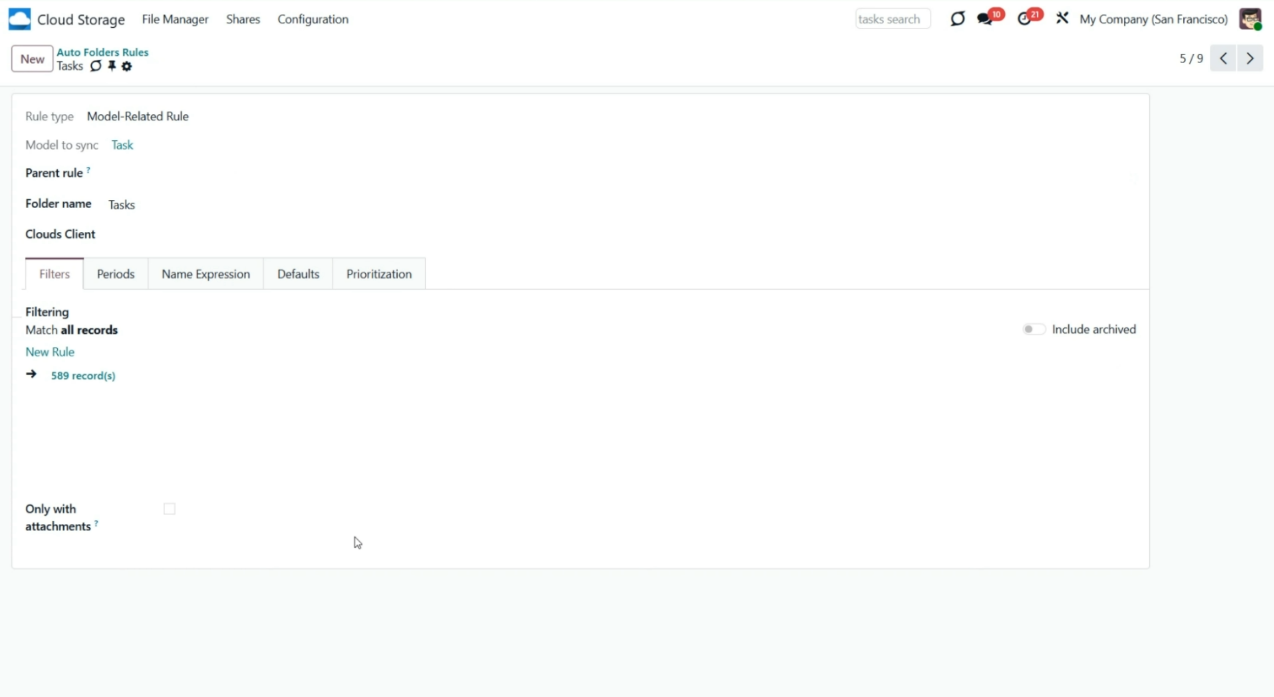
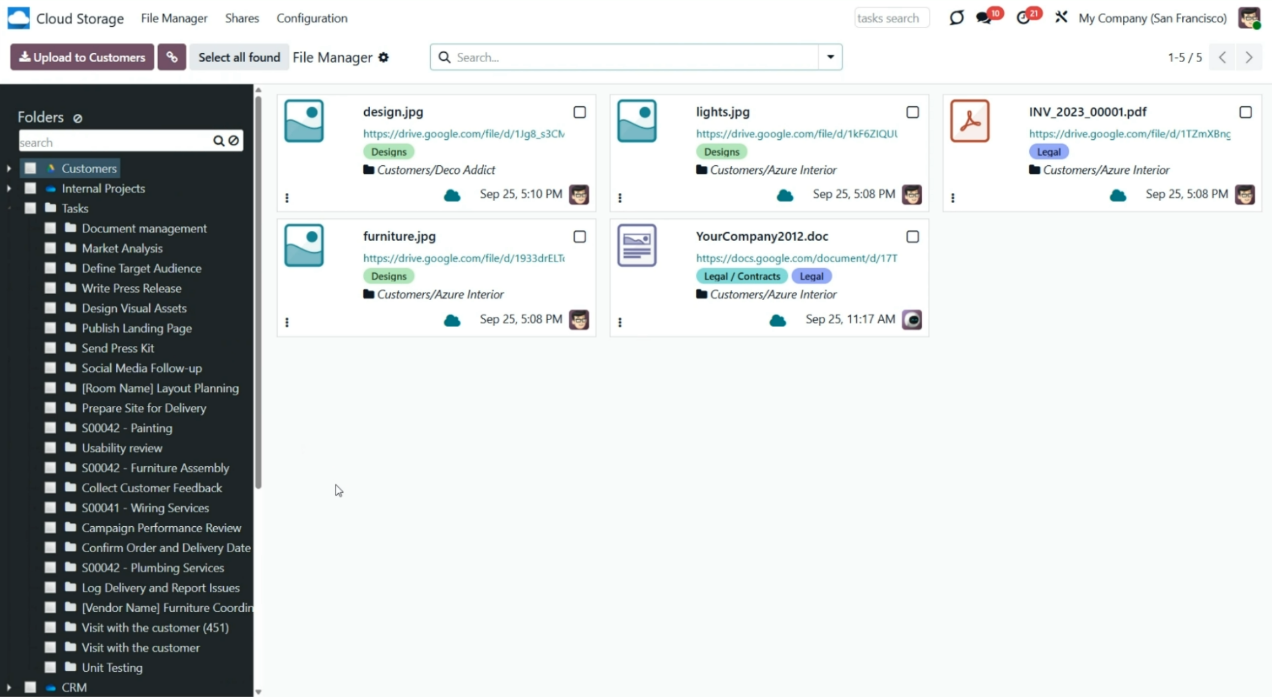
3. Change cloud client
If a folder's cloud client was changed through the folder's settings or a folder rule, then with one of the next syncs, the files will be returned to Odoo (reverse sync) and then moved to the other cloud client (direct sync). For example, we have two cloud clients in our system: Google Drive and OneDrive. The folder rule 'Departments' was first synced to OneDrive, but we later changed the cloud client to Google Drive, so it was returned to Odoo and then sent to Google Drive via the reverse sync.
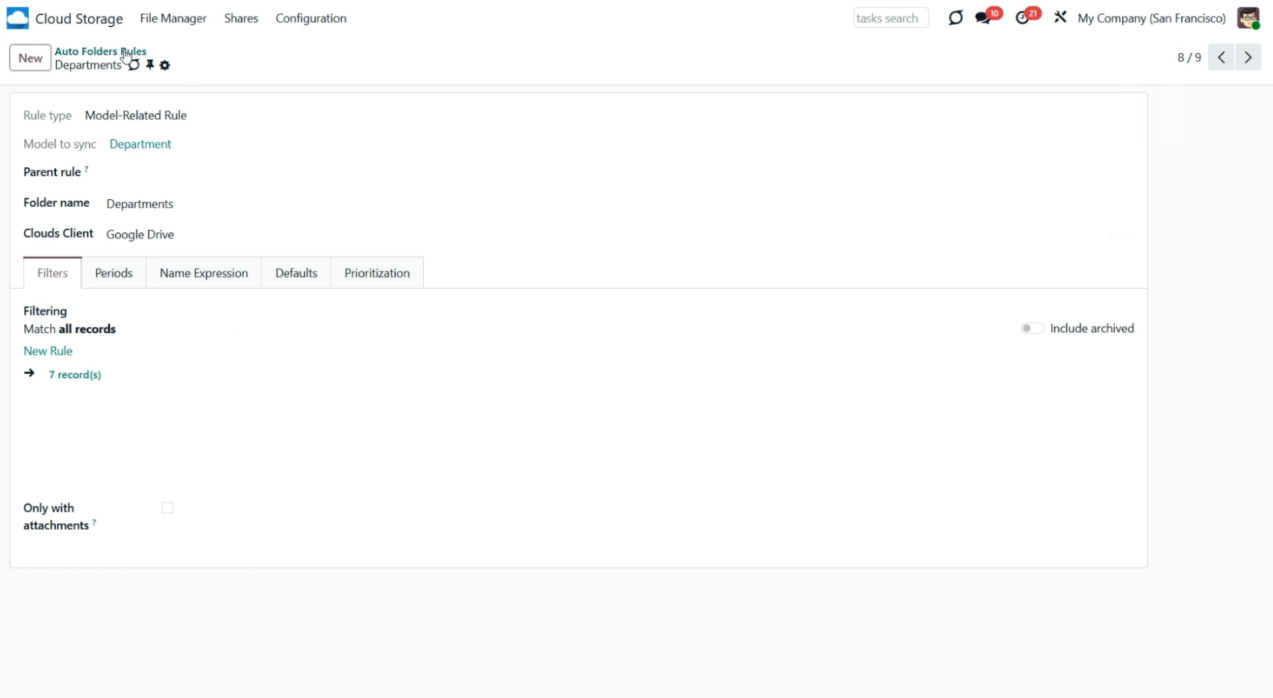
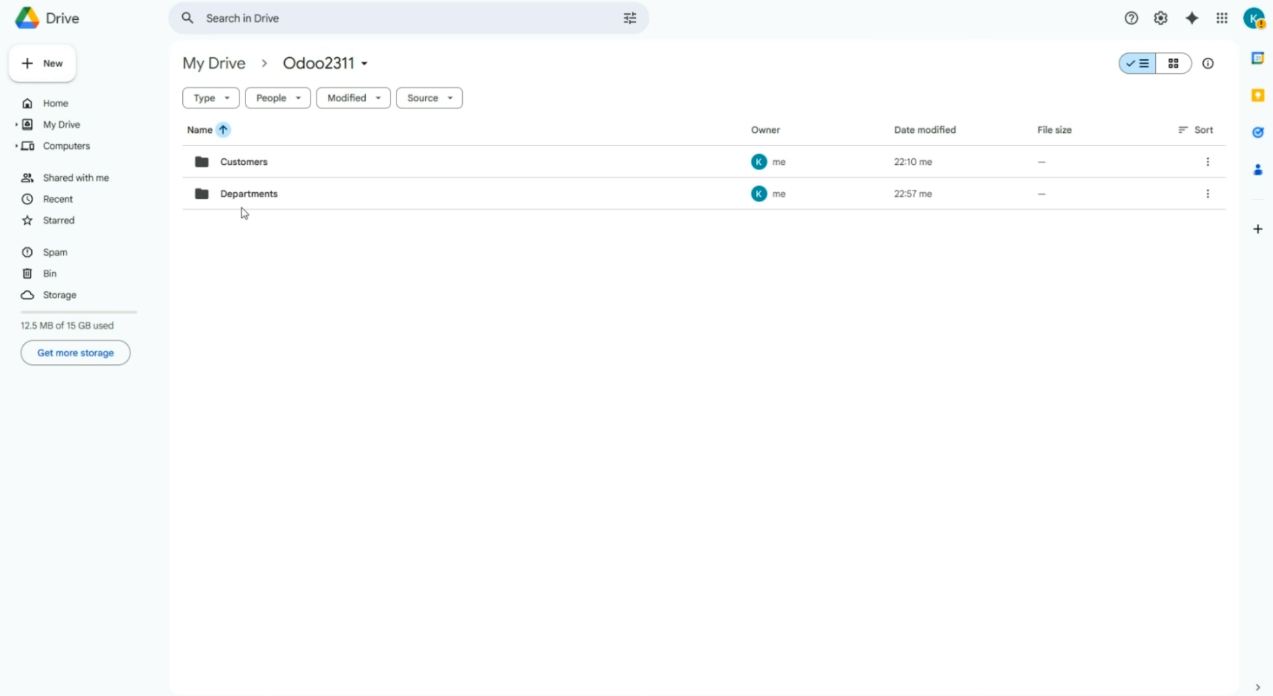
4. Change folder name
You can rename a folder in Odoo by editing it, updating the linked-to-synced-folder object, or using name expressions. The changes will also be applied to the cloud client. For example, we have a client, Azure Interior, which, after rebranding, changed its name to 'Azure', and we have updated it on the contact card. In the next sync, the name will change in the cloud client.
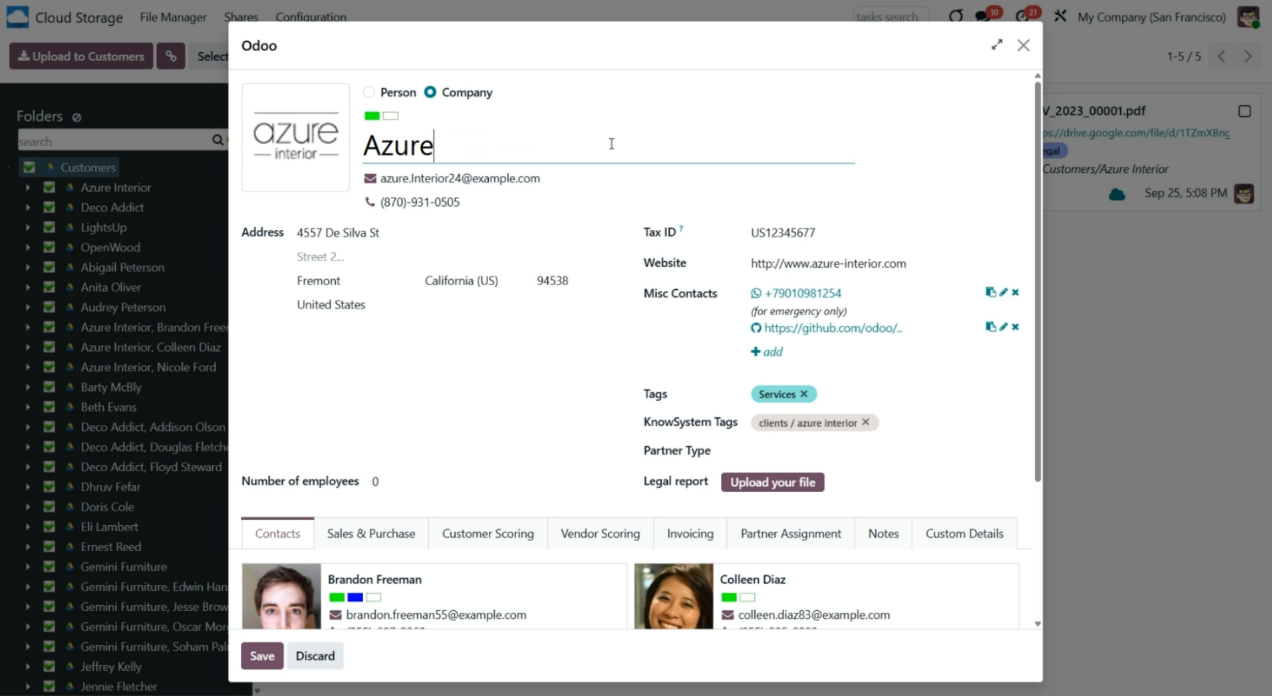
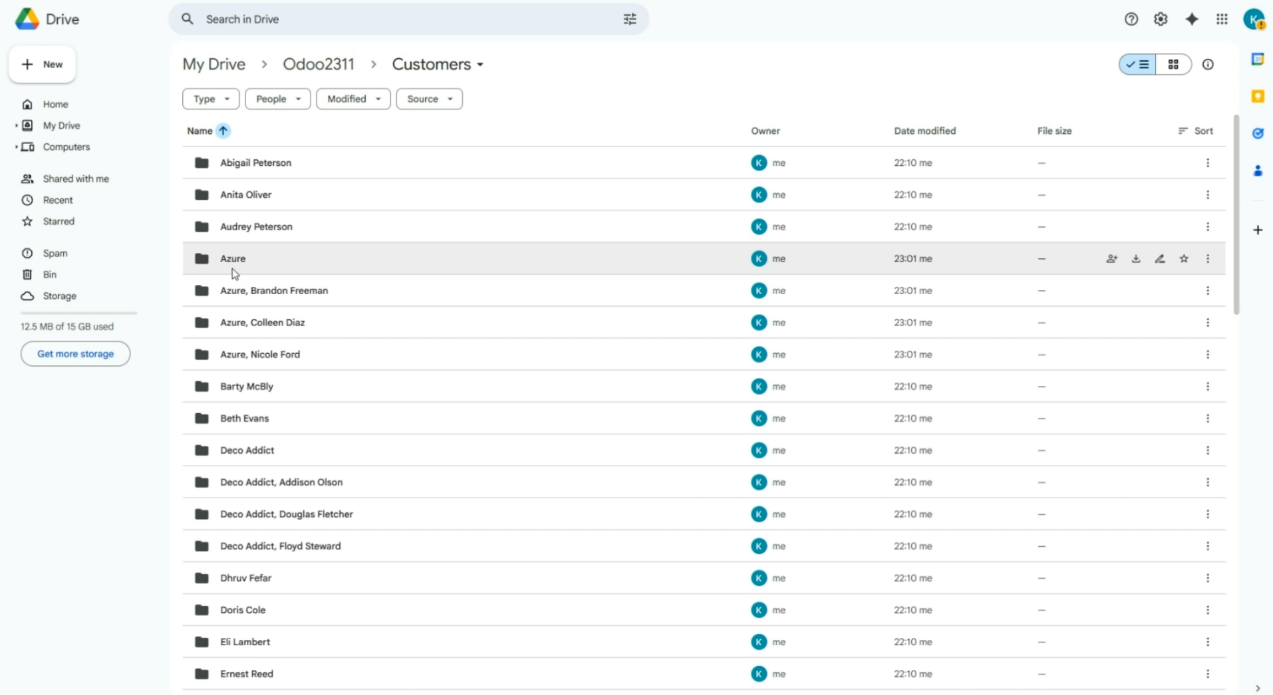
5. A folder is no longer synced
If you unassign a cloud client from a folder/folder rule, or change the filters on a folder rule, then the folder will no longer be synced. In this case, the folder containing the files will be returned to Odoo via reverse sync during the next scheduled job. For example, we have a folder rule to sync contacts with no filters applied; 61 contacts match the filter and are synced. Then we added the filter 'Is a Company is set', and only 12 contacts matched. So, contacts (folders and files) that are not company contacts will be returned to Odoo, and 12 contacts will be sent/will remain in the cloud.
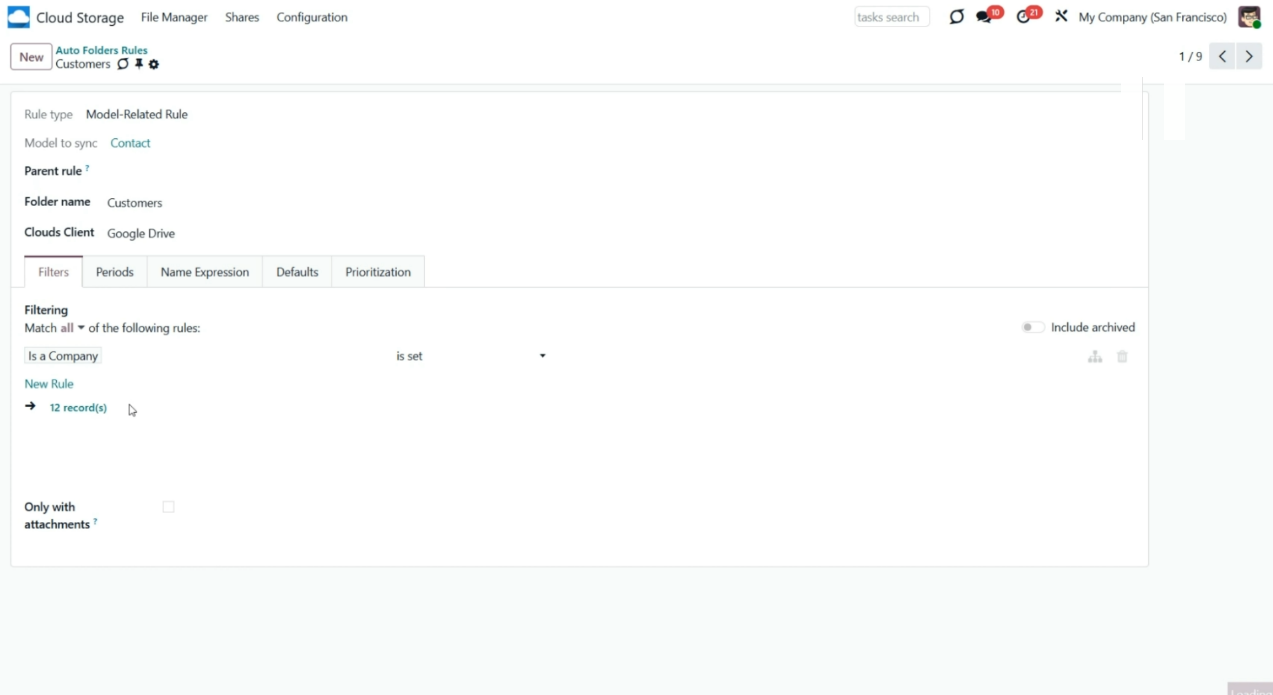

6. Archive a folder
You can archive a folder in Odoo. The reverse sync will run and return files to Odoo. There may be several reasons for archiving a folder. The folder is archived if you:
a. Delete an object
b. Archive a manual folder/folder rule
c. Change filters (so the object no longer matches them).
If you delete an object in Odoo, it will also be removed from the cloud client. For example, the company of our client 'Deco Addict' was closed, so we have archived the contact card. The files returned to Odoo, and the folder was removed from the cloud client with the next reverse sync.
Please avoid triggering the reverse sync, as it assumes the most complex and risky operations. Make sure you really need it.
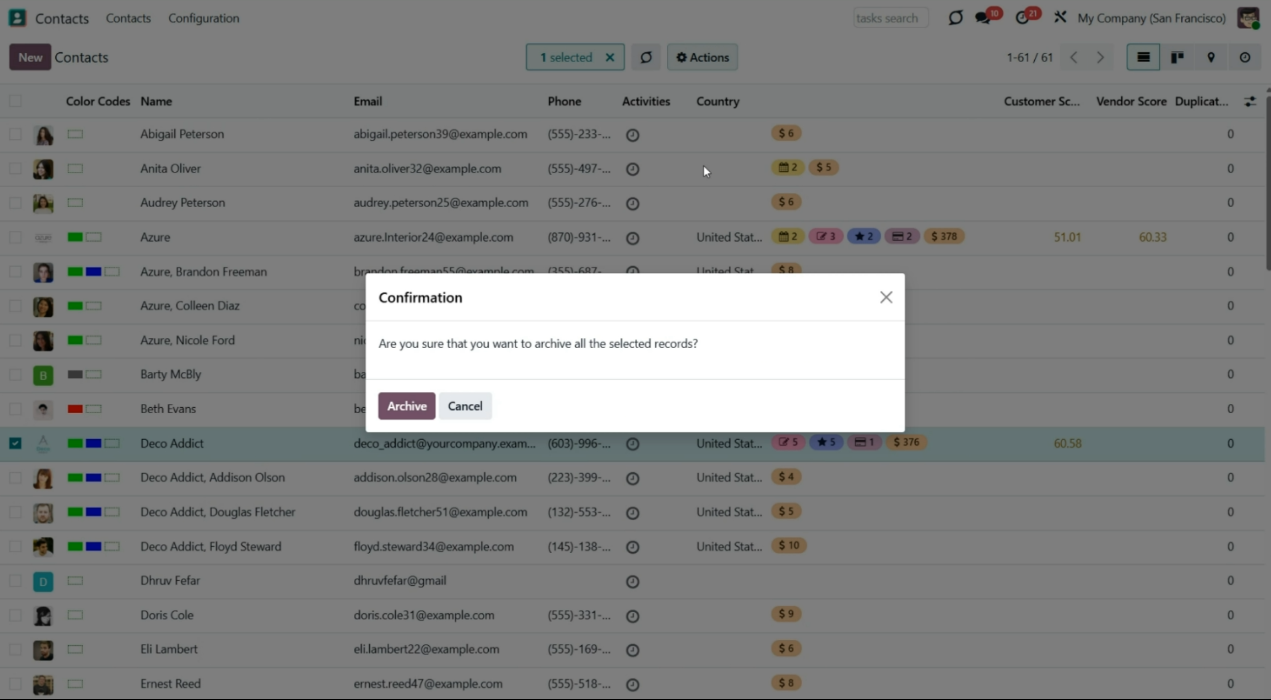
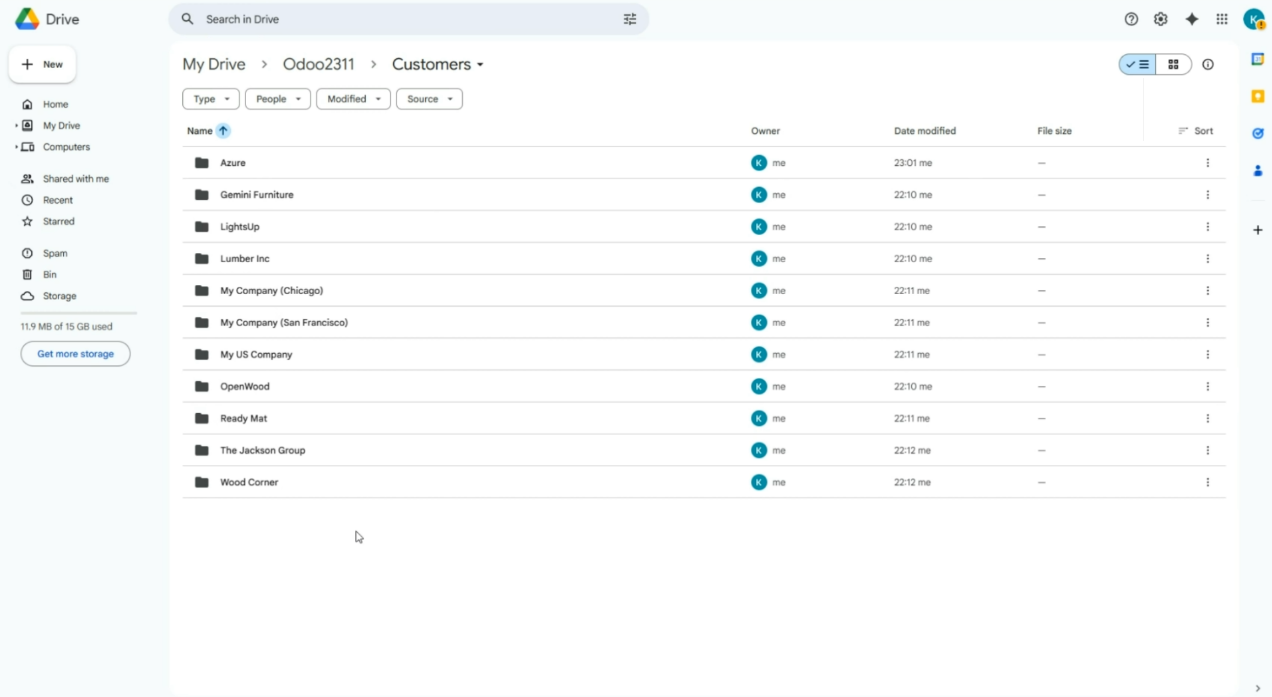
Let's look at the actions applied from the Cloud:
1. Create a folder
If you create a folder in the cloud client, it will be added as a subfolder in Odoo with the next sync. For example, let's add the 'Terms of agreement' folder to the project's 'Renovation' folder in the cloud client. At the next sync, it will be added to the related place in Odoo.
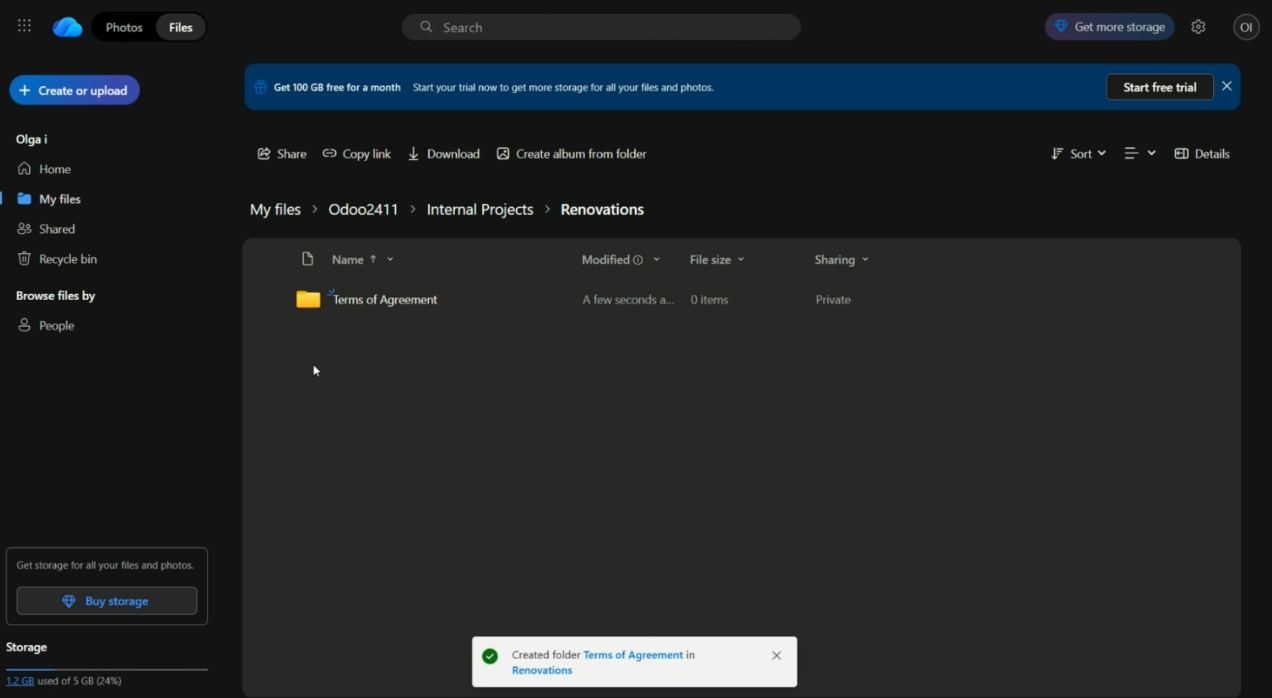
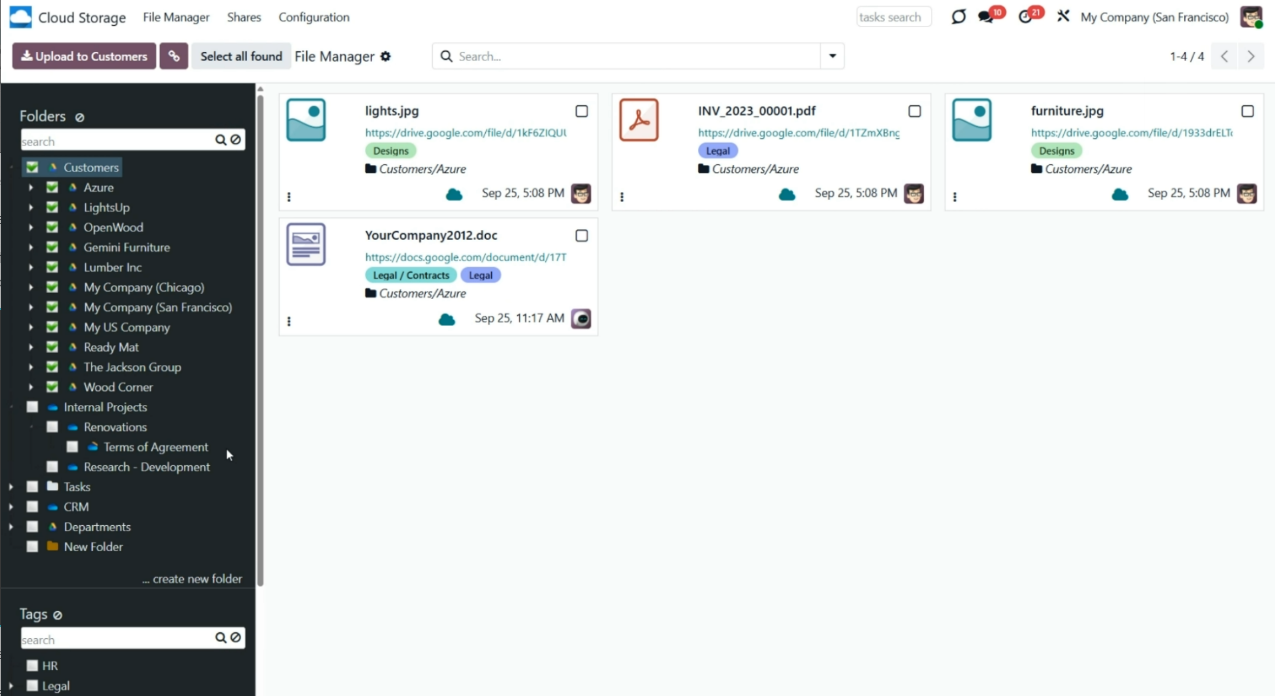
2. Change folder name
If you try to change a folder's name in the cloud client, the changes will not be applied in Odoo. However, the name in the cloud will not be changed back either. Thus, the same folder will have different names in Odoo and the Cloud. For example, we renamed the folder 'S01760' to 'Tables'. After the sync, no changes were applied in Odoo, and it wasn't reverted in the Cloud.
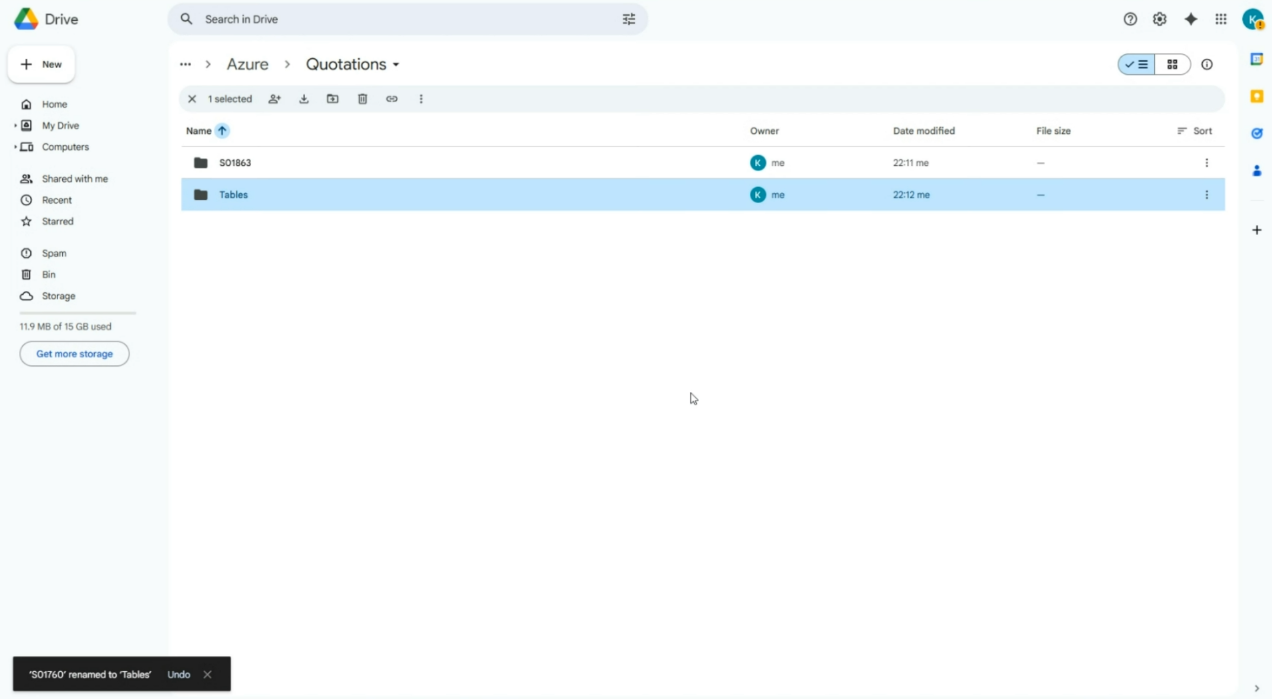
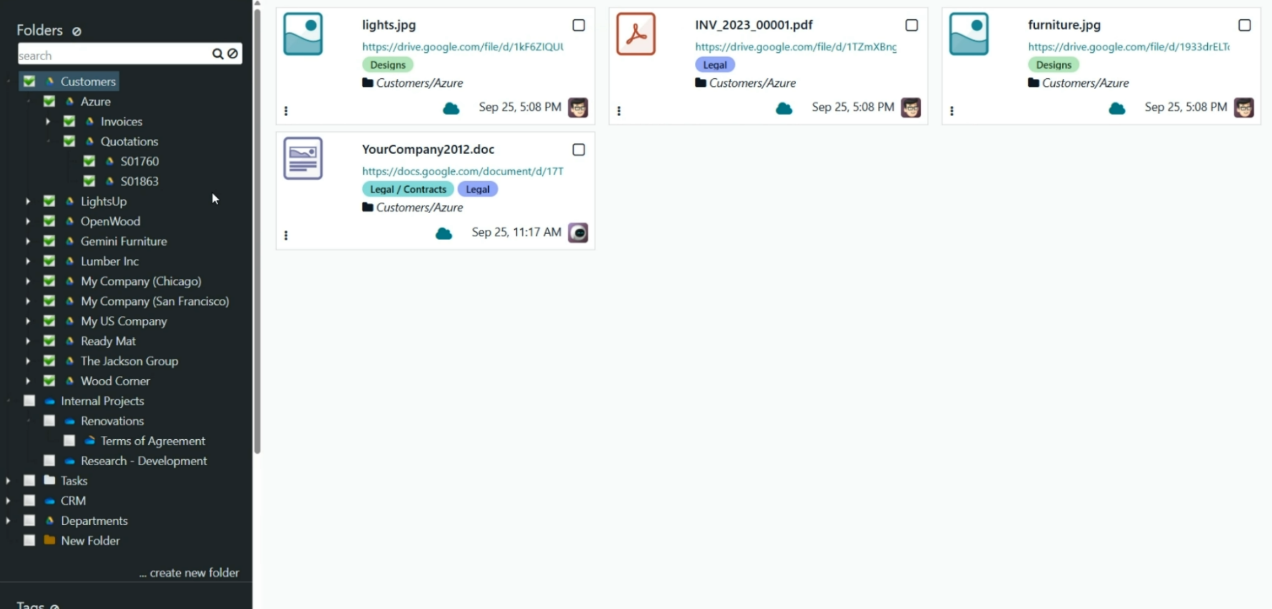
3. Move a folder
Performing such an operation is not desirable. The structure in Odoo and in the cloud will differ (since the folder will not be returned to its original location and will not trigger a move in Odoo). The warning in the sync logs will appear. For example, let's move the folder 'S01863' from the folder 'Quotations' to the folder 'Customers'. In the Odoo Files Manager, no changes will occur; however, the sync will continue, and the folder will remain in the root Odoo folder. In the sync logs, a warning will appear.
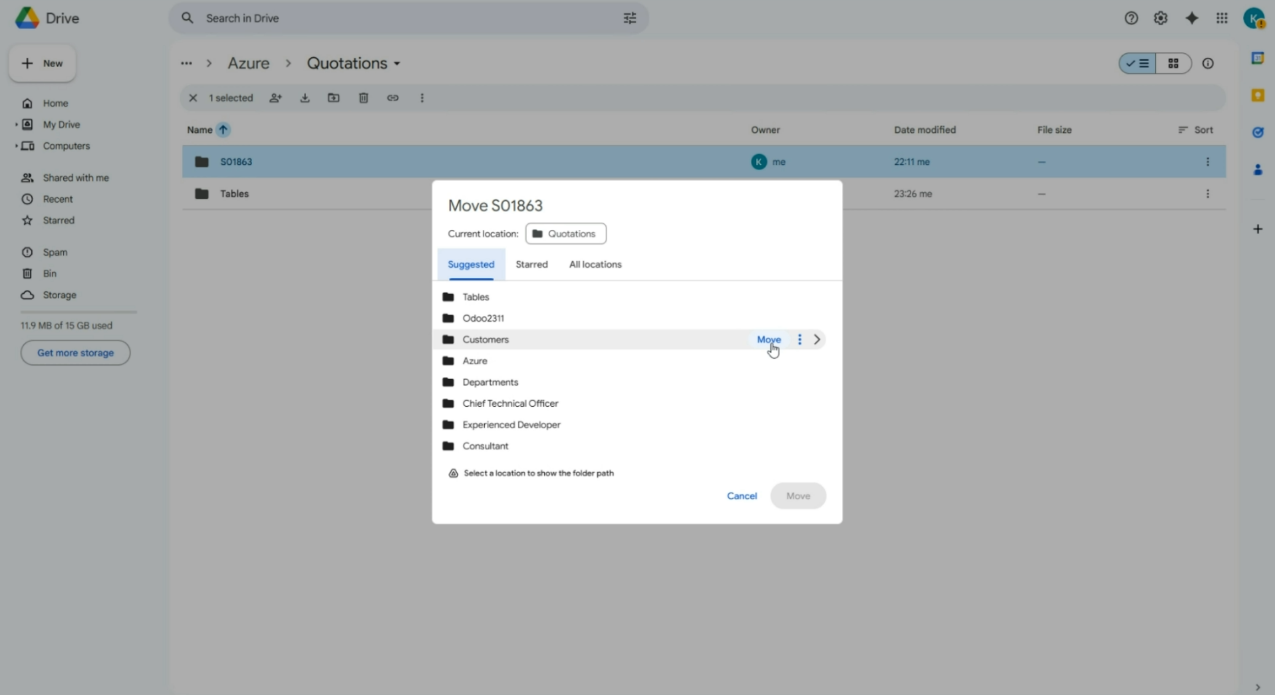

4. Delete a folder
Performing such an operation is not desirable. If you delete the folder in a cloud client, then the folder and its child folders will be recreated. However, because the files were stored in the cloud client and then deleted, they cannot be recovered. In Odoo, the broken links will remain.
Odoo folder changes take priority over those in a cloud client.
For example, if we permanently delete the 'Azure' folder, the next sync will recreate it and its child folders. However, the files will be lost as they were kept in the cloud.
Avoid renaming, moving, and deleting folders in the client. They should be managed in Odoo.
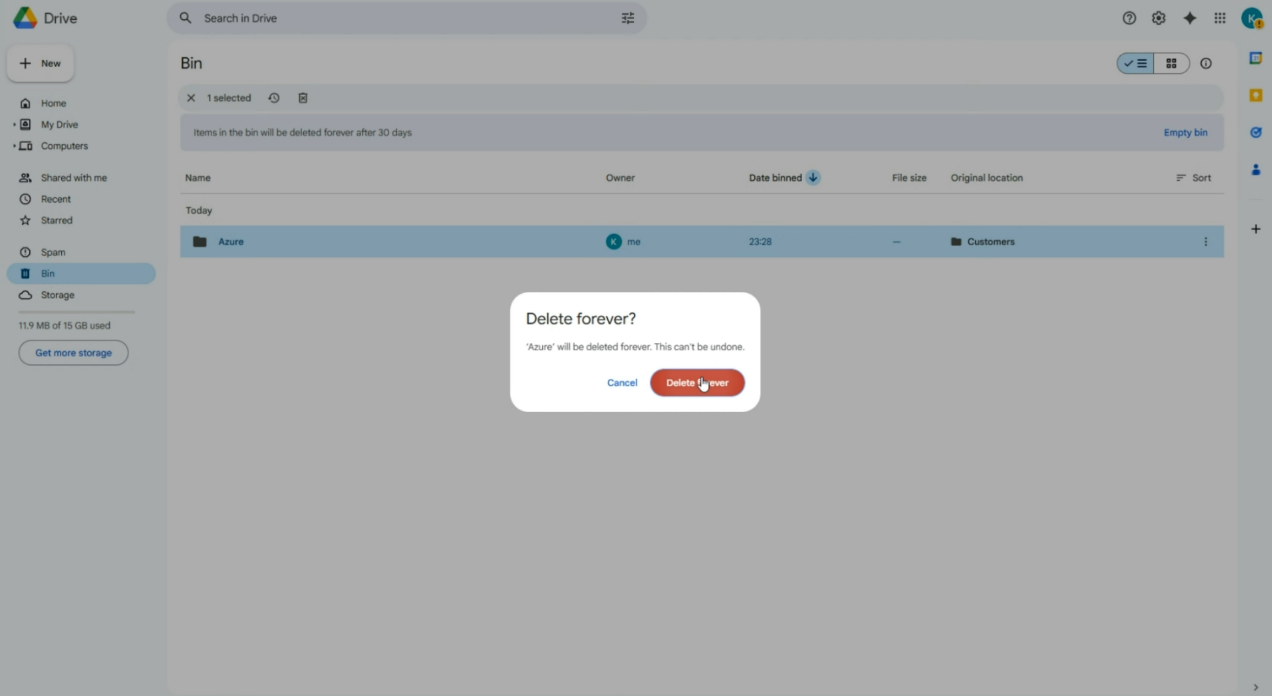
Files Sync
After the sync, the attachments of each folder (and hence, related Odoo object) will be moved to the corresponding folder in the cloud client. For example, Odoo > Customers > Azure Interior > scan1.jpeg. Only links to the files will be kept in Odoo.
As with folders, specific actions have different results depending on where the changes are introduced (in Odoo or in a cloud client). When considering files and their changes, modifications applied in the cloud client take priority over those in Odoo.
Let's see some common actions performed on the files and their consequences:
1. Upload files to Odoo / Upload files and folders to Cloud
If you upload files to Odoo, they will be transferred to the cloud client. Only links to them will remain in Odoo. However, you can still access the file quickly by clicking on it in Odoo.
If you upload the files directly to the cloud client, the app will create URL attachments for those items in the linked Odoo folder.
You can put files and child folders in cloud client folders. In that case, during one of the next syncs, the folder will be created in Odoo and will be visible in the object's attachments box and in the files storage.
For example, let's upload some files to the 'Renovations' project in the Files Manager in Odoo. Then, let's add a folder 'Terms of Agreement' with files to the 'Renovations' folder in the cloud client. After the sync, all files will be kept in the cloud client, while the links to them will remain in Odoo.
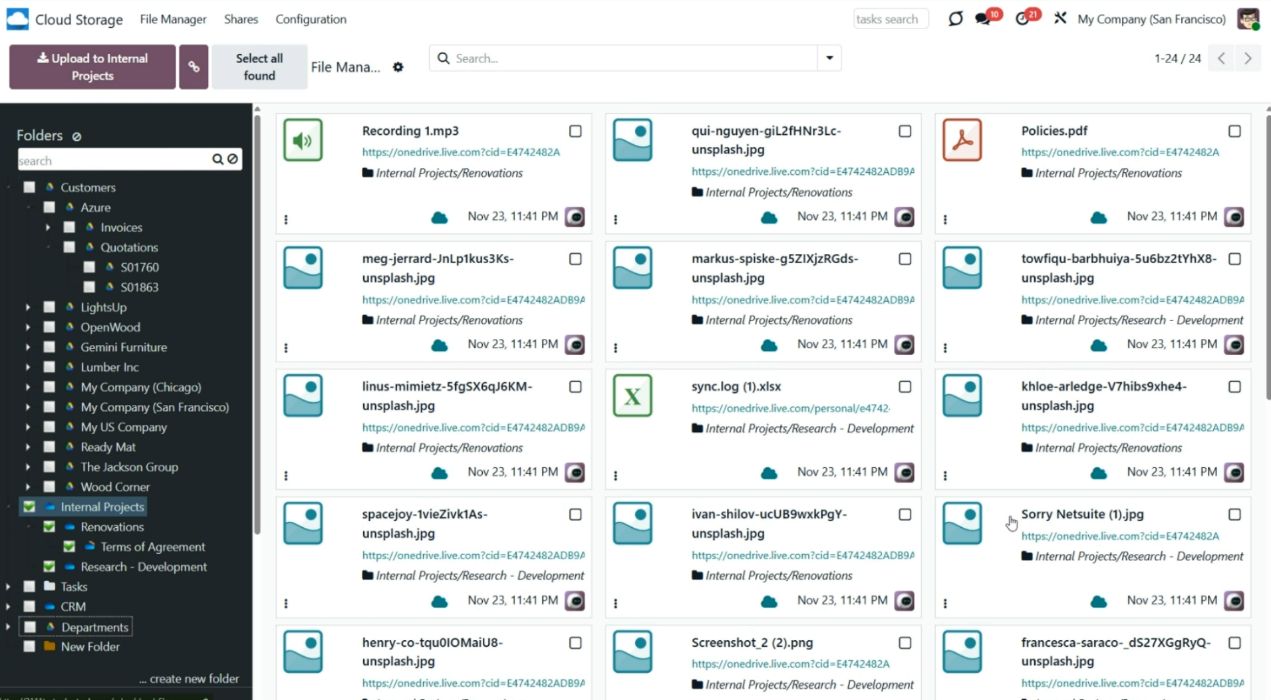
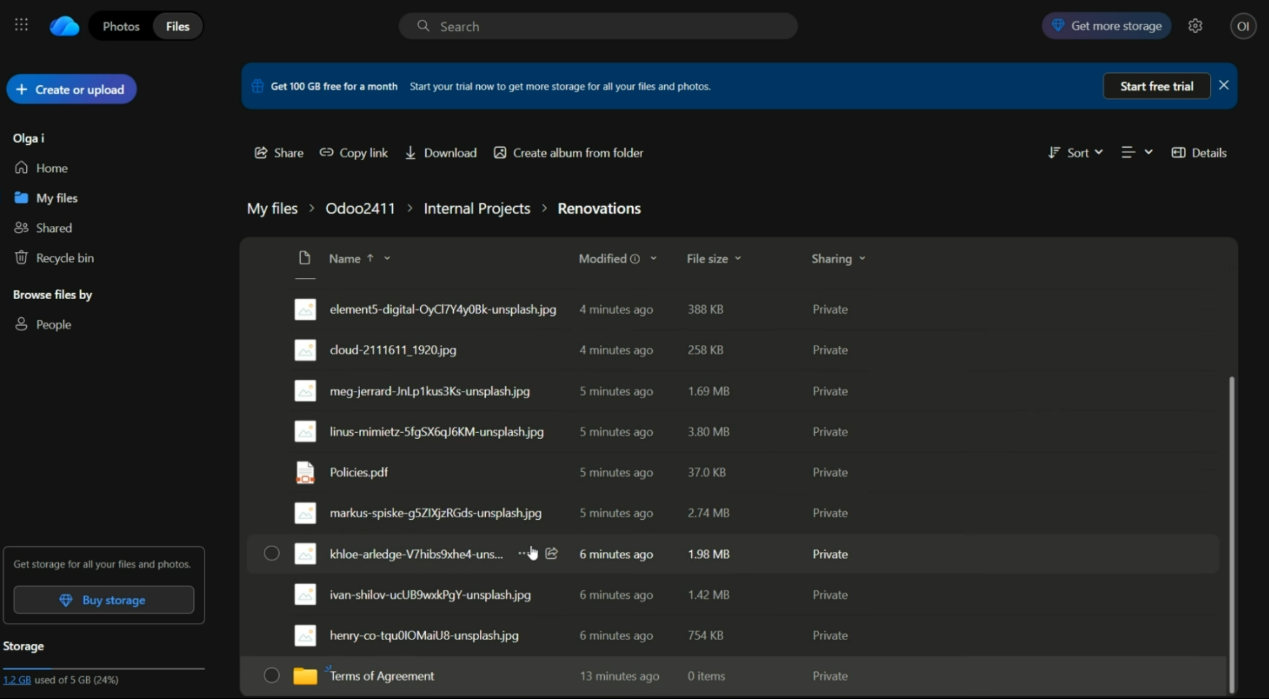
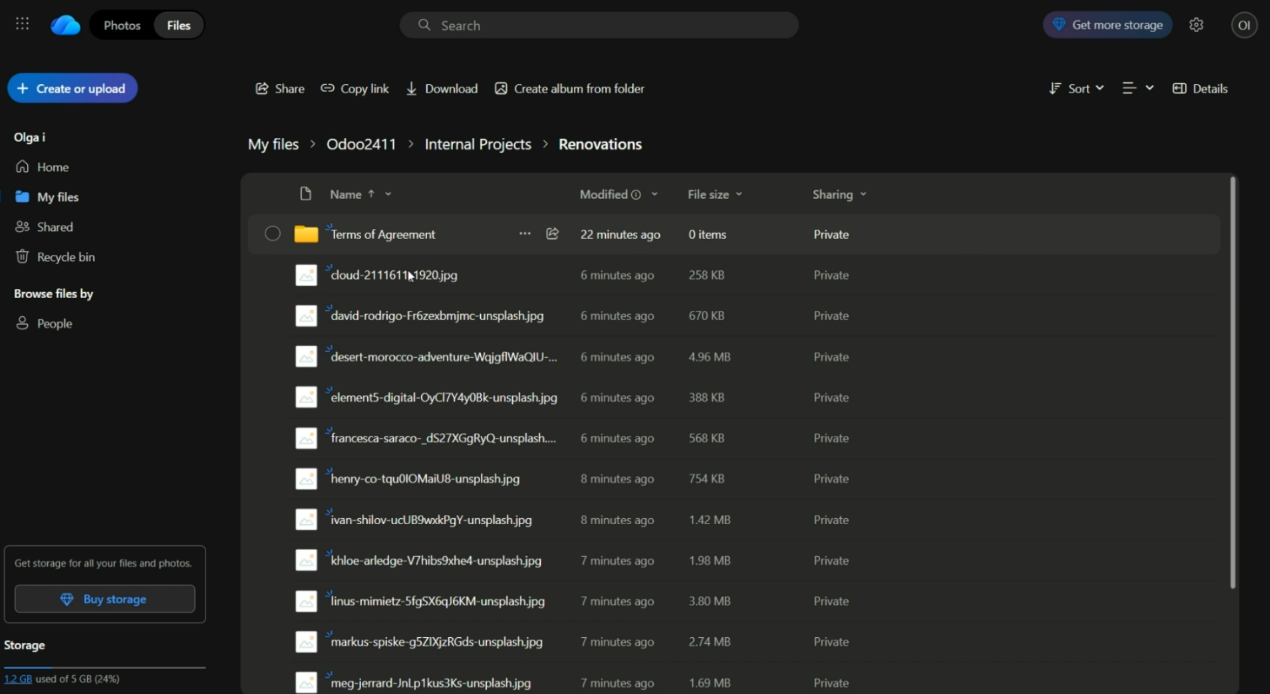
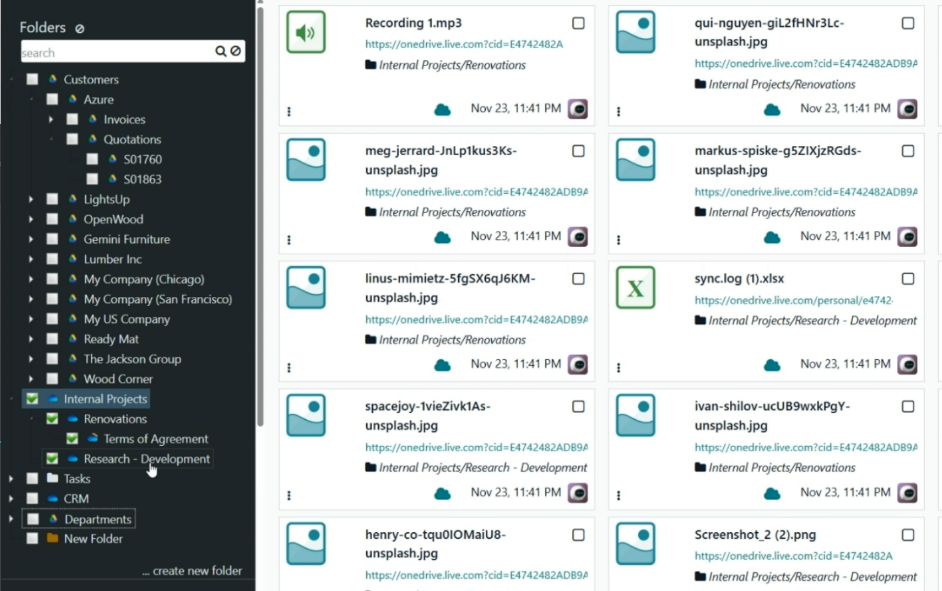
2. Rename a file in Odoo / Cloud
If you rename a file in the cloud client, the chained Odoo attachment will be renamed as well. For example, let's rename the file Policies.pdf to Plan for the team.pdf in the cloud client. After the next sync, it will also be renamed in Odoo.
You can also rename an attachment in Odoo. To do so, click the three-dot icon at the bottom left of an attachment, then click 'Open'. Then, introduce the new name. The changes will also be reflected in the cloud.
If you rename a file in both Odoo and Cloud simultaneously, the changes in Odoo are prioritized.
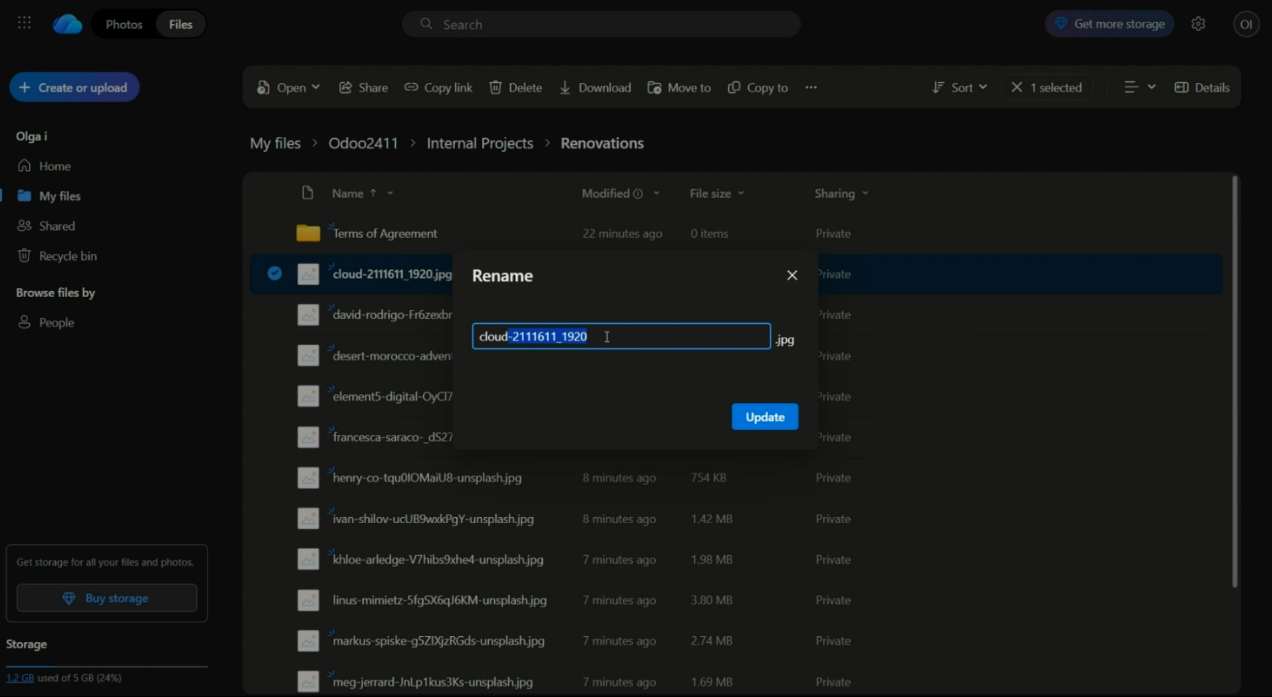
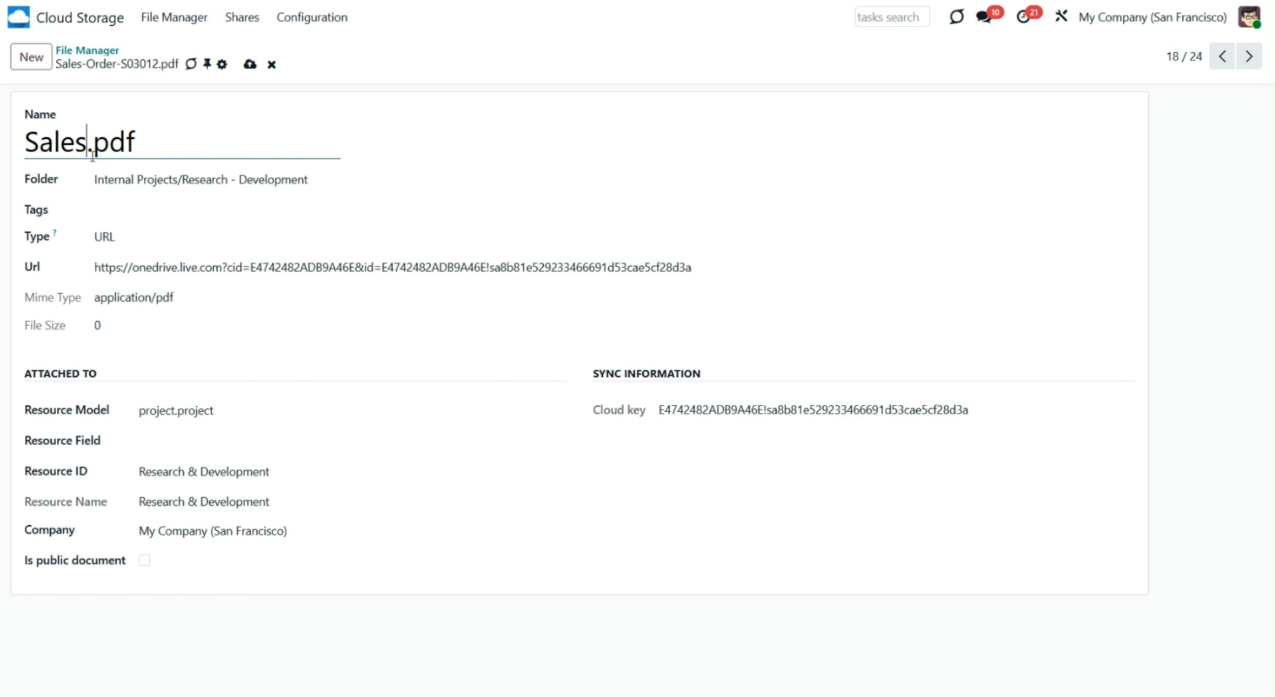
3. Move a file to Odoo/Clouds
If you move a file in the cloud client from one object to another, the linked Odoo attachment will be transferred as well.
For example, let's move the file 'Recording 1' from the 'Azure' folder to the 'Beth Evans' folder. With the next sync, it will also be moved to Odoo.
You can move an attachment to another folder in Odoo with the Mass action 'Update folder'. To do so, select the file(s), click 'Update folder', and choose the destination folder. Then the file will be moved to the appropriate location within the cloud client.
If you move a file between Odoo and the Cloud simultaneously, the changes in Odoo take precedence.
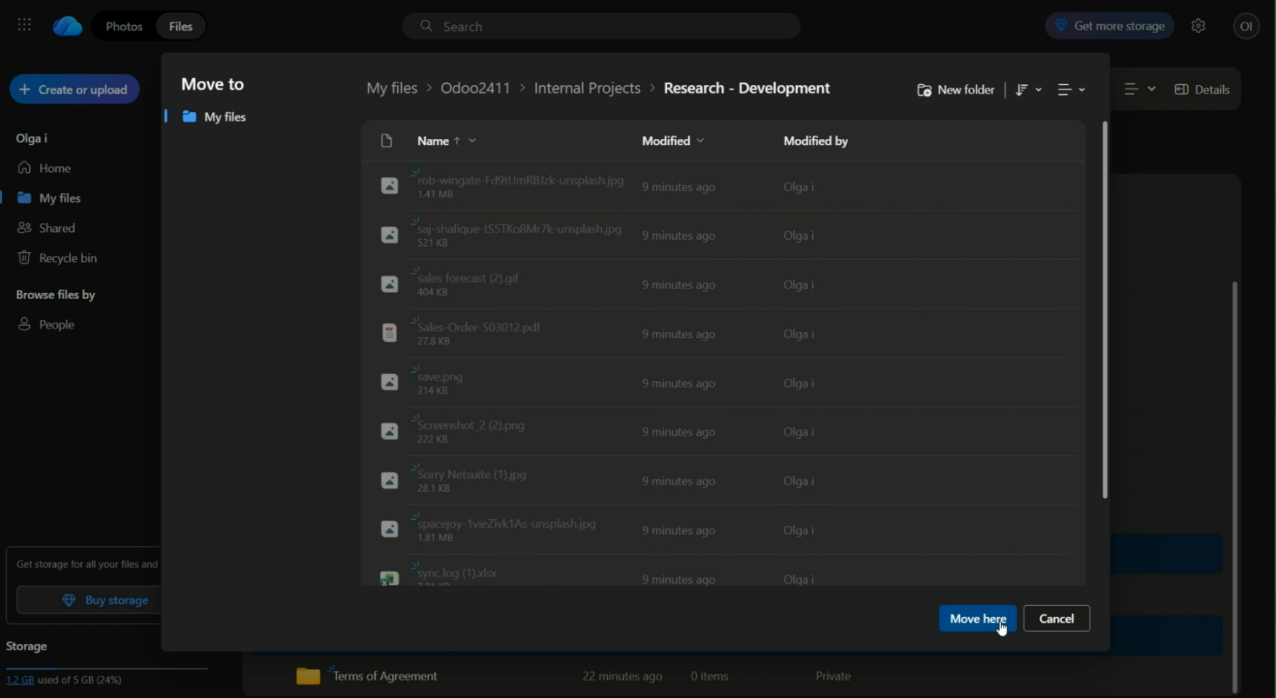
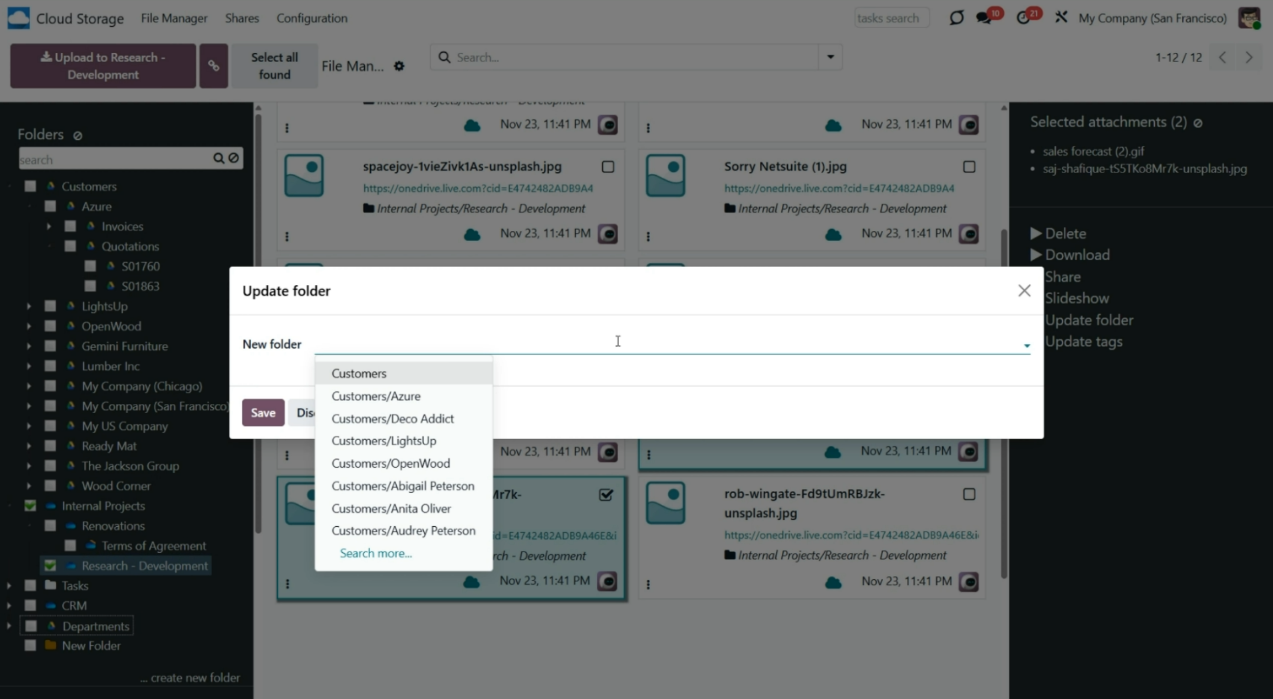
4. Delete a file from Odoo / Cloud
If you delete a URL attachment from Odoo, it will also be deleted from the cloud client.
If you delete a file from the cloud client, a linked Odoo attachment will also be deleted.
For example, let's delete some files from the 'Customers' folder in Odoo and the Azure file from the cloud client. With the next sync, the deleted files will be removed from both Odoo and the cloud client, regardless of where they were deleted.
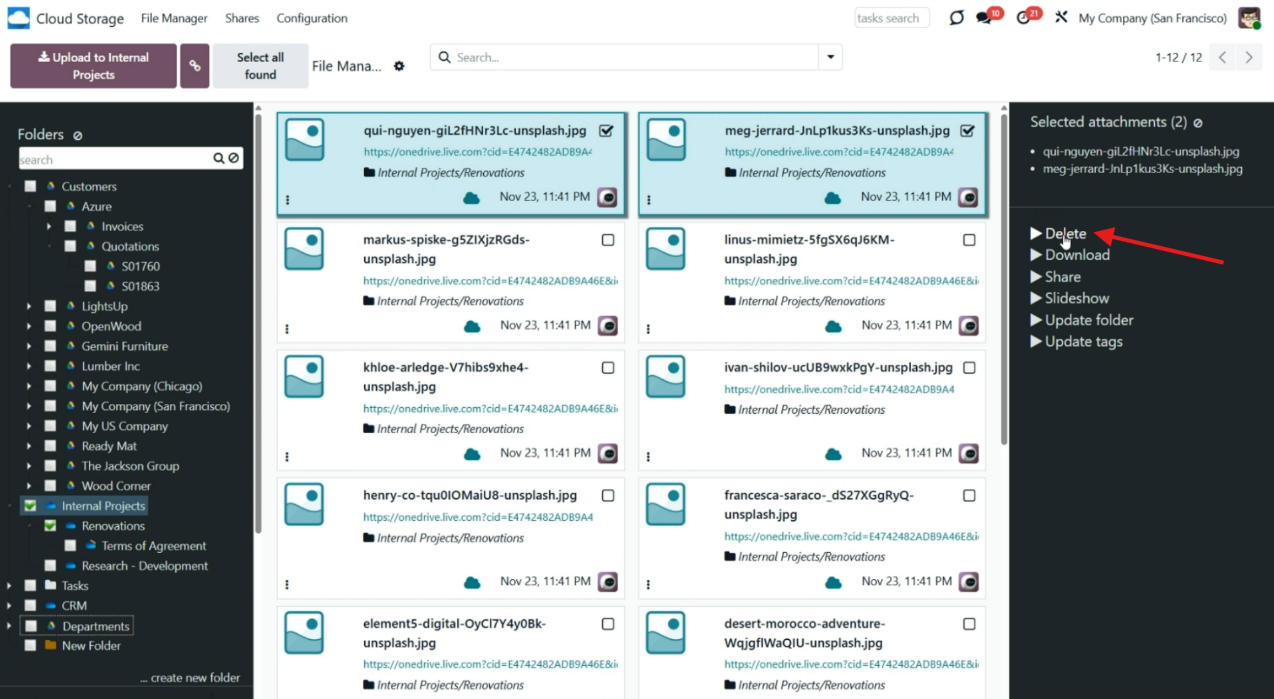
5. Download files from Odoo / Cloud
Regardless of the place, you can always download any attachment. To download the attachment from Odoo, click the 'Download' icon or use the mass action 'Download', and the download will start automatically. To download a file from the client, click on the file and choose the appropriate command.
For example, let's download the files 'save.png' and 'sales forecast (2).gif' from Odoo and the file 'furniture.jpg' from the cloud client.
Reconnection
As you configure a cloud client, the button 'Reconnect/Pause' appears in the top left corner. It is useful when:
1. A cloud client wasn't used for a while (for example, sometimes, when Google Drive is not used for a while, you need to reconnect and give all the permissions again to continue using it).
2. The sync has stopped (for example, when there was an error while syncing), a token has expired (for example, OneDrive's token is usually valid only for 6 months, and then it is necessary to generate a new one and reconnect)
3. Granting extra permissions is required (for example, when the terms of the agreement were changed, and it is necessary to permit managing files in a cloud client)
4. For migration purposes (for example, when a new version of Odoo comes out and you need to apply some changes to the platform)
5. You want to stop the sync (for example, when you configure several cloud clients and want to boost the sync process of one of them, you stop the other).
To reconnect the cloud client:
1. Press the button 'Reconnect/Pause'
2. Press the button 'Confirm'
3. Follow the instructions related to the target cloud client.

Resetting or changing cloud client: reverse sync
Reverse sync occurs when a folder is no longer synced, when you want to change the cloud client of previously synced files and folders, or when the sync is fully stopped (the cloud client is reset).
It assumes retrieving all items back into Odoo, deleting the files from the cloud client, and optionally sending them to another client.
The reverse sync is triggered by the same scheduled job as the direct and backward sync: 'Run/Prepare sync queue'. It can also be triggered manually by clicking the 'Launch sync' button.
Reverse sync operations are usually prioritized over direct and backward sync operations. Thus, in most cases, the planner will work on reverse-sync tasks until they are completed, and only then will it continue to complete the other tasks. You can set the maximum number of attempts for reverse and move tasks on the module's configuration page, in the 'Maximum Retries (Reverse and Move tasks)' field. This way, you can ensure that other tasks are not blocked for too long if certain reverse/move operations cannot be completed (see Synchronization Principles).
Due to cloud client peculiarities, not all items can be correctly reversed to Odoo. For example, some documents may exist only in cloud storage environments (e.g., Google Sheets). The app would attempt to convert such documents, but in some cases, manual interaction would be required.
At the moment of the reversed sync launch, the module detects the state of the files and folders. It may take a few synchronizations to process the tasks and return the files and folders to Odoo. It is important not to introduce any changes in Odoo or in the cloud, as the algorithm may ignore them.
Avoid using the reverse sync. Make sure you really need it.
Sync Logs
For extra convenience, the special sync logs interface was introduced. It allows you to control planned jobs and their fulfillment. With the help of the information from the sync logs, you will be able to:
1. See the sync history
2. Know whether the sync took place, and what has changed
3. Check whether a particular file was synchronized
4. Investigate the sync problems.
The sync history contains all the necessary information about the module's actions. For example, which folders were created, which files were added and synced, and which cloud they were related to. The action's time is also tracked, so you may see when it occurred. The time on sync logs is in Odoo server time; therefore, it may differ from the user's local time.
To open the sync logs interface, go to Cloud Storage > Configuration > Sync Logs. There, you will see the list of changes that occur while syncing. You can also see them in real time, as the objects and files are managed.
One of the most essential functions of the Sync Logs is to identify the sync problem. If there is a problem - a mistake, and its details will appear in the sync logs. From here, you can determine the appropriate actions to take or export the logs and send them to the customer support email for further investigation of the issue. Depending on the sync result, the sync operation may be green (successful), orange (minor error warning), or red (error).
The 'Export logs' button was introduced to share sync logs in case an error occurs. This way, you can send the logs to a responsible person, who can fix the issues.
If the instance has many logs and the export takes too long or doesn't finish, you can limit the number of sync logs exported. For that:
1. Open the Cloud Storage menu, and go to Configuration > Configuration
2. Find the section 'Settings'
3. In the field 'Logs to Export', define how many log lines should be prepared while exporting. If the existing logs exceed that number, earlier logs will be neglected.
You may choose to export fewer logs for improved performance, or increase the number if necessary.
If you have multiple cloud clients, you can view all logs at once or only those for one or more clients. Just click the slider button next to the cloud.
When many files and folders are synchronizing every day, it can be challenging to find the information you need in Sync Logs. Therefore, there are several ways to search for sync records conveniently. The ways to search Sync Logs:
1. By matches in Logs or cloud clients' names. To do that, start typing your request in the search field in the top-left corner, then click the search icon. It is also possible to search logs for a particular date. Just add it to the search field in the format '2022-11-24'.
2. By applying log levels on the left side of the interface, by clicking on the slider button. The available ones are Critical, Error, Warning, Info, and Debug.
3. By filtering logs by date and time. To do that, find the section 'Period' in the left part of the interface and click on one of the fields. There, you can specify the time frame. Note that the logs are specified in UTC.
4. By limiting the number of exported logs on the configuration page. If you click the 'Export' button after selecting a cloud client or applying the specified filters, only matching sync logs will be exported.
To find the acute sync logs more quickly and avoid consuming excessive server storage, you can limit the number of days for which the sync logs are retained. To define how many days sync logs should be kept in Odoo, go to Cloud Storage >Configuration >Configuration and specify the number of days in the field 'Logs storage period (days)'. The number of days should be at least 3.
If there are many logs in the instance, and the export doesn't finish, you can limit the number of logs to export. For that, go to Cloud Storage >Configuration >Configuration and define how many log lines should be prepared while exporting by typing the number in the field 'Logs to Export'. If the existing logs exceed that number, earlier logs will be neglected.
You can also subscribe to a specific cloud client's notifications, so if there is a critical connection error, you will receive an email and be able to resolve the issue in time. For that, go to Configuration > Cloud Clients, open one of them, and click 'Subscribe' in the bottom right corner.
Sync Logs do not replace Odoo server logs. They are complementary functions that allow you to control synchronization from the configuration interface. You may also need Odoo server logs to investigate the root causes of the warnings detected in Sync Logs.
Sync Logs do not replace Odoo server logs.
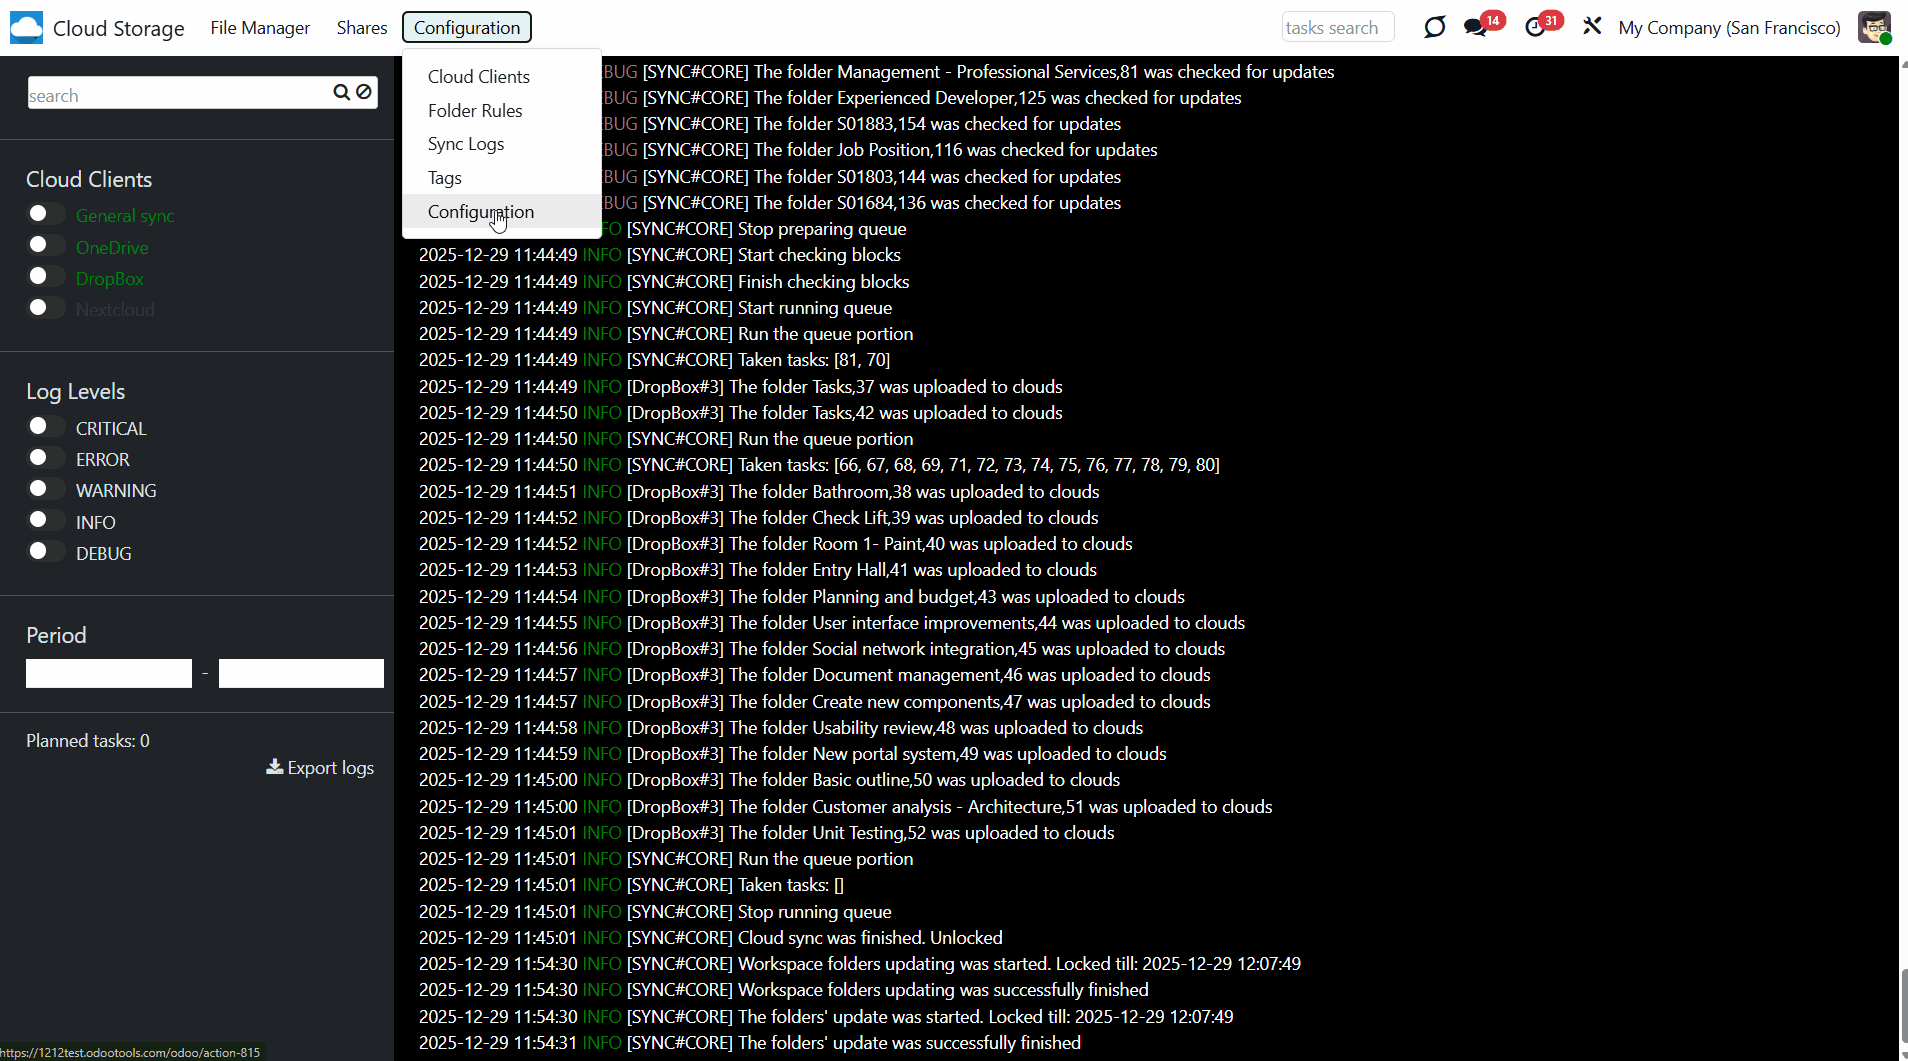
Google Drive Implementation
Google Drive is a cloud-based storage service from Google. It lets you save files online so you can access them from any device, anywhere. With Google Drive, you can access and manage your files securely. The tool offers many useful collaborative features and built-in integrations, making it popular among users.
Google Drive Odoo Integration is a tool for integrating Google Drive features into your Odoo business workflow. The app automatically stores Odoo attachments in Google Drive and provides instant access to them via web links. Thus, users can work comfortably with files in the cloud storage, while the results are fully available in Odoo.
Sync works for individual and team drives (Google Suite business and Enterprise tariffs). In the latter case, the root folder Odoo is placed within a chosen team drive, while in the former case, it is placed within a current user drive.
Configuration and Log in
After the installation of the module in your database, it is required to finish the setup by doing the following:
1. Go to the Google Developer Console via the URL: https://console.developers.google.com
If this is your first time on the platform, you will be asked to agree to the Terms of Service and Email update. Only the Terms of Service are mandatory.
2. Select or create a project. After clicking the 'Create Project' button, the new form will appear. There, write the project title, optionally add your organization, and click 'Create'.
3. From the project's dashboard, go to API's & Services overview and press 'ENABLE APIS AND SERVICES'.
4. Find the Google Drive API and push the button to enable its API.
5. Go to 'Credentials' and press the button 'Configure Consent Screen'.
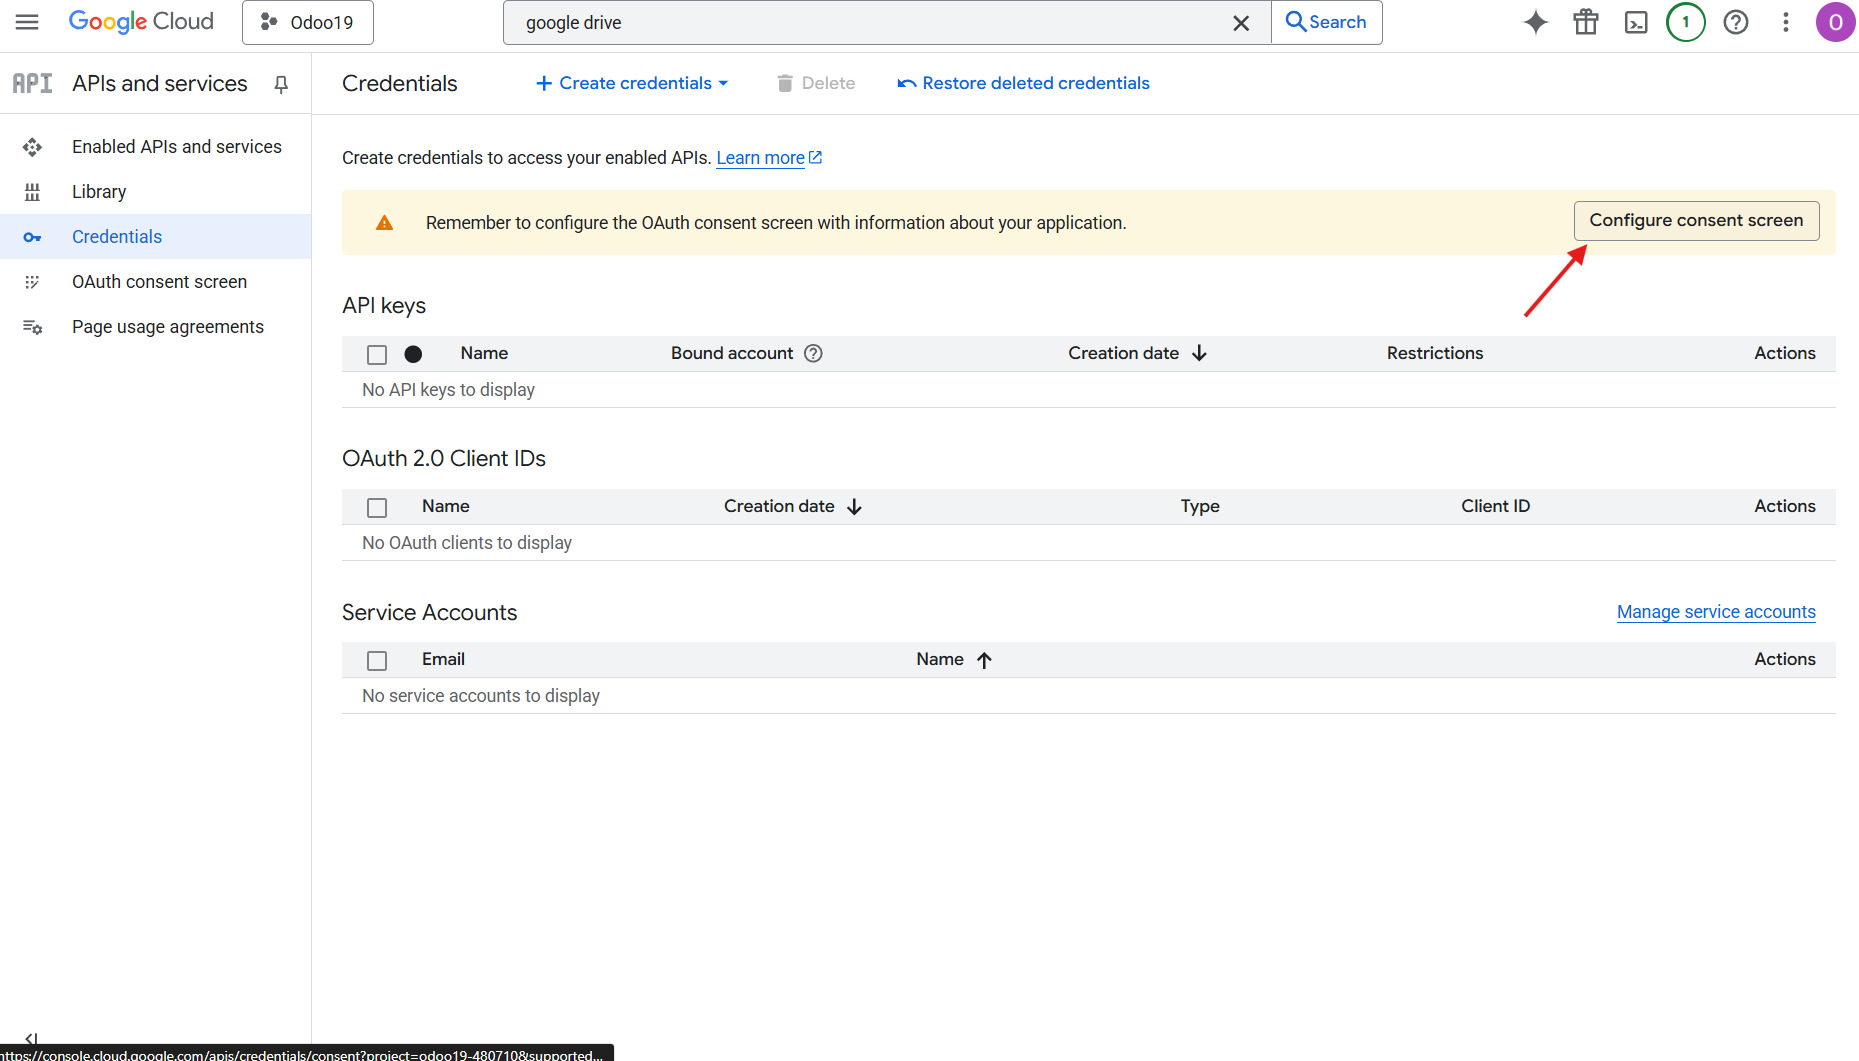
6. Then click 'Get started' and add app information. For the app name, select a suitable one, and for the user support email, enter your email. Then, click Next.

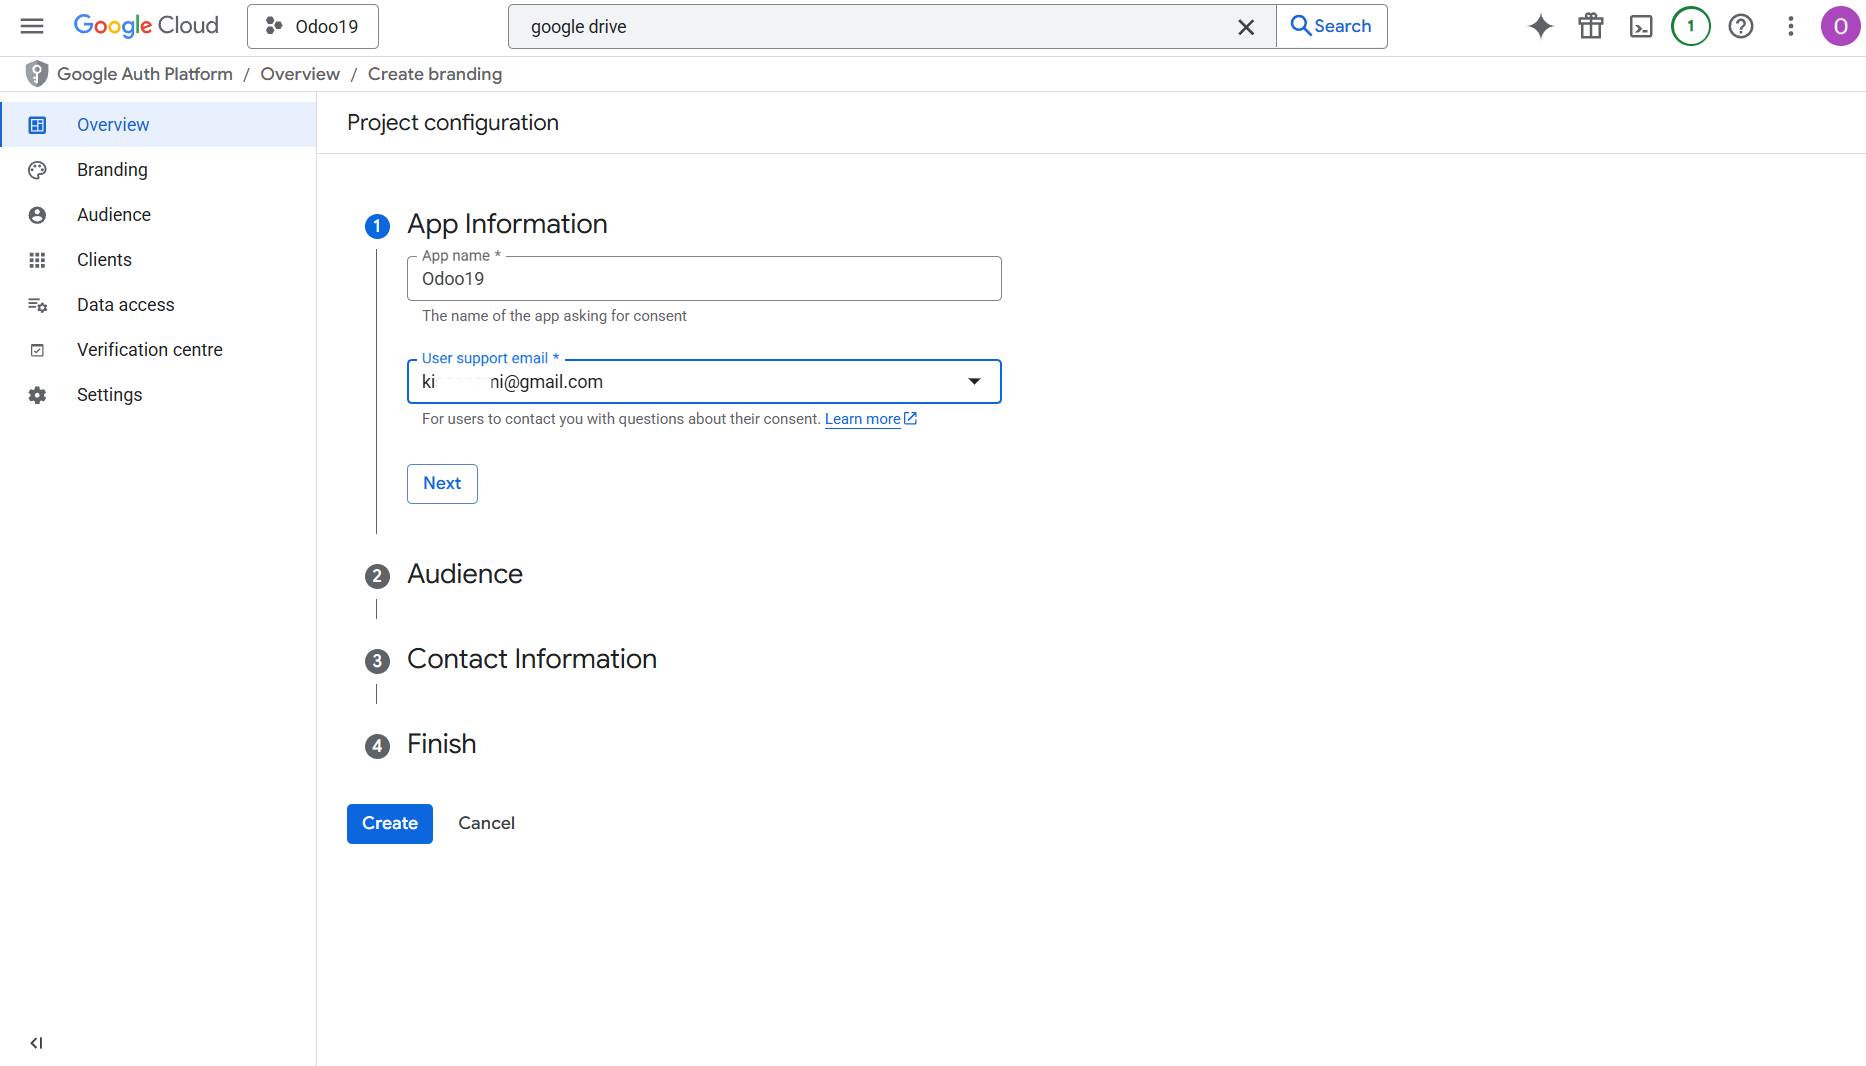
7. As the User Type, select 'External', and push 'Next'.
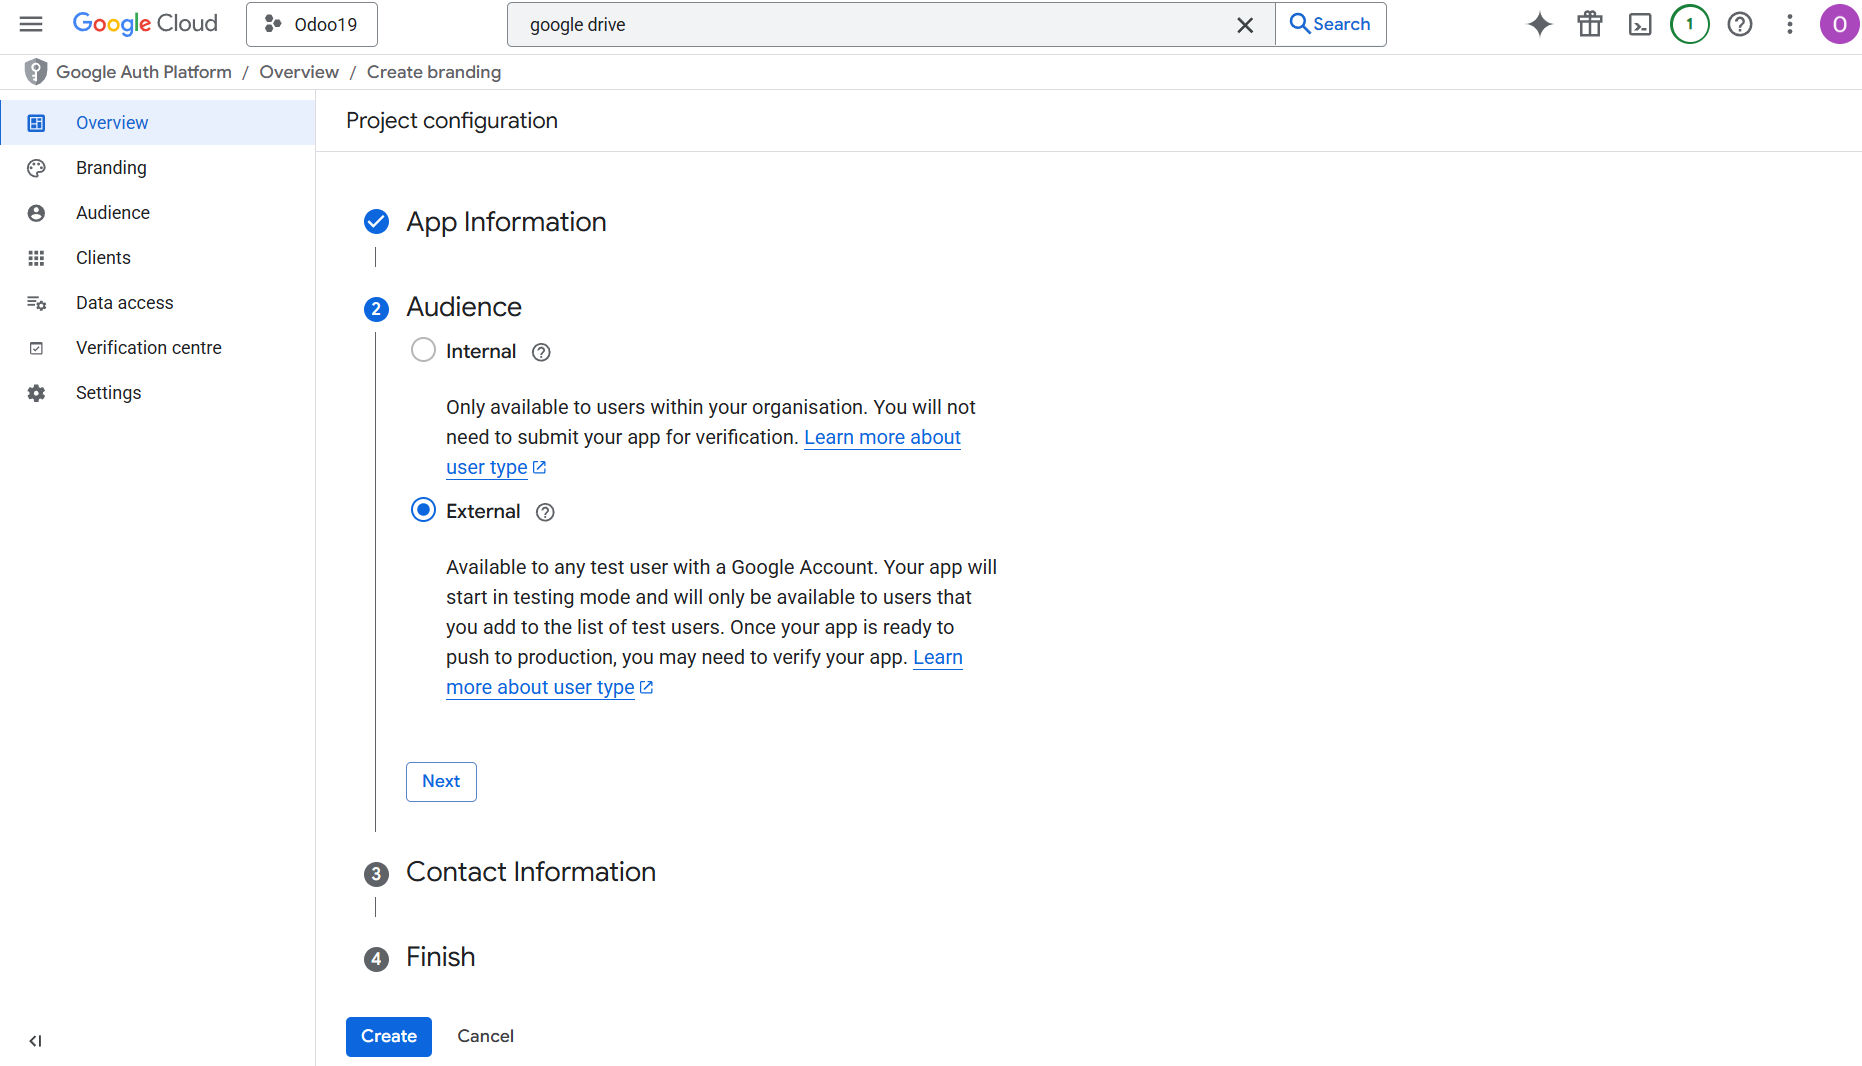
8. In the section Contact information, add your email address again and press 'Next'.
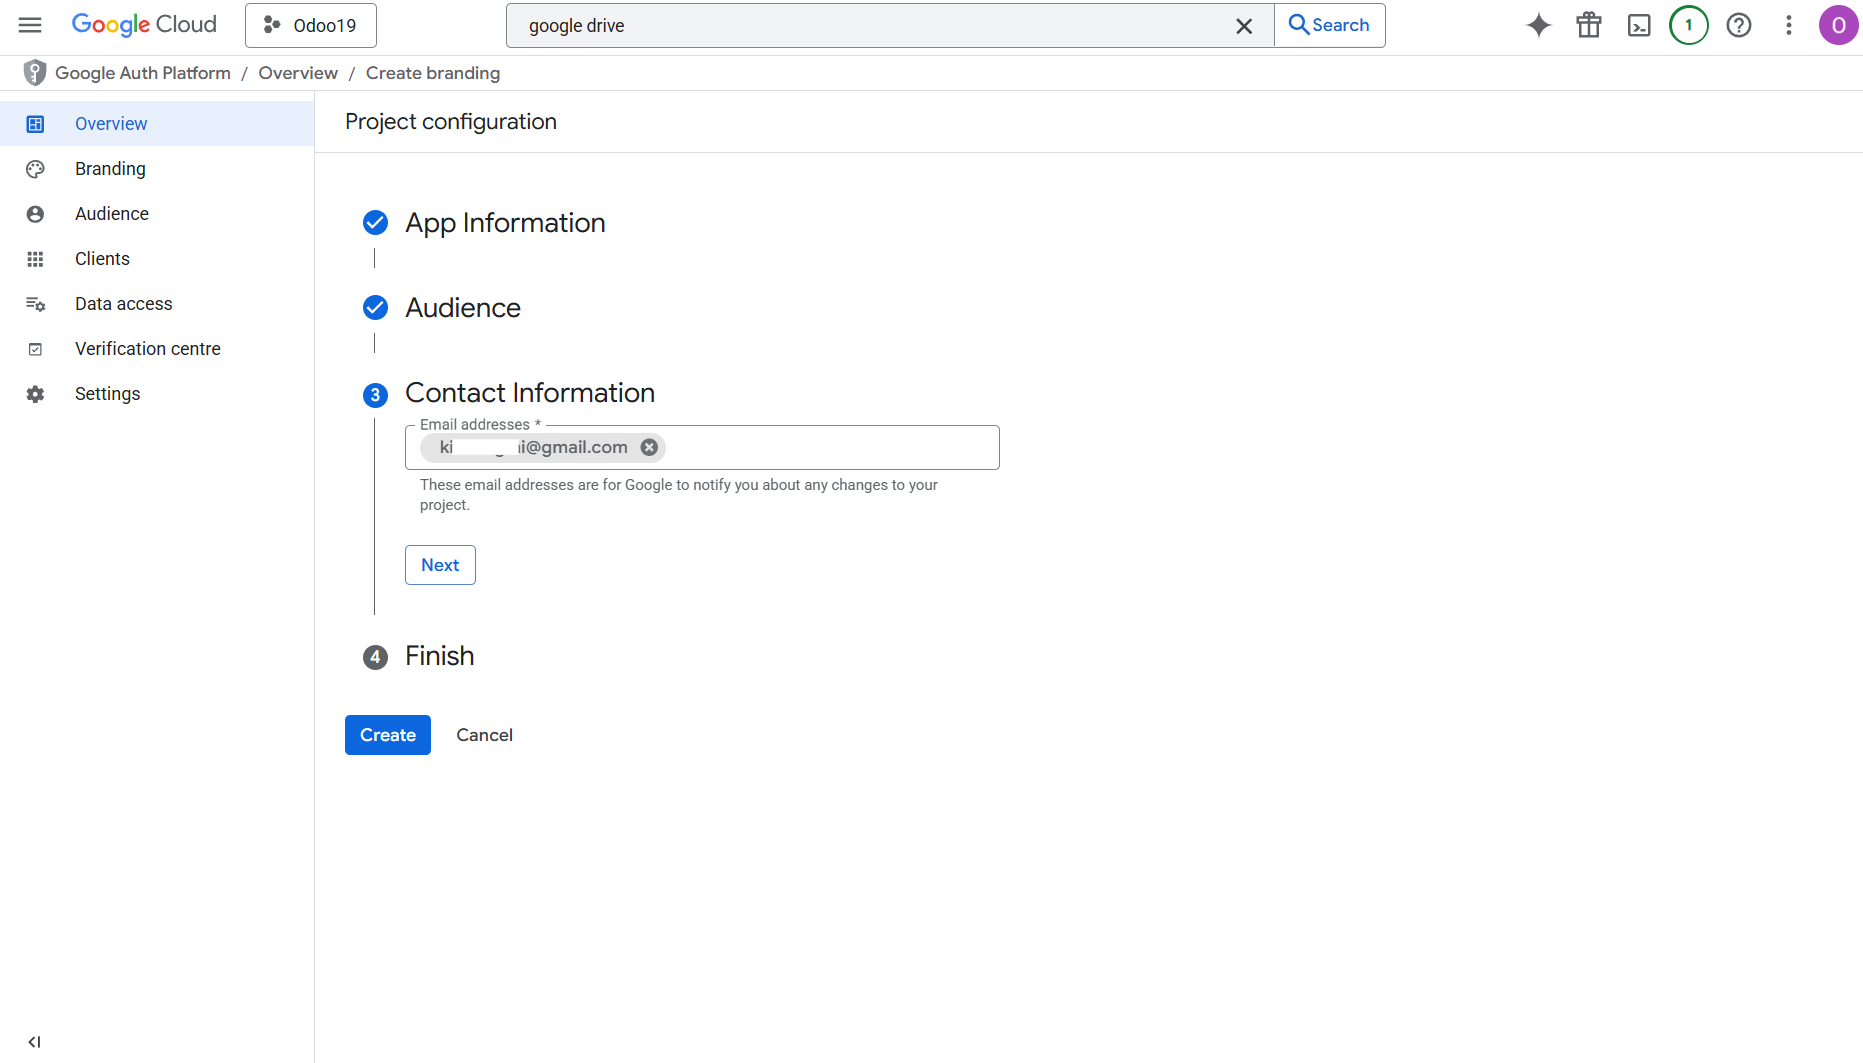
9. Then, agree to the 'Google API services user data policy', click 'Continue' and 'Create'.
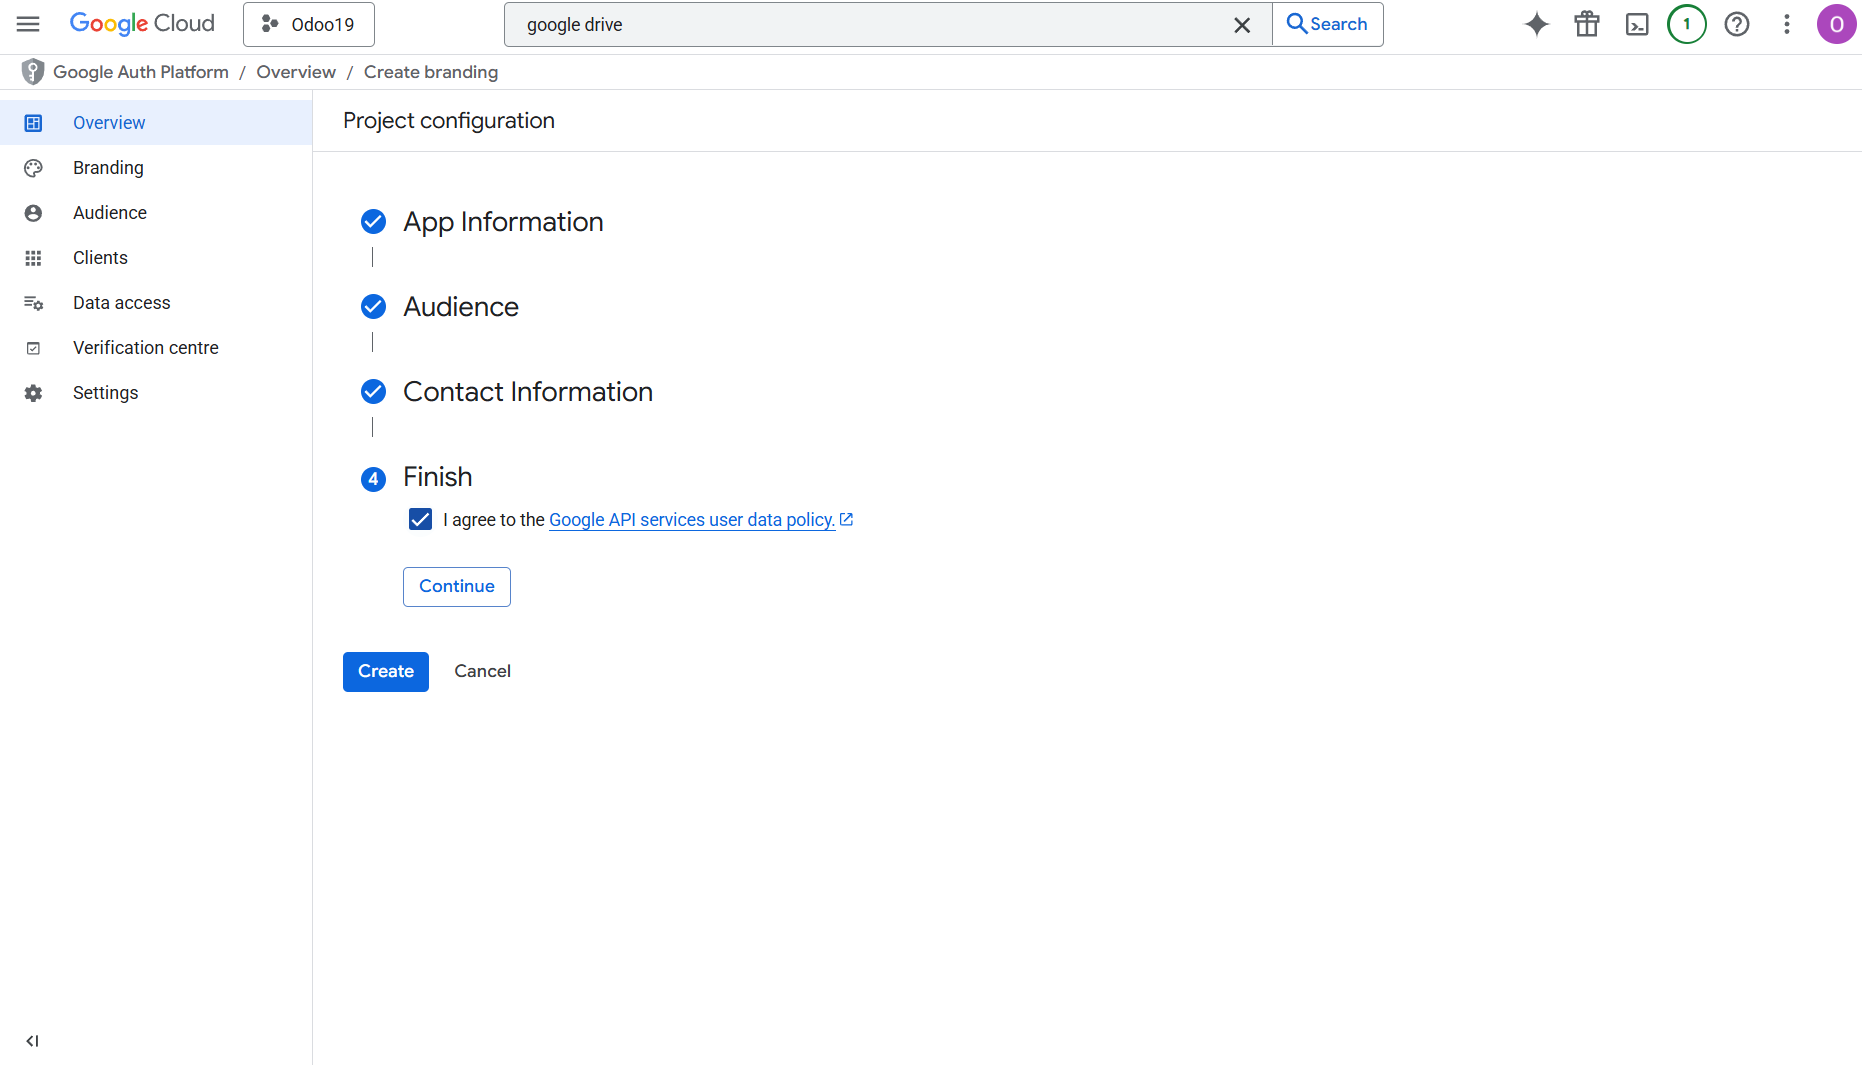
10. Then, click 'Create OAuth client'.
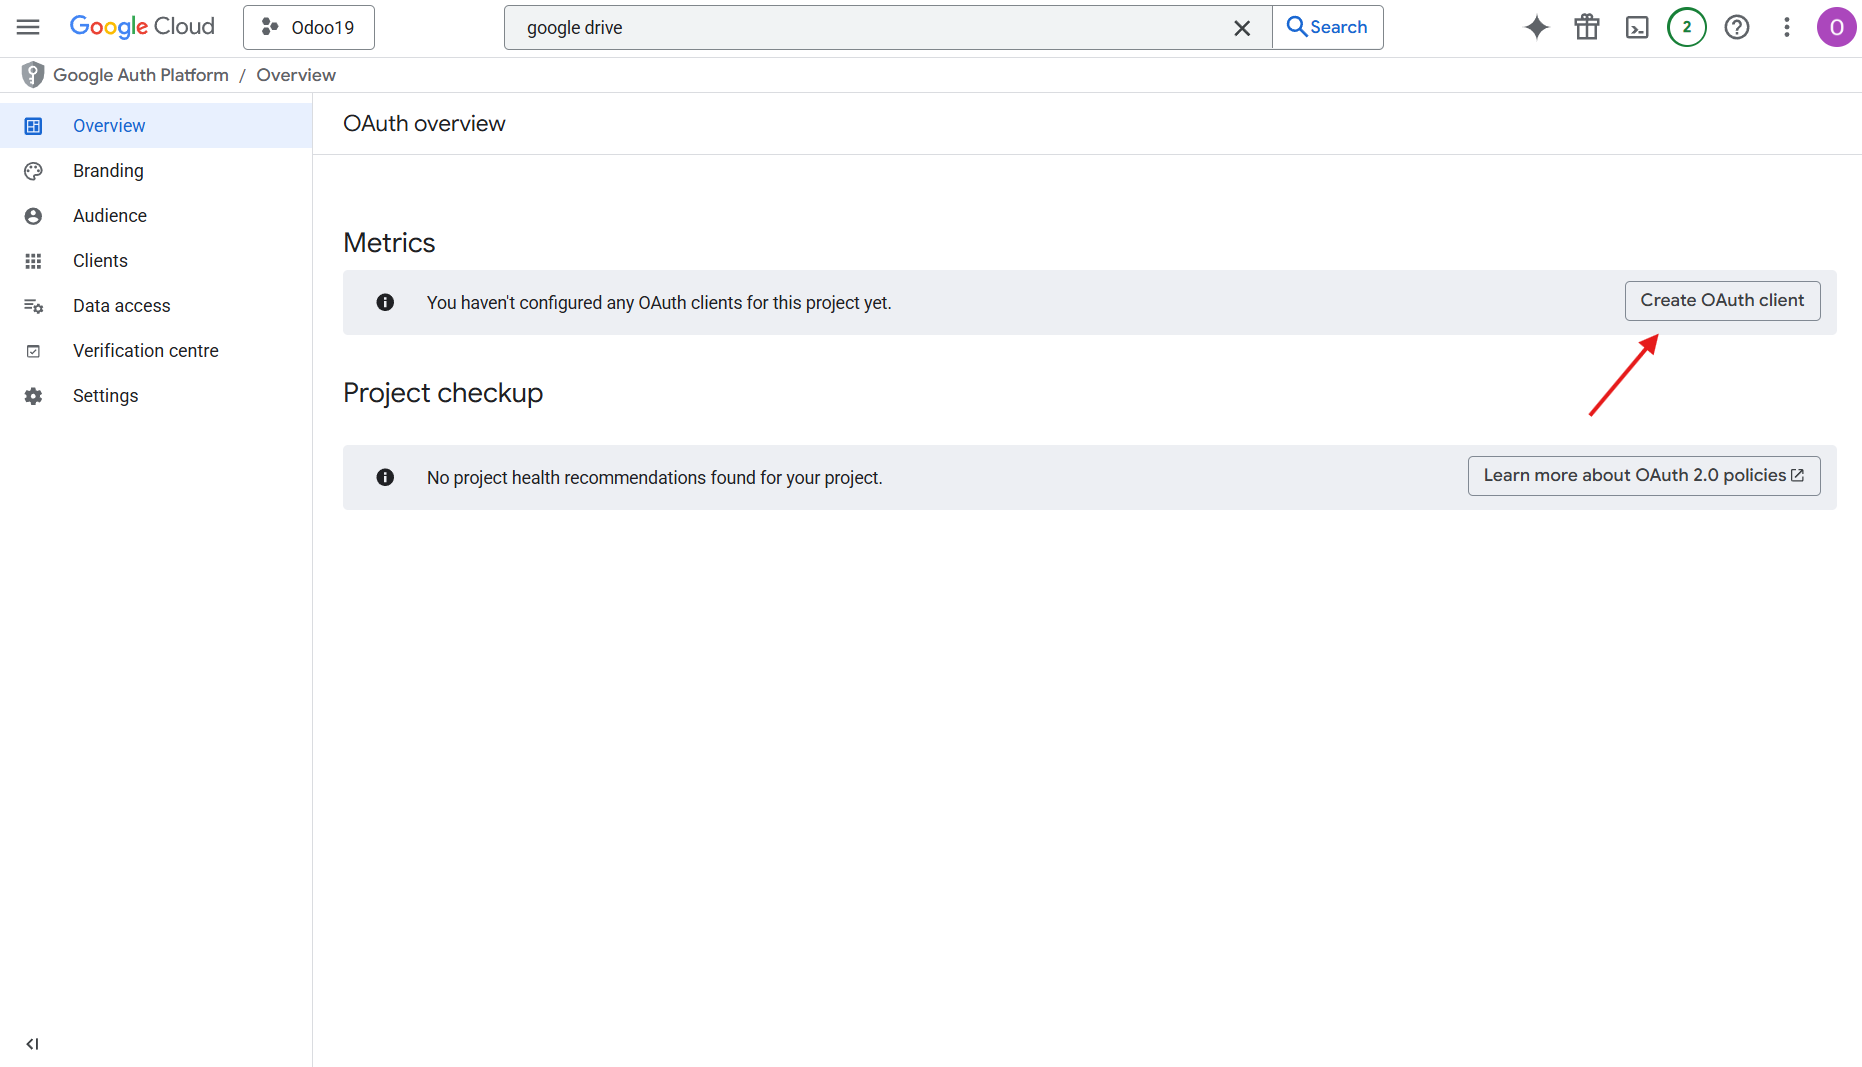
11. As the application type, choose 'Web application', and as the authorized redirect URI, add the link in a format [YOURODOOSITENAME]/google_drive_token (for example, https://odootools.com/google_drive_token).
12. Then click 'Create'.
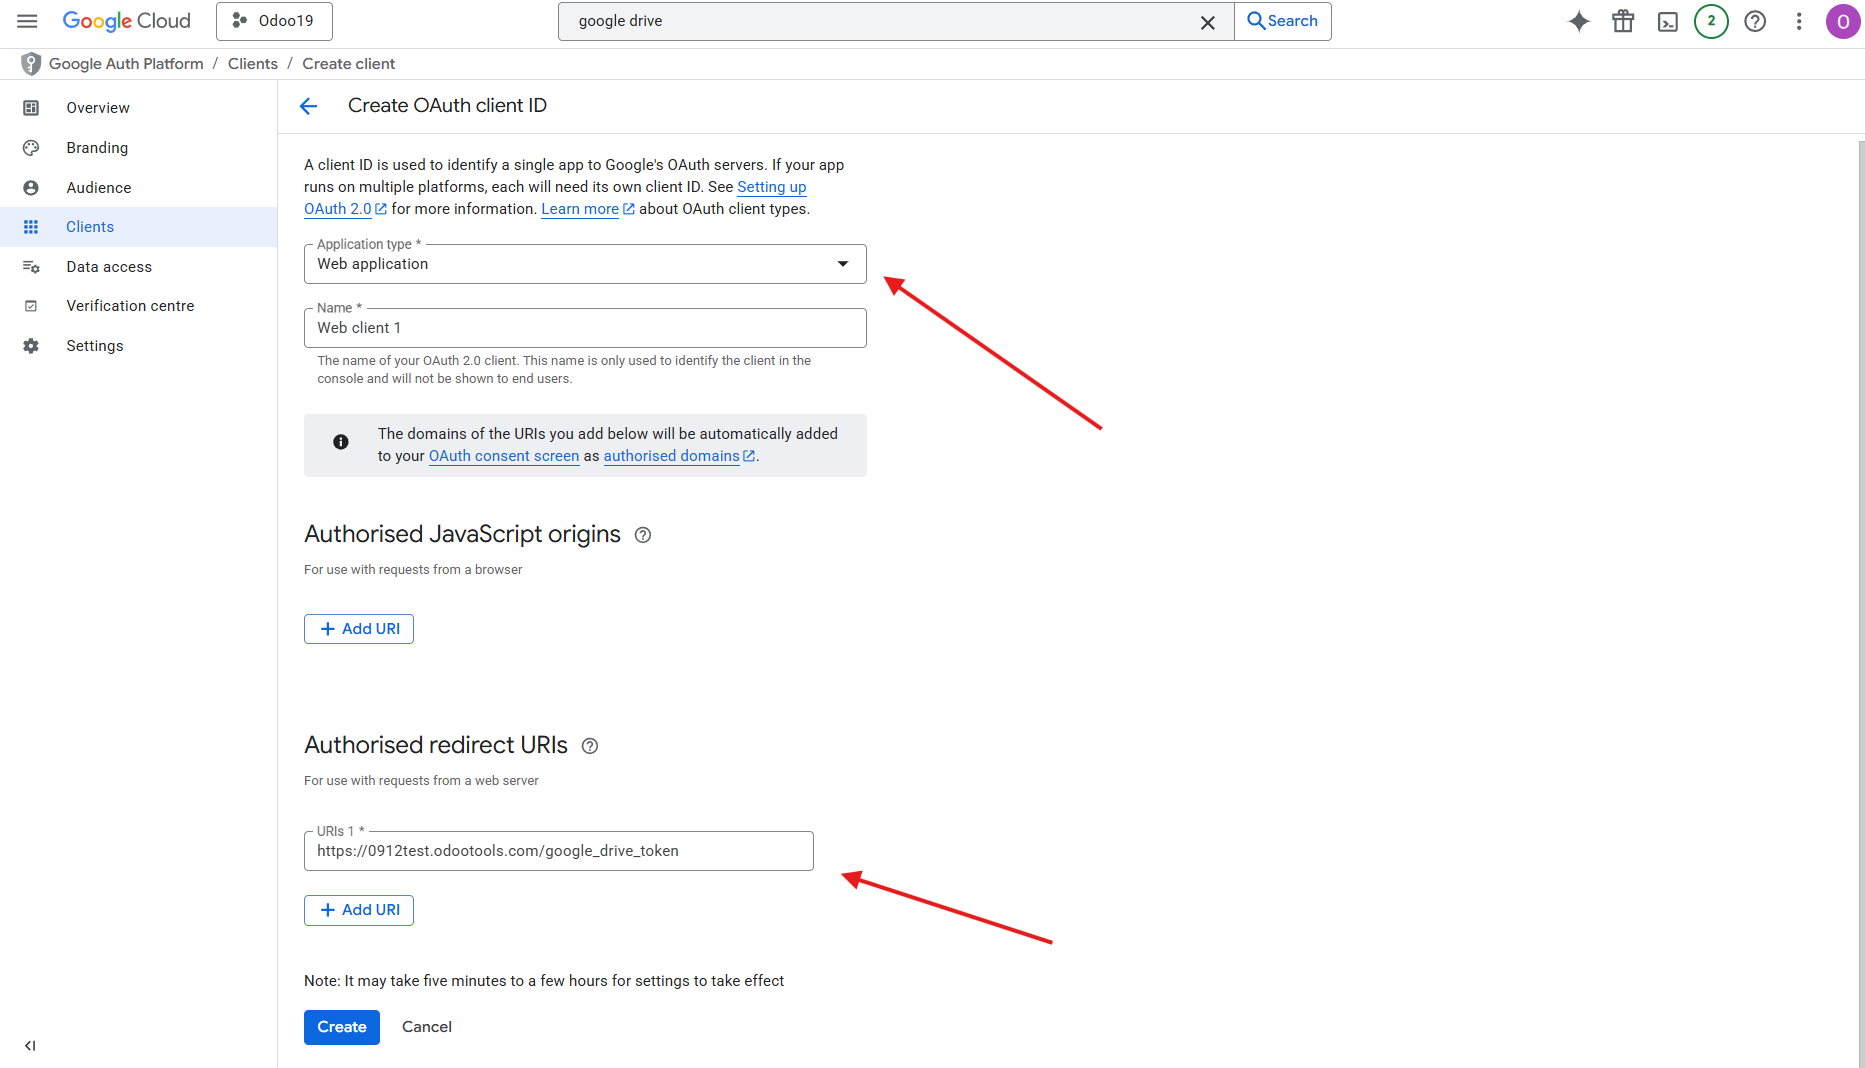
13. Go to the Cloud Storage > Configuration > Cloud Clients and click 'New'
14. Choose Google Drive from the list of available cloud clients
15. Optionally type the root folder name; otherwise, the default one, 'Odoo', will be used
16. Copy&Paste 'Client ID' to the 'App Client ID'
17. Copy&Paste 'Client Secret' into the field 'App Secret Key'
18. Insert previously generated redirect URL
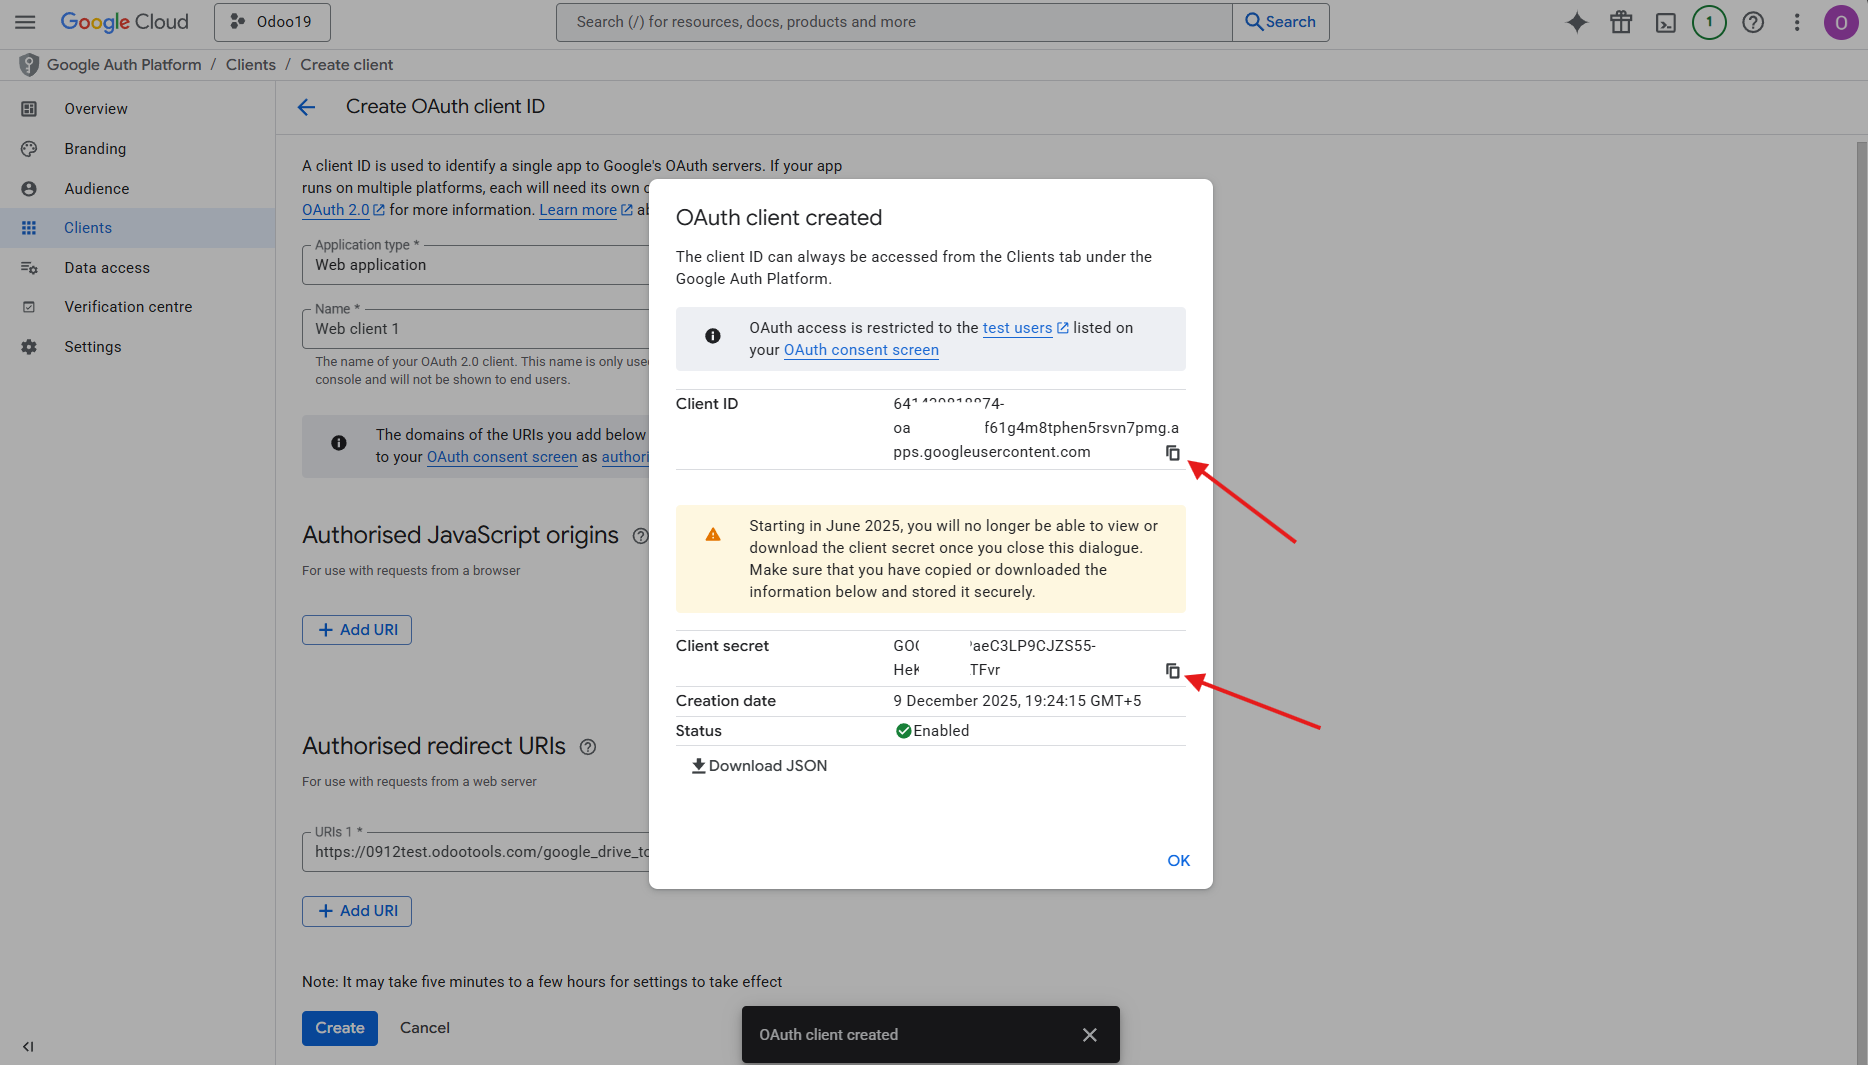
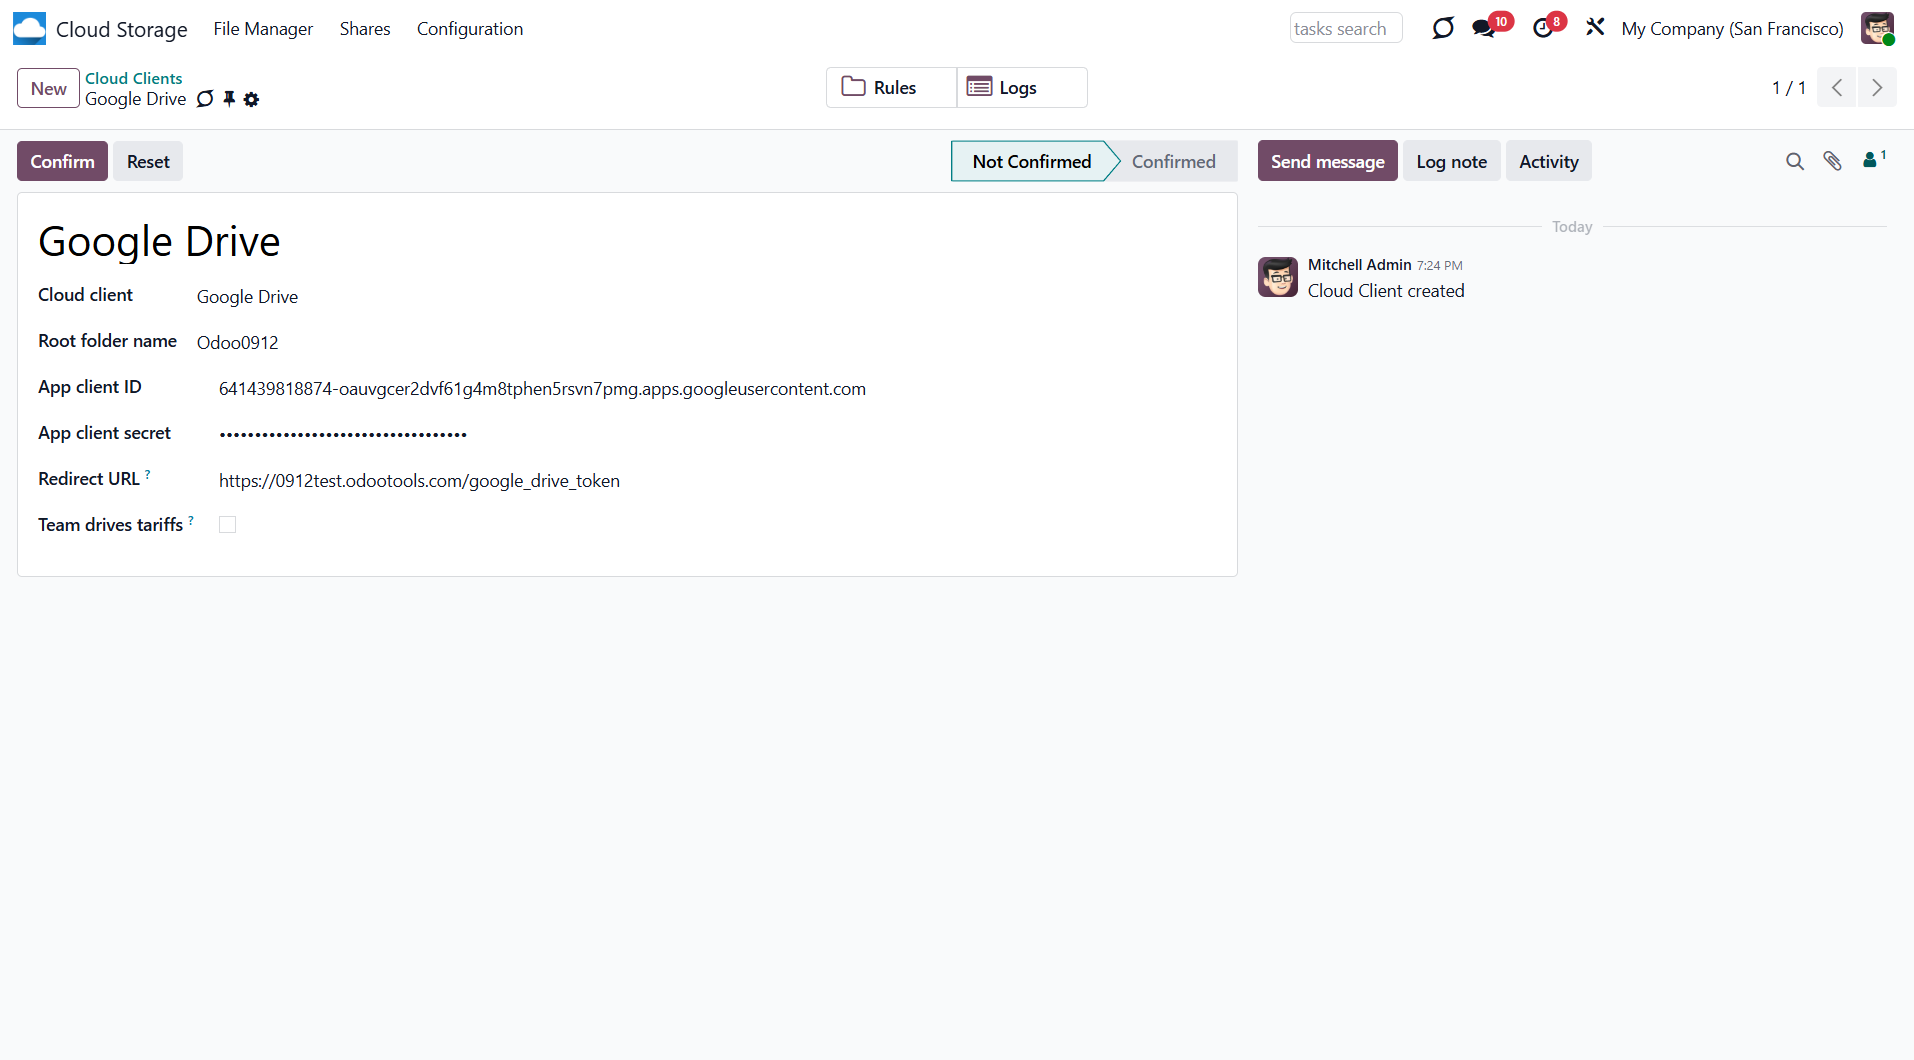
19. Go to the tab 'Audience', and in the section 'Test users', add your Gmail email address and click 'Save'.
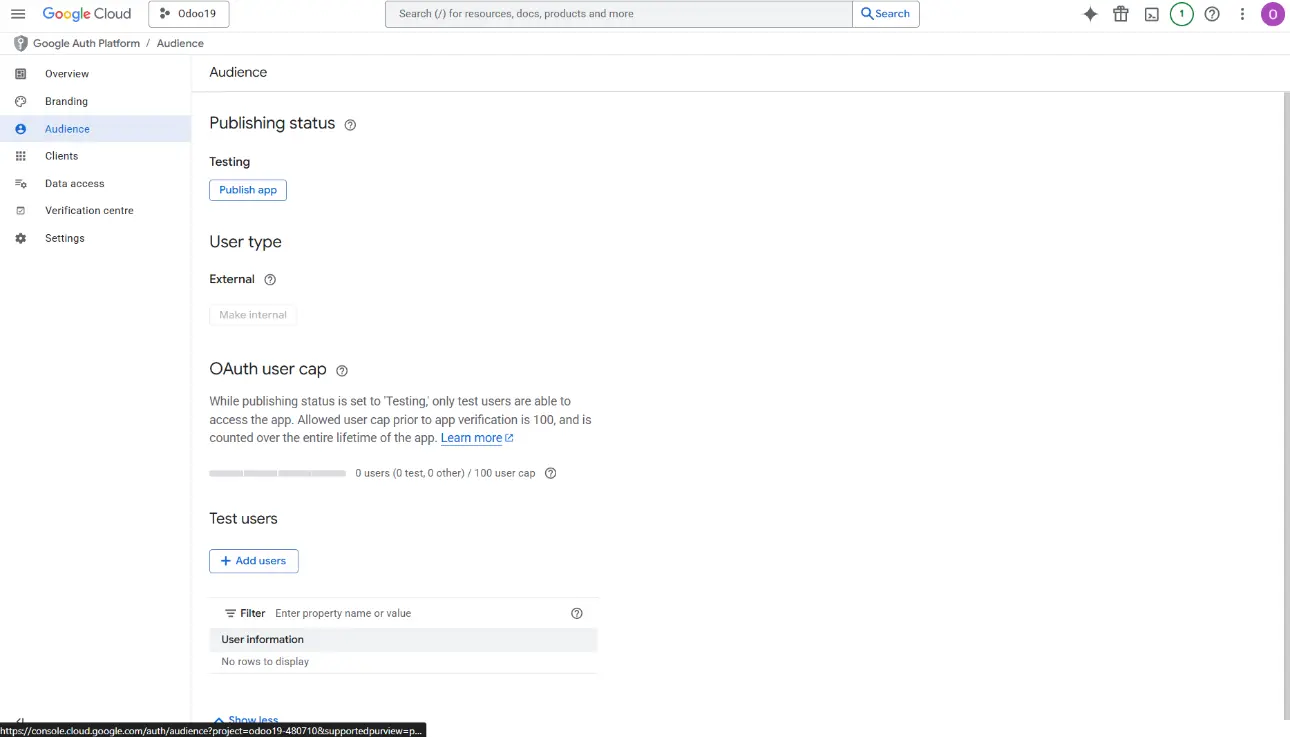
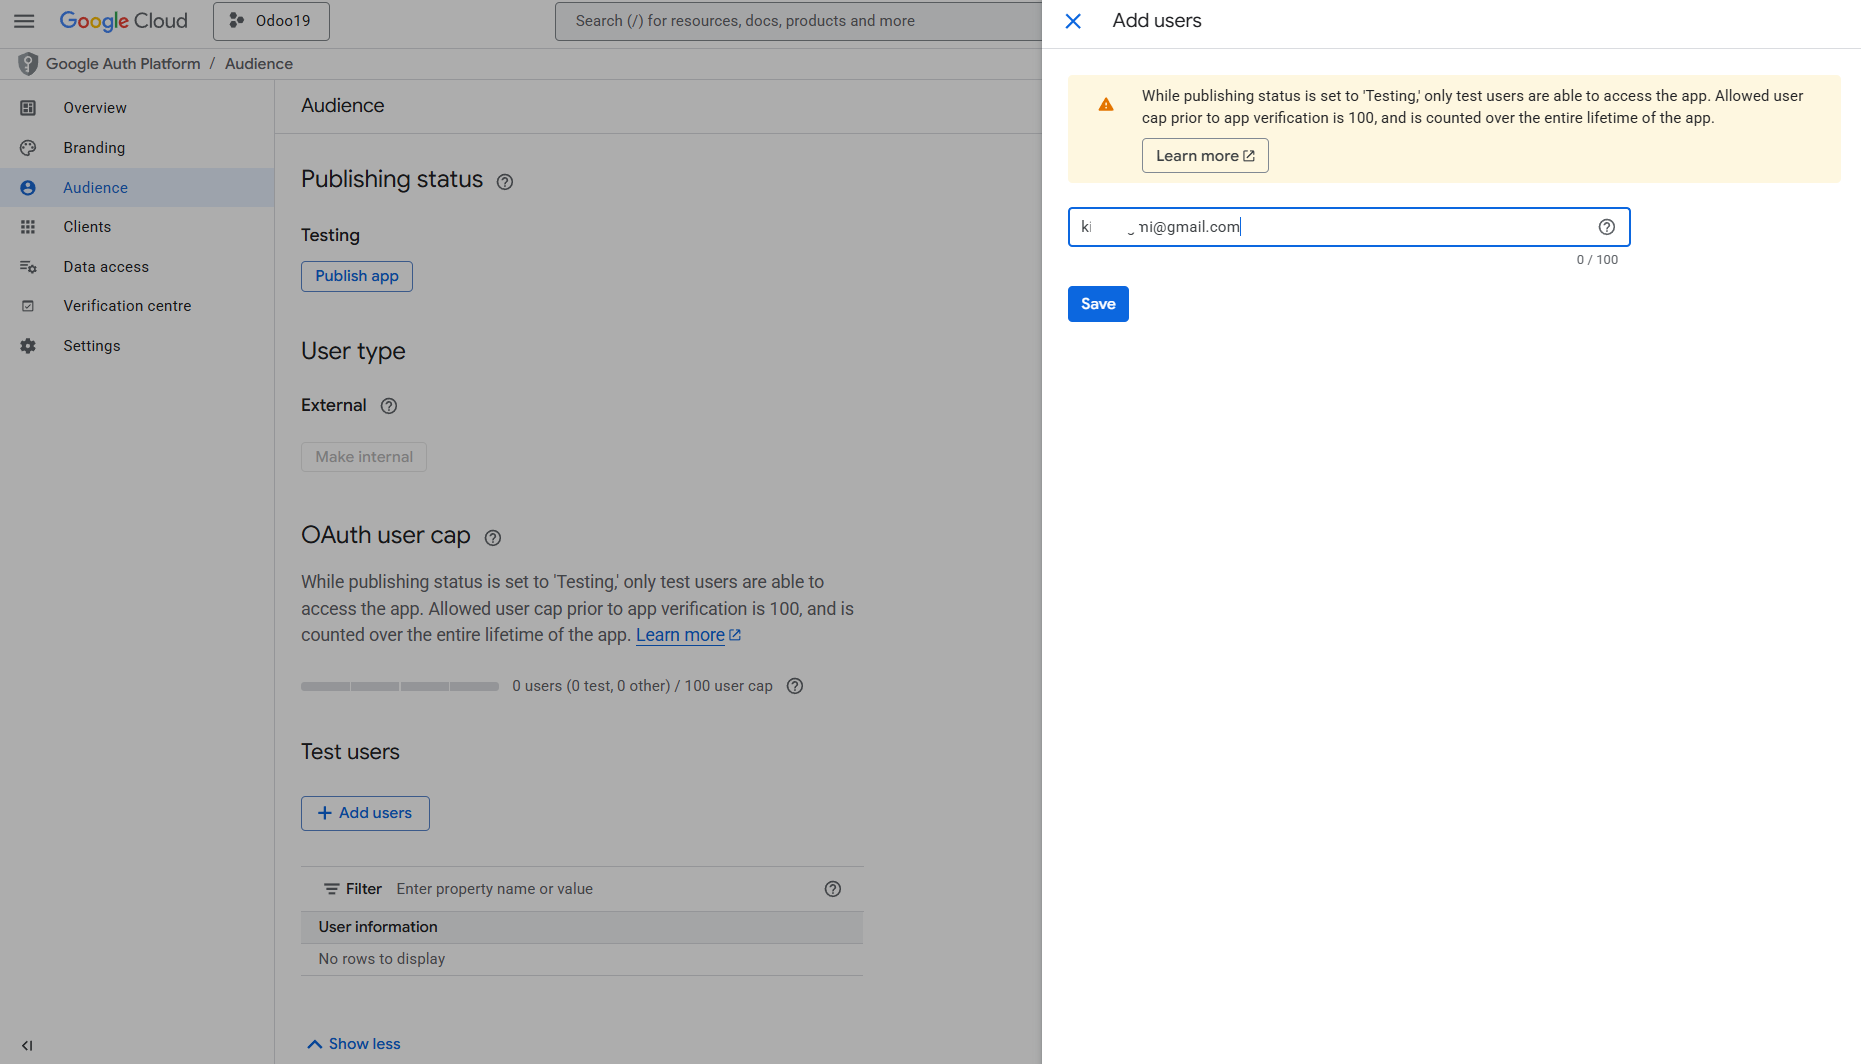
20*. If you use team drives, check the related box on the cloud card in Odoo.
Make sure you use team drives. In your Google Drive, you should find the item 'Team Drives' in the left sidebar. This feature is available only for business and enterprise tariffs.
If the 'Team Drive' option is enabled, introduce its name. It should be exactly the same as what you see in your Google Drive. Make sure that your user has full rights to all team drives.
If you configure a Team Drive account, make sure that your user has full rights to all Team Drives. Usually, the admin user sets the Google account up.
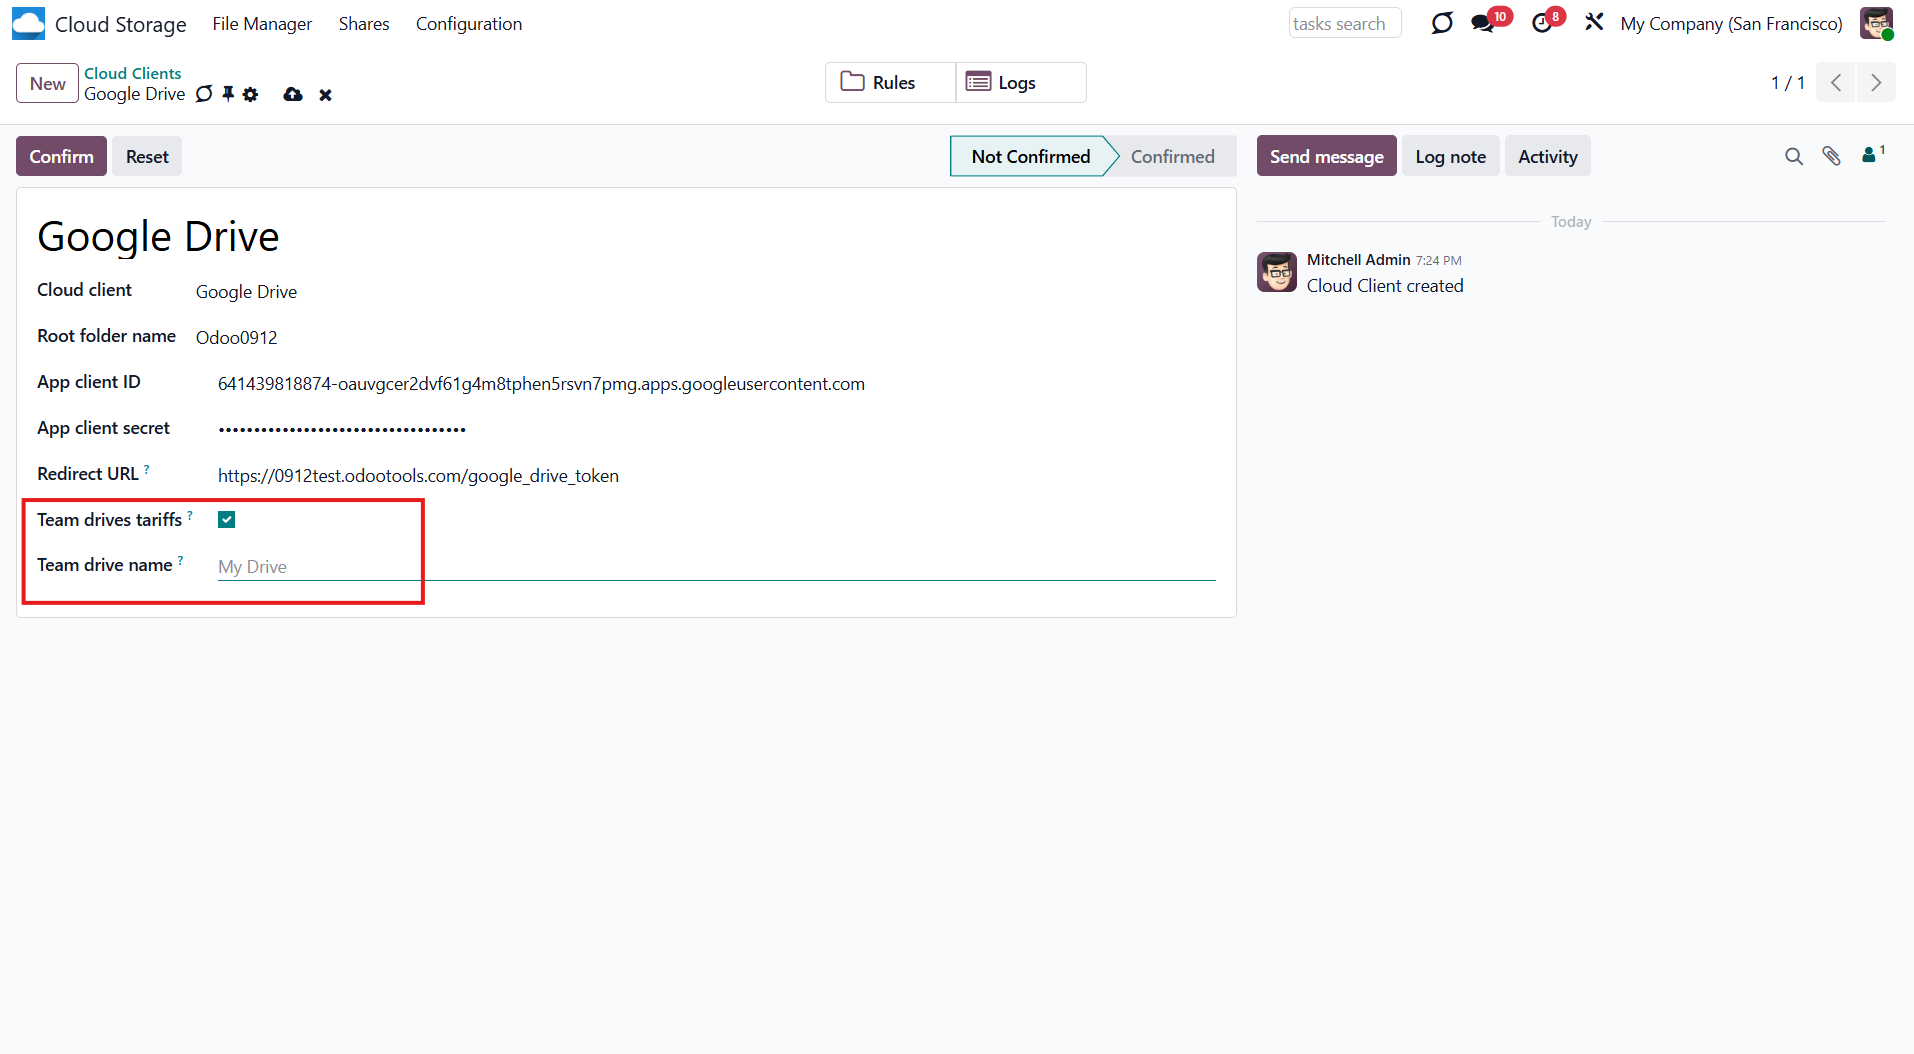
21. Press 'Confirm' to connect to the cloud.
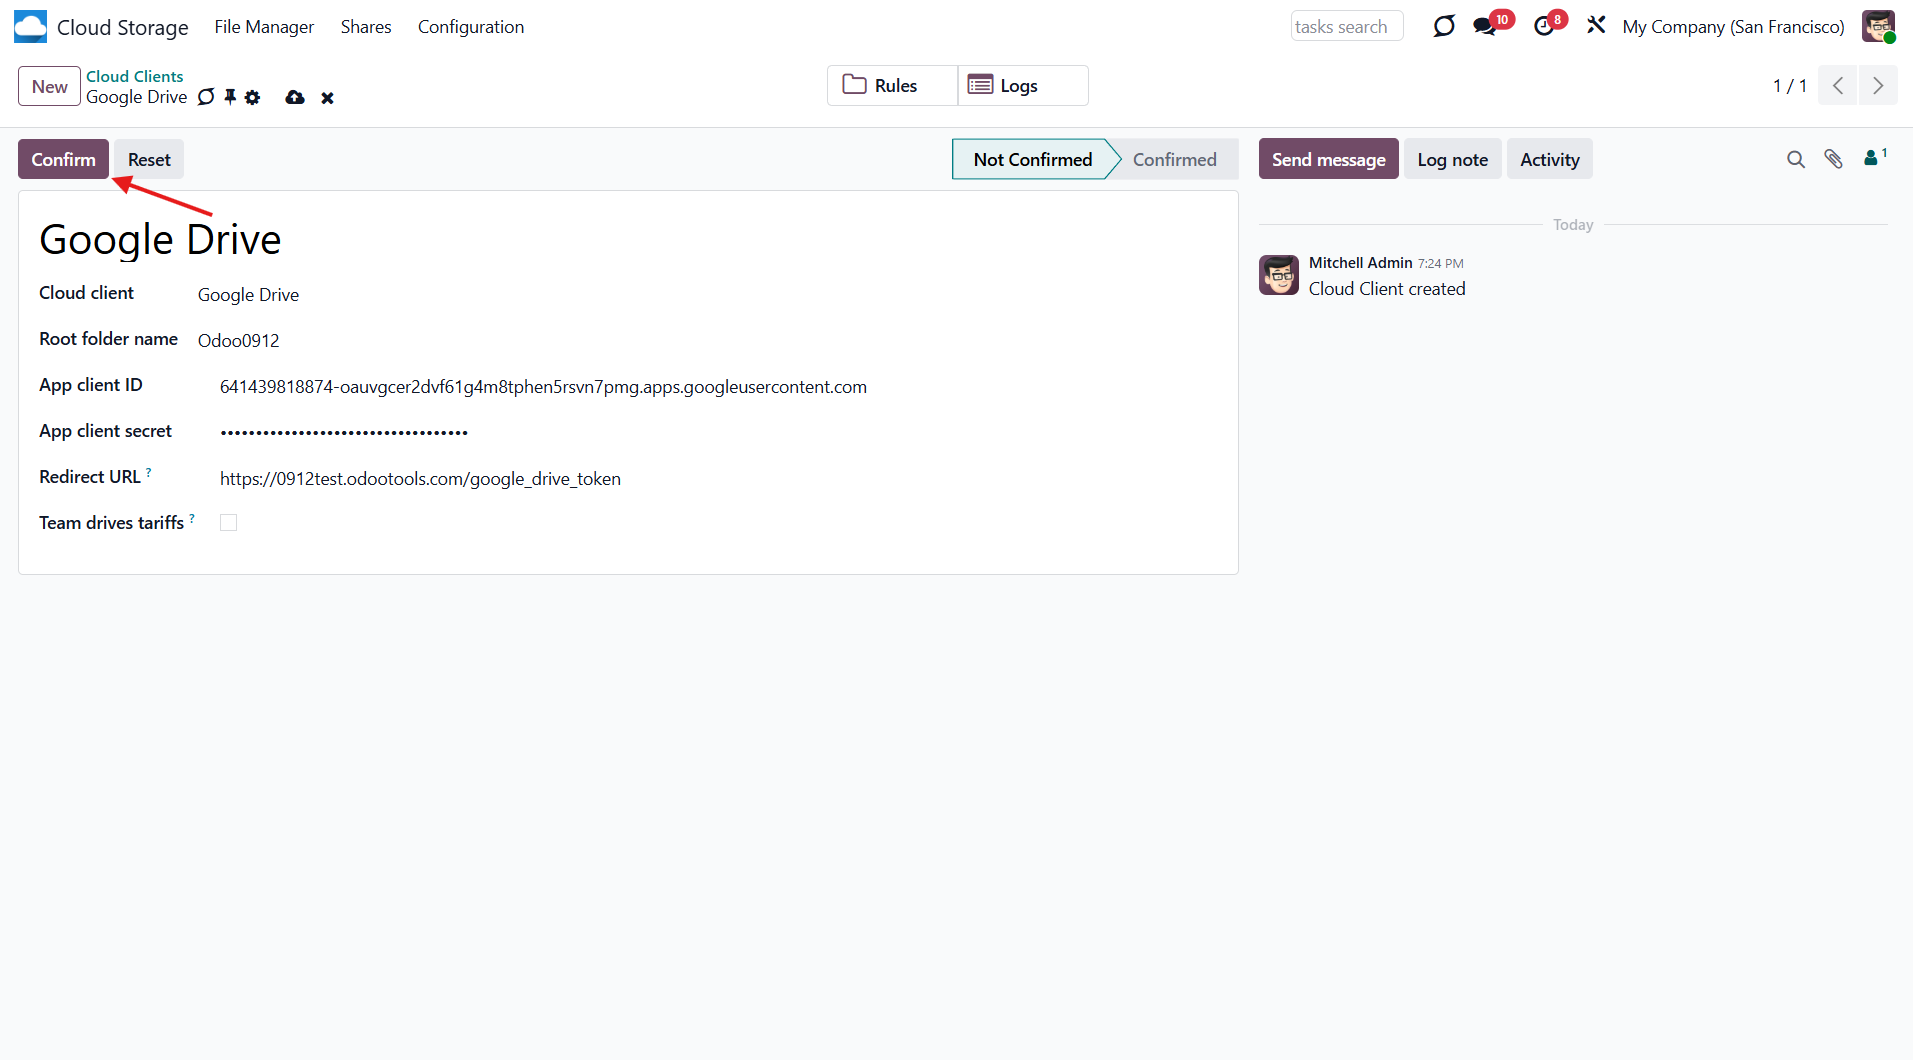
After that, you will be redirected to the Google login page. Check in, agree to all conditions, and grant the requested permissions.
After you log in, Google redirects you back to Odoo. The Google Drive—Odoo synchronization is ready to be completed.
Once setup is complete, you will be redirected to the module's settings. You will see the interface, which includes two buttons: 'Reconnect/Pause' and 'Reset'. You can use them to stop the sync and return the files and folders to Odoo (see Reconnection, Resetting or changing cloud client: reverse sync).

Reconnection
Reconnection may be required if the client hasn't been used for a while or when migrating the app from previous versions. In such a case:
1. Press the button 'Reconnect/Pause'
2. Press the button 'Confirm'.
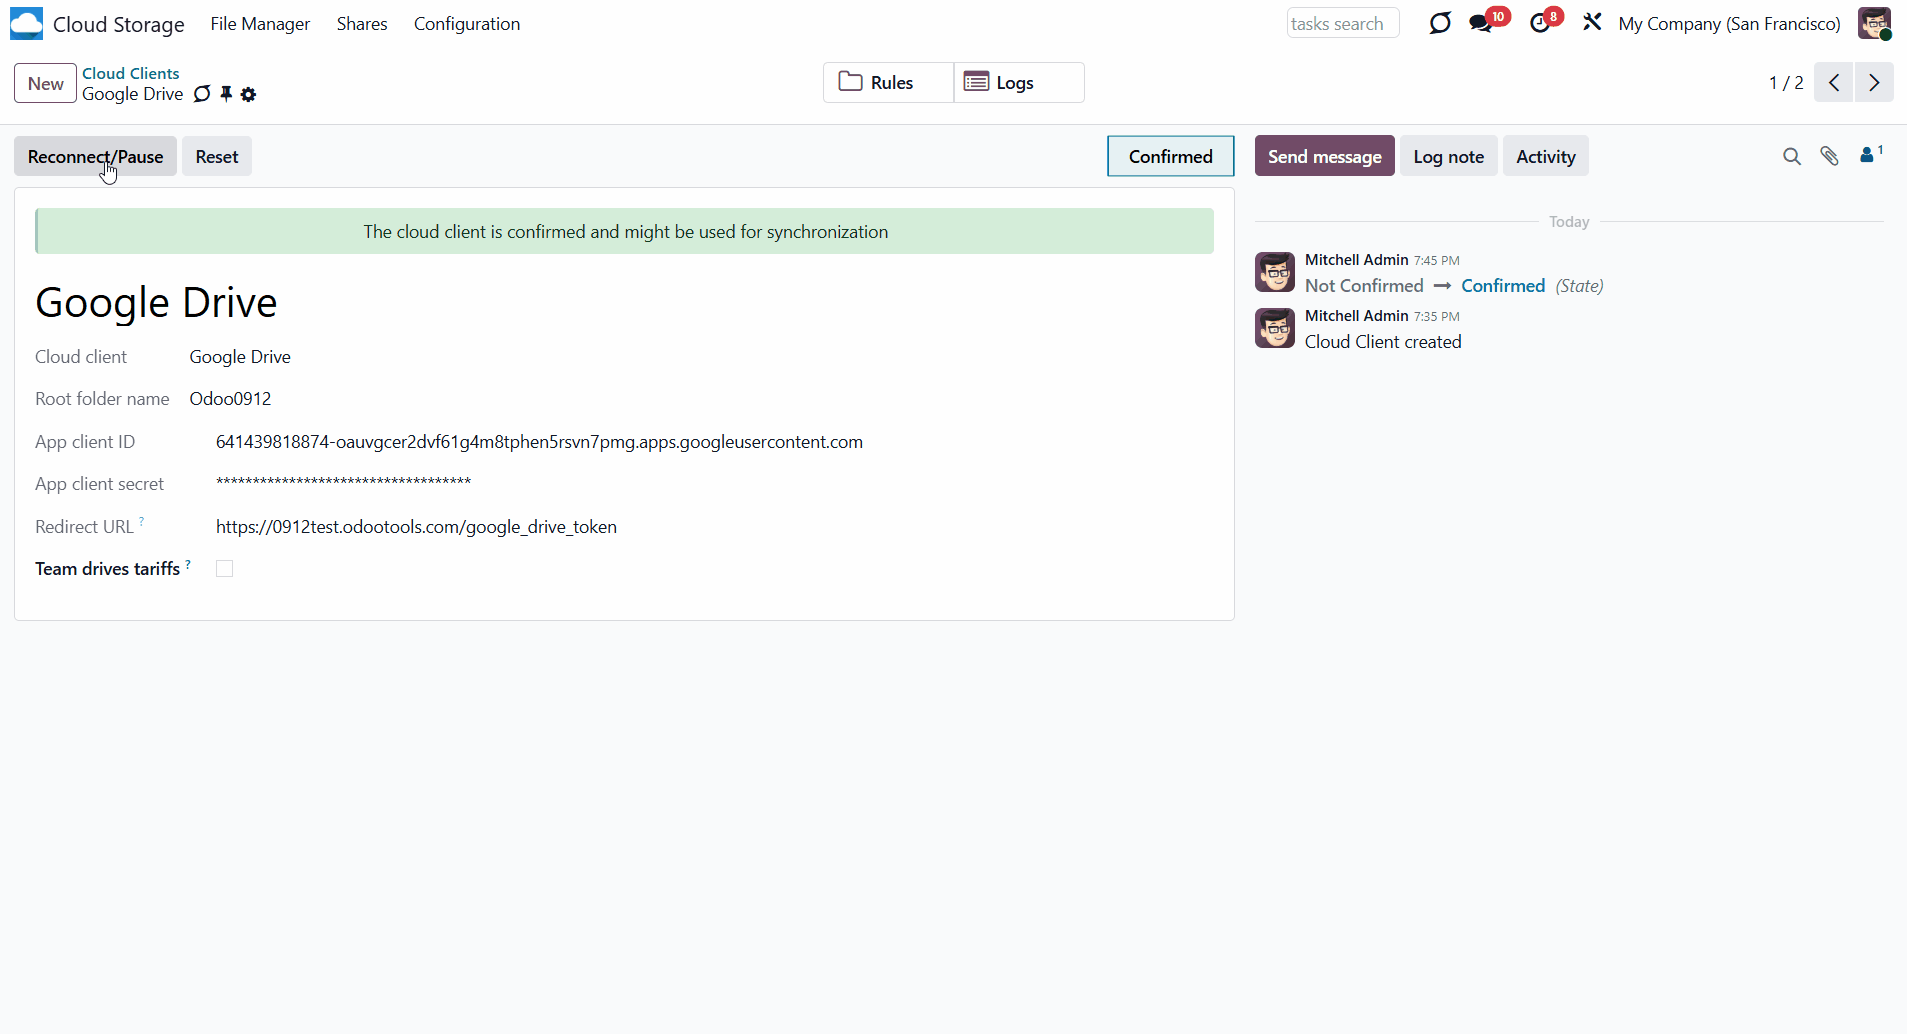
Peculiarities
1. To delete a folder or a file from Google Drive, it is necessary to delete it from the bin as well. Otherwise, it will continue being synced in the bin.
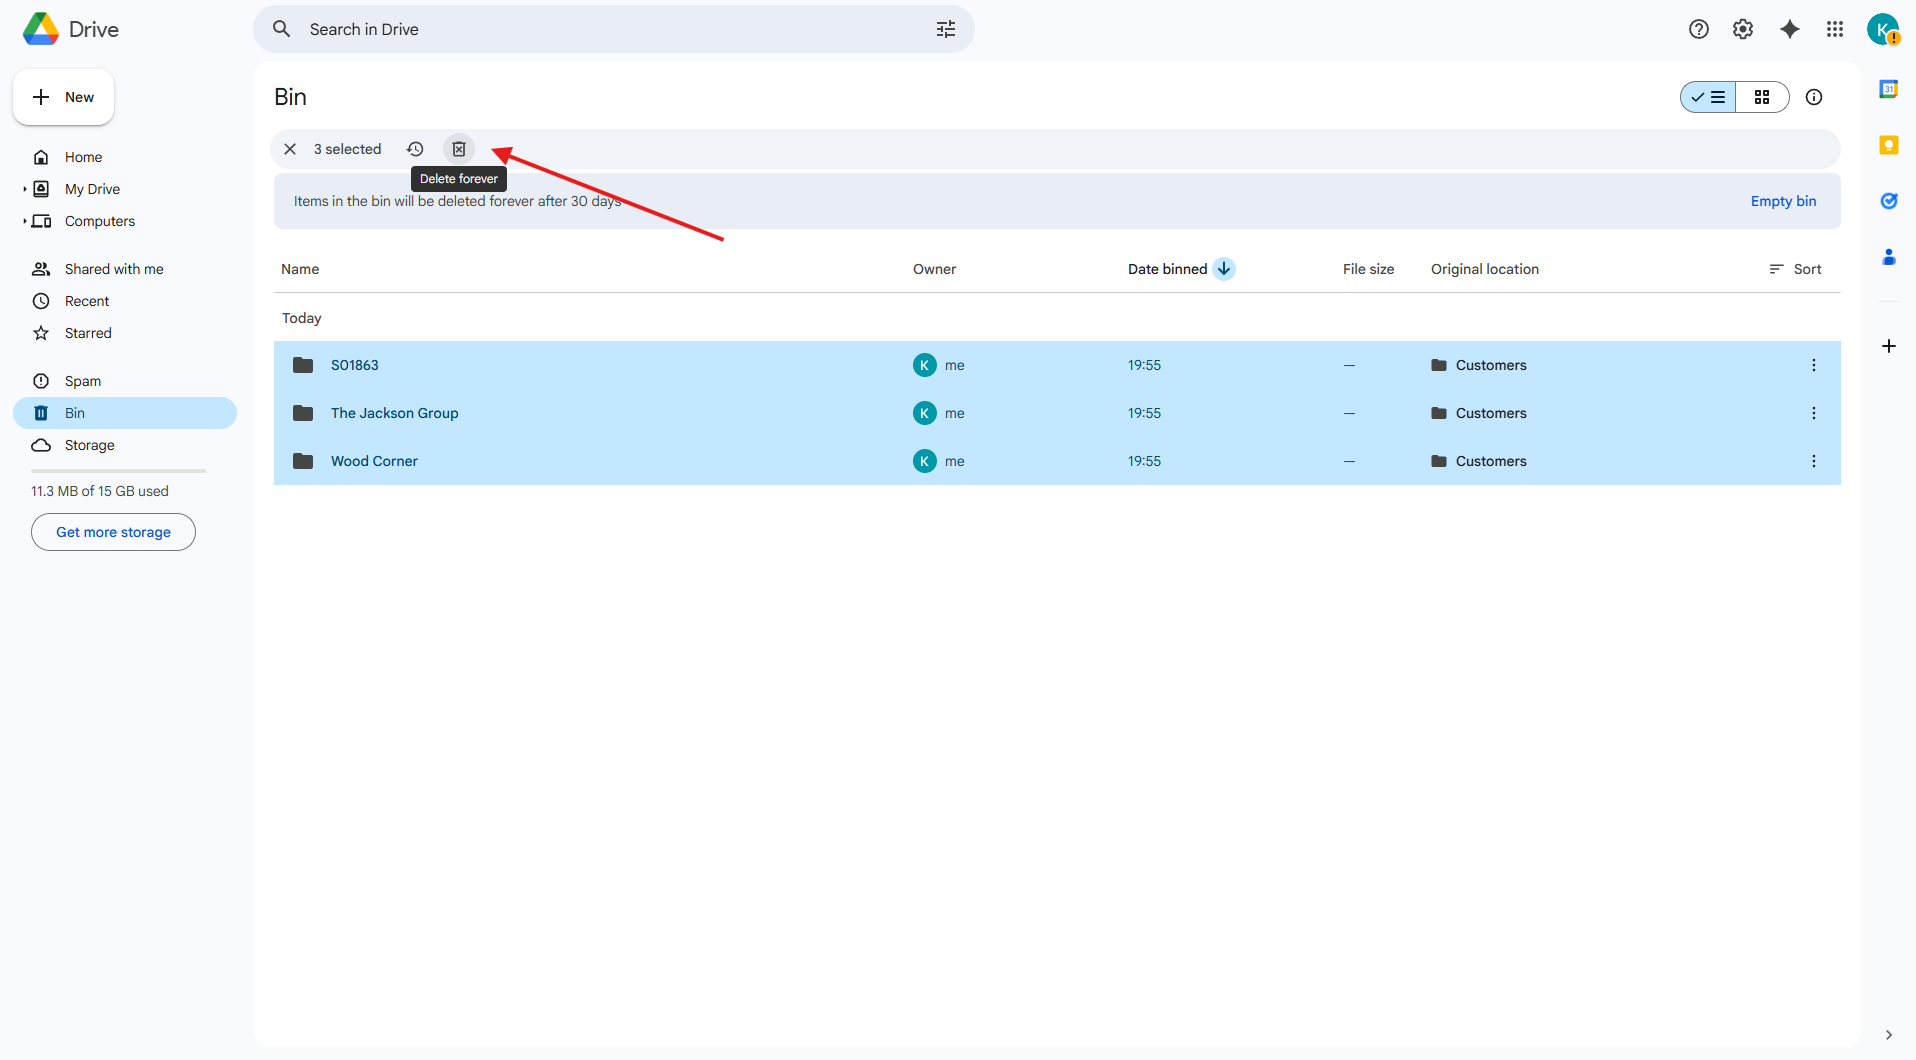
2. Sometimes, Google Drive revokes the token. In this case, reconnect the cloud client by clicking the 'Reconnect' button.
If the configured Google App is in the 'testing stage', its refresh tokens will expire exactly 1 week from now. To significantly increase token duration, go to the Google Developer Console> select your Project > OAuth consent screen, and find the 'Publishing status' section. If it is 'Testing', change that to 'In Production'.
OneDrive/SharePoint Implementation
OneDrive is a file hosting and synchronization service operated by Microsoft. It allows users to share and synchronize their files. Users whose computers run Windows 10 see OneDrive when they log in with their Microsoft Account. The available storage can be found in File Explorer. In Microsoft computers, it’s the default option for saving documents or files, which can help save space on your storage drive.
SharePoint is a cloud-based service for businesses that offers a range of applications and security features to support business teams' work. Users can upload a document, which is shared with co-workers immediately. They can also have their own personal storage space (OneDrive) where no one can see a document or file until it is shared with other users. SharePoint also enables you to control access to stored information and automate workflows across business units within the company.
OneDrive/SharePoint Odoo Integration is a tool to integrate OneDrive/SharePoint features into your Odoo business workflow. The app automatically stores Odoo attachments in OneDrive/SharePoint and provides instant access via web links. In this way, users can work comfortably with files in the cloud storage, while the results are fully available in Odoo. Sync works with both personal OneDrives and business SharePoint plans.
Python Dependency
The tool depends on the external libraries 'microsoftgraph'. Install this library for your Odoo server through the command: pip3 install microsoftgraph-python
Make sure that you are installing the package for the correct Python, the same one on which Odoo is run, usually, which assumes running the command under sudo. Contact your system administrator if, after installation, Odoo cannot detect the library.
Configuration and Log in
Before configuring, make sure your Microsoft user account has full admin rights to the OneDrive/SharePoint you want to connect to Odoo. This user is required only to grant permissions; the user data is not stored anywhere in Odoo and is no longer used. Also, make sure the Microsoft email address you use does not have a redirect (this usually happens when you configure your domain name while the primary address is still a Microsoft domain, such as @outlook.com or @office365).
When configuring a OneDrive/SharePoint account, ensure the user has full access. Usually, the admin user sets up the OneDrive/SharePoint account.

After the installation of the module in your database, it is required to finish the setup by doing the following:
1. Go to your Azure Portal: https://portal.azure.com/#blade/Microsoft_AAD_RegisteredApps/ApplicationsListBlade
2. Click 'New registration'
3. Introduce a new name for the application
4. As the supported account types, choose 'Accounts in any organizational directory (Any Azure AD directory - Multitenant) and personal Microsoft accounts (e.g., Skype, Xbox)'
5. Assign the redirect URI as [YOURODOOSITENAME]/one_drive_token (e.g., https://odootools.com/one_drive_token) and click 'Register'
6. Go to the Cloud Storage > Configuration > cloud clients and click 'New'
7. Choose OneDrive or SharePoint from the list of available cloud clients
8. Optionally type the root folder name; otherwise, the default one, 'Odoo', will be used
9. Copy the Application Client ID to the Odoo field 'App Client Id'
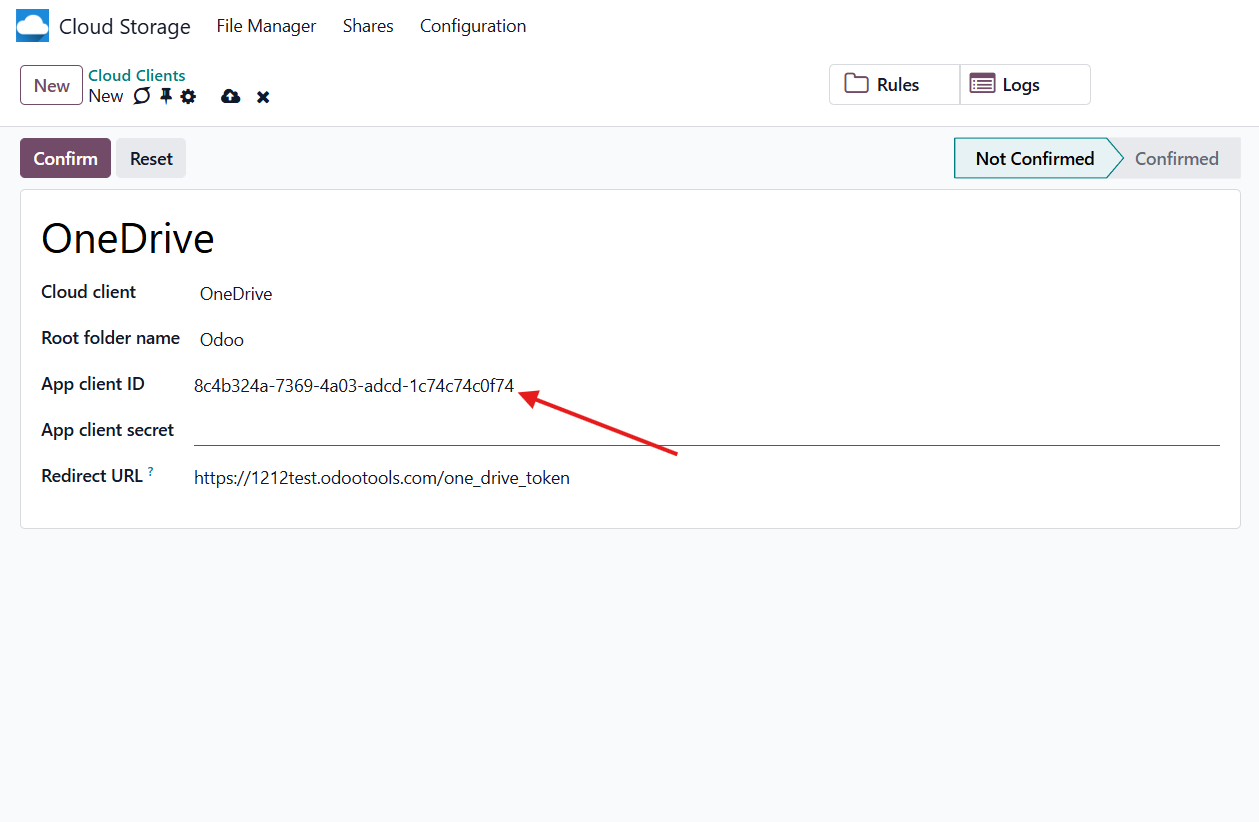
10. Go to Certificates & secrets - Click 'New Client Secret'. Copy the secret value to the Odoo field 'App Secret Key'
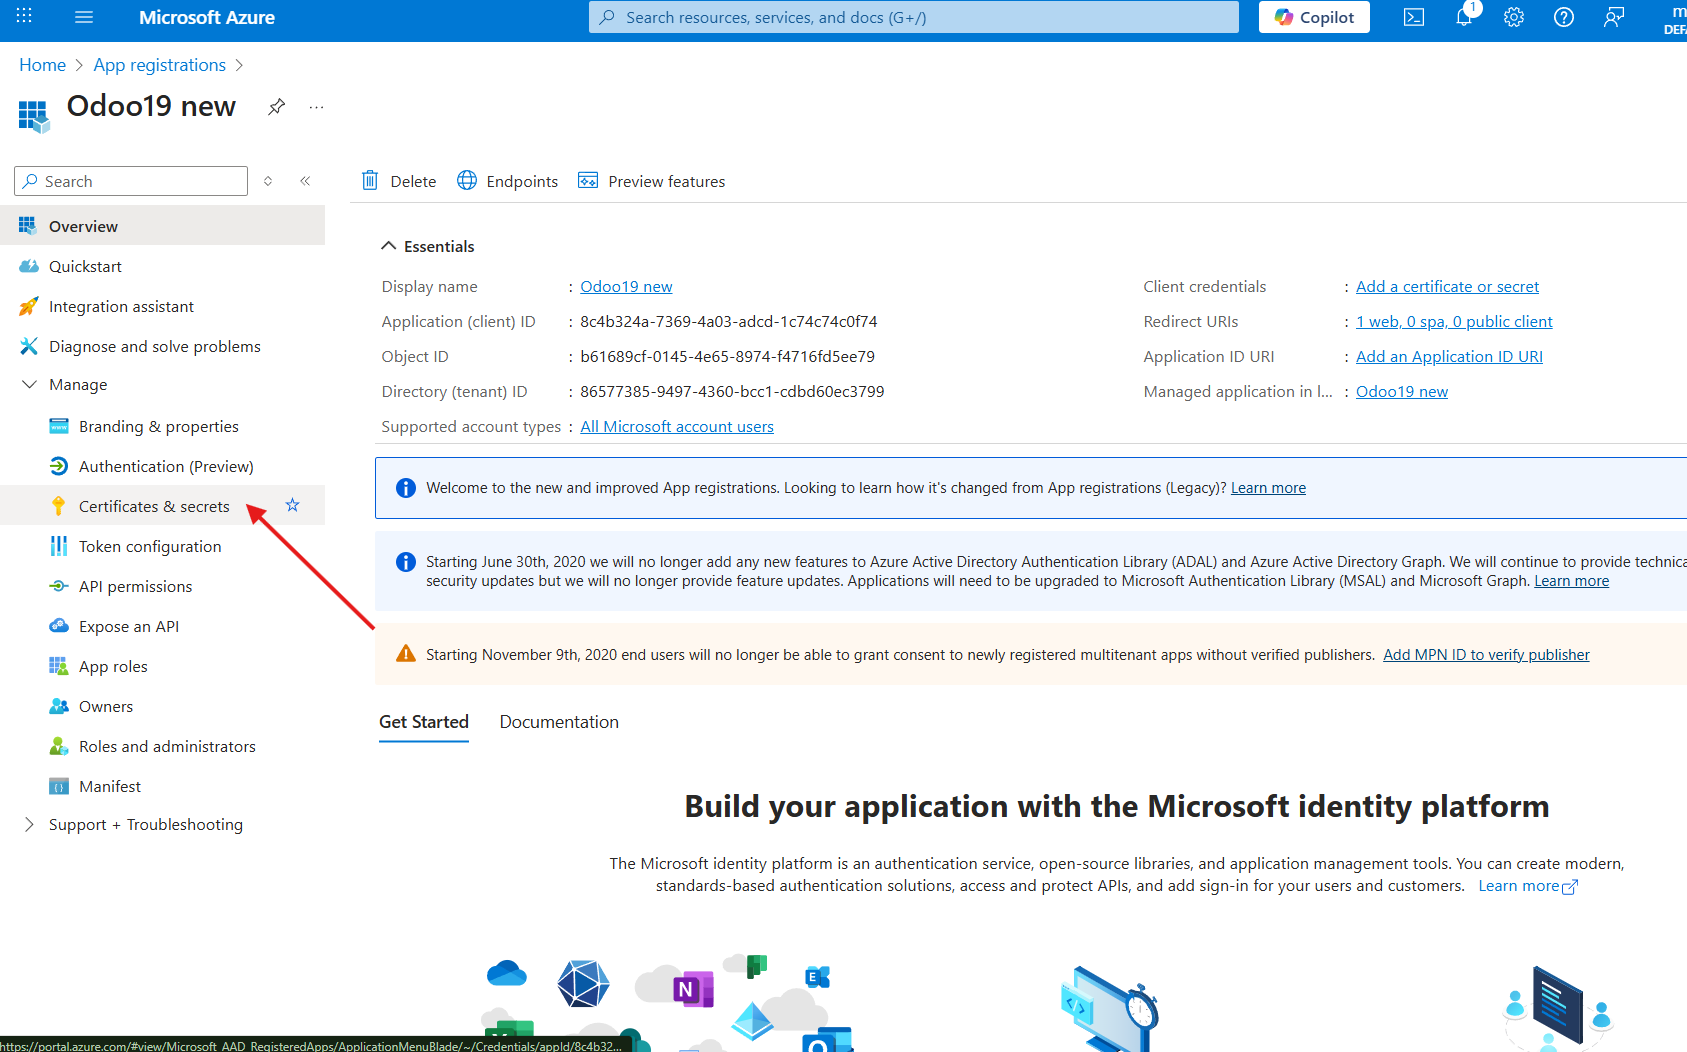
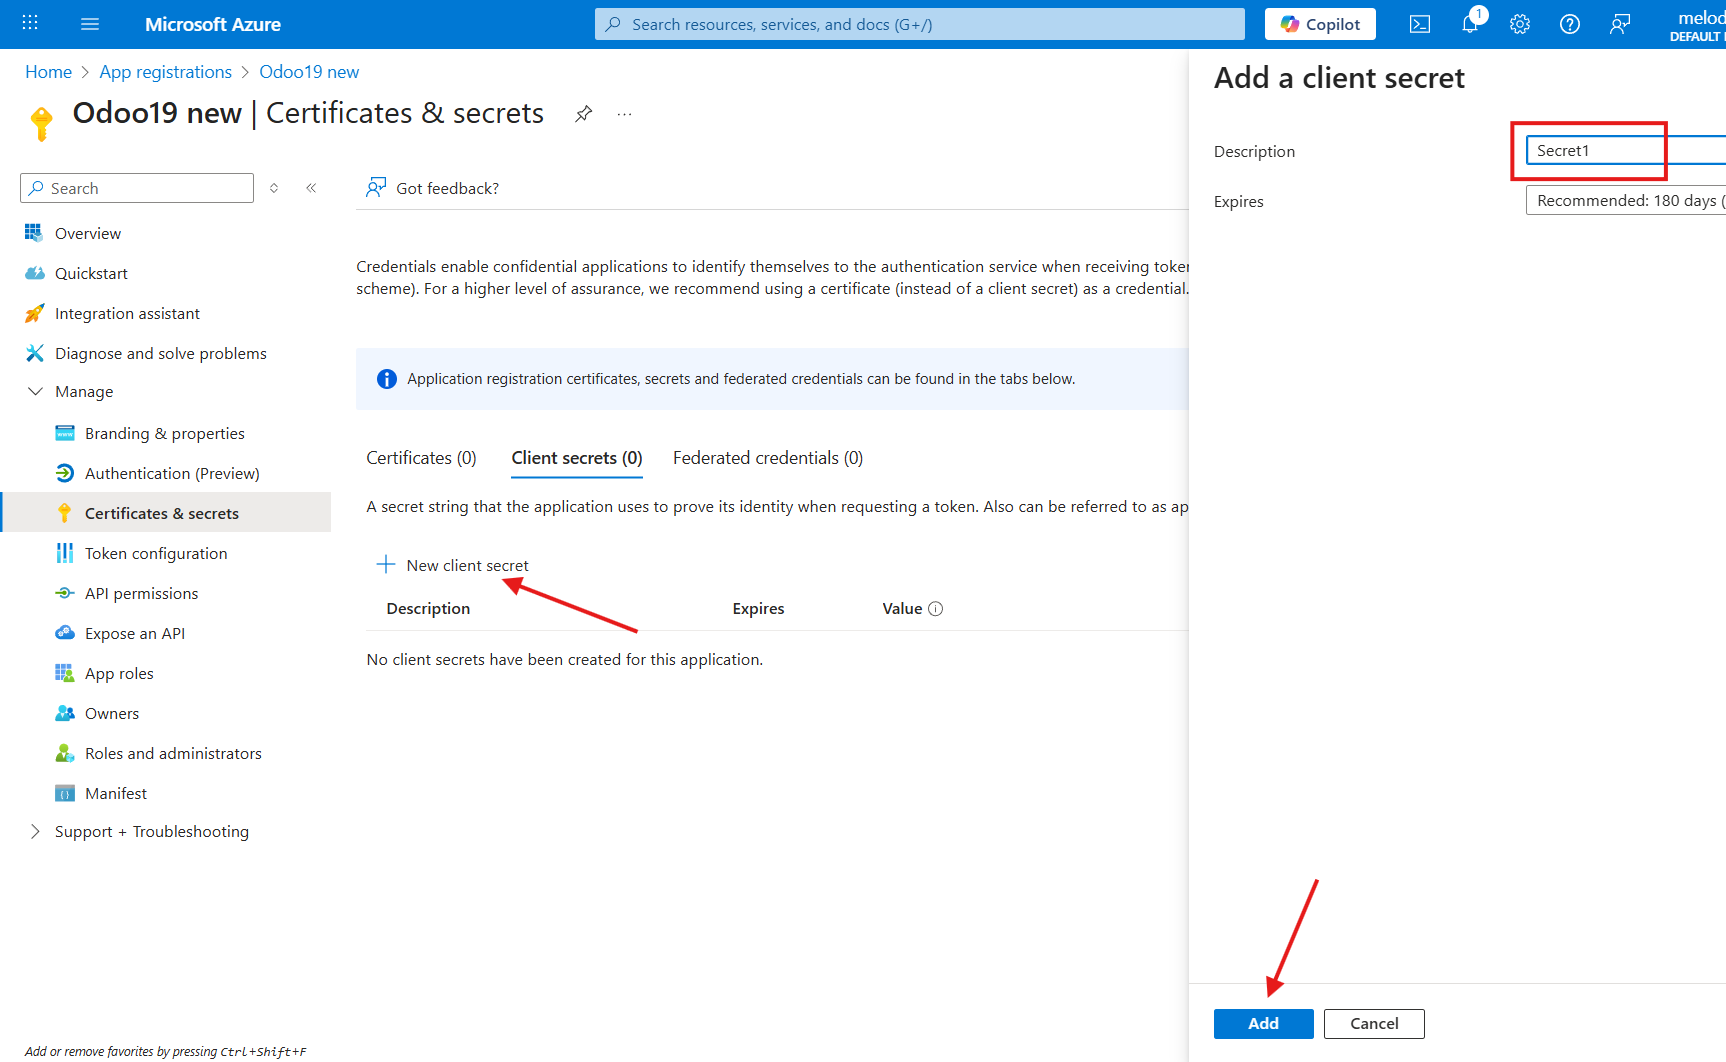
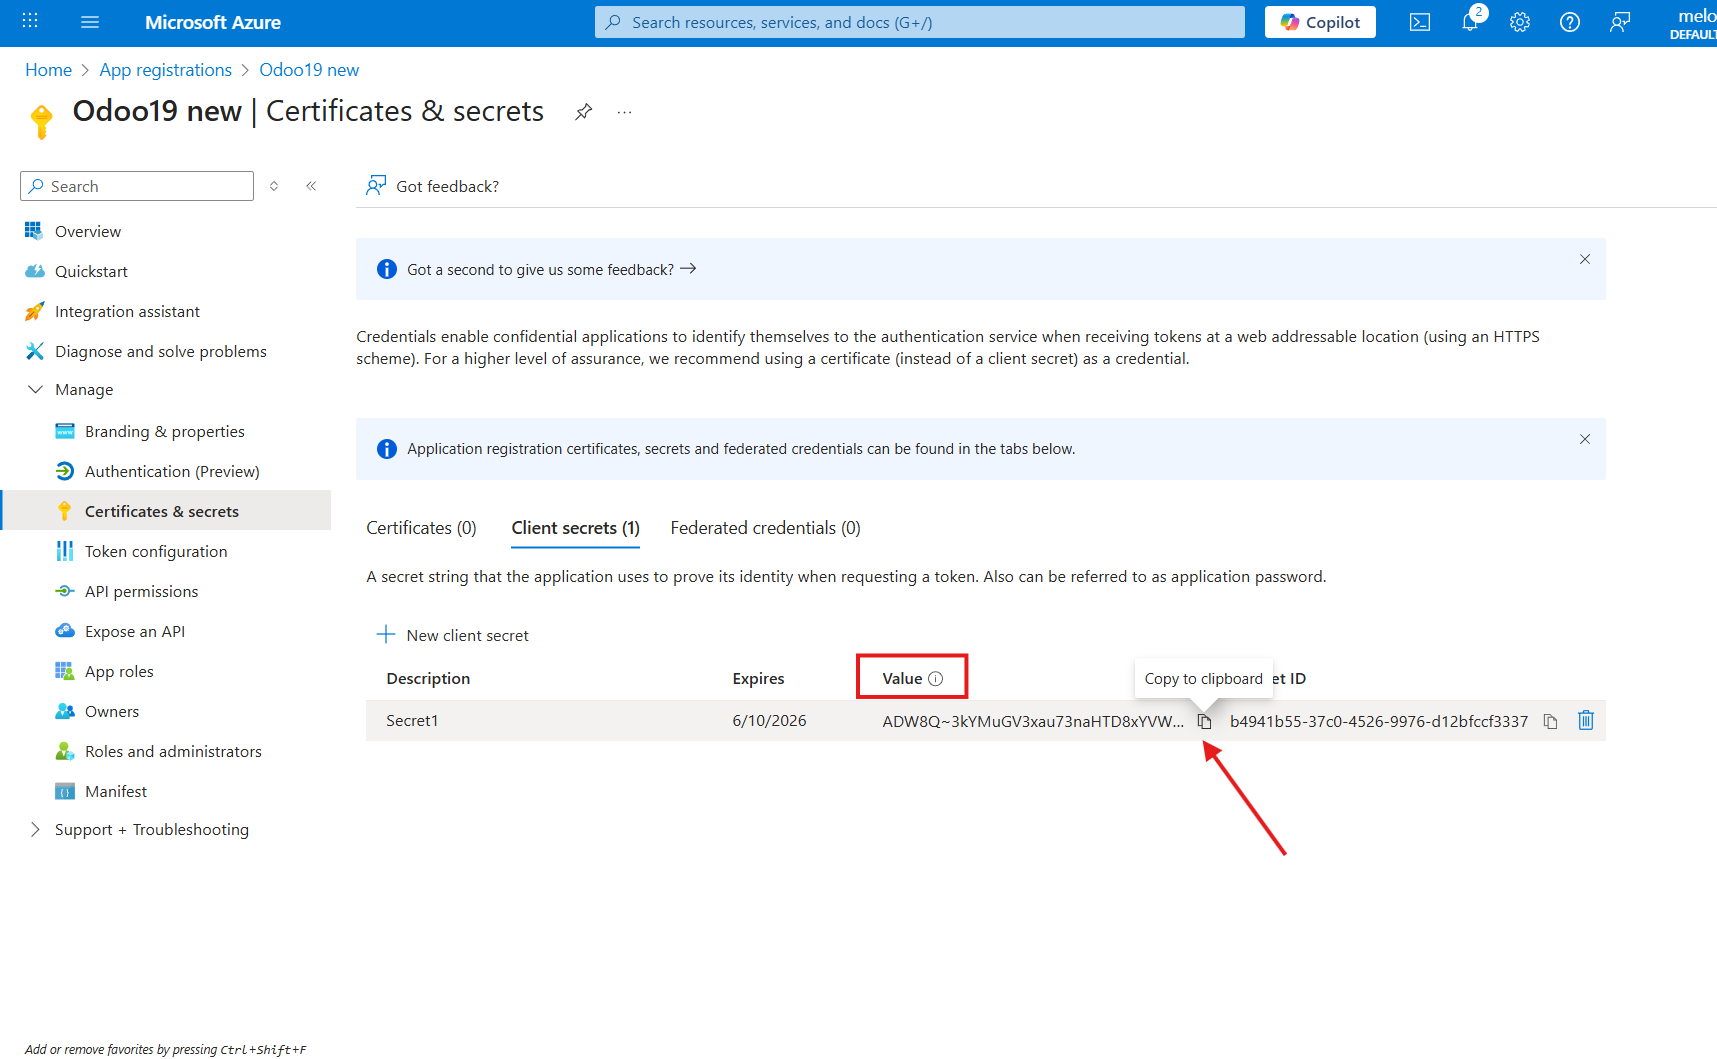
11. Press 'Confirm' on the Odoo configuration Page.

After that, you will be redirected to the Microsoft login page. Check in, agree to all conditions, and grant the requested permissions.
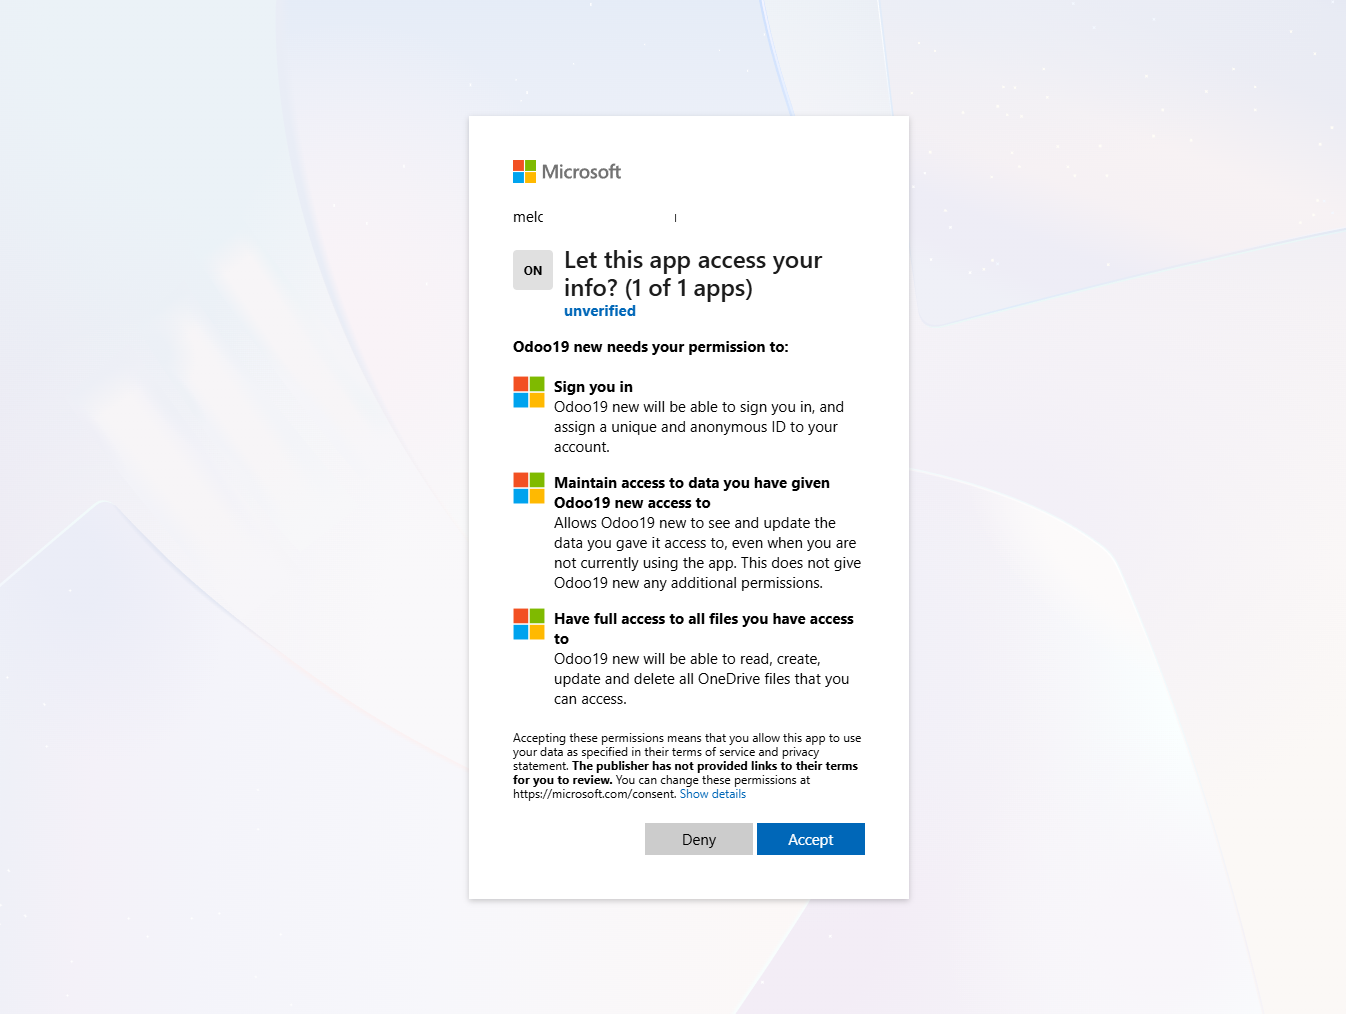
After the setup is successful, you will be redirected back to the module's settings. You will see the interface, which includes two buttons, 'Reconnect/Pause' and 'Reset'. You can use them to stop the sync and return the files and folders to Odoo (see Reconnection, Resetting, or changing cloud client: reverse sync).
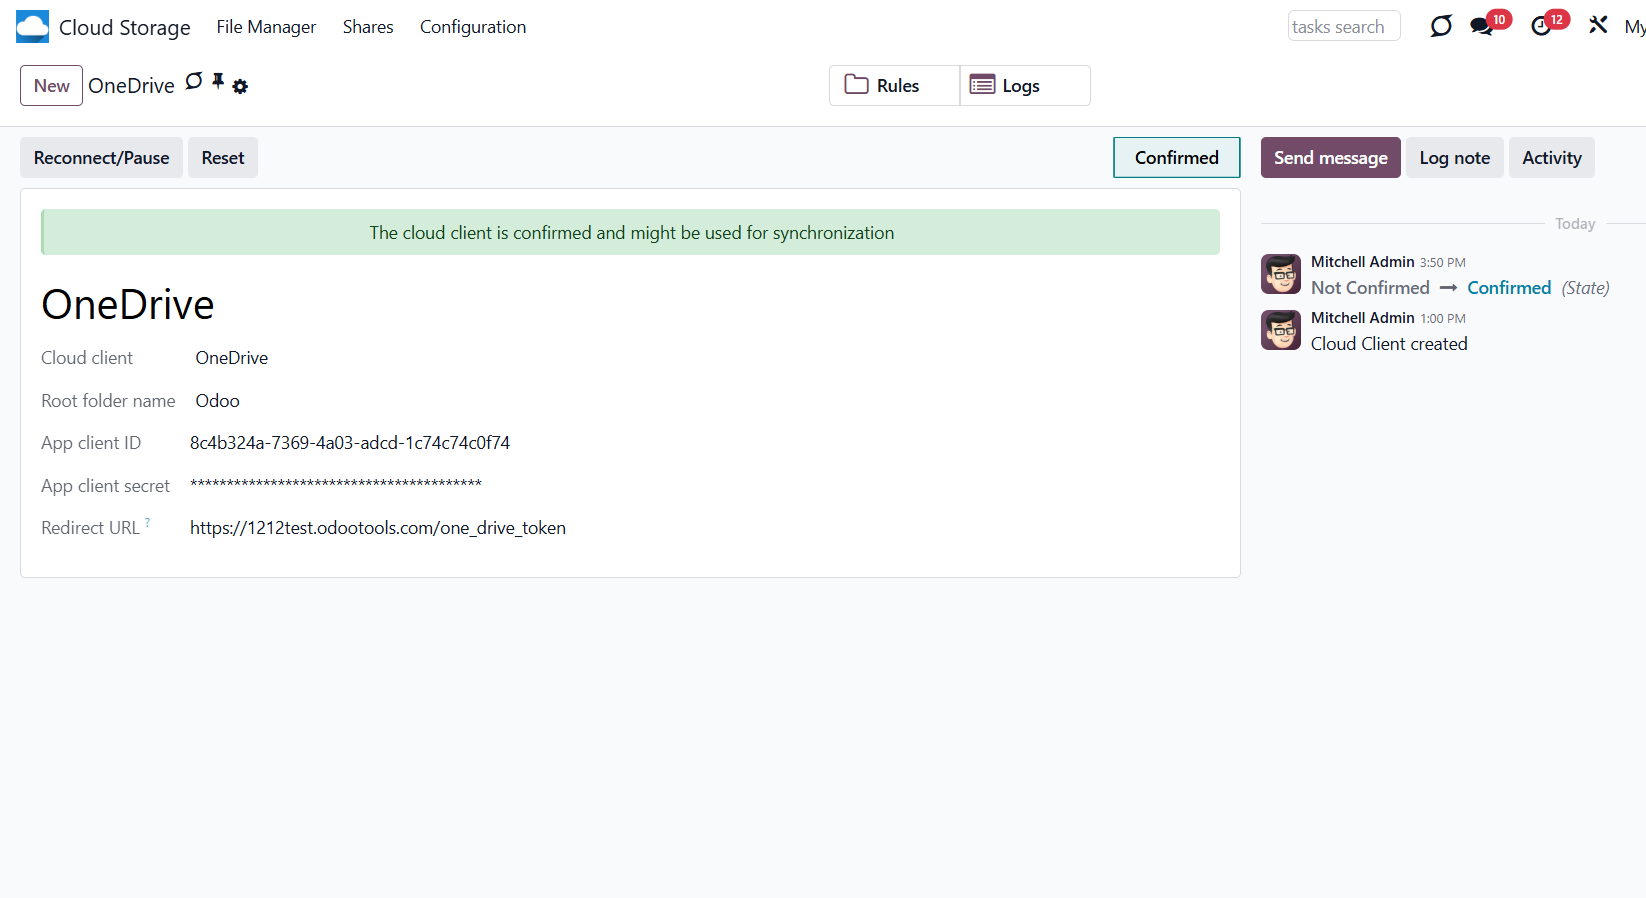
SharePoint configuration
The SharePoint configuration is almost identical to OneDrive's. You also need to specify the SharePoint site and SharePoint library parameters. So, to configure SharePoint:
1. Follow the steps 1-10 of the OneDrive configuration instructions
2. Go to your SharePoint site and prepare a new documents library (drive). You might use one of the existing ones, e.g., 'Documents'. The Odoo folder would be put there afterward, and it would be impossible to move it to another library.
3. In Odoo, while adding the cloud client, in the field 'Cloud client', choose 'SharePoint'
4. The SharePoint URL should be of the type https://[URL]/. The last '/' is required; the site name should not be included. For example, https://odootools.sharepoint.com/
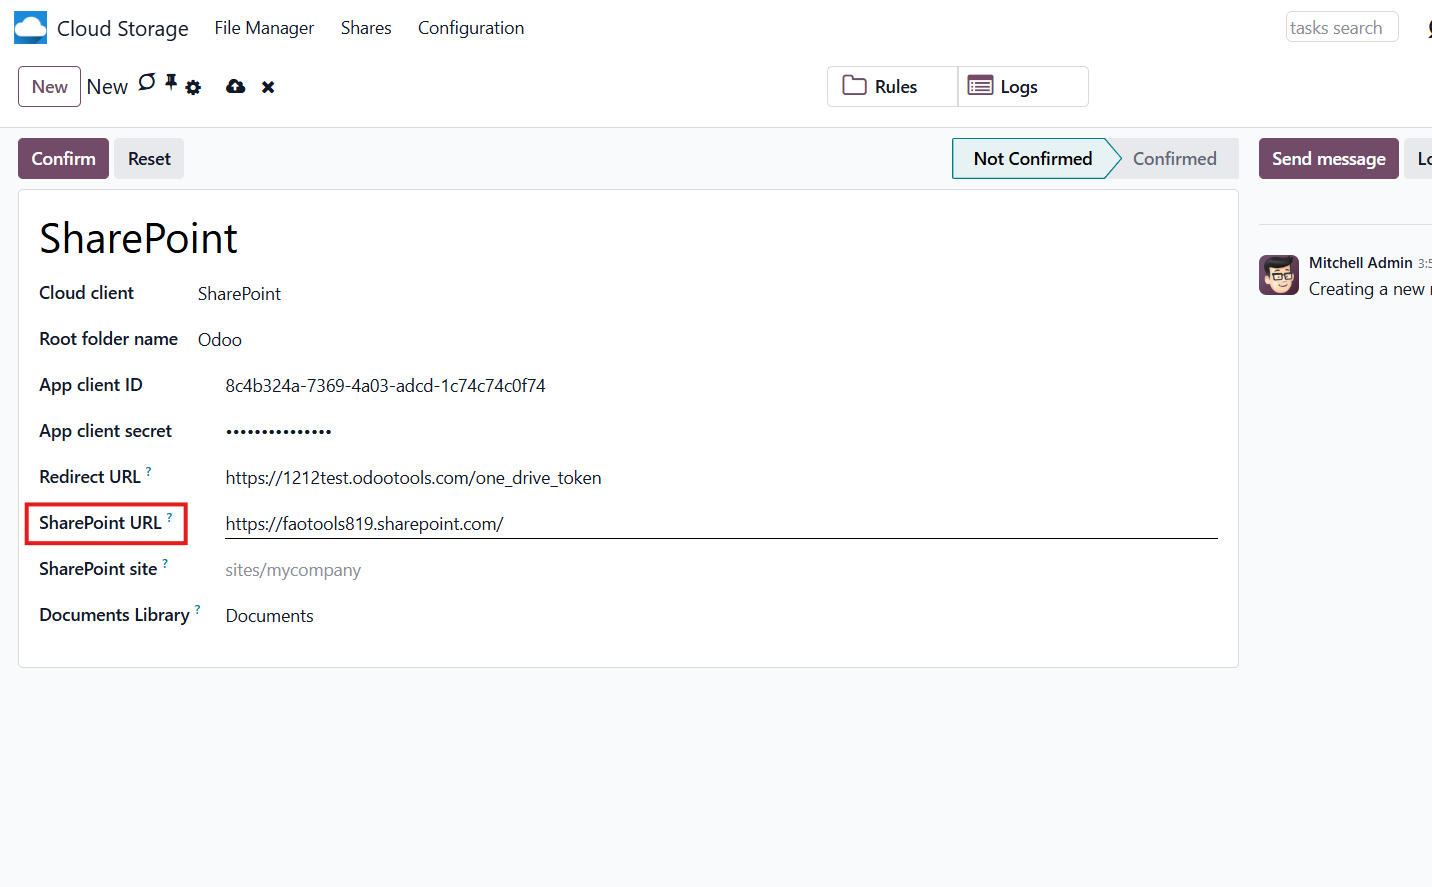
5. SharePoint site should be either root (the very root SharePoint site), my_site_name (in that case it is considered as sites/my_site_name), or sites/my_site_name (instead of 'sites', it might be 'teams' and so on). There should be no '/' at the beginning or at the end. For example, sites/odootools
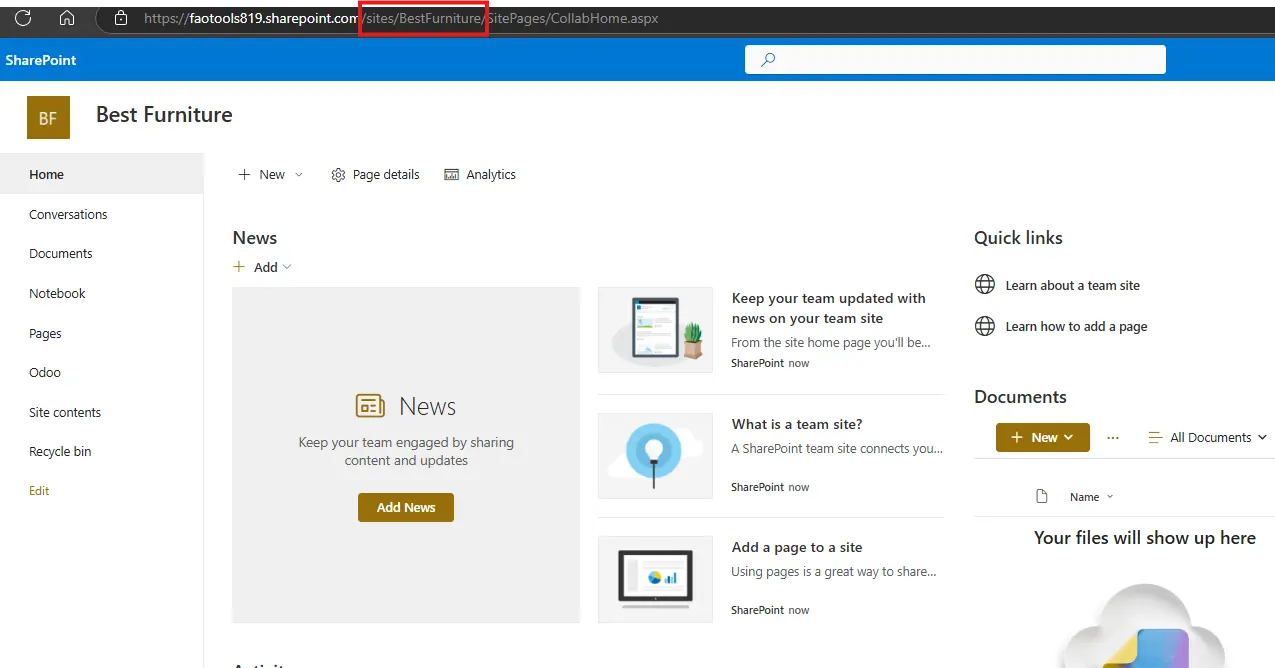
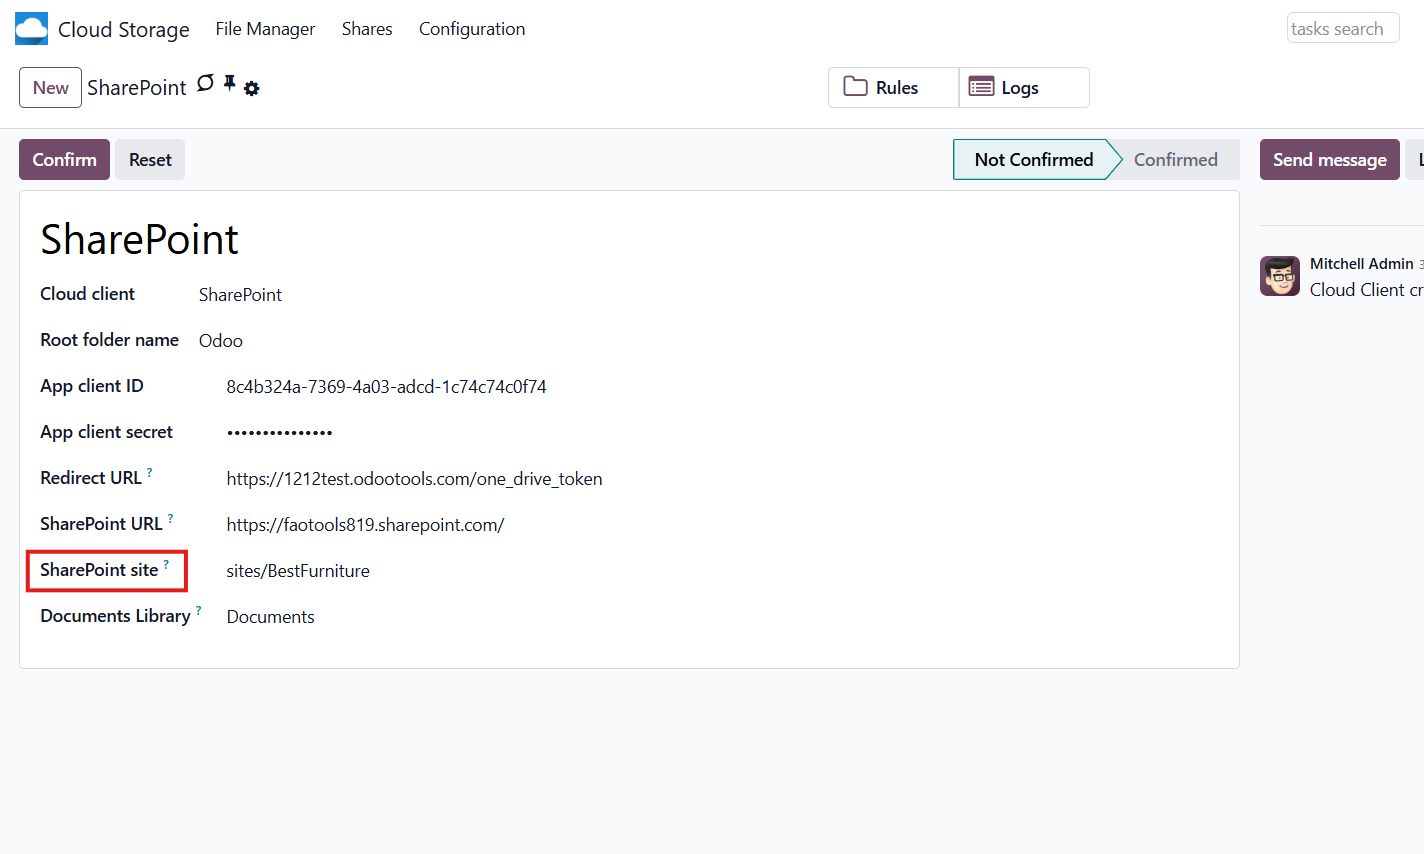
6. As Documents Library, use one created in SharePoint
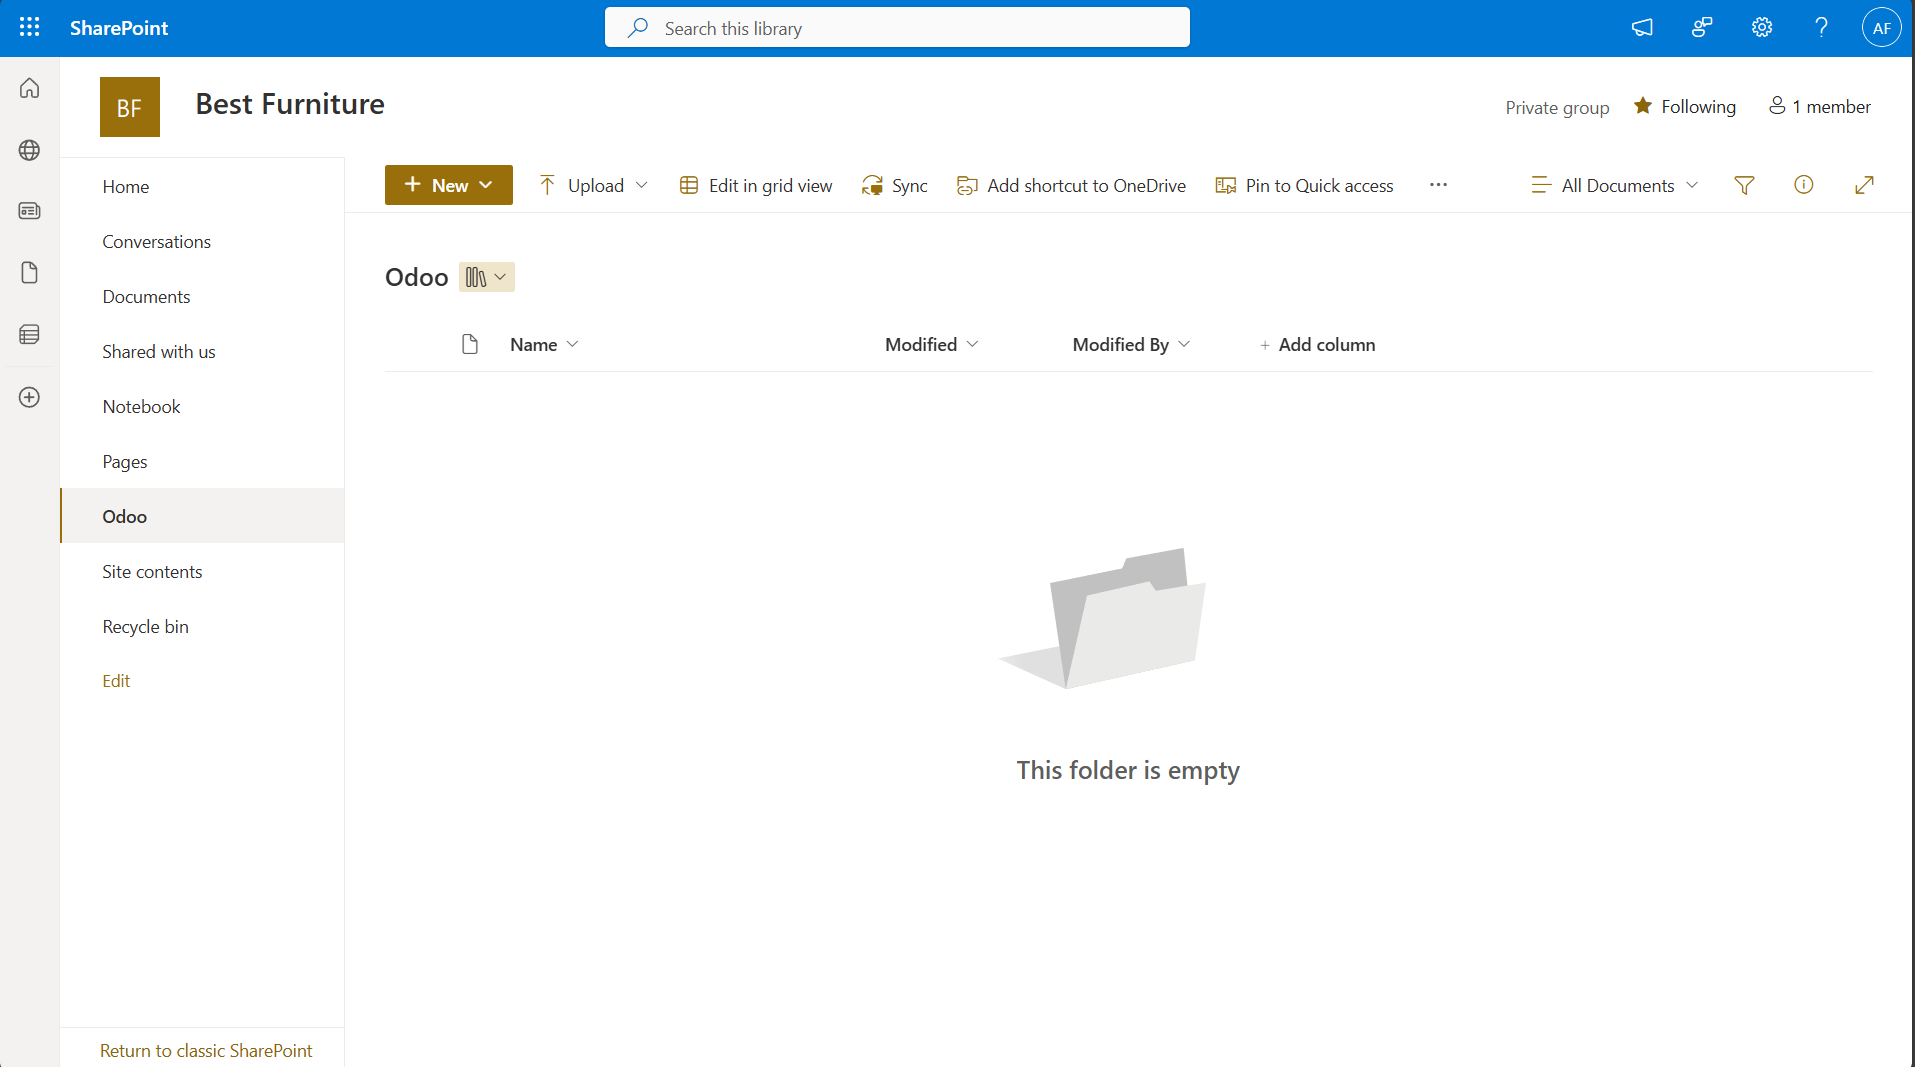
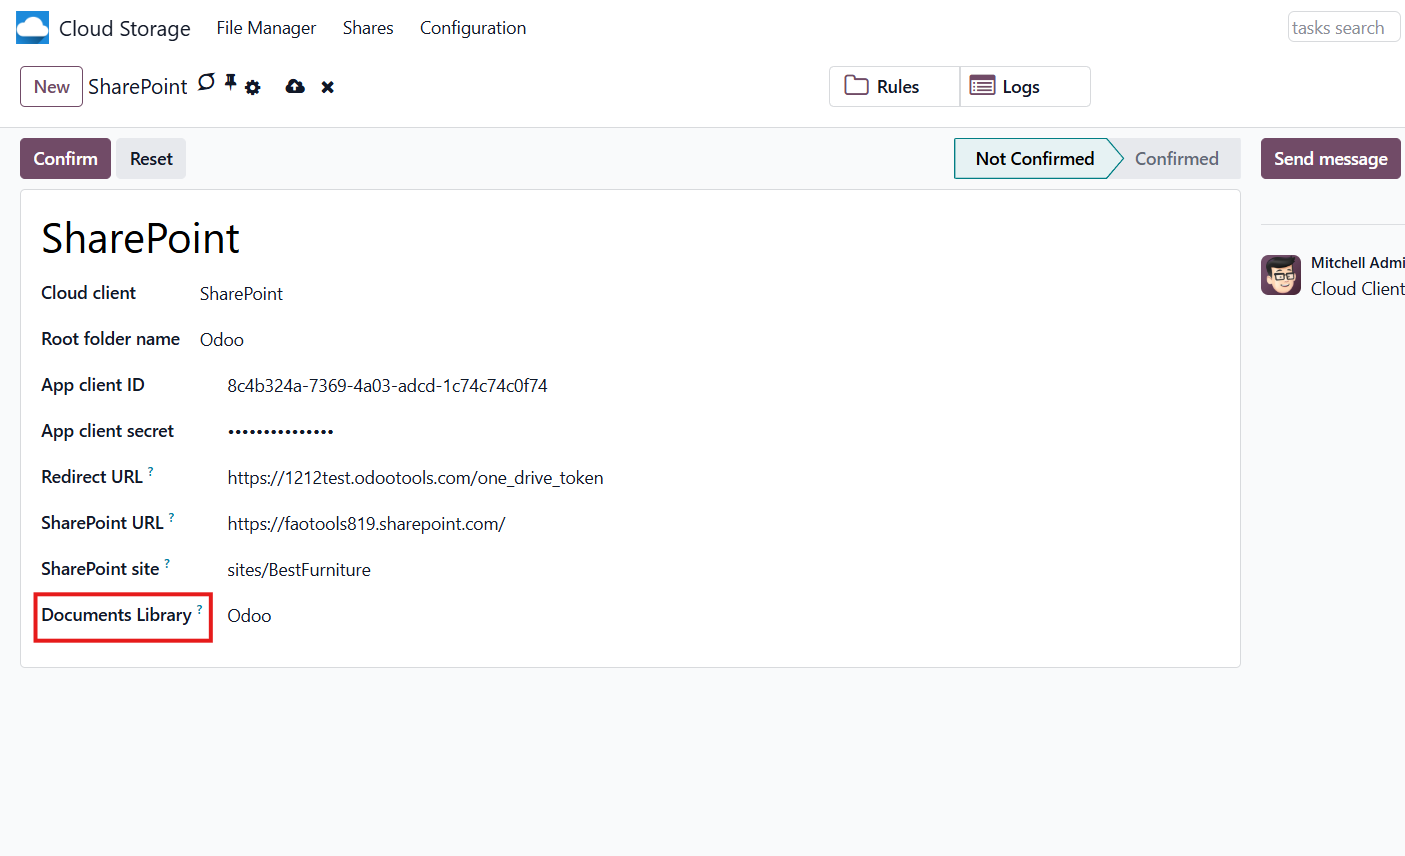
7. Then you need to establish the connection with SharePoint. For that, follow the steps 11-12 of the OneDrive configuration instructions.
Reconnection
Reconnection is required when you have not used the sync tool for more than 6 months. In such a case:
1. Press the button 'Reconnect/Pause'
2. Press the button 'Confirm'.
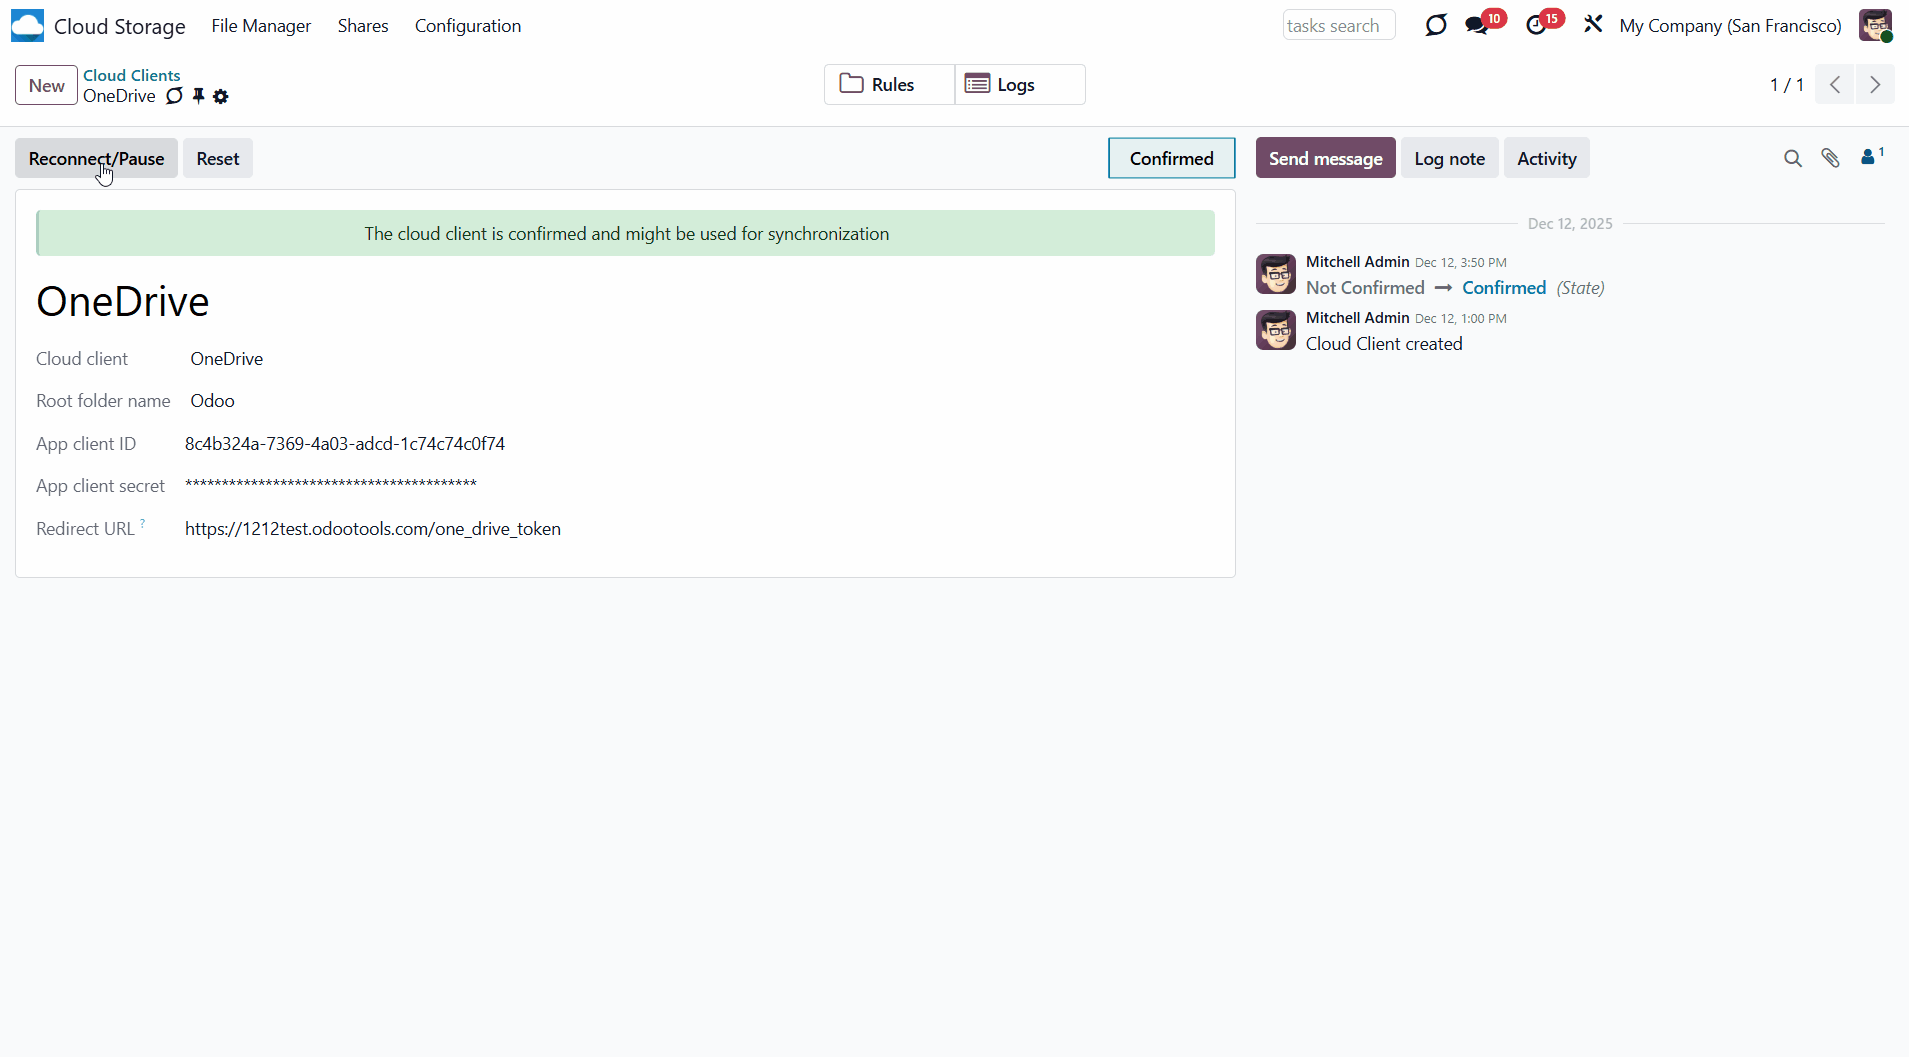
OwnCloud/Nextcloud Implementation
ownCloud is a file server that provides secure storage, collaboration, and sharing tools. Users can access the company's files quickly and easily from anywhere, on any device. ownCloud Community Edition is available for free as open-source software. Since it runs on your own server, the available storage space equals the disk space on your server. There are some subscription plans available.
Nextcloud is also free, open-source software that operates on the ownCloud fork. It can be installed and operated on a private server and is suitable for both companies and individuals. Compared to ownCloud, Nextcloud's toolset is broader and includes conferencing and groupware solutions.
Nextcloud/ownCloud Odoo Integration is a tool to integrate Nextcloud/ownCloud features into your Odoo business workflow. The app automatically stores Odoo attachments in Nextcloud/ownCloud and provides instant access via web links. In this way, users can work comfortably with files in the cloud storage, while the results are fully available in Odoo.
Python Dependency
The tool depends on the external libraries 'ownCloud. Install this library for your Odoo server through the command: pip3 install pyocclient
Make sure that you are installing the package for the correct Python, the same one on which Odoo is run, usually, which assumes running the command under sudo. Contact your system administrator if, after installation, Odoo cannot detect the library.
Configuration and Log in
After the installation of the module in your database, it is required to finish the setup by doing the following:
1. Go to the Cloud Storage > Configuration > Cloud Clients and click 'New'
2. Choose ownCloud or Nextcloud from the list of available cloud clients
3. Optionally type the root folder name; otherwise, the default one, 'Odoo', will be used
4. Enter your ownCloud / Nextcloud full URL
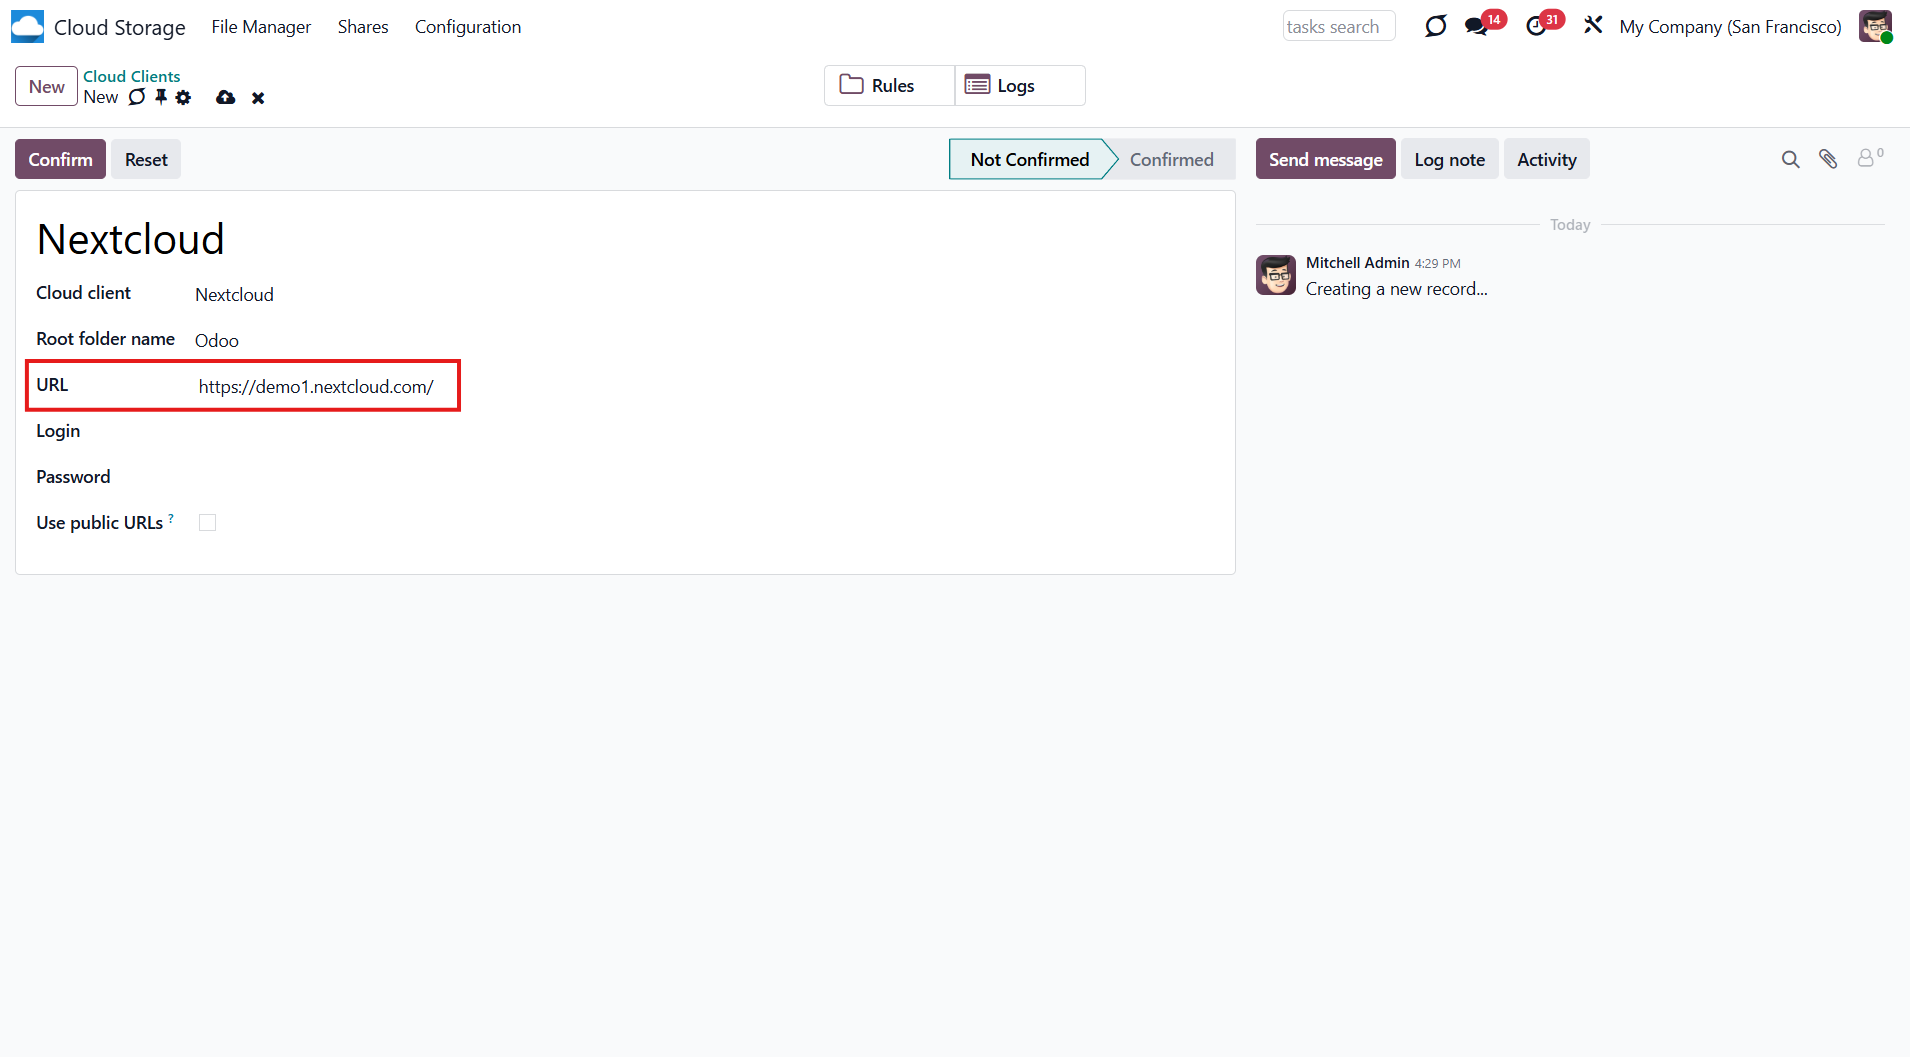
5. Select an ownCloud / Nextcloud user who has full rights to read, create, write, and delete files and folders within a root directory
6. Enter the login and password of this user
If you configure a Nextcloud account, make sure that your user has full rights to it. Usually, the admin user sets the account up.
7. Introduce the title for the ownCloud/Nextcloud folder, e.g., Odoo

8. Optionally tick the box 'Use Public URLs' (see Internal and Public URLs)

9. Click 'Confirm'.

Once setup is complete, you will be redirected back to the module's settings. You will see the interface, which includes two buttons: 'Reconnect/Pause' and 'Reset'. You can use them to stop the sync and return the files and folders to Odoo (see Reconnection, Resetting or changing cloud client: reverse sync).
Make sure that the root directory or its children are shared with your colleagues.

Reconnection
Reconnection might be required in case a refresh token is expired, and when you migrate the app from previous versions. In such a case:
1. Press the button 'Reconnect/Pause'
2. Press the button 'Confirm'.
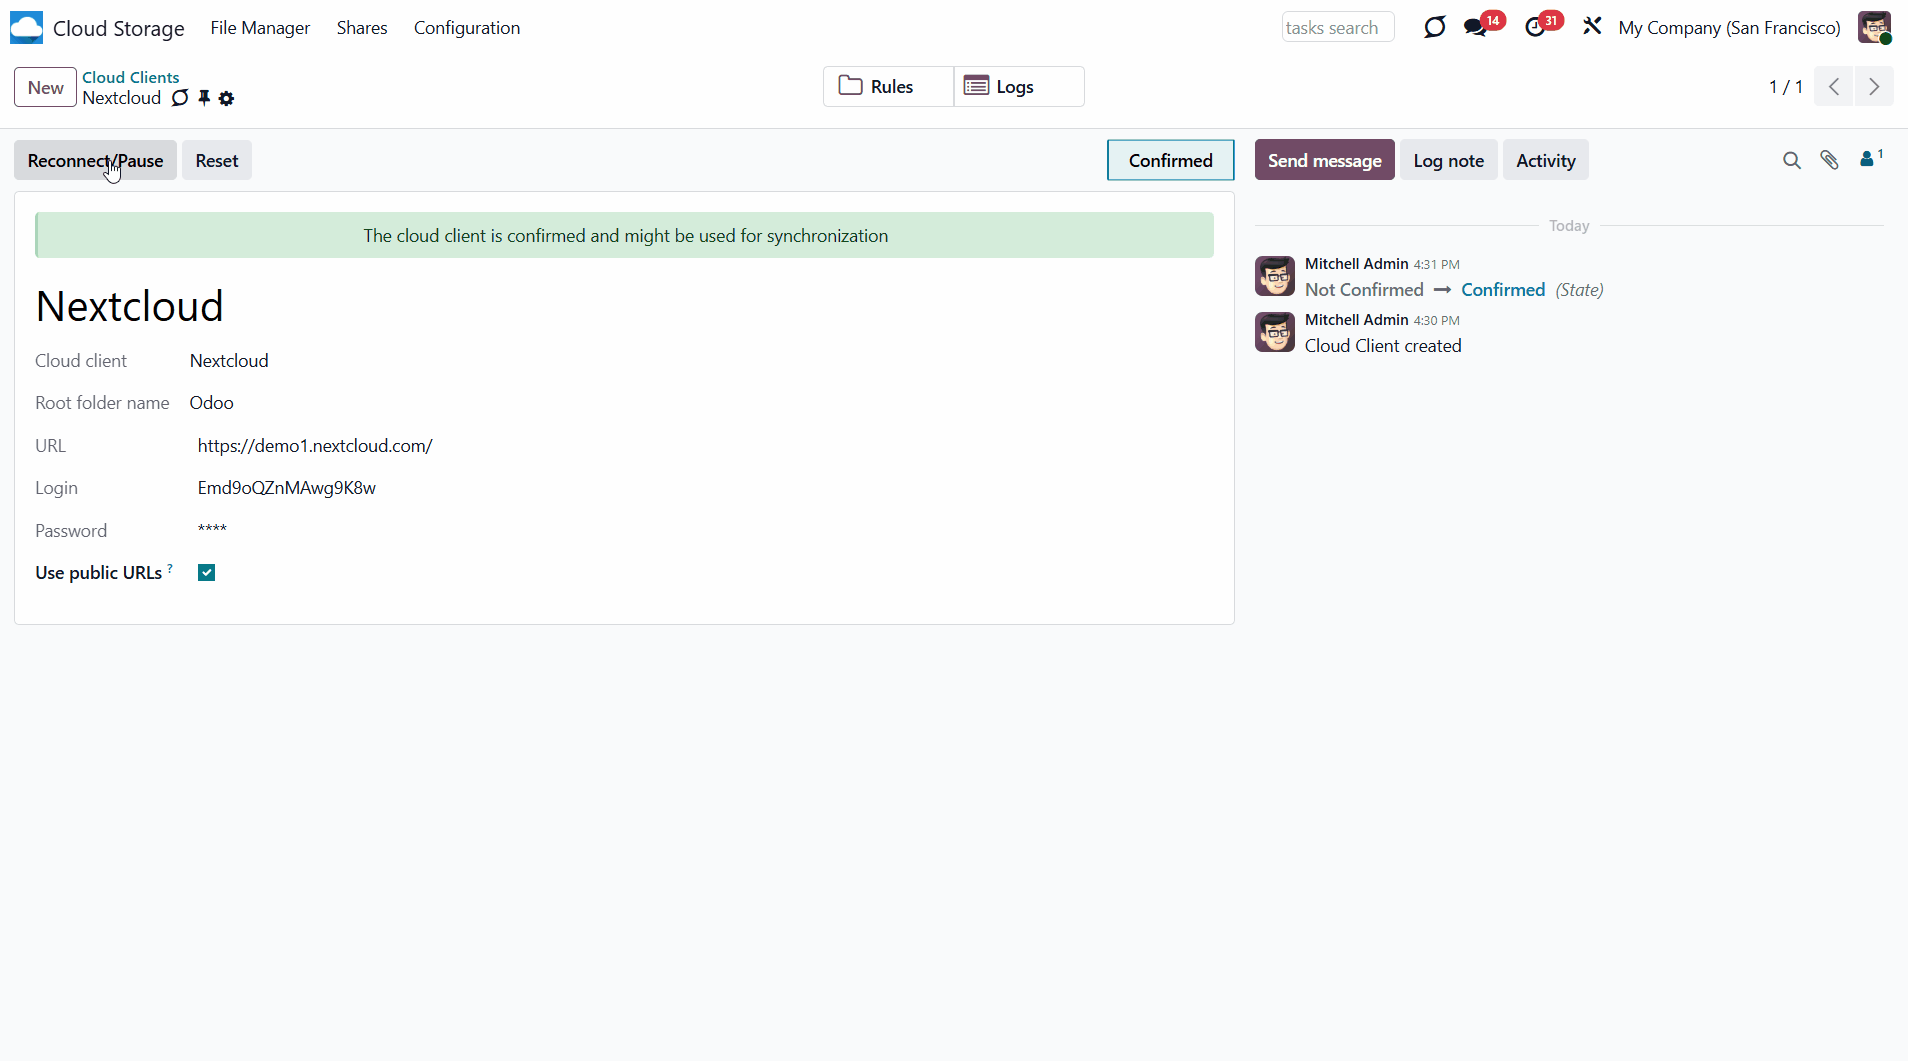
Peculiarities
By default, all links from Odoo to ownCloud/Nextcloud are internal. This means that only authorized users may access them and generate shared URLs for others.
It is possible to make them public by selecting the 'Use Public URLs' option. In that case, links will become 'shared', meaning everyone can access those files via them. Although the links are hardly known to external users, they may become visible through user actions. Additionally, sharing link generation is not fast and can slow synchronization. Thus, be cautious if you decide to enable the feature and use shared links.
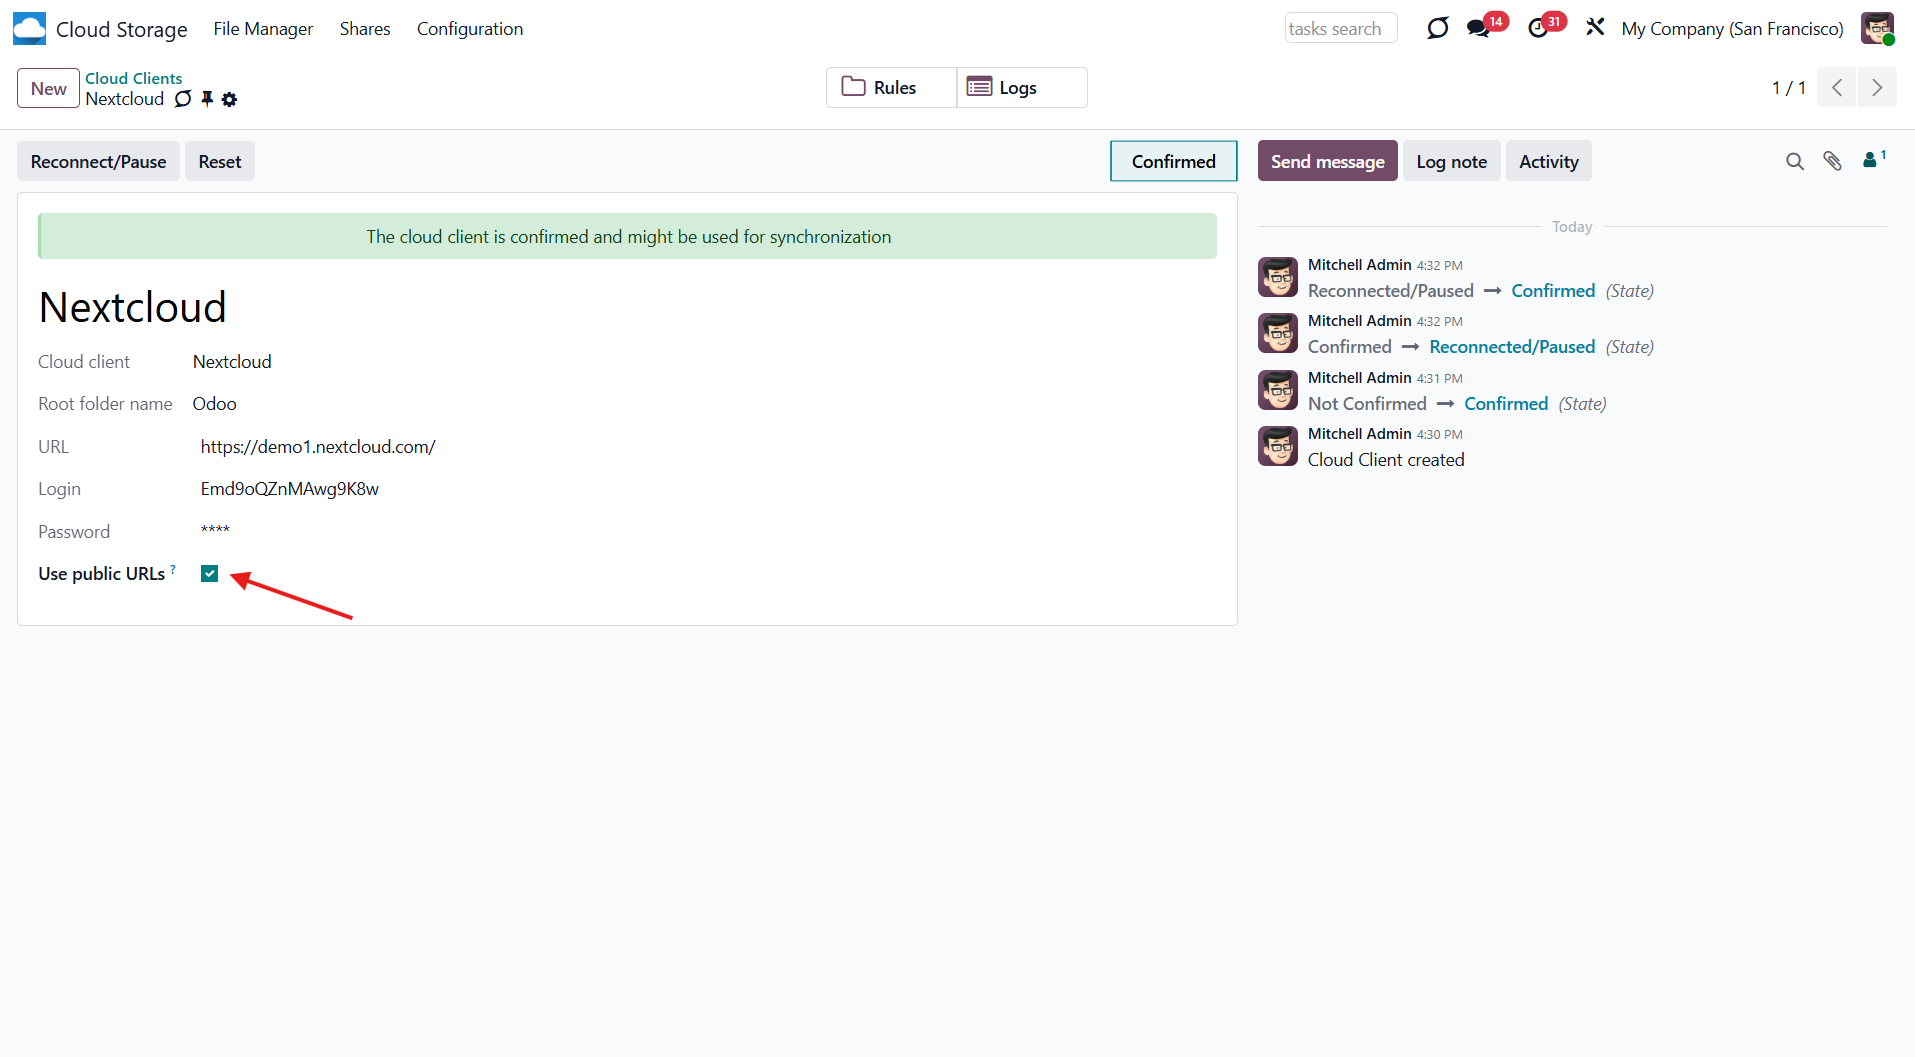
Dropbox Implementation
Dropbox is a cloud storage system that helps you synchronize and access files from any device. It also allows you to control permission levels, share files and folders via a link, or make files public so anyone with the appropriate link can access them. You can also create a Dropbox account for business.
The Dropbox Odoo Integration tool integrates Dropbox features into your Odoo business workflow. The app automatically stores Odoo attachments in Dropbox and provides instant access via web links. In this way, users can work comfortably with files in the cloud storage, while the results are fully available in Odoo.
Synchronization works for any Dropbox tariff, including Personal Dropbox (Basic, Plus, Family) and Business Dropbox (Professional, Standard, Advanced).
Python Dependency
The tool depends on the external library 'dropbox'. Install this library for your Odoo server through the command: pip3 install dropbox
Make sure that you are installing the package for the correct Python, the same one on which Odoo is run, usually, which assumes running the command under sudo. Contact your system administrator if, after installation, Odoo cannot detect the library.
Configuration and Log in
After the installation of the module in your database, it is required to finish the setup by doing the following:
1. Follow the URL https://www.dropbox.com/developers/apps/create
2. Choose an API as 'Soped access'
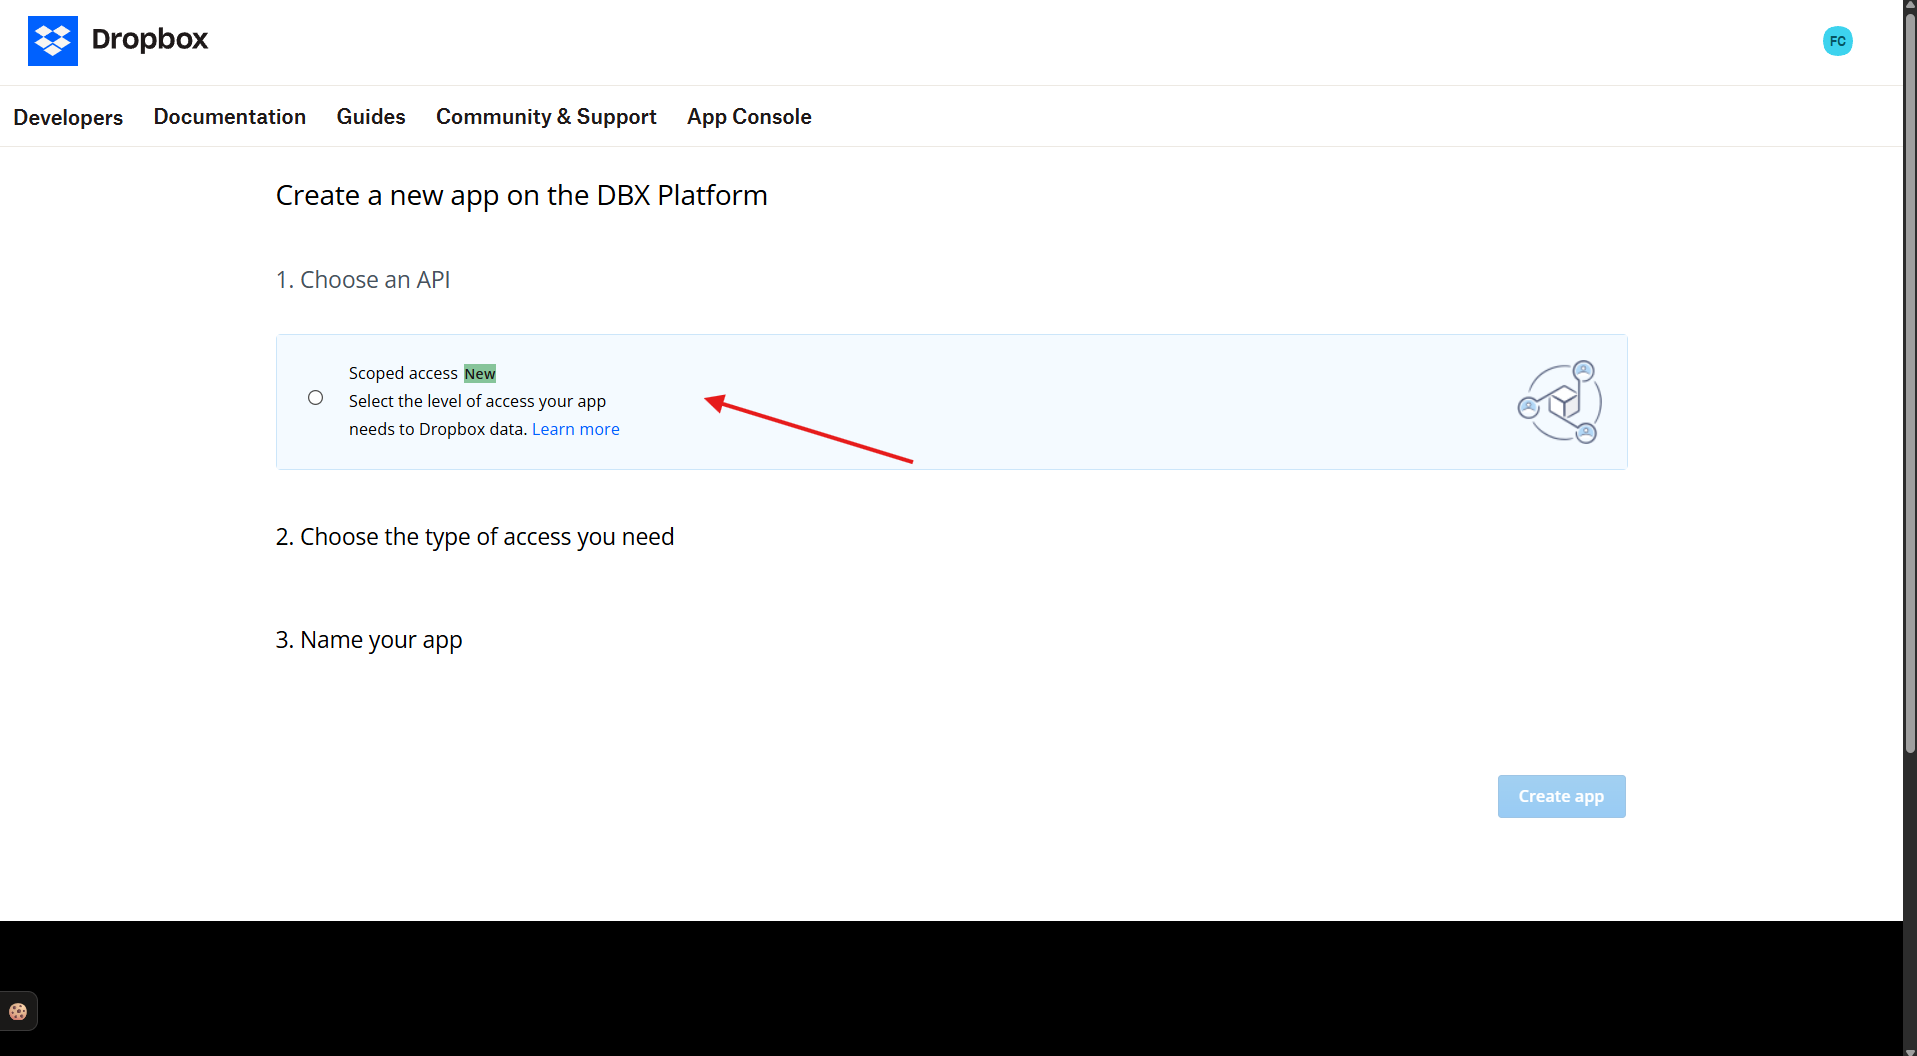
3. Choose the type of access as 'Full Dropbox'
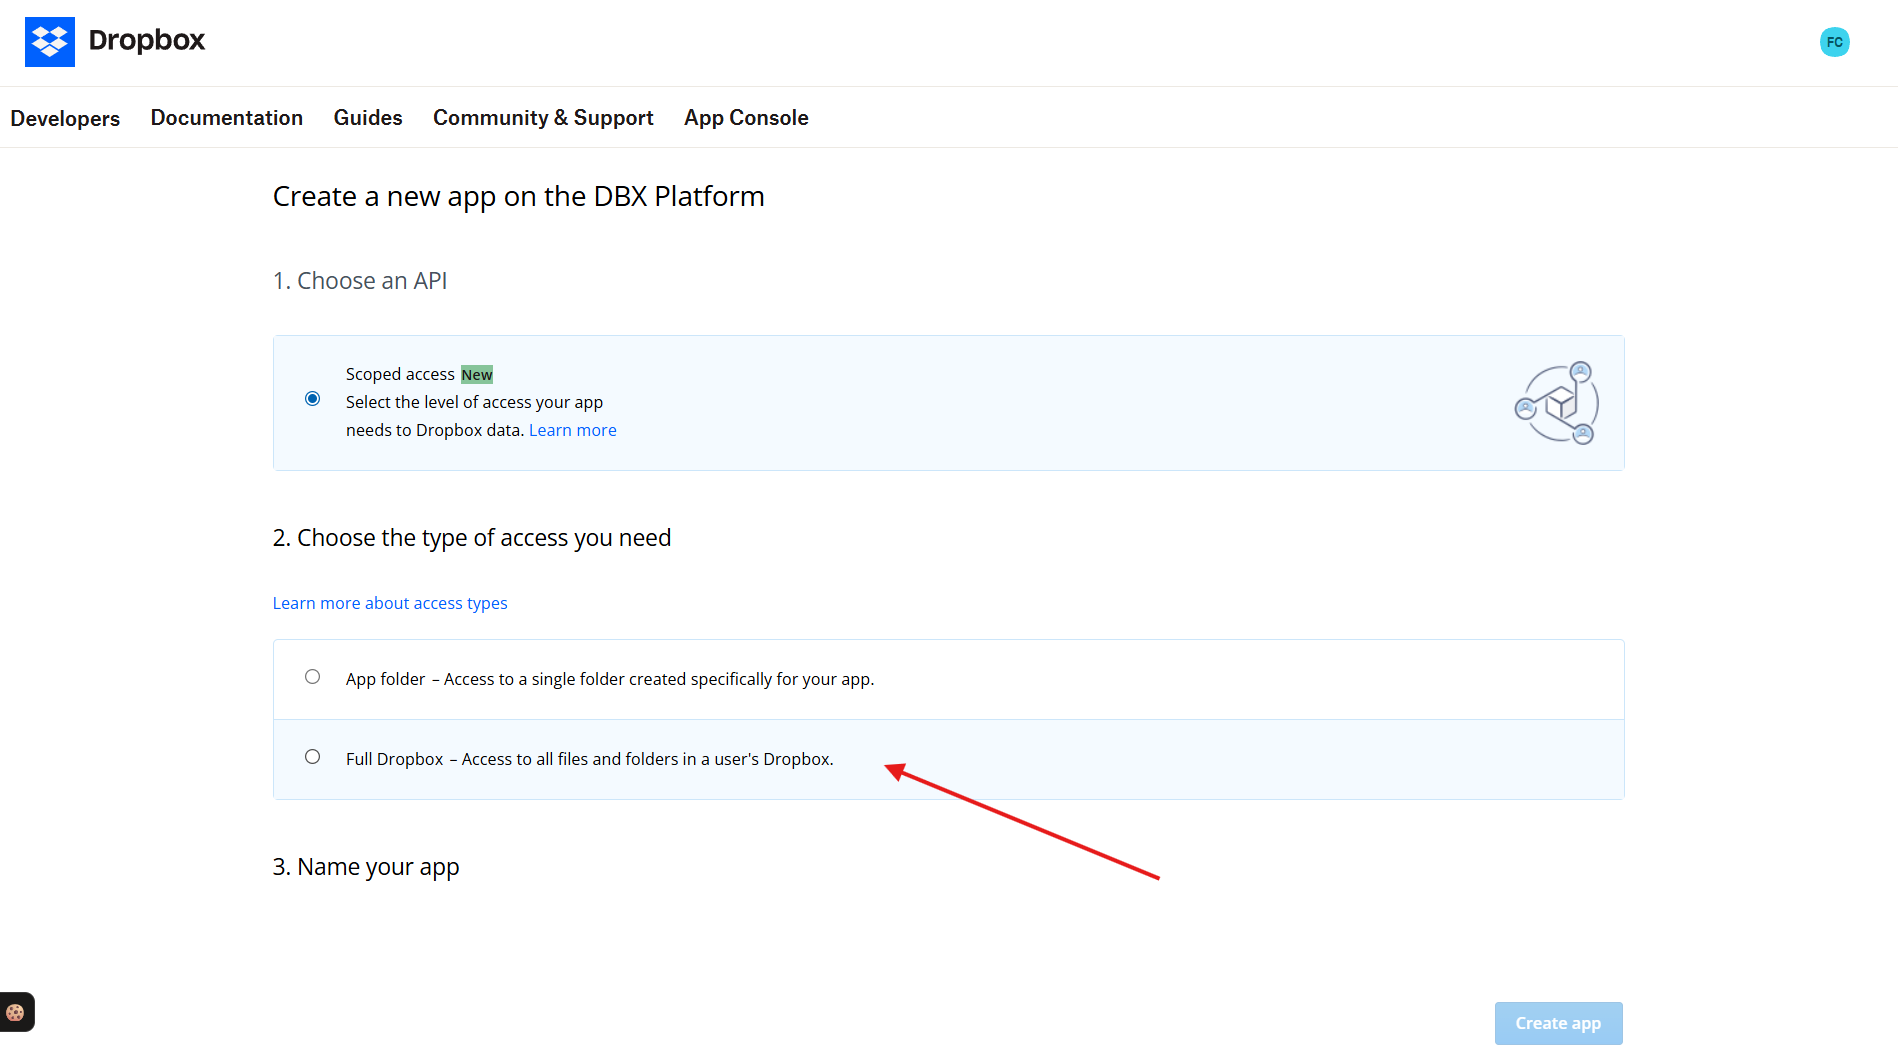
4. Select any suitable name for the app and push the button 'Create app'
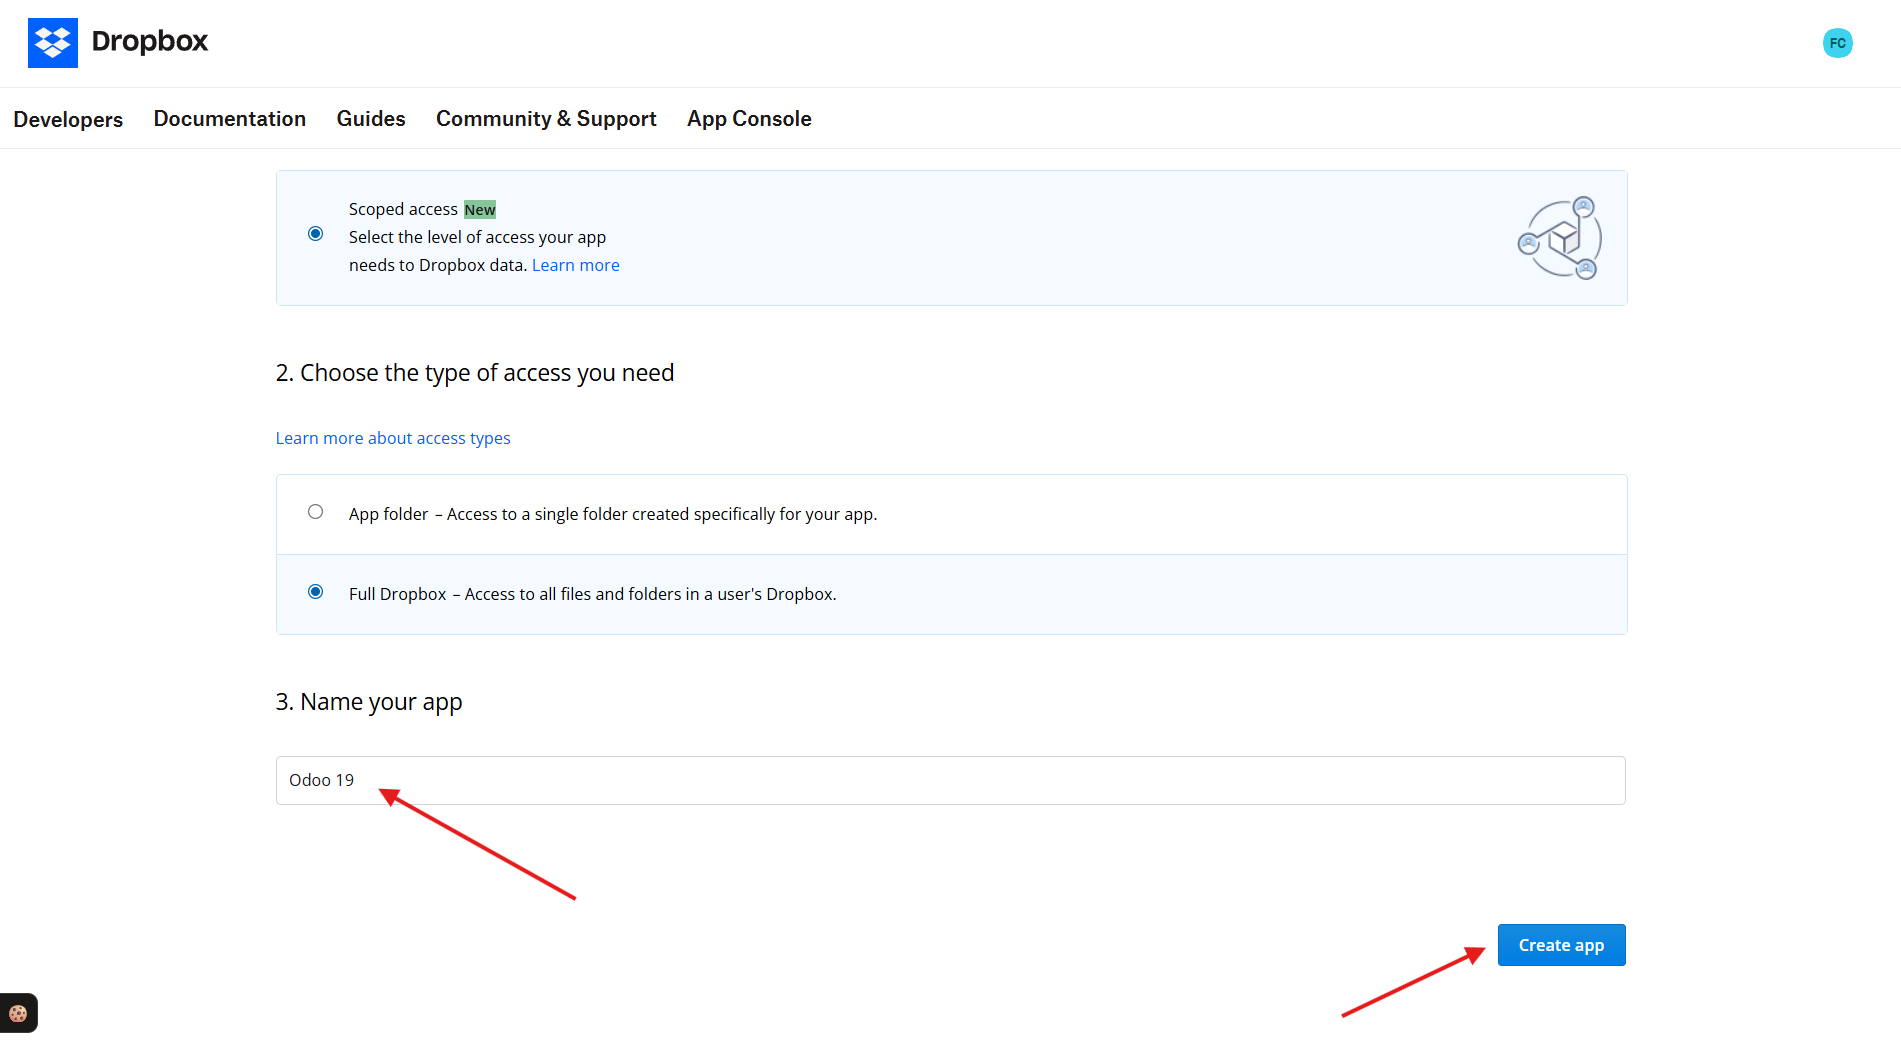
5. Add the redirect URI as YOURODOOSITENAME/dropbox_token (e.g., https://faotools.com/dropbox_token). A valid SSL certificate (https) is required
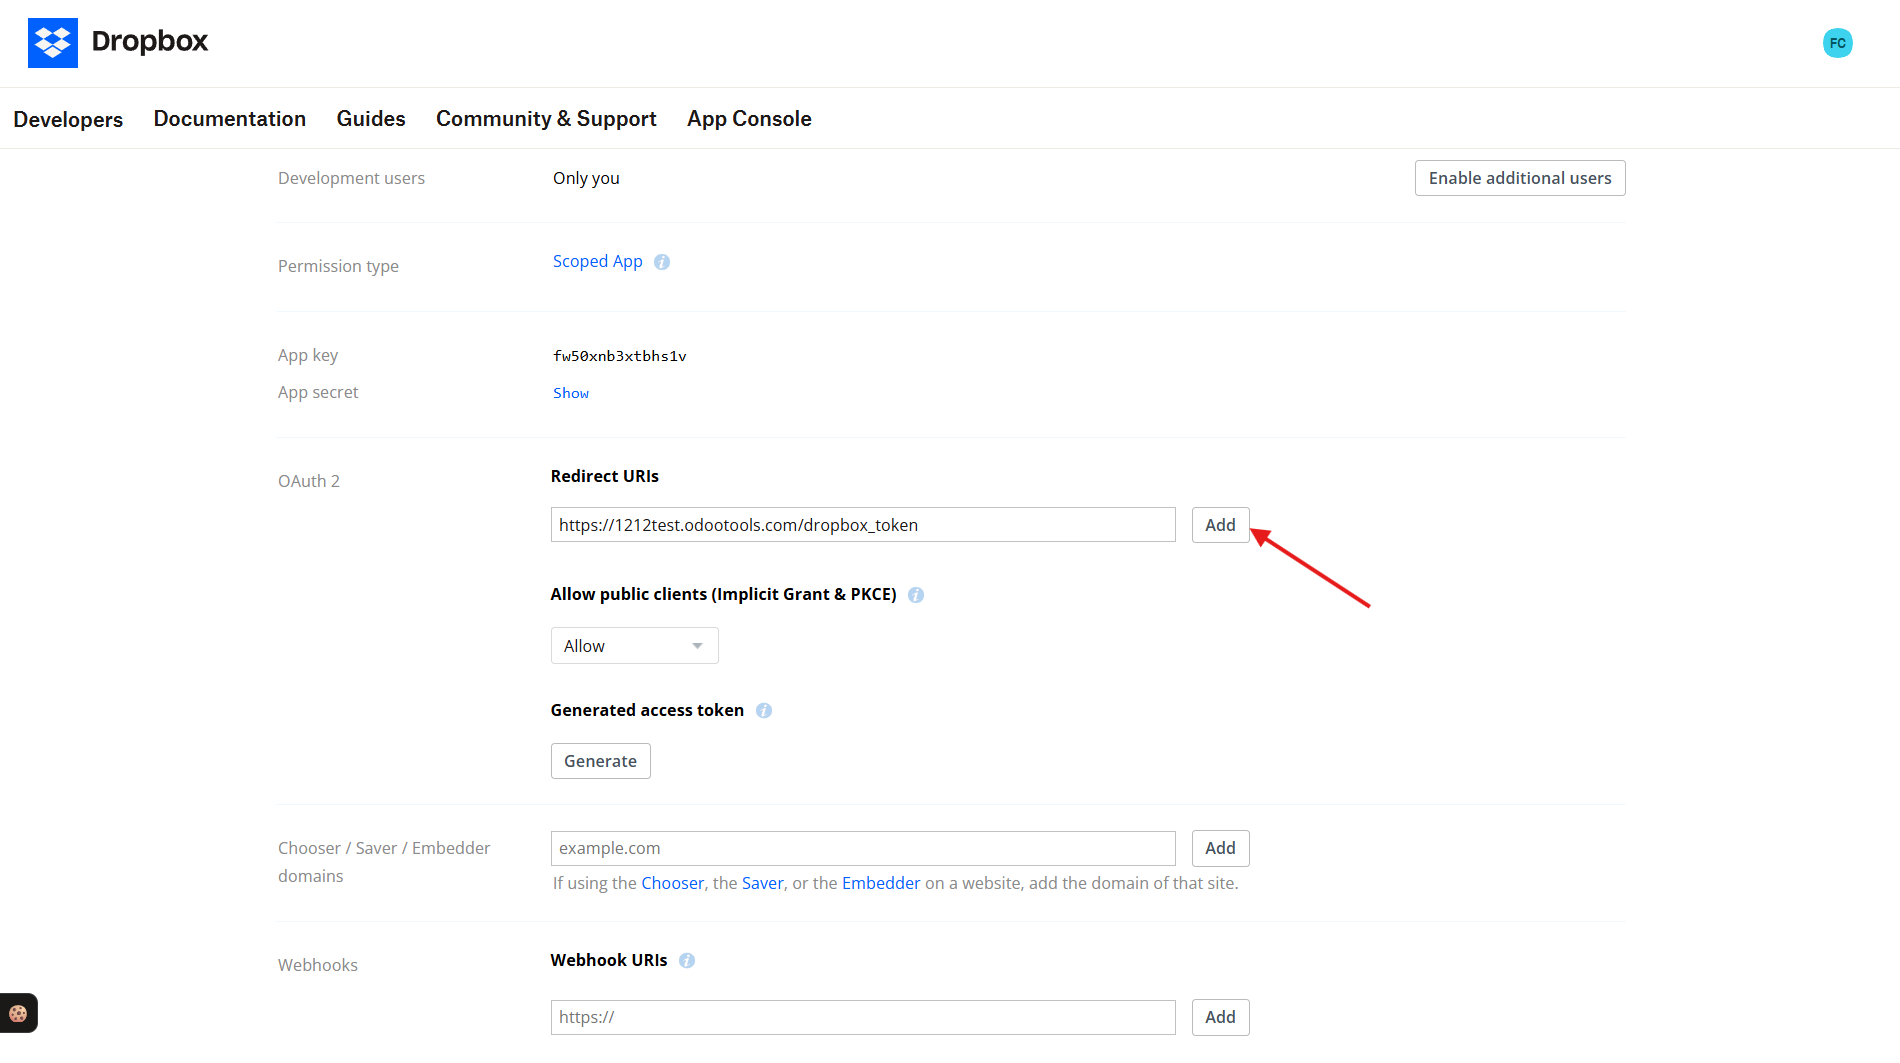
6. Go to the tab 'Permissions'
7. Grant the app the following permissions: 'Account Info (Read)', 'Files and folders Metadata (Write) (Read)', 'Files Content (Write) (Read)', and 'Collaboration (Write) (Read)'. For the team Dropbox, assign 'Team Data Members' and 'Members (Read)'. Make sure no other permissions are assigned.
8. Click 'Submit'.
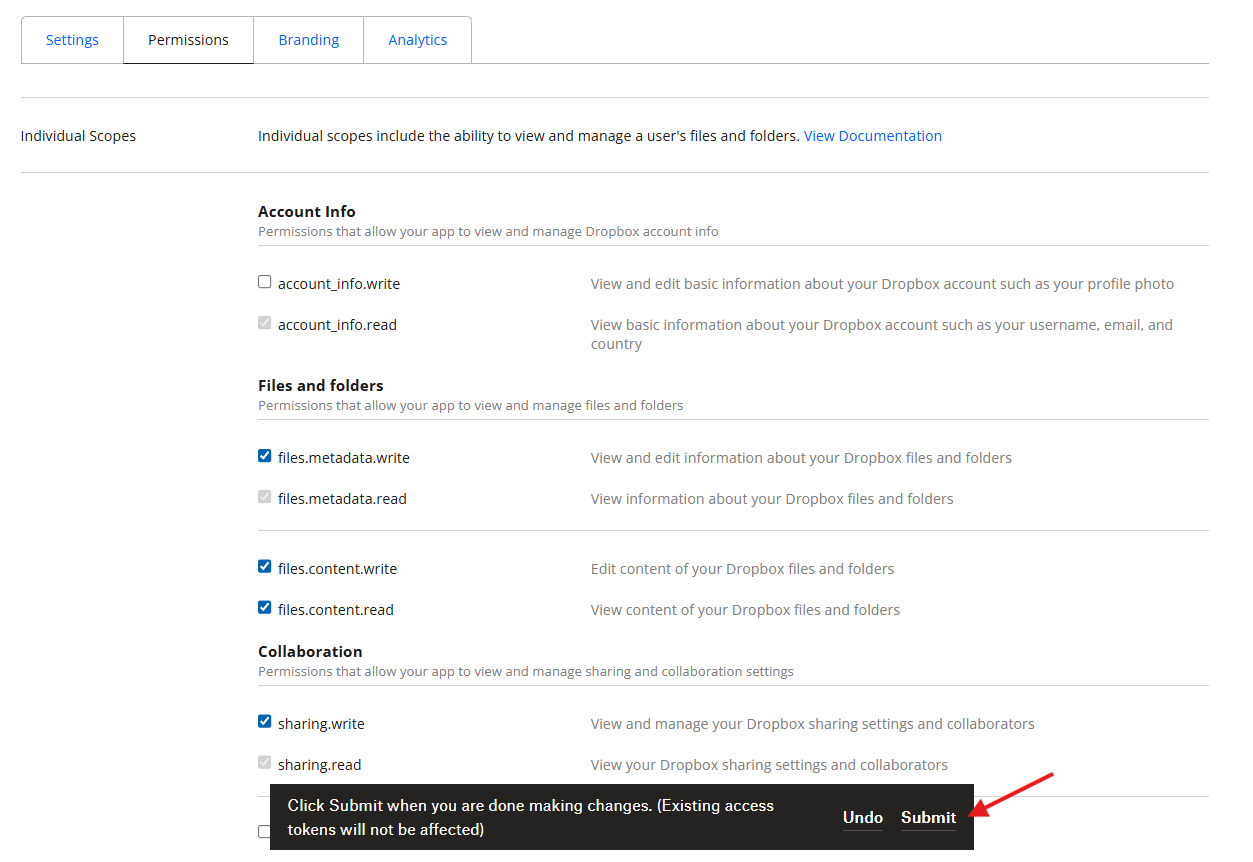
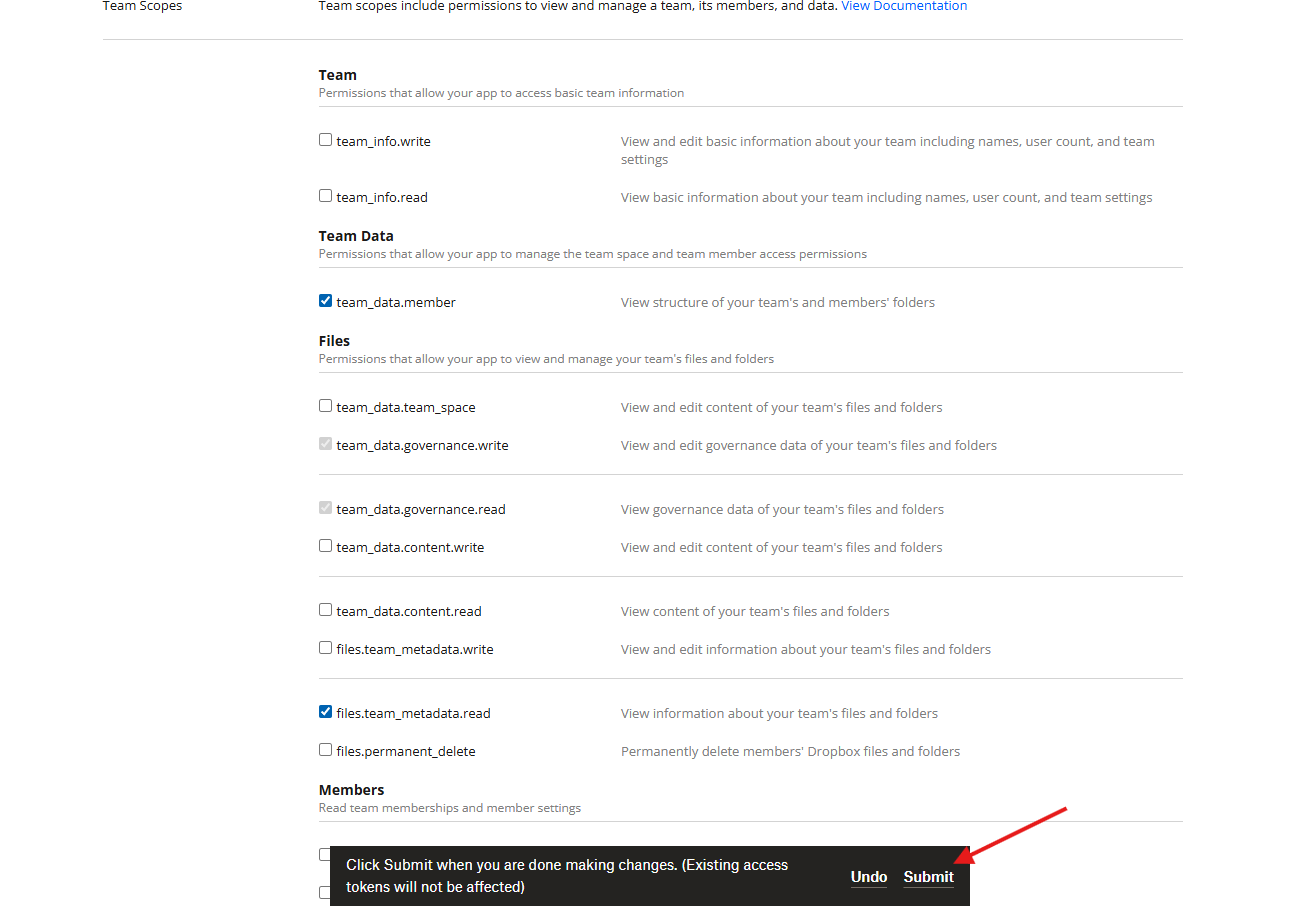
9. Go to the Cloud Storage > Configuration > Cloud Clients and click 'New'
10. Choose Dropbox from the list of available cloud clients
11. Optionally type the root folder name; otherwise, the default one, 'Odoo', will be used
12. Copy the App Key, App Secret, and the redirect URI to the related fields in Odoo.
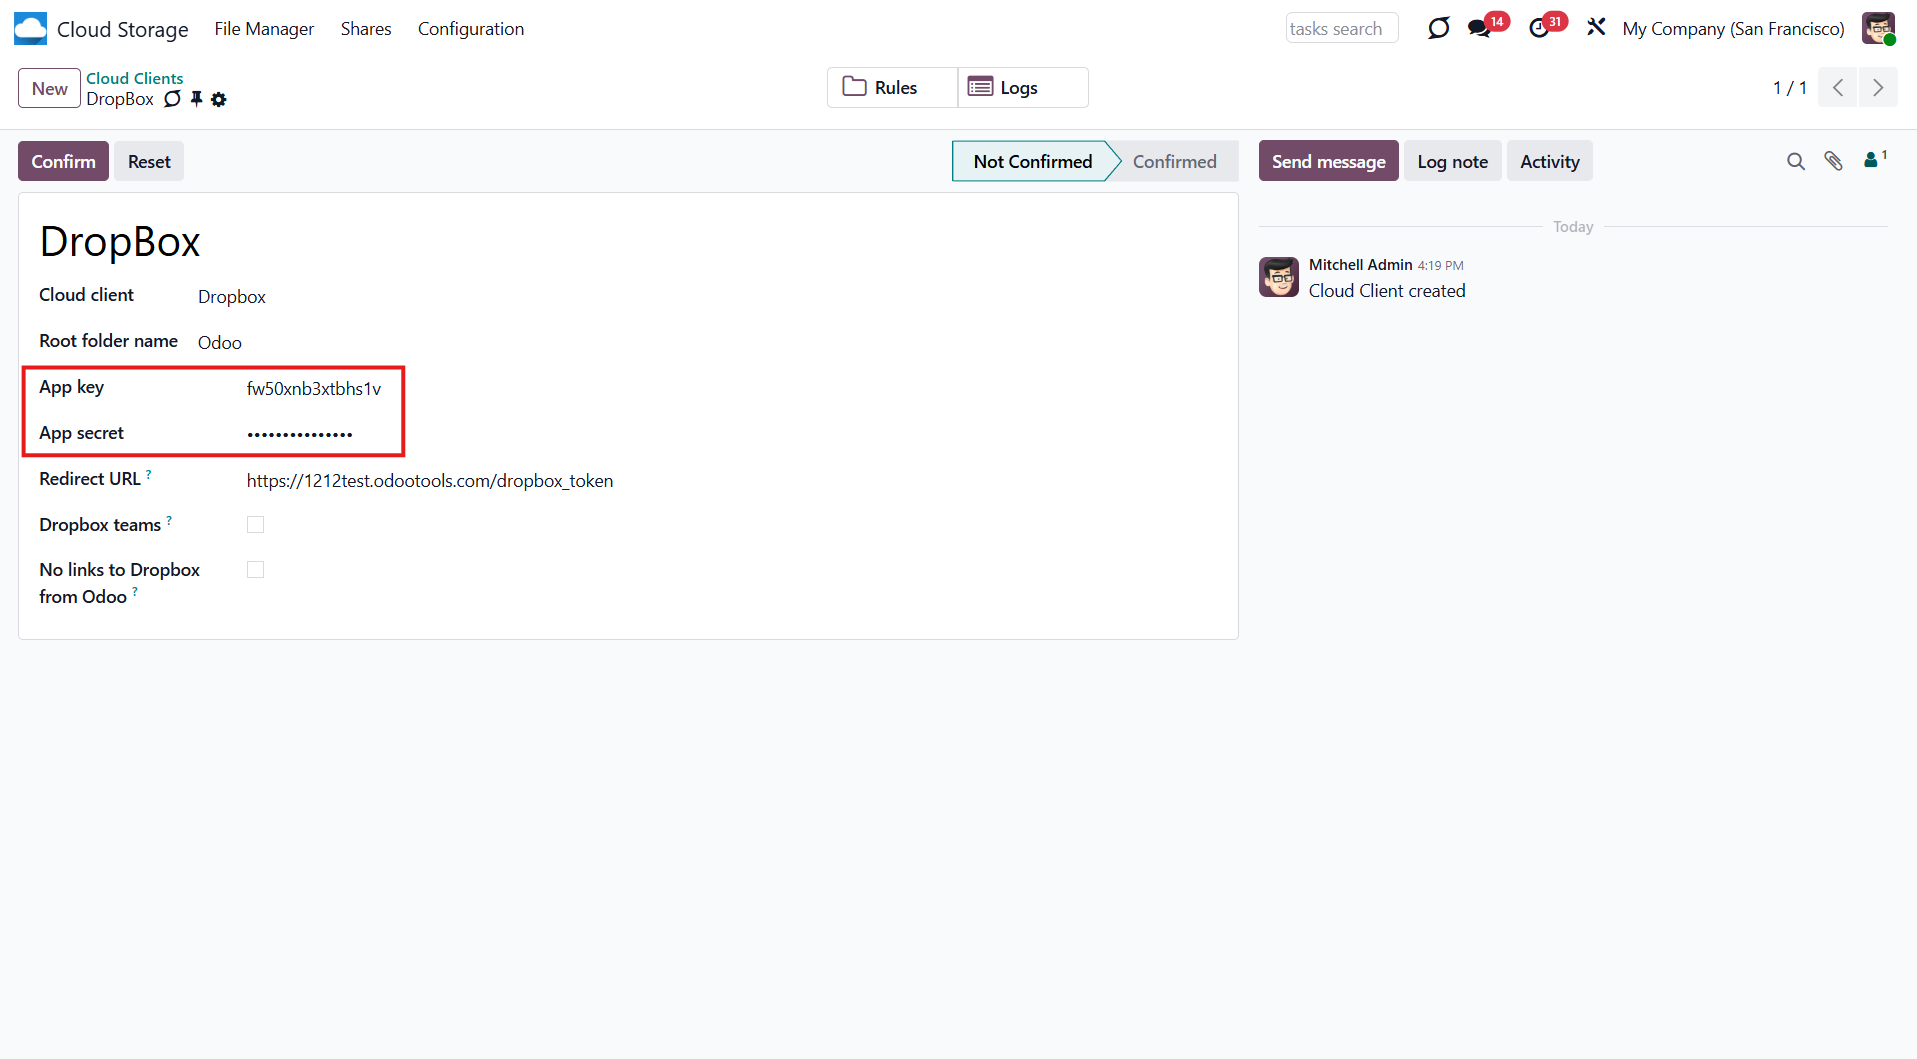
For team Dropboxes only:
- Check the 'Dropmox Team' box and set the Dropbox user's email. Within this user folder, all Odoo-related items will be created and shared with other users. Under this user, all files and folders are created, changed, moved, and deleted
- Choose a suitable name for the root Odoo folder, e.g., 'Odoo' or 'ERP'.
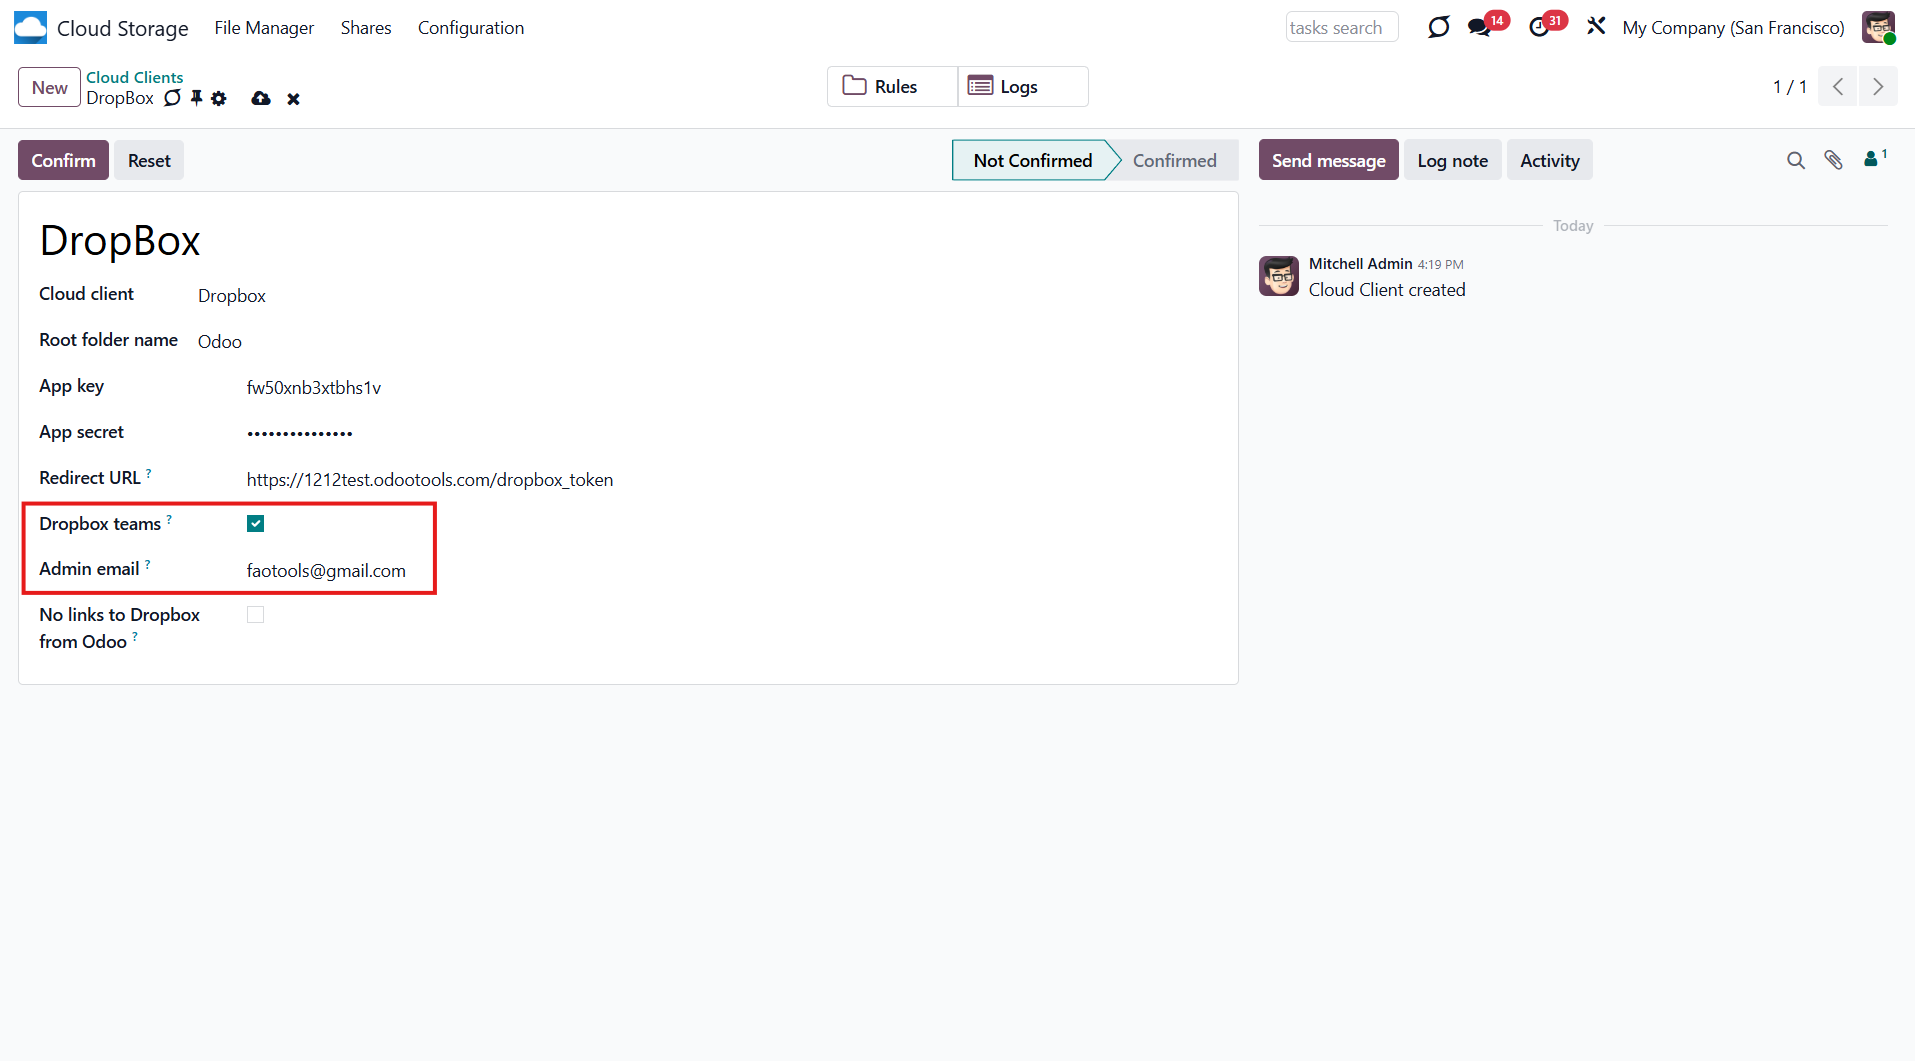
13. Optionally tick the box 'No links to Dropbox from Odoo' (see Dropbox URLs)
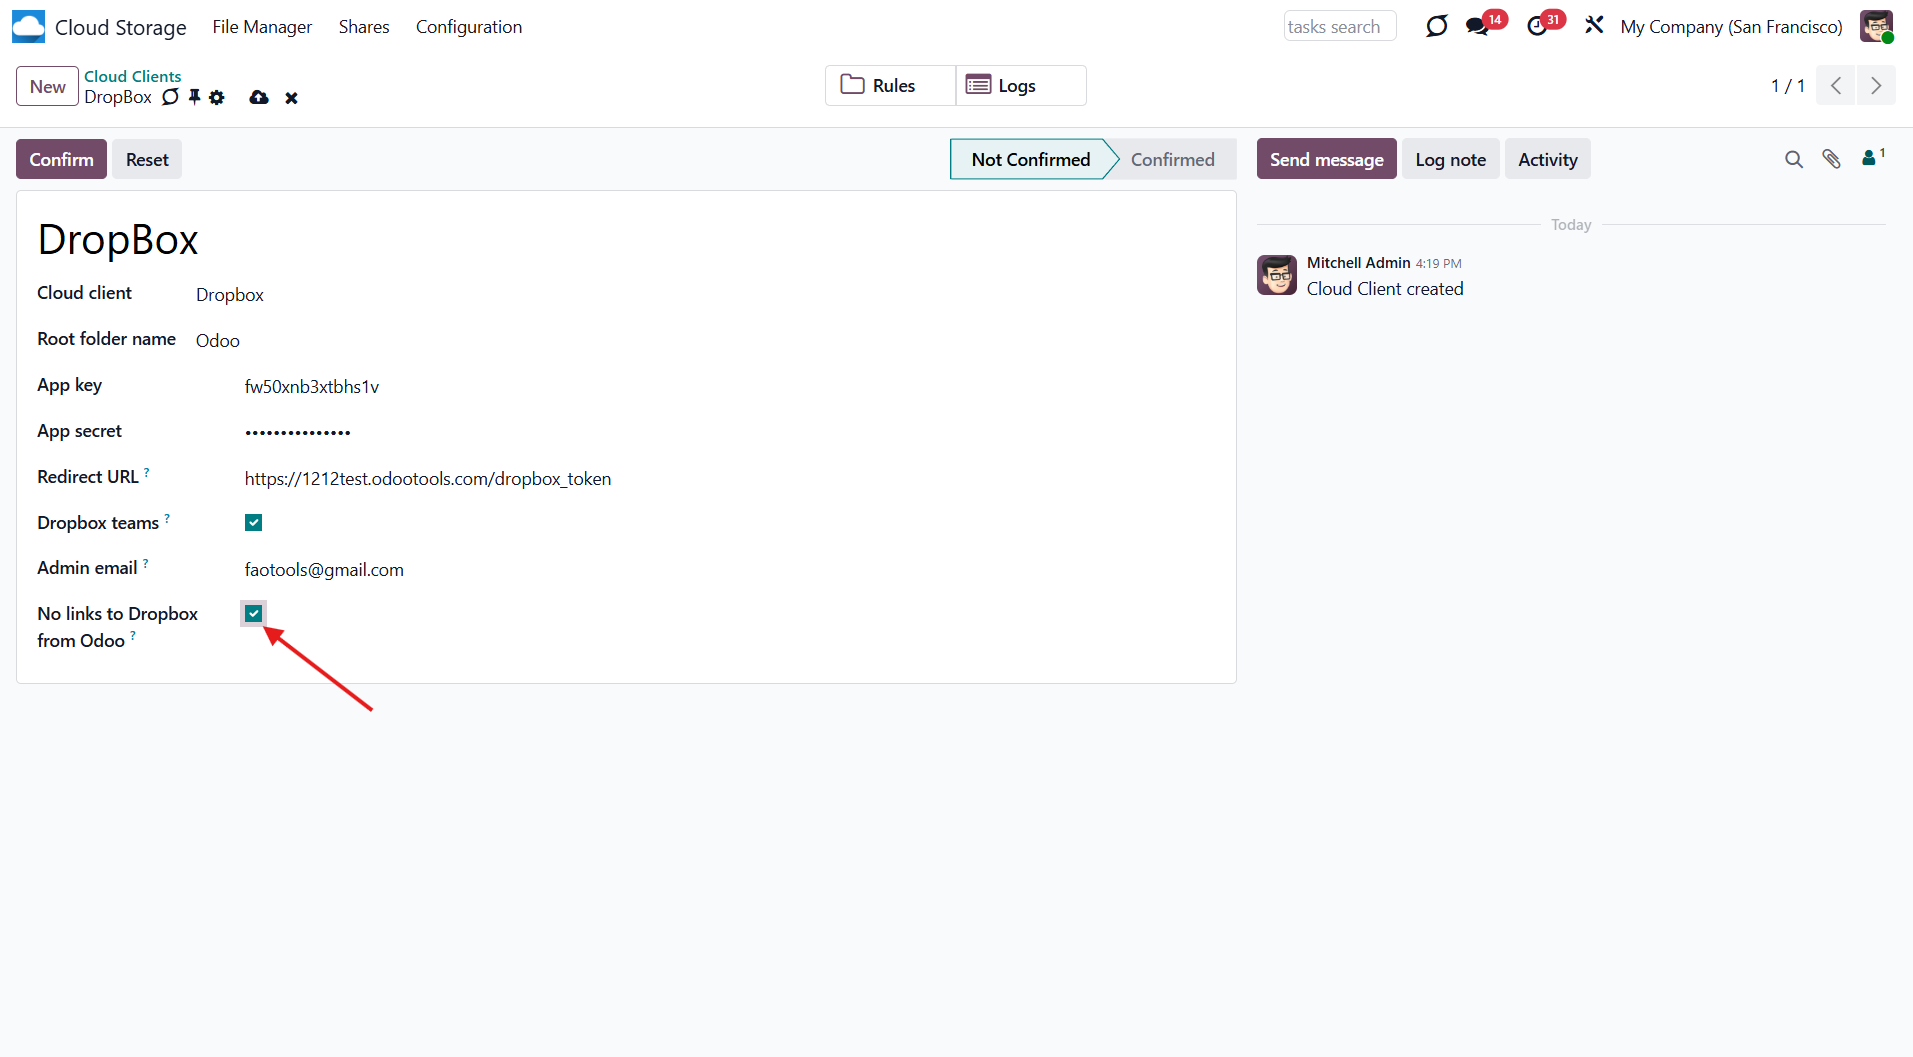
14. Press 'Confirm'.
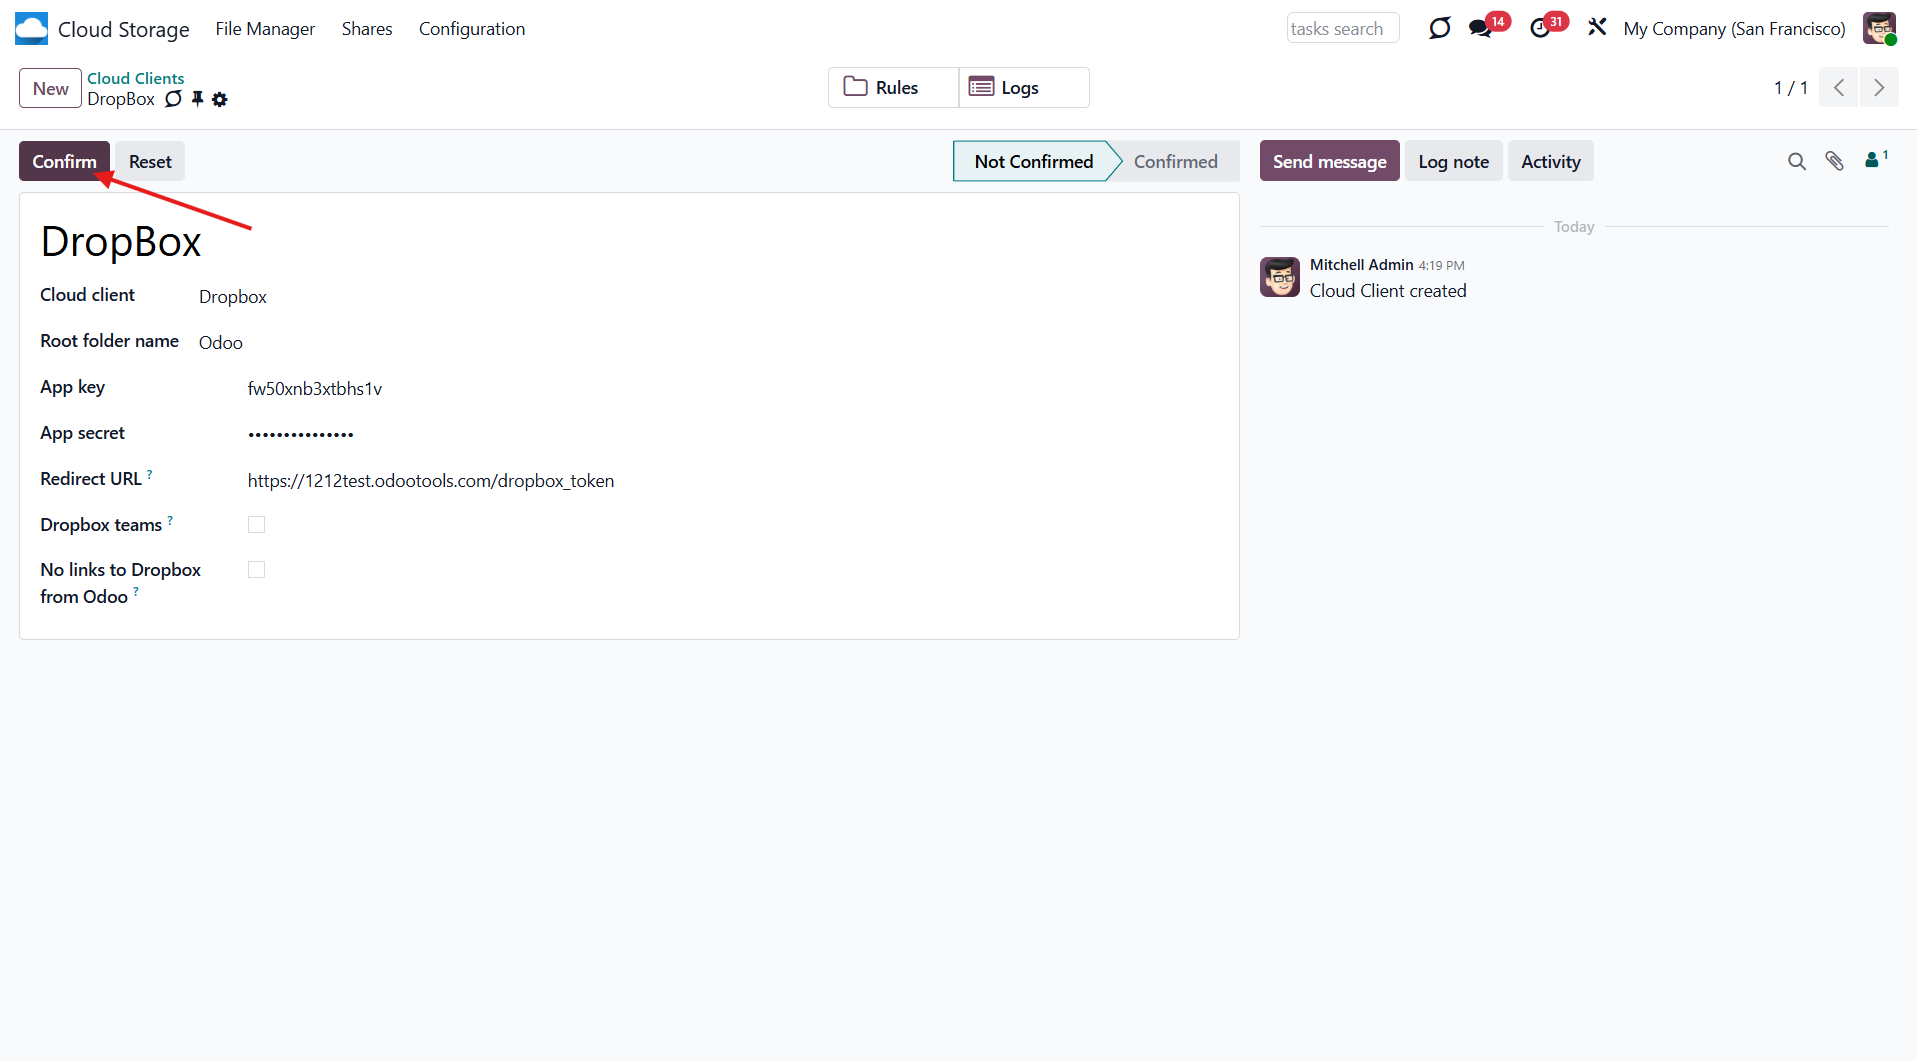
After that, you will be redirected to the Dropbox login page. Check in, agree to all conditions, and grant the requested permissions.
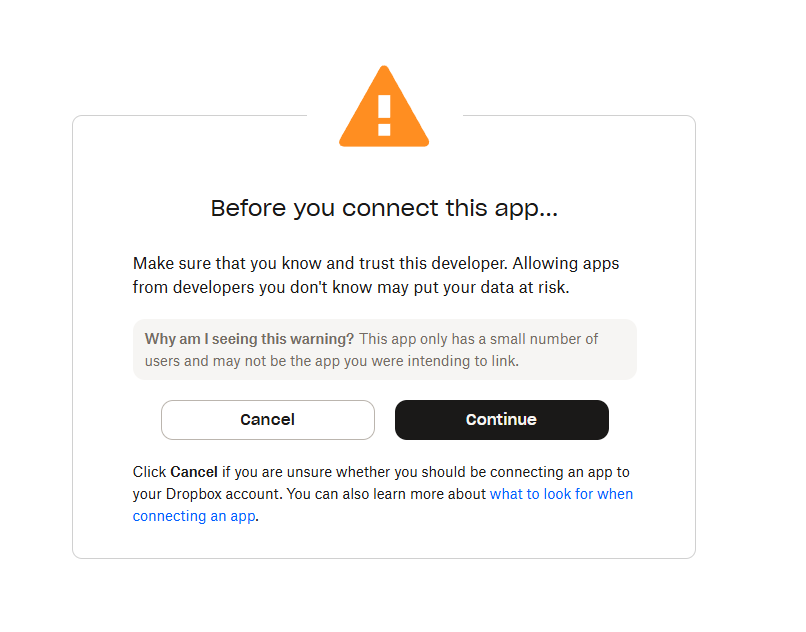
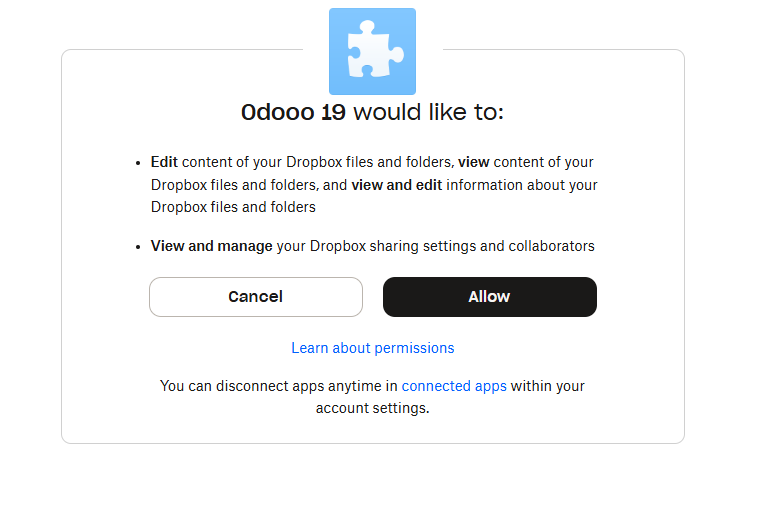
If you did everything right, but a mistake appears as you 'login and confirm' to the account. Add and remove permissions, then log in several times (Steps 7, 8, 12).
Once the setup is complete, you will be redirected back to the module's settings. You will see the interface, which includes two buttons: 'Reconnect/Pause' and 'Reset'. You can use them to stop the sync and return the files and folders to Odoo (see Reconnection, Resetting or changing cloud client: reverse sync).
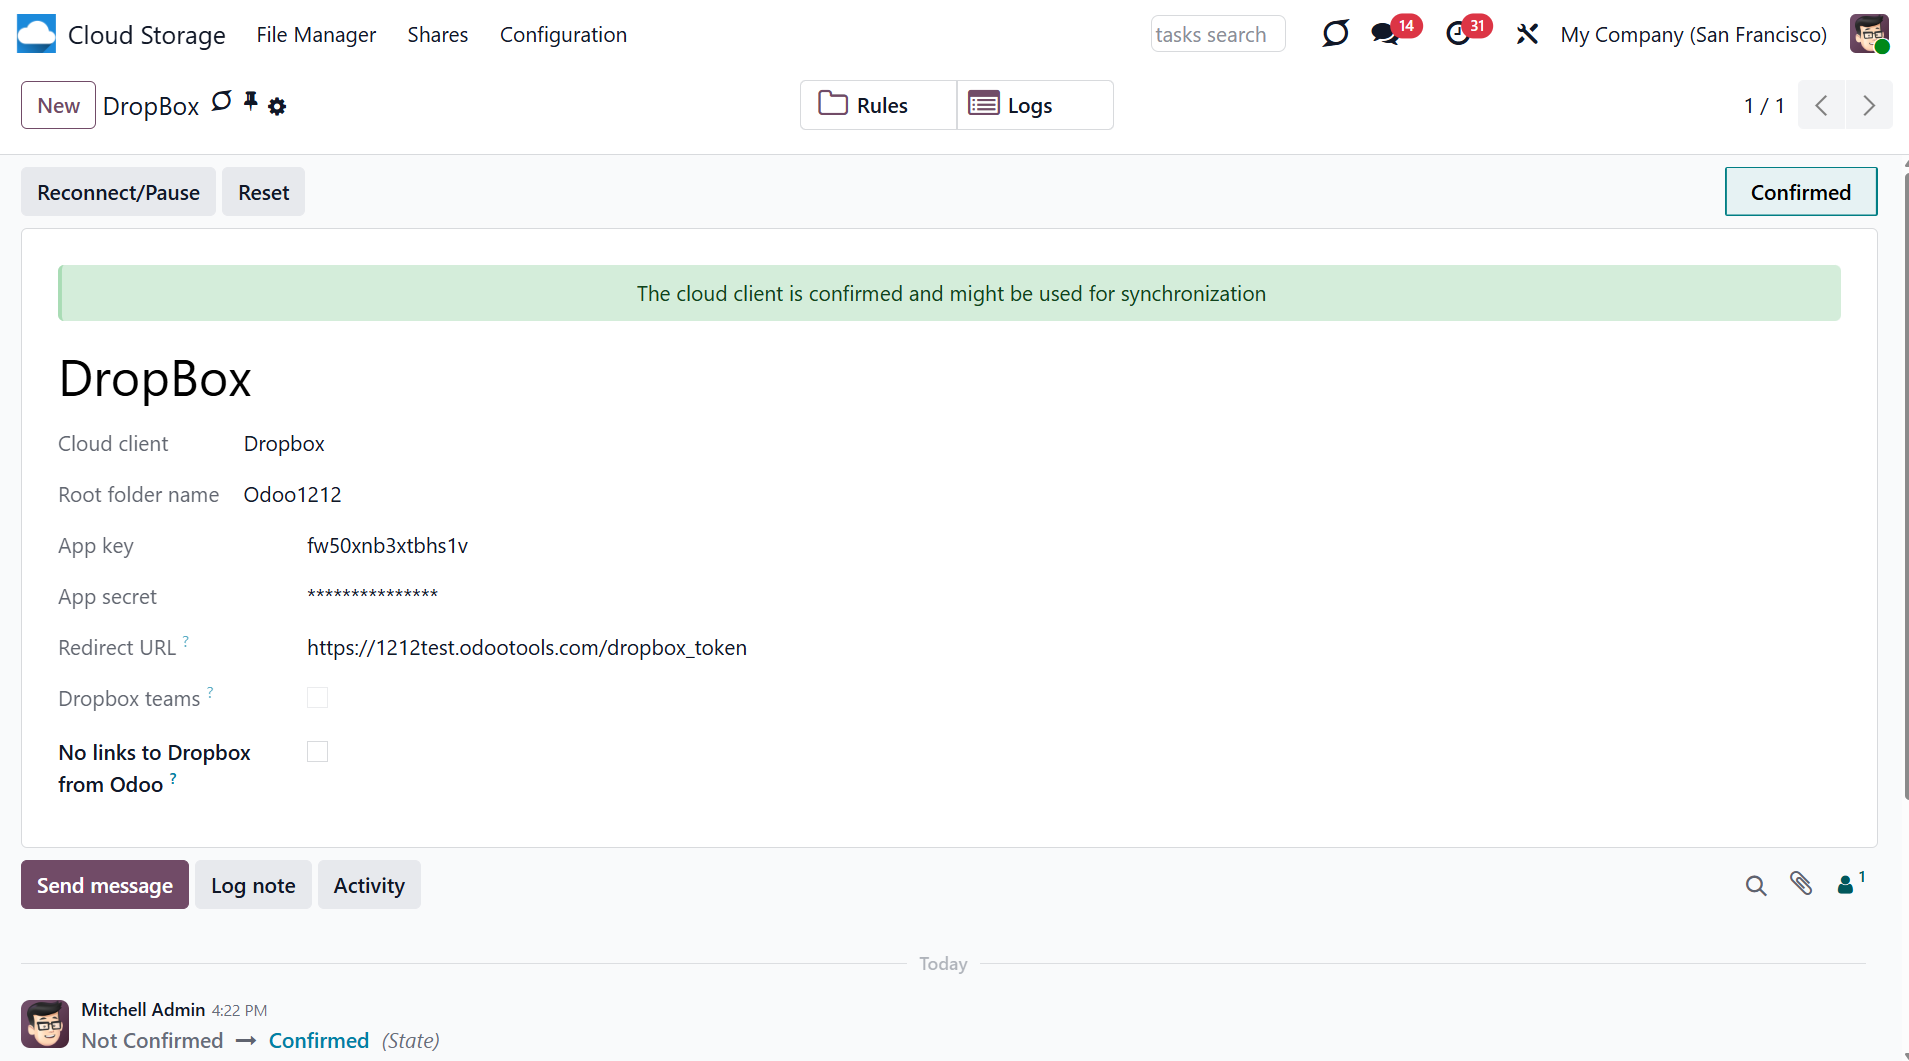
Reconnection
Reconnection might be required in case a refresh token has expired and when you migrate the app from previous versions. In such a case:
1. Press the button 'Reconnect/Pause'
2. Press the button 'Confirm'.
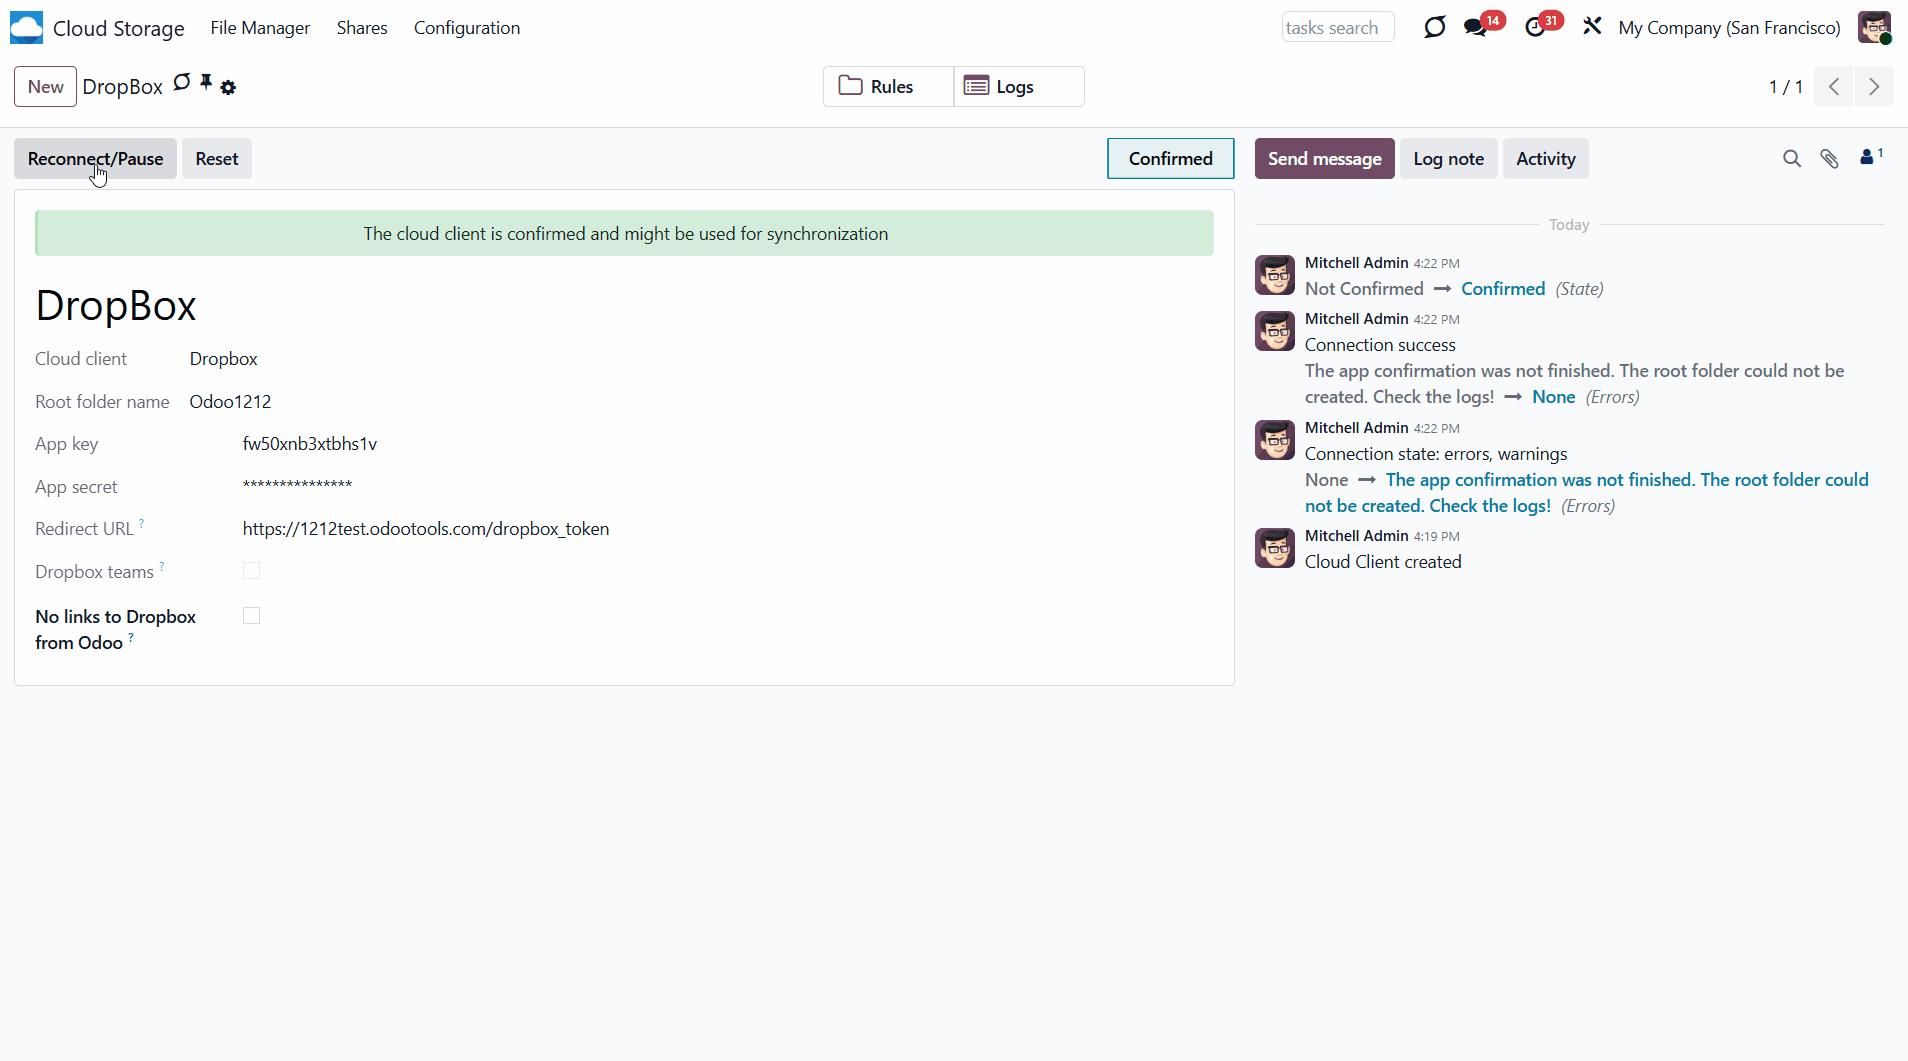
Peculiarities
DropBox has a specific way to generate links for existing files and folders. In particular, there are no concepts of internal or private URLs. Instead, each Dropbox item might get a so-called shared URL. Such shared links are either public or team-only. Moreover, this feature is available only for Dropbox business accounts.
This tool relies on the mechanics of sharing links. This means that each attachment link is either public (for all personal Dropbox accounts) or team-only (for all business Dropbox accounts).
Sometimes, it is considered unsafe. Although website URLs are hardly known to external users, there is a slight chance they become available through user actions. Additionally, sharing link generation is not so fast and may slow down the IR sync process. That is why the feature to turn off URL sharing is being introduced.
If checked, all Dropbox URLs in Odoo will be of the type: https://www.dropbox.com/home/Odoo/[PATH]. Such links will not work in many cases. For example, you will not be able to use the 'Open in Cloud' button. Also, you will not be able to open formats such as .xlsx using the standard Odoo reviewers. For that, authorization will be required.
Thus, if you need to open Dropbox files/folders from Odoo, do not enable the 'No links to Dropbox from Odoo' feature.
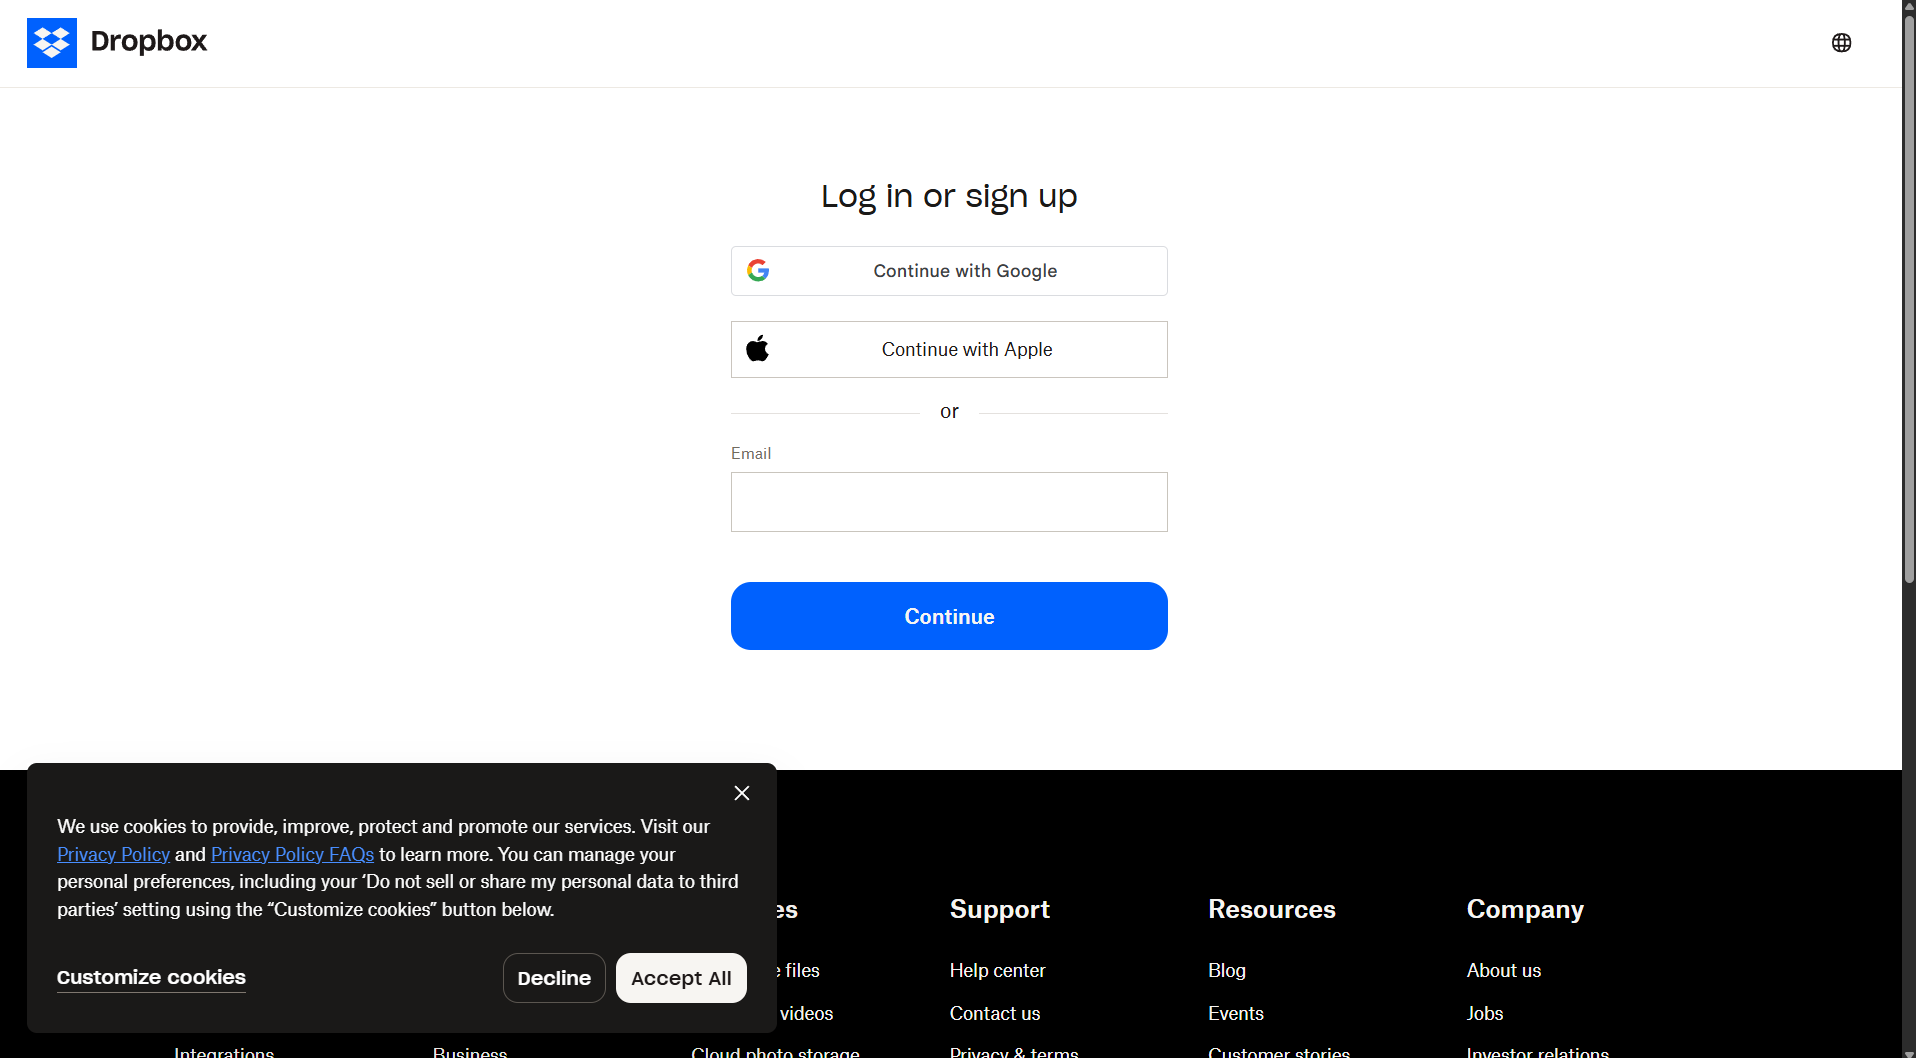
Access Rights
The module introduces two new user groups, which can view and manage the Cloud Storage menu: File Manager Access and Administration.
To access the 'Cloud Storage' menu and the app Files Manager, a user should belong to the security group 'Cloud Storage > File Manager Access'.
To configure automatic folder rules, establish connections with various cloud clients, control sync logs, and apply the app settings, a user should belong to the 'Cloud Storage > Administration' security group.
To assign one of the roles to a user:
1. Go to Settings > Manage Users
2. Choose a particular user
3. Scroll to the section 'Productivity'
4. In the field 'Cloud Storage', choose one of the options.
A user without the assigned cloud storage rights can't open the Files Manager interface, but can see folders with files in the attachments box. This way, they will have access to the object's files, including synced ones, if they have access to the object itself.
The access rights system ensures that users can access only the folders they have permission to view.
Access to a particular folder is determined by its type, its connection to an Odoo object, its parent-child relationships, and its special folder settings.
There are two types of folders: automatic and manual. An automatic folder is a rule-based folder. A manual folder is a folder that was created by a user. See the article Folders in Cloud Storage Solutions.
Access to an automatic folder is defined by access to the related object. For example, we created a folder rule for Odoo customers and sales orders, and configured the rule hierarchy (see Hierarchy of Rules). Based on that, Odoo created the following folder structure:
Customers
-- Azure Interior
---- Orders
-------- S02009 (linked to the sale order S00010, where a Manager is Anita Oliver)
-- Deco Addict
---- Orders
-------- S00005 (linked to the sale order S00020, where a Manager is Doris Cole).
-------- S00001 (linked to the sale order S00030, where a Manager is Abigail Peterson)
As a user with the "Sales/User: All Documents" rights, Anita Oliver can access all created subfolders. Doris Cole has the "Sales/User: Own Documents Only" right assigned, so she can access only sales orders where she is a manager (i.e., folder S00005).
Access to automatic folders that are directly connected to folder rules and don't have the related object is determined based on access to the parent folder. In the example above, such folders are the 'Customers' and 'Orders'. The 'Orders' folder has a parent folder 'Azure Interior', and the second folder 'Orders' has a parent folder 'Deco Addict'. Therefore, a user should have access to the parent folder 'John Brown' to access the related sub-folder 'Orders', and to Elena Green to access its' sub-folder 'Orders'.
If an automatic folder that is directly connected with the folder rules and doesn't have the related object has no parent, then access is defined by the associated model. In the example above, the 'Customers' folder has no parent. Any user who can see Odoo partners can access the 'Customers' folder.
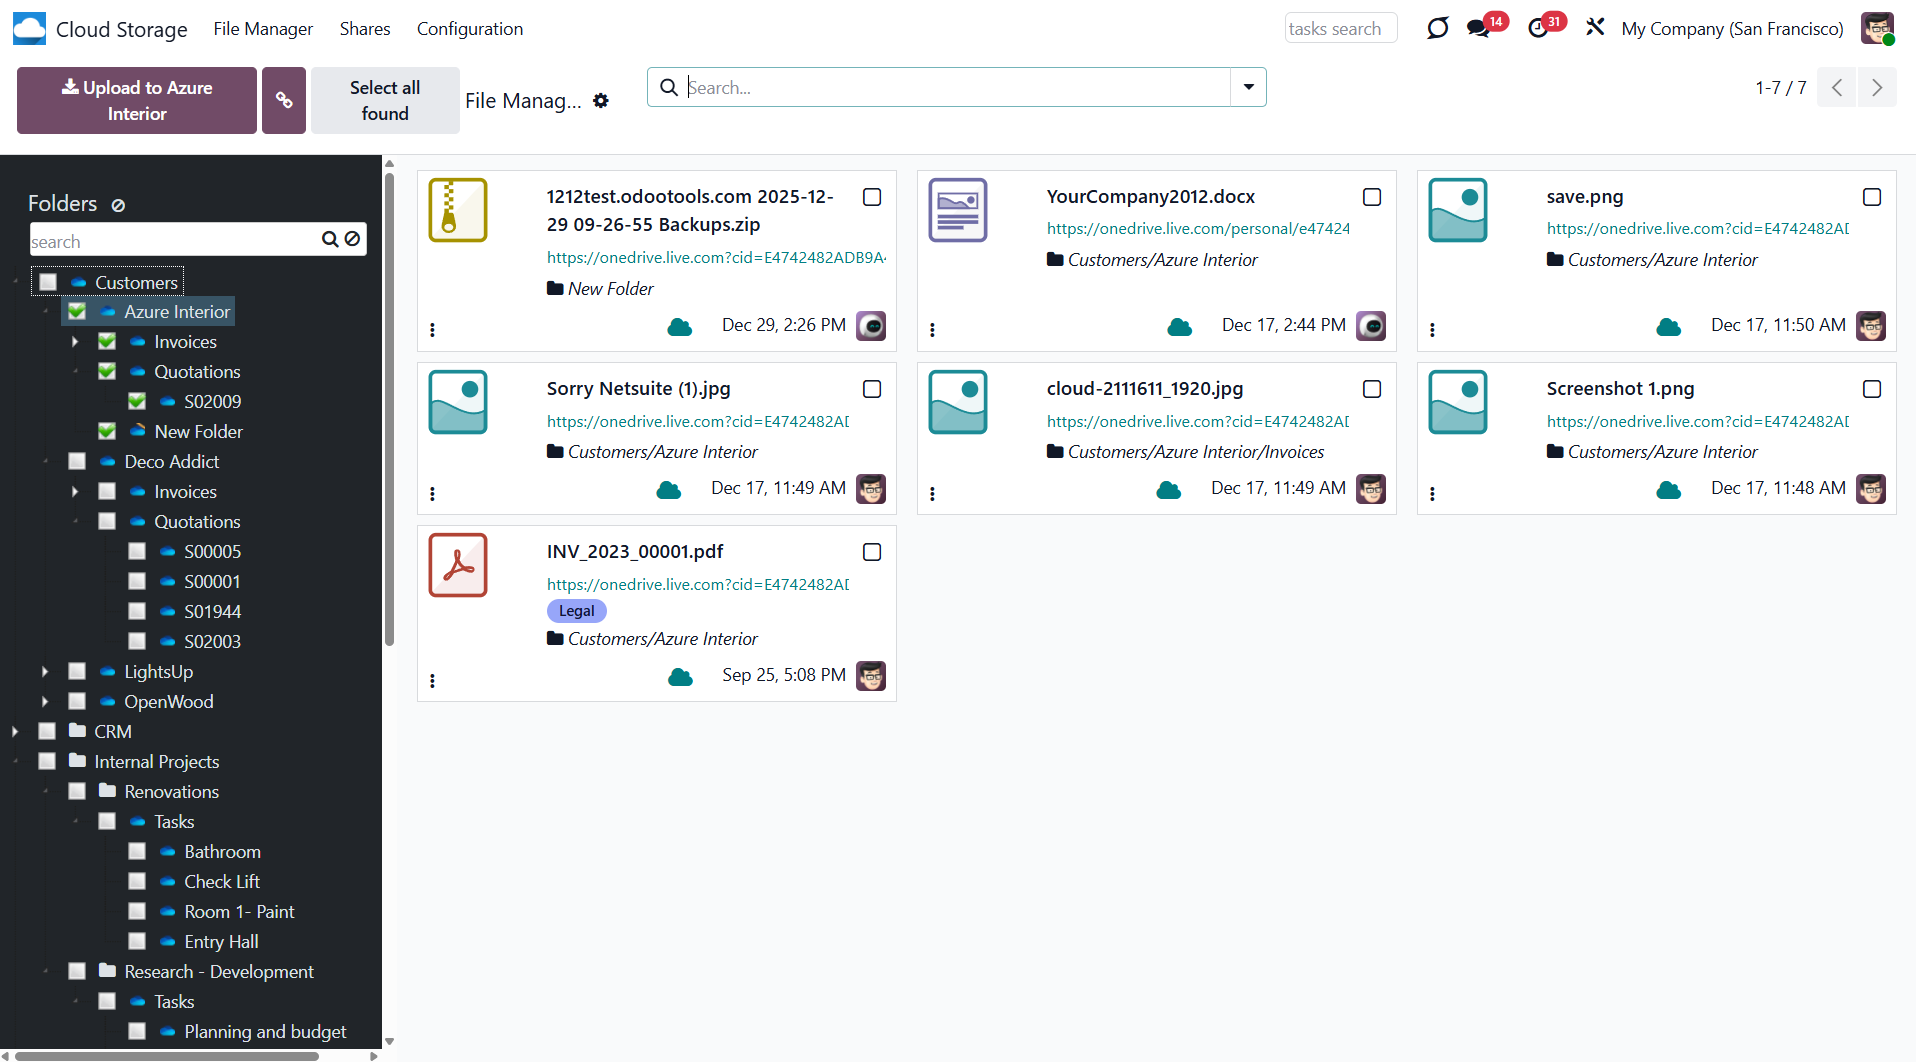
Note that access to all other automatic folders does not depend on access to the parent folders. For example, a user may not have access to the partner folders Azure Interior and Deco Addict, or the model 'Contacts', but they can still work with all relevant orders if they have access to the related objects. For example, even if a user doesn't have access to the folders 'Azure Interior' and 'Deco Addict', they might still access the folders S02009, S00005, and S00001 if they have access to the related sale orders.
However, in this case, such users will see a flat folder structure: the parent folders, which a user cannot access, will be hidden, and the folders the user can access will appear separately in the folder tree. For example:
S02009
S00005
S00001
It is essential to consider this peculiarity when configuring the rule hierarchy to avoid numerous ungrouped folders that are difficult to navigate.
Access to Odoo manual folders is determined by the parent folder's access and the user's settings.
If a manual folder has no parent folder, anyone can access it. For example, we created a standalone folder, 'Documents', that is accessible to everyone unless we restrict access in its settings (see below).
If a manual folder is placed inside an automatic folder, access to the manual folder is determined by the parent automatic folder's access. For example, we created a folder 'Documents' inside the automatic folder 'S00005', so only users with access to 'S00005' can access 'Documents'.
If a manual folder is placed inside an automatic folder, which is directly connected with the folder rule and doesn't have the related object, then the access to the manual folder is based on the access to the parent folder of the automatic folder, if any, or on the associated model, if there is no parent folder. For example, if we place the 'Documents' manual folder inside the 'Orders' folder in the structure above, only users with access to the 'John Brown' folder will be able to access it. If we place the manual folder 'Documents' inside the 'Customers' folder in the structure above, only users with access to the 'Contacts' model will be able to access it.
If we create a manual folder inside a manual folder, which is itself inside another manual folder, and place it inside an Automatic Folder without restricting access to manual folders, then access to each manual folder will be determined by its parent's access. For example, we have the structure:
--Azure Interior
----Documents
------Important
--------Top Priority
In this structure, the 'Azure Interior' folder is an automatic folder, and the 'Documents', 'Important', and 'Top Priority' folders are manual folders. The access to the folder 'Top Priority' will be based on access to the folder 'Important', the access to the folder 'Important' will be based on access to the folder 'Documents', and the access to the folder 'Documents' will be based on the access to the folder 'Azure Interior', which is available to the users with the access to the related object - contact 'Azure Interior'.
This way, administrators can easily manage access to multiple folders within a nested structure without configuring individual permissions for each separate folder. This simplifies the administrative process and ensures consistent access control across the entire hierarchy.
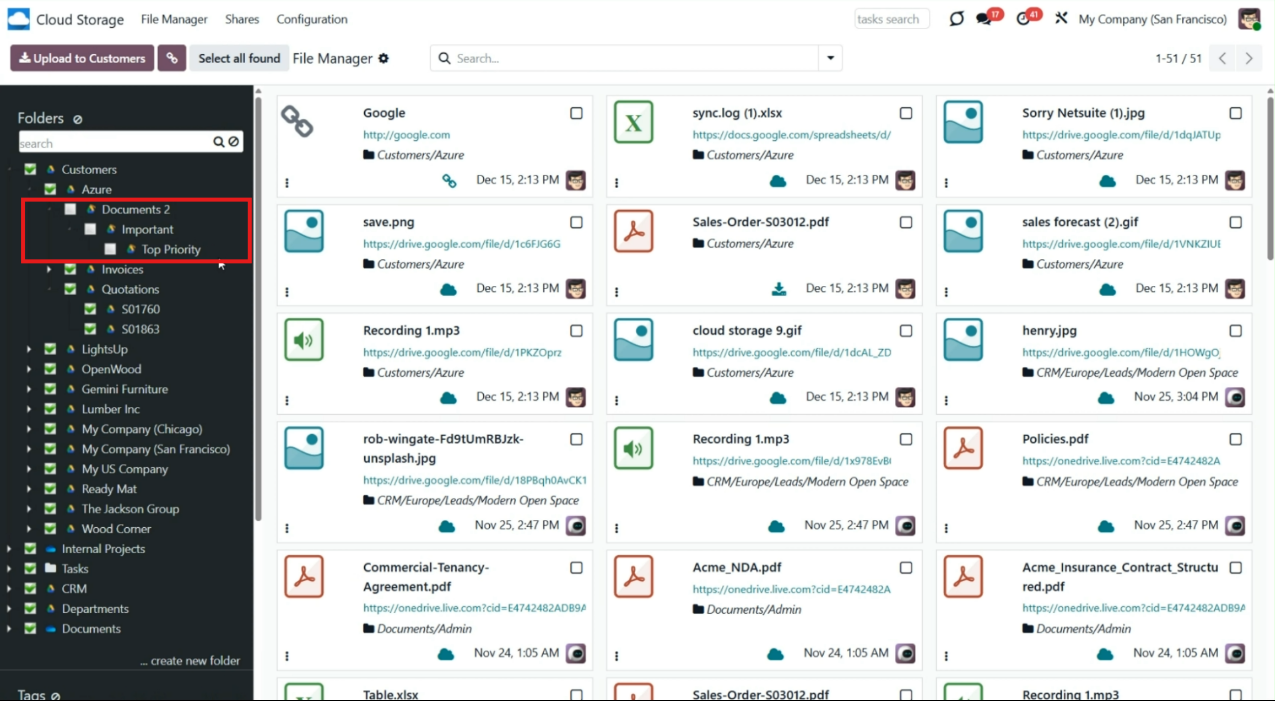
You can also restrict access to each manual folder by defining users or user groups in its settings, preventing anyone else from accessing it. For example, we created a manual folder 'Documents' and granted access to users (Mitchel Admin and Abigail Peterson) and user groups (Sales/Administration and Project/Administration). Anita Oliver has the 'Sales/Administration' role assigned so that she may access the 'Documents' folder.
If you place a manual folder inside another manual folder with limitations in its settings, access to the child manual folder will be determined by both the parent folder's restrictions and own folder's restrictions. For example, we have created a structure ... > Important > Top Priority. Then, we have restricted access to the 'Important' folder by specifying the users (Mitchel Admin and Abigail Peterson) and user groups (Sales/Administration and Project/Administration) who can see it. And, we have restricted access to the child manual folder 'Top Priority' by granting access to users (Mitchel Admin, Anita Oliver) and user groups (Sales/Administration, Inventory/Administrator). Although Anita Oliver and users in the 'Inventory/Administrator' group were specified in the folder 'Top Priority' settings, they still cannot access it, while they don't have access to the parent folder 'Important'. This way, only Mitchel Admin and users with the 'Sales/Administration' user group assigned will be able to access the 'Top Priority' folder.
To manage access to a manually created folder:
1. Click on any manually created folder with the right side of the mouse
2. Choose the option 'Edit Settings'
3. Go to the tab 'Extra security'
4. Specify the users and groups who can see the folder
5. Click 'Save&Close'. Keep in mind that the folder's creator must also be added to the list to access the folder.
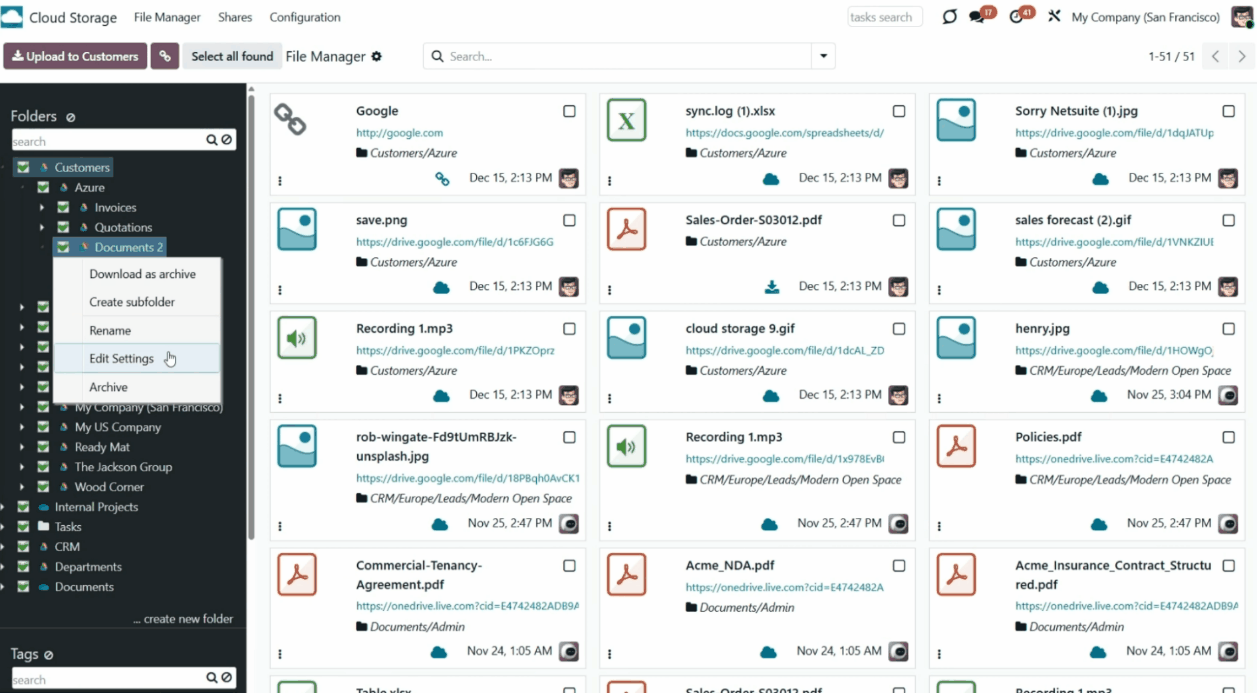
The app does not regulate access levels for cloud clients and their items. The tool regulates rights only for Odoo objects and synchronizes those to the required storage. After the sync, if necessary, you should apply the settings for a target cloud client, folders, and files.
Sharing in Portal
Often, there may be a need to share specific files and documents with colleagues, clients, or partners. However, traditional methods of sending multiple attachments via email can be inefficient. This is where portal shares come in. They offer a seamless, organized way to share specific attachments, entire directories, or all files with particular portal users and, if necessary, public users.
With portal shares, users can grant Odoo portal access, send invitations, and generate public access links. Shares can be created temporarily or made available constantly until archived, providing flexibility and control over the sharing process.
You can create an unlimited number of shares with any setup and attachments you need. Users can access these shares via the 'Shares' entry in the Odoo portal.
Portal share users can optionally download any files, an entire share, a specific directory, or a tag as a ZIP archive. It is also possible to allow uploading files to any folder or only the default one. Users can easily search for attachments by title, linked folder, and tag. Share users can optionally download any files, an entire share, a specific directory, or a tag as a ZIP archive. It is also possible to allow uploading files to any folder or only the default one. Users can easily search for attachments by title, linked folder, and tags, and navigate shares by folders and/or tags.
The Portal Shares functionality can be enabled or disabled on the module's configuration page. To turn on the attachment sharing with portal users:
1. Open the Cloud Storage menu
2. Go to Configurations > Settings
3. Tick the option 'Sharing'
4. Scroll down and find the section 'Mass actions'
5. Click 'Add a line' and add the mass action 'Share'
6. Click 'Save'.
After that, a new entry, 'Shares,' will appear in the systray, and the 'Shares' section will appear in the left navigation panel of the single-view interface.

It is possible to create an unlimited number of Portal Shares and share them with an unlimited number of Odoo partners. There are several ways of creating a portal vault:
1. Through the special menu 'Shares'.
2. In the Files Manager Interface, as you click on the button '...add' below the shares in the left functional interface, you select the attachments and apply the mass action 'Share'.
To add a Portal Share through the special menu:
1. In the systray, click 'Shares'
2. Click 'New'
3. Type the share's name
4. Choose portal users who will have access to this vault. Each partner may have access to multiple shares
5. Optionally, tick the box 'Access by Token' to enable access to the share by the link. After that, the field 'Access URL' with the link will appear. You can copy the link and share it with anyone
6. Optionally, define a validity date for a temporary sharing to auto-archive Portal Shares
7. Optionally, in the tab 'Attachments', choose the folders, tags, and/or separate attachments that should be shared. When you select a tag or a folder, all the included attachments are shared
8. Optionally, in the tab 'View and permissions', configure the settings of the share
8.1. To allow users to upload files from the portal share, tick the option 'Allow Uploading' and choose a default target folder in the field 'Uploading Folder'. Portal users can upload files to any available folder in the share. If the target folder isn't selected, the attachments will be uploaded to the default folder. The uploaded files are also accessible via the related folder in the backend files manager interface.
8.2. Tick the option 'Show tags' to allow users who access the portal to share and see the attachments' tags. To allow users to add sub-tags in the portal, enable the 'Allow adding tags' option. To allow users to search the attachments by tags, enable the option 'Allow searching tags'
8.3. Tick the option 'Show folders' to allow users who access the portal share to see the attachments' folders. To allow users to add their own subfolders in the portal, enable the 'Allow adding folders' option. To allow users to search the attachments by folders, enable the option 'Allow searching folders'
8.4. Allow users to observe images in a slideshow by enabling the option 'Slideshow'
8.5. Tick the option 'Show Chat' to allow users to leave comments below the share
9. Optionally add notes in the tab 'Notes'.

You can also create and manage portal shares right from the single-view interface. All internal users accessing the files manager interface can create or update any portal share.
When an internal user opens the file manager interface, the list of portal shares, if any, is shown on the left side of the interface. Use the search bar above the shares list to find the ones you need quickly.
To create a portal, share the list of shares below, click on the '...add' button, and introduce its name.
Right-click a portal share to view the available actions and manage the share. In particular, you will be able to:
1. Download as an archive - allows downloading the attachments of a specific share.
2. Send Invitation - allows giving chosen users access to the share and sends them an email invitation with the link to the share.
3. Copy access URL - allows copying the URL with a token to access the share. It is visible only when token-based access is enabled.
4. Preview Portal - allows the portal version of the share to be seen.
5. Create - allows creating a child portal share. You can create as many child shares as you need
6. Rename - allows changing the name of a particular portal share
7. Edit - allows changing the properties of the portal share, including name, access, view, and permissions, attachments, etc.
8. Archive - allows removing a share from the folder tree. Later, it can be restored.
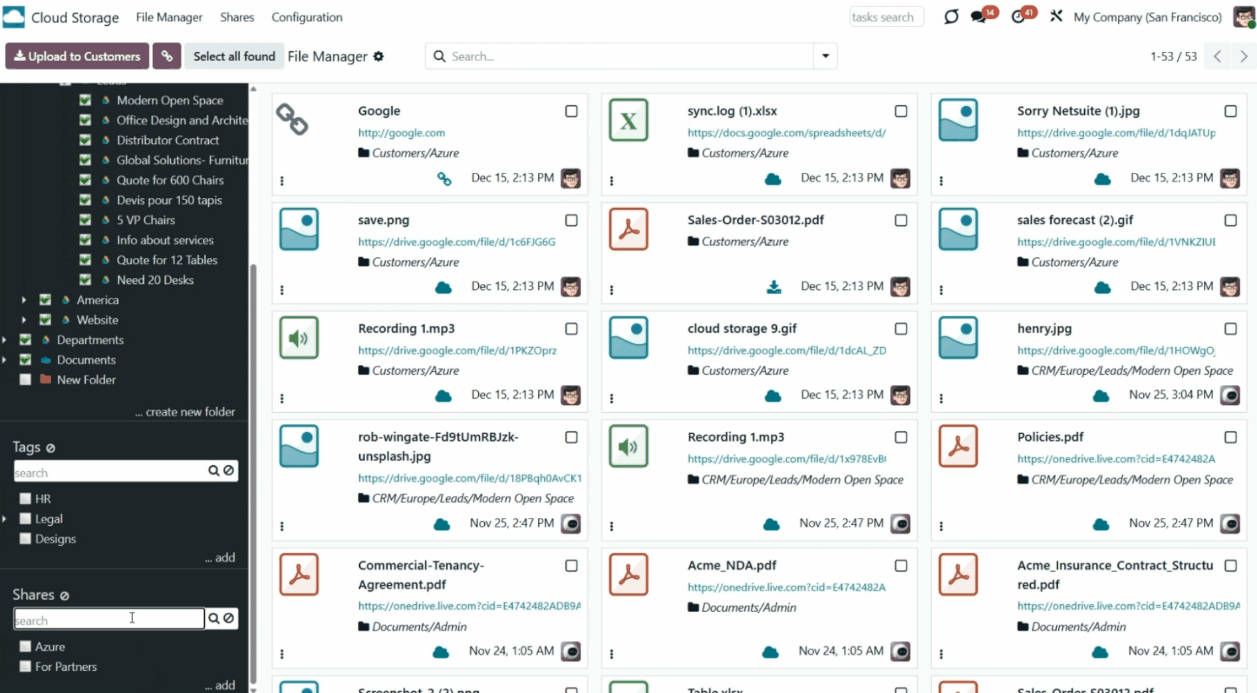
To add some attachments to a portal share, or create a new portal share right from the files manager interface:
1. Select the attachments
2. Click on the mass action 'Share' on the right side of the interface
3. In the field 'Share', choose either to create a new share or update the existing one
4. If the option 'Create a new share' is chosen, specify its name, select the portal users that should have access to the share, send them an invitation, specify extra tags and folders to share, enable access by token for public users, and specify the time for which the share should be active
5. If the option 'Add to an existing Share' is chosen, choose the Portal Share in which the attachments should be shared, and specify extra tags and folders to share, if necessary
6. Click 'Save'.
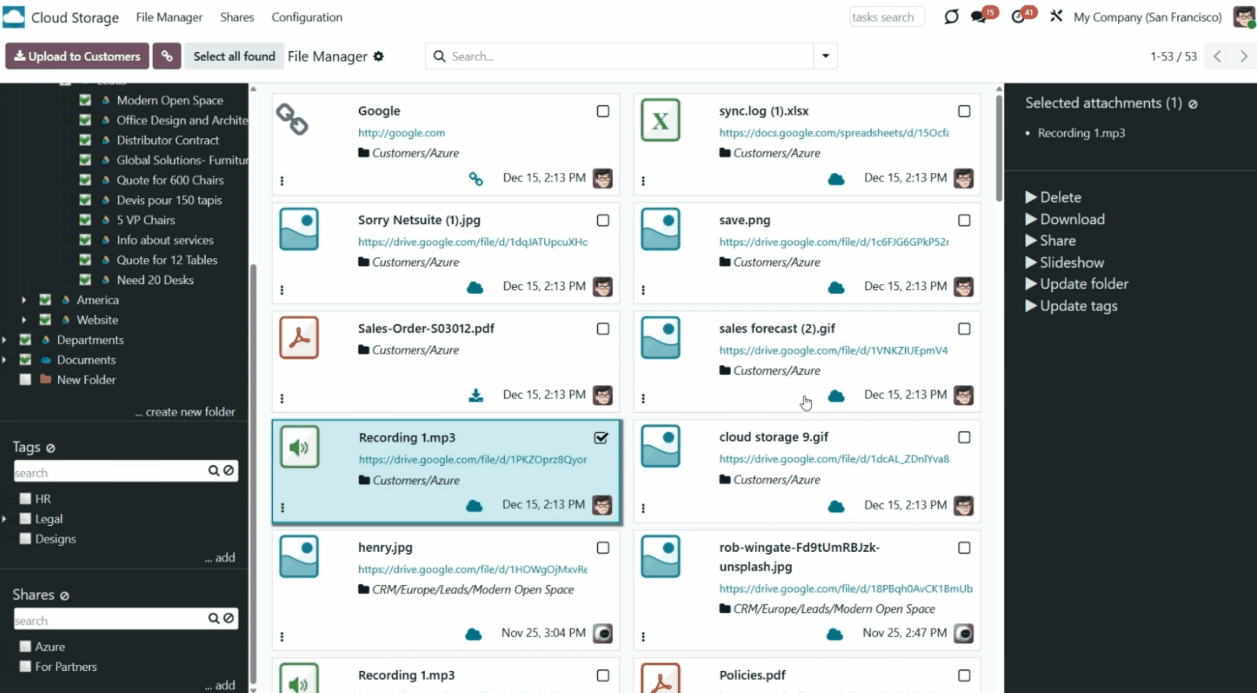
Portal users can easily access shares by accessing the dedicated 'Shares' section on the home portal page. Users must have portal rights, which can be obtained by submitting a partner form (Action > 'Grant portal access').
Upon entering the 'Shares' section, users will find a list of shares they can access. Specifically, portal users can view all portal shares where either they or their parent company is designated in the 'Portal access' field.
Clicking a portal share opens the portal share interface, which offers tools and features to enhance sharing and collaboration. These tools enable users to manage and interact with shared attachments efficiently, improving productivity and collaboration within the portal environment.
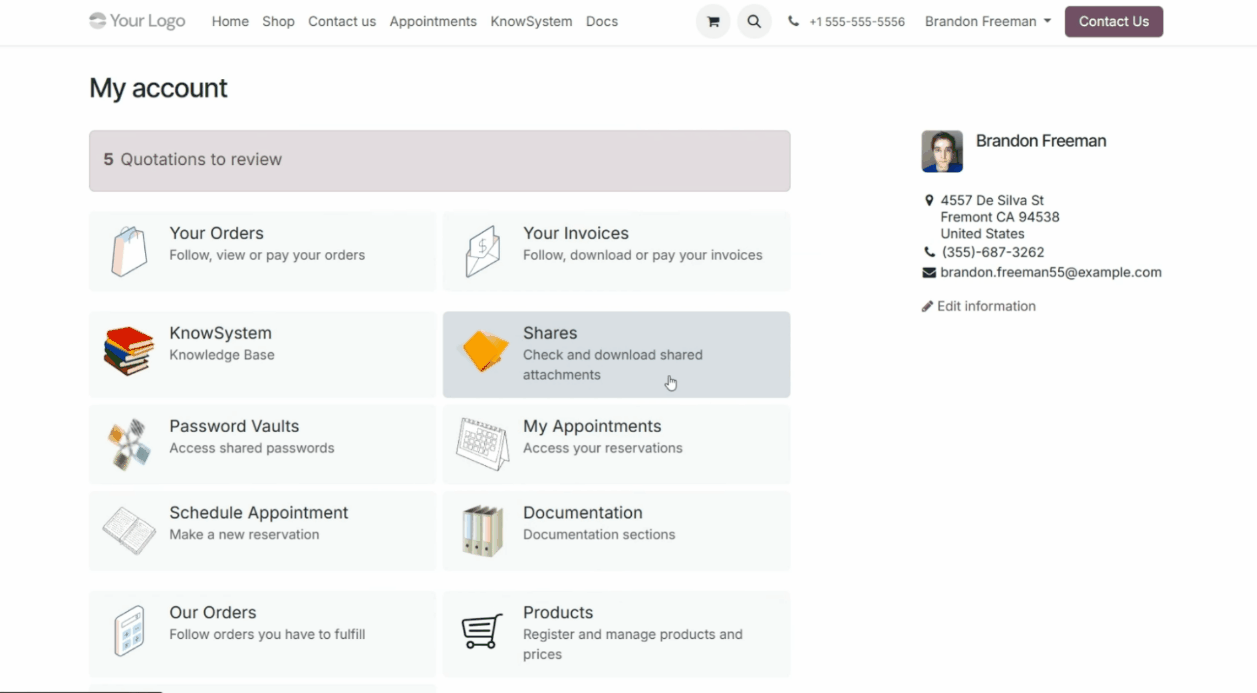
The layout and functionality of the portal's share interface may vary depending on the specific views and permissions configured for each share. Users can sort, search, and download the attachments regardless of these settings.
It is possible to sort attachments by name and folder, making it easier to find specific files within a share. To do so, choose the option Name or Folder in the field 'Sort by' above the attachments list.
When there are numerous files, a search bar lets users quickly locate the desired attachments by name, tag, or folder. Just choose the search parameter, type the text, and click the search button.
A button located below the attachments makes downloading attachments simple. Users can download individual files or select the 'Download share as archive' button to download all available files at once. If the tags and folder lists are also shown, users can download all attachments within a file or folder by right-clicking it and selecting the 'Download as Archive' action.
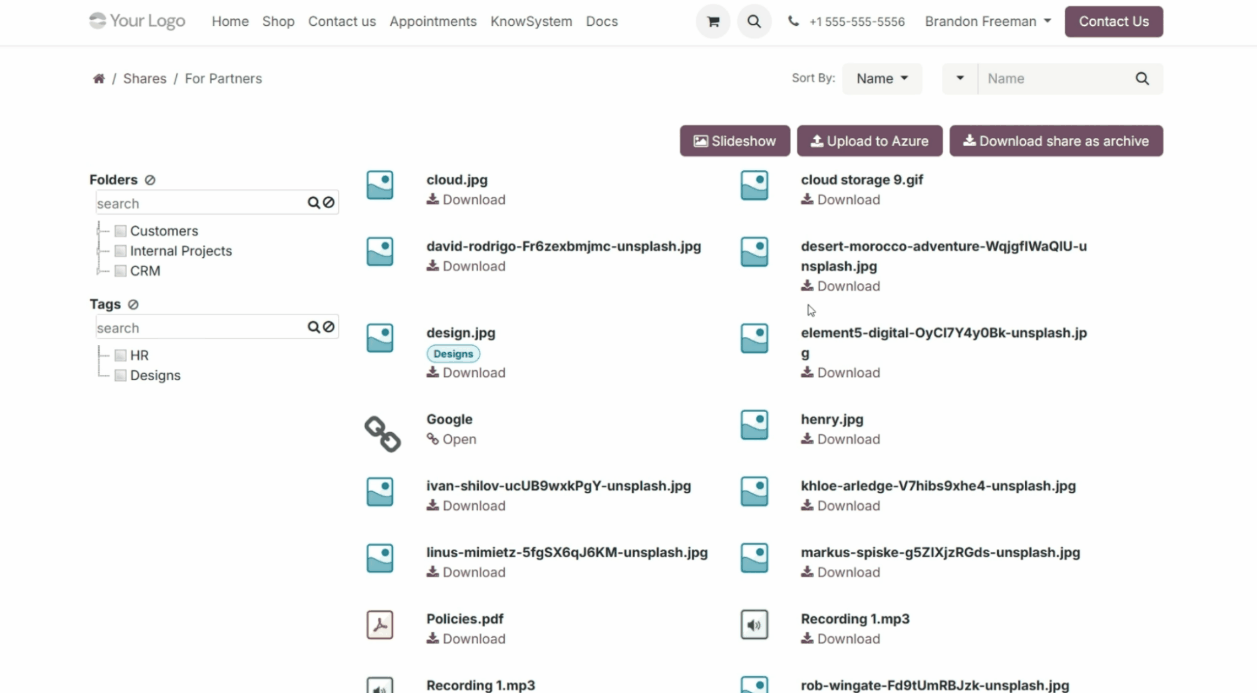
If you want your users to have a more organized view, enable the options 'Show Tags' and 'Show Folders' in the portal share's configurations. This way, if at least one folder/tag is specified in the portal share's settings, it will be shown on the left side of the interface in a hierarchical format. Users can conveniently navigate tags and folders and view the attachments they contain.
Additional options such as 'Allow searching tags' and 'Allow searching folders' enhance the user experience by enabling users to search for specific tags or folders within a share easily. To that end, separate search bars are added above the folder and tag trees. Just start typing the word and press 'Enter' or the search button; the matching results will be shown and marked in red. Click the 'Reset' button on the right side of the search bars to clear the search.
Enable the options 'Allow adding tags' and 'Allow adding folders' to allow users to add their sub-tags and sub-folders to the portal share. After that, when they right-click a tag or folder, they will see the 'Create' option. The tags and folders created in the portal share are also visible in the backend file manager interface. At the same time, because the created tags and folders are added as children of the shared ones, you can be sure that customer-created folders won't affect the hierarchy of the main list.
In the portal shares, users can upload files to the share if the 'Allow uploading' option is enabled. Attachments can be uploaded manually to any available folder. That is why, as in the backend, there is always a default folder selected and highlighted in a color. Usually, the default folder is set in the Shares settings under the 'Uploading Folder' field. In other cases, it is the folder with the smallest sequence number among the selected folders (listed higher in the folder list).
The target folder is also specified on the dynamic button 'Upload to ...' above the attachments list to avoid confusion. This way, you can ensure that the attachments will end up in the correct directory. For example, if the currently selected folder is 'Customers,' then you will see the button 'Upload to Customers' above the left functional interface.
Users can upload attachments not only by clicking the dynamic 'Upload to...' button, but also by dragging and dropping files into the central part with the attachments list.
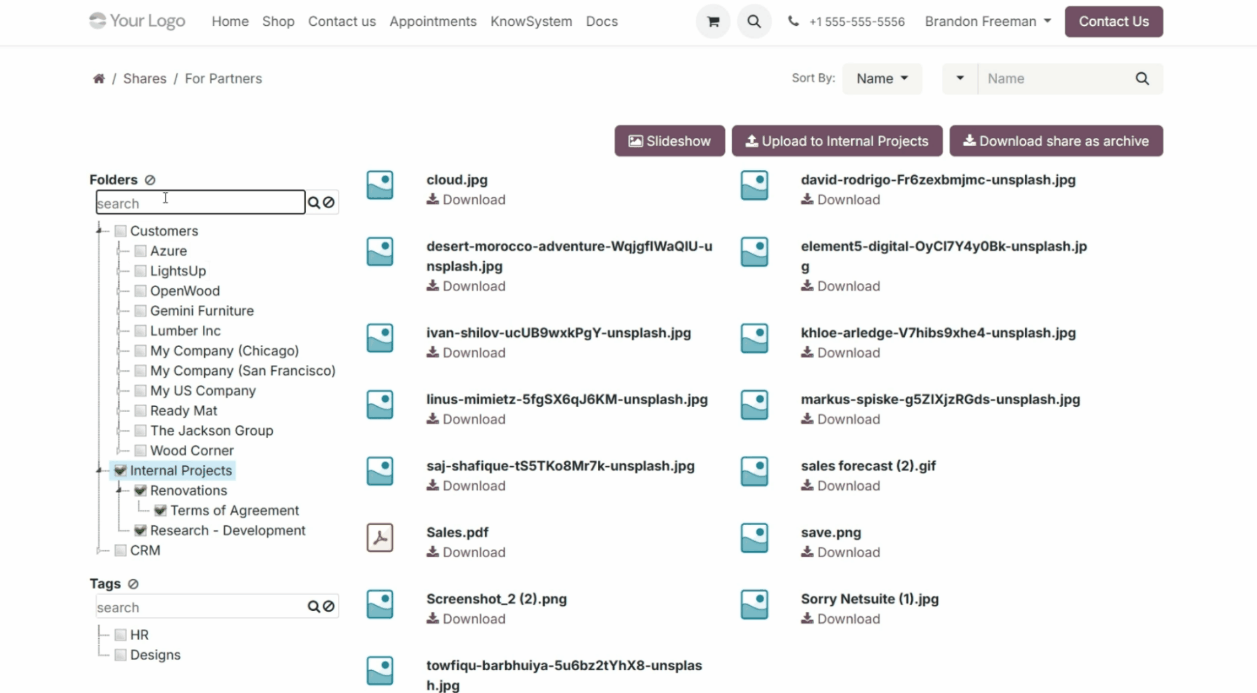
Portal users can also preview all found attachments in a slideshow. To do so, make sure the 'Allow slideshow' option is enabled in the share's settings.
After that, above the attachments list, the button 'Slideshow' appears. When a user clicks it, all attachments for the image types will be displayed one by one. The time each image is displayed is set in the time step field below.
Use the arrow icons to navigate between images manually. Click the pause icon to pause the slideshow, and click the play icon to resume it.
After reaching the last image, the slideshow starts over from the beginning. Click the cross icon in the top-right corner or press Esc to exit slideshow mode.
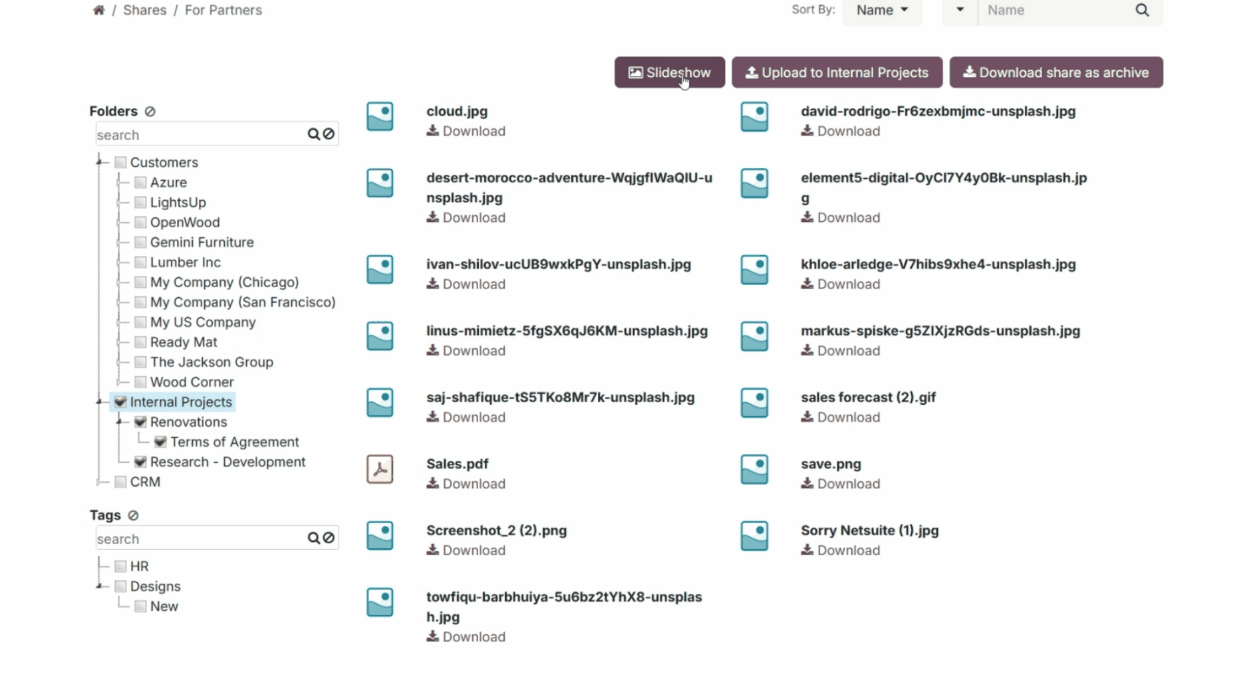
If the 'Show Chat' option is enabled, below the attachments list, portal and public users will see a message thread where they can leave comments.
These messages are also visible in the backend, in the messages thread of the related portal share card, where internal users can communicate with portal users.
Internal users can be added as followers to the portal share to receive notifications about new messages. The 'Discussions' subscription option should be enabled.
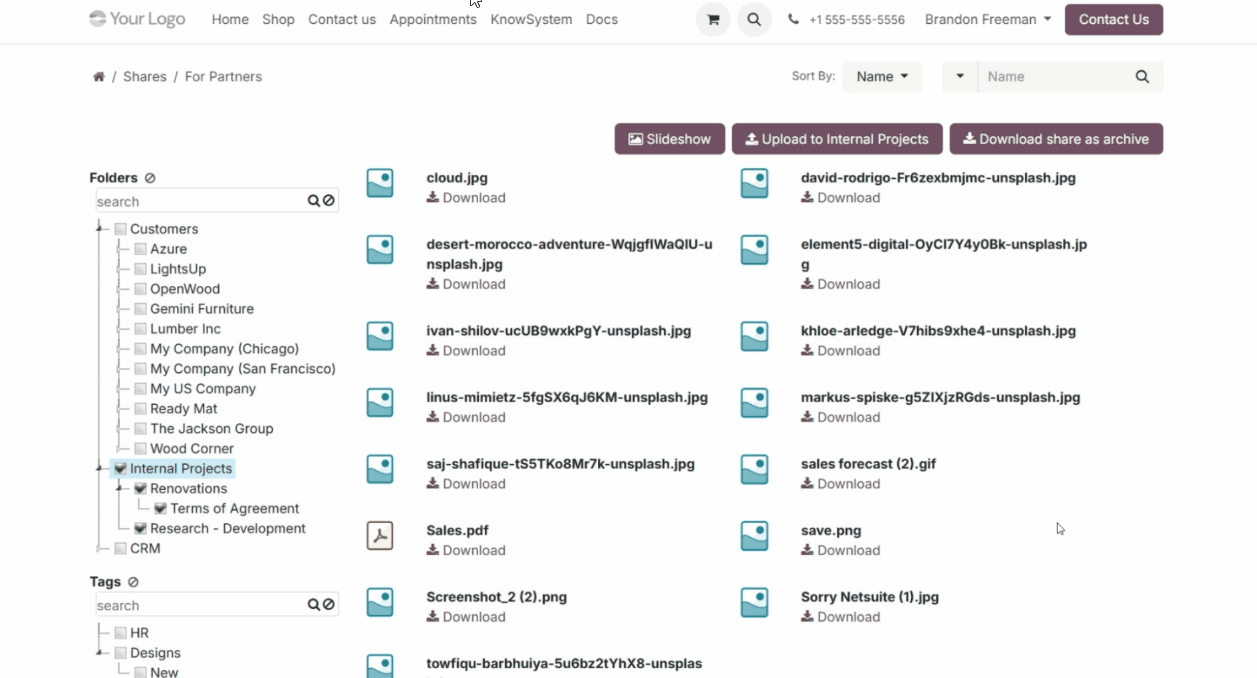
Odoo server configuration
Proper database and server setup is required to provide sufficient resources for sync operations and avoid queue-processing slowdowns. It also minimizes the risk of concurrent updates and API request conflicts.
To do so, apply appropriate timeouts to the Odoo configuration file: LIMIT_TIME_CPU, LIMIT_TIME_REAL & LIMIT_TIME_REAL_CRON. They should be at least 900 seconds to give enough time for sync and prevent the server from cutting it off earlier.
If you use Odoo.sh, then you don't need to configure Server Timeouts, since they are predefined and not configurable.
Also, avoid changing the frequency of the cron jobs assumed by the app: '[Cloud Storage] Prepare Cloud Folders' and '[Cloud Storage] Run / Prepare sync queue'. Those jobs are configured to run every 15 minutes, and that frequency is used in the algorithms to prevent interruptions and data loss. If you need to stop sync for a while, pause particular cloud clients instead.
On the module's configuration page, you will find buttons to trigger folder updates and synchronization. However, push the buttons only to configure the cloud client and for testing purposes. Avoid clicking buttons while the cron is active. Give the system enough time to finish one process before manually triggering the second (e.g., don't click both buttons at once; wait at least 10 minutes, depending on the number of folders).
To avoid errors, don't trigger the sync manually by clicking on the buttons 'Launch folders' update' and 'Launch sync'. These buttons can be used for the first or test syncs only.
Database Backups Sync
To support database protection and long-term storage, you can configure a backup strategy to automatically or manually save the current Odoo database to a connected cloud client. For each strategy, you can define when the backup should occur, where it should be stored, how many versions to retain, and whether to include the filestore and/or the manifest file. The feature is experimental and available in developer mode for advanced configuration and control.
To configure a database backup for a specific cloud client:
1. Turn on the developer mode
2. Open the cloud storage menu, go to Configuration > Cloud Clients, and open the target cloud
3. Enable the feature 'Auto database backups'. After that, the 'Backups' tab will appear
4. Click 'Add a line' and write the reference for the backup strategy
5. In the field 'Backup Folder', select a synced folder where backups should be stored
6. In the field Frequency (days), define how often the backup should occur. Floating-point values are allowed (e.g., 1 = daily, 0.25 = every 6 hours, 7 = weekly)
7. In the field Next backup time (auto), define the exact date and time from which the system should begin tracking the schedule. You may leave the value empty to start from the current moment
8. In the field Backups count, set the maximum number of backups to keep. Older backups will be removed when this number is exceeded. If the value is zero or negative, all backups are kept
9. Enable the option 'Include filestore' if you want to include the filestore (attachments) in the backup archive
10. Enable the option 'Include manifest' if you want to store system metadata (Odoo version, PostgreSQL version, installed modules)
11. Optionally, add some extra backup strategies by clicking 'Add a line'.
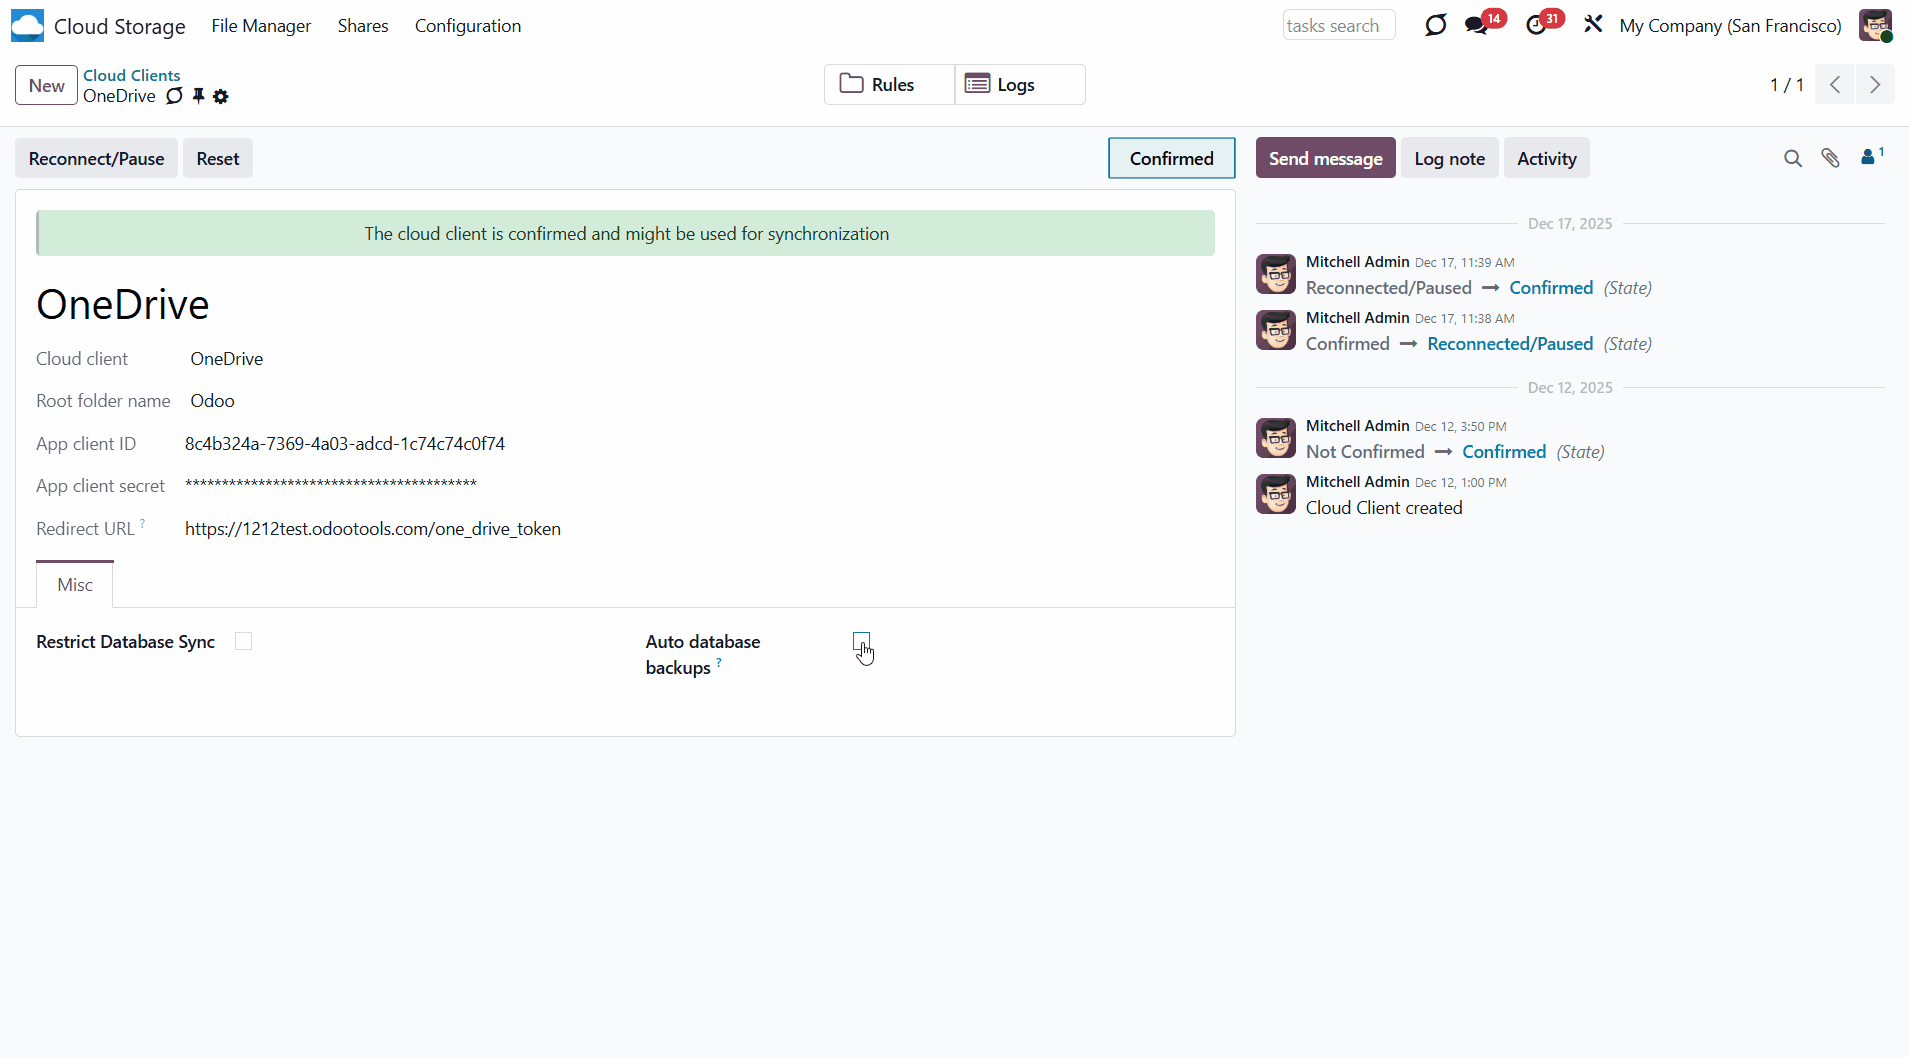
Once the strategy is saved, the system automatically calculates the backup schedule. The 'Frequency (days)' field specifies how often the backup should be created. Floating-point values are supported. For example: 1 – once per day; 0.25 – approximately every 6 hours; 0.5 – roughly every 12 hours; 7 – once per week.
The next strategy time is calculated from the previous date and time (or from the current moment if not defined) plus the frequency. If the result is still in the past, the frequency is added repeatedly until a future date and time are reached. This way, the next backup is always scheduled for a consistent moment in the future. For example, if the strategy starts at 04:00 UTC with a frequency of 1, future backups will be planned for around 04:00 UTC each day.
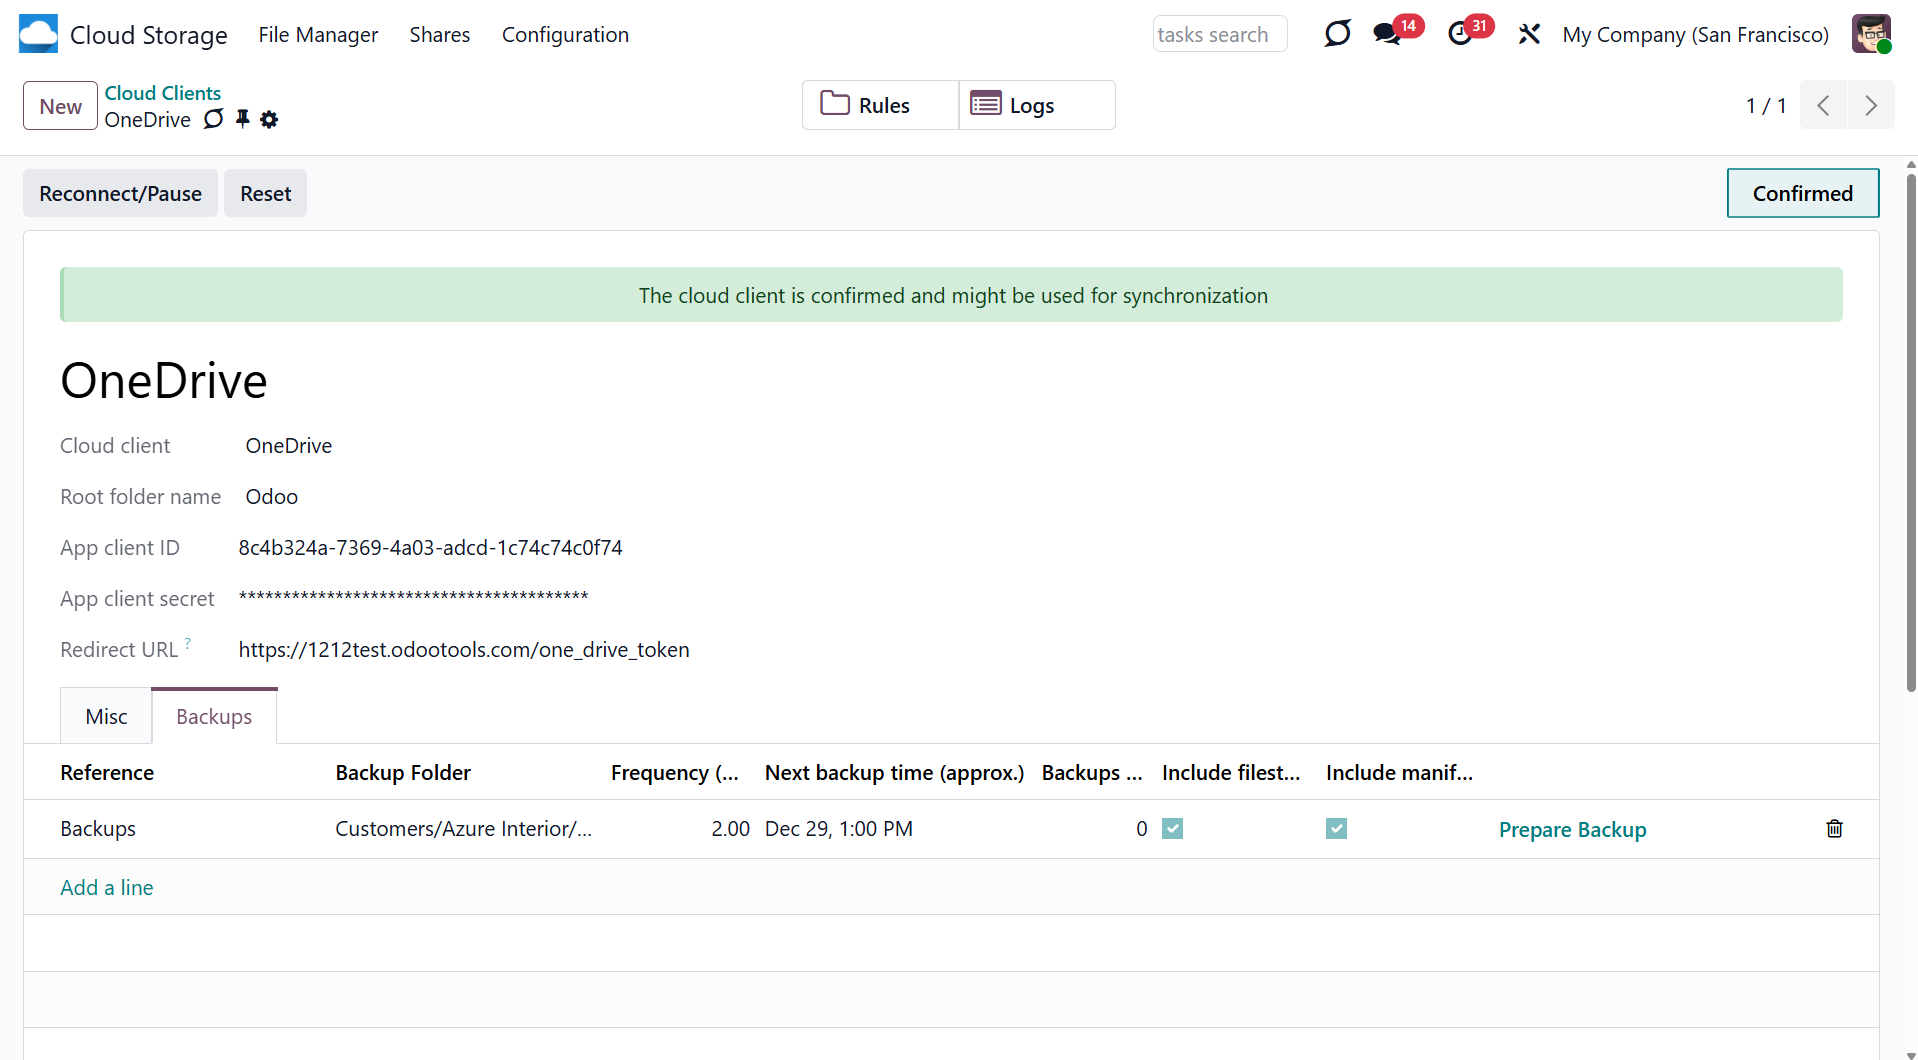
The app checks all defined strategies according to the scheduled job '[Cloud Storage] Create Database Automatic Backups', which runs by default every 15 minutes. The job compares the current time with the strategy's next backup time. A backup is triggered only if the calculated next time has already passed. This makes the next time an approximate indicator - not a strict execution time.
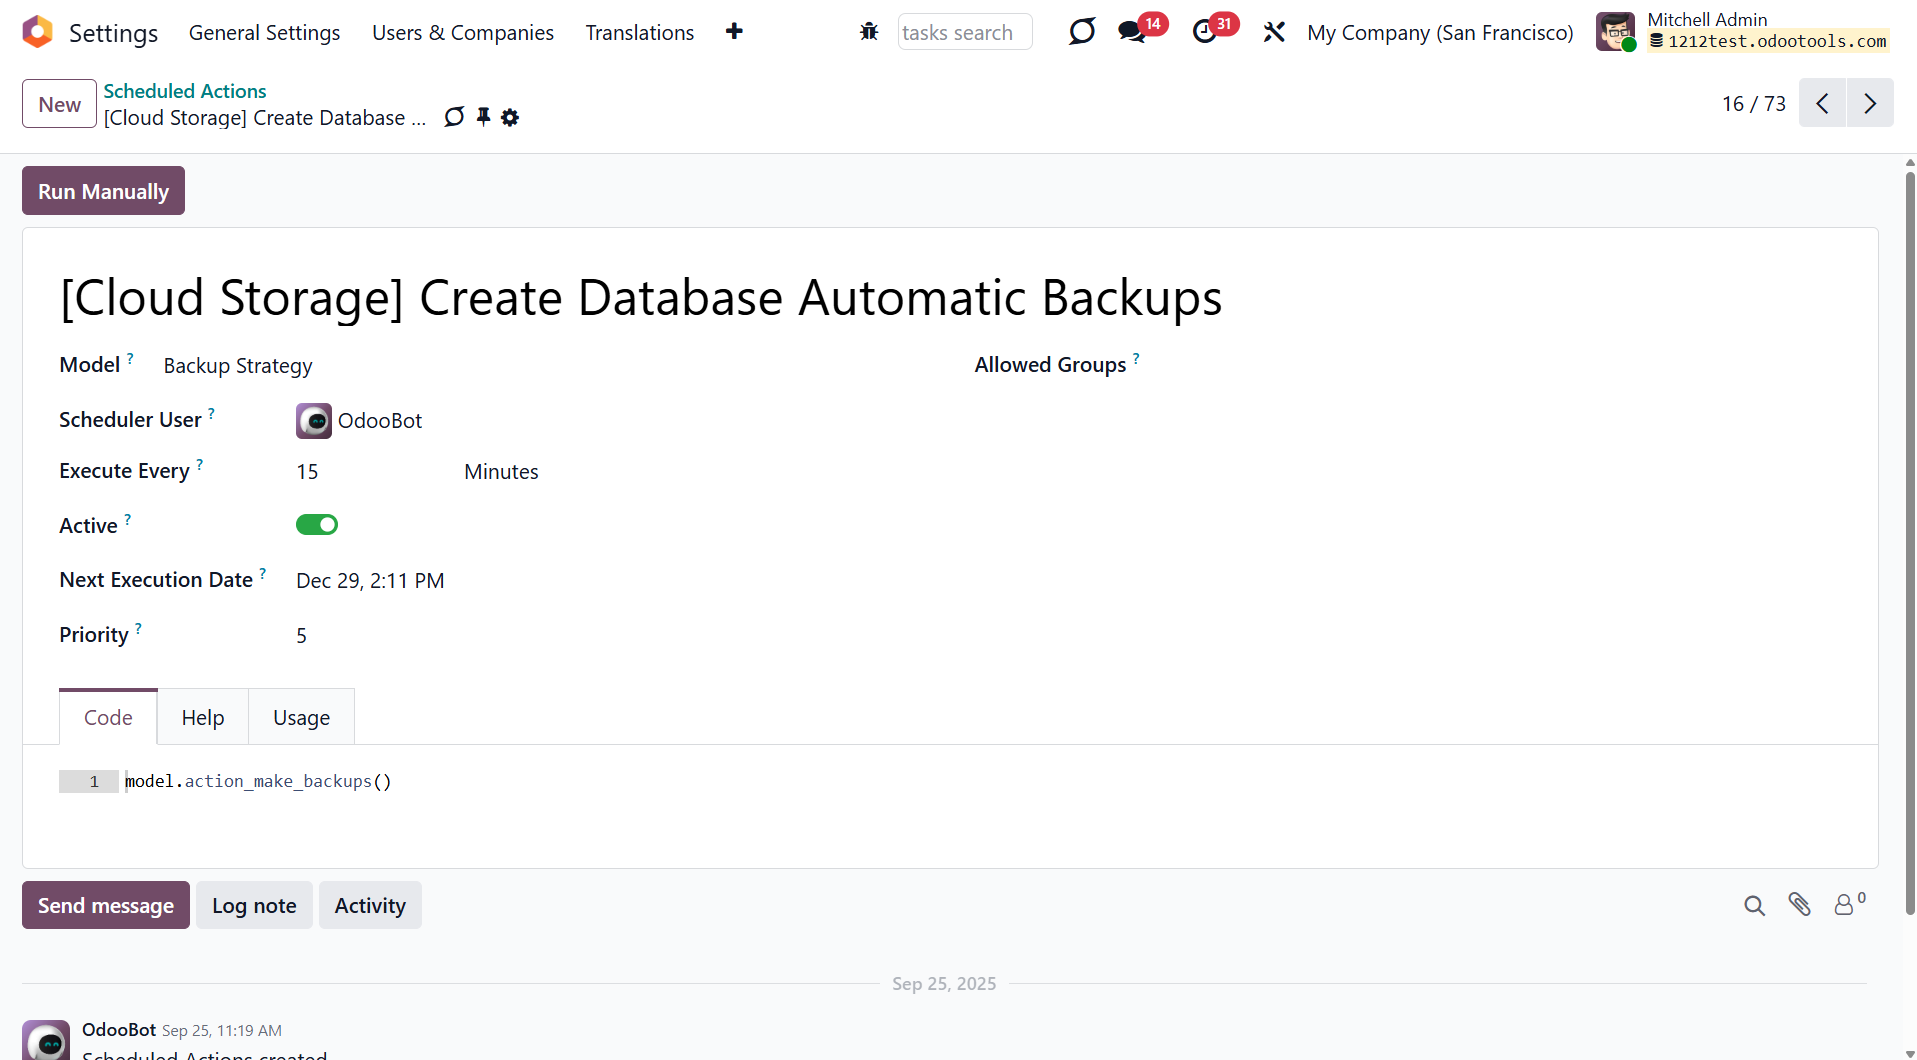
If multiple strategies are defined for the same cloud client, only the strategy with the highest frequency will be used. This avoids running multiple backups unnecessarily. For example, if a daily and a weekly backup are both configured and the weekly one is due, the daily one will be skipped.
Manual backups can be created from the client form at any time. They do not affect the planned schedule unless the manual backup was the last failed attempt — in that case, it resets the failure counter and shifts the next backup time.
If a scheduled backup fails (for example, due to API issues), the app retries the operation with every cron job execution, which occurs every 15 minutes. The system will continue retrying until the maximum number of attempts is reached. After that, the failure counter is reset, and the next planned backup time is moved forward according to the strategy settings.
The resulting dump archive may be extensive, especially when the filestore is included. In such cases, it may not be possible to complete the operation within the allowed execution time. If this happens, the backup attempt will fail, and the retry logic will apply.
Large backups may not finish within the allowed timeout. If so, the operation will fail silently. In this case, consider increasing the server timeouts and cron frequency or excluding the filestore when necessary.
Backups are not designed to be reversed or transferred between cloud clients, as reverse sync for heavy files is usually not possible. Each strategy should be used only with its original target.
Additionally, to reduce the risk of overlapping operations or API refusals, it is recommended that backups for different clients be scheduled at different times.
Each strategy includes a 'Backups count' field that defines how many backup files should be kept to manage storage and avoid keeping too many old backups.
When a new backup is successfully created and synced, the system checks if the number of existing backups for that strategy exceeds the defined limit. If it does, the oldest backup is removed from Odoo first, then deleted from the cloud during a subsequent sync.
If the 'Backups count' value is set to 0 or a negative number, backups are not deleted automatically. In this case, all backups are kept until manually removed from the cloud client interface.
Each backup archive is saved in .zip format and named using the following pattern: 'database_name' + UTC timestamp + strategy reference + '.zip'. This helps identify backups by source and timing.
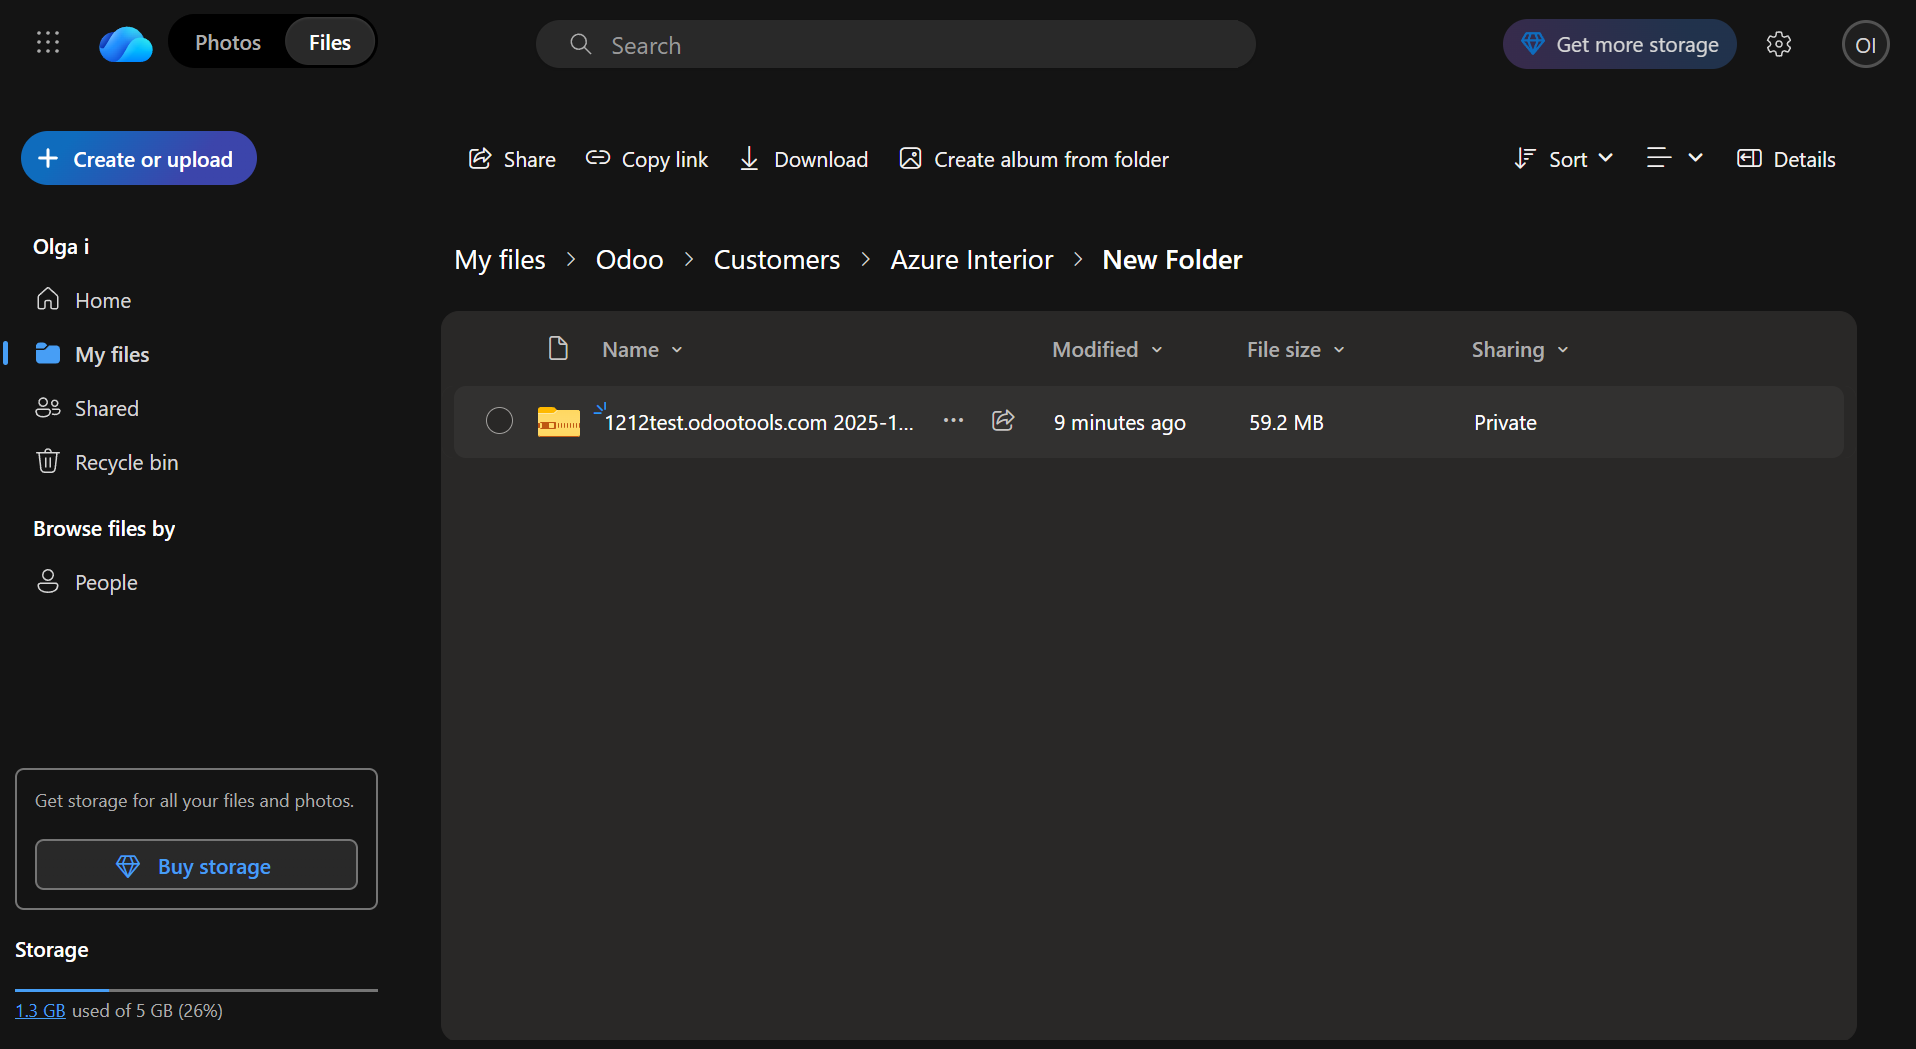
Extra notes
The module is based on API requests to the third-party service (cloud client). The more the sync scope (number of synced objects & files), the more requests the app has to send. Moreover, each sync requires special checks (e.g., access request to the cloud storage). Each request might take significantly longer than similar requests on the Odoo platform. Such communication between systems is inherently risky due to potential disconnections, API updates, and unsolvable conflicts. The app is designed to handle such risks by carefully handling failures and checking the states of cloud clients. Simultaneously, ensure that you have configured a proper backup strategy for Odoo and cloud clients.
The special risk factor is the sync scope, i.e., the number of files and folders to sync. The larger the sync scope, the longer it will take Odoo to finish integrations. Hence, there is more space for errors. Try to reduce the sync scope by selecting only the required folders.
Another risk factor to consider is reverse operations. Reverse operations might be risky because they assume reflecting cloud clients' features, which may be absent in Odoo. For example, Google Sheets cannot be opened outside Google Docs. The app would try to address these scenarios by applying similar features (e.g., converting a file into simple electronic tables). However, that is not always possible so that manual interactions would be required. Also, some tasks in complex scenarios may fail at specific reversed sync iterations when folders are checked in first-in-first-out order, and a child folder might not yet know that some of its parents have changed state. Such tasks will be retried up to 8 times in subsequent iterations, and once the item parents are ready, their tasks will be completed (see Synchronization Principles).
The app assumes automatic regular synchronization with various cloud clients. Please take into account that synchronization is not real-time but is based on task queues and scheduled jobs (see Odoo server configuration). Depending on the number of folders and attachments, the app might take some time to check all directories and complete the tasks. That's why, until the sync is done, Odoo attachment interfaces work as in standard Odoo.
The module provides FIFO (first-in, first-out) logic for the sync. That means the files are uploaded based on the queue: the oldest changes are reflected first. Therefore, not a single file is lost, and system resources are used efficiently. Even if you have a lot of files, they will be synced for a particular time (see Odoo server configuration). For example, you have 10,000 sales orders to sync and only 15 minutes left before the system times out. After 15 minutes, 3000 files have been synced. Then, during the next sync, 3000 more synced. Therefore, several synchronizations will be required to sync all the files.
However, a large number of files to sync may lead to long waits and, in some cases, errors. So, it would be better to limit synchronization using filters by field and period. For example, you can sync only August sale orders or sync only sale orders with a total over 50000$. The folder rules configuration lets you restrict syncing of obsolete items (e.g., there is no sense to sync archived partners or orders from 2 years ago) (see Filters & Periods).
About Cloud Storage Solutions
Cloud Storage Solutions is an Odoo app for organizing attachments, managing folder trees, and synchronizing Odoo with the cloud storage solution(s) of your choice. The app introduces automatic algorithms to prepare document directories and integrate them with the workflows of Google Drive, OneDrive/SharePoint, Nextcloud/ownCloud, and Dropbox.
Decide which Odoo document types should have their folder trees. Flexibly create folder rules. Any Odoo model can be chosen.
Manage folders and attachments from a single view. Conveniently navigate through them. Search for and download files one by one or in batches.
Organize files of any Odoo object in a set of subfolders. Instantly access folders and files in the attachments box and synced cloud interfaces.
Share files, directories, and tags with particular partners or with an access URL. Let users download whole shares and separate items, upload attachments, and add folders or tags.
The module allows you to prepare directories and send them to the cloud client of your choice (Google Drive, OneDrive/SharePoint, Nextcloud/ownCloud, and Dropbox). You can have as many connections as you need. A separate add-on for each client is required.
Rely on auto-synchronization between Odoo and cloud solutions based on scheduled jobs. No manual interaction is required.
You can control sync logs right in Odoo. You can export and share those in case of any issues, and you can be notified of any client disconnections.
Set up rules to prepare folders based on Odoo Enterprise workspaces (). All features (including sharing, downloading, and signing) would work even after sync.
Files manager interface
Automatic regular bilateral sync
Multi synchronization
Files and folders portal sharing
Concepts and Terms
Here, you can find terms and add-ons icons used throughout all documentation.
Odoo model – a document type in Odoo (for example, Sale Order, Project, Contact).
Odoo object – an Odoo record within an Odoo model (for example, S00032, Project XYZ, Abigail Peterson).
Folder - a key object in cloud storage solutions that represents a virtual location for attachments and other sub-folders.
Folder rules – the configurations, based on which the module generates folders by checking the settings and fields of models and objects.
Model-related rule – a folder rule based on an Odoo model (for example, Sale Order, Purchase Order, Project, Contacts, Leads/Opportunities). The model-related folder rules state from what model the information should be extracted.
Workspace-related rule () - a folder rule used to sync the files from the module Documents, which generates folders according to the workspace structure.
Single View Interface – the functional interface for internal users to manage folders and files.
Automatic folder – a rule-based folder generated regularly, based on the scheduled job 'Prepare Cloud Folders'.
Manual folder – a folder that a user created. Unlike automatic folder settings, each folder should be set manually. Usually serve as subfolders to automatic folders.
Tag - a special object to categorize attachments, make them easily searchable, and provide a colorful visual mark for a file's quick identification.
(Portal) Share - a special Odoo object for combining attachments and sharing them with specific portal users or publicly through the access URL.
Attachment – a special Odoo object that serves to organize and store files in Odoo.
Attachments box – the standard Odoo interface for Odoo object form views, where attachments are displayed (available for downloading and uploading).
Default folder – manual folders with or without default attachments that would be auto-generated for a specific Odoo object folder, as soon as an object-related folder is created for the first time. Further folder refreshes will not generate default folders with default attachments.
Prioritization – a feature that allows checking specific 'unimportant' folders more frequently and, therefore, prioritizes other folders' checks. It is set separately for each folder rule.
Cloud client - external software that might be used to organize cloud storage, such as Google Drive, OneDrive/SharePoint, ownCloud/Nextcloud, or Dropbox.
Direct sync - the sync from Odoo to the cloud client. For example, when you add files to the attachments box of an object or its folder, it is a direct sync that sends them to the cloud.
Backward sync – the sync from the cloud client to Odoo. For example, when you add files to one of the synced object’s folders in the cloud client, the backward sync fetches them and adds them to the related folders in Odoo.
Reverse sync – the sync that assumes getting back all items to Odoo and deleting the files from the cloud client. It occurs when a folder isn't synced anymore, when you want to change the cloud client for previously synced files and folders, or when the sync is fully stopped (the cloud is reset).
Sync logs - records that provide helpful information on the type of operations that were processed or completed. They help detect errors and investigate their causes.
Add-ons icons
These signs mark features introduced by add-ons.
Google Drive Odoo Integration
The connector, to synchronize Odoo folders and attachments with Google Drive.
ownCloud/Nextcloud Odoo Integration
The connector, to synchronize Odoo folders and attachments with Nextcloud and/or ownCloud.
OneDrive/SharePoint Odoo Integration
The connector, to synchronize Odoo folders and attachments with OneDrive or/and SharePoint.
DropBox Odoo Integration
The connector, to synchronize Odoo folders and attachments with DropBox.
Cloud Sync for Enterprise Documents
An optional add-on to prepare workspace-related folders and to sync Odoo documents (introduced by the enterprise app 'Documents') with clouds.
Folders in Cloud Storage Solutions
A folder is a key object in cloud storage solutions. It represents a virtual location for attachments and other sub-folders.
Folders serve for convenient file storing and organization as they support hierarchy and may contain subfolders. Creating an efficient folder structure simplifies the navigation between attachments. For example, you can add subfolders 'Invoices' and 'Projects' to the Odoo document 'Contacts' and then easily find all a person's invoices and attachments related to their projects.
With folders, you can conveniently navigate files, create easily accessible structures, restrict rights for a particular folder, create personal storage, and even sync some or all folders to one or several cloud clients (for example, Google Drive or OneDrive). You can read more about the folder’s features in articles: Folders in Cloud Storage Solutions, Folder Rules, Hierarchy of Folders, Synchronization Principles, and Access Rights.
Folders are associated with Odoo objects. You can add links between them by creating a folder rule, which will automatically create folders as matching objects appear (see Folder Rules). For example, select the model 'Task' to make Odoo add a folder for each project's task (Tasks > Task 1, Task 2, ...). Automatically created directories would contain all attachments associated with their linked objects. Folders are updated regularly based on the scheduled job (see Hierarchy Rules).
The folder rules allow you to create a specific folder structure, which is preserved when syncing with a cloud client of your choice. After making a rule, no further action is required; however, you can always change it. In this case, the folders will be recalculated.
You can create a rule that generates folders and manually create folders or subfolders. Manual folders and subfolders can be added from the Files Manager interface and an object's attachments box. They may even be synced from the cloud (see the Files Manager Interface and Synchronization Principles).
Manually created folders are handy when you need a particular folder that cannot be extracted from an Odoo database. They can serve as personal storage. Specify the users who might access it, place it anywhere in the folder’s tree, and add any files. For example, configure the folder so a user can access 'Office design', but not 'Office design/Commercial contracts' (see Access Rights).
Automatic and manual folders may contain attachments. An Odoo attachment is a way to organize and store files in Odoo. Attachments can be added through the attachments box of a particular Odoo object, its messages thread, or to the related object’s folder in the Files Manager. As automatic folders are generated, the associated attachments are also added, so you can access them both from the Files Manager interface and attachments boxes (see Attachments Box).
Both automatic and manual folders, their attachments, and manually uploaded files can be synced with cloud clients. Read more about their sync in the articles Folder Rules, Files Manager Interface, and Attachments Box.
You can assign a particular cloud client to each automatic and manual folder. For example, you have a manual folder 'Important documents', and an automatic folder related to the sale order 'S0003'. You can sync the 'Important documents' folder with OneDrive and the 'S0003' folder with Google Drive. Thus, in OneDrive, you will see the structure Odoo > Sale Orders >Important Documents, and in Google Drive, the structure Odoo > Sale Orders > S0003. To assign a cloud client to an automatic folder, specify the cloud client in folder rules. To assign it to a manually created folder, start editing the folder from the single-view interface.
You can sync a child folder without syncing its parent. For example, sync the folder 'Tasks' and don’t sync its parent folder 'Project'. However, keep in mind that a child and a parent folder cannot have different cloud clients assigned to them. Even if a folder rule originally had another cloud client assigned, when you choose a parent folder rule, the child's cloud client is changed to the parent’s. For example, you have the parent folder 'Project' and the child folder 'Tasks'. You have assigned Google Drive as a cloud client for the folder rule 'Project' and OneDrive for the folder rule 'Tasks'. Both folders will be synced to Google Drive regardless of the child's settings.
Files Manager Interface
The module introduces a special menu that lets you view and manage the folder's structure. For that, the single-view interface was introduced.
The single-view interface is divided into three parts: a central part with attachments in the middle, and two functional parts with sets of control elements on the sides.
The left navigation panel lets you select folders, tags, and portal shares to find related attachments quickly.
As you create folder rules, the next scheduled job adds the related folders to the Files Manager interface. The folder rules sequence determines the order of the folders. The smaller the sequence, the higher the folder.
As you select one or several folders, the related attachments are shown in the central part of the interface. This way, you can simultaneously see the attachments of one or several folders. For example, if you select the folders 'Azure Interior' and 'Deco Addict' by checking the corresponding boxes, their attachments will be displayed.
To see all available attachments, clear the folder selection by clicking the 'Reset' button in the 'Folders' line. After the option is removed, all attachments from all folders are displayed. At the same time, the attachments may still be limited by the selected tags, shares, applied filters, and search parameters.
You can see and manage folders in the left navigation menu. From there, you can search for a particular folder, open a linked object, view its Configuration, create a new manual folder or subfolder, edit it, and change the order by drag-and-drop.
If you have many folders, you should use the search to find the one you need. For that, use the navigation input 'Search folder' on the left side of the single-view interface.
If a child folder is selected, its parents will be hierarchically highlighted by the border of dots around the element's name. Thus, it is always clear that a child folder is chosen (even if the structure itself is closed).
You can remove the folder selection by clicking on the 'Reset' icon next to 'Folders'. This is especially useful when searching for particular attachments in all available folders.
Even if none of the folders are selected, one is selected by default and highlighted in color. This way, even if none of the folders are selected, you will still be able to upload the attachments to that folder through the dynamic button 'Upload to...' (see below).
As you right-click on an automatically created folder, you see the following actions:
1. Download as Archive
2. Create Subfolder
3. Open the linked object
4. Settings
As you click 'Download as Archive', the folder's attachments download automatically. For example, you have a folder structure Contacts > Azure Interior > Sale Order 1, with attachments in each folder. If you click on the folder 'Azure Interior' and choose the option 'Download as Archive’, then the attachments of this particular folder will be downloaded. If you want to download the attachments from various folders, select them and use the mass action 'Download' (read below).
If you click 'Create a subfolder', then the child folder will appear in the folder's tree. Type the folder's name to finish creating the subfolder. You can create a subfolder for any folder. A subfolder cannot be a parent folder of an automatic folder. For example, you have a folder structure Contacts > Azure Interior > Sale Order 1. You can add a subfolder to each level of this structure: Contacts > Azure Interior, Jake Ruth > Sale Order 1, Sale Order 567 > For documents. In this example, 'Jake Ruth' is a subfolder of 'Contacts', 'Sale Order 567' is a subfolder of 'Azure Interior', and 'For documents' is a subfolder of 'Sale Order 1'.
Automatically generated folders are those created based on Odoo objects. Thus, it is possible to open a linked object in a folder. To open the related object, choose 'Open linked object'. For example, you have a folder structure Contacts > Azure Interior > Sale Order 1. If you right-click the 'Azure Interior' option and choose 'Open linked folder', the contact's card for Azure Interior will open in a pop-up window. Click Open the linked folder' by 'Sale Order 1' and the linked sale order will be opened in the pop-up window.
To see the automatic folder's settings, right-click on the folder and choose 'Settings'. The hierarchy and settings of automatic folder rules cannot be changed from the single-view menu. To change the rule's settings, go to Configuration> Folder Rules.
You can also create and manage manual folders from the single-view interface. To add a root folder manually, click the '...create new folder' button below the folder list and enter its title.
To add a subfolder:
1. Right-click on any folder
2. Choose the option 'Create subfolder'
3. Write the title
It is possible to change the hierarchy of a manual folder by drag and drop. However, assigning a manual folder as the parent of the automatic one is not possible. Also, you can't drag and drop automatic folders. Their hierarchy should be changed in the related folder rules, if necessary.
As you click on a manually created folder, you see the following actions:
1. Download as Archive - allows downloading the attachments of a particular manual folder
2. Create Subfolder - allows creating a subfolder within the manually created folder. You can create as many subfolders as you need
3. Rename - allows changing the name of a particular folder
4. Edit Settings - change properties of the manual folder, including name, parent folder, assign cloud client, limit access to a user or user groups, and add some notes
5. Archive - allows removing a folder from the folder tree. Later, it can be restored.
If enabled, the tags section is also visible in the left part of the interface. A tag is a special object that typically represents a keyword or phrase. It is added to attachments to categorize them, make them easily searchable, and provide a colorful visual mark for quick identification. For example, you can assign the 'Important' tag to the most essential attachments.
To create and manage tags, the 'Tags' option in the module's settings should be enabled. After that, the tree of tags will appear in the file manager Interface, and the separate Tags menu will appear when you click the Configurations option in the systray.
There are two ways to create tags: in the files manager interface and under the separate menu.
To create a tag in the files manager interface, click on the '...add' button in the 'Tags' section in the left part of the interface.
To create a tag through the separate menu:
1. Go to Configuration > Tags
2. Click 'New'
3. Type the tag's name
4. Choose the parent tag, if any
5. Optionally, add some notes in the tab 'Notes'.
Each attachment can have multiple tags. For example, you can assign the tags 'Important', 'Document', and 'For clients' to the same attachment 'Contract 2134'. This way, as you filter/search for attachments by tags, any attachment associated with any of the chosen tags will be shown.
As you select one or several tags, the related attachments are shown in the central part of the interface. This way, you can view the attachments for one or more tags simultaneously. For example, if you select tags 'Important' and 'Design' by checking the related box, the attachments related to either will be shown.
To see all available attachments, remove the choice of tags by clicking on the 'Reset' button in the line 'Tags'. After the option is removed, all attachments, regardless of assigned tags, are displayed. At the same time, attachments may still be limited by the selected folders and shares, as well as by the applied filters and search parameters.
You can see and manage tags in the left navigation menu. From there, you can search for a particular tag, create a new tag or sub-tag, edit it, and change the order by drag-and-drop.
If you have a lot of tags, you should use the search to find the one you need easily. For that, use the navigation input 'Search tag' on the left side of the single-view interface.
If a child tag is selected, its parents will be hierarchically highlighted by the border of dots around the element's name. Thus, it is always clear that a child tag is chosen (even if the structure itself is closed).
You can remove the tag selection by clicking on the 'Reset' icon next to 'Tags'. This is especially useful when you want to search for specific attachments, with or without assigned tags.
As you right-click on a tag, you see the following actions:
1. Download as Archive
2. Create
3. Rename
4. Edit
5. Archive
When you click 'Download as Archive,' the attachments with this tag are automatically downloaded. For example, you have tags 'Important', 'Design', and 'HR'. If you click the 'HR' tag and select 'Download as Archive,' the attachments with that tag will be downloaded. If you want to download attachments from multiple tags, select them and use the mass action 'Download' (see below).
If you click 'Create', then a sub-tag will appear in the tags' tree. Type the tag's name to finish creating it. For example, you have tags Important > Design > Images. You can add a sub-tag to each level of this structure: Important > Design, Design > Images.
To change a tag's name and settings, or archive it, right-click the tag and select the action. You can always restore the archived tags in the separate menu 'Tags'.
In the left part of the interface, you can also see the portal shares section, if enabled. A share is a special object that combines attachments and shares them with specific portal users or the public via an access URL. For example, you can create a share 'For customers', add separate attachments, or all attachments within one or several folders and tags, and allow specific clients to access it in the portal. You can find out how to create and manage shares in the article Sharing in Portal.
A single attachment can be added to different portal shares. For example, you can add the attachment 'Room Design' to shares 'For Clients', 'Azure Interior', and 'For Partners'.
As you select one or more shares, the related attachments appear in the central part of the interface. This way, you can simultaneously see the attachments of one or several portal shares. For example, if you select shares 'For Clients' and 'For Partners' by checking the related box, then the attachments related to either of these shares will be shown.
To see all available attachments, remove the choice of shares by clicking on the 'Reset' button in the line 'Shares'. After the option is removed, all attachments, regardless of assigned shares, are displayed. At the same time, attachments may still be limited by the selected folders, tags, applied filters, and search parameters.
You can see and manage shares in the left navigation menu. From there, you can search for a particular share, create a new share or sub-share, edit it, and change the order by drag-and-drop.
If you have many portal shares, you should use search to find the one you need. For that, use the navigation input 'Search share' on the left side of the single-view interface.
If a child's share is selected, its parents will be hierarchically highlighted by the border of dots around the element's name. Thus, it is always clear that a child's share is chosen (even if the structure itself is closed).
You can remove the share selection by clicking on the 'Reset' icon next to 'Shares'. This is especially useful when you don't want to limit the search by share and want to see all attachments.
In the files manager interface, right-clicking on a share displays the list of available actions. The article Sharing in Portal explains more about possible actions when sharing.
The attachment list is located in the central part of the interface. It is sorted according to the selected folders, tags, shares, and applied search and filter parameters.
If several folders/tags/shares are chosen, the attachments related to any of them will be shown. For example, if you select the folders 'Customers' and 'Projects', the attachments from both folders will be displayed.
If you choose a folder(s), a tag(s), and a share(s) at the same time, then only the attachments that match ALL the conditions will be shown. For example, if you select the folders 'Customers' and 'Projects', then tick the tag 'Legal', and select the share 'For Customers', then only the attachments from the folders 'Customers' and 'Projects' with the tag 'Legal', and within the share 'For Customers' will be shown.
Attachments can be uploaded to any folder manually through the single-view interface. That is why there is always a default folder selected and highlighted in color. When you open the Cloud Storage menu, it is the first folder in the list. When searching for a folder, it is the first visible one. In other cases, the currently selected folder is the last chosen folder.
To upload attachments, click on the dynamic button 'Upload to ...', or drag and drop the attachments to the central part of the interface. To avoid confusion, the target folder is specified on the button. This way, you can ensure the attachments are in the correct directory. For example, if the currently selected folder is 'Customers', then you will see the following button 'Upload to Customers' above the left functional interface.
To add a file of the URL type through the files manager, click the icon '' by the button 'Upload to...'. In the pop-up wizard, specify the name and the related link. Then, as you confirm the details, the app will create a URL attachment in the currently selected folder.
In the central part of the interface, you can select one or multiple attachments by clicking on the square in the top right corner. To select all found attachments, click the 'Select all found attachments' button.
To deselect one or more attachments, click their titles in the third functional interface or tap the square in the top-right corner of an attachment. To remove the selection, click the 'Reset' button in the right functional panel, next to the line 'Selected attachments'.
The selection will not be reset as you switch between folders and filters, use the search bar, or apply mass actions.
You can quickly change the folder of all selected attachments, assign a new tag, or share them in the portal by dragging and dropping them onto the related object in the left part of the interface. For example, drag and drop the selected attachments into the 'Design' tag, and they will be assigned to it immediately.
To find the particular attachments quickly, use the search bar above. You can search attachments by name, folder, tags, author (creator), and mime type (in developer mode). For that, start typing the word, choose one of the options, and click 'Search'. The search considers the selected folders, tags, and shares in the left functional interface. You can remove the selection or choose other options by clicking them, and previously chosen search criteria will not be removed. To reset the search, click the cross next to the search input.
Click the three dots in the bottom-left corner of an attachment to choose a color to highlight it, or click the 'Open' button to open the attachment's card. There, you can view and manage the information about the file, such as changing the attachment's name, moving it to another folder, changing tags, and finding the attachment's extension.
Click on the thumbnail of any attachment in the central functional interface to preview it. Here, the module relies on the standard Odoo behavior. Therefore, if an attachment can be previewed in Odoo, it can also be previewed in the Cloud Storage interface. This way, for example, you can preview the .jpeg and .pdf attachments, but cannot preview the attachments of the .xlsx type.
The right functional panel appears when you select one or multiple attachments. In the right functional panel, you will find a list of mass actions that let you execute actions on all selected attachments simultaneously. The available mass actions are:
1. Download - allows downloading all selected attachments. If there are two or more attachments to download, then they will be downloaded as a .zip
2. Update folder - allows moving the attachment to another folder. Start typing the folder's name to find the required one quickly
3. Update tags - allows adding/removing tags of all chosen attachments
4. Slideshow - allows watching the chosen images in a slideshow. You can pause the slideshow, set the time step to move between pictures, move to the next image, and return to the previous image
5. Share - allows sharing chosen attachments, related tags, and directories with particular partners or through the access URL
6. Delete - allows removing an attachment permanently.
The Slideshow mass action enhances the user experience by allowing users to preview selected images one by one conveniently. With the help of the slideshow mass action, users can easily navigate through their chosen images for a seamless viewing experience. For that:
1. On the configuration page of the module, add the mass action 'Slideshow' to the left functional interface
2. Select images by clicking on them, ticking the related checkbox, or using the button 'Select all found attachments'
3. In the left functional interface, apply the mass action 'Slideshow'.
Afterward, all selected attachments of the image types will be previewed individually. Click on the time selection to change it. This way, you can configure how long an image is displayed.
Use the arrow icons to move between images manually. Click the pause icon to pause the slideshow, and click the play icon to resume it. After reaching the last image, the slideshow restarts from the beginning. Click the cross icon in the top-right corner or press Esc to exit slideshow mode.
The list of mass actions can be edited. You can select the mass actions to display only the ones you need. To add a mass action:
1. Go to Configuration > Configuration
2. Find the section 'Mass actions'
3. Click 'Add a line'
4. Choose mass actions by ticking the box by the action, or tick the box above the action to select all available ones
5. Click 'Select'
6. Click 'Save'.
After saving the settings, the list of mass actions in the right navigation panel will be updated.
To deactivate a mass action you no longer need, click on a bin icon by the action.
In addition to the available actions, you can also prepare your own mass actions. Batch actions for attachments are based on Odoo Server Actions. This means you can add custom mass-editing operations.
To create a new mass action:
1. Go to configuration and find the section 'Mass Actions'
2. Click 'Add a line'
3. Click 'New'
4. Type the name of the action
5. Choose the model 'Attachment'
6. Specify what should be done in the section 'Action Details'
7. Create an action by clicking 'Add a line' in the tab 'Data to write' and choosing the related details
8. Optionally, in the field 'Allowed Groups', choose the security groups that will be able to see and apply the mass action
9. Click 'Save&Close'
10. Click 'Save'.
After that, it will appear in the list of available mass actions, from which it can be added to the right navigation panel. To update the attachments, choose them and click on the action.
Attachment box
As you create folder rules, the attachment boxes for the related models will change after the scheduled folder refresh. The attachment box is the standard Odoo interface for storing attachments. To open the attachments box, go to any Odoo object’s form view, find the ‘Clip’ icon, and click on it. Here, you will see all the attachments for the objects that users can manage.
You can see the object's folder and its children in the attachments box, if available. You can navigate folders by clicking the arrow icons to view subfolders. Click on a folder to select it and see its attachments.
Even if you have a long list of folders, you can easily find the one you need with the help of the search bar. Start typing the folder's title, then click the 'Search' button on the right side of the field. If there is a match, the result will be marked red. To reset the search, click on the 'Reset' button on the right side of the search bar.
As you right-click a folder, the list of actions appears. The list of actions differs slightly between manual and automatic folders.
The available actions with the automatic folders are:
1. Download as Archive - allows downloading attachments of a chosen automatic folder
2. Create Subfolder - allows the creation of a subfolder in an automatic folder. The subfolder is added to the folder tree in the correct hierarchy. Type the folder's name to finish creating the subfolder
3. Open in File Manager - allows opening the related folder in the File Manager for quick access to the main folder tree. Above, you will see the breadcrumbs for quickly returning to the object
4. Settings - allows checking the folder settings. To change a folder's settings, adjust the associated folder rule.
The available actions with the manual folders are:
1. Download as Archive - allows downloading the attachments of a particular manual folder
2. Create Subfolder - allows creating a subfolder for the manually created folder. You can create as many subfolders as you need
3. Open in File Manager - allows opening the related folder in the File Manager for quick access to the main folder tree. Above, you will see the breadcrumbs for quickly opening the file manager
4. Rename - allows changing the name of a particular folder
5. Edit Settings - change properties of the manual folder, including name, parent folder, assign cloud client, limit access to a user or user groups, and add some notes
6. Archive - removing a folder from the folder tree. Later, it can be restored.
You can add files through the attachments box, message thread, or the Files Manager. To add a file through the attachments box, open the related object, click 'Attach files', and select the file to upload. To add files of the URL type, click 'Add URL' and enter the file name and associated link. Upon confirmation, the app creates a URL attachment in the current folder or the object, if no folder is chosen.
If an object has child folders, you can also add a file to another folder from the list. To do so, select the folder by clicking on it, then click 'Attach files' or 'Add URL'.
Another way to upload files to the attachments box is to drag and drop them. Pull the file to the attachments box and drop it when you see the uploading wizard.
After uploading, you will see the standard Odoo functional buttons on the attachment cards. These buttons let you perform specific actions on attachments. Depending on the file type, the buttons and their placement may differ.
For example, if you upload a picture, you will see its thumbnail. Click the image to see its preview. Below the preview window, you will see the 'Print' and 'Download' buttons. Click an arrow on either side to move between pictures and other files, with a preview function. To delete an image, click the 'Cross' icon in the top right corner of the thumbnail.
As for other extensions, some attachments have previews, for example, PDF, and some don't, for instance, Docs. If you upload a document, then the preview will not be available. On the document's card, you will find two buttons:
1. Delete - allows deleting the document
2. Download - allows downloading the document.
When a file is added to an object's message thread, it also goes to the attachments box. The files in the message thread share the same set of functional buttons. You can also open, download, and delete them without opening the attachments box.
To add a file through the Files Manager, open the Cloud Storage menu, click on the folder, click the 'Upload file' button, and choose the file. After that, you will be able to access the file from both the object's attachments box and the Files Manager, as they are interconnected.
Even if the Files Manager is hidden from the user, if they have access to an object, they can access the related folder from the attachments box. The other folders in the structure will be visible only if the user has access to them (see Access Rights). For example, our sales manager, Anita Oliver, doesn't have access to the Files Manager. As she opens a sales order 'S0010', in the attachments box, she sees the folder 'S0010' and the manual folders 'Related Documents' and 'Terms of Agreement', each with its related attachments. However, she can't see the related folder 'Projects' because she doesn't have the project manager's permission.
Synced files and folders will also be accessible from the attachments box. The cloud client icon will mark automatic folders, and manually created folders will have a ribbon on their icon (see Synchronization Principles).
By default, synced files would use app-specific thumbnails instead of standard small previews to avoid additional requests to the cloud client for each form opening. For example, you cannot preview the picture without clicking the attachment.
You can still preview attachments with the preview function in Odoo by clicking on them. Click the arrow icons on either side to move between the attachment previews.
From the attachments box, you can also open the Cloud Folder to view all synced files and folders associated with the object. For that, the 'Open in Cloud' button is introduced. Right-click a folder, then choose the action, and in a new tab, you will be redirected to the corresponding folder.
Even after the sync, a user might download attachments locally by clicking the 'Download' icon on the file. Downloading synced files from Odoo doesn't require logging in to the cloud client.
The standard Odoo preview would also work for standard Odoo attachments and synced attachments. Files that do not support the preview function in Odoo (e.g., .doc) will be opened in the cloud client.
If you click the remove button after submitting your decision in the pop-up window, the link will be removed from Odoo. After the next sync, the file will also be removed from Cloud Storage (see Synchronization Principles).
Optionally, the Show synced attachment preview setting can be enabled. When this option is enabled, image and GIF content for synced attachments will be retrieved and displayed when the attachments box is opened (for message attachments, when the message is displayed).
Please note that enabling this option may slow interface load times, as it requires additional requests to the cloud client. This setting is intended for cases where immediate visual previews are preferred over faster loading performance.
Adding Existing Attachments to Messages
Sometimes, specific files may need to be sent through messages. The required files may already exist in the instance, and sending them would require users to download them locally first, which isn't convenient and results in duplicates. The module solves this problem by allowing users to select existing attachments when composing an email, thereby simplifying file sharing.
To send the existing attachments, users need to open the full message composer and locate the 'Existing Attachments' field. This field lets users add attachments directly from the email composer.
When a user clicks the 'Search more' button, a pop-up window with various filters appears. Users can filter attachments by folders, tags, names (searches indexed content), and MIME type. Click on an attachment card to see its details. To add an attachment to the selection, click the plus icon in the top-right corner of the attachment.
Both synced and non-synced attachments can be selected. The attachments added as links cannot be selected. For example, we have added three binary files and two links to the attachments box. As a user composes a message, in the 'existing attachments' field, he can choose the three most recently added binary files, but cannot select the two attachments of the URL type. With one of the following scheduled jobs, the binary attachments were added to the cloud. As a user composes a message in the 'existing attachments' field, he can still choose those three attachments while they represent actual files, even after the sync.
The selected attachments will appear in the 'Selected Attachments' tab. To attach these files to the email, users can click 'Save&Close'. The attachments will be added to the message, along with any standard uploaded files, via the 'Attachments' icon.
After sending the message, the attachments added via the 'Existing Attachments' field will appear among the message attachments, but will not be automatically added to the attachment box. This prevents duplicates and allows users to send attachments from other objects without adding them to the attachments box. For example, you can add the project attachment when generating an email from the contact Azure Interior. This attachment will remain linked to the project, and if you delete it here in the contact's messages thread after sending, it will be removed from the project as well.
Users without access to an attachment cannot add it via the 'Existing Attachments' field. They will still see the attachment in the messages thread, but cannot delete it. For example, our sales manager, Abigail Peterson, doesn't have access to the 'Renovations' project, so she can preview but cannot delete the attachments that Mitchel sent in a message in the sale order S0001.
Automatic Folders
Folder rules are configurations that determine how the module generates folders by evaluating model and object settings and fields. The folder rules define a specific folder structure that is preserved during syncing with a cloud client of your choice.
Folder rules create folders for Odoo objects, establish a flexible folder structure, and prepare folders and any attachments for synchronization.
To configure a specific Odoo document type and generate related folders, create a new folder rule (Cloud Storage > Configuration > Folder rules). For example, create a folder rule 'Project', by clicking on the button 'New' in the folder rules' menu and choosing 'Project' in the field 'Model to sync'. Automatically created directories would contain all attachments associated with their linked objects.
As you open the folder rules menu, you see a list of folder rules. From the columns on the right, you can find information about them without opening them. Here you see:
1. Folder name
2. Cloud client, if any
3. Parent rule, if any
Workspace-related folder rules can be created if the add-on Cloud Sync for Enterprise Documents is installed. These rules are marked by color (see Workspace-Related Rules).
You can reorder folders by adjusting folder rules. Open the folder rules menu, then drag and drop to reorder the rules. The lower the sequence, the higher the folder for the related document will be. Keep in mind that the child's folder rules will not be higher than their parents', regardless of their sequence. For example, the folder rule 'Customers' is a parent one for the rule 'Invoices'. Thus, even if we drag and drop the 'Invoices' rule above the 'Customer' rule, it will not appear higher in the folder tree.
You can also archive folder rules from the folder rules menu. To do so, open any rule and click on the 'Gear' icon, or select several folder rules by ticking the box on the left side of the rules and selecting the action by clicking on the 'Gear' icon. If you archive the folder rule, the related folders will also be archived with the next scheduled job.
Folders are updated regularly. An automatic rule appears in the Files Manager only after the scheduled job 'Prepare Cloud Folders' runs. The folder rules are checked and updated every 15 minutes. If there are many objects, some folders might be created/refreshed by one of the following scheduled jobs.
It is possible to trigger the scheduled job manually by going to Cloud Storage > Configuration and clicking on the 'Launch Folder Update' button at the bottom of the page. However, we highly recommend using the button only for testing purposes (see Extra Notes).
To configure automatic folder rules, a user should belong to the security group 'Cloud Storage > Administration' (see Access Rights).
If you have the Cloud Sync for Enterprise Documents add-on, when you create an automatic folder rule, another field, 'Rule Type', appears. The available options are 'Model-Related Rule' and 'Workspace-Related Rule'. The first one relates to Odoo models (for example, Sale Order, Purchase Order, Lead/Opportunity, Project, Task) (see Model-Related Rules). The second relates to the Documents module (see Workspace-Related Rules).
Model-Related Rules
A model is an Odoo document type (for example, Sales Orders or Contacts). By selecting the model, we tell the module where to obtain the information needed to generate folders.
Model-Related Rule - a folder rule, which is based on an Odoo model. By creating a model-related rule, we define the criteria for creating folders.
To set a model-related automatic folder rule:
1. Go to Cloud Storage > Configuration > Folder Rules
2. Click 'New'
3. Choose the rule type as 'Model-Related Rule' (If you have the add-on Cloud Sync for Enterprise Documents, otherwise it is applied by default as the only available one)
4. Choose the folder name. Avoid using the following symbols in folders' and files' names: *, ?, ", ', :, <, >, /, +, %, !, @, \, /. Upon saving the name, they will be replaced with '-'. It is done to avoid conflicts with file systems. The name should include fewer than 100 symbols
5. If there is at least one cloud client connected, then you may assign it to sync the folders with attachments, or leave the field empty if you don't want to sync them (see Synchronization Principles)
6. Choose the related model to sync and optionally set a 'Parent rule' (see Hierarchy Rules)
7. Optionally, limit the folders, which should be synced by applying filters and/or periods (see Filters & Periods)
8. Optionally, introduce an expression to extract folder names for directories (see Name Expressions)
9. Optionally, create a default folder structure, which will be added inside the objects-related folders with the first sync (see Default Folders).
The app lets you split models into a few folders based on selected filters. Use any document-storable field to distinguish a directory. Have a separate folder for individuals and companies, for European and American opportunities, for quotations and confirmed orders, for each project, etc. You can also limit documents by relative periods by using the date fields of linked documents. For example, leads registered in the last 3 months or invoices updated in the previous week (see Filters & Periods).
Define name expressions to specify titles of documents' cloud client folders. For instance, to include a project name in a task directory (see Name Expressions).
Prepare a hierarchy of default folders and files to be created when a document directory is synced to a cloud client for the first time (see Default Folders).
The folder rules are applied according to the scheduled job 'Prepare Cloud Folders'. They are checked and updated every 15 minutes (see Folder Rules).
If you change the rule, the changes will be applied with one of the following cron jobs. The folder list will update based on the new rule's settings.
Hierarchy of Rules
When you need to add objects of one model inside the objects of another one, you can specify the parent rule. For that, select the model in the 'Parent Rule' field and a related many2one field. This way, you can reflect your Odoo workflow logic, create a complex folder structure, and navigate folders conveniently. So, it will be easier to find the required attachments. For example, place tasks inside the related Project, and the Project inside the associated contacts to get the structure: Contacts > Azure > Projects > Software Design > Tasks > Prepare markup.
The many2one field can link the models. For example, if you want to store task folders within the related project's folders, the task card should include a many2one field that references the related project.
Let's create and assign a parent rule to the rule 'Tasks':
1. First, create a model-related folder rule, and choose 'Projects' as the 'Model to Sync'.
2. Start creating another model-related folder rule, choose 'Tasks' as the 'Model to Sync', choose the previously created folder rule 'Project' as a parent rule, and as the 'Parent Model Field' choose 'Project'.
As you create folder rules, the next scheduled job will reflect the structure in the Files Manager's Interface. For example, in the case above, the following structure will be generated: Project > Project XYZ...> Tasks > Task 1...
You can create a more complex structure by manually creating subfolders or adding default folders. For example, you have created folder rules 'Project' and 'Tasks'. Then, in the parent folder 'Project', you can add the manual subfolder 'Project managers' to store information or files related to the people responsible for the Project. To the 'Task' folder rule, add a default folder 'Documents to sign' containing the file 'Terms of agreement'. The folder will be created in all task folders, so you can share it with the client if necessary (see Default Folders).
The folder structure is also preserved in the objects' attachments boxes (see Attachments Box). Here you can view the object's folder hierarchy, switch between folders, and manually add folders. You can also see, upload, and manage attachments.
It isn't necessary to sync the entire folder structure to a cloud client. You can assign the client to specific folders. Keep in mind that the child folder cannot be synced to a different cloud client. Even if it has another one in its settings, it will be synced to the parent folder's client.
Filters & Periods
Create folders only for the specific objects of a particular model, and don't create any others to simplify access. For example, to have only the won opportunities folder or to divide sales orders by the salesperson or a particular period. Therefore, the app lets you limit the types of objects for which folders are created.
The list of the model's objects to sync can be limited by:
1. Filters
2. Periods.
With the help of filters, you can use any document-storable field to distinguish a directory. Have a separate folder for individuals and companies, for European and American opportunities, for quotations and confirmed orders, for each project, etc.
To add a filter:
1. Create a new folder rule or start editing an existing one
2. Click on the button 'New'
3. Set up the rule, for example, 'country contains US'
4. If any records match the filter, you will see their number on the right side (click on it to see the records to make sure the filter is correctly set)
5. Optionally, click on the 'New Rule' again to add one more rule, so only records that match 'ALL' or 'ANY' of the rules will be considered for sync.
Here are some useful examples of filters by models:
Generate folders for internal projects. To do so, add a tag 'Internal' to such projects and set up a filter Tags > Name contains Internal in the related folder rule.
Generate folders for contacts of a particular country. For that, add a filter Country contains US.
Generate folders for won leads. For that, add a filter Won/Lost is equal to Won.
Generate folders for quotations. For that, add the filters: Status is equal to Quotation, Status is equal to Quotation Sent. Switch the filtering button to 'ANY'. Thus, if a record matches any of the filters, it will be considered by the rule.
Generate folders for purchase orders with a particular status. For that, add a filter Status is equal to RFQ.
Generate folders for appointments of a particular responsible person. For that, add a filter Responsible is equal to Doris Cole.
Generate folders for articles with attachments. For that, enable the option 'Only with attachments'.
You can create as many auto folder rules as you want that refer to the same model. But try to make filters self-exclusive, so that a document is strictly distinguished. For instance, 'customer but not supplier', 'supplier but not customer'. Otherwise, a specific document folder will be added to the folder rule, with a smaller sequence number (such folder rules are higher in the list 'Auto Folders Rules'). For example, you have 2 Folder Rules: 'Sale Orders' and 'Cancelled Sale Orders'. The order S00001 was cancelled, and therefore, it meets the conditions of both. However, the folder rule 'Cancelled Sale Orders' has a smaller sequence because it was placed above 'Sale Orders'. Thus, the object S00001 will be added to the 'Cancelled Sale Orders' model.
It is also possible to limit the document folder list by relative periods by using the date fields of linked documents. For example, generate folders for only leads registered in the last three months or invoices updated in the previous week.
Periods are useful when you want to create a special folder for old objects or sync only the objects for a particular period. For example, you can create folders such as 'this year invoices', 'last year invoices', and 'archived invoices'. When a folder no longer matches any filters or periods, it will be removed from the Files Manager during the next folder refresh. If the folder has been synced before, the files will be returned to Odoo via the reverse sync.
To set the period of a folder rule:
1. Click on one of the folder rules or start creating a new one
2. Choose the tab 'Periods'
3. Click 'Add a line'
4. Choose the object's field, which will be considered to choose the object-related folders for sync
5. Choose to consider the next or the last period
6. Set interval and interval type
7. Tick the box 'Including current', to include the current period in the calculations (For example, today is 25/09/2020. For instance, in case 'last 2 months' is selected. If the box is not checked, Odoo would consider July and August. If checked, August and September.)
8. In the field 'Compared to', choose the option 'Today' if the set period should be calculated relative to today. Choose the option 'Past'/'Future' and set the period type and length in the fields 'Interval type' and 'Interval' to calculate the period relative to a particular moment in the past/future.
9. You can check the set periods below in the section 'If today, the periods would be...'
10. Optionally add some more periods.
Periods can be calculated relative to today (Current day), the past (Current day - compared period), and the future (Current day + Compared Period).
To calculate periods relative to today, when setting a folder rule period, choose the 'Today' option. For example, today is 03/09/2023, meaning the 'last 2 months' are July and August. The 'next 5 days' are 04/09-08/09/2023. The current period is also included if the 'Including current' flag is checked. For example, today is 03/09/2023, so the 'last 2 months', including the current, are August and September. The 'next 5 days', including the current, are 03/09 – 07/09/2023.
To calculate periods relative to the past, when you set a period for a folder rule, choose the 'Past' option. This way, we compare the set period not with the current day, but with the 'Current day' minus the 'Compared period'. It may be beneficial to keep older records in the cloud while having the most topical ones handy in Odoo. For example, you can set the period 'Created on in the last 5 years compared to the past 2 years'. For instance, if it is September 2023 and the option including current is ticked, then the objects created during the following period will be considered for the sync 01/01/2017 – 32/12/2021. If it isn't ticked, then 01/01/2016 – 32/12/2020. This way, when 2024 starts, the considered period will be changed to 01/01/2018 – 32/12/2022 or 01/01/2017 – 32/12/2021, respectively.
When the 'Future' option is selected, we compare the specified period to a future date. This way, we compare the set period not with the current day, but with the Current day + the Compared period. For example, you can set the period 'Expected Closing in the next 3 weeks compared to the future 2 weeks' to the folder rule 'Opportunities'. Then, if the option including current is ticked and today is 15th September 2023, the objects with expected closing in the following period will be considered for the sync 2023/09/18 – 2023/10/08. If it isn't ticked, then 2023/09/25 – 2023/10/15. As you set periods, folders for objects that match the periods are generated. If a cloud client is assigned to the folder rule, the folders with the attachments will be synced. Over time, as periods are calculated relative to the past, present, or future, particular objects may no longer match the period. Such objects are returned to the instance via the reversed sync. For example, we set the period for the folder rule 'Sales Orders' as 'Created on' in the last 2 months, including the current one. As of 15th September 2023, sales orders created in August and September are synced. When we create a new sale order, it is also synced, but its creation date is September. Then, in October, the sales orders created in August no longer fall within the set period; therefore, the related folders and files are returned to Odoo. Restrictions on periods are accumulated. If you added a few lines, then all period conditions should be satisfied. For example, the deadline should be within the last 2 months, AND the ending date should be within the previous year. However, if you added the same date field twice, the condition should satisfy ANY of those criteria. For example, the deadline should be within the last 2 months OR the next month, AND the end date should be within the previous year.
To ensure that the periods are correctly configured, please, consult the dynamic field 'If today, the periods would be...'.
Here are the results of the filters and periods' influence on folder rules:
1. If an object-related folder no longer relates to a folder rule after adding some filters or periods, then its folder will be archived. For example, you have a folder rule 'Contact' with the 'Country =US' filter, and the 40 records match this condition. Then, you were asked to change the country for one of the sales orders to Belgium, as the order needed to be sent directly to the partner's customer. This sales order no longer relates to the synced ones, as it does not match the filter. If the information related to the order folder has already been synced to the cloud client, it will be archived. The files will be returned to Odoo from the cloud client via reverse sync.
2. If an object didn't relate to a folder rule but later matched the conditions of one, then its folder will be created in the related directory. For example, we had a sales order with the country 'Belgium' and later changed it to 'US'. Thus, since it now matches the filter, the related-to-the-record folder will be generated in the Files Manager.
3. If you have two folder rules that relate to the same document (for example, Sale Order), then the object-related folder that relates to both of them will be added to the folder rule with the smaller sequence. For instance, we have folder rules 'Sale Orders' and 'Cancelled Sale Orders'. The order S00001 was cancelled, and therefore, it meets the conditions of both. However, the folder rule 'Cancelled Sale Orders' has a smaller sequence because it was placed above 'Sale Orders'. Thus, the object S00001 will be associated with the folder rule 'Cancelled Sale Orders'.
4. If an object matches the conditions of one folder rule and then matches the conditions of another one instead, then matches the conditions of one folder rule and then matches the conditions of another one instead, then the folder with files will be transferred to the correct directory with the next scheduled job. For example, we have folder rules 'Sale Orders' and 'Cancelled Sale Orders'. The folder rule 'Sale Orders' now has a complex filter 'Status = Quotation; Status =Quotation Sent; Status = Sales Order; Status =Locked', so all sales orders that aren't cancelled are included. One of the sale orders (S0003) was later cancelled. Thus, it matched the folder rule 'Cancelled Sale Orders' and was transferred to the related directory.
Using Filters and Periods will help minimize the resources spent refreshing folders and syncing (if you sync folders). It lets you focus only on the relevant objects.
Name Expressions
When folders are created, their titles are generated by default from the computed field Display Name (display_name). For example, the contact Anita Olivier will have the folder 'Azure Interior/Anita Olivier' generated. For different models, it may work differently. For Contacts with a company assigned, the company's name is added before the person's name. For example, the contact Addison Olson will have the folder Deco Addict, Addison Olson said, where 'Deco Addict' is the company she works for. But you can always change the way the names are generated.
If you want another logic for generating names for folders, then you can also use the value of object fields to develop them with the help of name expressions. This way, you can get the necessary information about an object without opening it. For example, if you create a folder rule 'Contact', you can add contacts' phone numbers to the folder's titles.
It is possible to define rules for folder names that include information from one or more fields. To that end, apply the special syntax (the same that is used in Odoo email templates).
To add an object's name:
1. Start creating a Folder rule or start editing an existing one
2. Open the tab Name Expression
3. Type the name using the syntax in the field 'Name Expression'.
An expression, created with the help of the syntax, starts and finishes with the double curly brackets {{}}. Everything that is not included in brackets will be written in the folder's name. For example, let's add a name expression to the Contacts table. Add the expression "Files of {{object.name}}, partner" in the field 'Name Expression'. After refreshing, the contact's folders will look like Files of Abigail Peterson, partner; Files of Anita Oliver, partner. The comma was also outside the brackets, so it will also be applied right after the parsed expression.
You can add a condition so that if the object has a particular field filled, the name will be taken from that field. The operator introduces the conditions 'and'. The field following the last 'and' will be used as a name if all the previous conditions are true. The action, which should be done otherwise, is introduced by the operator 'or'. For example, let's add the name expression "{{object.mobile and object.mobile or 'no mobile phone'}}" to Contacts. In this example, if a contact has a mobile phone, the field mobile phone should be used as the folder name. Otherwise, the information in the quotation marks will be used; in this case, there will be no phone. After refreshing, the contact's folders will look like -43454123453; no phone.
Avoid the following symbols in folders' and files' names: *, ?, ", ', :, <, >, /, +, %, !, @, \, /,. The folders refreshing will replace such symbols with '-'. It is done to avoid conflicts with file systems.
You can also create a complex expression containing information from several fields. In this case, each field should be written in separate curly brackets. Let's add a complex expression "{{object.name}} {{object.phone and object.phone or 'no phone'}}, {{object.mobile and object.mobile or 'no mobile'}}" to Contacts. In this complex expression, the first term represents an object's name, and the second and third are conditions that check whether the phone and mobile fields are filled. After refreshing the folders, the contact folders will look like this: Abigail Peterson 356745, no mobile; Anita Oliver no phone, -37854756231. Please pay attention to the fact that there isn't a comma after the name expression, so it wasn't added to the result.
If an expression is parsed successfully, the title of each object-related folder changes according to it.
If the expression cannot be parsed because of the syntax error, the standard сomputed field Display Name (display_name) will be used.
When a part of the title can be parsed, and the second one contains a condition, you should also add the operator 'or' to the condition to introduce what to write in the title if the condition is false. Otherwise, if the condition is not met, you will see 'False' in a folder's title.
You can change the syntax at any time, or revert to the default computed field Display Name.
If the folder name appears empty after rendering, the app will use the standard сomputed field Display Name to avoid folders without names.
Here are some useful examples of the names, created with the help of the syntax used in Odoo email templates:
Name expression: {{object.name}} {{object.phone and object.phone or 'no phone'}}, {{object.email and object.email or 'no email'}}
Result examples: Anita Oliver, 34854325, anitao@test.com
Use this expression to include contact phone number and email in the folder's title.
Name expression: {{object.name}}, {{object.state}}
Result examples: S03093, draft; S03094, sale
Use this expression to see the state of a sale order in the folder's title.
Name expression: {{object.name}}, Total {{object.amount_total}}
Result examples: P00001, Total 28700.0
Use this expression to see the total for a purchase order in the folder's title.
Name expression: {{object.name}}, {{object.automated_probability}}
Result examples: Table with chairs, 50.0
Use this expression to see the automated probability of a lead in the cloud client. The probability will change after sync as the lead will move in the pipeline.
Name expression: {{object.name}}, {{object.invoice_date}}
Result examples: BILL-2018-09-0001, 2021-07-12
Use this expression to see the invoice date in the folder's title.
Name expression: {{object.name}}, {{object.message_attachment_count}}
Result examples: Abigail Peterson, 12
Use this expression to see how many attachments are in each object's folder without opening it. It can be used for any Folder rule.
Default folders
Default folders - manual folders with or without default attachments that would be auto-generated for a specific Odoo object folder, as soon as an object-related folder is created for the first time. Further folder refreshes will not generate default folders with default attachments.
This function creates the same folder structure in each object-related folder specified by the folder rule. For example, the folder rule based on the 'Sale Order' model was set. The default folder structure 'Documents to sign> Terms of agreement' was added. So, in the end, the structure will be 'Odoo > Sale Order > S00001, S0002... > Documents to sign> Terms of agreement'.
You can also add some files to any of the default folders, and when the first folders are refreshed, the folders with files will be added to all related objects. For example, you can create a default folder for employees with the documents for signing. Thus, when a new employee's card is made in Odoo, the next time the folders are refreshed, the default folder containing the files will be added to the related object's folder.
How to configure the default folder and attachment generation:
1. Start creating a folder rule and choose a model, or start editing an existing one if it hasn't been refreshed yet
2. Open the tab Default Folders
3. Click 'Create Root Subfolder'
4. Type the name of a folder
5. Optionally add some more folders
6. Optionally add some files by clicking on the button 'Upload Root File'
7. Move folders by drag&drop to change the hierarchy
8. Click on the folder with the right side of the mouse to create a folder inside the folder; to rename, edit, or delete it.
Prioritization of Folder Rule Checks
The module allows checking specific 'unimportant' folders less frequently, thereby prioritizing the checks of other folders. This way, users can ensure that their most crucial folders are checked regularly while less important folders are checked less frequently.
The prioritization is set separately for each folder rule. This way, you can enable it for some folder rules and turn it off for others. For example, check the folder rule 'Contacts' less frequently than the 'Leads/Opportunities' folder rule.
The frequency of checks is set in hours; however, you can also restrict monitoring for a very long period, with no limit on the number of hours.
To set the prioritization:
1. Start creating or editing a folder rule
2. Go to the tab 'Prioritization'
3. Enable the 'Restrict Monitoring' feature
4. In the field 'Do not check more frequently than once in?', set the number of hours to limit the frequency of checks.
When a folder is created, there are no restrictions initially. The pause time is applied immediately after the next check with the scheduled job 'Prepare Cloud Folders'. Any further changes to the monitoring settings will take effect only during the next check. For example, we set a 240-hour restriction on the folder on 1st April, which was applied within 15 minutes via the scheduled job 'Prepare Cloud Folders'. The next day, we decided to change the prioritization from 240 to 24 hours. After 240 hours, on 11th April, the folder was rechecked, and the new 24-hour restriction was applied. This way, the next check will be on 12th April.
The prioritization is calculated per folder; the module first checks the folder rule's prioritization. If no rule is assigned to a folder, the parent folder's rule is considered, and so on. It is important to note that the parent rule must not exceed the child rule, ensuring hierarchical structures are maintained within the folder management system.
For example, if a user has folder rules for 'Customers' and 'Projects' with a subfolder structure of 'Customers > Azure > Projects > Project 1', and the 'Customers' rule has a 2-hour restriction specified, then the 'Customers' and 'Azure' folders will be checked no more than once every 2 hours. Similarly, if the 'Projects' rule has a 4-hour restriction, then the 'Projects' and 'Project 1' folders will be checked every 4 hours, with the parent rule setting the limit for the child rule.
Sometimes, you may need to force the folders to check, especially if a long monitoring restriction was mistakenly assigned. In this case, the 'Clear next folders priority' button will be helpful.
Upon clicking this button, all connected folders, along with their child rules and subfolders, will be checked in the regular queue without any restrictions the next time the scheduled job 'Prepare cloud folders' takes place. This allows immediate implementation of any changes.
The button is useful when a long monitoring restriction is set, and it isn't possible to wait that long for the changes to take effect. By using the button, adjustments to monitoring restrictions can be applied without delay during the next check.
For example, we have a folder rule named Projects with a 100-hour monitoring restriction. We want to check the folder rule every 10 hours, and we cannot wait 100 hours for the new limitation to be applied. So, we changed the restriction to 10 hours and clicked the 'Clear next folders priority' button. This way, with the next scheduled job, 'prepare cloud folders ', the folder will be checked, and the new 10-hour monitoring restriction will be applied.
Due to the timeout, the operation may hang when there are many folders. In such cases, pressing the button again after a while is necessary.
Clicking on the button influences only the next check. After that, the blocking date will be recalculated based on the folder rule's prioritization settings.
Workspace-Related Rules
The add-on Cloud Sync for Enterprise Documents () introduces the possibility of generating folders for workspaces.
Workspace-Related Rule is a folder rule that syncs files from the Documents module and creates folders according to the workspace structure.
To force Odoo to prepare workspace-related directories, define folder rule(s) of the 'Workspace-Related rule' type. The tool would automatically create linked folders and sync them to the chosen cloud storage using one of the following scheduled jobs.
The folder rules for the workspace type are highlighted in blue in the folder rules menu.
To set a workspace-related automatic folder rule:
1. Go to Cloud Storage > Configuration > Folder Rules
2. Click 'New'
3. Choose the rule type as 'Workspace-Related Rule'
4. Choose the folder name. Avoid using the following symbols in folders' and files' names: *, ?, ", ', :, <, >, /, +, %, !, @, \, /. Upon saving the name, they will be replaced with '-'. It is done to avoid conflicts with file systems. The name should include fewer than 100 symbols
5. If there is more than one cloud client connected, then choose the one to which you want to sync the files, or leave the field empty if you don't want to sync the folder (see Synchronization Principles)
6. Optionally, limit the objects that should be synced by applying filters (see Filters & Periods).
It is not obligatory to reflect the whole DMS structure. Thus, it is possible to filter workspaces by any storable field. For example, add a folder for workspaces containing the keyword 'Internal'. The process of adding a filter to a Workspace-Related Rule is the same as that to a Model-Related Rule (see Filters &Periods).
For example, let's create a Workspace-Related Rule to sync only one's own documents. To do so, start by creating a folder rule, selecting the Workspace-Related Rule rule type, entering the folder name 'Documents', and choosing a cloud client, such as Google Drive. Then, click 'Add Filter' and set the filter 'Owner is in your_user'.
If a parent folder matches a filter, all its children will be added to the same rule.
Specific actions on workspaces and documents may yield different results depending on where the changes are introduced (in Odoo or a cloud client). Let's look at the most common ones.
The actions with workspaces in Odoo:
1. Adding a new workspace with the cloud client assigned.
If you add a new workspace and assign a cloud client, a related folder will be created in the cloud client with the next sync.
2. Renaming a workspace
If you rename a synced workspace, the related folder in the cloud client will also be renamed with the next sync.
3. Moving a workspace
If you move a synced workspace, for example, by changing the parent one, then the structure in the cloud client also changes accordingly with the next sync.
4. Deleting a workspace
If you delete a synced workspace in Odoo, it will also be deleted from the cloud with the next sync.
The actions with workspace-related folders in the cloud client:
1. Adding a new folder
If you create a folder in the cloud client, it is also added to Odoo as both a workspace folder and a folder in Files Manager. Files added to a workspace folder in the cloud client are also synced to Odoo. You can read more about the consequences of possible actions with folders and files in the article Synchronization Principles (see Synchronization Principles).
2. Renaming a folder
If you try to rename an object-related folder in the cloud client, the name will differ in Odoo and the Cloud until you rename the object in Odoo.
3. Moving a folder
If you move an object-related folder in the cloud client, the structure will differ between Odoo and the Documents module. The folder will not be restored to its previous location in the cloud, but it will remain synced.
4. Deleting a folder
If you delete an object-related folder from the cloud client, it will be recovered during the next sync, without its files. The broken links will remain in Odoo.
The actions with documents in Odoo:
1. Uploading a document
If you upload a document to a synced objects' folder, it will also be added to the corresponding folder in the cloud during the next sync.
2. Renaming a document
If you change the name of a synced document in Odoo, its name in the cloud client will be updated during the next sync.
3. Moving a document
If you move a document to another workspace in Odoo, it will be moved to the cloud during the next sync.
4. Deleting a document
If you delete a previously synced document from Odoo, it will also be deleted from the cloud with the next sync.
The actions with documents in the Cloud:
1. Uploading a document
If you upload a document to a synced folder in the cloud client, it will also be uploaded to the corresponding folder in Odoo during the next sync.
2. Renaming a document
If you rename a synced document in the cloud, it will be renamed in Odoo during the next sync.
3. Moving a document
If you move a synced document to another workspace in the cloud, it will be moved in Odoo accordingly with the next sync.
4. Deleting a document
If you delete a synced document from the cloud client, it will also be deleted from Odoo with the next sync.
Examples of Complex Structures
Here, you will find some possible structures that you can create in your Odoo instance:
To achieve the structure, first, create a folder rule called 'Contacts' and choose 'Contacts' as a 'Model to sync.'
After that you need to create a folder rule 'Projects' and choose 'Project' in the field 'Model to sync'. Then, choose the previously created parent rule 'Contacts', and as the parent model field, choose 'Customer.
Finally, create a folder rule 'Tasks'. As a parent rule, choose 'Projects,' and as a parent model field, choose 'Project.'
To achieve the structure, first, you need to create a folder rule 'Vendors' and choose 'Contacts' as a 'Model to sync'. Then, you need to add a filter so that only contacts with products are considered Vendors: Products is set.
After that, you need to create a folder rule 'Purchase Order' and choose 'Purchase Order' in the field 'Model to sync'. Then, choose the previously created parent rule 'Vendors' and choose 'Vendor' as the parent model field.
In order to achieve the structure, firstly, you need to create a folder rule 'Vendors' and choose 'Contacts' as a 'Model to sync'. Then, you need to add a filter, so only contacts with products, would be considered as Vendors: Products is set.
After that, you need to create a folder rule 'Products' and choose 'Product' in the field 'Model to sync'. Then, choose the previously created parent rule 'Vendors'. Here, we also need a parent model field of the many2one type, but there isn't such a field on the product template. So, we used the module Custom Fields for products and created a field 'Manufacturer'. In this case, we can add 'Manufacturer' as the parent model field.
To achieve the structure, first create a folder rule called 'Departments' and choose 'Department' as a 'Model to sync'.
After that, you need to create a folder rule 'Employees' and choose 'Employee' in the field 'Model to sync'. Then, choose the previously created parent rule 'Departments' and choose 'Department' as the parent model field.
To achieve the structure, first, create a folder rule called 'Sales Team' and choose 'Sales Team' as a 'Model to sync.'
After that, you need to create a folder rule 'Lead' and choose 'Lead' in the field 'Model to sync'. Then, choose the previously created parent rule 'Sales Team' and choose 'Sales Team' as the parent model field.
To achieve the structure, first, create a folder rule called 'Contacts' and choose 'Contacts' as a 'Model to sync'.
After that, you need to create a folder rule 'Sale Orders' and choose 'Sale Order' in the field 'Model to sync'. Then, choose the previously created parent rule 'Contacts' and choose 'Customer' as the parent model field.
Finally, create a folder rule for Universal Appointments. In the field 'Model to sync,' choose 'Appointments'. Then, as a parent rule, choose 'Sale Orders', and as a parent model field choose 'Sale Order'.
Synchronization Principles
Synchronization is fully automatic, and after setup, no manual actions are required. Just create some folder rules and configure a cloud client. Synchronization is a schedule-based process, so a particular time is required for the changes to be applied.
The connector works on a queue (first-in, first-out) principle. First, the application scans all folders. Based on these changes, the application creates a task queue. Then, the tasks are processed. Each sync, especially the very first one, might take quite a long time.
Synchronization doesn't occur in real time to avoid performance issues and functionality problems.
Synchronization is bilateral, meaning it occurs in both directions: from Odoo to the cloud client and back. Both types of sync work within a single process, and each serves a specific purpose.
If Odoo is unable to complete a task (for example, sending a file or folder), it will retry it after a period of time. The module will make several attempts. The time between attempts increases exponentially (the first attempt will be in 30, the second in 60…), but does not exceed 24 hours. If the task fails after the last attempt, it will not be attempted again to avoid excessive platform resource consumption.
It is possible to set the maximum number of attempts that the module will make to complete failed tasks. For that:
1. Open the Cloud Storage menu, and go to Configuration > Configuration
2. Find the section 'Settings'
3. In the field, Maximum Retries defines how many times a failed task should be retried
4. In the field Maximum Retries (Reverse and Move tasks), define how many times failed reverse and move tasks should be retried.
The number of failed task processing for reverse & move tasks is set separately, as these tasks can block other tasks and lead to longer wait times if not fulfilled. In cases where blocking reverse or move tasks cannot be fulfilled (e.g., related folders/files manually deleted in the cloud), users can set a lower number of attempts on the configuration page to cancel these tasks sooner. These changes will be applied during the next attempt. If the new number of attempts is lower than the current number of attempts for failed tasks, those tasks will be canceled.
If there are any active tasks, the application runs them before scanning the folders. The application searches for the oldest folder, if any.
The module typically operates on a FIFO basis, meaning it reflects the oldest changes first. First, folders that haven't synced for the longest time are checked, then those synced recently. Some prioritized operations may reorder tasks.
The module's sync logs enable real-time tracking of the queue, task creation, and operational fulfillment.
Synchronization is a two-way process, meaning it occurs in both directions: from Odoo to the cloud client and from the cloud back to Odoo. For example, if you add an attachment to the attachments box of a synced sale order S00345, then it will be sent during the next synchronization. If you add an attachment to a cloud client folder, it will be added to the related folder in the Odoo Files Manager, depending on the following job.
Direct synchronization:
1. Creates a Files Manager's folder structure in the cloud client
2. Uploads all the attachments of created folders from Odoo to the object-related folders within the special root folder 'Odoo'
3. Makes all synced Odoo attachments change their type to a link (URL), while binary content is removed with the next Odoo cleaner. No actual files would be stored on your Odoo server.
Binary content is stored in clouds, while Odoo provides direct access to synced items.
4. Checks whether a new folder for sync is added/renamed/archived. If so, the changes will be reflected in the Cloud
5. Checks whether attachments are added or deleted for synced folders. If so, they would be created or removed from the cloud client.
Backward sync:
1. Checks whether any items are added to a cloud client document folder. If so, the app would create URL attachments for those items in the Files Manager folder and, if any, the related object's attachments box
2. Checks whether any item is renamed in the cloud client. If so, a chained Odoo attachment should also be renamed
3. Checks whether any items are deleted/moved to a cloud document folder. If so, a linked Odoo attachment will also be unlinked or moved.
Another type of synchronization, reverse sync, was introduced to allow changing a cloud client or switching between them, or resetting the sync. It helps to:
1. Return previously synced files back to Odoo and delete them from the Cloud
2. Move files from one cloud client to another.
The types of files that should be synced directly can be limited. For example, don't sync .png pictures or .pdf files. For that, go to Cloud Storage >Configuration >Configuration. Find the field 'Non synced mimetypes' and enter comma-separated mimetypes without spaces that should not be synced. For example, "application/pdf, image/png".
If you choose not to sync a particular file type and then add it to the cloud client, the file will also be added to Odoo with the next sync, as the limitation doesn't affect backward sync.
Note that if you disregard this setting, the following mime types will not be synced: "text/html," "text/css," "text/javascript," "application/javascript," "text/XML," "application/XML," and “odoo.spreadsheet.” Moreover, zero-size attachments and attachments that start with '/' will also not be taken into account.
Make sure you use the correct extension name. Odoo recognizes applications in its own way (with an intuitive extension). For example, 'pdf' is recognized as 'application/pdf', and the extension .mepx is recognized as application/zip. To check the extension of uploaded attachments:
1. Turn on the developer mode
2. Open the technical menu 'Attachments'
3. Click on any attachment
4. Check the extension of the file in the line 'Mime type'.
The tool relies on a single-user endpoint, meaning all sync processes are handled by a single cloud admin (app). Access rights for created folders/files are not automated. You should administer those rights in your cloud client.
The module doesn't provide the functionality to manage access rights to the synced files. You should administrate those rights in your cloud client.
Synchronization of Enterprise Documents has its own specific. Therefore, the special add-on 'Solutions for Enterprise Documents' is required. To sync files from Enterprise Documents, as you create a folder's rule, in the field 'Rule related type', you should choose the option 'Workspace related rule' and finish the setup as usual (see Workspace-Related Rules).
Folders Sync
As soon as folders appear, the same ones are created in the cloud client during the next sync. All folders are made inside the root folder 'Odoo'. The folder rule's folders serve as storage for object-related folders. Each Odoo folder will have its cloud folder. For example, Odoo > Customers > Azure Interior > files and folders related to the object.
Changes applied to a folder in Odoo take priority over those used in the cloud client.
The results of your actions will differ depending on where the changes are introduced (in Odoo or in a cloud client).
Let's look at the actions applied by Odoo and their consequences:
1. Create a folder to sync
If a cloud client is assigned to a folder via the folder's settings or a folder rule, the folder will be synced. For example, we created a folder rule 'Customers', and the related folders were generated in the Files Manager. As we assigned the cloud client 'Google Drive' to the folder rule, those folders were synced to the cloud.
2. Move a folder/change the parent folder
If you move a folder, for example, by changing its folder rule's parent folder, it will be transferred to the cloud client as well. For instance, we have a folder rule 'Tasks' with a parent rule 'Projects'. If we clear the 'Parent rule' field, the folder rule will no longer be a child of 'Projects'; thus, the hierarchy will change, and the folder 'Tasks' will change its position in both the Files Manager and a cloud client.
3. Change cloud client
If a folder's cloud client was changed through the folder's settings or a folder rule, then with one of the next syncs, the files will be returned to Odoo (reverse sync) and then moved to the other cloud client (direct sync). For example, we have two cloud clients in our system: Google Drive and OneDrive. The folder rule 'Departments' was first synced to OneDrive, but we later changed the cloud client to Google Drive, so it was returned to Odoo and then sent to Google Drive via the reverse sync.
4. Change folder name
You can rename a folder in Odoo by editing it, updating the linked-to-synced-folder object, or using name expressions. The changes will also be applied to the cloud client. For example, we have a client, Azure Interior, which, after rebranding, changed its name to 'Azure', and we have updated it on the contact card. In the next sync, the name will change in the cloud client.
5. A folder is no longer synced
If you unassign a cloud client from a folder/folder rule, or change the filters on a folder rule, then the folder will no longer be synced. In this case, the folder containing the files will be returned to Odoo via reverse sync during the next scheduled job. For example, we have a folder rule to sync contacts with no filters applied; 61 contacts match the filter and are synced. Then we added the filter 'Is a Company is set', and only 12 contacts matched. So, contacts (folders and files) that are not company contacts will be returned to Odoo, and 12 contacts will be sent/will remain in the cloud.
6. Archive a folder
You can archive a folder in Odoo. The reverse sync will run and return files to Odoo. There may be several reasons for archiving a folder. The folder is archived if you:
a. Delete an object
b. Archive a manual folder/folder rule
c. Change filters (so the object no longer matches them).
If you delete an object in Odoo, it will also be removed from the cloud client. For example, the company of our client 'Deco Addict' was closed, so we have archived the contact card. The files returned to Odoo, and the folder was removed from the cloud client with the next reverse sync.
Please avoid triggering the reverse sync, as it assumes the most complex and risky operations. Make sure you really need it.
Let's look at the actions applied from the Cloud:
1. Create a folder
If you create a folder in the cloud client, it will be added as a subfolder in Odoo with the next sync. For example, let's add the 'Terms of agreement' folder to the project's 'Renovation' folder in the cloud client. At the next sync, it will be added to the related place in Odoo.
2. Change folder name
If you try to change a folder's name in the cloud client, the changes will not be applied in Odoo. However, the name in the cloud will not be changed back either. Thus, the same folder will have different names in Odoo and the Cloud. For example, we renamed the folder 'S01760' to 'Tables'. After the sync, no changes were applied in Odoo, and it wasn't reverted in the Cloud.
3. Move a folder
Performing such an operation is not desirable. The structure in Odoo and in the cloud will differ (since the folder will not be returned to its original location and will not trigger a move in Odoo). The warning in the sync logs will appear. For example, let's move the folder 'S01863' from the folder 'Quotations' to the folder 'Customers'. In the Odoo Files Manager, no changes will occur; however, the sync will continue, and the folder will remain in the root Odoo folder. In the sync logs, a warning will appear.
4. Delete a folder
Performing such an operation is not desirable. If you delete the folder in a cloud client, then the folder and its child folders will be recreated. However, because the files were stored in the cloud client and then deleted, they cannot be recovered. In Odoo, the broken links will remain.
Odoo folder changes take priority over those in a cloud client.
For example, if we permanently delete the 'Azure' folder, the next sync will recreate it and its child folders. However, the files will be lost as they were kept in the cloud.
Avoid renaming, moving, and deleting folders in the client. They should be managed in Odoo.
Files Sync
After the sync, the attachments of each folder (and hence, related Odoo object) will be moved to the corresponding folder in the cloud client. For example, Odoo > Customers > Azure Interior > scan1.jpeg. Only links to the files will be kept in Odoo.
As with folders, specific actions have different results depending on where the changes are introduced (in Odoo or in a cloud client). When considering files and their changes, modifications applied in the cloud client take priority over those in Odoo.
Let's see some common actions performed on the files and their consequences:
1. Upload files to Odoo / Upload files and folders to Cloud
If you upload files to Odoo, they will be transferred to the cloud client. Only links to them will remain in Odoo. However, you can still access the file quickly by clicking on it in Odoo.
If you upload the files directly to the cloud client, the app will create URL attachments for those items in the linked Odoo folder.
You can put files and child folders in cloud client folders. In that case, during one of the next syncs, the folder will be created in Odoo and will be visible in the object's attachments box and in the files storage.
For example, let's upload some files to the 'Renovations' project in the Files Manager in Odoo. Then, let's add a folder 'Terms of Agreement' with files to the 'Renovations' folder in the cloud client. After the sync, all files will be kept in the cloud client, while the links to them will remain in Odoo.
2. Rename a file in Odoo / Cloud
If you rename a file in the cloud client, the chained Odoo attachment will be renamed as well. For example, let's rename the file Policies.pdf to Plan for the team.pdf in the cloud client. After the next sync, it will also be renamed in Odoo.
You can also rename an attachment in Odoo. To do so, click the three-dot icon at the bottom left of an attachment, then click 'Open'. Then, introduce the new name. The changes will also be reflected in the cloud.
If you rename a file in both Odoo and Cloud simultaneously, the changes in Odoo are prioritized.
3. Move a file to Odoo/Clouds
If you move a file in the cloud client from one object to another, the linked Odoo attachment will be transferred as well.
For example, let's move the file 'Recording 1' from the 'Azure' folder to the 'Beth Evans' folder. With the next sync, it will also be moved to Odoo.
You can move an attachment to another folder in Odoo with the Mass action 'Update folder'. To do so, select the file(s), click 'Update folder', and choose the destination folder. Then the file will be moved to the appropriate location within the cloud client.
If you move a file between Odoo and the Cloud simultaneously, the changes in Odoo take precedence.
4. Delete a file from Odoo / Cloud
If you delete a URL attachment from Odoo, it will also be deleted from the cloud client.
If you delete a file from the cloud client, a linked Odoo attachment will also be deleted.
For example, let's delete some files from the 'Customers' folder in Odoo and the Azure file from the cloud client. With the next sync, the deleted files will be removed from both Odoo and the cloud client, regardless of where they were deleted.
5. Download files from Odoo / Cloud
Regardless of the place, you can always download any attachment. To download the attachment from Odoo, click the 'Download' icon or use the mass action 'Download', and the download will start automatically. To download a file from the client, click on the file and choose the appropriate command.
For example, let's download the files 'save.png' and 'sales forecast (2).gif' from Odoo and the file 'furniture.jpg' from the cloud client.
Reconnection
As you configure a cloud client, the button 'Reconnect/Pause' appears in the top left corner. It is useful when:
1. A cloud client wasn't used for a while (for example, sometimes, when Google Drive is not used for a while, you need to reconnect and give all the permissions again to continue using it).
2. The sync has stopped (for example, when there was an error while syncing), a token has expired (for example, OneDrive's token is usually valid only for 6 months, and then it is necessary to generate a new one and reconnect)
3. Granting extra permissions is required (for example, when the terms of the agreement were changed, and it is necessary to permit managing files in a cloud client)
4. For migration purposes (for example, when a new version of Odoo comes out and you need to apply some changes to the platform)
5. You want to stop the sync (for example, when you configure several cloud clients and want to boost the sync process of one of them, you stop the other).
To reconnect the cloud client:
1. Press the button 'Reconnect/Pause'
2. Press the button 'Confirm'
3. Follow the instructions related to the target cloud client.
Resetting or changing cloud client: reverse sync
Reverse sync occurs when a folder is no longer synced, when you want to change the cloud client of previously synced files and folders, or when the sync is fully stopped (the cloud client is reset).
It assumes retrieving all items back into Odoo, deleting the files from the cloud client, and optionally sending them to another client.
The reverse sync is triggered by the same scheduled job as the direct and backward sync: 'Run/Prepare sync queue'. It can also be triggered manually by clicking the 'Launch sync' button.
Reverse sync operations are usually prioritized over direct and backward sync operations. Thus, in most cases, the planner will work on reverse-sync tasks until they are completed, and only then will it continue to complete the other tasks. You can set the maximum number of attempts for reverse and move tasks on the module's configuration page, in the 'Maximum Retries (Reverse and Move tasks)' field. This way, you can ensure that other tasks are not blocked for too long if certain reverse/move operations cannot be completed (see Synchronization Principles).
Due to cloud client peculiarities, not all items can be correctly reversed to Odoo. For example, some documents may exist only in cloud storage environments (e.g., Google Sheets). The app would attempt to convert such documents, but in some cases, manual interaction would be required.
At the moment of the reversed sync launch, the module detects the state of the files and folders. It may take a few synchronizations to process the tasks and return the files and folders to Odoo. It is important not to introduce any changes in Odoo or in the cloud, as the algorithm may ignore them.
Avoid using the reverse sync. Make sure you really need it.
Sync Logs
For extra convenience, the special sync logs interface was introduced. It allows you to control planned jobs and their fulfillment. With the help of the information from the sync logs, you will be able to:
1. See the sync history
2. Know whether the sync took place, and what has changed
3. Check whether a particular file was synchronized
4. Investigate the sync problems.
The sync history contains all the necessary information about the module's actions. For example, which folders were created, which files were added and synced, and which cloud they were related to. The action's time is also tracked, so you may see when it occurred. The time on sync logs is in Odoo server time; therefore, it may differ from the user's local time.
To open the sync logs interface, go to Cloud Storage > Configuration > Sync Logs. There, you will see the list of changes that occur while syncing. You can also see them in real time, as the objects and files are managed.
One of the most essential functions of the Sync Logs is to identify the sync problem. If there is a problem - a mistake, and its details will appear in the sync logs. From here, you can determine the appropriate actions to take or export the logs and send them to the customer support email for further investigation of the issue. Depending on the sync result, the sync operation may be green (successful), orange (minor error warning), or red (error).
The 'Export logs' button was introduced to share sync logs in case an error occurs. This way, you can send the logs to a responsible person, who can fix the issues.
If the instance has many logs and the export takes too long or doesn't finish, you can limit the number of sync logs exported. For that:
1. Open the Cloud Storage menu, and go to Configuration > Configuration
2. Find the section 'Settings'
3. In the field 'Logs to Export', define how many log lines should be prepared while exporting. If the existing logs exceed that number, earlier logs will be neglected.
You may choose to export fewer logs for improved performance, or increase the number if necessary.
If you have multiple cloud clients, you can view all logs at once or only those for one or more clients. Just click the slider button next to the cloud.
When many files and folders are synchronizing every day, it can be challenging to find the information you need in Sync Logs. Therefore, there are several ways to search for sync records conveniently. The ways to search Sync Logs:
1. By matches in Logs or cloud clients' names. To do that, start typing your request in the search field in the top-left corner, then click the search icon. It is also possible to search logs for a particular date. Just add it to the search field in the format '2022-11-24'.
2. By applying log levels on the left side of the interface, by clicking on the slider button. The available ones are Critical, Error, Warning, Info, and Debug.
3. By filtering logs by date and time. To do that, find the section 'Period' in the left part of the interface and click on one of the fields. There, you can specify the time frame. Note that the logs are specified in UTC.
4. By limiting the number of exported logs on the configuration page. If you click the 'Export' button after selecting a cloud client or applying the specified filters, only matching sync logs will be exported.
To find the acute sync logs more quickly and avoid consuming excessive server storage, you can limit the number of days for which the sync logs are retained. To define how many days sync logs should be kept in Odoo, go to Cloud Storage >Configuration >Configuration and specify the number of days in the field 'Logs storage period (days)'. The number of days should be at least 3.
If there are many logs in the instance, and the export doesn't finish, you can limit the number of logs to export. For that, go to Cloud Storage >Configuration >Configuration and define how many log lines should be prepared while exporting by typing the number in the field 'Logs to Export'. If the existing logs exceed that number, earlier logs will be neglected.
You can also subscribe to a specific cloud client's notifications, so if there is a critical connection error, you will receive an email and be able to resolve the issue in time. For that, go to Configuration > Cloud Clients, open one of them, and click 'Subscribe' in the bottom right corner.
Sync Logs do not replace Odoo server logs. They are complementary functions that allow you to control synchronization from the configuration interface. You may also need Odoo server logs to investigate the root causes of the warnings detected in Sync Logs.
Sync Logs do not replace Odoo server logs.
Google Drive Implementation
Google Drive is a cloud-based storage service from Google. It lets you save files online so you can access them from any device, anywhere. With Google Drive, you can access and manage your files securely. The tool offers many useful collaborative features and built-in integrations, making it popular among users.
Google Drive Odoo Integration is a tool for integrating Google Drive features into your Odoo business workflow. The app automatically stores Odoo attachments in Google Drive and provides instant access to them via web links. Thus, users can work comfortably with files in the cloud storage, while the results are fully available in Odoo.
Sync works for individual and team drives (Google Suite business and Enterprise tariffs). In the latter case, the root folder Odoo is placed within a chosen team drive, while in the former case, it is placed within a current user drive.
Configuration and Log in
After the installation of the module in your database, it is required to finish the setup by doing the following:
1. Go to the Google Developer Console via the URL: https://console.developers.google.com
If this is your first time on the platform, you will be asked to agree to the Terms of Service and Email update. Only the Terms of Service are mandatory.
2. Select or create a project. After clicking the 'Create Project' button, the new form will appear. There, write the project title, optionally add your organization, and click 'Create'.
3. From the project's dashboard, go to API's & Services overview and press 'ENABLE APIS AND SERVICES'.
4. Find the Google Drive API and push the button to enable its API.
5. Go to 'Credentials' and press the button 'Configure Consent Screen'.
6. Then click 'Get started' and add app information. For the app name, select a suitable one, and for the user support email, enter your email. Then, click Next.
7. As the User Type, select 'External', and push 'Next'.
8. In the section Contact information, add your email address again and press 'Next'.
9. Then, agree to the 'Google API services user data policy', click 'Continue' and 'Create'.
10. Then, click 'Create OAuth client'.
11. As the application type, choose 'Web application', and as the authorized redirect URI, add the link in a format [YOURODOOSITENAME]/google_drive_token (for example, https://odootools.com/google_drive_token).
12. Then click 'Create'.
13. Go to the Cloud Storage > Configuration > Cloud Clients and click 'New'
14. Choose Google Drive from the list of available cloud clients
15. Optionally type the root folder name; otherwise, the default one, 'Odoo', will be used
16. Copy&Paste 'Client ID' to the 'App Client ID'
17. Copy&Paste 'Client Secret' into the field 'App Secret Key'
18. Insert previously generated redirect URL
19. Go to the tab 'Audience', and in the section 'Test users', add your Gmail email address and click 'Save'.
20*. If you use team drives, check the related box on the cloud card in Odoo.
Make sure you use team drives. In your Google Drive, you should find the item 'Team Drives' in the left sidebar. This feature is available only for business and enterprise tariffs.
If the 'Team Drive' option is enabled, introduce its name. It should be exactly the same as what you see in your Google Drive. Make sure that your user has full rights to all team drives.
If you configure a Team Drive account, make sure that your user has full rights to all Team Drives. Usually, the admin user sets the Google account up.
21. Press 'Confirm' to connect to the cloud.
After that, you will be redirected to the Google login page. Check in, agree to all conditions, and grant the requested permissions.
After you log in, Google redirects you back to Odoo. The Google Drive—Odoo synchronization is ready to be completed.
Once setup is complete, you will be redirected to the module's settings. You will see the interface, which includes two buttons: 'Reconnect/Pause' and 'Reset'. You can use them to stop the sync and return the files and folders to Odoo (see Reconnection, Resetting or changing cloud client: reverse sync).
Reconnection
Reconnection may be required if the client hasn't been used for a while or when migrating the app from previous versions. In such a case:
1. Press the button 'Reconnect/Pause'
2. Press the button 'Confirm'.
Peculiarities
1. To delete a folder or a file from Google Drive, it is necessary to delete it from the bin as well. Otherwise, it will continue being synced in the bin.
2. Sometimes, Google Drive revokes the token. In this case, reconnect the cloud client by clicking the 'Reconnect' button.
If the configured Google App is in the 'testing stage', its refresh tokens will expire exactly 1 week from now. To significantly increase token duration, go to the Google Developer Console> select your Project > OAuth consent screen, and find the 'Publishing status' section. If it is 'Testing', change that to 'In Production'.
OneDrive/SharePoint Implementation
OneDrive is a file hosting and synchronization service operated by Microsoft. It allows users to share and synchronize their files. Users whose computers run Windows 10 see OneDrive when they log in with their Microsoft Account. The available storage can be found in File Explorer. In Microsoft computers, it’s the default option for saving documents or files, which can help save space on your storage drive.
SharePoint is a cloud-based service for businesses that offers a range of applications and security features to support business teams' work. Users can upload a document, which is shared with co-workers immediately. They can also have their own personal storage space (OneDrive) where no one can see a document or file until it is shared with other users. SharePoint also enables you to control access to stored information and automate workflows across business units within the company.
OneDrive/SharePoint Odoo Integration is a tool to integrate OneDrive/SharePoint features into your Odoo business workflow. The app automatically stores Odoo attachments in OneDrive/SharePoint and provides instant access via web links. In this way, users can work comfortably with files in the cloud storage, while the results are fully available in Odoo. Sync works with both personal OneDrives and business SharePoint plans.
Python Dependency
The tool depends on the external libraries 'microsoftgraph'. Install this library for your Odoo server through the command: pip3 install microsoftgraph-python
Make sure that you are installing the package for the correct Python, the same one on which Odoo is run, usually, which assumes running the command under sudo. Contact your system administrator if, after installation, Odoo cannot detect the library.
Configuration and Log in
Before configuring, make sure your Microsoft user account has full admin rights to the OneDrive/SharePoint you want to connect to Odoo. This user is required only to grant permissions; the user data is not stored anywhere in Odoo and is no longer used. Also, make sure the Microsoft email address you use does not have a redirect (this usually happens when you configure your domain name while the primary address is still a Microsoft domain, such as @outlook.com or @office365).
When configuring a OneDrive/SharePoint account, ensure the user has full access. Usually, the admin user sets up the OneDrive/SharePoint account.
After the installation of the module in your database, it is required to finish the setup by doing the following:
1. Go to your Azure Portal: https://portal.azure.com/#blade/Microsoft_AAD_RegisteredApps/ApplicationsListBlade
2. Click 'New registration'
3. Introduce a new name for the application
4. As the supported account types, choose 'Accounts in any organizational directory (Any Azure AD directory - Multitenant) and personal Microsoft accounts (e.g., Skype, Xbox)'
5. Assign the redirect URI as [YOURODOOSITENAME]/one_drive_token (e.g., https://odootools.com/one_drive_token) and click 'Register'
6. Go to the Cloud Storage > Configuration > cloud clients and click 'New'
7. Choose OneDrive or SharePoint from the list of available cloud clients
8. Optionally type the root folder name; otherwise, the default one, 'Odoo', will be used
9. Copy the Application Client ID to the Odoo field 'App Client Id'
10. Go to Certificates & secrets - Click 'New Client Secret'. Copy the secret value to the Odoo field 'App Secret Key'
11. Press 'Confirm' on the Odoo configuration Page.
After that, you will be redirected to the Microsoft login page. Check in, agree to all conditions, and grant the requested permissions.
After the setup is successful, you will be redirected back to the module's settings. You will see the interface, which includes two buttons, 'Reconnect/Pause' and 'Reset'. You can use them to stop the sync and return the files and folders to Odoo (see Reconnection, Resetting, or changing cloud client: reverse sync).
SharePoint configuration
The SharePoint configuration is almost identical to OneDrive's. You also need to specify the SharePoint site and SharePoint library parameters. So, to configure SharePoint:
1. Follow the steps 1-10 of the OneDrive configuration instructions
2. Go to your SharePoint site and prepare a new documents library (drive). You might use one of the existing ones, e.g., 'Documents'. The Odoo folder would be put there afterward, and it would be impossible to move it to another library.
3. In Odoo, while adding the cloud client, in the field 'Cloud client', choose 'SharePoint'
4. The SharePoint URL should be of the type https://[URL]/. The last '/' is required; the site name should not be included. For example, https://odootools.sharepoint.com/
5. SharePoint site should be either root (the very root SharePoint site), my_site_name (in that case it is considered as sites/my_site_name), or sites/my_site_name (instead of 'sites', it might be 'teams' and so on). There should be no '/' at the beginning or at the end. For example, sites/odootools
6. As Documents Library, use one created in SharePoint
7. Then you need to establish the connection with SharePoint. For that, follow the steps 11-12 of the OneDrive configuration instructions.
Reconnection
Reconnection is required when you have not used the sync tool for more than 6 months. In such a case:
1. Press the button 'Reconnect/Pause'
2. Press the button 'Confirm'.
OwnCloud/Nextcloud Implementation
ownCloud is a file server that provides secure storage, collaboration, and sharing tools. Users can access the company's files quickly and easily from anywhere, on any device. ownCloud Community Edition is available for free as open-source software. Since it runs on your own server, the available storage space equals the disk space on your server. There are some subscription plans available.
Nextcloud is also free, open-source software that operates on the ownCloud fork. It can be installed and operated on a private server and is suitable for both companies and individuals. Compared to ownCloud, Nextcloud's toolset is broader and includes conferencing and groupware solutions.
Nextcloud/ownCloud Odoo Integration is a tool to integrate Nextcloud/ownCloud features into your Odoo business workflow. The app automatically stores Odoo attachments in Nextcloud/ownCloud and provides instant access via web links. In this way, users can work comfortably with files in the cloud storage, while the results are fully available in Odoo.
Python Dependency
The tool depends on the external libraries 'ownCloud. Install this library for your Odoo server through the command: pip3 install pyocclient
Make sure that you are installing the package for the correct Python, the same one on which Odoo is run, usually, which assumes running the command under sudo. Contact your system administrator if, after installation, Odoo cannot detect the library.
Configuration and Log in
After the installation of the module in your database, it is required to finish the setup by doing the following:
1. Go to the Cloud Storage > Configuration > Cloud Clients and click 'New'
2. Choose ownCloud or Nextcloud from the list of available cloud clients
3. Optionally type the root folder name; otherwise, the default one, 'Odoo', will be used
4. Enter your ownCloud / Nextcloud full URL
5. Select an ownCloud / Nextcloud user who has full rights to read, create, write, and delete files and folders within a root directory
6. Enter the login and password of this user
If you configure a Nextcloud account, make sure that your user has full rights to it. Usually, the admin user sets the account up.
7. Introduce the title for the ownCloud/Nextcloud folder, e.g., Odoo
8. Optionally tick the box 'Use Public URLs' (see Internal and Public URLs)
9. Click 'Confirm'.
Once setup is complete, you will be redirected back to the module's settings. You will see the interface, which includes two buttons: 'Reconnect/Pause' and 'Reset'. You can use them to stop the sync and return the files and folders to Odoo (see Reconnection, Resetting or changing cloud client: reverse sync).
Make sure that the root directory or its children are shared with your colleagues.
Reconnection
Reconnection might be required in case a refresh token is expired, and when you migrate the app from previous versions. In such a case:
1. Press the button 'Reconnect/Pause'
2. Press the button 'Confirm'.
Peculiarities
By default, all links from Odoo to ownCloud/Nextcloud are internal. This means that only authorized users may access them and generate shared URLs for others.
It is possible to make them public by selecting the 'Use Public URLs' option. In that case, links will become 'shared', meaning everyone can access those files via them. Although the links are hardly known to external users, they may become visible through user actions. Additionally, sharing link generation is not fast and can slow synchronization. Thus, be cautious if you decide to enable the feature and use shared links.
Dropbox Implementation
Dropbox is a cloud storage system that helps you synchronize and access files from any device. It also allows you to control permission levels, share files and folders via a link, or make files public so anyone with the appropriate link can access them. You can also create a Dropbox account for business.
The Dropbox Odoo Integration tool integrates Dropbox features into your Odoo business workflow. The app automatically stores Odoo attachments in Dropbox and provides instant access via web links. In this way, users can work comfortably with files in the cloud storage, while the results are fully available in Odoo.
Synchronization works for any Dropbox tariff, including Personal Dropbox (Basic, Plus, Family) and Business Dropbox (Professional, Standard, Advanced).
Python Dependency
The tool depends on the external library 'dropbox'. Install this library for your Odoo server through the command: pip3 install dropbox
Make sure that you are installing the package for the correct Python, the same one on which Odoo is run, usually, which assumes running the command under sudo. Contact your system administrator if, after installation, Odoo cannot detect the library.
Configuration and Log in
After the installation of the module in your database, it is required to finish the setup by doing the following:
1. Follow the URL https://www.dropbox.com/developers/apps/create
2. Choose an API as 'Soped access'
3. Choose the type of access as 'Full Dropbox'
4. Select any suitable name for the app and push the button 'Create app'
5. Add the redirect URI as YOURODOOSITENAME/dropbox_token (e.g., https://faotools.com/dropbox_token). A valid SSL certificate (https) is required
6. Go to the tab 'Permissions'
7. Grant the app the following permissions: 'Account Info (Read)', 'Files and folders Metadata (Write) (Read)', 'Files Content (Write) (Read)', and 'Collaboration (Write) (Read)'. For the team Dropbox, assign 'Team Data Members' and 'Members (Read)'. Make sure no other permissions are assigned.
8. Click 'Submit'.
9. Go to the Cloud Storage > Configuration > Cloud Clients and click 'New'
10. Choose Dropbox from the list of available cloud clients
11. Optionally type the root folder name; otherwise, the default one, 'Odoo', will be used
12. Copy the App Key, App Secret, and the redirect URI to the related fields in Odoo.
For team Dropboxes only:
- Check the 'Dropmox Team' box and set the Dropbox user's email. Within this user folder, all Odoo-related items will be created and shared with other users. Under this user, all files and folders are created, changed, moved, and deleted
- Choose a suitable name for the root Odoo folder, e.g., 'Odoo' or 'ERP'.
13. Optionally tick the box 'No links to Dropbox from Odoo' (see Dropbox URLs)
14. Press 'Confirm'.
After that, you will be redirected to the Dropbox login page. Check in, agree to all conditions, and grant the requested permissions.
If you did everything right, but a mistake appears as you 'login and confirm' to the account. Add and remove permissions, then log in several times (Steps 7, 8, 12).
Once the setup is complete, you will be redirected back to the module's settings. You will see the interface, which includes two buttons: 'Reconnect/Pause' and 'Reset'. You can use them to stop the sync and return the files and folders to Odoo (see Reconnection, Resetting or changing cloud client: reverse sync).
Reconnection
Reconnection might be required in case a refresh token has expired and when you migrate the app from previous versions. In such a case:
1. Press the button 'Reconnect/Pause'
2. Press the button 'Confirm'.
Peculiarities
DropBox has a specific way to generate links for existing files and folders. In particular, there are no concepts of internal or private URLs. Instead, each Dropbox item might get a so-called shared URL. Such shared links are either public or team-only. Moreover, this feature is available only for Dropbox business accounts.
This tool relies on the mechanics of sharing links. This means that each attachment link is either public (for all personal Dropbox accounts) or team-only (for all business Dropbox accounts).
Sometimes, it is considered unsafe. Although website URLs are hardly known to external users, there is a slight chance they become available through user actions. Additionally, sharing link generation is not so fast and may slow down the IR sync process. That is why the feature to turn off URL sharing is being introduced.
If checked, all Dropbox URLs in Odoo will be of the type: https://www.dropbox.com/home/Odoo/[PATH]. Such links will not work in many cases. For example, you will not be able to use the 'Open in Cloud' button. Also, you will not be able to open formats such as .xlsx using the standard Odoo reviewers. For that, authorization will be required.
Thus, if you need to open Dropbox files/folders from Odoo, do not enable the 'No links to Dropbox from Odoo' feature.
Access Rights
The module introduces two new user groups, which can view and manage the Cloud Storage menu: File Manager Access and Administration.
To access the 'Cloud Storage' menu and the app Files Manager, a user should belong to the security group 'Cloud Storage > File Manager Access'.
To configure automatic folder rules, establish connections with various cloud clients, control sync logs, and apply the app settings, a user should belong to the 'Cloud Storage > Administration' security group.
To assign one of the roles to a user:
1. Go to Settings > Manage Users
2. Choose a particular user
3. Scroll to the section 'Productivity'
4. In the field 'Cloud Storage', choose one of the options.
A user without the assigned cloud storage rights can't open the Files Manager interface, but can see folders with files in the attachments box. This way, they will have access to the object's files, including synced ones, if they have access to the object itself.
The access rights system ensures that users can access only the folders they have permission to view.
Access to a particular folder is determined by its type, its connection to an Odoo object, its parent-child relationships, and its special folder settings.
There are two types of folders: automatic and manual. An automatic folder is a rule-based folder. A manual folder is a folder that was created by a user. See the article Folders in Cloud Storage Solutions.
Access to an automatic folder is defined by access to the related object. For example, we created a folder rule for Odoo customers and sales orders, and configured the rule hierarchy (see Hierarchy of Rules). Based on that, Odoo created the following folder structure:
Customers
-- Azure Interior
---- Orders
-------- S02009 (linked to the sale order S00010, where a Manager is Anita Oliver)
-- Deco Addict
---- Orders
-------- S00005 (linked to the sale order S00020, where a Manager is Doris Cole).
-------- S00001 (linked to the sale order S00030, where a Manager is Abigail Peterson)
As a user with the "Sales/User: All Documents" rights, Anita Oliver can access all created subfolders. Doris Cole has the "Sales/User: Own Documents Only" right assigned, so she can access only sales orders where she is a manager (i.e., folder S00005).
Access to automatic folders that are directly connected to folder rules and don't have the related object is determined based on access to the parent folder. In the example above, such folders are the 'Customers' and 'Orders'. The 'Orders' folder has a parent folder 'Azure Interior', and the second folder 'Orders' has a parent folder 'Deco Addict'. Therefore, a user should have access to the parent folder 'John Brown' to access the related sub-folder 'Orders', and to Elena Green to access its' sub-folder 'Orders'.
If an automatic folder that is directly connected with the folder rules and doesn't have the related object has no parent, then access is defined by the associated model. In the example above, the 'Customers' folder has no parent. Any user who can see Odoo partners can access the 'Customers' folder.
Note that access to all other automatic folders does not depend on access to the parent folders. For example, a user may not have access to the partner folders Azure Interior and Deco Addict, or the model 'Contacts', but they can still work with all relevant orders if they have access to the related objects. For example, even if a user doesn't have access to the folders 'Azure Interior' and 'Deco Addict', they might still access the folders S02009, S00005, and S00001 if they have access to the related sale orders.
However, in this case, such users will see a flat folder structure: the parent folders, which a user cannot access, will be hidden, and the folders the user can access will appear separately in the folder tree. For example:
S02009
S00005
S00001
It is essential to consider this peculiarity when configuring the rule hierarchy to avoid numerous ungrouped folders that are difficult to navigate.
Access to Odoo manual folders is determined by the parent folder's access and the user's settings.
If a manual folder has no parent folder, anyone can access it. For example, we created a standalone folder, 'Documents', that is accessible to everyone unless we restrict access in its settings (see below).
If a manual folder is placed inside an automatic folder, access to the manual folder is determined by the parent automatic folder's access. For example, we created a folder 'Documents' inside the automatic folder 'S00005', so only users with access to 'S00005' can access 'Documents'.
If a manual folder is placed inside an automatic folder, which is directly connected with the folder rule and doesn't have the related object, then the access to the manual folder is based on the access to the parent folder of the automatic folder, if any, or on the associated model, if there is no parent folder. For example, if we place the 'Documents' manual folder inside the 'Orders' folder in the structure above, only users with access to the 'John Brown' folder will be able to access it. If we place the manual folder 'Documents' inside the 'Customers' folder in the structure above, only users with access to the 'Contacts' model will be able to access it.
If we create a manual folder inside a manual folder, which is itself inside another manual folder, and place it inside an Automatic Folder without restricting access to manual folders, then access to each manual folder will be determined by its parent's access. For example, we have the structure:
--Azure Interior
----Documents
------Important
--------Top Priority
In this structure, the 'Azure Interior' folder is an automatic folder, and the 'Documents', 'Important', and 'Top Priority' folders are manual folders. The access to the folder 'Top Priority' will be based on access to the folder 'Important', the access to the folder 'Important' will be based on access to the folder 'Documents', and the access to the folder 'Documents' will be based on the access to the folder 'Azure Interior', which is available to the users with the access to the related object - contact 'Azure Interior'.
This way, administrators can easily manage access to multiple folders within a nested structure without configuring individual permissions for each separate folder. This simplifies the administrative process and ensures consistent access control across the entire hierarchy.
You can also restrict access to each manual folder by defining users or user groups in its settings, preventing anyone else from accessing it. For example, we created a manual folder 'Documents' and granted access to users (Mitchel Admin and Abigail Peterson) and user groups (Sales/Administration and Project/Administration). Anita Oliver has the 'Sales/Administration' role assigned so that she may access the 'Documents' folder.
If you place a manual folder inside another manual folder with limitations in its settings, access to the child manual folder will be determined by both the parent folder's restrictions and own folder's restrictions. For example, we have created a structure ... > Important > Top Priority. Then, we have restricted access to the 'Important' folder by specifying the users (Mitchel Admin and Abigail Peterson) and user groups (Sales/Administration and Project/Administration) who can see it. And, we have restricted access to the child manual folder 'Top Priority' by granting access to users (Mitchel Admin, Anita Oliver) and user groups (Sales/Administration, Inventory/Administrator). Although Anita Oliver and users in the 'Inventory/Administrator' group were specified in the folder 'Top Priority' settings, they still cannot access it, while they don't have access to the parent folder 'Important'. This way, only Mitchel Admin and users with the 'Sales/Administration' user group assigned will be able to access the 'Top Priority' folder.
To manage access to a manually created folder:
1. Click on any manually created folder with the right side of the mouse
2. Choose the option 'Edit Settings'
3. Go to the tab 'Extra security'
4. Specify the users and groups who can see the folder
5. Click 'Save&Close'. Keep in mind that the folder's creator must also be added to the list to access the folder.
The app does not regulate access levels for cloud clients and their items. The tool regulates rights only for Odoo objects and synchronizes those to the required storage. After the sync, if necessary, you should apply the settings for a target cloud client, folders, and files.
Sharing in Portal
Often, there may be a need to share specific files and documents with colleagues, clients, or partners. However, traditional methods of sending multiple attachments via email can be inefficient. This is where portal shares come in. They offer a seamless, organized way to share specific attachments, entire directories, or all files with particular portal users and, if necessary, public users.
With portal shares, users can grant Odoo portal access, send invitations, and generate public access links. Shares can be created temporarily or made available constantly until archived, providing flexibility and control over the sharing process.
You can create an unlimited number of shares with any setup and attachments you need. Users can access these shares via the 'Shares' entry in the Odoo portal.
Portal share users can optionally download any files, an entire share, a specific directory, or a tag as a ZIP archive. It is also possible to allow uploading files to any folder or only the default one. Users can easily search for attachments by title, linked folder, and tag. Share users can optionally download any files, an entire share, a specific directory, or a tag as a ZIP archive. It is also possible to allow uploading files to any folder or only the default one. Users can easily search for attachments by title, linked folder, and tags, and navigate shares by folders and/or tags.
The Portal Shares functionality can be enabled or disabled on the module's configuration page. To turn on the attachment sharing with portal users:
1. Open the Cloud Storage menu
2. Go to Configurations > Settings
3. Tick the option 'Sharing'
4. Scroll down and find the section 'Mass actions'
5. Click 'Add a line' and add the mass action 'Share'
6. Click 'Save'.
After that, a new entry, 'Shares,' will appear in the systray, and the 'Shares' section will appear in the left navigation panel of the single-view interface.
It is possible to create an unlimited number of Portal Shares and share them with an unlimited number of Odoo partners. There are several ways of creating a portal vault:
1. Through the special menu 'Shares'.
2. In the Files Manager Interface, as you click on the button '...add' below the shares in the left functional interface, you select the attachments and apply the mass action 'Share'.
To add a Portal Share through the special menu:
1. In the systray, click 'Shares'
2. Click 'New'
3. Type the share's name
4. Choose portal users who will have access to this vault. Each partner may have access to multiple shares
5. Optionally, tick the box 'Access by Token' to enable access to the share by the link. After that, the field 'Access URL' with the link will appear. You can copy the link and share it with anyone
6. Optionally, define a validity date for a temporary sharing to auto-archive Portal Shares
7. Optionally, in the tab 'Attachments', choose the folders, tags, and/or separate attachments that should be shared. When you select a tag or a folder, all the included attachments are shared
8. Optionally, in the tab 'View and permissions', configure the settings of the share
8.1. To allow users to upload files from the portal share, tick the option 'Allow Uploading' and choose a default target folder in the field 'Uploading Folder'. Portal users can upload files to any available folder in the share. If the target folder isn't selected, the attachments will be uploaded to the default folder. The uploaded files are also accessible via the related folder in the backend files manager interface.
8.2. Tick the option 'Show tags' to allow users who access the portal to share and see the attachments' tags. To allow users to add sub-tags in the portal, enable the 'Allow adding tags' option. To allow users to search the attachments by tags, enable the option 'Allow searching tags'
8.3. Tick the option 'Show folders' to allow users who access the portal share to see the attachments' folders. To allow users to add their own subfolders in the portal, enable the 'Allow adding folders' option. To allow users to search the attachments by folders, enable the option 'Allow searching folders'
8.4. Allow users to observe images in a slideshow by enabling the option 'Slideshow'
8.5. Tick the option 'Show Chat' to allow users to leave comments below the share
9. Optionally add notes in the tab 'Notes'.
You can also create and manage portal shares right from the single-view interface. All internal users accessing the files manager interface can create or update any portal share.
When an internal user opens the file manager interface, the list of portal shares, if any, is shown on the left side of the interface. Use the search bar above the shares list to find the ones you need quickly.
To create a portal, share the list of shares below, click on the '...add' button, and introduce its name.
Right-click a portal share to view the available actions and manage the share. In particular, you will be able to:
1. Download as an archive - allows downloading the attachments of a specific share.
2. Send Invitation - allows giving chosen users access to the share and sends them an email invitation with the link to the share.
3. Copy access URL - allows copying the URL with a token to access the share. It is visible only when token-based access is enabled.
4. Preview Portal - allows the portal version of the share to be seen.
5. Create - allows creating a child portal share. You can create as many child shares as you need
6. Rename - allows changing the name of a particular portal share
7. Edit - allows changing the properties of the portal share, including name, access, view, and permissions, attachments, etc.
8. Archive - allows removing a share from the folder tree. Later, it can be restored.
To add some attachments to a portal share, or create a new portal share right from the files manager interface:
1. Select the attachments
2. Click on the mass action 'Share' on the right side of the interface
3. In the field 'Share', choose either to create a new share or update the existing one
4. If the option 'Create a new share' is chosen, specify its name, select the portal users that should have access to the share, send them an invitation, specify extra tags and folders to share, enable access by token for public users, and specify the time for which the share should be active
5. If the option 'Add to an existing Share' is chosen, choose the Portal Share in which the attachments should be shared, and specify extra tags and folders to share, if necessary
6. Click 'Save'.
Portal users can easily access shares by accessing the dedicated 'Shares' section on the home portal page. Users must have portal rights, which can be obtained by submitting a partner form (Action > 'Grant portal access').
Upon entering the 'Shares' section, users will find a list of shares they can access. Specifically, portal users can view all portal shares where either they or their parent company is designated in the 'Portal access' field.
Clicking a portal share opens the portal share interface, which offers tools and features to enhance sharing and collaboration. These tools enable users to manage and interact with shared attachments efficiently, improving productivity and collaboration within the portal environment.
The layout and functionality of the portal's share interface may vary depending on the specific views and permissions configured for each share. Users can sort, search, and download the attachments regardless of these settings.
It is possible to sort attachments by name and folder, making it easier to find specific files within a share. To do so, choose the option Name or Folder in the field 'Sort by' above the attachments list.
When there are numerous files, a search bar lets users quickly locate the desired attachments by name, tag, or folder. Just choose the search parameter, type the text, and click the search button.
A button located below the attachments makes downloading attachments simple. Users can download individual files or select the 'Download share as archive' button to download all available files at once. If the tags and folder lists are also shown, users can download all attachments within a file or folder by right-clicking it and selecting the 'Download as Archive' action.
If you want your users to have a more organized view, enable the options 'Show Tags' and 'Show Folders' in the portal share's configurations. This way, if at least one folder/tag is specified in the portal share's settings, it will be shown on the left side of the interface in a hierarchical format. Users can conveniently navigate tags and folders and view the attachments they contain.
Additional options such as 'Allow searching tags' and 'Allow searching folders' enhance the user experience by enabling users to search for specific tags or folders within a share easily. To that end, separate search bars are added above the folder and tag trees. Just start typing the word and press 'Enter' or the search button; the matching results will be shown and marked in red. Click the 'Reset' button on the right side of the search bars to clear the search.
Enable the options 'Allow adding tags' and 'Allow adding folders' to allow users to add their sub-tags and sub-folders to the portal share. After that, when they right-click a tag or folder, they will see the 'Create' option. The tags and folders created in the portal share are also visible in the backend file manager interface. At the same time, because the created tags and folders are added as children of the shared ones, you can be sure that customer-created folders won't affect the hierarchy of the main list.
In the portal shares, users can upload files to the share if the 'Allow uploading' option is enabled. Attachments can be uploaded manually to any available folder. That is why, as in the backend, there is always a default folder selected and highlighted in a color. Usually, the default folder is set in the Shares settings under the 'Uploading Folder' field. In other cases, it is the folder with the smallest sequence number among the selected folders (listed higher in the folder list).
The target folder is also specified on the dynamic button 'Upload to ...' above the attachments list to avoid confusion. This way, you can ensure that the attachments will end up in the correct directory. For example, if the currently selected folder is 'Customers,' then you will see the button 'Upload to Customers' above the left functional interface.
Users can upload attachments not only by clicking the dynamic 'Upload to...' button, but also by dragging and dropping files into the central part with the attachments list.
Portal users can also preview all found attachments in a slideshow. To do so, make sure the 'Allow slideshow' option is enabled in the share's settings.
After that, above the attachments list, the button 'Slideshow' appears. When a user clicks it, all attachments for the image types will be displayed one by one. The time each image is displayed is set in the time step field below.
Use the arrow icons to navigate between images manually. Click the pause icon to pause the slideshow, and click the play icon to resume it.
After reaching the last image, the slideshow starts over from the beginning. Click the cross icon in the top-right corner or press Esc to exit slideshow mode.
If the 'Show Chat' option is enabled, below the attachments list, portal and public users will see a message thread where they can leave comments.
These messages are also visible in the backend, in the messages thread of the related portal share card, where internal users can communicate with portal users.
Internal users can be added as followers to the portal share to receive notifications about new messages. The 'Discussions' subscription option should be enabled.
Odoo server configuration
Proper database and server setup is required to provide sufficient resources for sync operations and avoid queue-processing slowdowns. It also minimizes the risk of concurrent updates and API request conflicts.
To do so, apply appropriate timeouts to the Odoo configuration file: LIMIT_TIME_CPU, LIMIT_TIME_REAL & LIMIT_TIME_REAL_CRON. They should be at least 900 seconds to give enough time for sync and prevent the server from cutting it off earlier.
If you use Odoo.sh, then you don't need to configure Server Timeouts, since they are predefined and not configurable.
Also, avoid changing the frequency of the cron jobs assumed by the app: '[Cloud Storage] Prepare Cloud Folders' and '[Cloud Storage] Run / Prepare sync queue'. Those jobs are configured to run every 15 minutes, and that frequency is used in the algorithms to prevent interruptions and data loss. If you need to stop sync for a while, pause particular cloud clients instead.
On the module's configuration page, you will find buttons to trigger folder updates and synchronization. However, push the buttons only to configure the cloud client and for testing purposes. Avoid clicking buttons while the cron is active. Give the system enough time to finish one process before manually triggering the second (e.g., don't click both buttons at once; wait at least 10 minutes, depending on the number of folders).
To avoid errors, don't trigger the sync manually by clicking on the buttons 'Launch folders' update' and 'Launch sync'. These buttons can be used for the first or test syncs only.
Database Backups Sync
To support database protection and long-term storage, you can configure a backup strategy to automatically or manually save the current Odoo database to a connected cloud client. For each strategy, you can define when the backup should occur, where it should be stored, how many versions to retain, and whether to include the filestore and/or the manifest file. The feature is experimental and available in developer mode for advanced configuration and control.
To configure a database backup for a specific cloud client:
1. Turn on the developer mode
2. Open the cloud storage menu, go to Configuration > Cloud Clients, and open the target cloud
3. Enable the feature 'Auto database backups'. After that, the 'Backups' tab will appear
4. Click 'Add a line' and write the reference for the backup strategy
5. In the field 'Backup Folder', select a synced folder where backups should be stored
6. In the field Frequency (days), define how often the backup should occur. Floating-point values are allowed (e.g., 1 = daily, 0.25 = every 6 hours, 7 = weekly)
7. In the field Next backup time (auto), define the exact date and time from which the system should begin tracking the schedule. You may leave the value empty to start from the current moment
8. In the field Backups count, set the maximum number of backups to keep. Older backups will be removed when this number is exceeded. If the value is zero or negative, all backups are kept
9. Enable the option 'Include filestore' if you want to include the filestore (attachments) in the backup archive
10. Enable the option 'Include manifest' if you want to store system metadata (Odoo version, PostgreSQL version, installed modules)
11. Optionally, add some extra backup strategies by clicking 'Add a line'.
Once the strategy is saved, the system automatically calculates the backup schedule. The 'Frequency (days)' field specifies how often the backup should be created. Floating-point values are supported. For example: 1 – once per day; 0.25 – approximately every 6 hours; 0.5 – roughly every 12 hours; 7 – once per week.
The next strategy time is calculated from the previous date and time (or from the current moment if not defined) plus the frequency. If the result is still in the past, the frequency is added repeatedly until a future date and time are reached. This way, the next backup is always scheduled for a consistent moment in the future. For example, if the strategy starts at 04:00 UTC with a frequency of 1, future backups will be planned for around 04:00 UTC each day.
The app checks all defined strategies according to the scheduled job '[Cloud Storage] Create Database Automatic Backups', which runs by default every 15 minutes. The job compares the current time with the strategy's next backup time. A backup is triggered only if the calculated next time has already passed. This makes the next time an approximate indicator - not a strict execution time.
If multiple strategies are defined for the same cloud client, only the strategy with the highest frequency will be used. This avoids running multiple backups unnecessarily. For example, if a daily and a weekly backup are both configured and the weekly one is due, the daily one will be skipped.
Manual backups can be created from the client form at any time. They do not affect the planned schedule unless the manual backup was the last failed attempt — in that case, it resets the failure counter and shifts the next backup time.
If a scheduled backup fails (for example, due to API issues), the app retries the operation with every cron job execution, which occurs every 15 minutes. The system will continue retrying until the maximum number of attempts is reached. After that, the failure counter is reset, and the next planned backup time is moved forward according to the strategy settings.
The resulting dump archive may be extensive, especially when the filestore is included. In such cases, it may not be possible to complete the operation within the allowed execution time. If this happens, the backup attempt will fail, and the retry logic will apply.
Large backups may not finish within the allowed timeout. If so, the operation will fail silently. In this case, consider increasing the server timeouts and cron frequency or excluding the filestore when necessary.
Backups are not designed to be reversed or transferred between cloud clients, as reverse sync for heavy files is usually not possible. Each strategy should be used only with its original target.
Additionally, to reduce the risk of overlapping operations or API refusals, it is recommended that backups for different clients be scheduled at different times.
Each strategy includes a 'Backups count' field that defines how many backup files should be kept to manage storage and avoid keeping too many old backups.
When a new backup is successfully created and synced, the system checks if the number of existing backups for that strategy exceeds the defined limit. If it does, the oldest backup is removed from Odoo first, then deleted from the cloud during a subsequent sync.
If the 'Backups count' value is set to 0 or a negative number, backups are not deleted automatically. In this case, all backups are kept until manually removed from the cloud client interface.
Each backup archive is saved in .zip format and named using the following pattern: 'database_name' + UTC timestamp + strategy reference + '.zip'. This helps identify backups by source and timing.
Extra notes
The module is based on API requests to the third-party service (cloud client). The more the sync scope (number of synced objects & files), the more requests the app has to send. Moreover, each sync requires special checks (e.g., access request to the cloud storage). Each request might take significantly longer than similar requests on the Odoo platform. Such communication between systems is inherently risky due to potential disconnections, API updates, and unsolvable conflicts. The app is designed to handle such risks by carefully handling failures and checking the states of cloud clients. Simultaneously, ensure that you have configured a proper backup strategy for Odoo and cloud clients.
The special risk factor is the sync scope, i.e., the number of files and folders to sync. The larger the sync scope, the longer it will take Odoo to finish integrations. Hence, there is more space for errors. Try to reduce the sync scope by selecting only the required folders.
Another risk factor to consider is reverse operations. Reverse operations might be risky because they assume reflecting cloud clients' features, which may be absent in Odoo. For example, Google Sheets cannot be opened outside Google Docs. The app would try to address these scenarios by applying similar features (e.g., converting a file into simple electronic tables). However, that is not always possible so that manual interactions would be required. Also, some tasks in complex scenarios may fail at specific reversed sync iterations when folders are checked in first-in-first-out order, and a child folder might not yet know that some of its parents have changed state. Such tasks will be retried up to 8 times in subsequent iterations, and once the item parents are ready, their tasks will be completed (see Synchronization Principles).
The app assumes automatic regular synchronization with various cloud clients. Please take into account that synchronization is not real-time but is based on task queues and scheduled jobs (see Odoo server configuration). Depending on the number of folders and attachments, the app might take some time to check all directories and complete the tasks. That's why, until the sync is done, Odoo attachment interfaces work as in standard Odoo.
The module provides FIFO (first-in, first-out) logic for the sync. That means the files are uploaded based on the queue: the oldest changes are reflected first. Therefore, not a single file is lost, and system resources are used efficiently. Even if you have a lot of files, they will be synced for a particular time (see Odoo server configuration). For example, you have 10,000 sales orders to sync and only 15 minutes left before the system times out. After 15 minutes, 3000 files have been synced. Then, during the next sync, 3000 more synced. Therefore, several synchronizations will be required to sync all the files.
However, a large number of files to sync may lead to long waits and, in some cases, errors. So, it would be better to limit synchronization using filters by field and period. For example, you can sync only August sale orders or sync only sale orders with a total over 50000$. The folder rules configuration lets you restrict syncing of obsolete items (e.g., there is no sense to sync archived partners or orders from 2 years ago) (see Filters & Periods).