About Periodic Reporting and Reminders
Periodic Reporting and Reminders is a tool for configuring automatic reports for any Odoo document type in the form of lists. Each record will satisfy the criteria you have chosen, suit pre-defined time frames, and contain only the data you would like to share.
Configure the tool to send periodic reports and reminders for all Odoo documents, including custom ones, such as sales orders, opportunities, warehouse transfers, requests for quotations, tasks, MRP operations, etc.
Choose data columns to include. Attach the report as an electronic table (xlsx),/as a PDF file,/or as a table in the email body. Apply aggregation (average, sum) for numeric columns. Introduce email greetings. Show or hide links.
Include in the report only those objects that suit your period requirements. It is possible to filter by any date and datetime fields of a target Odoo model.
Apply any filters using storable fields to include only documents of interest. Filter by a chosen partner or responsible user. Sort table lines by any searchable model field. Group lines by a specific model attribute.
Send lists with any periodicity: every day, on the last Friday of each month, on a definite date of the year, and so on. Make reports reflect company calendars.
Any partner might be one of the reminder recipients: internal or portal users, customers, or suppliers.
Reports by any Odoo object
Flexible recurrence
Filter, sort, and group records
For external and internal use
Managing Lists Reminders
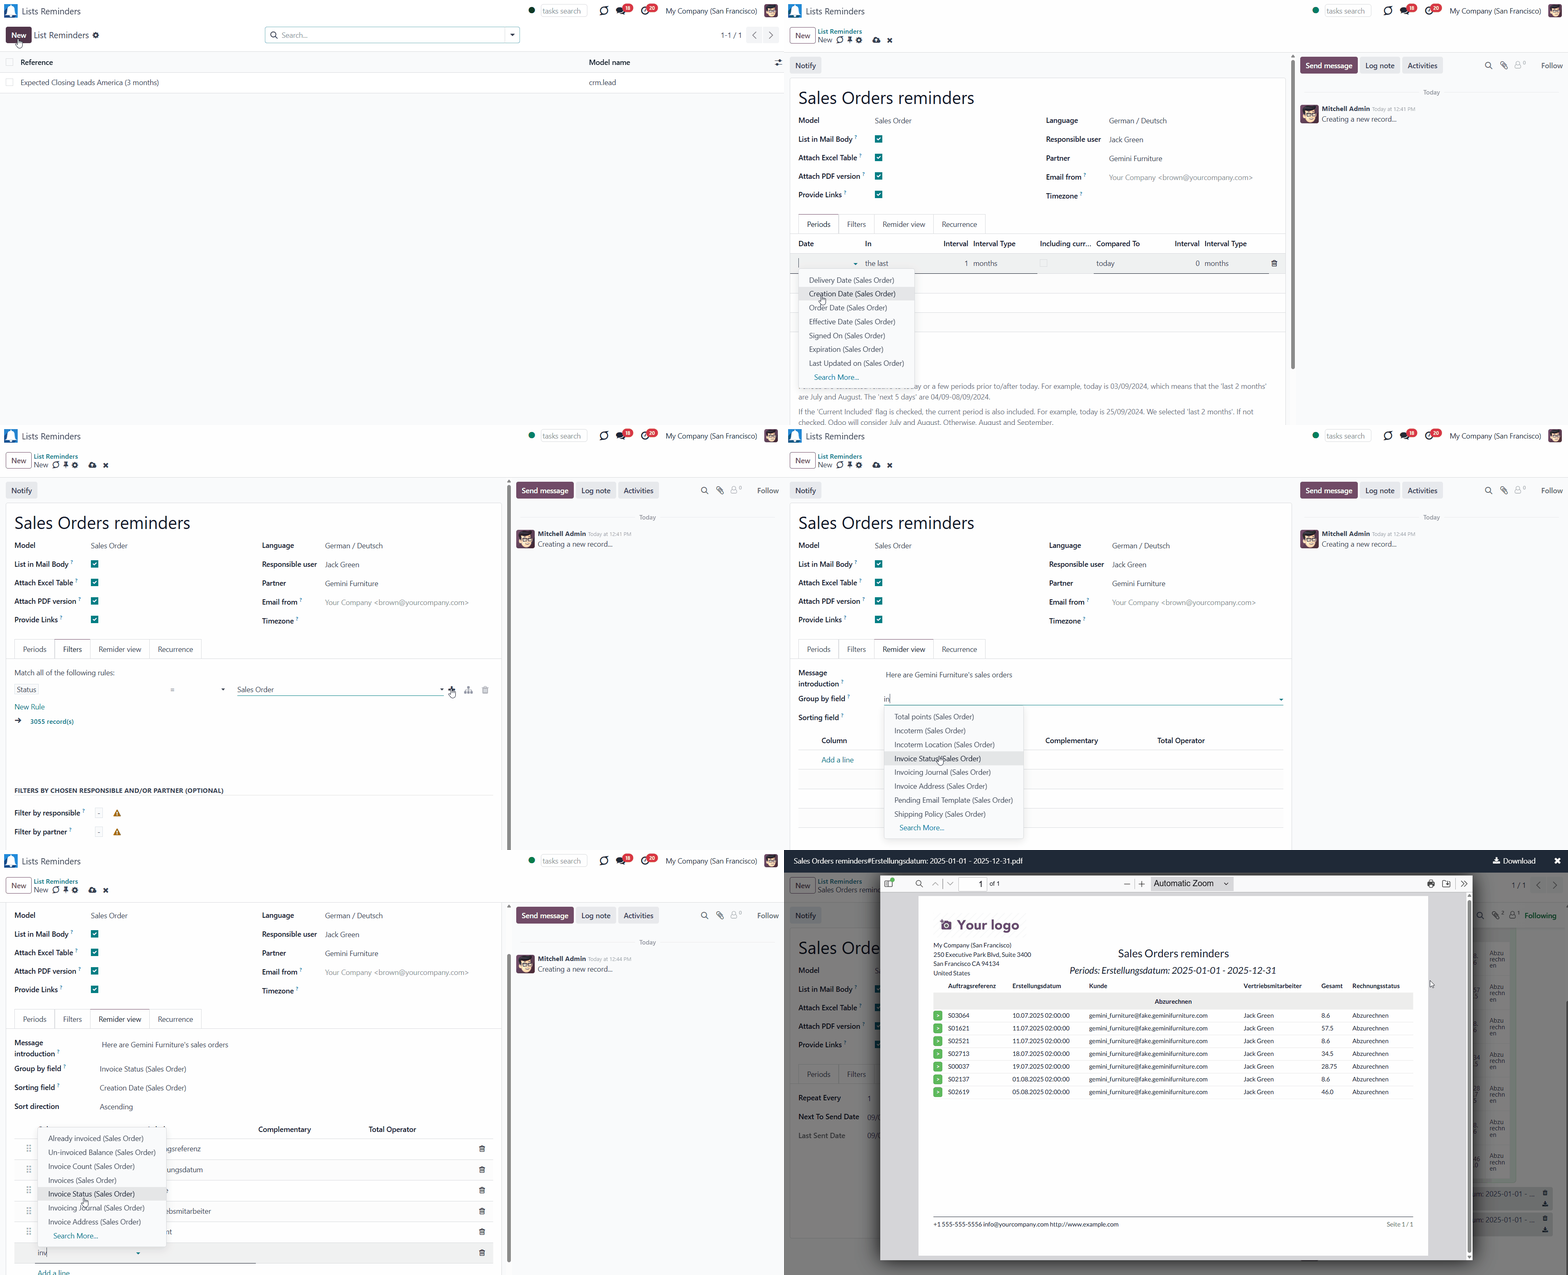
The app generates a table of records related to a specific model and filters them according to your rules (including dates). It is up to you what records to include in the report, with what periodicity to send it, and whom to send it to. This way, you can configure various list reminders that will be sent regularly to different partners, including internal or portal users, customers, and suppliers.
To create a list reminder:
1. Go to Lists Reminders
2. Click 'Create'
3. Introduce the reminder's title
4. Choose the related model
5. Choose the format in which the reminder will be presented. For that, tick one or several options: 'List in Mail Body', 'Attach Excel Table', 'Attach PDF version' (see Report Format)
6. Optionally, tick the option 'Provide links' to have the reference for the source Odoo record (see Report Recipients)
7. Choose the language in which the report will be generated (should be installed in the instance) (see Report Appearance)
8. Choose the responsible person (see Filtering Records for the Report)
9. Choose a partner to easily distinguish different list reminders (see Filtering Records for the Report)
10. In the field 'Email from', choose the author of the email. Otherwise, the user (usually the Odoo bot) who sends the reminder would be its author. Please note that the setting does not affect the reply-to address. Here, the app will use the standard Odoo catchall address, as is done for any other threads
11. In the tab 'Periods', choose the dates, so that only records related to this period would be added to the reminder (see Filtering Records for the Report)
12. Optionally, add some filters and/or filter by chosen responsible/partner (see Filtering Records for the Report)
13. Optionally, in the tab 'Reminder view', write the introduction to the reminder. It will be included at the beginning of the email (see Report Appearance)
14. Optionally, choose the grouping field to group the table lines. The grouping criterion will be shown as a title line above the related table lines (see Report Appearance)
15. Optionally, choose the sorting field to order the found records. Otherwise, standard sorting will be applied (see Report Appearance)
16. Choose the columns that will be presented in the report one by one by clicking on the button 'Add a line' and specifying their labels (see Report Appearance)
17. In the tab 'Recurrence', specify the frequency of sending the report (see Periodicity of Reports).
As a result, you would receive an email with a table of all found records and/or an Excel/PDF file attached to the email.
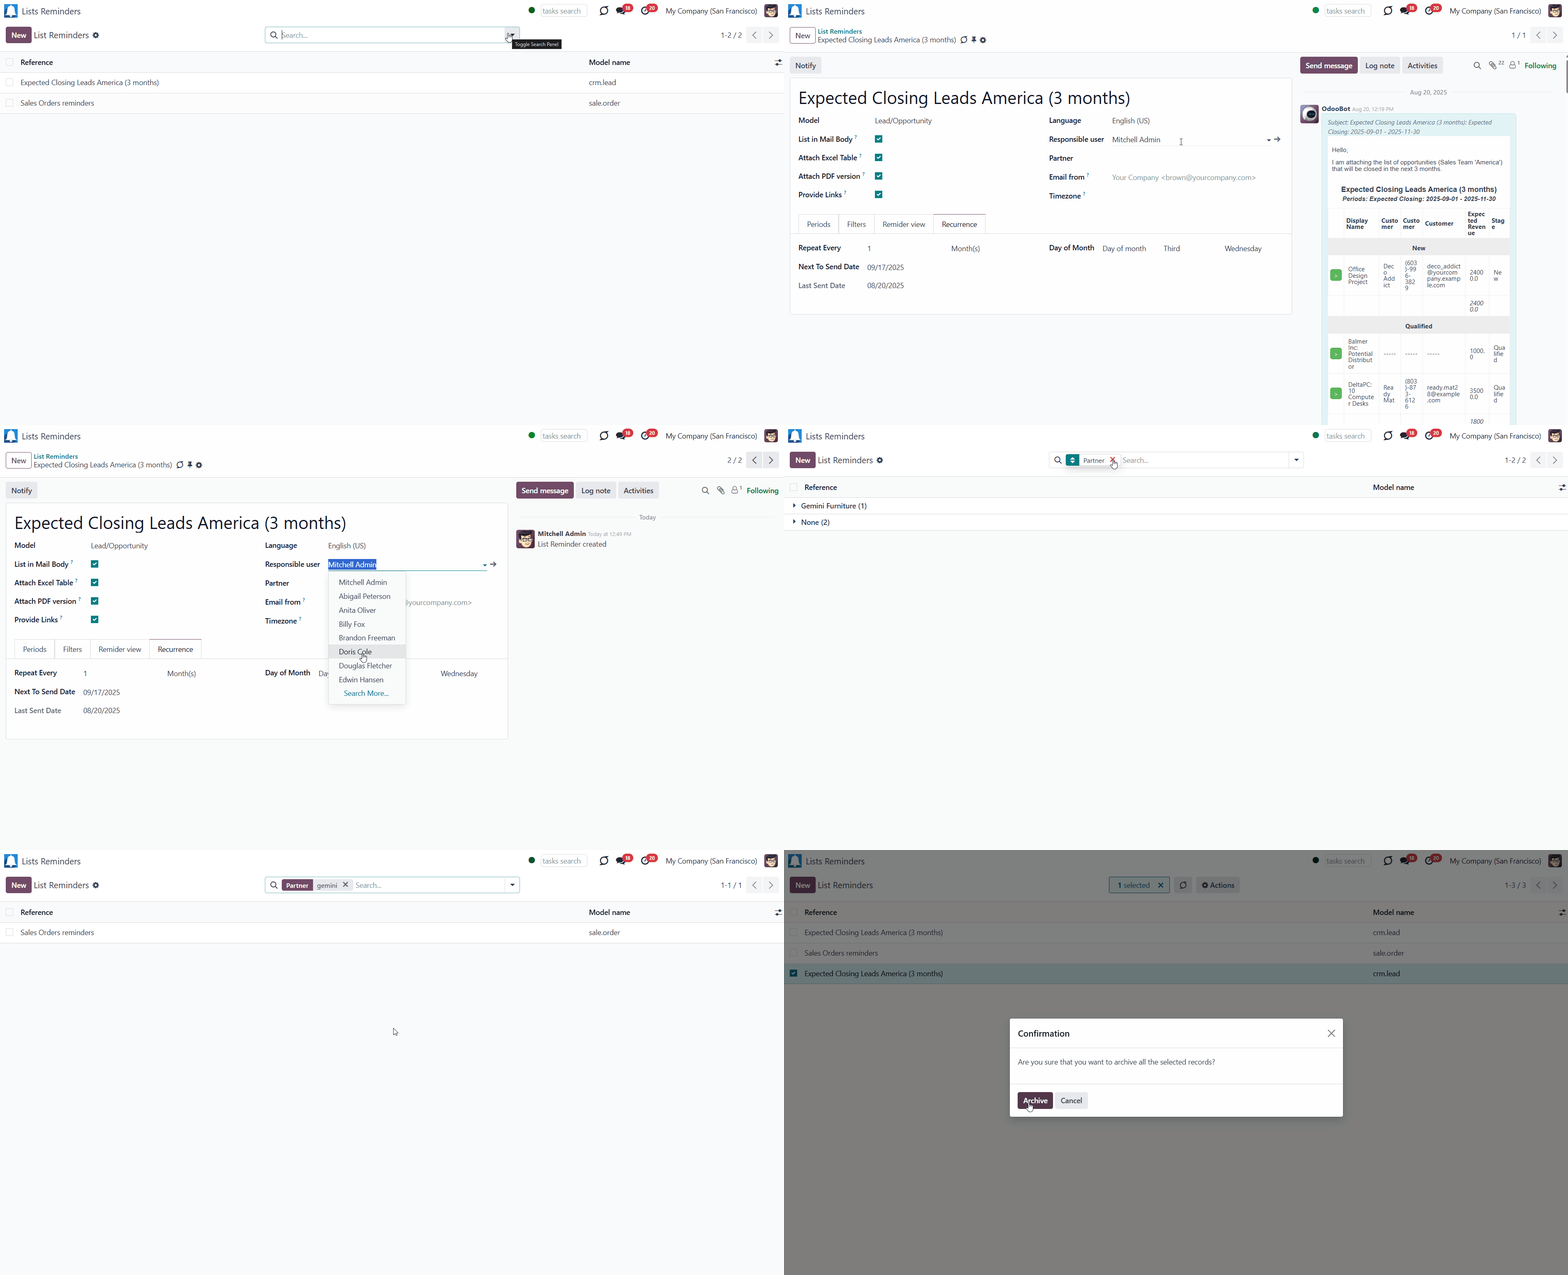
The module provides a convenient menu 'Lists Reminders', where you can create and manage related reminders. You can distinguish the created reminders by their reference and the related model.
Navigate around list reminders conveniently with the help of the search bar, filters, and grouping options. You can search for reminders by their reference and related partner. Filter the records that fall under your responsibility and group them by model, responsible party, or partner.
Duplicate reminders, to quickly create similar ones, with just a few changes. For that, open any reminder, click on the actions button, and then 'Duplicate'.
You can archive one or several reminders that you no longer need. For that, open any reminder, click on the actions button, and then 'Archive'. Or, in the list's reminders menu, select several ones by ticking the box next to them, click on the actions button, and then 'Archive'.
Filtering Records for the Report
As we select a specific model, all its records are considered to be included in the list reminder. If there are a large number of records, it may not be a good idea to display them all in the report. For example, if you prepare a list reminder for the model 'Sale Order', sending the list of sale orders for the entire period is hardly convenient. The module allows filtering records, so only the relevant, up-to-date records will be added to the list reminder. For this, filters were introduced by relative periods, document details, and the responsible/partner.
Filtering by relative periods allows you to limit the records by date, so only the ones for the specified time are added to the list reminder. For example, instead of adding sale orders for the whole time, you can configure the report to show you only the sale orders for the last month. This way, you will not have to look through the whole list of sales orders to find the ones you need.
Filtering by document details allows you to add only the records that match your conditions to the list reminder. For example, you can configure the report to show only the sales orders in the statuses' Sent Quotation' and 'Sale Order'.
Filtering by responsible/partner allows you to show only the records related to a specific responsible user or customer/vendor. For example, you can configure the report to show only the sales orders of the customer Gemini Furniture, where the salesperson is Jack Green.
Filters by periods, relative fields, and responsible/partner can be combined. This way, if you prepare a list reminder for the model 'Sale Order', you can include only the sale orders for the last month, that are in the status' Sent Quotation', for the customer Gemini Furniture, where the salesperson is Jack Green.
Suppose you create a similar list of reminders with slightly different filters. In that case, it will be helpful to duplicate an existing reminder and modify the filters to ensure they are distinct.
Filters by Relative Periods
Filters by period are added in the 'Periods' tab as you create or edit a list reminder. It is possible to restrict report time frames by any kept date or datetime fields of a target document type, such as deadline, create or close date, or next activity day, as intervals can be selected in days, weeks, months, or years.
You can apply a few periods based on different dates, for example, selecting this month's closed leads that were opened in the last year. Records should satisfy each criterion, but if you selected the same date twice, records should be within any of those periods. For example, a deadline should be within the last two months OR the next month, AND a close date should be within the previous year.
Intervals may define previous time frames ('the last') and forthcoming periods ('the next'). Periods are relative, allowing them to be set in relation to today or a specific period in the past/future. For example, 'this month', 'the last year compared to the past 5 months', or 'the next 5 weeks compared to the next month'.
Exclude or include a current period. For example, you might send a reminder on the first day of a month for a previous one. Vice versa, forward a list on the last day of this month for a current one.
To add a filter by period:
1. Click 'Add a line'
2. Choose the date field, which the module will consider
3. In the column 'In', choose if the date should be in the future or in the past
4. In the column 'Interval Type', choose the type of period that should be considered
5. In the column 'Interval', set the number of 'Interval types' that should be considered
6. Tick the box 'Including current', consider the records of the current 'Interval type' for the report (For example, today is 25/09/2025. If 'last 2 months' is selected and the box is not checked, Odoo would consider July and August. If checked, August and September.)
7. In the field 'Compared to', choose the option 'Today' if the set period should be calculated relative to today. Choose the option 'Past'/'Future' and set the period type and length in the fields' Interval type' and 'Interval' to calculate the period relative to a particular moment in the past/future.
8. You can check the set periods below in the section 'If the reminder is sent today, the periods will be'
9. Optionally add some more periods.
For example, you can create a filter by relative period to show only sales orders with creation dates within the last 3 months, including the current one, compared to the past 2 weeks. This way, if today were 07/11/2025, the sale orders created from 01/08/2025 to 31/10/2025 would be considered for the report.
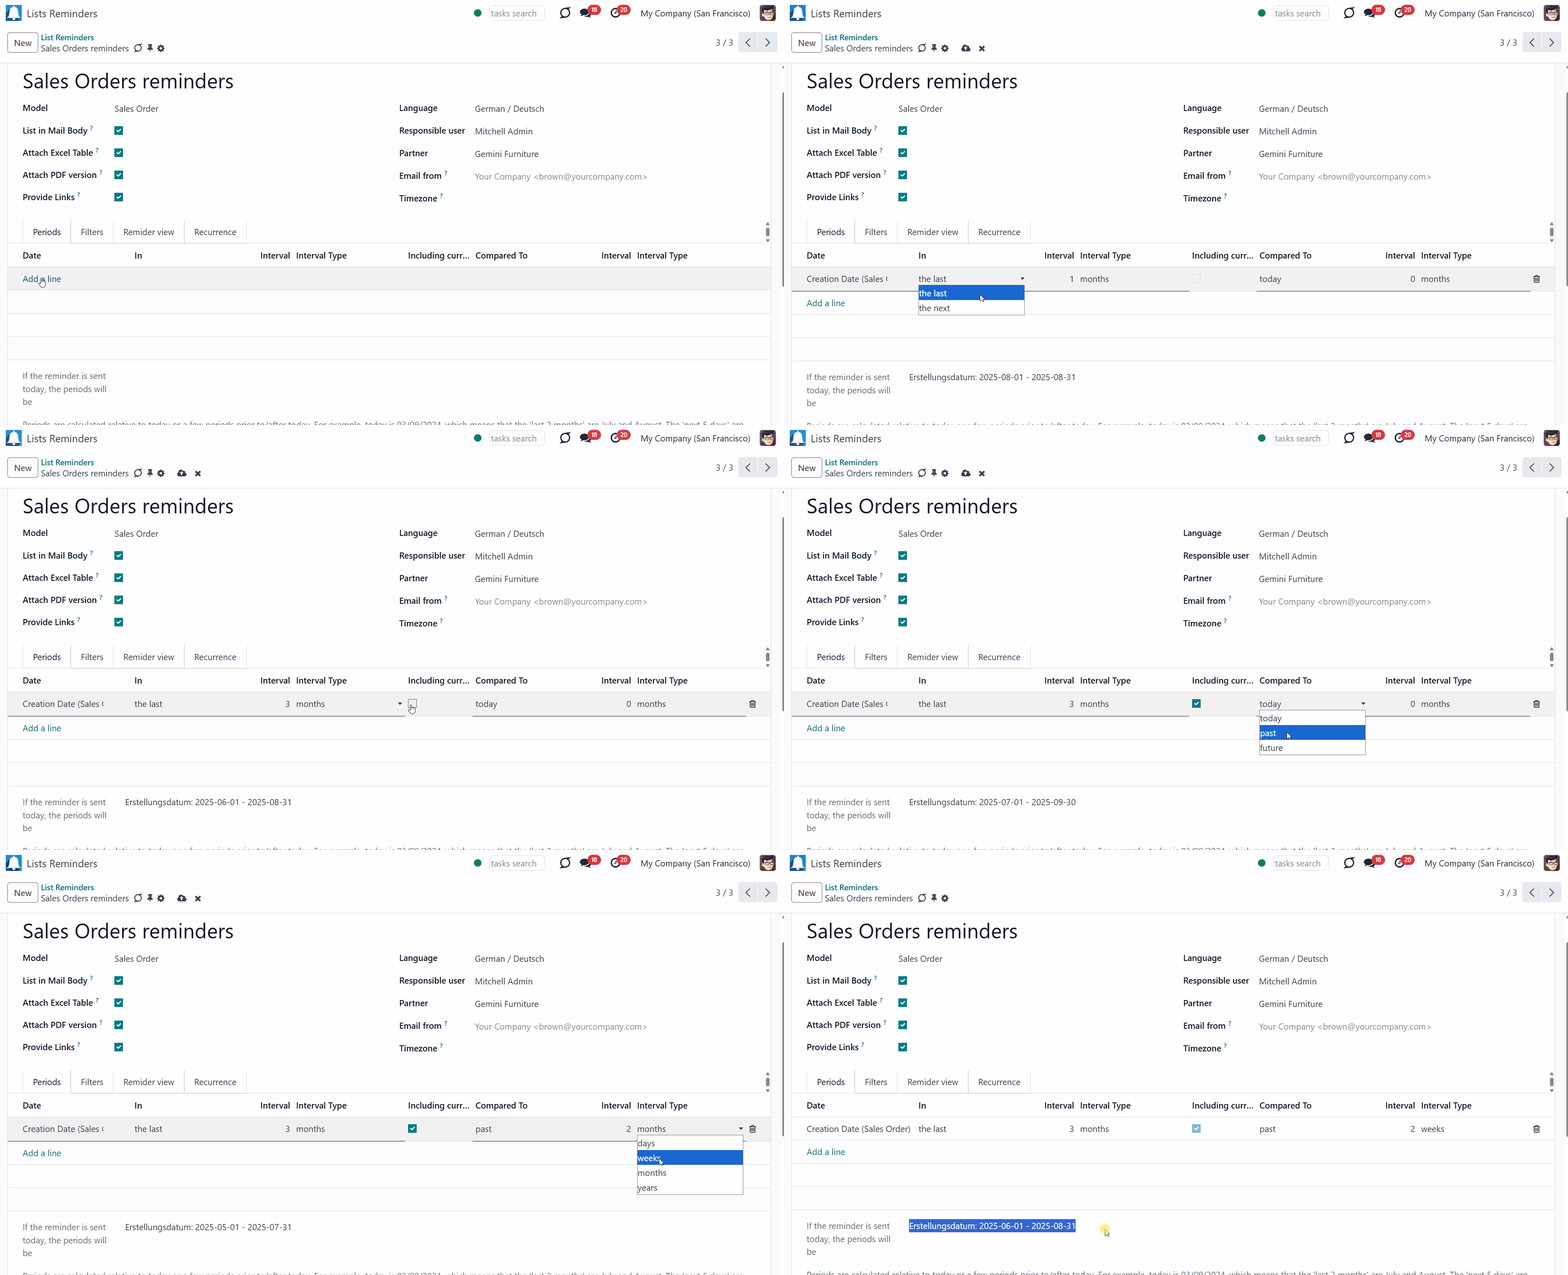
Periods can be calculated relative to today (Current day), relative to a past period (Current day – Compared period), and relative to a future period (Current day + Compared Period).
To calculate periods relative to today, when setting a period for the report, choose the 'Today' option. For example, today is 03/09/2025, which means that the 'last 2 months' are July and August. The 'next 5 days' are 04/09-08/09/2025. If the 'Including current' flag is checked, the current period is also included. For example, today is 03/09/2025, which means that the 'last 2 months', including the current, are August and September. The 'next 5 days', including the current, are 03/09 – 07/09/2025.
To calculate periods relative to the past, set a period for the report and choose the 'Past' option. This way, we compare the set period not with the current day, but with the Current day minus the compared period. It may be beneficial when you want to receive reports about older records. For example, you can set the period 'Created on in the last 5 years compared to the past 2 years'. For instance, if it is now September 2025 and the 'current' option is selected, then records created during the following period will be considered for inclusion in the report: January 1, 2018 – December 31, 2023. If it isn't ticked, then 01/01/2017 – 32/12/2022. This way, when the year 2026 starts, the considered period will be changed to 01/01/2019 – 32/12/2023 or 01/01/2018 – 32/12/2022, respectively.
When the 'Future' option is selected, we compare the specified period to a future date. This way, we compare the set period not with the current day, but with the Current day plus the Compared period. For example, you can set the period 'Expected Closing in the next 3 weeks compared to the future 2 weeks' to the report for the model 'Leads/Opportunities. Then, the option including the current date is ticked, and today is September 15, 2025. In that case, the records with the expected closing in the following period will be considered for the report from September 18, 2025, to October 8, 2025. If it isn't ticked, then it applies to the period from September 25, 2025, to October 15, 2025.
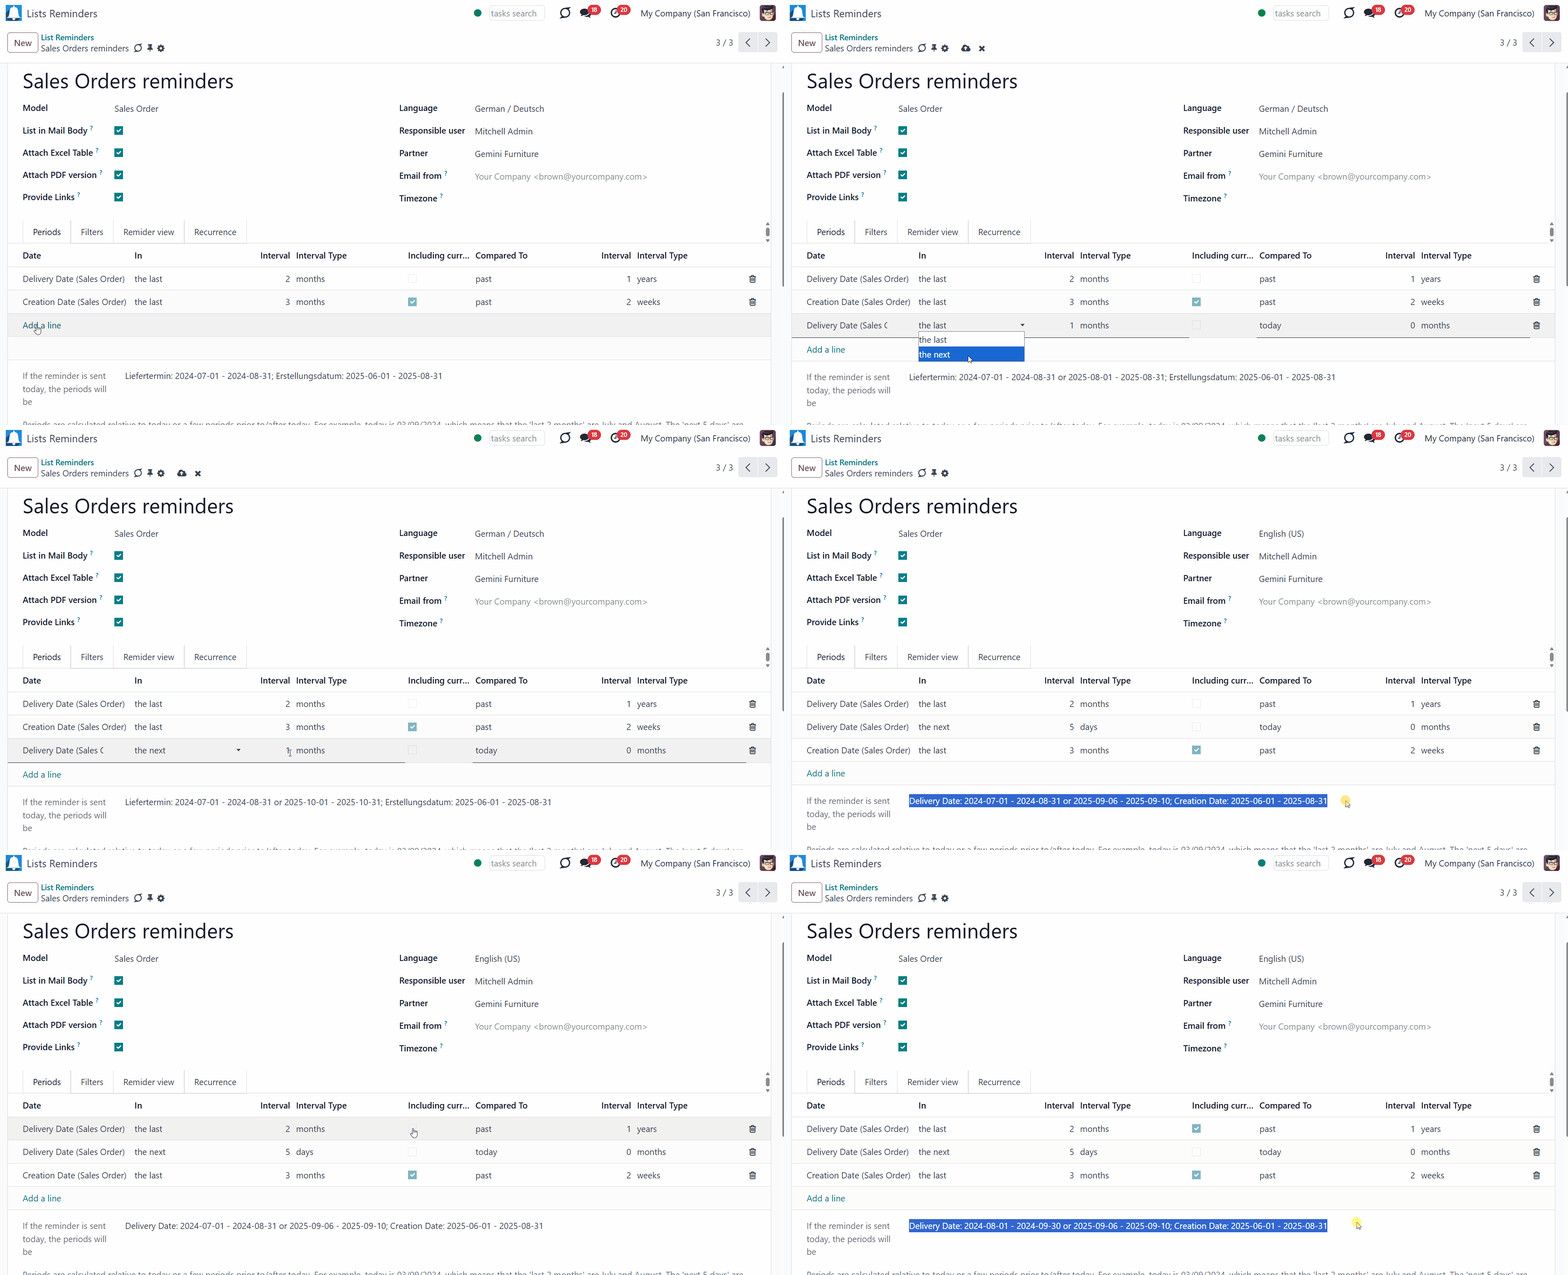
Optionally, you can add another filter by relative period. If you added a few lines that relate to different fields, then the period restrictions are accumulated. It means that ALL period conditions should be satisfied. For example, if the delivery date should be within the last 2 months AND the creation date should be within the previous year.
However, if you added the same date twice, the condition should satisfy ANY of those criteria. For example, if the delivery date should be within the last 2 months OR the next month, AND the creation date should be within the previous year.
Keep in mind that periods are calculated relative to today or a specific period in the past/future. To determine the exact period for which the records will be included in the list reminder, it is also essential to consider the moment when this reminder is sent (see Periodicity of Records). For example, we have created a list reminder for sales orders. Then, we added two filters by relative periods: Delivery Date within the last 2 months compared to the past year, and Delivery Date within the next 5 days compared to today. The reminder is set on the first Monday of each month. Today is 07/11/2025, meaning the 'last 2 months compared to the past year' are September and October 2025. The 'next 5 days' are 08/11-12/11/2025.
Note that if a related date is not specified for a document, it is considered to be always outside the specified periods.
If the 'Including Current' option is checked, the current period is also included. For example, today is 07/11/2025, and we selected the period of 'last 2 months compared to the past year'. If the 'Including current' option is not ticked, then Odoo will consider September and October. If ticked, October and November.
To delete a filter by a relative period that you no longer need, tick the bin on the right side of the line with the period.
In the tab 'Periods', you will find the dynamic field 'If the reminder is sent today, the periods would be'. It shows the resulting period according to your period filters in real-time. This way, you can make sure that you have set the correct period for the reminder.
Filters by Storable Fields
Another way to filter records is by storable fields. With their help, you can use any document-storable field to distinguish the records that should be added. For example, adding all opportunities/leads to the report is not convenient. Instead, you can configure the report to show you only the opportunities/leads on a particular stage, i.e., 'Won'.
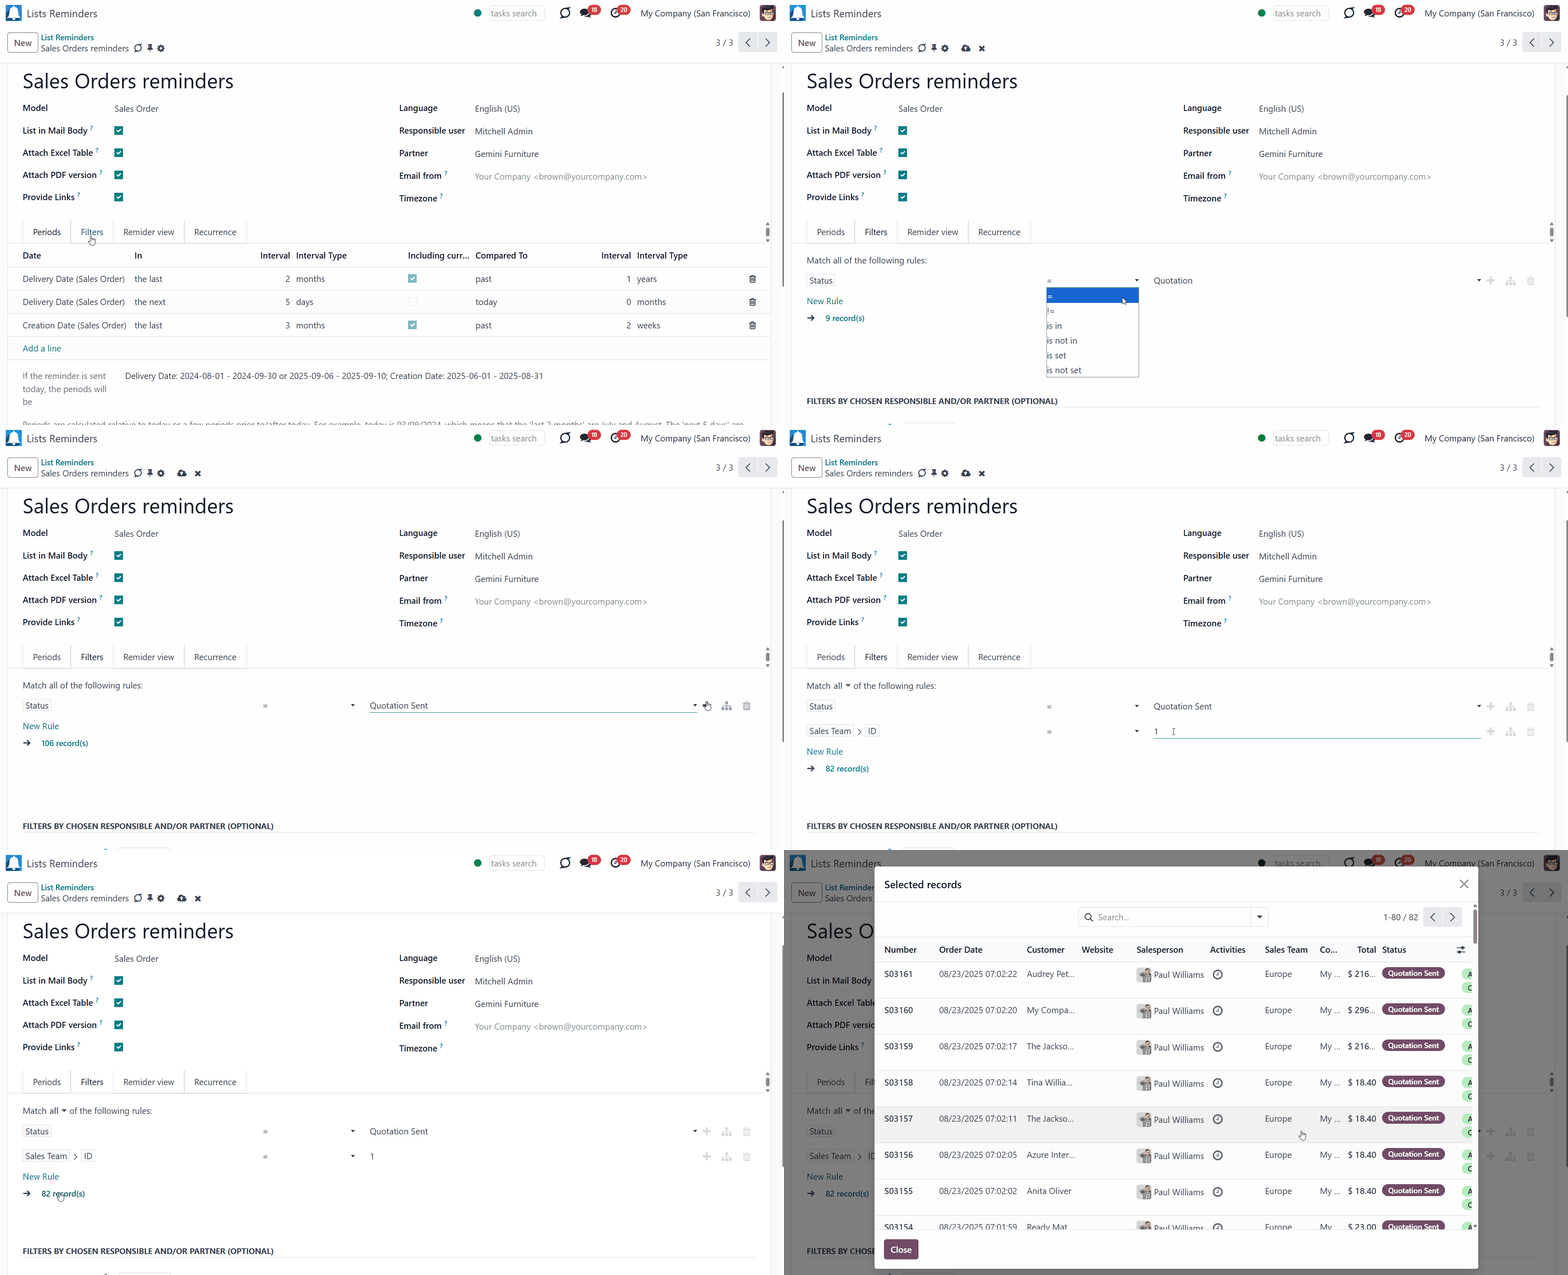
Filters by stored fields are added in the tab 'Filters' as you create or edit a list reminder. Filters are organized as a domain constructor: you may use most storable fields with any level of precision. For example, you can filter projects by a related partner country or even by the state of a company of a related partner.
To add a filter:
1. Click '+Add Filter'
2. Choose filter options by scrolling or typing the beginning of the search field and choosing the filter options
3. Optionally, Click on '+' on the right side of the rule you wrote to add one more line for another filter option
4. Now, as you have more than one rule, you can choose ANY or ALL button above, so only records that match ANY of the rules or ALL rules will be added to the reminder
5. Click on the '...' button, on the right side near '+', to add an even more complex rule
6. Here, you can also choose to filter documents that match ALL or ANY rules
7. If you choose ALL or ANY both times, your rules will stand in one line, and only one button will remain.
For example, let's add a complex rule for the model' Sale Orders' to show only sent quotations of our sales team 'Europe'. For that, we need to add two domains: Status = Sent Quotation, and Sales Team = 1 (where 1 is the ID of the related sales team).
You can check yourself by pressing the 'Records' button. In the pop-up window, you will see a list of records that satisfy your criteria (and for which you have access).
If you feel confident in preparing Reverse Polish Notation domains, enable developer mode and apply more complex expressions, such as 'category is child_of all'.
Please be careful when applying filters: ensure you are not forwarding confidential data to the wrong partners. Be especially cautious when receiving reminders for external contacts: ensure you filter documents by a related customer/vendor.
Filters by Responsible/Partner
The app lets you quickly limit analysis for document owners. For this, special filters were introduced by a chosen partner or a responsible user. This way, you can filter documents by the related customer/vendor or the responsible person.
To show only the records related to a particular customer/vendor in the report:
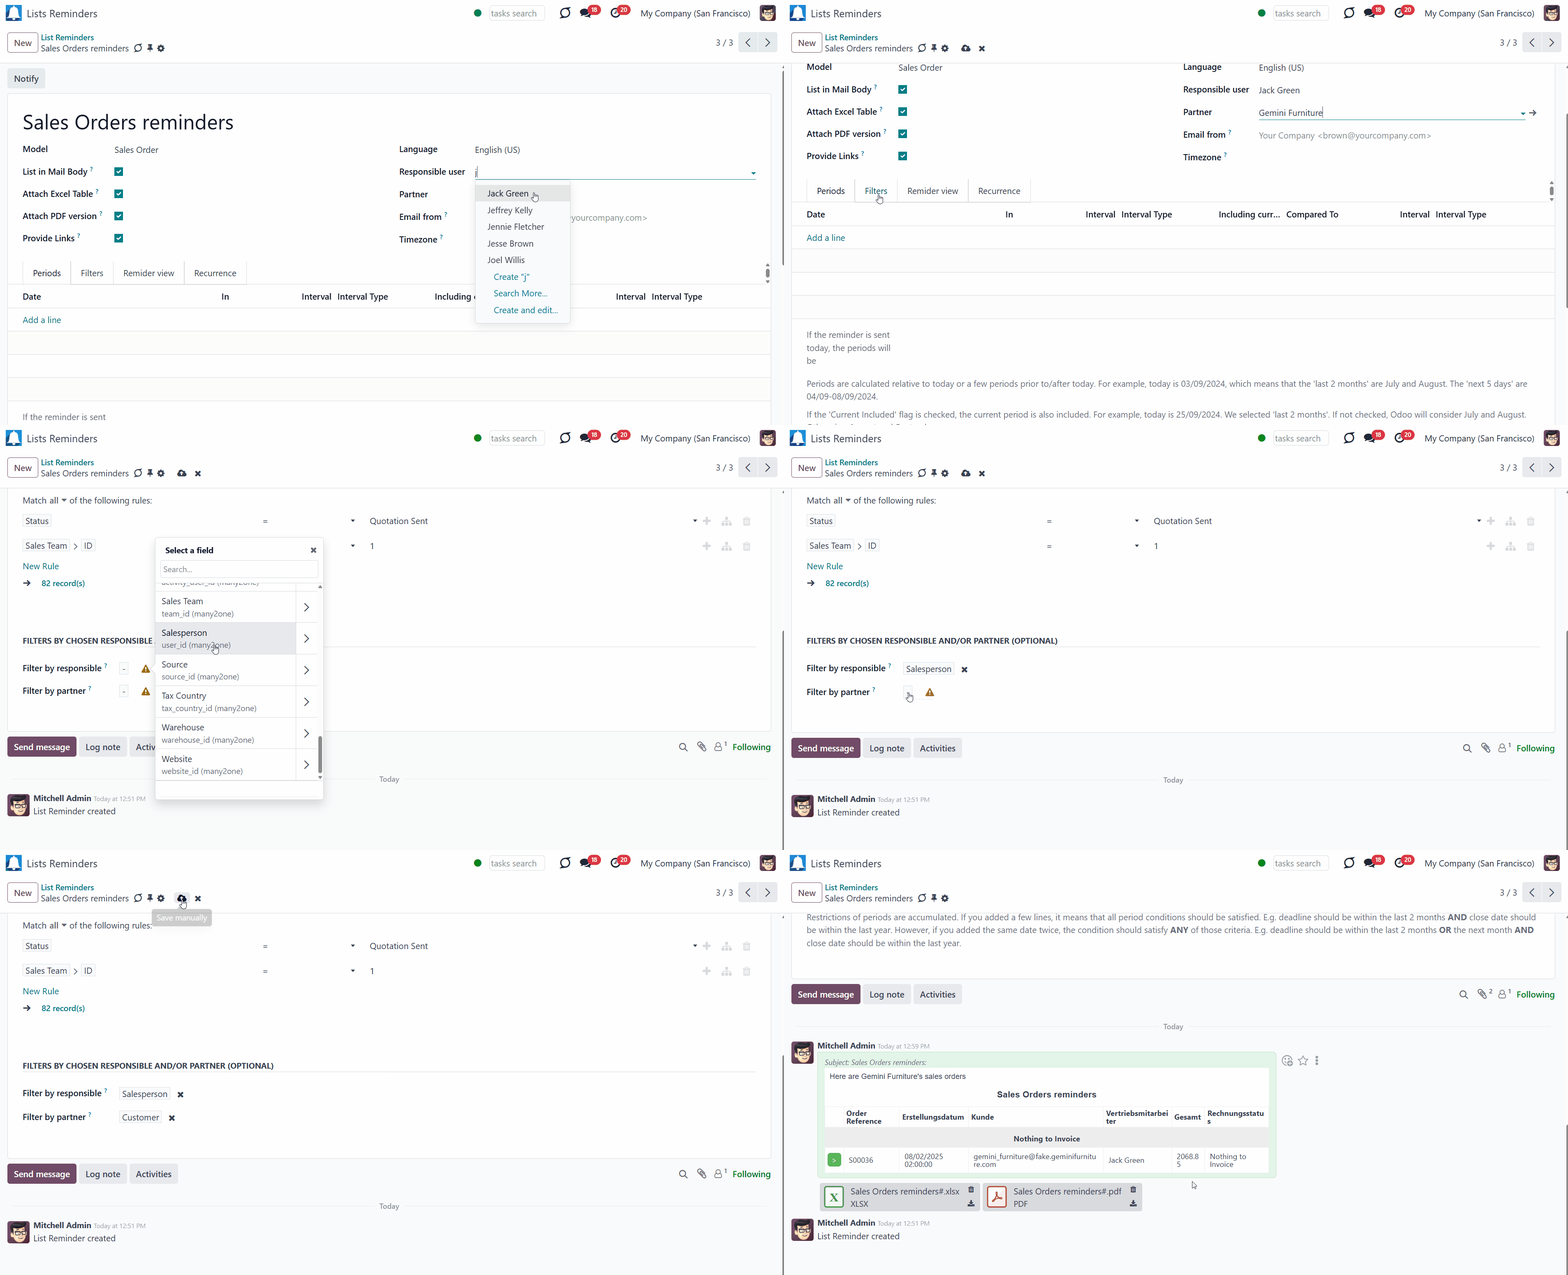
1. As you create or edit a list reminder, choose a particular customer/vendor in the field 'Partner'
2. In the tab 'Filters', find the section 'Filters by chosen responsible and/or partner (OPTIONAL)'
3. In the field 'Filter by partner', choose the field from which the information will be analyzed.
For example, let's show only the sale orders, where the customer is Gemini Furniture. For that, in the 'Partner' field, we select Gemini Furniture, and in the 'Filter by partner' field in the 'Filters' tab, we select the 'Customer' field.
To show only the records related to a particular responsible person in the report:
1. As you create or edit a list reminder, choose a responsible person in the field 'Responsible'
2. In the tab 'Filters', find the section 'Filters by chosen responsible and/or partner (OPTIONAL)'
3. In the field 'Filter by responsible', choose the field from which the information will be analyzed.
For example, let's add to the report only the sales orders where the responsible user is Jack Green. For that, in the 'Responsible' field, we select Jack Green, and in the 'Filter by responsible' field in the 'Filters' tab, we select the 'Salesperson' field.
Periodicity of Reports
Set up the periodicity of the report sending flexibly. The module allows for configuring the frequency of sending reports to fully reflect business calendars: by day, by week, by month, or by year. It is even possible to select a specific day of the week to receive the report.
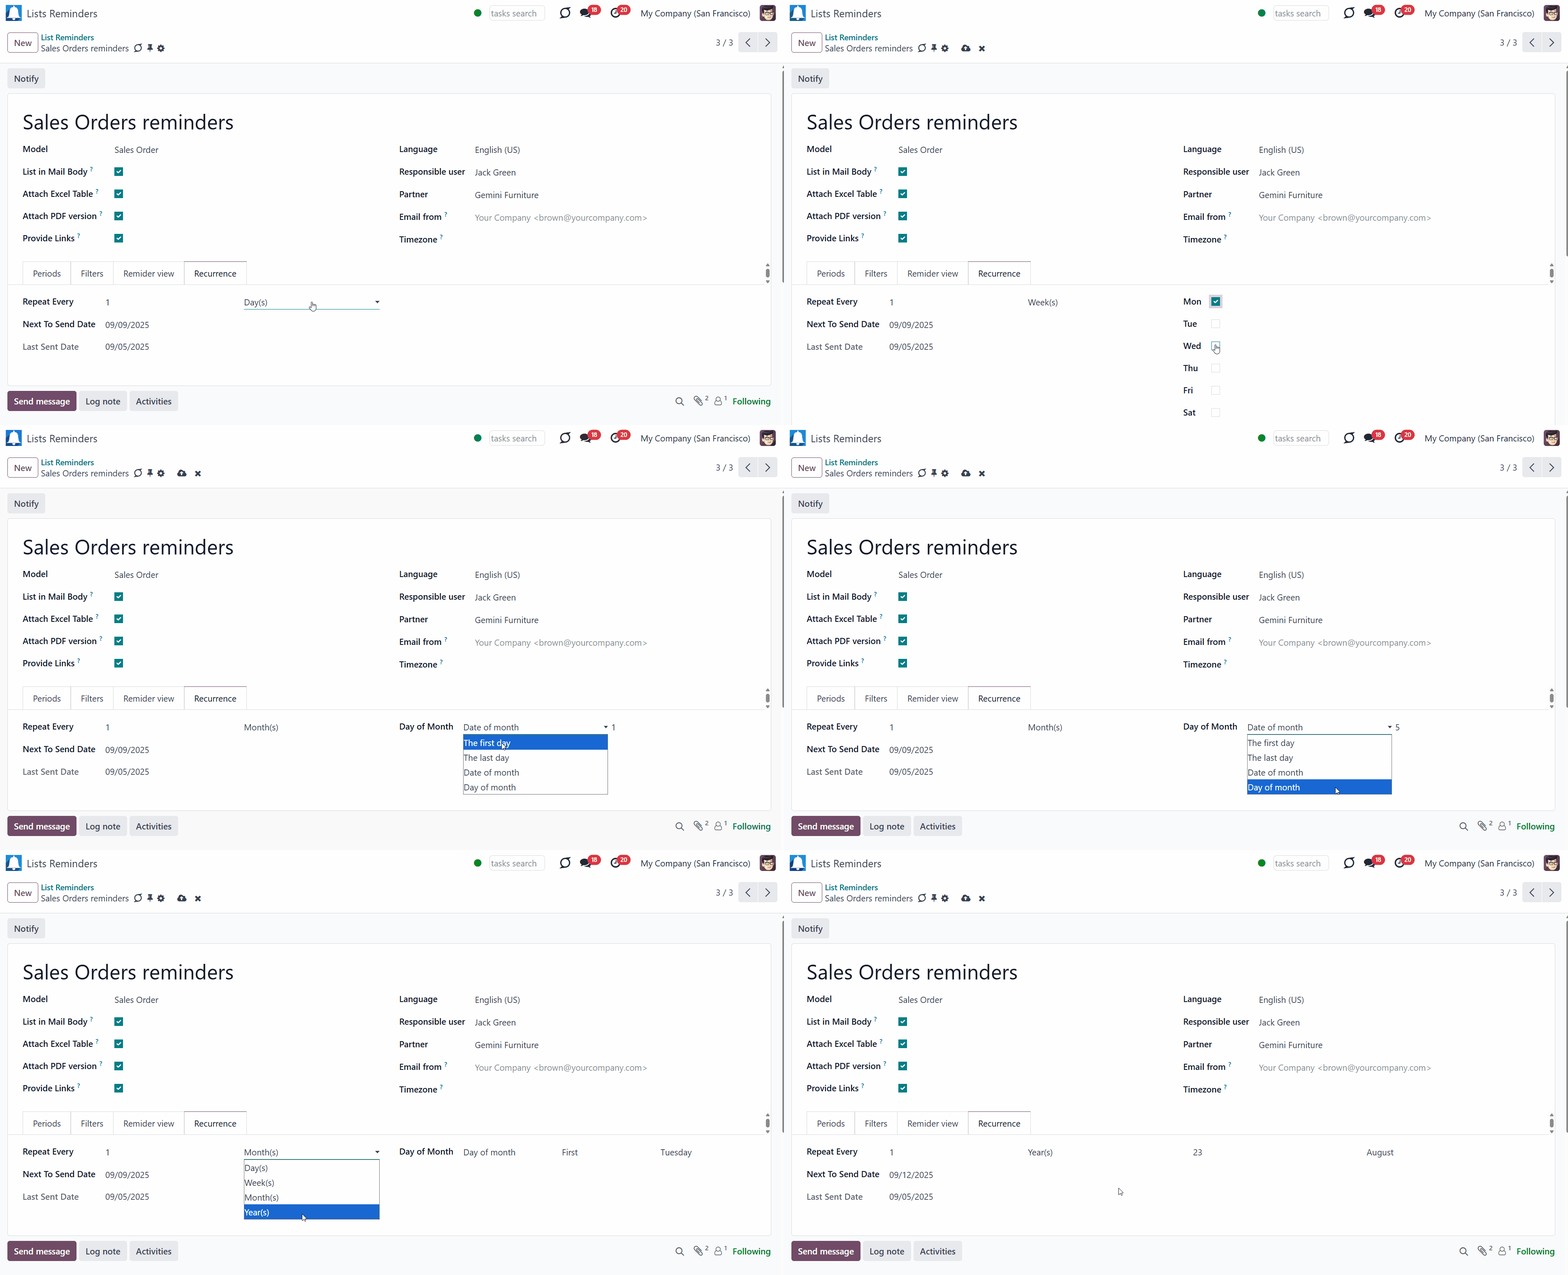
The periodicity of reports is set for each list reminder. As you start creating or editing a list reminder, in the 'Recurrence' tab, select the frequency of sending the report by choosing the number and the period type (days, weeks, months, or years) in the 'Repeat every' line.
Depending on the chosen period type, the set of configurations may vary.
If you choose the periodicity by days, then you need to specify the number of days between reports. This way, you can prepare a reminder to be sent every day, every 5 days, or every 181 days.
If you choose the periodicity by weeks, you will be able to select a specific day/days of the week to send the report on. To do this, choose the days by checking the box next to each one. This way, you can send statistics each Monday, or once every five weeks on Thursday, and so on.
If you choose the periodicity by month, you can also select the day of the month when the report will be sent. The available options are:
1. For the first or the last month's day (for example, the 1st or 31st of December)
2. For the exact date (for example, the 16th)
3. For a definite weekday (for instance, the first Monday, the last Friday, or the third Tuesday).
If you choose the periodicity by years, then you will also be able to select the exact date to send the report. For example, you can set the list reminder to be sent every year or 5 years on September 1.
If you set yearly or monthly reminders, please make sure that the exact date exists. Otherwise, the last day of the previous month will be applied. For example, if you set the reminder to be sent on February 28, then, as there is no 29th day, the report will be sent on the last day, which is either the 28th or 29th of February.
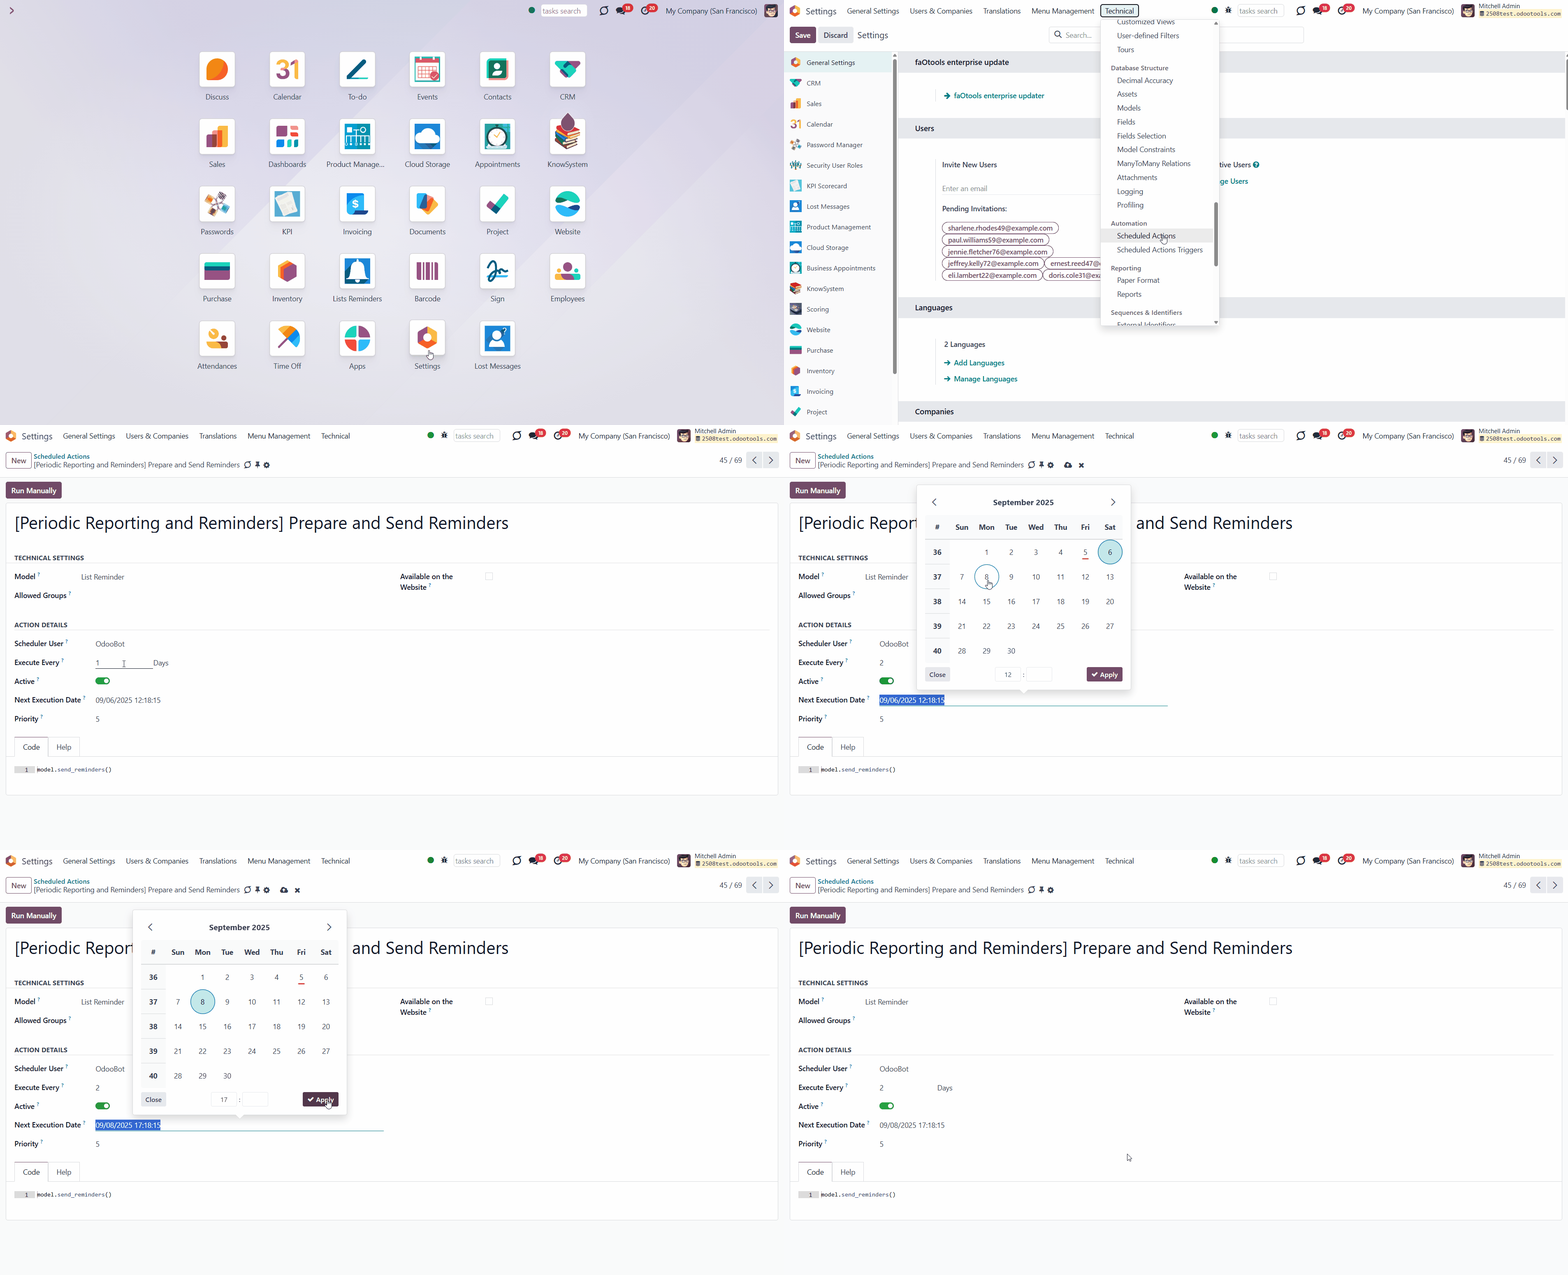
The app automatically sends emails based on the scheduled job 'Lists Reminders'. It is possible to adjust the frequency of checks and the time when list reminders are sent. For example, you can configure the checks to be done once a day at noon. For that:
1. In the General Settings, turn on the developer mode
2. Go to Technical Settings > Scheduled Actions
3. Find the scheduled job 'Lists Reminders'
4. Start editing it and, in the field 'Execute every', specify the frequency with which the scheduled job should be launched. For that, choose the number and type of the period
5. Optionally, set the next execution date and time in the field' Next Execution Date'.
For testing purposes, it is also possible to manually generate and send a list reminder. For that, use the button 'Notify' above the created record.
Please note that if you are a follower of the record and click the 'Notify' button, you will not receive the notification. You will receive it only when someone else pushes the button or when the cron processes the scheduled action.
Report Appearance
The report's appearance can be flexibly configured. It is only up to you to decide what introduction to add, which fields to include in the list reminder, or which report format to send. To customize the list reminder, it is possible to:
1. Introduce any greeting text for reminders. The introduction is edited in a standard Odoo HTML editor
2. Define report language to make sure the correct translation is applied, where possible
3. Enter the email address that would be shown for reminder recipients. Otherwise, it would be the user who sends the report
4. Choose the format of the reminder. You can send a list reminder in the email body, or attach it as a PDF or XLSX file. Optionally, you can combine various formats. For example, attach both PDF and XLSX files to the email
5. Choose an unlimited number of columns for a list reminder
6. Set up table grouping for any document-storable field. For example, group the sales lines by sales team, country, salesperson, and so on
7. Set up table sorting for any document-storable field. For instance, send a sales list ordered by a sales team, a country, a salesperson, or other criteria
8. Apply aggregation operators for columns to calculate the sum or average per record's column (applicable for integer, float, and monetary fields)
9. Add references to the email by including the links to the reminder's records.
The appearance of the report is set separately for each report in the 'Reminder View' tab.
Basic Configurations
As you generate a list reminder, above the generated table with records, you will see the model and the periods for which the report is sent. This information is also included in the subject of the email. For example, if you create a list reminder for the model sale orders and, as a period set 'Created on' in the last month, including the current month, then in case today is December 30, 2025, the subject of the report will be 'Sale Orders: Creation Date: 2025-12-01 - 2025-12-31'.
It is possible to add an introduction to the report. For that, write the text in the field' Message Introduction'. It will be added to the beginning of the email body. Such an introduction is edited in a standard Odoo HTML editor.
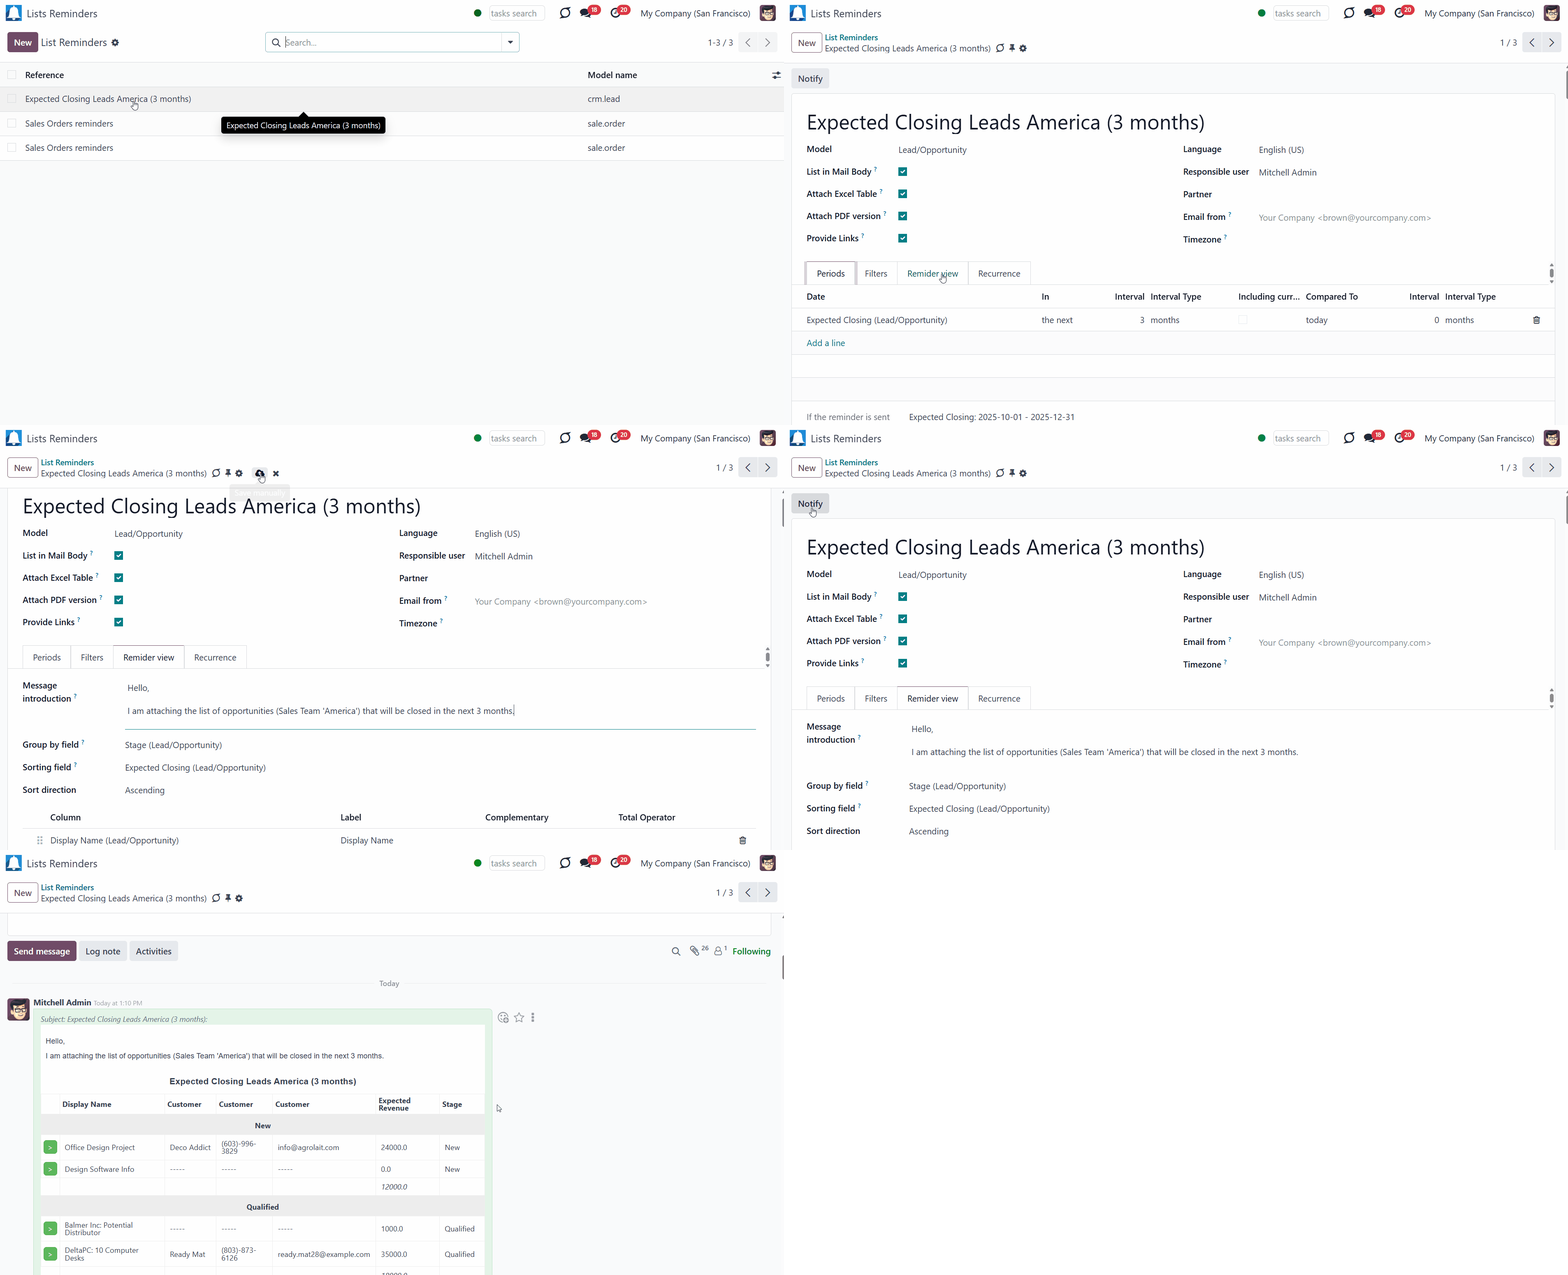
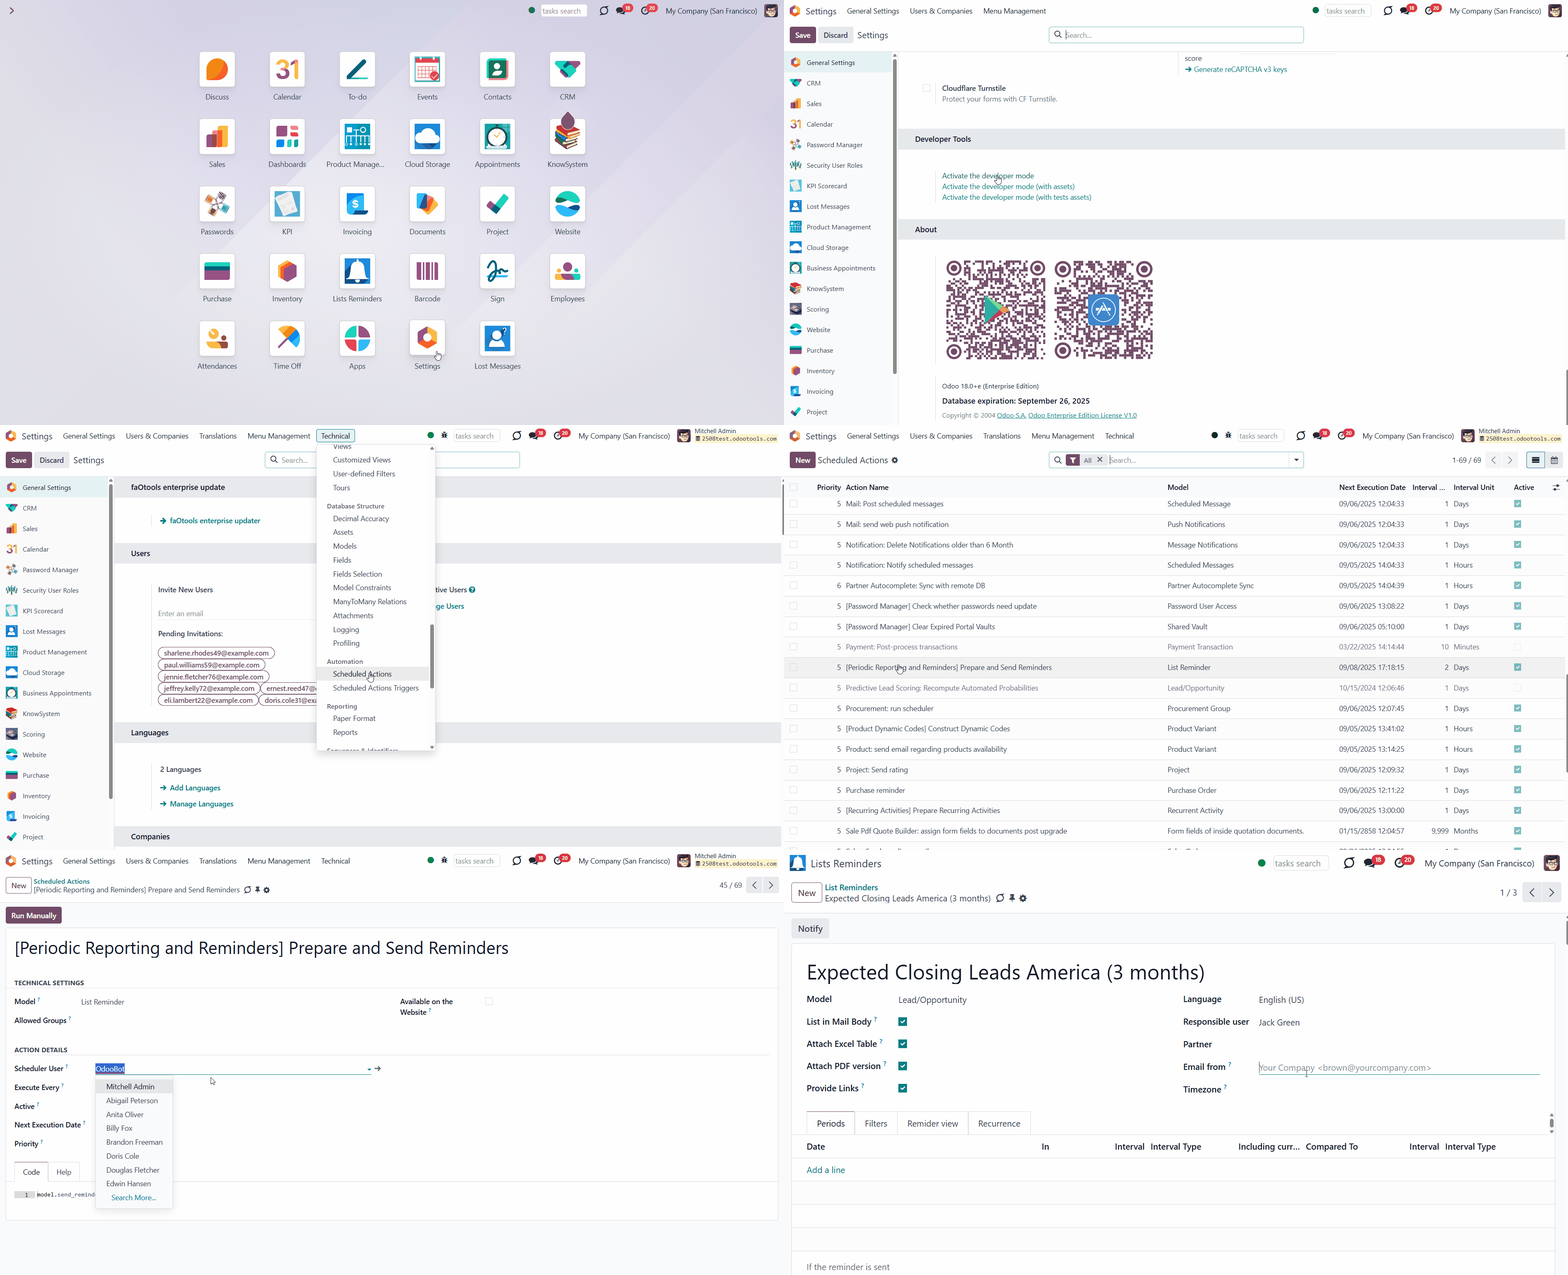
Automatic notification sending occurs exactly as planned - by default, from the Odoo Bot. Still, you can change it in the field' Scheduler user' on the related scheduled job form.
Optionally, in the 'Email from' field when creating or editing a reminder, you can set an email address that will be displayed to reminder recipients.
It is possible to launch the notification manually. In this case, the sender's address is always taken from the user who initiates the reminder generation. That is, from the user who clicks the button ('Notify').
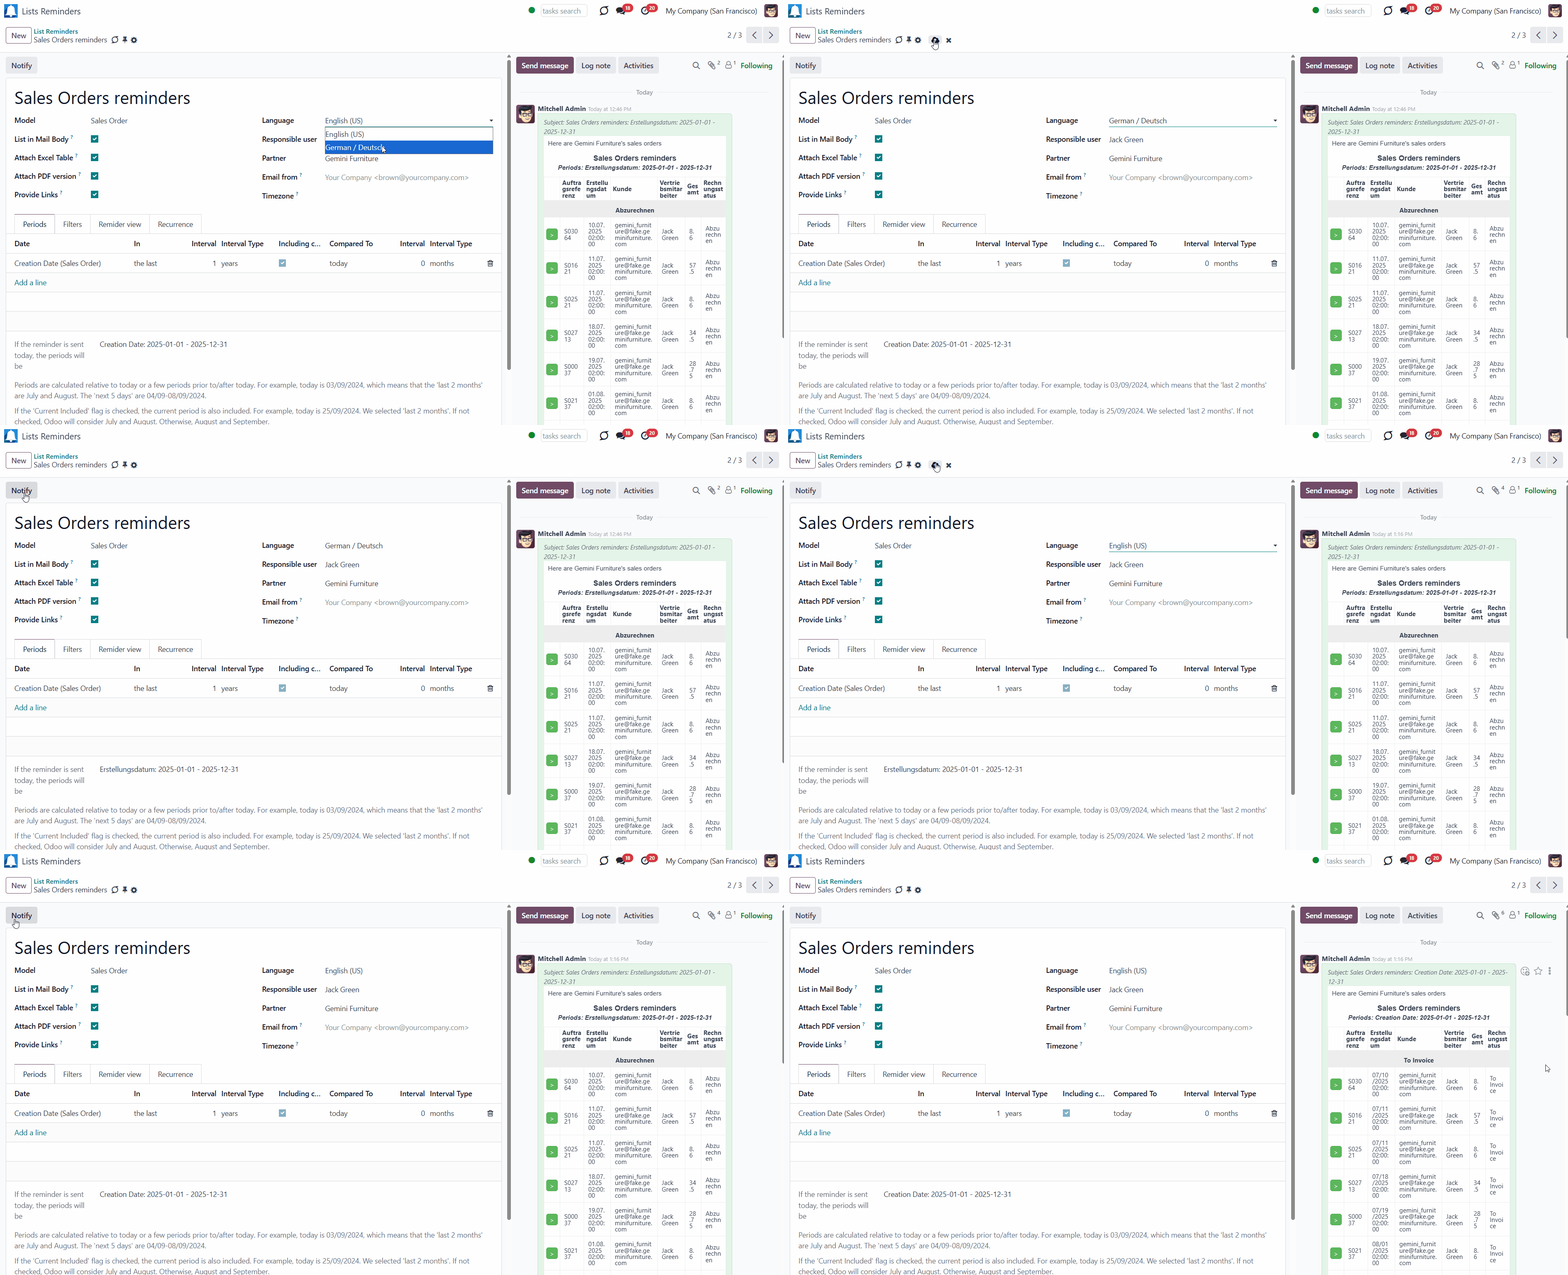
Optionally, you can define the report language to ensure the correct translation is applied. This way, the translation will be used. For that, in the field 'Language' on the form, choose the language that you need. Please note that the language must be installed on the instance.
Report Format
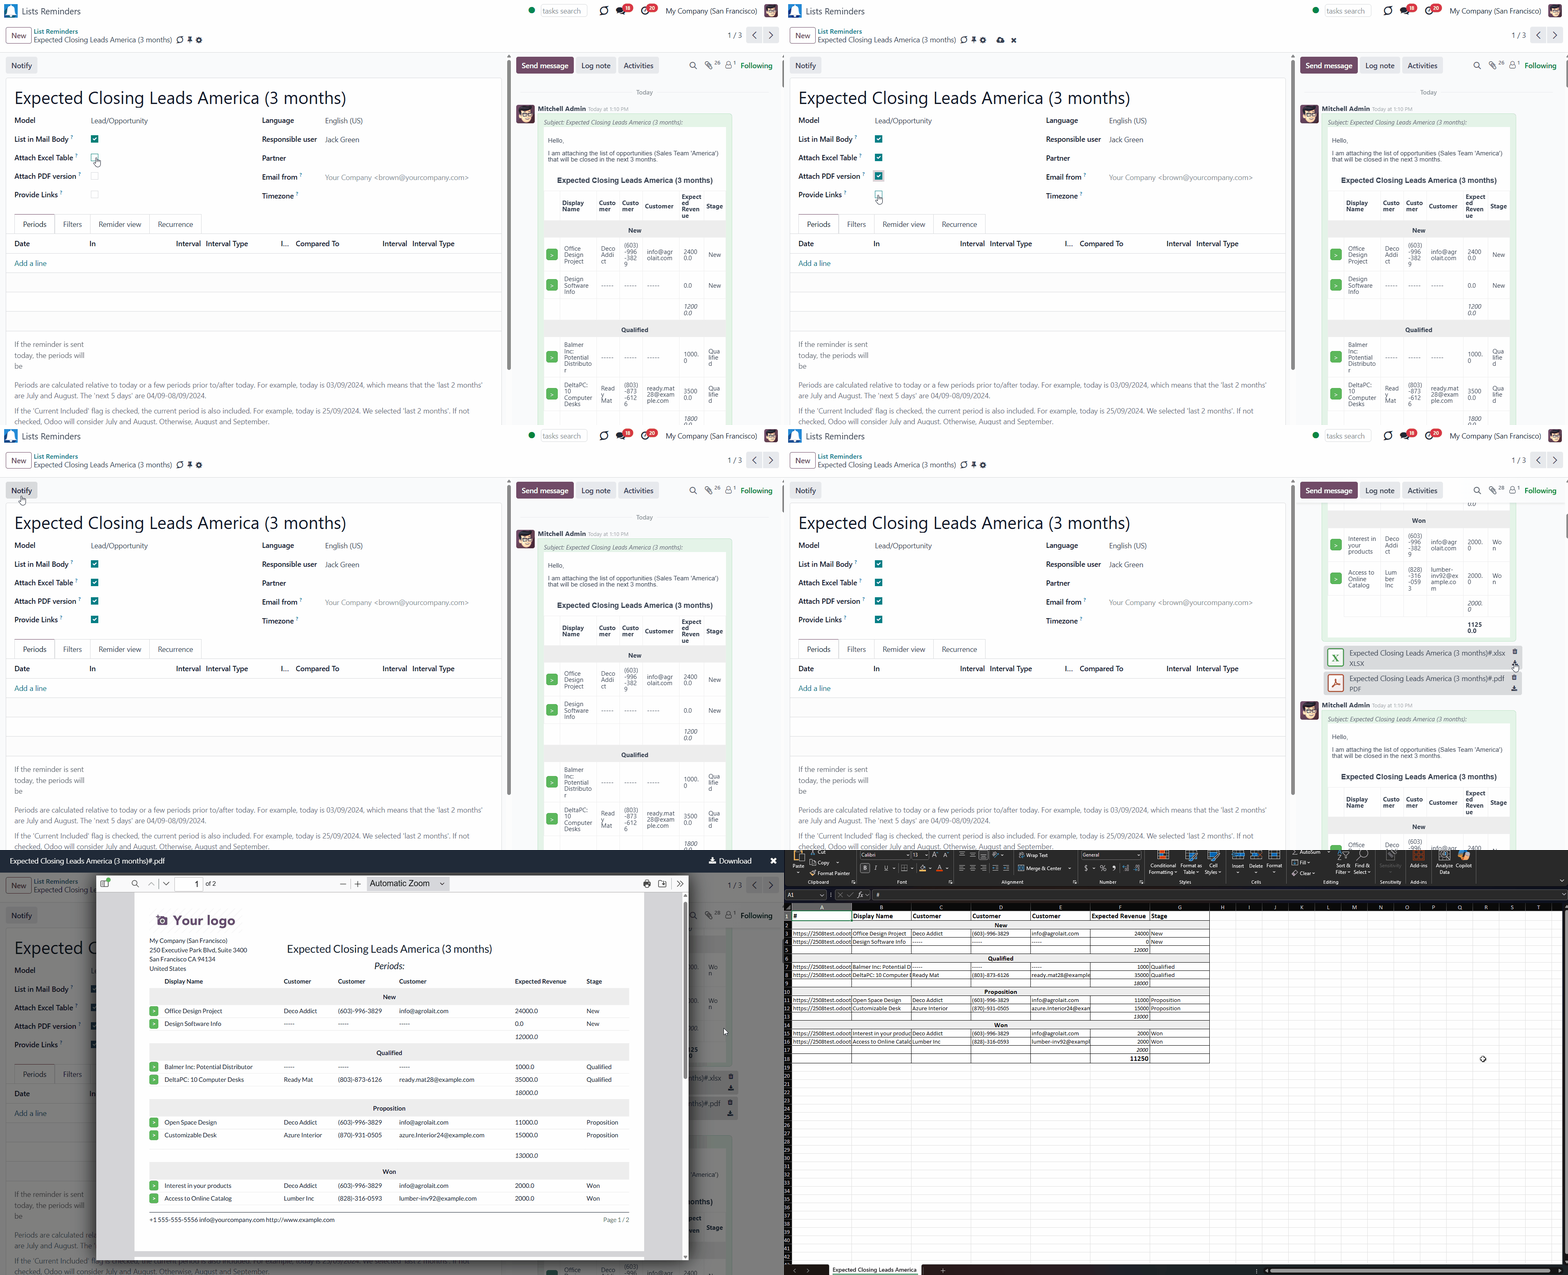
There are several formats in which the report can be sent. It is possible to add the report to the body of the email or attach it as an XLSX/PDF file to the email.
To attach the report to the body of the email, tick the option 'List in Mail Body' while creating or editing a list reminder.
To attach the report as an XLSX file, tick the option 'Attach Excel Table' while creating or editing a list reminder.
To attach the report as a PDF file, select the 'Attach PDF version' option when creating or editing a list reminder. The table is added in the landscape view. Please use only in case the number of columns suits the A4 width; otherwise, the table may not look good.
It is also possible to select one or more options at a time. For example, if we tick the options' List in Mail Body' and 'Attach Excel Table', then in the email, we will see the report in the email body, and the XLSX file will be attached to the email.
Please note that if you don't select at least one format, the related email will contain only greetings, if any.
Report Columns
Choose the fields that will be presented in the report by clicking the 'Add a line' button and choosing the field. It is possible to select an unlimited number of columns. Please keep in mind that with a large number of columns, it is better to send the list reminder as an Excel file, while the table may not fit into the letter/printed form.
As a column, it is possible to choose any field of the following types: char, text, HTML, integer, float, selection, boolean, date, datetime, and relations to other documents (many2one, one2many, many2many). The list of fields may vary depending on the chosen model in the reminder. For example, if you create a list reminder for the model 'Sale order', you can select the fields 'Reference', 'Creation Date', and 'Total', and they will be displayed in the report.
As you select a field, the field description is used as the column name by default. Optionally, in the column 'Label', you can change the way the related column will be named in the table. For example, for the 'Sale Order' model, add the 'Display name' field and in the 'Label' column, change the title to 'Order number'.
For the relational fields, you might also choose second-level precision. For example, you might display a customer's phone number for a sales order reminder or tag colors for tasks. For that, in the column 'Complementary', choose the field that should be added to the table. For example, if you add a 'Customer' field and select its complementary field as 'Phone', then in the table, the column related to the 'Phone' field will be added, not the 'Customer' field.
For integer, float, and monetary fields, you can also choose what to show as a table total by applying aggregation operators for columns. The app allows you to calculate the sum or average based on the records column. For that, in the field' Total Operator', choose one of the options 'Sum' or 'Average'. For example, if we add a 'Total' field to the sale orders list reminder and choose the 'Sum' option in the 'Total Operator' field, then below the column, we will see the sum of the total of the sale orders included in the reminder.
Optionally, in the field' Group by field', set the grouping field, which will be considered to group the table lines. This way, the grouping criteria will be written above the related table lines, for example, separate sales orders into sections by a sales team, country, salesperson, etc.
Set the sorting field in the field' Sorting Field', which will be considered to decide the placement of records in the table. And, choose the ascending or descending direction in the field 'Sort Direction'. This way, you can get the most convenient order of the records. For example, set to sort the sale orders by the 'Creation Date' in ascending order, then the order of orders will be shown from the oldest (created earlier) to the most recently created ones.
Optionally, change the order of the chosen columns by dragging & dropping the fields to ensure that the table looks exactly as you want.
Some of the chosen fields may be empty or not particularly useful. In this case, it is possible to delete the fields that you no longer need. For that, in the table, click on the cross on the right side of it.
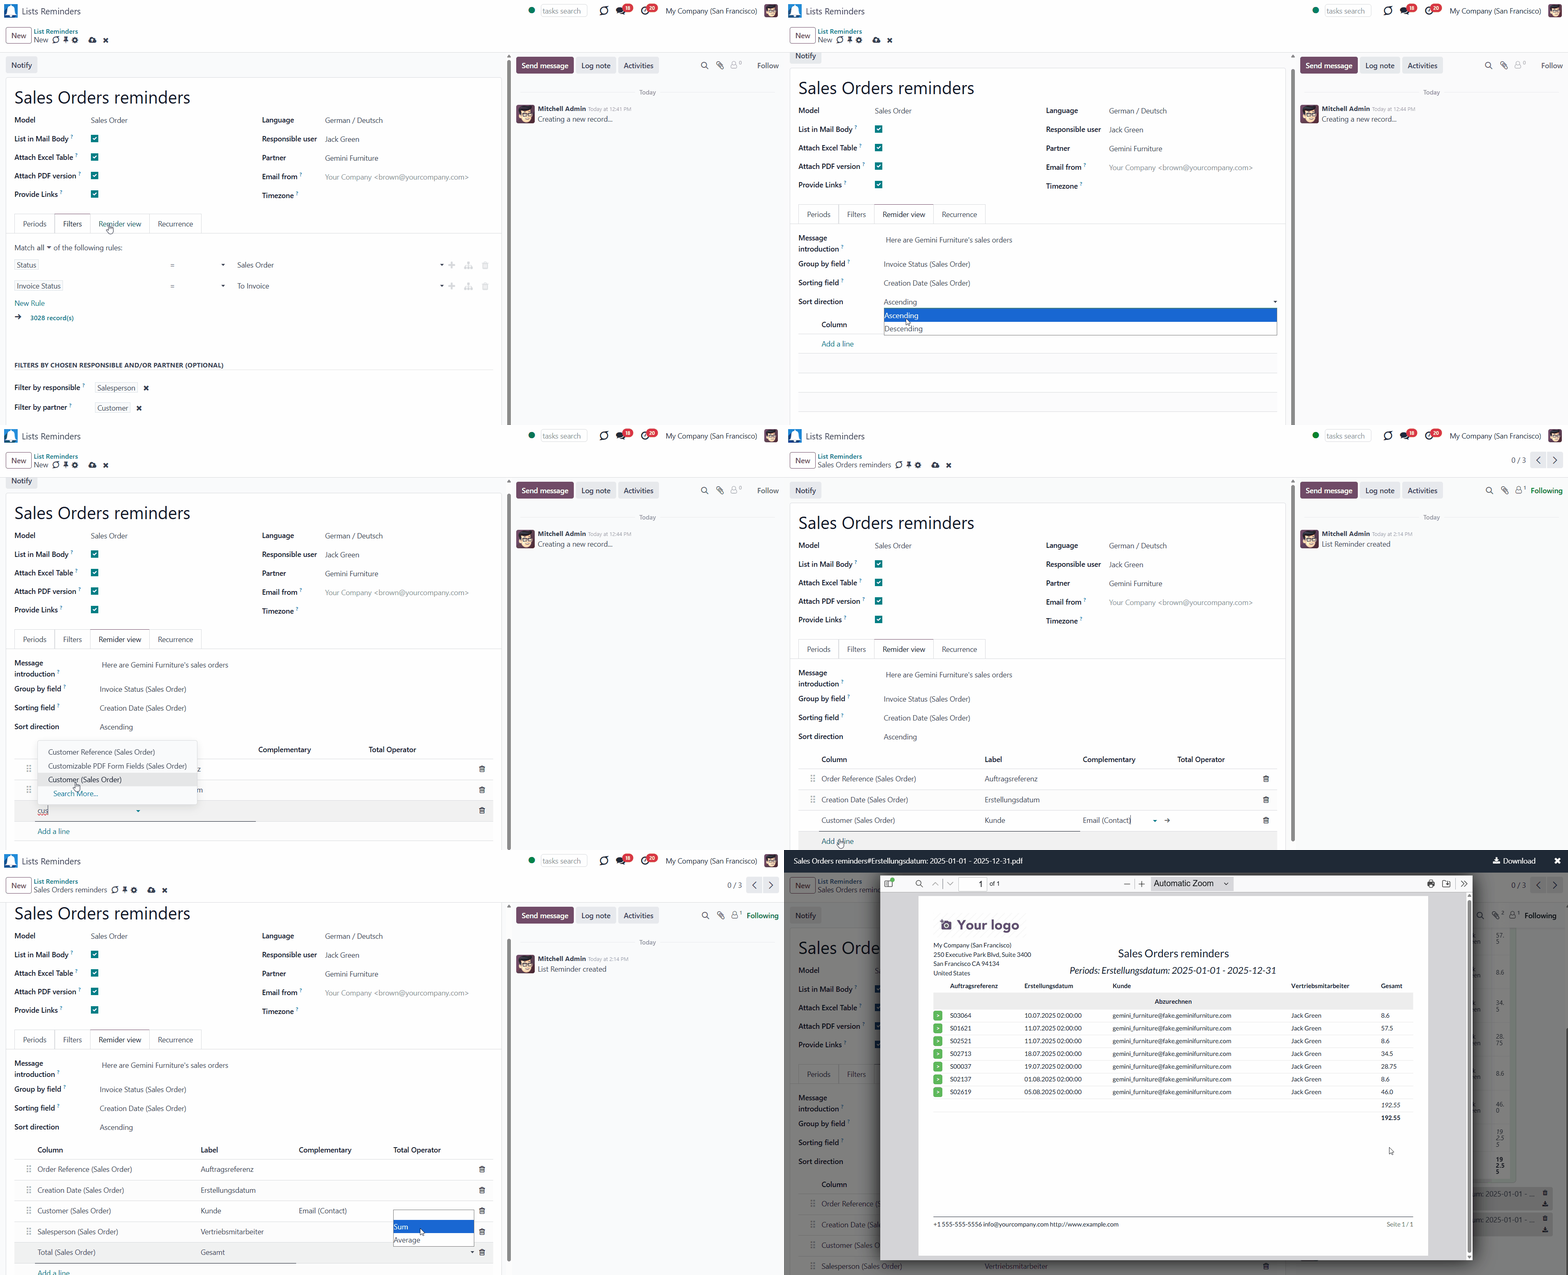
Only chosen fields will be presented in the table. If you don't select any field, the table will be empty or contain only a list of links to related records (if the 'Provide Links' option is enabled).
Optionally, you can include or exclude links to Odoo objects. To include links to the list reminder, ensure that the 'Provide links' option on the form is selected. This way, you can check out the linked objects for additional details.
Both internal and external users will be able to see the links in the table. However, if a user is external or doesn't have the right to a particular object, they shouldn't be able to open the link (see Report Recipients).
Be cautious when sending a list reminder to external users with the option enabled, to ensure that no confidential information is shared.
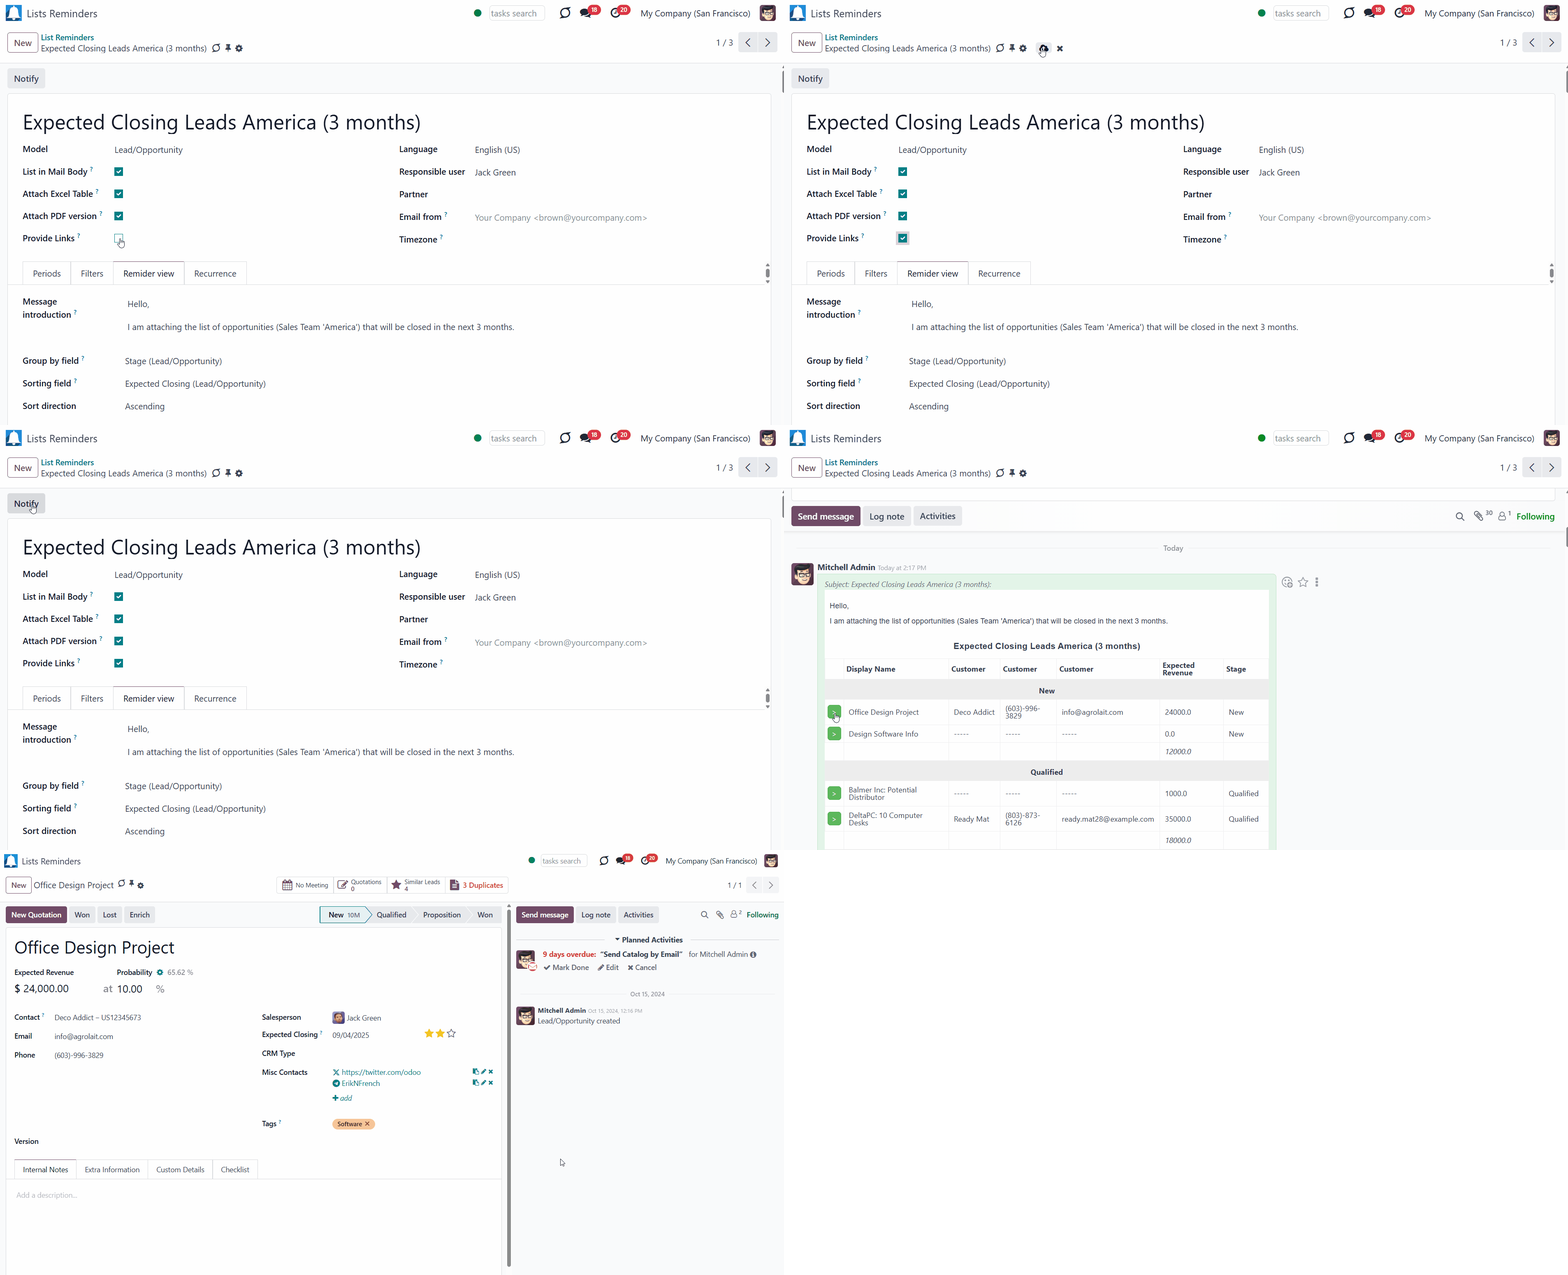
Report Recipients
You can set the recipients of the report flexibly. Any partner might be one of the reminder recipients: internal or portal users, customers, or suppliers.
To add a follower to a reminder: open any reminder, click on the 'Person' icon below the reminder, and choose 'Add followers'.
This way, the notification is received by all users specified as followers of the reminder.
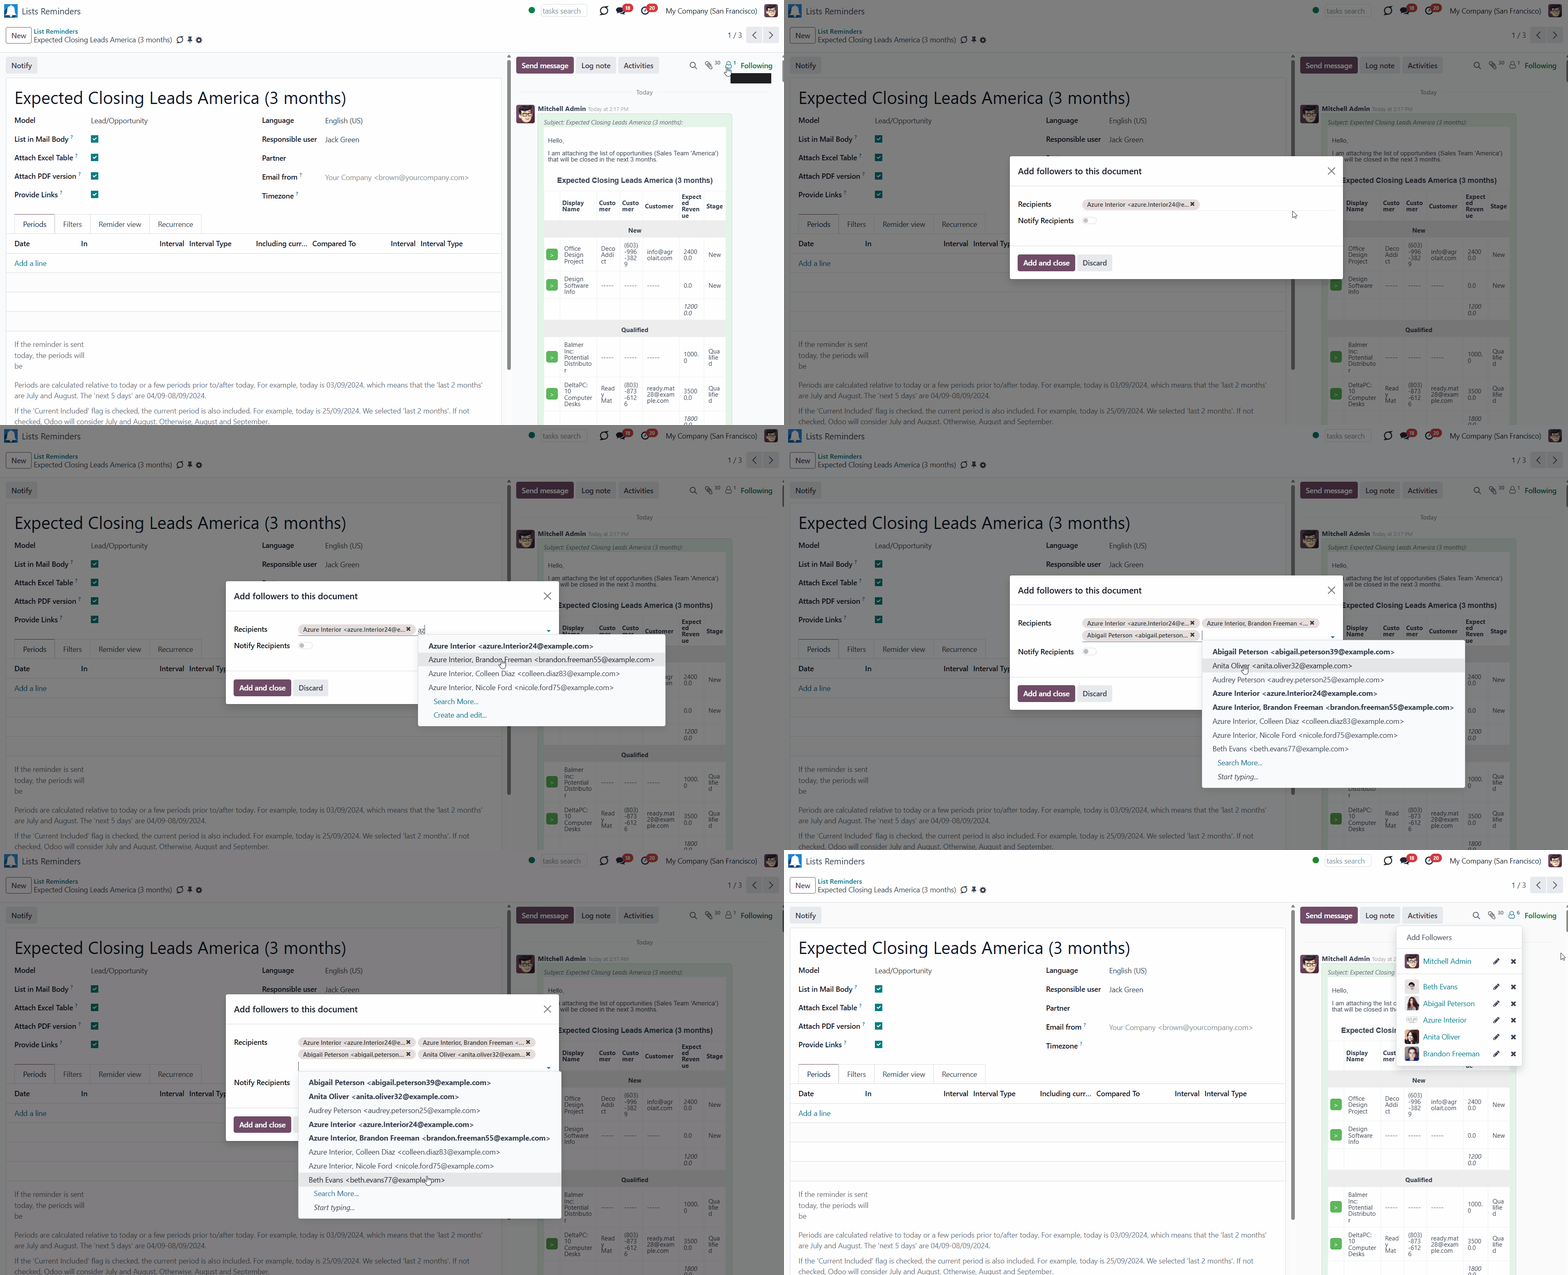
If you have ticked the option 'Provide links' to have the reference for the source Odoo record while creating or editing a list reminder, the links to the related Odoo records will be included in each row of the table. However, the Odoo records will be accessible only to internal users. If you sent the list reminder to your partners, the links would not be of any use to them. So, if they try to follow the link, they will be redirected to the login page (see Report Appearance).
For example, we have added our customer 'Azure Interior' as a follower of the list reminder' Sale Orders', and the links to Odoo records are included in the reminder. However, when Azure Interior clicks on the link, the customer is redirected to the login page or to their user portal, if they are already logged in.
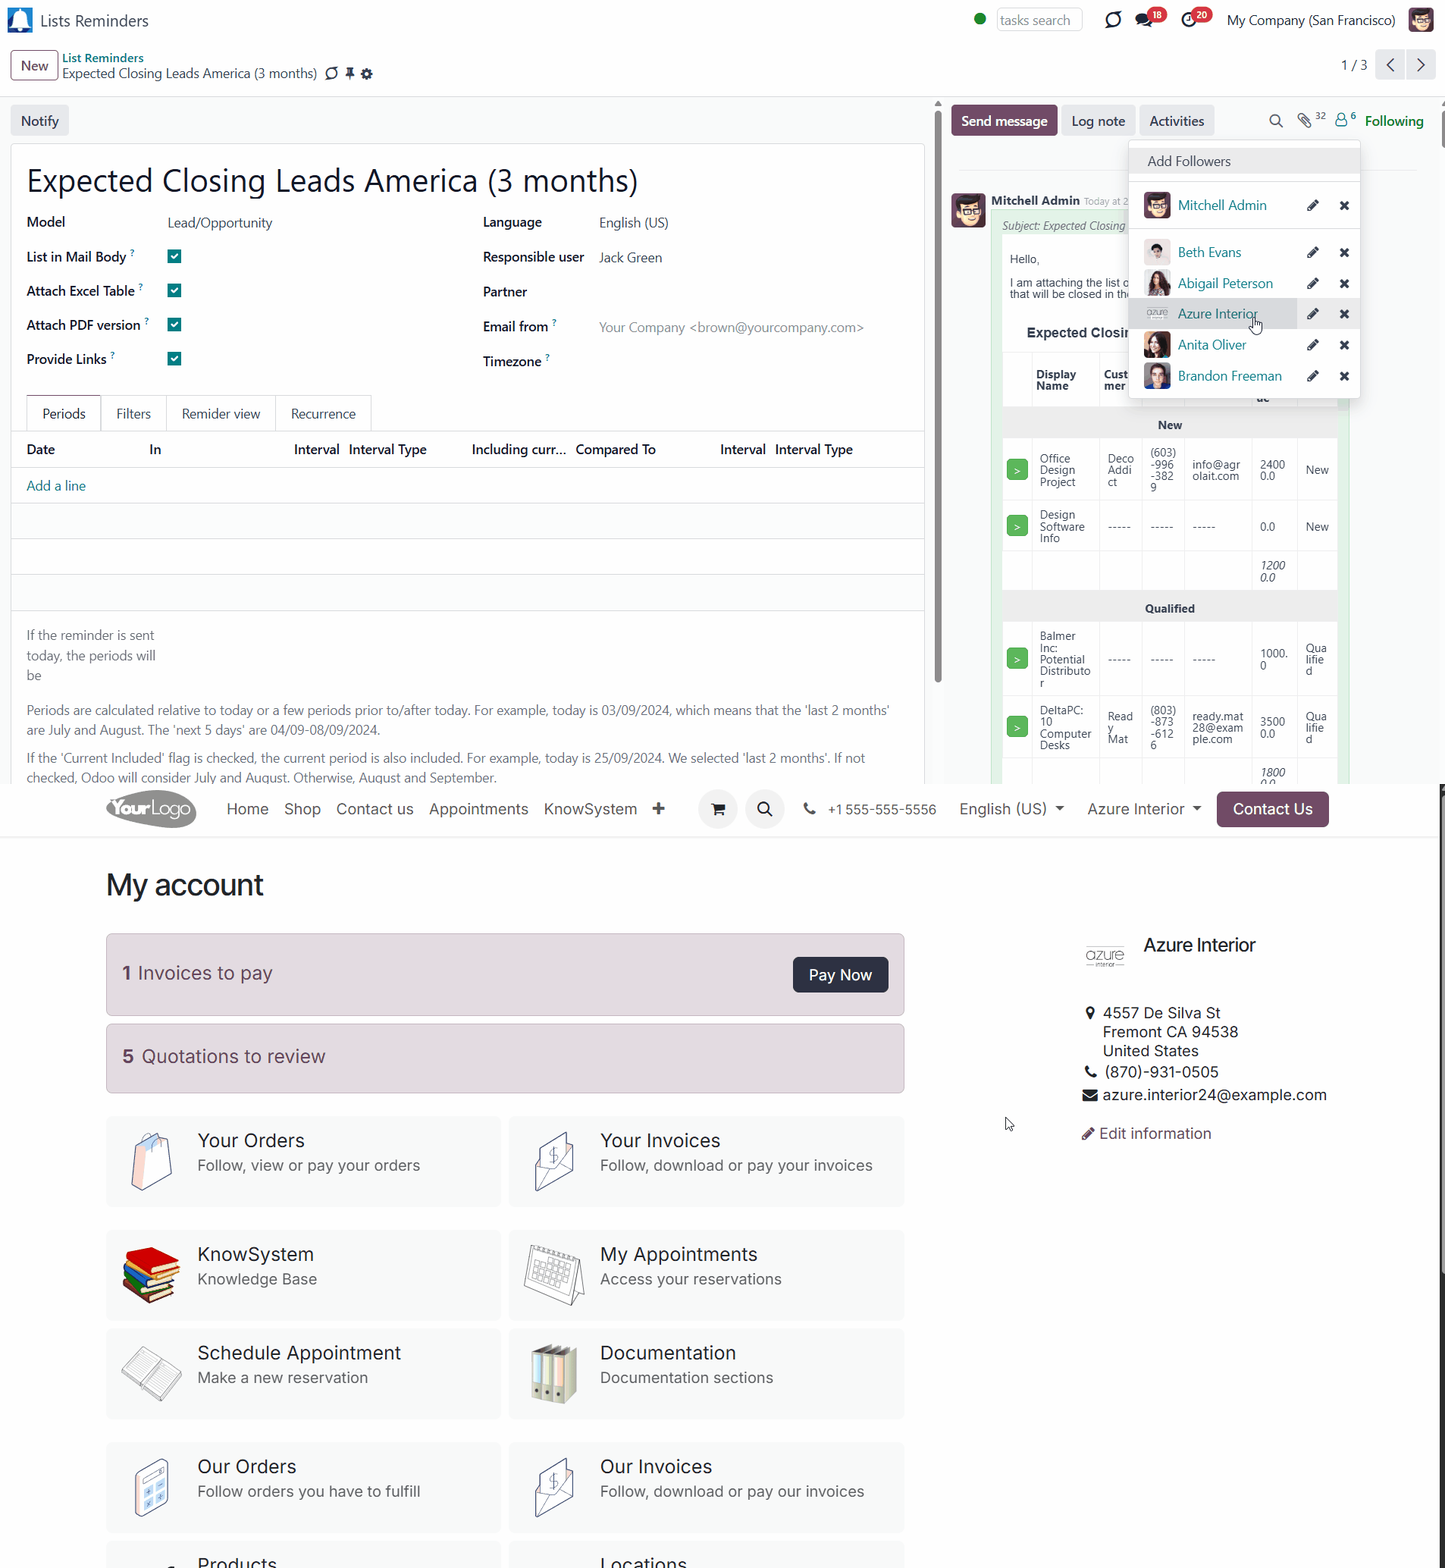
Typical Use Cases
The app is used to aggregate information for any Odoo document type, including sales and purchase orders, leads and tasks, activities and meetings, deliveries, or manufacturing operations. Generally, the app should be able to retrieve information from any model that exists in the system.
Here you can find some examples of the typical use cases:
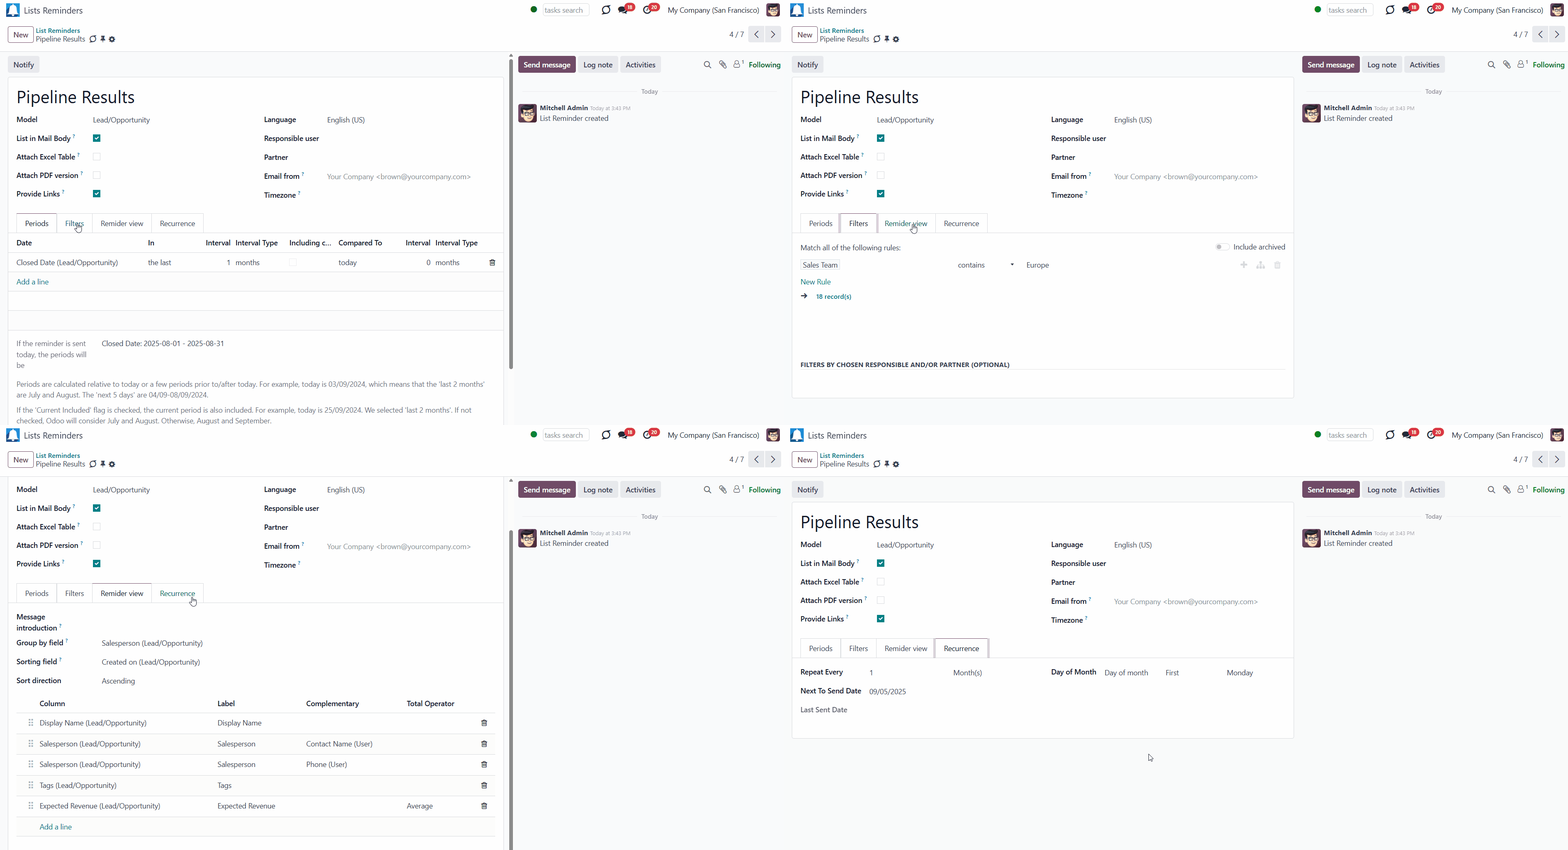
The goal: Receiving an email with the leads closed in the previous month by a team manager
Model: Lead/Opportunity
Periods: "Closed Date" in the last month
Filters: Sales Team (e.g., to contain 'Europe')
Grouping: Salesperson
Sorting: Created on (Ascending)
Columns: Display Name, Salesperson - name, Salesperson - phone, Tags, Expected Revenue (as total operator - use average, for example)
Recurrence: Send a list each month, on the first Monday.
Subscribers: a sales team manager
Similar reminders can be prepared for sales orders, deliveries, purchase orders, manufacturing operations, etc.
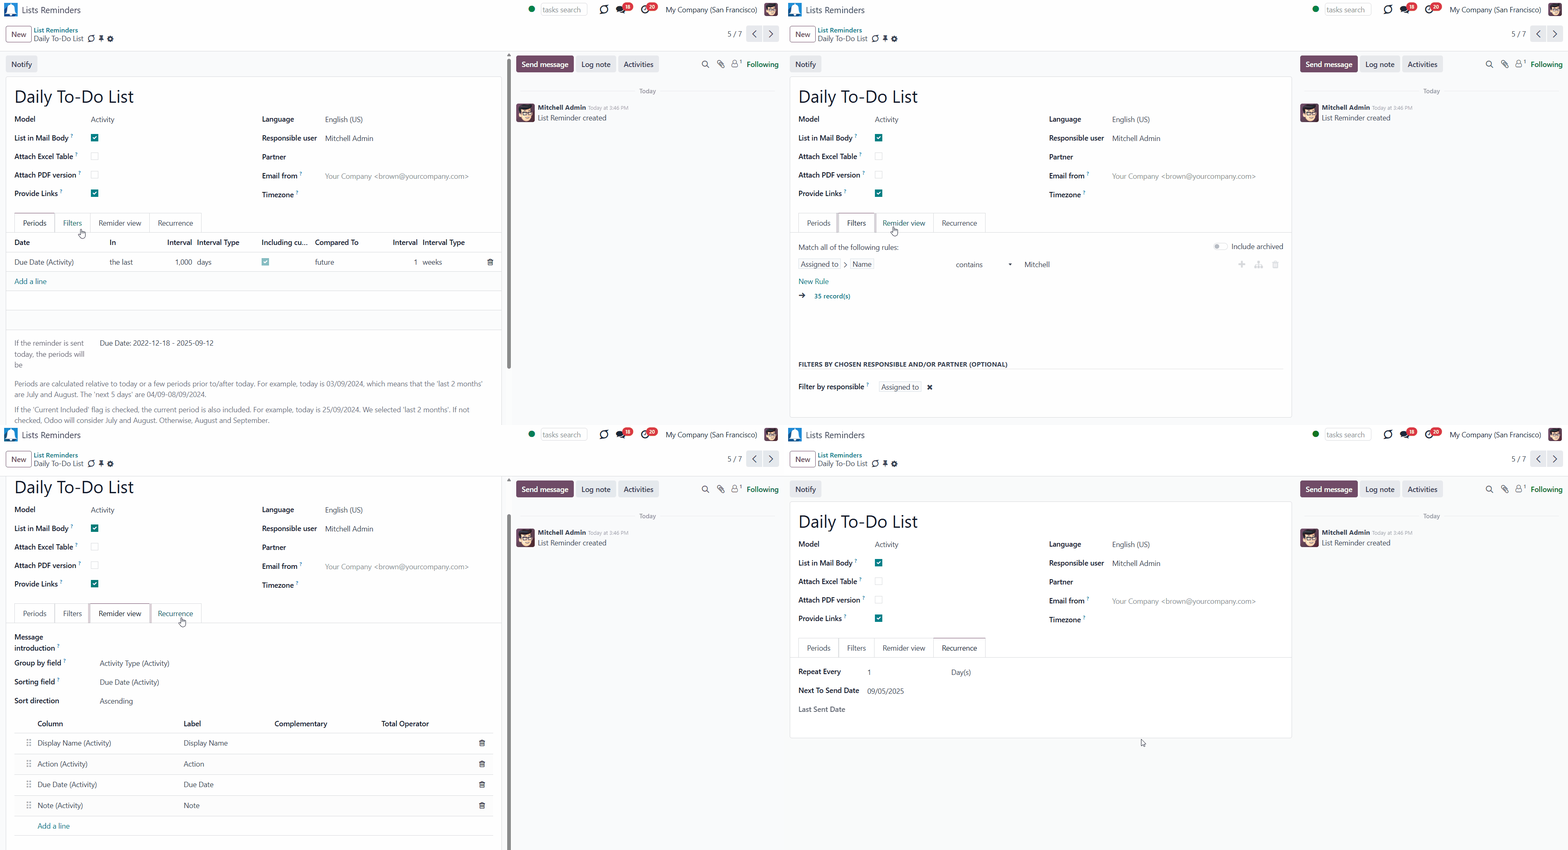
The goal: Receiving an email with the activities that should be done today or earlier
Model: Activity
Periods: "Due Date" in the last 1000 days, including current, compared to future 1 week (to get even the eldest activities)
Filters: Assigned to - Name contains 'Mitchell' (where 'Mitchell' is a user to notify)
Grouping: Activity Type
Sorting: Due Date (Ascending)
Columns: Display name, Action, Due Date, Note
Recurrence: Send a list every day
Subscribers: Mitchell Admin
Similar reminders can be prepared for project tasks, opportunities, planned deliveries, or incoming shipments, etc.
To create a similar reminder for another user quickly, duplicate this one, update the filter to another employee, and subscribe them.
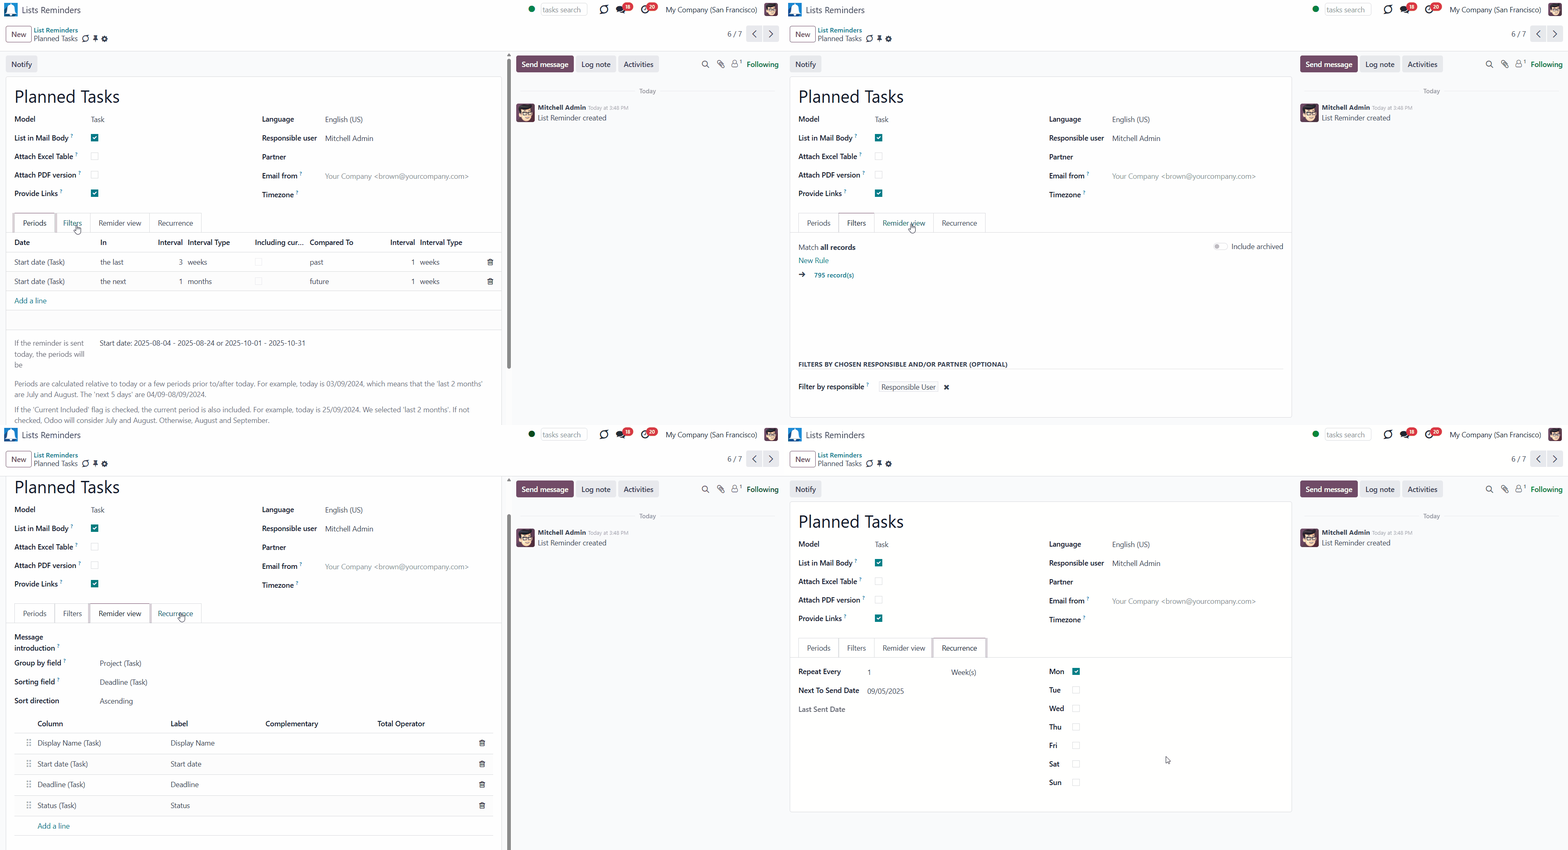
The goal: Receiving an email with the tasks that will happen in the forthcoming periods
Model: Task
Periods: "Start Date" the last 3 weeks compared to the past 1 week, or the next 1 month compared to the future 1 week
Grouping: Project
Sorting: Deadline (Ascending)
Columns: Display name, Start Date, Deadline, Status
Recurrence: Send a list on Mondays
Subscribers: John Brown (where John Brown is an event department head)
Similar reminders can be prepared for activities, events, leads, deliveries, incoming shipments, etc.
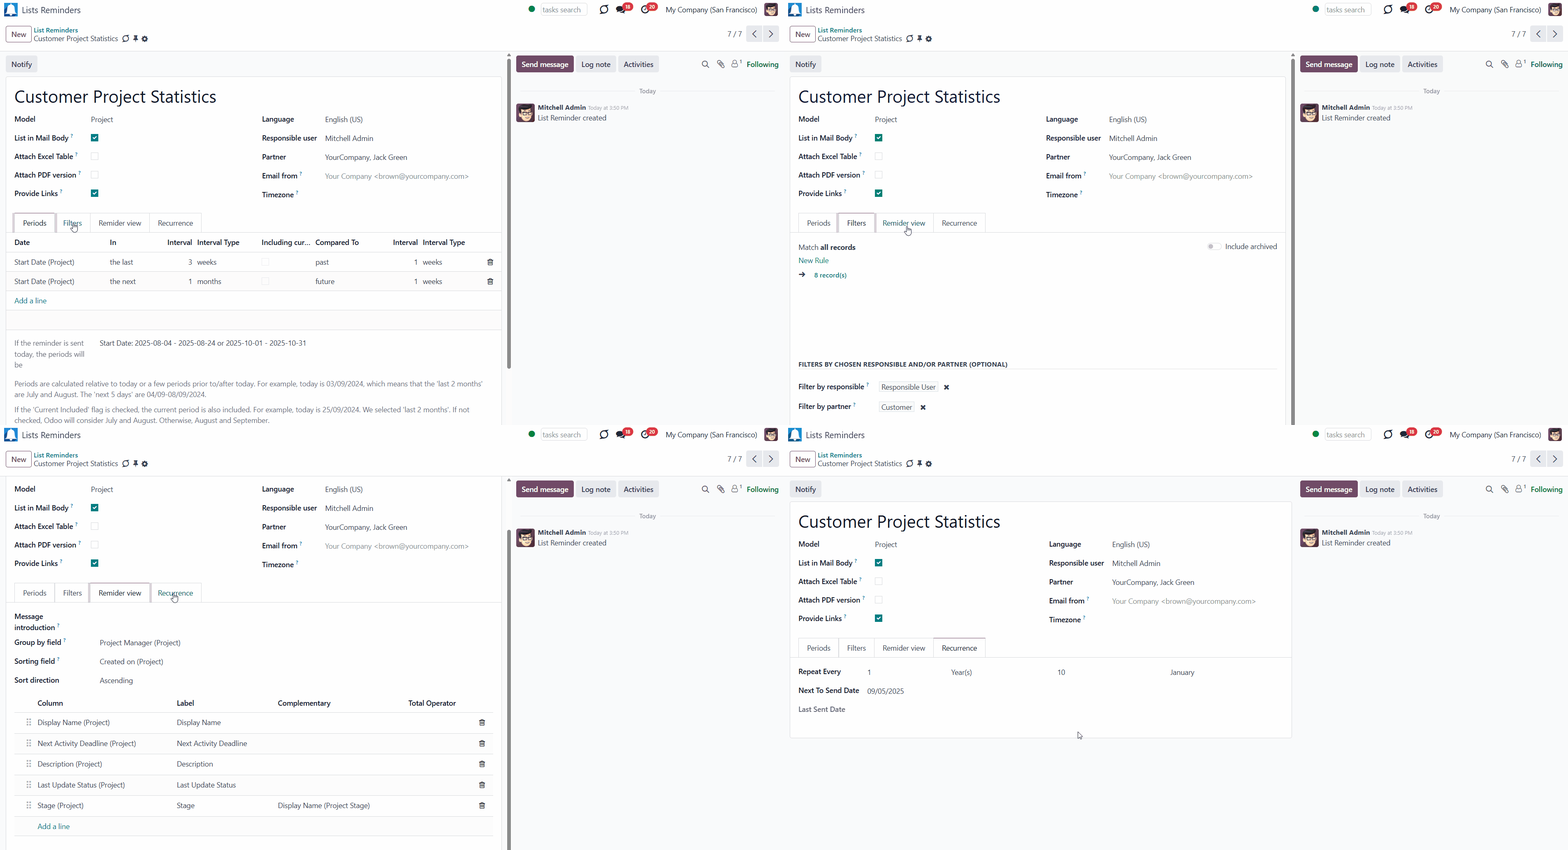
The goal: Notifying customers about their project tasks
Model: Project
Periods: "Created on" in the last year
Filter by partner: Partner - Azure Interior, Filter by partner - Customer
Grouping: Project Manager
Sorting: Created on (Ascending)
Columns: Display name, Next Activity Deadline, Description, Last Update Status, Stage - Display name
Recurrence: Send a list on January 10 each year
Subscribers: John Brown (where John Brown is a managing partner of Azure Interior)
Similar statistics are frequently forwarded for support tickets, paid invoices, done sales orders, etc.
Access Rights
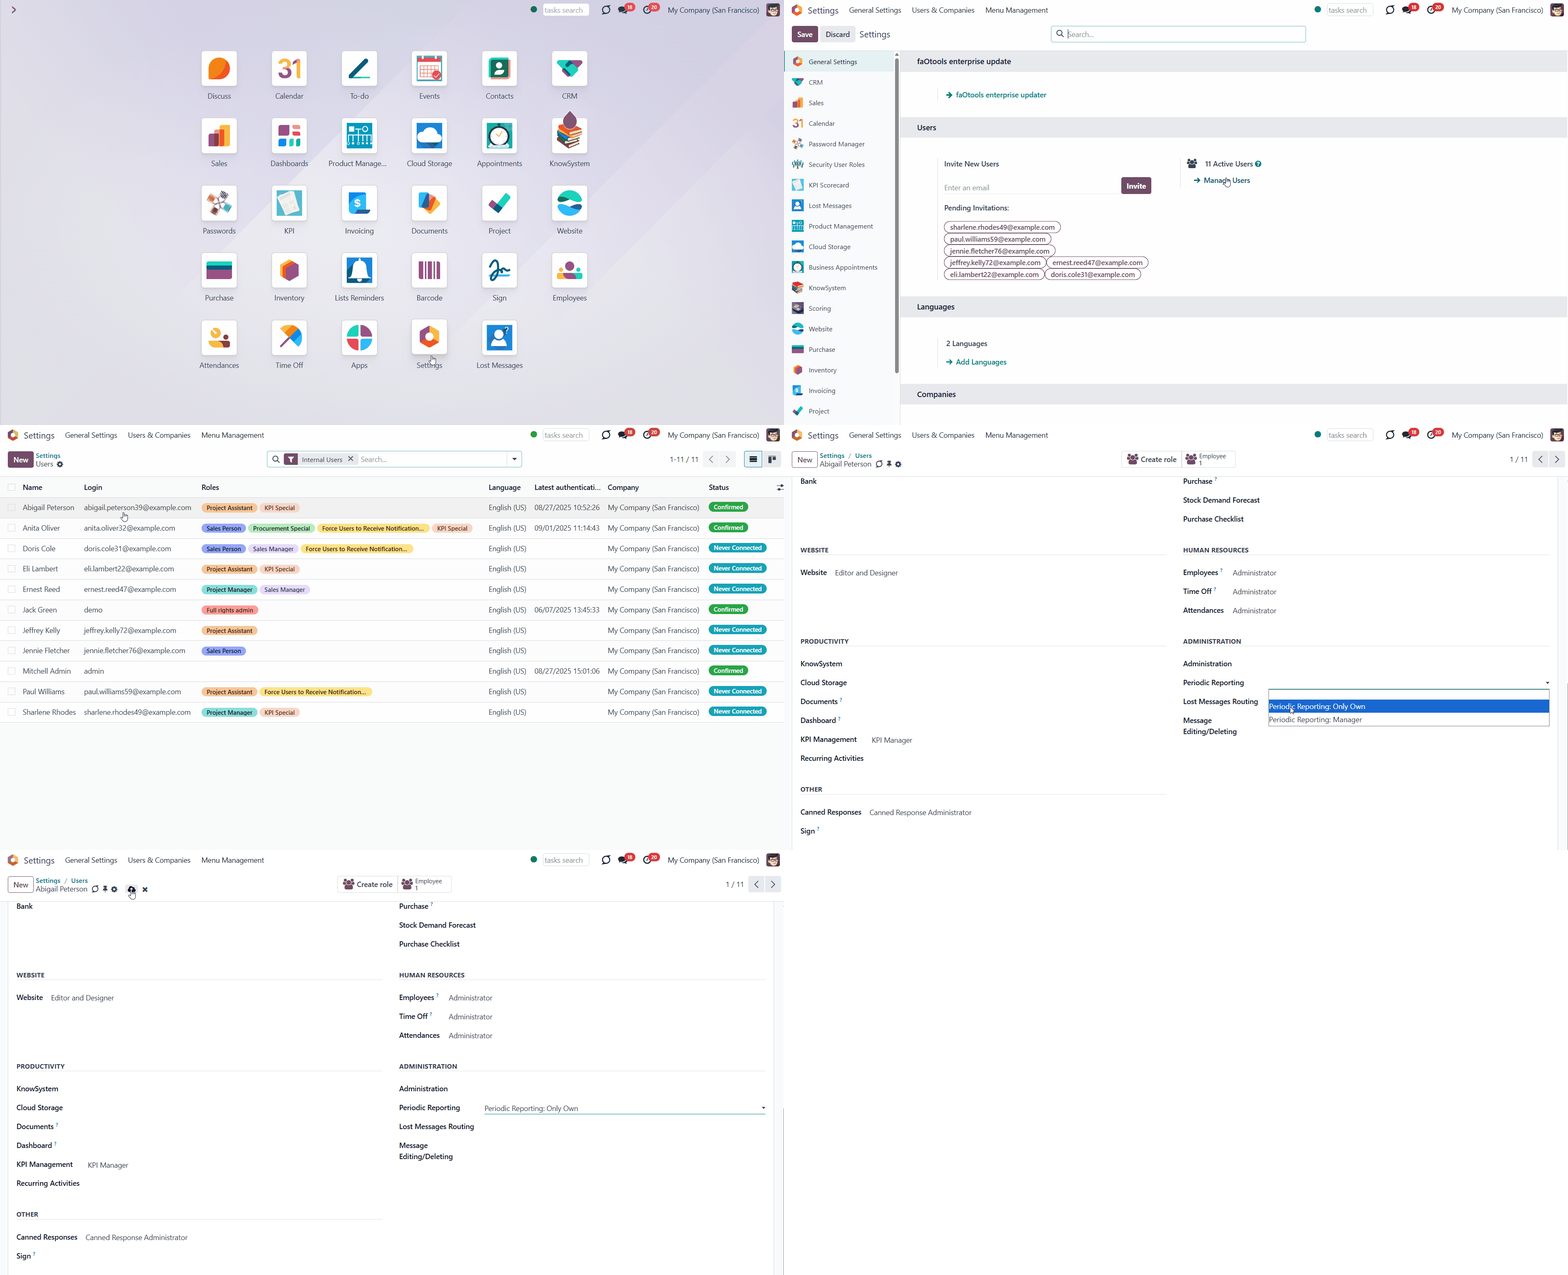
Rights to administrate the list reminders belong to 2 user roles: 'Periodic Reporting: Only Own' and 'Periodic Reporting: Manager'. If you want a user to be able to see and list reminders, they should belong to one of those groups. If an internal user doesn't have one of the listed reminder roles assigned, the related menu will be hidden for that user.
The user with the role' Periodic Reporting: Only Own' will be able to see and manage list reminders, where they are a responsible user. To set a responsible user for the list reminder, select the user in the 'Responsible' field and choose the field that will be used for filtering in the 'Filters' tab, specifically the 'Filter by partner' field.
The user with the role' Periodic Reporting: Manager' will be able to see and manage all the list reminders, regardless of the responsible user, if any.
To assign one of the list reminder roles to a user:
1. Go to General Settings > Manage Users
2. Choose a particular user
3. Scroll to the section 'Productivity'
4. In the field' Periodic Reporting', choose one of the roles.
Keep in mind that to configure a list reminder for a particular document type, a user must have at least read access to that model. For example, an employee without the right' Warehouse user' might not prepare a reminder for deliveries.
In most cases, reminders should be prepared by Odoo administrators, as they are the only users with full rights for all models. Additionally, the tool allows you to grant access to lists for any user.
Ensure you trust a person before assigning one of the roles, as this user will be able to send any data by a document type to which they have read access. It means that if a user can read leads in general, but does not have the right to read the exact lead' Tables and chairs', they would still be able to send the data for the lead' Tables and chairs' using list reminders.
About Periodic Reporting and Reminders
Periodic Reporting and Reminders is a tool for configuring automatic reports for any Odoo document type in the form of lists. Each record will satisfy the criteria you have chosen, suit pre-defined time frames, and contain only the data you would like to share.
Configure the tool to send periodic reports and reminders for all Odoo documents, including custom ones, such as sales orders, opportunities, warehouse transfers, requests for quotations, tasks, MRP operations, etc.
Choose data columns to include. Attach the report as an electronic table (xlsx),/as a PDF file,/or as a table in the email body. Apply aggregation (average, sum) for numeric columns. Introduce email greetings. Show or hide links.
Include in the report only those objects that suit your period requirements. It is possible to filter by any date and datetime fields of a target Odoo model.
Apply any filters using storable fields to include only documents of interest. Filter by a chosen partner or responsible user. Sort table lines by any searchable model field. Group lines by a specific model attribute.
Send lists with any periodicity: every day, on the last Friday of each month, on a definite date of the year, and so on. Make reports reflect company calendars.
Any partner might be one of the reminder recipients: internal or portal users, customers, or suppliers.
Reports by any Odoo object
Flexible recurrence
Filter, sort, and group records
For external and internal use
Managing Lists Reminders
The app generates a table of records related to a specific model and filters them according to your rules (including dates). It is up to you what records to include in the report, with what periodicity to send it, and whom to send it to. This way, you can configure various list reminders that will be sent regularly to different partners, including internal or portal users, customers, and suppliers.
To create a list reminder:
1. Go to Lists Reminders
2. Click 'Create'
3. Introduce the reminder's title
4. Choose the related model
5. Choose the format in which the reminder will be presented. For that, tick one or several options: 'List in Mail Body', 'Attach Excel Table', 'Attach PDF version' (see Report Format)
6. Optionally, tick the option 'Provide links' to have the reference for the source Odoo record (see Report Recipients)
7. Choose the language in which the report will be generated (should be installed in the instance) (see Report Appearance)
8. Choose the responsible person (see Filtering Records for the Report)
9. Choose a partner to easily distinguish different list reminders (see Filtering Records for the Report)
10. In the field 'Email from', choose the author of the email. Otherwise, the user (usually the Odoo bot) who sends the reminder would be its author. Please note that the setting does not affect the reply-to address. Here, the app will use the standard Odoo catchall address, as is done for any other threads
11. In the tab 'Periods', choose the dates, so that only records related to this period would be added to the reminder (see Filtering Records for the Report)
12. Optionally, add some filters and/or filter by chosen responsible/partner (see Filtering Records for the Report)
13. Optionally, in the tab 'Reminder view', write the introduction to the reminder. It will be included at the beginning of the email (see Report Appearance)
14. Optionally, choose the grouping field to group the table lines. The grouping criterion will be shown as a title line above the related table lines (see Report Appearance)
15. Optionally, choose the sorting field to order the found records. Otherwise, standard sorting will be applied (see Report Appearance)
16. Choose the columns that will be presented in the report one by one by clicking on the button 'Add a line' and specifying their labels (see Report Appearance)
17. In the tab 'Recurrence', specify the frequency of sending the report (see Periodicity of Reports).
As a result, you would receive an email with a table of all found records and/or an Excel/PDF file attached to the email.

The module provides a convenient menu 'Lists Reminders', where you can create and manage related reminders. You can distinguish the created reminders by their reference and the related model.
Navigate around list reminders conveniently with the help of the search bar, filters, and grouping options. You can search for reminders by their reference and related partner. Filter the records that fall under your responsibility and group them by model, responsible party, or partner.
Duplicate reminders, to quickly create similar ones, with just a few changes. For that, open any reminder, click on the actions button, and then 'Duplicate'.
You can archive one or several reminders that you no longer need. For that, open any reminder, click on the actions button, and then 'Archive'. Or, in the list's reminders menu, select several ones by ticking the box next to them, click on the actions button, and then 'Archive'.

Filtering Records for the Report
As we select a specific model, all its records are considered to be included in the list reminder. If there are a large number of records, it may not be a good idea to display them all in the report. For example, if you prepare a list reminder for the model 'Sale Order', sending the list of sale orders for the entire period is hardly convenient. The module allows filtering records, so only the relevant, up-to-date records will be added to the list reminder. For this, filters were introduced by relative periods, document details, and the responsible/partner.
Filtering by relative periods allows you to limit the records by date, so only the ones for the specified time are added to the list reminder. For example, instead of adding sale orders for the whole time, you can configure the report to show you only the sale orders for the last month. This way, you will not have to look through the whole list of sales orders to find the ones you need.
Filtering by document details allows you to add only the records that match your conditions to the list reminder. For example, you can configure the report to show only the sales orders in the statuses' Sent Quotation' and 'Sale Order'.
Filtering by responsible/partner allows you to show only the records related to a specific responsible user or customer/vendor. For example, you can configure the report to show only the sales orders of the customer Gemini Furniture, where the salesperson is Jack Green.
Filters by periods, relative fields, and responsible/partner can be combined. This way, if you prepare a list reminder for the model 'Sale Order', you can include only the sale orders for the last month, that are in the status' Sent Quotation', for the customer Gemini Furniture, where the salesperson is Jack Green.
Suppose you create a similar list of reminders with slightly different filters. In that case, it will be helpful to duplicate an existing reminder and modify the filters to ensure they are distinct.
Filters by Relative Periods
Filters by period are added in the 'Periods' tab as you create or edit a list reminder. It is possible to restrict report time frames by any kept date or datetime fields of a target document type, such as deadline, create or close date, or next activity day, as intervals can be selected in days, weeks, months, or years.
You can apply a few periods based on different dates, for example, selecting this month's closed leads that were opened in the last year. Records should satisfy each criterion, but if you selected the same date twice, records should be within any of those periods. For example, a deadline should be within the last two months OR the next month, AND a close date should be within the previous year.
Intervals may define previous time frames ('the last') and forthcoming periods ('the next'). Periods are relative, allowing them to be set in relation to today or a specific period in the past/future. For example, 'this month', 'the last year compared to the past 5 months', or 'the next 5 weeks compared to the next month'.
Exclude or include a current period. For example, you might send a reminder on the first day of a month for a previous one. Vice versa, forward a list on the last day of this month for a current one.
To add a filter by period:
1. Click 'Add a line'
2. Choose the date field, which the module will consider
3. In the column 'In', choose if the date should be in the future or in the past
4. In the column 'Interval Type', choose the type of period that should be considered
5. In the column 'Interval', set the number of 'Interval types' that should be considered
6. Tick the box 'Including current', consider the records of the current 'Interval type' for the report (For example, today is 25/09/2025. If 'last 2 months' is selected and the box is not checked, Odoo would consider July and August. If checked, August and September.)
7. In the field 'Compared to', choose the option 'Today' if the set period should be calculated relative to today. Choose the option 'Past'/'Future' and set the period type and length in the fields' Interval type' and 'Interval' to calculate the period relative to a particular moment in the past/future.
8. You can check the set periods below in the section 'If the reminder is sent today, the periods will be'
9. Optionally add some more periods.
For example, you can create a filter by relative period to show only sales orders with creation dates within the last 3 months, including the current one, compared to the past 2 weeks. This way, if today were 07/11/2025, the sale orders created from 01/08/2025 to 31/10/2025 would be considered for the report.

Periods can be calculated relative to today (Current day), relative to a past period (Current day – Compared period), and relative to a future period (Current day + Compared Period).
To calculate periods relative to today, when setting a period for the report, choose the 'Today' option. For example, today is 03/09/2025, which means that the 'last 2 months' are July and August. The 'next 5 days' are 04/09-08/09/2025. If the 'Including current' flag is checked, the current period is also included. For example, today is 03/09/2025, which means that the 'last 2 months', including the current, are August and September. The 'next 5 days', including the current, are 03/09 – 07/09/2025.
To calculate periods relative to the past, set a period for the report and choose the 'Past' option. This way, we compare the set period not with the current day, but with the Current day minus the compared period. It may be beneficial when you want to receive reports about older records. For example, you can set the period 'Created on in the last 5 years compared to the past 2 years'. For instance, if it is now September 2025 and the 'current' option is selected, then records created during the following period will be considered for inclusion in the report: January 1, 2018 – December 31, 2023. If it isn't ticked, then 01/01/2017 – 32/12/2022. This way, when the year 2026 starts, the considered period will be changed to 01/01/2019 – 32/12/2023 or 01/01/2018 – 32/12/2022, respectively.
When the 'Future' option is selected, we compare the specified period to a future date. This way, we compare the set period not with the current day, but with the Current day plus the Compared period. For example, you can set the period 'Expected Closing in the next 3 weeks compared to the future 2 weeks' to the report for the model 'Leads/Opportunities. Then, the option including the current date is ticked, and today is September 15, 2025. In that case, the records with the expected closing in the following period will be considered for the report from September 18, 2025, to October 8, 2025. If it isn't ticked, then it applies to the period from September 25, 2025, to October 15, 2025.
Optionally, you can add another filter by relative period. If you added a few lines that relate to different fields, then the period restrictions are accumulated. It means that ALL period conditions should be satisfied. For example, if the delivery date should be within the last 2 months AND the creation date should be within the previous year.
However, if you added the same date twice, the condition should satisfy ANY of those criteria. For example, if the delivery date should be within the last 2 months OR the next month, AND the creation date should be within the previous year.
Keep in mind that periods are calculated relative to today or a specific period in the past/future. To determine the exact period for which the records will be included in the list reminder, it is also essential to consider the moment when this reminder is sent (see Periodicity of Records). For example, we have created a list reminder for sales orders. Then, we added two filters by relative periods: Delivery Date within the last 2 months compared to the past year, and Delivery Date within the next 5 days compared to today. The reminder is set on the first Monday of each month. Today is 07/11/2025, meaning the 'last 2 months compared to the past year' are September and October 2025. The 'next 5 days' are 08/11-12/11/2025.
Note that if a related date is not specified for a document, it is considered to be always outside the specified periods.
If the 'Including Current' option is checked, the current period is also included. For example, today is 07/11/2025, and we selected the period of 'last 2 months compared to the past year'. If the 'Including current' option is not ticked, then Odoo will consider September and October. If ticked, October and November.
To delete a filter by a relative period that you no longer need, tick the bin on the right side of the line with the period.
In the tab 'Periods', you will find the dynamic field 'If the reminder is sent today, the periods would be'. It shows the resulting period according to your period filters in real-time. This way, you can make sure that you have set the correct period for the reminder.

Filters by Storable Fields
Another way to filter records is by storable fields. With their help, you can use any document-storable field to distinguish the records that should be added. For example, adding all opportunities/leads to the report is not convenient. Instead, you can configure the report to show you only the opportunities/leads on a particular stage, i.e., 'Won'.
Filters by stored fields are added in the tab 'Filters' as you create or edit a list reminder. Filters are organized as a domain constructor: you may use most storable fields with any level of precision. For example, you can filter projects by a related partner country or even by the state of a company of a related partner.
To add a filter:
1. Click '+Add Filter'
2. Choose filter options by scrolling or typing the beginning of the search field and choosing the filter options
3. Optionally, Click on '+' on the right side of the rule you wrote to add one more line for another filter option
4. Now, as you have more than one rule, you can choose ANY or ALL button above, so only records that match ANY of the rules or ALL rules will be added to the reminder
5. Click on the '...' button, on the right side near '+', to add an even more complex rule
6. Here, you can also choose to filter documents that match ALL or ANY rules
7. If you choose ALL or ANY both times, your rules will stand in one line, and only one button will remain.
For example, let's add a complex rule for the model' Sale Orders' to show only sent quotations of our sales team 'Europe'. For that, we need to add two domains: Status = Sent Quotation, and Sales Team = 1 (where 1 is the ID of the related sales team).
You can check yourself by pressing the 'Records' button. In the pop-up window, you will see a list of records that satisfy your criteria (and for which you have access).
If you feel confident in preparing Reverse Polish Notation domains, enable developer mode and apply more complex expressions, such as 'category is child_of all'.
Please be careful when applying filters: ensure you are not forwarding confidential data to the wrong partners. Be especially cautious when receiving reminders for external contacts: ensure you filter documents by a related customer/vendor.

Filters by Responsible/Partner
The app lets you quickly limit analysis for document owners. For this, special filters were introduced by a chosen partner or a responsible user. This way, you can filter documents by the related customer/vendor or the responsible person.
To show only the records related to a particular customer/vendor in the report:
1. As you create or edit a list reminder, choose a particular customer/vendor in the field 'Partner'
2. In the tab 'Filters', find the section 'Filters by chosen responsible and/or partner (OPTIONAL)'
3. In the field 'Filter by partner', choose the field from which the information will be analyzed.
For example, let's show only the sale orders, where the customer is Gemini Furniture. For that, in the 'Partner' field, we select Gemini Furniture, and in the 'Filter by partner' field in the 'Filters' tab, we select the 'Customer' field.
To show only the records related to a particular responsible person in the report:
1. As you create or edit a list reminder, choose a responsible person in the field 'Responsible'
2. In the tab 'Filters', find the section 'Filters by chosen responsible and/or partner (OPTIONAL)'
3. In the field 'Filter by responsible', choose the field from which the information will be analyzed.
For example, let's add to the report only the sales orders where the responsible user is Jack Green. For that, in the 'Responsible' field, we select Jack Green, and in the 'Filter by responsible' field in the 'Filters' tab, we select the 'Salesperson' field.

Periodicity of Reports
Set up the periodicity of the report sending flexibly. The module allows for configuring the frequency of sending reports to fully reflect business calendars: by day, by week, by month, or by year. It is even possible to select a specific day of the week to receive the report.
The periodicity of reports is set for each list reminder. As you start creating or editing a list reminder, in the 'Recurrence' tab, select the frequency of sending the report by choosing the number and the period type (days, weeks, months, or years) in the 'Repeat every' line.
Depending on the chosen period type, the set of configurations may vary.
If you choose the periodicity by days, then you need to specify the number of days between reports. This way, you can prepare a reminder to be sent every day, every 5 days, or every 181 days.
If you choose the periodicity by weeks, you will be able to select a specific day/days of the week to send the report on. To do this, choose the days by checking the box next to each one. This way, you can send statistics each Monday, or once every five weeks on Thursday, and so on.
If you choose the periodicity by month, you can also select the day of the month when the report will be sent. The available options are:
1. For the first or the last month's day (for example, the 1st or 31st of December)
2. For the exact date (for example, the 16th)
3. For a definite weekday (for instance, the first Monday, the last Friday, or the third Tuesday).
If you choose the periodicity by years, then you will also be able to select the exact date to send the report. For example, you can set the list reminder to be sent every year or 5 years on September 1.
If you set yearly or monthly reminders, please make sure that the exact date exists. Otherwise, the last day of the previous month will be applied. For example, if you set the reminder to be sent on February 28, then, as there is no 29th day, the report will be sent on the last day, which is either the 28th or 29th of February.

The app automatically sends emails based on the scheduled job 'Lists Reminders'. It is possible to adjust the frequency of checks and the time when list reminders are sent. For example, you can configure the checks to be done once a day at noon. For that:
1. In the General Settings, turn on the developer mode
2. Go to Technical Settings > Scheduled Actions
3. Find the scheduled job 'Lists Reminders'
4. Start editing it and, in the field 'Execute every', specify the frequency with which the scheduled job should be launched. For that, choose the number and type of the period
5. Optionally, set the next execution date and time in the field' Next Execution Date'.
For testing purposes, it is also possible to manually generate and send a list reminder. For that, use the button 'Notify' above the created record.
Please note that if you are a follower of the record and click the 'Notify' button, you will not receive the notification. You will receive it only when someone else pushes the button or when the cron processes the scheduled action.

Report Appearance
The report's appearance can be flexibly configured. It is only up to you to decide what introduction to add, which fields to include in the list reminder, or which report format to send. To customize the list reminder, it is possible to:
1. Introduce any greeting text for reminders. The introduction is edited in a standard Odoo HTML editor
2. Define report language to make sure the correct translation is applied, where possible
3. Enter the email address that would be shown for reminder recipients. Otherwise, it would be the user who sends the report
4. Choose the format of the reminder. You can send a list reminder in the email body, or attach it as a PDF or XLSX file. Optionally, you can combine various formats. For example, attach both PDF and XLSX files to the email
5. Choose an unlimited number of columns for a list reminder
6. Set up table grouping for any document-storable field. For example, group the sales lines by sales team, country, salesperson, and so on
7. Set up table sorting for any document-storable field. For instance, send a sales list ordered by a sales team, a country, a salesperson, or other criteria
8. Apply aggregation operators for columns to calculate the sum or average per record's column (applicable for integer, float, and monetary fields)
9. Add references to the email by including the links to the reminder's records.
The appearance of the report is set separately for each report in the 'Reminder View' tab.
Basic Configurations
As you generate a list reminder, above the generated table with records, you will see the model and the periods for which the report is sent. This information is also included in the subject of the email. For example, if you create a list reminder for the model sale orders and, as a period set 'Created on' in the last month, including the current month, then in case today is December 30, 2025, the subject of the report will be 'Sale Orders: Creation Date: 2025-12-01 - 2025-12-31'.
It is possible to add an introduction to the report. For that, write the text in the field' Message Introduction'. It will be added to the beginning of the email body. Such an introduction is edited in a standard Odoo HTML editor.

Automatic notification sending occurs exactly as planned - by default, from the Odoo Bot. Still, you can change it in the field' Scheduler user' on the related scheduled job form.
Optionally, in the 'Email from' field when creating or editing a reminder, you can set an email address that will be displayed to reminder recipients.
It is possible to launch the notification manually. In this case, the sender's address is always taken from the user who initiates the reminder generation. That is, from the user who clicks the button ('Notify').

Optionally, you can define the report language to ensure the correct translation is applied. This way, the translation will be used. For that, in the field 'Language' on the form, choose the language that you need. Please note that the language must be installed on the instance.

Report Format
There are several formats in which the report can be sent. It is possible to add the report to the body of the email or attach it as an XLSX/PDF file to the email.
To attach the report to the body of the email, tick the option 'List in Mail Body' while creating or editing a list reminder.
To attach the report as an XLSX file, tick the option 'Attach Excel Table' while creating or editing a list reminder.
To attach the report as a PDF file, select the 'Attach PDF version' option when creating or editing a list reminder. The table is added in the landscape view. Please use only in case the number of columns suits the A4 width; otherwise, the table may not look good.
It is also possible to select one or more options at a time. For example, if we tick the options' List in Mail Body' and 'Attach Excel Table', then in the email, we will see the report in the email body, and the XLSX file will be attached to the email.
Please note that if you don't select at least one format, the related email will contain only greetings, if any.

Report Columns
Choose the fields that will be presented in the report by clicking the 'Add a line' button and choosing the field. It is possible to select an unlimited number of columns. Please keep in mind that with a large number of columns, it is better to send the list reminder as an Excel file, while the table may not fit into the letter/printed form.
As a column, it is possible to choose any field of the following types: char, text, HTML, integer, float, selection, boolean, date, datetime, and relations to other documents (many2one, one2many, many2many). The list of fields may vary depending on the chosen model in the reminder. For example, if you create a list reminder for the model 'Sale order', you can select the fields 'Reference', 'Creation Date', and 'Total', and they will be displayed in the report.
As you select a field, the field description is used as the column name by default. Optionally, in the column 'Label', you can change the way the related column will be named in the table. For example, for the 'Sale Order' model, add the 'Display name' field and in the 'Label' column, change the title to 'Order number'.
For the relational fields, you might also choose second-level precision. For example, you might display a customer's phone number for a sales order reminder or tag colors for tasks. For that, in the column 'Complementary', choose the field that should be added to the table. For example, if you add a 'Customer' field and select its complementary field as 'Phone', then in the table, the column related to the 'Phone' field will be added, not the 'Customer' field.
For integer, float, and monetary fields, you can also choose what to show as a table total by applying aggregation operators for columns. The app allows you to calculate the sum or average based on the records column. For that, in the field' Total Operator', choose one of the options 'Sum' or 'Average'. For example, if we add a 'Total' field to the sale orders list reminder and choose the 'Sum' option in the 'Total Operator' field, then below the column, we will see the sum of the total of the sale orders included in the reminder.
Optionally, in the field' Group by field', set the grouping field, which will be considered to group the table lines. This way, the grouping criteria will be written above the related table lines, for example, separate sales orders into sections by a sales team, country, salesperson, etc.
Set the sorting field in the field' Sorting Field', which will be considered to decide the placement of records in the table. And, choose the ascending or descending direction in the field 'Sort Direction'. This way, you can get the most convenient order of the records. For example, set to sort the sale orders by the 'Creation Date' in ascending order, then the order of orders will be shown from the oldest (created earlier) to the most recently created ones.
Optionally, change the order of the chosen columns by dragging & dropping the fields to ensure that the table looks exactly as you want.
Some of the chosen fields may be empty or not particularly useful. In this case, it is possible to delete the fields that you no longer need. For that, in the table, click on the cross on the right side of it.

Only chosen fields will be presented in the table. If you don't select any field, the table will be empty or contain only a list of links to related records (if the 'Provide Links' option is enabled).
Optionally, you can include or exclude links to Odoo objects. To include links to the list reminder, ensure that the 'Provide links' option on the form is selected. This way, you can check out the linked objects for additional details.
Both internal and external users will be able to see the links in the table. However, if a user is external or doesn't have the right to a particular object, they shouldn't be able to open the link (see Report Recipients).
Be cautious when sending a list reminder to external users with the option enabled, to ensure that no confidential information is shared.

Report Recipients
You can set the recipients of the report flexibly. Any partner might be one of the reminder recipients: internal or portal users, customers, or suppliers.
To add a follower to a reminder: open any reminder, click on the 'Person' icon below the reminder, and choose 'Add followers'.
This way, the notification is received by all users specified as followers of the reminder.

If you have ticked the option 'Provide links' to have the reference for the source Odoo record while creating or editing a list reminder, the links to the related Odoo records will be included in each row of the table. However, the Odoo records will be accessible only to internal users. If you sent the list reminder to your partners, the links would not be of any use to them. So, if they try to follow the link, they will be redirected to the login page (see Report Appearance).
For example, we have added our customer 'Azure Interior' as a follower of the list reminder' Sale Orders', and the links to Odoo records are included in the reminder. However, when Azure Interior clicks on the link, the customer is redirected to the login page or to their user portal, if they are already logged in.

Typical Use Cases
The app is used to aggregate information for any Odoo document type, including sales and purchase orders, leads and tasks, activities and meetings, deliveries, or manufacturing operations. Generally, the app should be able to retrieve information from any model that exists in the system.
Here you can find some examples of the typical use cases:
The goal: Receiving an email with the leads closed in the previous month by a team manager
Model: Lead/Opportunity
Periods: "Closed Date" in the last month
Filters: Sales Team (e.g., to contain 'Europe')
Grouping: Salesperson
Sorting: Created on (Ascending)
Columns: Display Name, Salesperson - name, Salesperson - phone, Tags, Expected Revenue (as total operator - use average, for example)
Recurrence: Send a list each month, on the first Monday.
Subscribers: a sales team manager
Similar reminders can be prepared for sales orders, deliveries, purchase orders, manufacturing operations, etc.

The goal: Receiving an email with the activities that should be done today or earlier
Model: Activity
Periods: "Due Date" in the last 1000 days, including current, compared to future 1 week (to get even the eldest activities)
Filters: Assigned to - Name contains 'Mitchell' (where 'Mitchell' is a user to notify)
Grouping: Activity Type
Sorting: Due Date (Ascending)
Columns: Display name, Action, Due Date, Note
Recurrence: Send a list every day
Subscribers: Mitchell Admin
Similar reminders can be prepared for project tasks, opportunities, planned deliveries, or incoming shipments, etc.
To create a similar reminder for another user quickly, duplicate this one, update the filter to another employee, and subscribe them.

The goal: Receiving an email with the tasks that will happen in the forthcoming periods
Model: Task
Periods: "Start Date" the last 3 weeks compared to the past 1 week, or the next 1 month compared to the future 1 week
Grouping: Project
Sorting: Deadline (Ascending)
Columns: Display name, Start Date, Deadline, Status
Recurrence: Send a list on Mondays
Subscribers: John Brown (where John Brown is an event department head)
Similar reminders can be prepared for activities, events, leads, deliveries, incoming shipments, etc.

The goal: Notifying customers about their project tasks
Model: Project
Periods: "Created on" in the last year
Filter by partner: Partner - Azure Interior, Filter by partner - Customer
Grouping: Project Manager
Sorting: Created on (Ascending)
Columns: Display name, Next Activity Deadline, Description, Last Update Status, Stage - Display name
Recurrence: Send a list on January 10 each year
Subscribers: John Brown (where John Brown is a managing partner of Azure Interior)
Similar statistics are frequently forwarded for support tickets, paid invoices, done sales orders, etc.

Access Rights
Rights to administrate the list reminders belong to 2 user roles: 'Periodic Reporting: Only Own' and 'Periodic Reporting: Manager'. If you want a user to be able to see and list reminders, they should belong to one of those groups. If an internal user doesn't have one of the listed reminder roles assigned, the related menu will be hidden for that user.
The user with the role' Periodic Reporting: Only Own' will be able to see and manage list reminders, where they are a responsible user. To set a responsible user for the list reminder, select the user in the 'Responsible' field and choose the field that will be used for filtering in the 'Filters' tab, specifically the 'Filter by partner' field.
The user with the role' Periodic Reporting: Manager' will be able to see and manage all the list reminders, regardless of the responsible user, if any.
To assign one of the list reminder roles to a user:
1. Go to General Settings > Manage Users
2. Choose a particular user
3. Scroll to the section 'Productivity'
4. In the field' Periodic Reporting', choose one of the roles.
Keep in mind that to configure a list reminder for a particular document type, a user must have at least read access to that model. For example, an employee without the right' Warehouse user' might not prepare a reminder for deliveries.
In most cases, reminders should be prepared by Odoo administrators, as they are the only users with full rights for all models. Additionally, the tool allows you to grant access to lists for any user.
Ensure you trust a person before assigning one of the roles, as this user will be able to send any data by a document type to which they have read access. It means that if a user can read leads in general, but does not have the right to read the exact lead' Tables and chairs', they would still be able to send the data for the lead' Tables and chairs' using list reminders.
