About Products Management Interface
Products Management Interface is an Odoo app that helps to improve catalog administration and to simplify the implementation of changes. The app introduces an innovative interface to search, analyze, select, and mass edit Odoo product templates.
Filter products by the hierarchy of categories and tags: select one or a few. Systematize products by attributes: e.g., find products that are both white and made of metal. You can also filter products by the e-shop categories ().
Create and manage categories, attributes, and attribute values, e-categories (), and tags right from the product management interface. Drag and drop products to a category, attribute value, e-category, and tag to assign it to all chosen products.
Sort product templates by name, reference, category, type, and price. Apply to the standard Odoo search. Click on an image to open a product form; on the card, add it for selection.
Pick products up step by step: the selection is not cleared with a new search or after you've opened a record. Proceed mass action(s) for all chosen templates.
Define which mass operations are available from a predefined list or prepare your server actions. Just a few clicks to update the category, add attribute values, withdraw from sales, change price, etc.
Add any product template fields for kanban cards for an instant overview.
Assign any user with product rights (e.g., sales, warehouse, or purchase manager) the special role of 'Product manager' to access the products' interface.
Convenient navigation and interface
Configurable list of mass actions
Efficient multi-selection and mass update
Secured interface and actions
Add-ons icons
Features introduced by add-ons are marked by these signs:
Product Management Interface: e-Commerce
The optional module introduces mass product actions to change E-shop-related attributes.
Product Management Interface: Warehouse
The optional module allows for updating batch warehouse characteristics of product templates.
Product Management Interface: Accounting
The optional module to manage the accounting traits of products in bulk.
Product Management Interface: Purchases
The optional module offers mass actions on product purchase columns.
Products Management Interface
The innovative single-view interface is implemented in the module. This allows you to see product details and perform a mass action from the same entry, without opening product templates. The interface has three functional areas: the central part with products in the middle and two functional parts with sets of control elements on the sides of it.
The left navigation panel lets you sort products according to various criteria, select all found products, and filter products by categories, attributes, e-commerce categories (), and Odoo product tags.
You can sort products by name, category, product type, internal reference, and basic sale price. If you click on the 'Arrow' icon on the right side of the sorting criteria, then the sorting will be reversed.
To sort products:
1. Open Product Management Interface
2. Choose the sorting criterion
3. Click on the 'Arrows' sign to see the reversed sorting
You can filter products by categories. To see all products of one or several categories, just put a tick in the box next to them. Categories have a hierarchy: if you choose a parent category, you will see products in the child categories as well. You can choose different variations of them.
If you tick two categories, you will see the product templates that relate to either the first OR the second category. For example, if you filter by the category 'Consumable' and then also add the filtering option by the category 'Expenses', then the product templates related to ANY of these categories will be shown.
Categories have a hierarchy. You can set a parent category and some subcategories while editing or creating a category, or simply by dragging and dropping. The order of the parent and child categories is defined alphabetically (by name).
If a child category is selected, its parents will be hierarchically highlighted by the border of dots around the name of the element. Thus, it is always clear that some choice has been made somewhere (even if the structure itself is closed).
Apart from the standard way of creating a category, it is possible to create and edit categories right from the product management interface. To add a new category through the interface, click '...add' and write the title. Right-click on a category to see all available actions:
1. Create (click to start creating a child category)
2. Rename (click to change the category's name)
3. Edit (click to edit a category).
To create and edit categories, users should have the right to create products.
You can assign/change a category of a product in the field 'Product Category' as you create or edit a product. You can also quickly change the category of all selected products by dragging and dropping them to the required one.
Also, you can filter products by attributes. Unlike categories, when you choose two different product template attributes, only the products that have BOTH chosen attributes are shown. For example, you filter by the attribute 'Color' - 'White' and also by the attribute - 1 year ('Duration'). Then only product templates of the white color with a 3-year warranty will be shown.
If you select two values of one attribute, then the product templates, which relate to ANY of those, will be shown. For example, we have different values (Steel, Aluminium, Custom) for the attribute 'Legs'.
If we select several or all values within the attribute 'Legs', we will see all the product templates related to each of the chosen values.
As you filter products by attributes, only products that have the attribute assigned are shown, even if the related attribute values aren't chosen.
Attributes have a flat hierarchy, so it isn't possible to add child attributes to attributes, or child attribute values to attribute values, etc. You can change the order of the attributes and attribute values, or change the attribute of a particular attribute value simply by dragging and dropping.
If an attribute value is selected, the related attribute will be hierarchically highlighted by the border of dots around the name of the element. Thus, it is always clear that some choice has been made somewhere (even if the structure itself is closed).
Apart from the standard way of creating an attribute, it is possible to create and edit attributes right from the product management interface. To add a new attribute through the interface, click '...add' and write the title. Right-click on an attribute to see all available actions:
1. Create (click to start creating a new attribute value)
2. Rename (click to change the attribute's name)
3. Edit (click to edit an attribute).
To create and edit attributes and attribute values, users should have the right to create products.
You can add/change attributes and attribute values of a product in the tab 'Attributes & Variants' as you create or edit a product. You can also quickly add the attribute value to all selected products by dragging and dropping them to the required one.
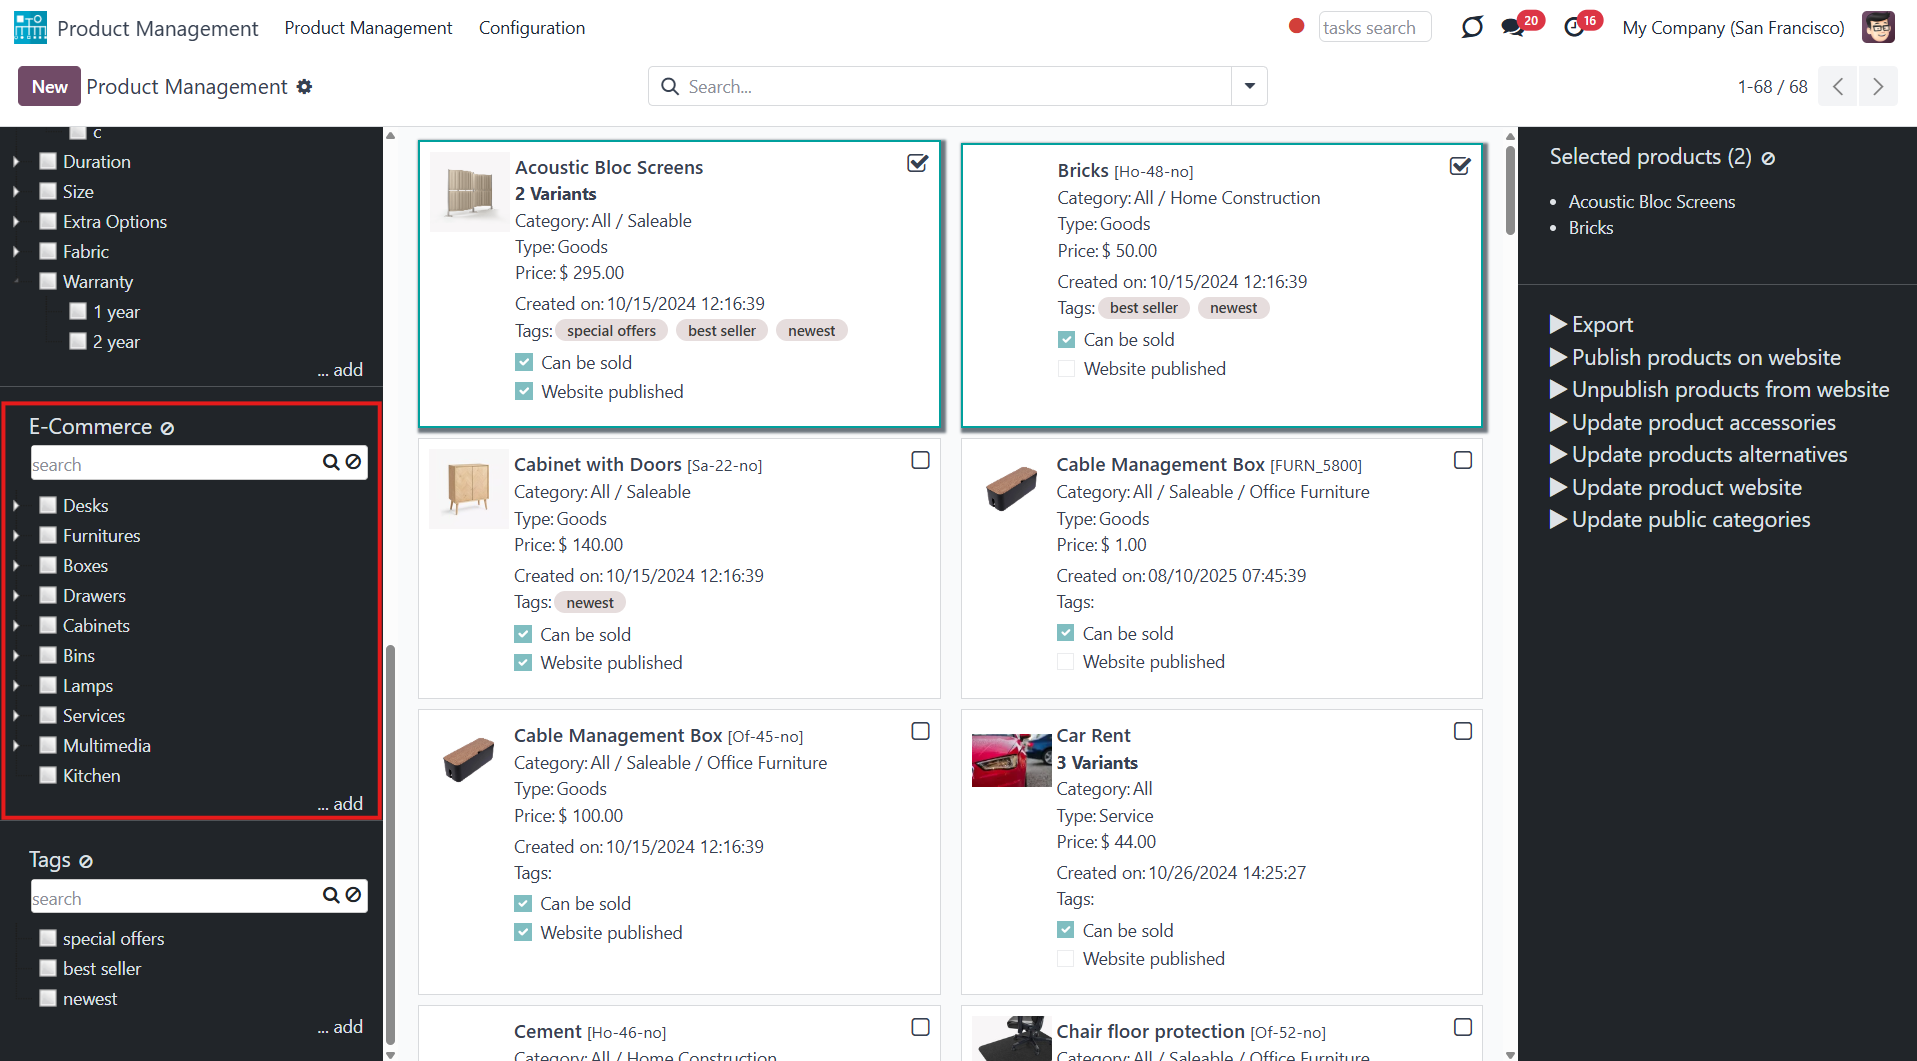
You can also filter products by e-commerce categories (). To see all products of one or several e-categories, just put a tick in the box next to them. E-categories also have a hierarchy: if you choose a parent e-category, you will see products in the child e-categories as well.
If you filter by several e-categories, product templates are also displayed if they relate to ANY of the chosen ones.
If a product relates to two different e-commerce categories and only one of them is chosen, then this product template will be shown anyway.
Suppose you filter product templates both by a category and an e-category. Then, only products that relate to BOTH will be shown. For example, let's filter by the e-categories 'Chairs' and 'Boxes'. All products related to ANY of these e-categories will be displayed. Let's also add the category 'Expenses'. Here, we will not see any product templates, as there are no products that relate to both a category and an e-category.
E-categories have a hierarchy. You can set a parent e-category and some subcategories while editing or creating an e-category, or simply by dragging and dropping. It is also possible to change the order of the parent and child e-categories by drag and drop.
If a child e-category is selected, its parents will be hierarchically highlighted by the border of dots around the name of the element. Thus, it is always clear that some choice has been made somewhere (even if the structure itself is closed).
It is possible to create and edit e-categories right from the product management interface. To add a new e-category through the interface, click '...add' and write the title. Right-click on an e-category to see all available actions:
1. Create (click to start creating a child e-category)
2. Rename (click to change the e-category's name)
3. Edit (click to edit an e-category)
To create and edit e-categories, users should have the right Sales/Administrator.
You can assign/add an e-category of a product in the field 'Categories' as you create or edit a product. You can also quickly assign/add the e-category to all selected products by dragging and dropping them to the required one.
You can also filter products by the existing Odoo product tags. If you choose several tags, then the products that relate to either of the tags will be shown.
If you filter products by a tag and a category/e-category or an attribute, then only those that match both will be shown. For example, if we filter by the tag 'Best Seller' and the e-commerce category 'Chairs', then only the products that match both will be shown.
Apart from the standard way of creating a tag, it is possible to create and edit tags right from the product management interface. To add a new tag through the interface, click '...add' and write the title. Optionally, change the order of tags by drag and drop. Right-click on a tag to see all available actions:
1. Rename (click to change the tag's name)
2. Edit (click to edit a tag).
To create and edit tags through the interface, users should have the right to create products.
You can add a tag to a product in the field 'Product Template Tags' as you create or edit a product. You can also quickly add a tag to all selected products by dragging and dropping them to the required one.

Simultaneously, you can search for products with the help of the search bar at the top right of the page. The standard searching criteria are available; for example, you can search products by their category or title.
For extra convenience, above the categories/attributes/e-commerce categories/tags, special search bars were introduced. Type the word and click 'Enter' or the search button; the matching results will be displayed and highlighted in red. Click the 'Reset' button on the right side of the search bar to clear the search results.
You can combine filtering by attributes and searching by attributes. In this case, you will also see only those product templates that match both of the attribute values. For example, you filter by the attribute 'Color' - white and search by the attribute - steel ('Legs'). Then only product templates of the white color with legs made of steel will be shown.
If you choose a child category, attribute, or e-commerce option, then all parents in the hierarchy will be outlined. This way, it is always clear when limitations are applied, even if the structure is hidden. The outline is shown only in case the parent element itself is not chosen.
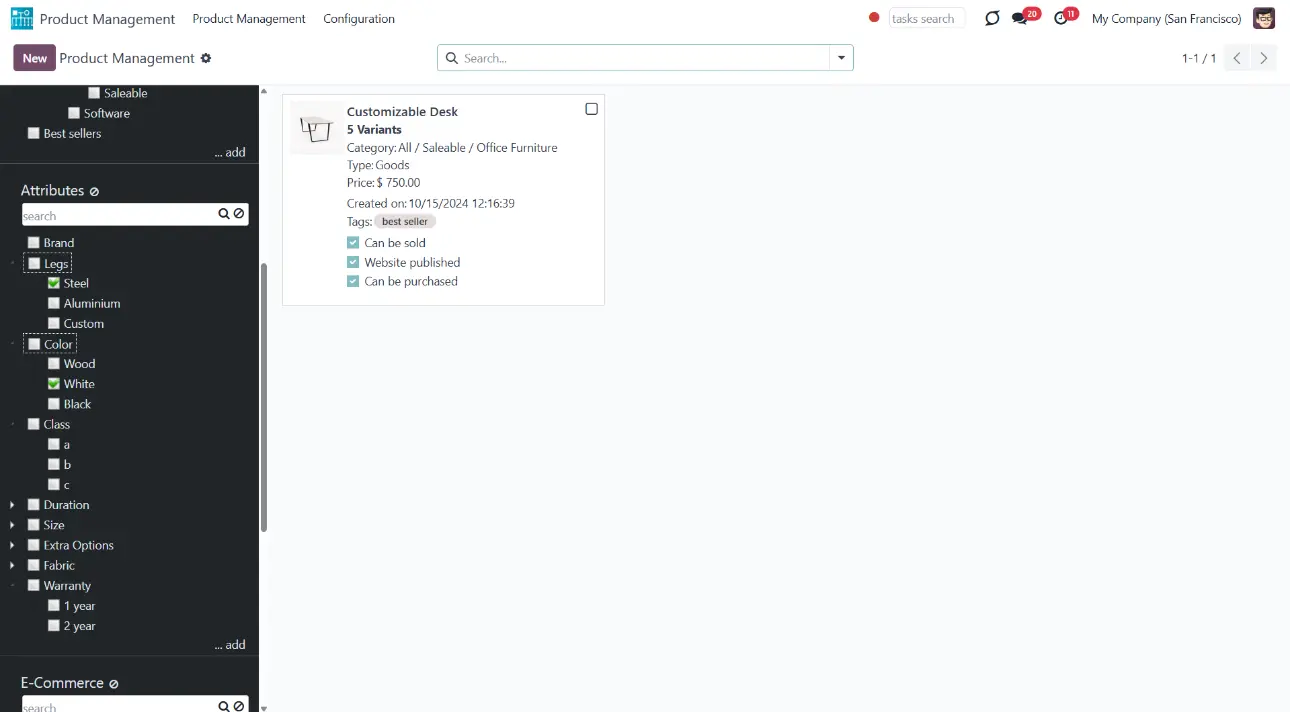
The central part of the interface shows the list of product templates. On a product template card, you will find the product's name and picture, its category, type, and price.
You may also find some of the product templates' characteristics. For example, 'Can be sold', 'Can be purchased', and 'Website published'.
The list of fields on the product's template might be changed according to the installed modules. For example, the product's stock 'On Hand' will be shown only if you have the extension 'Stock by Locations' installed.
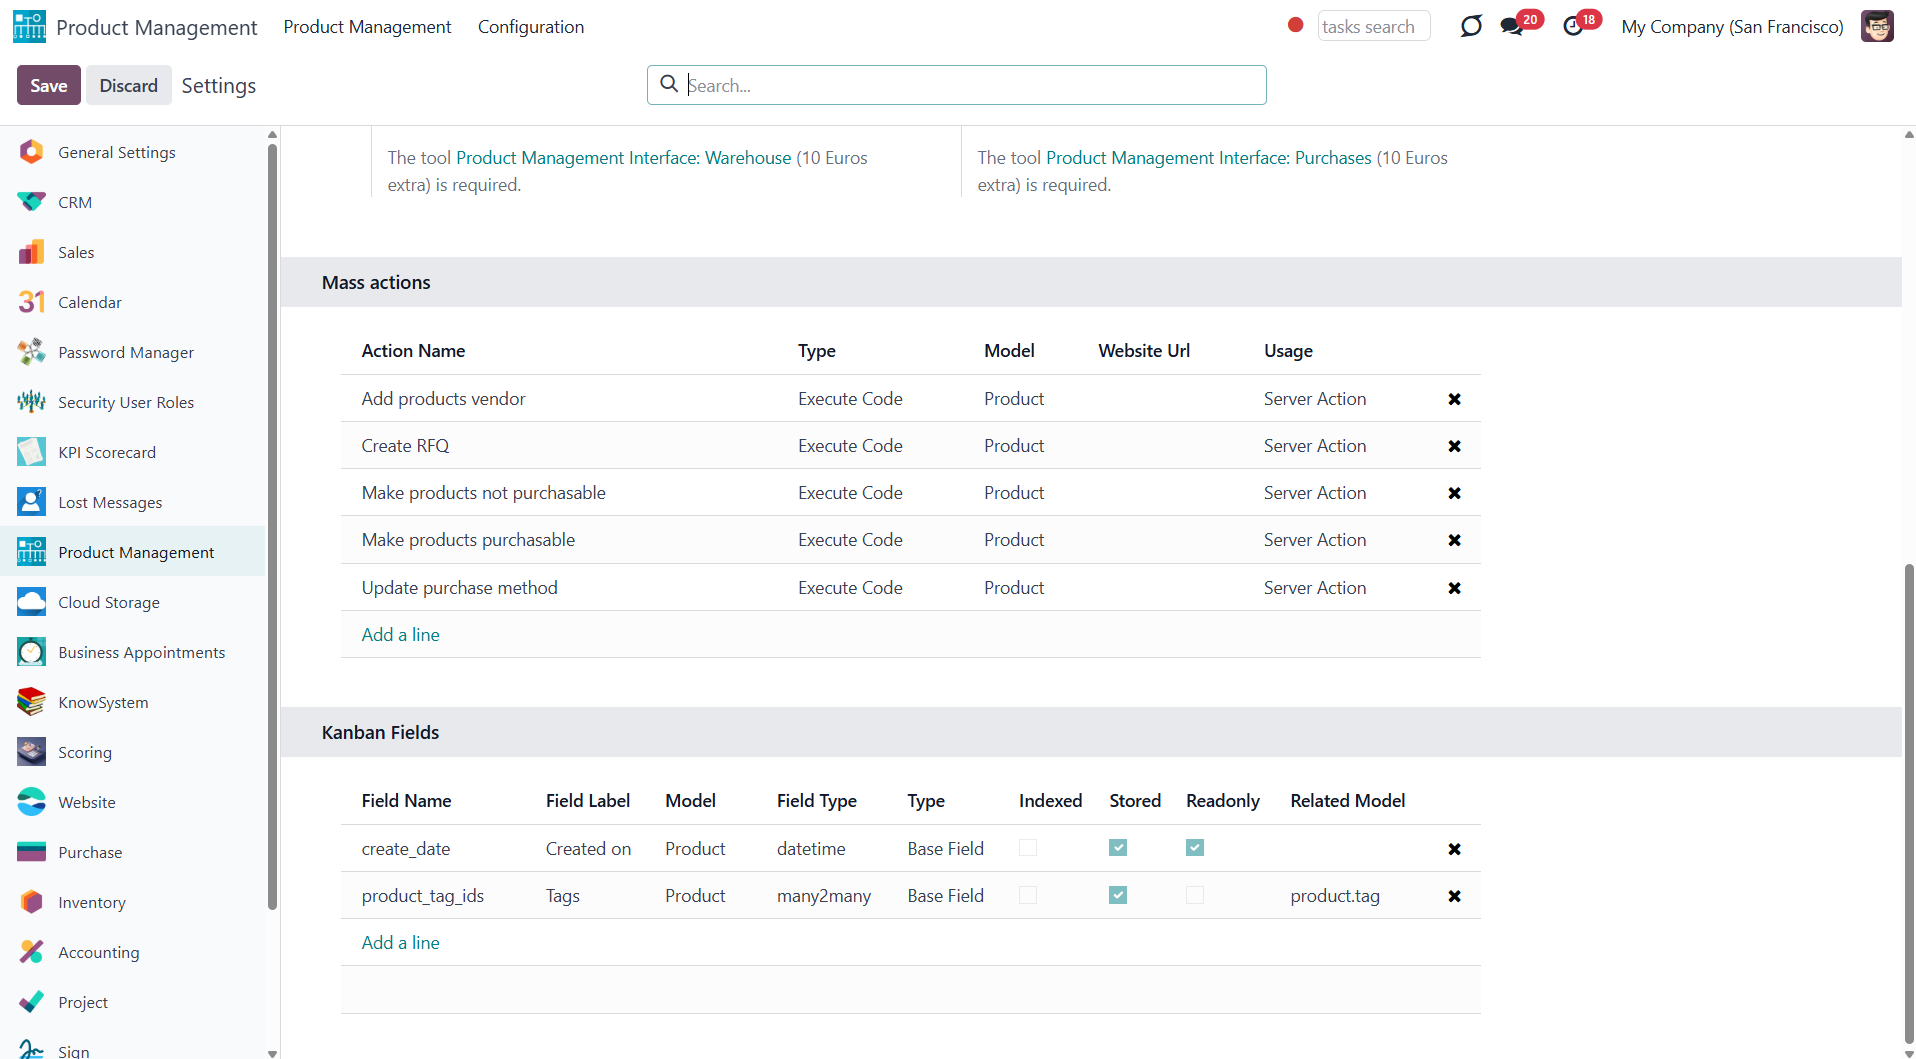
Any field on the product template can also be manually added to the kanban view for an instant overview. For that:
1. Open the 'Products Management Interface' and go to Configuration
2. Scroll down the page and find the section 'Kanban Fields'
3. Click 'Add a line'
4. Choose the fields and click 'Select'
5. Click 'Save'.
To delete a field that you no longer need after adding it, you can click on the cross on the right side of the field.
If you click on a product's picture, then the product's template will be opened.
Tick a checkbox in the top right corner of a product or click anywhere on a product card (except the image) to choose it and open the right navigation panel.
Choose an unlimited number of products step by step. When you switch between filters or apply a new search, the selection will not be cleared, which is very convenient when you want to search, open, update, or perform another mass action on various products at once.

As you choose some products, the right navigation menu appears. There, you will find the list of selected products and the list of available mass actions for products (see Managing Mass Actions). Click on a product's title in the right functional interface to remove it from the list. Remove all products by clicking on the icon () on the right side of 'Selected products'.
Managing Mass Actions
The product management Interface allows applying mass actions to all chosen product templates in a batch. Our module and its add-ons offer a list of mass actions, among which you can select the ones you need. The complete list of available mass actions you can see in the articles: 'Product Management Basic Mass Actions', 'Product Management Interface: e-Commerce', 'Product Management Interface: Warehouse', 'Product Management Interface: Accounting', 'Product Management Interface: Purchases'.
You can select the mass actions to show only the ones that you need. To add a mass action:
1. Open the product management app and go to Configuration
2. Find the section 'Mass actions'
3. Click 'Add a line'
4. Choose mass actions by ticking the box next to the action
5. Click 'Select'
6. Click 'Save'.
After saving the changes in settings, the list of mass actions in the right navigation panel will be updated.
To add the mass action 'Export', in Configuration, in the section Product Management Options, tick the option 'Export'.
Besides the available ones, you can also prepare your server actions and then choose them as mass actions (see Custom Mass Editing Operations).
In the list of available mass actions for selection, you will also find some standard Odoo Server Actions for product templates. For example, the Manufacturing module adds the action 'Generate Pricelist Report', which is also detected by our module and can be added to the right navigation panel for managing product templates in a batch.
To delete a mass action that you don't need from the list, go to Configuration and find the section 'Mass Actions'. Click on a cross by the mass actions that you don't need. Then, click 'Save' in the top left corner of the page. The mass action will not be deleted from the system; it will just be hidden from the list. Thus, later, if you need this action, you will be able to select it again.
Product Management Basic Mass Actions
The list of the mass actions of the Product Management Interface includes:
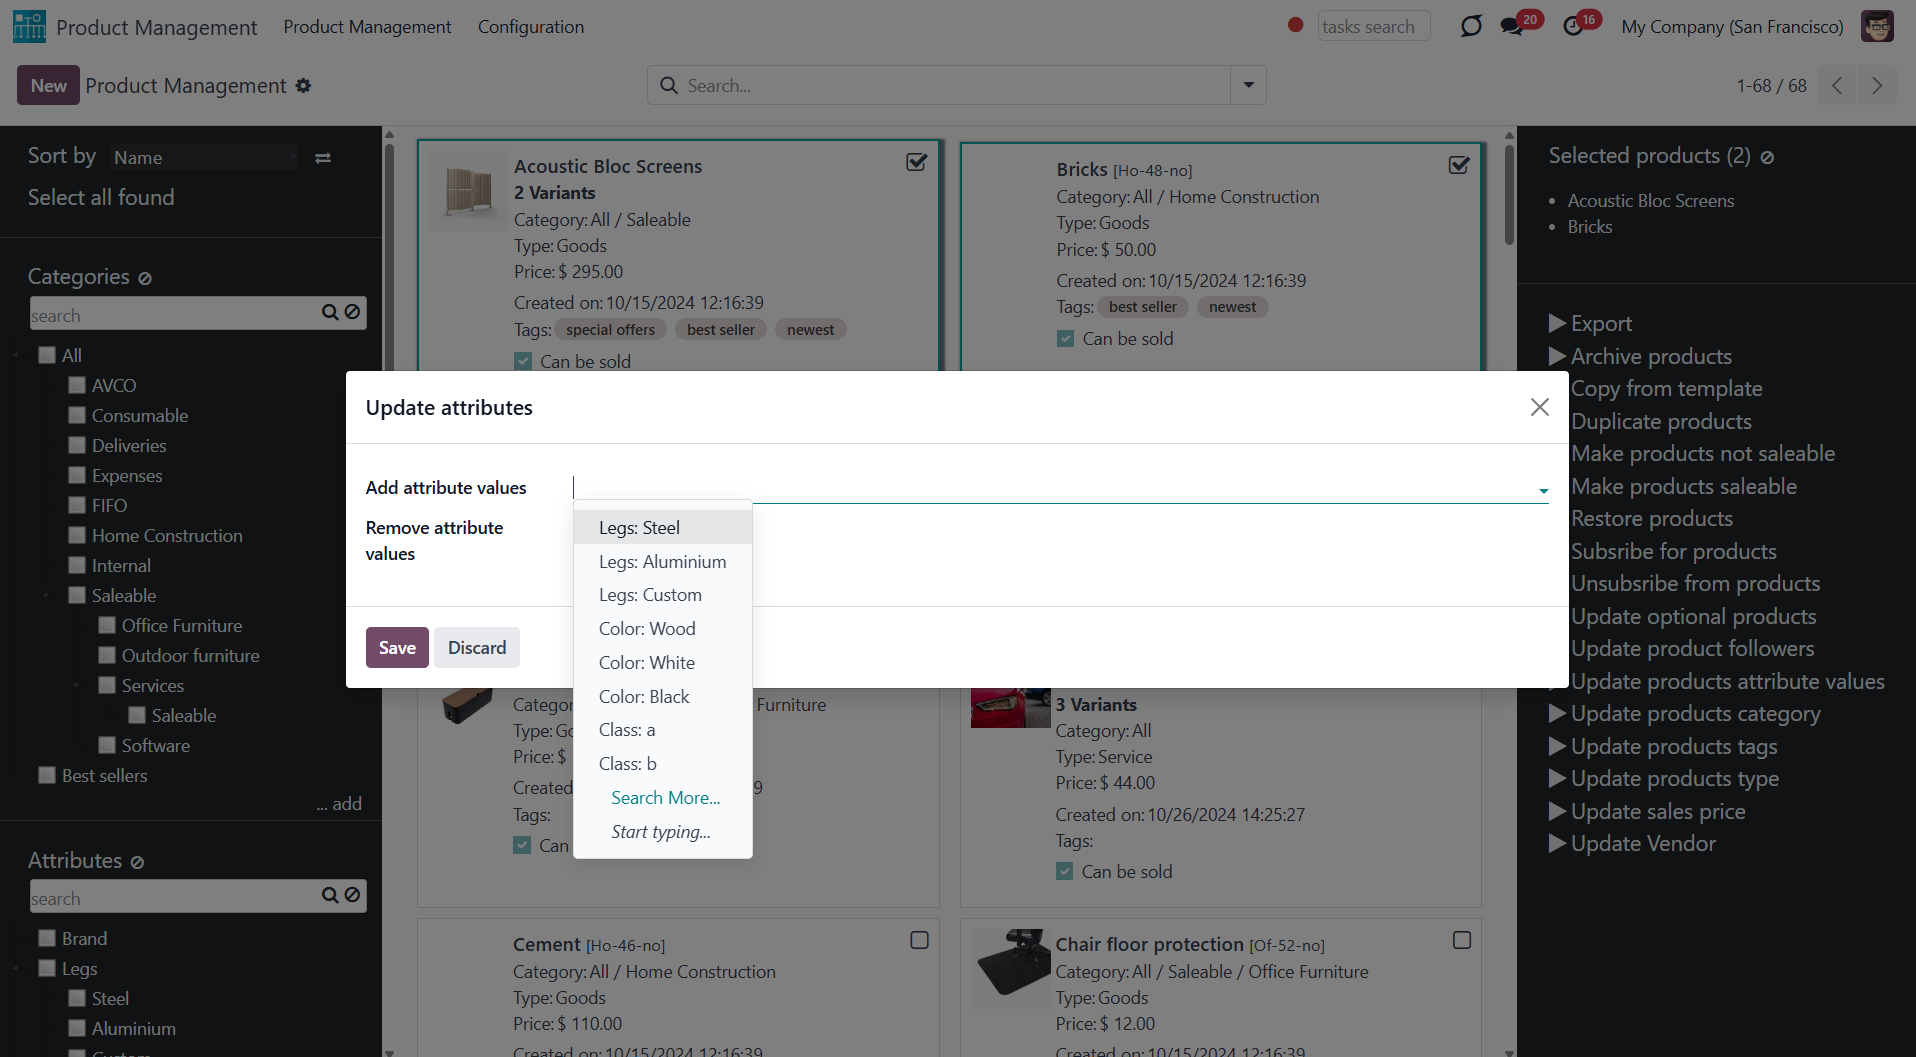
Click to add or remove attribute values to all found templates. In the field 'Add attribute value', choose the one you want to add to all of the products, and in the field 'Remove attribute value', choose the one that you want to remove.
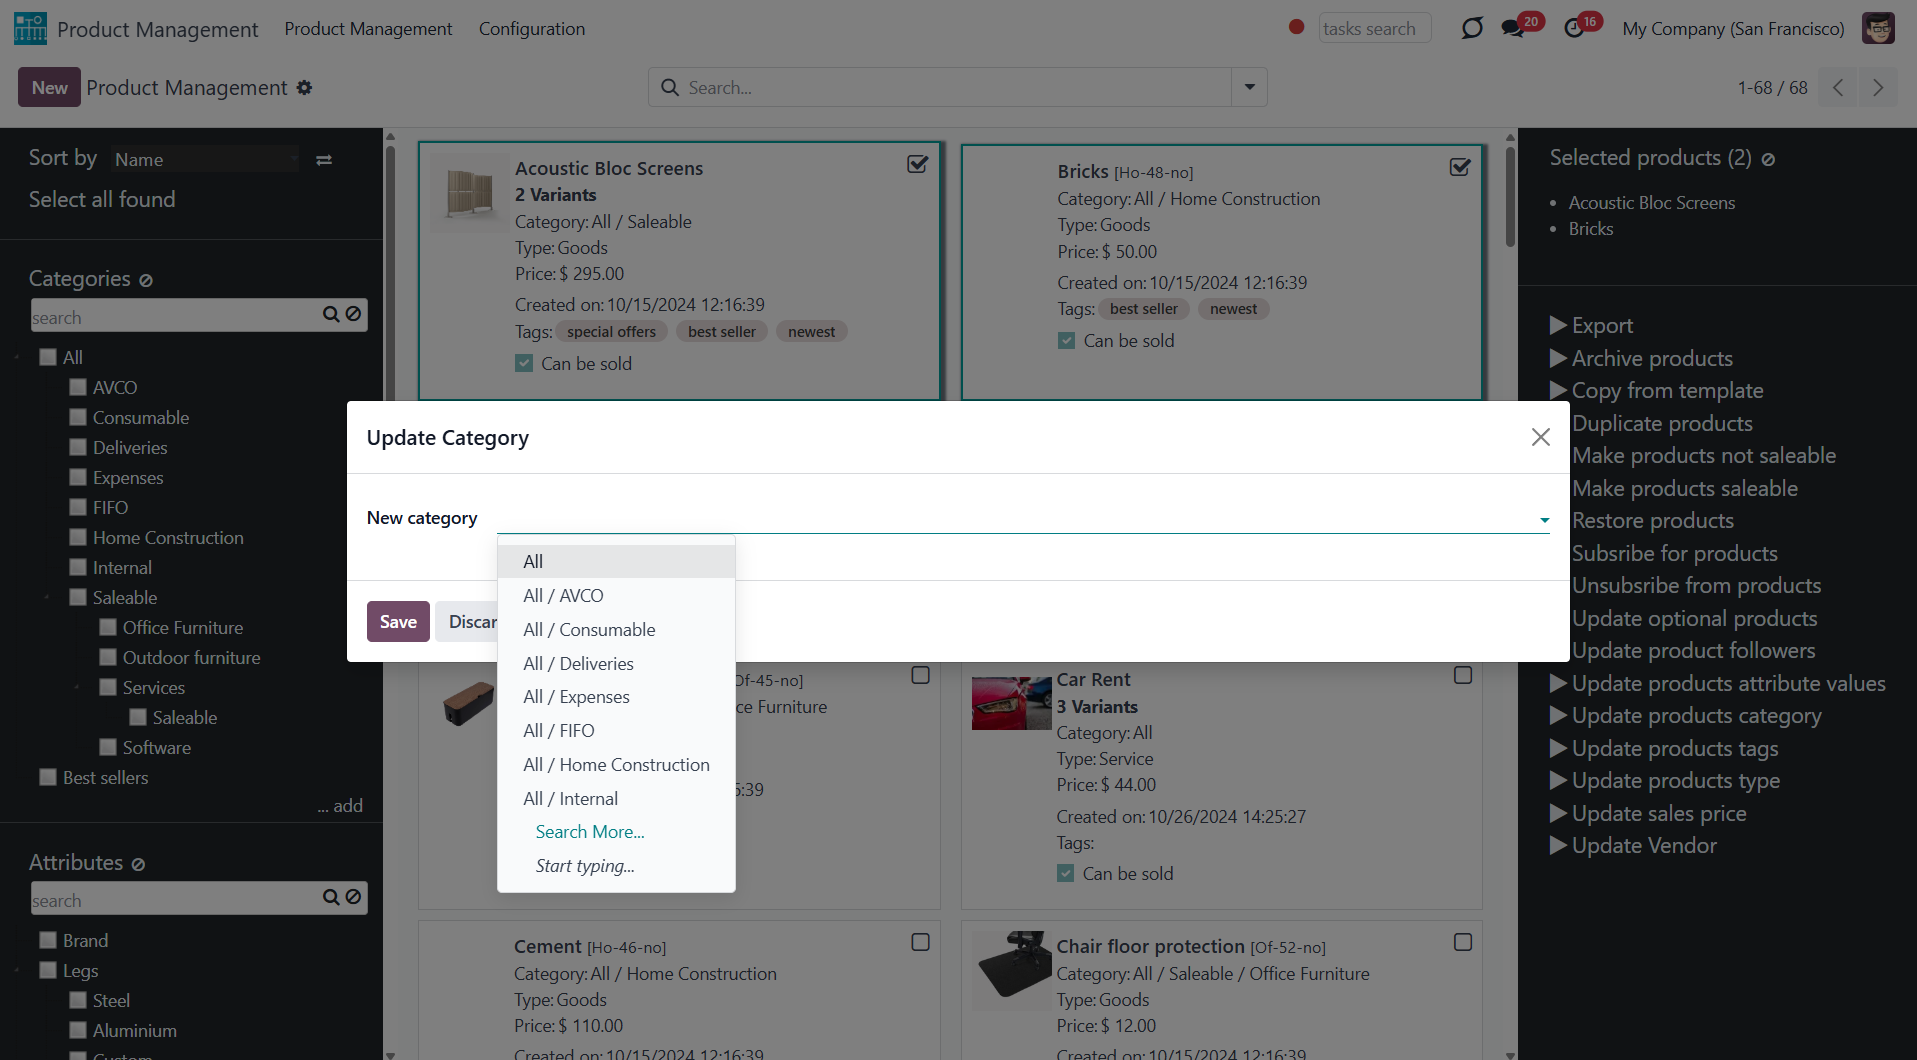
Click to change the Odoo product category of all selected products. Choose the category in the field 'New category'.
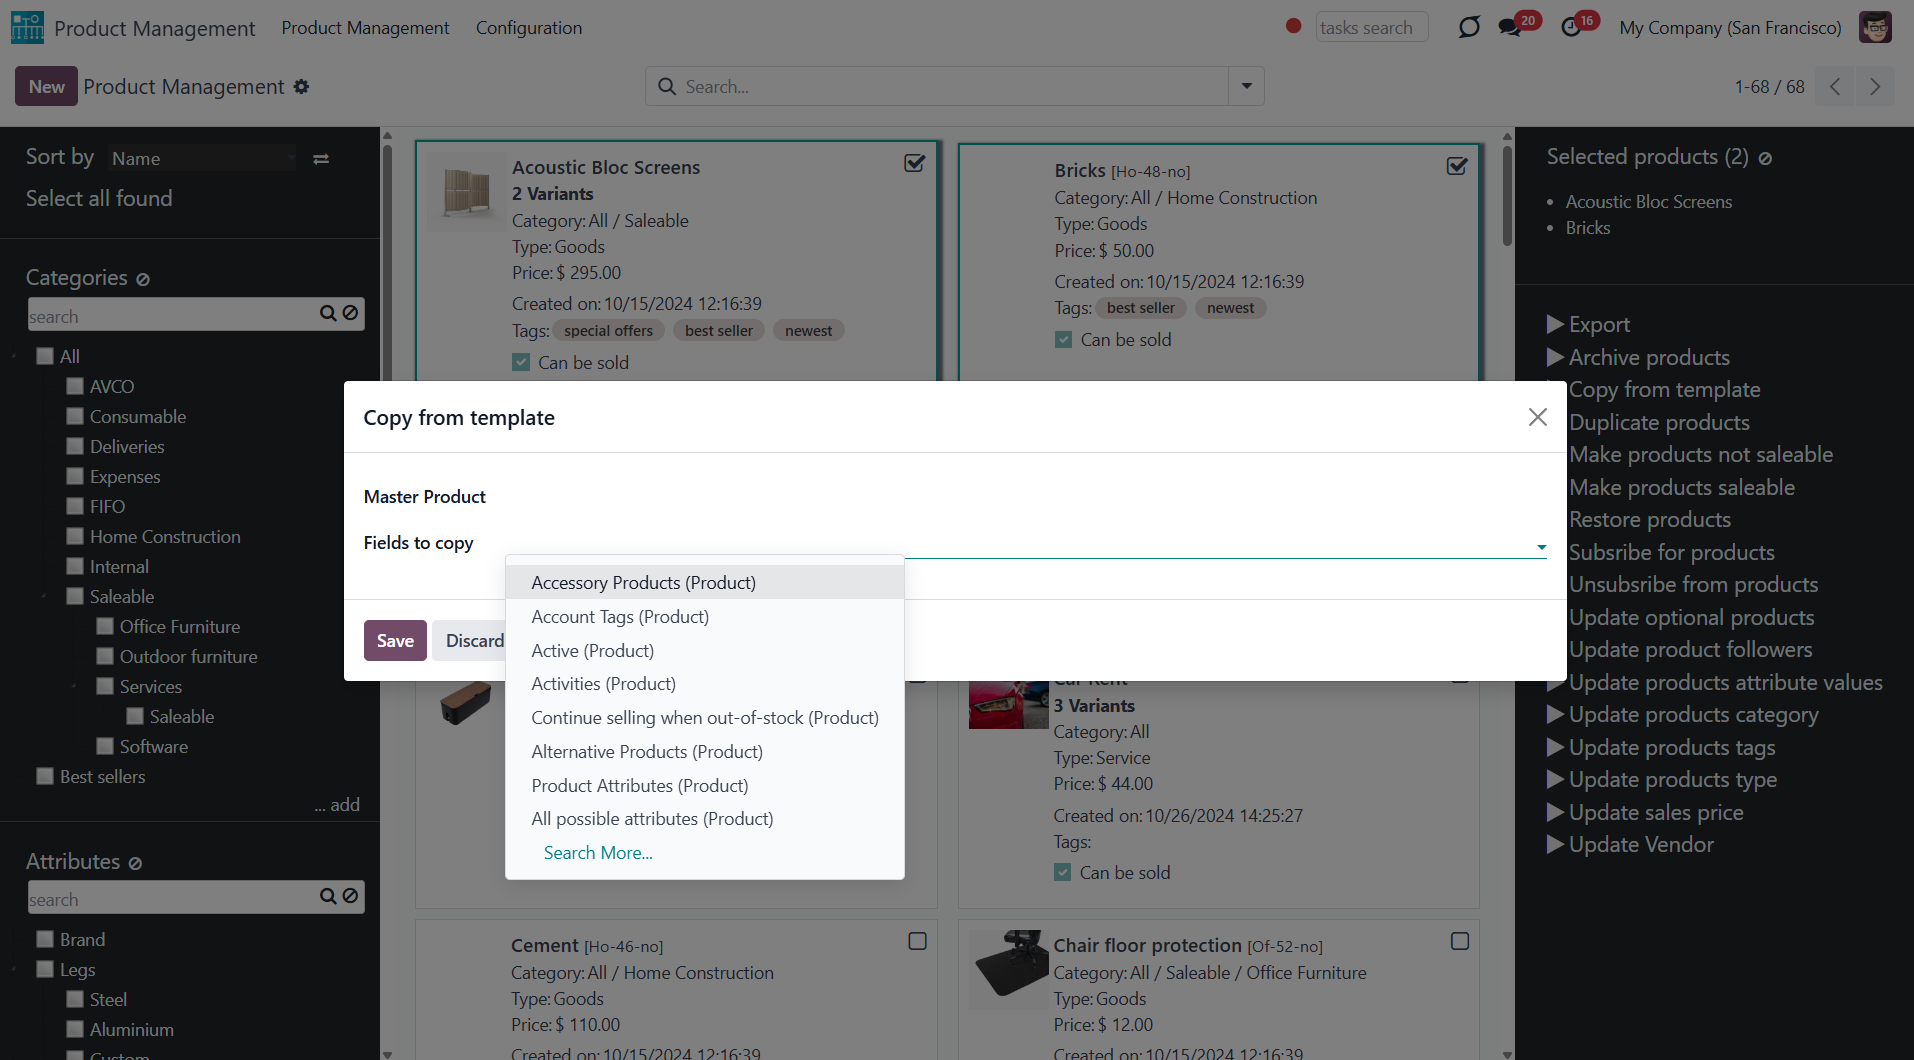
Click to specify the "master product" and its fields that should be copied to the selected products. Any storable, non-calculated field can be selected.
Choose the product to copy the field values from in the field 'Master Product' and the fields in the field 'Fields to copy'.
For example, you can assign the value from the fields price and description from the master products to all selected product templates.
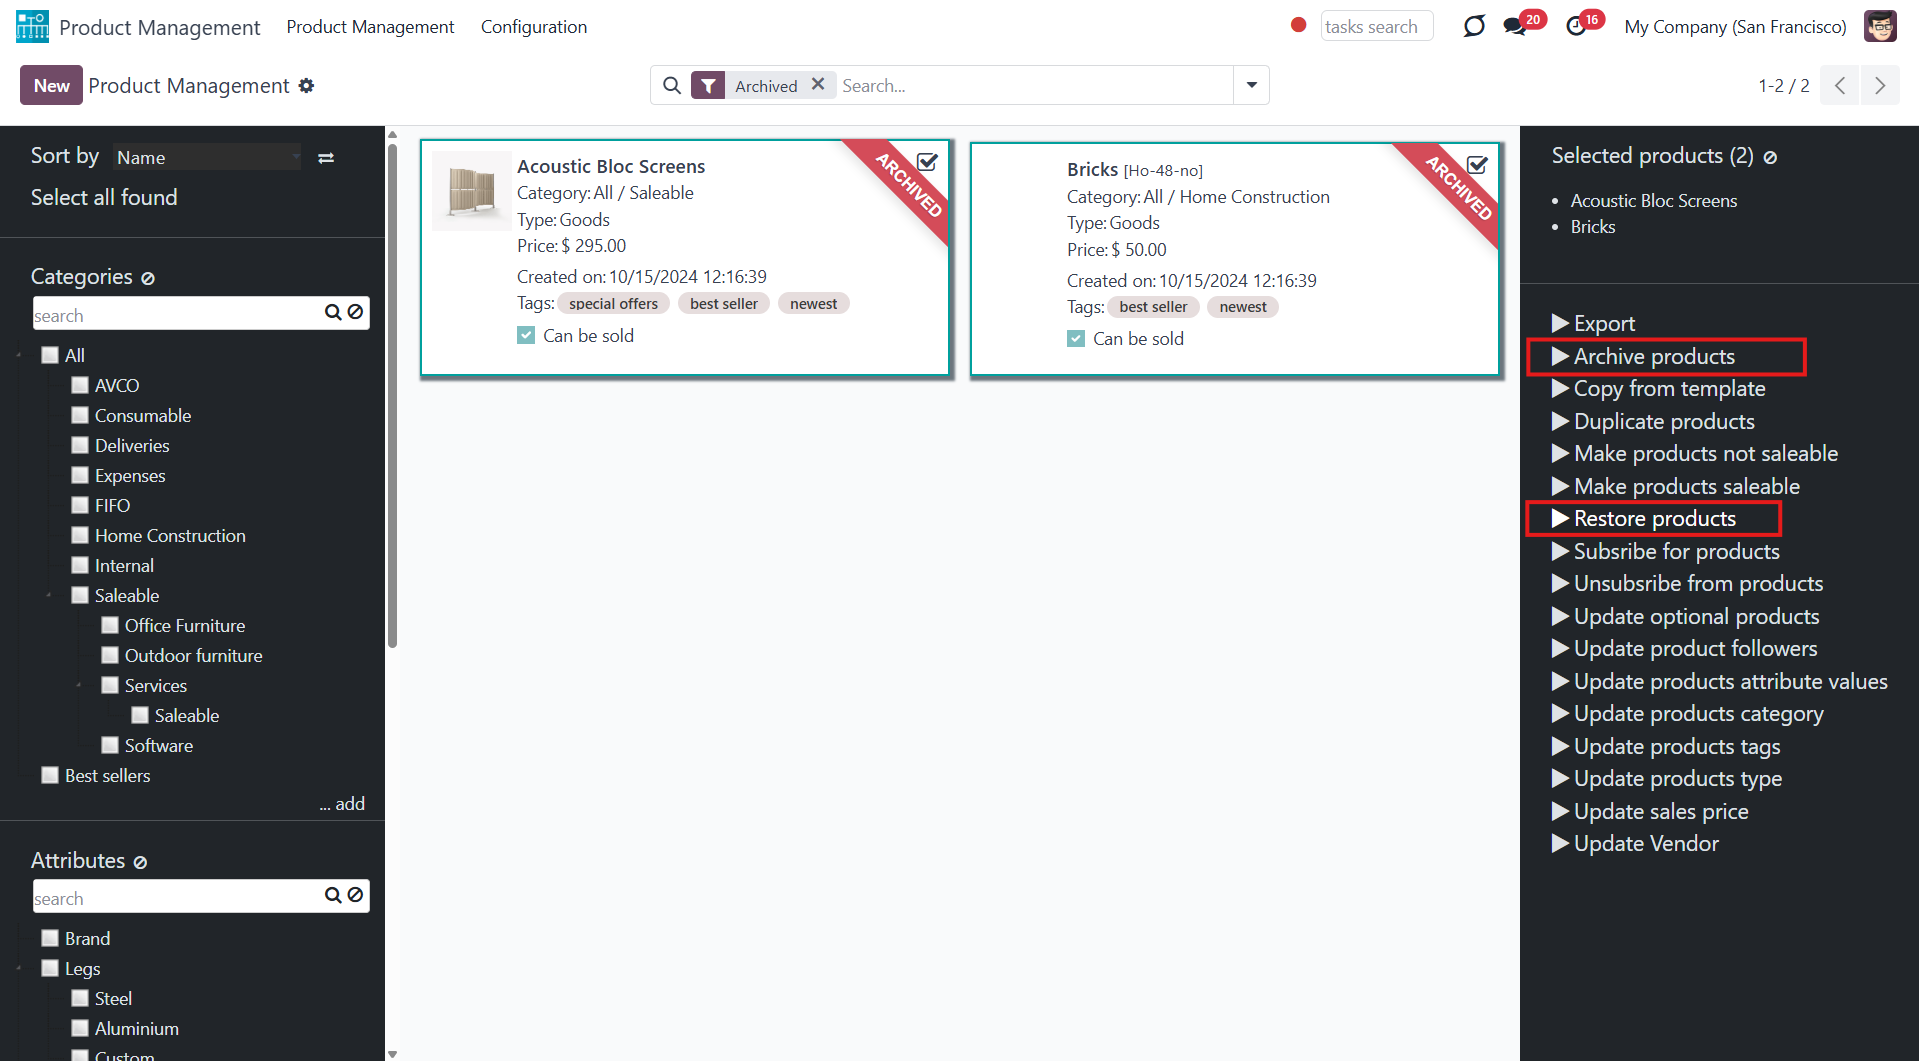
Click to archive all chosen products. You can always restore previously archived products using the mass action 'Restore'.
To see all archived products, choose the filter 'Archived'.
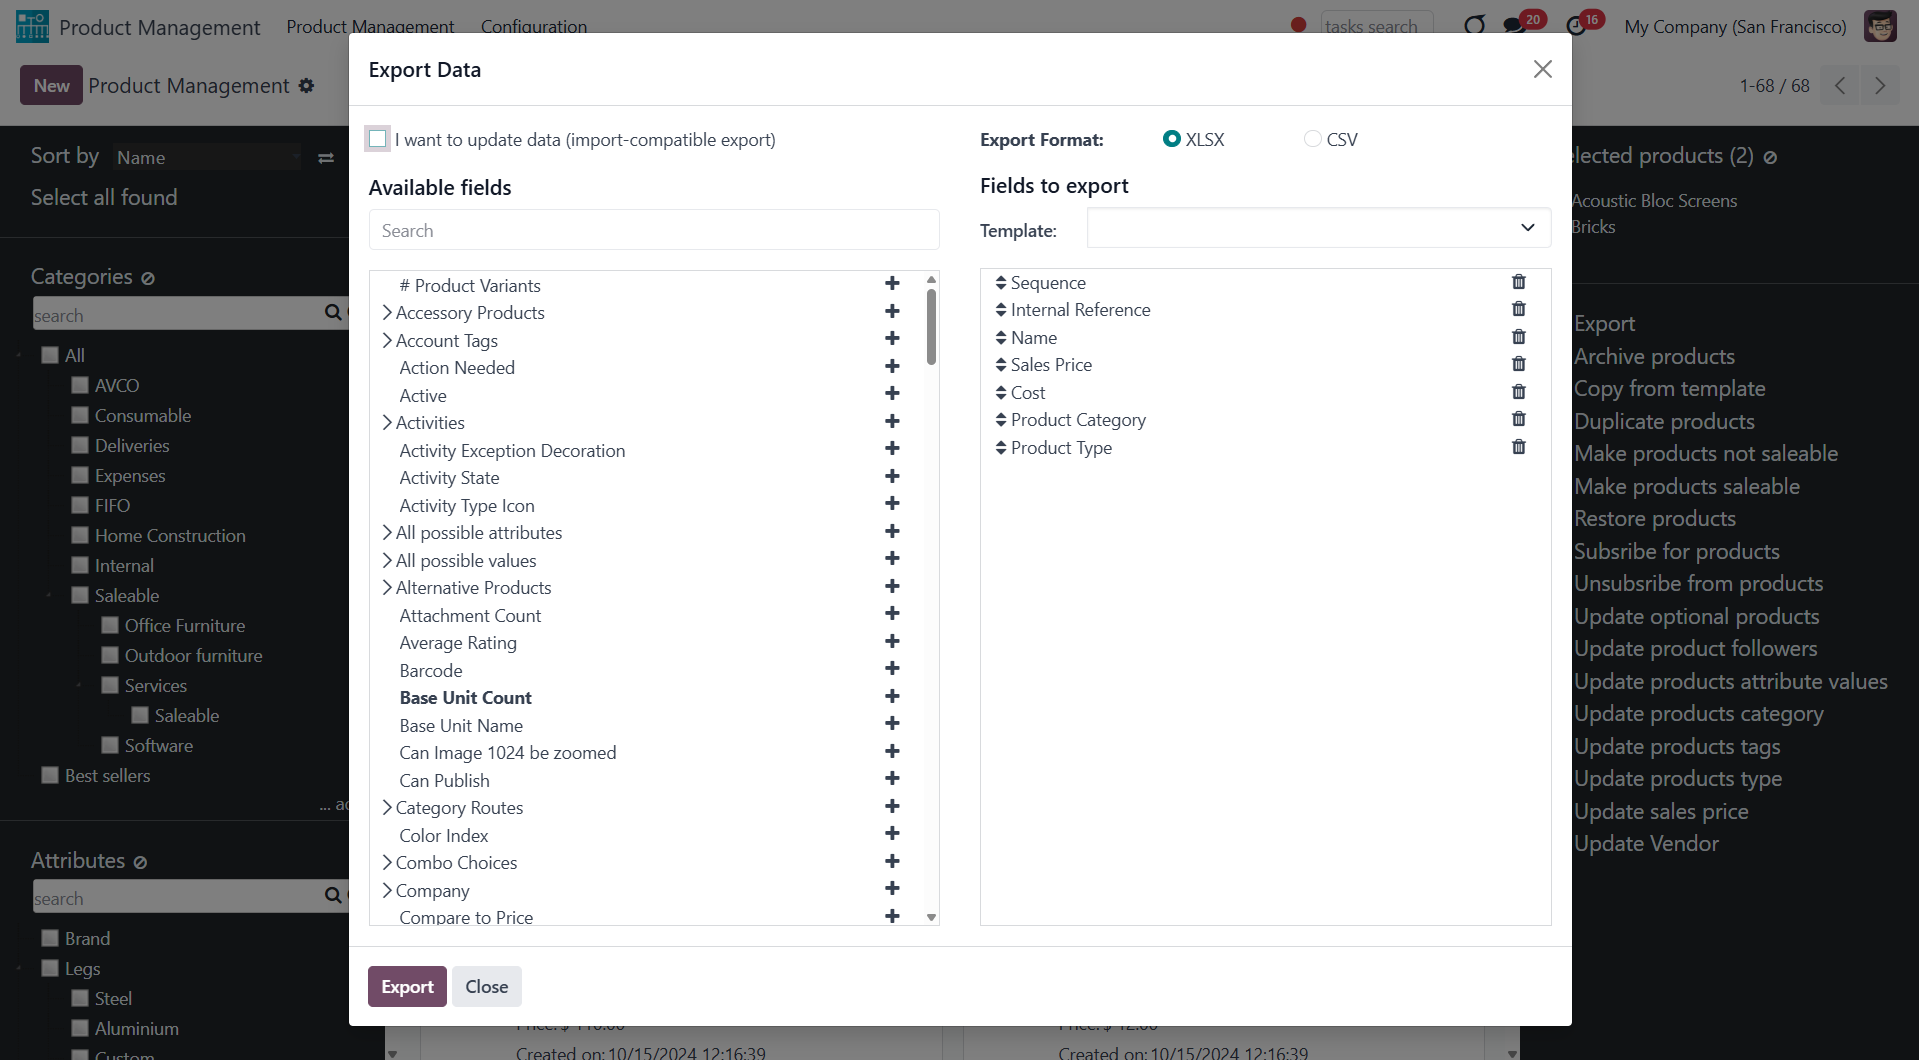
Click to export all chosen products in .xlsx or .csv. You can select fields for export.
To see this mass action, you need to turn it on (see the Module's Configuration).
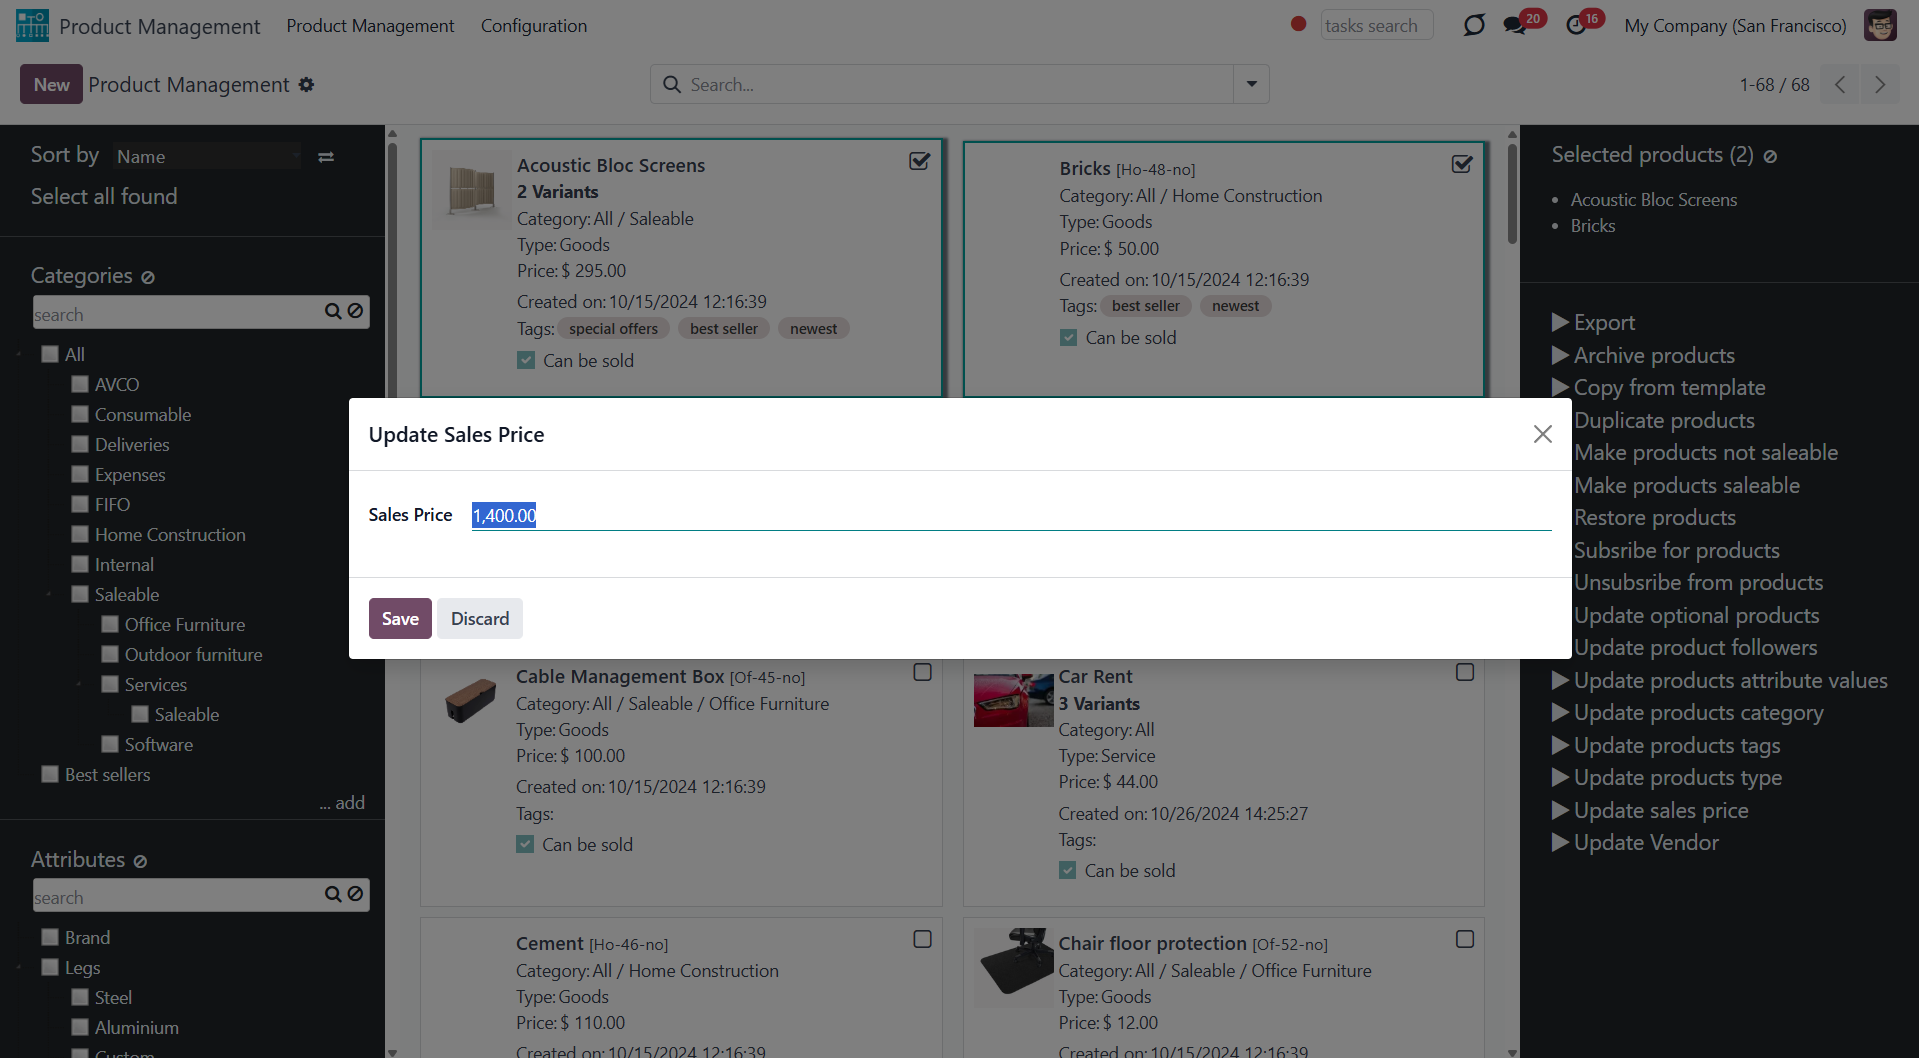
Click to change the price of all selected Odoo product templates. In the field 'Sales Price', type the price that will be applied.
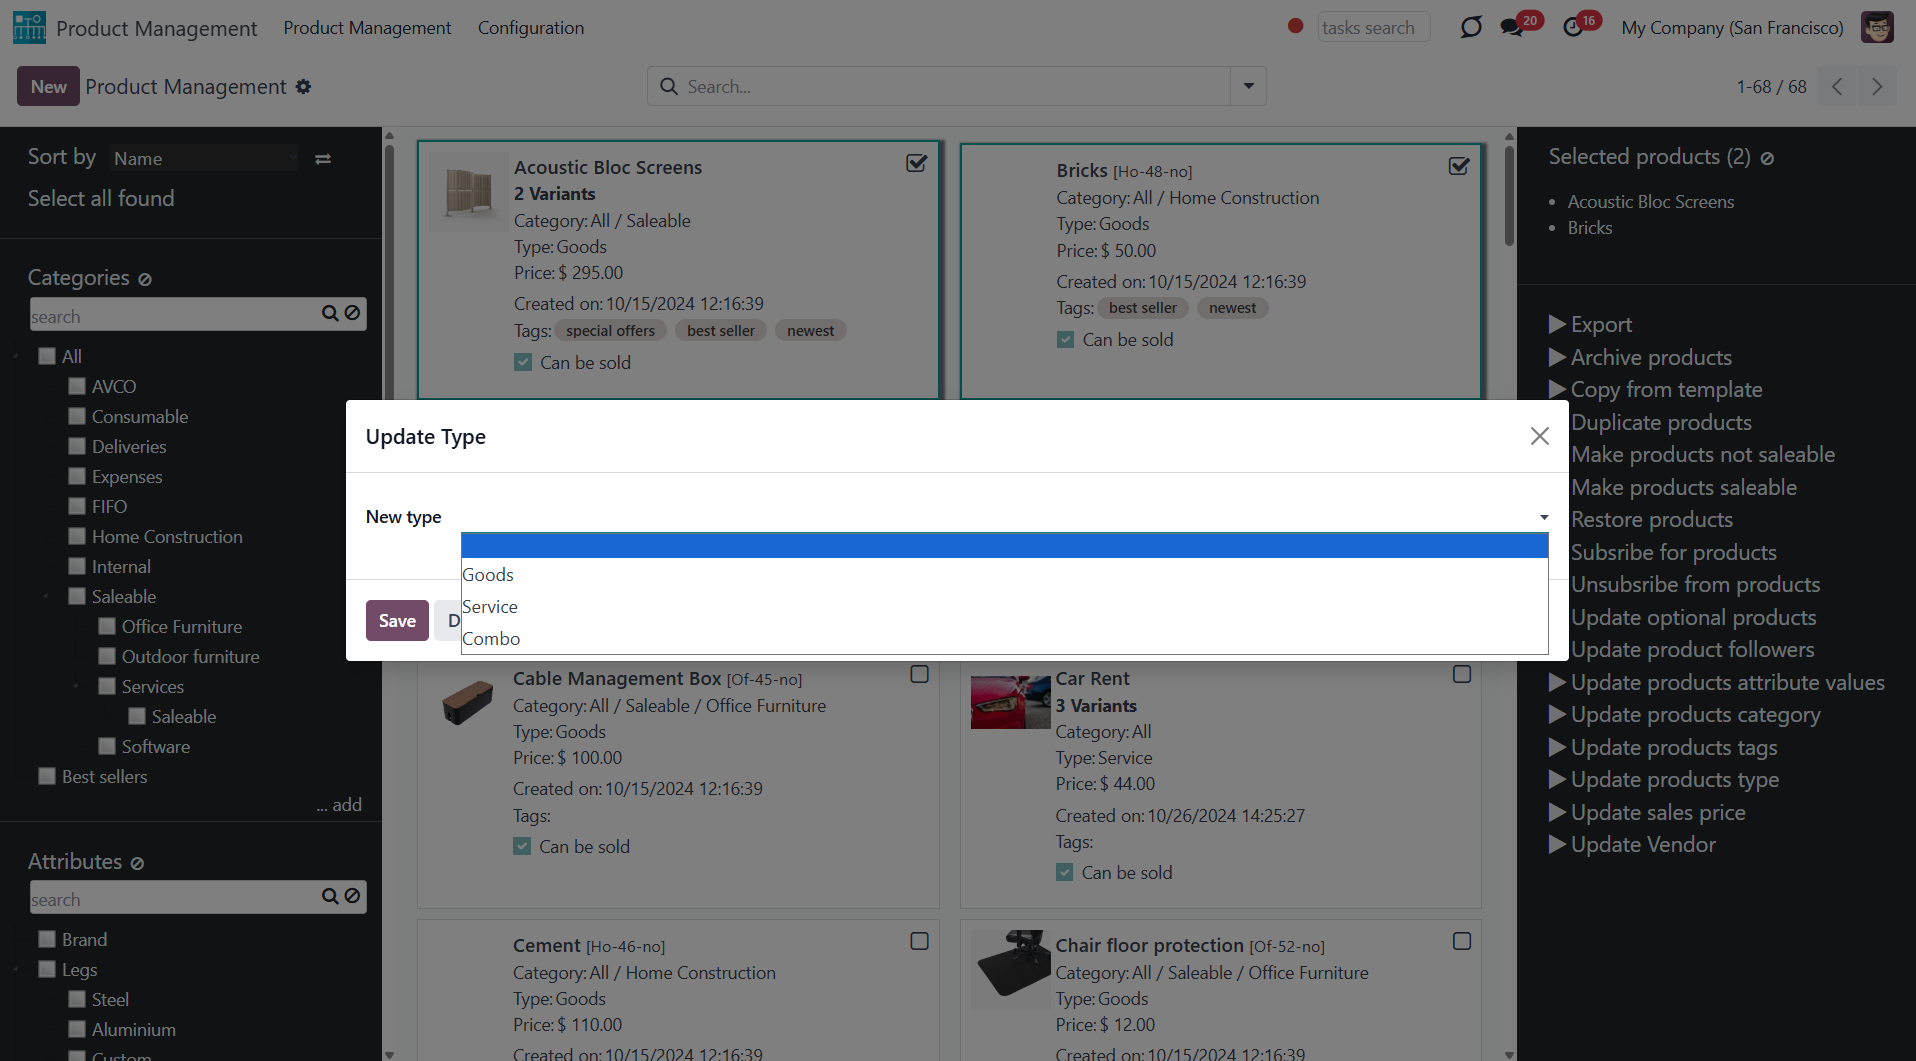
Click to change the product type of all selected templates. For that, change the type in the field 'New type'. You can assign the following types: consumable, service, and storable.
Click to update all chosen products to be saleable or not saleable.

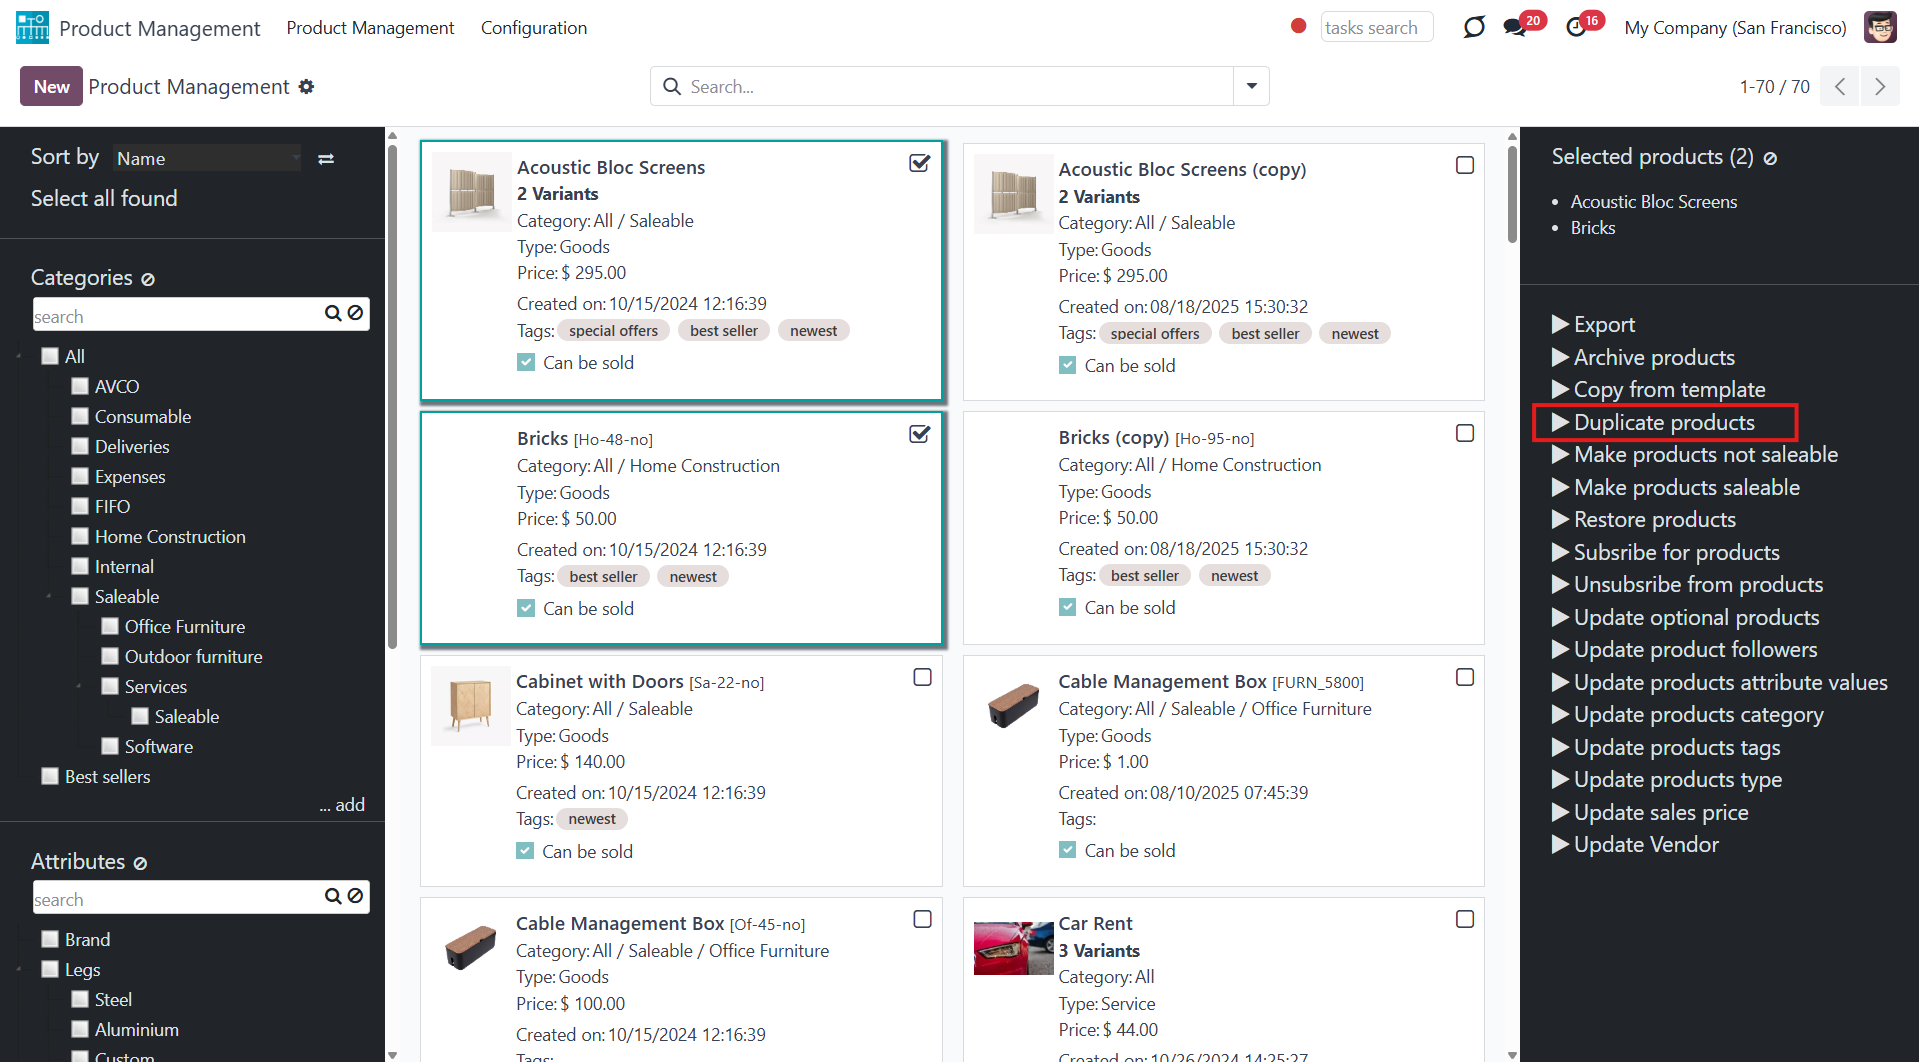
Click to duplicate a few product templates simultaneously. The duplicates will have a mark '(copy)' in the title.
Click to follow/unfollow all the selected products' discussions.

Click to add/remove product templates' followers. You can add partners by choosing them in the field 'Subscribe partners'. To remove some partners, choose them in the field 'Unsubscribe partners'.

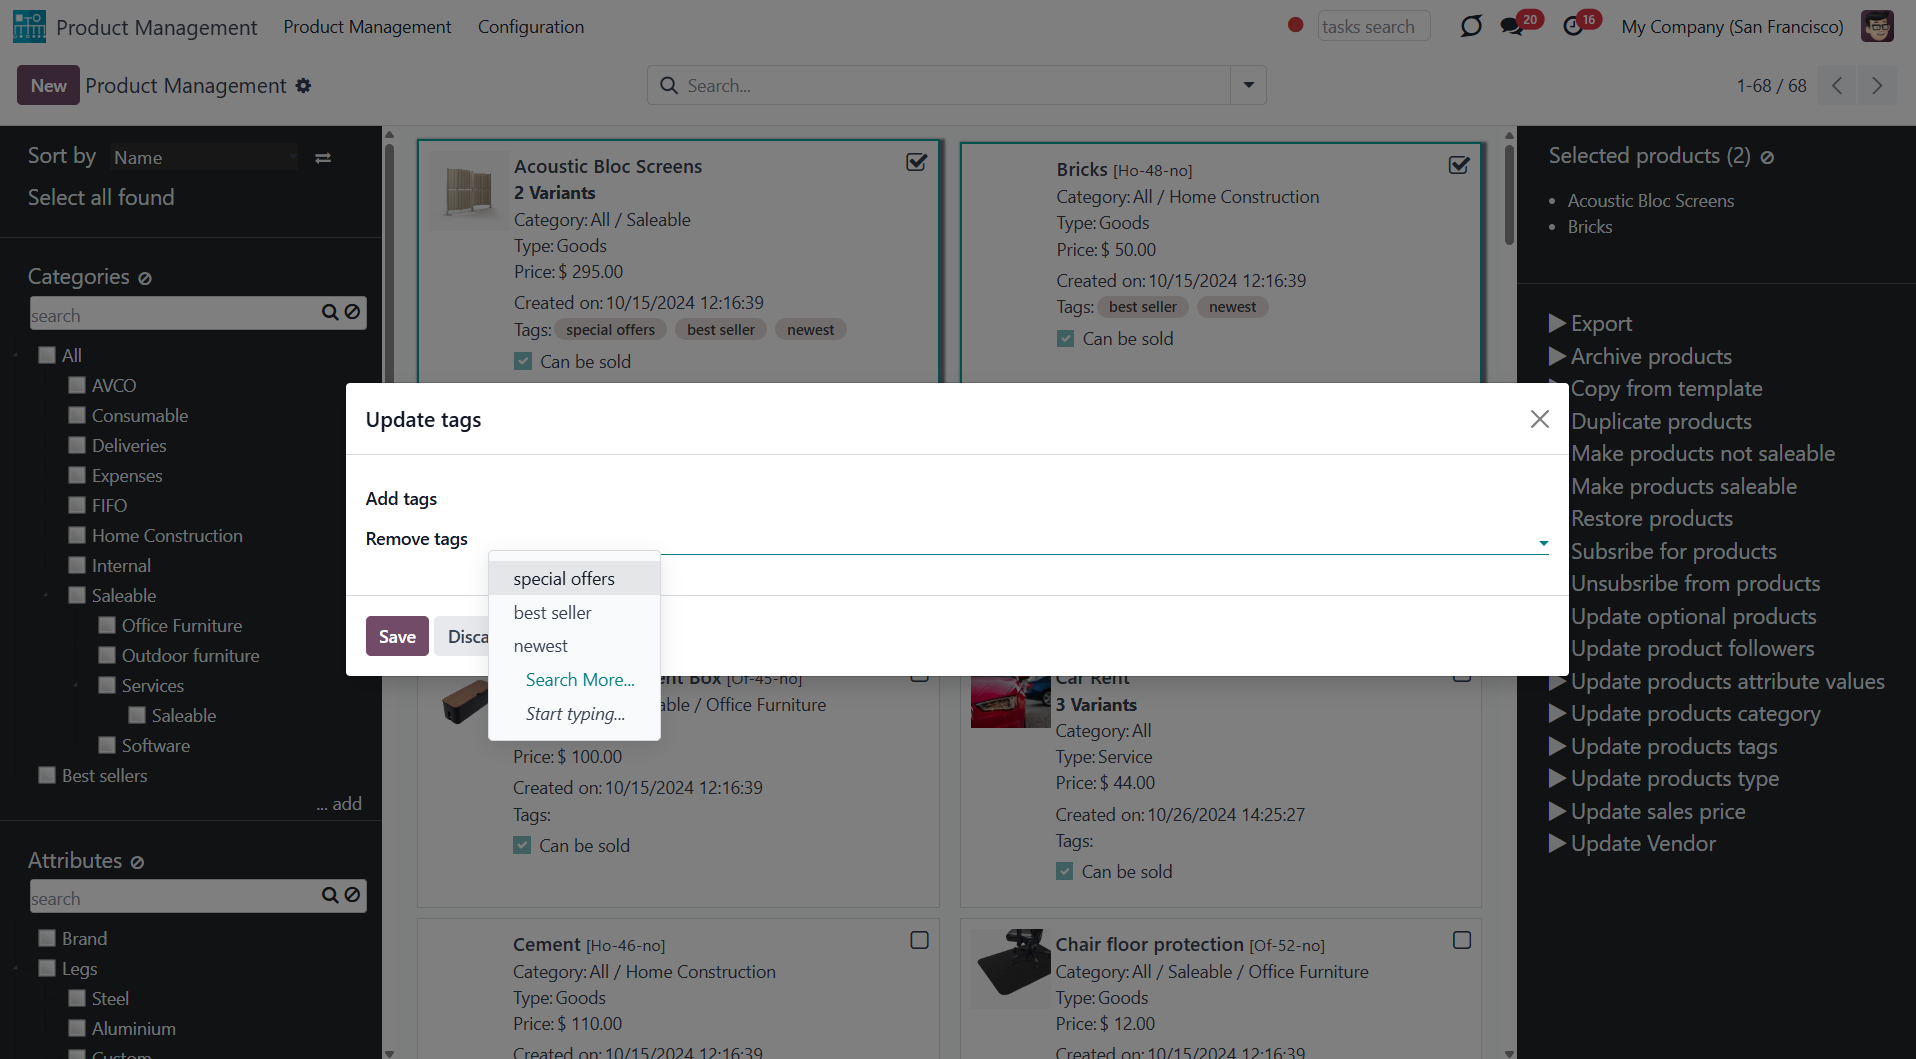
Click to add/remove product tags. You can add tags by choosing them in the field 'Add tags'. To remove some tags, choose them in the field 'Remove tags'.
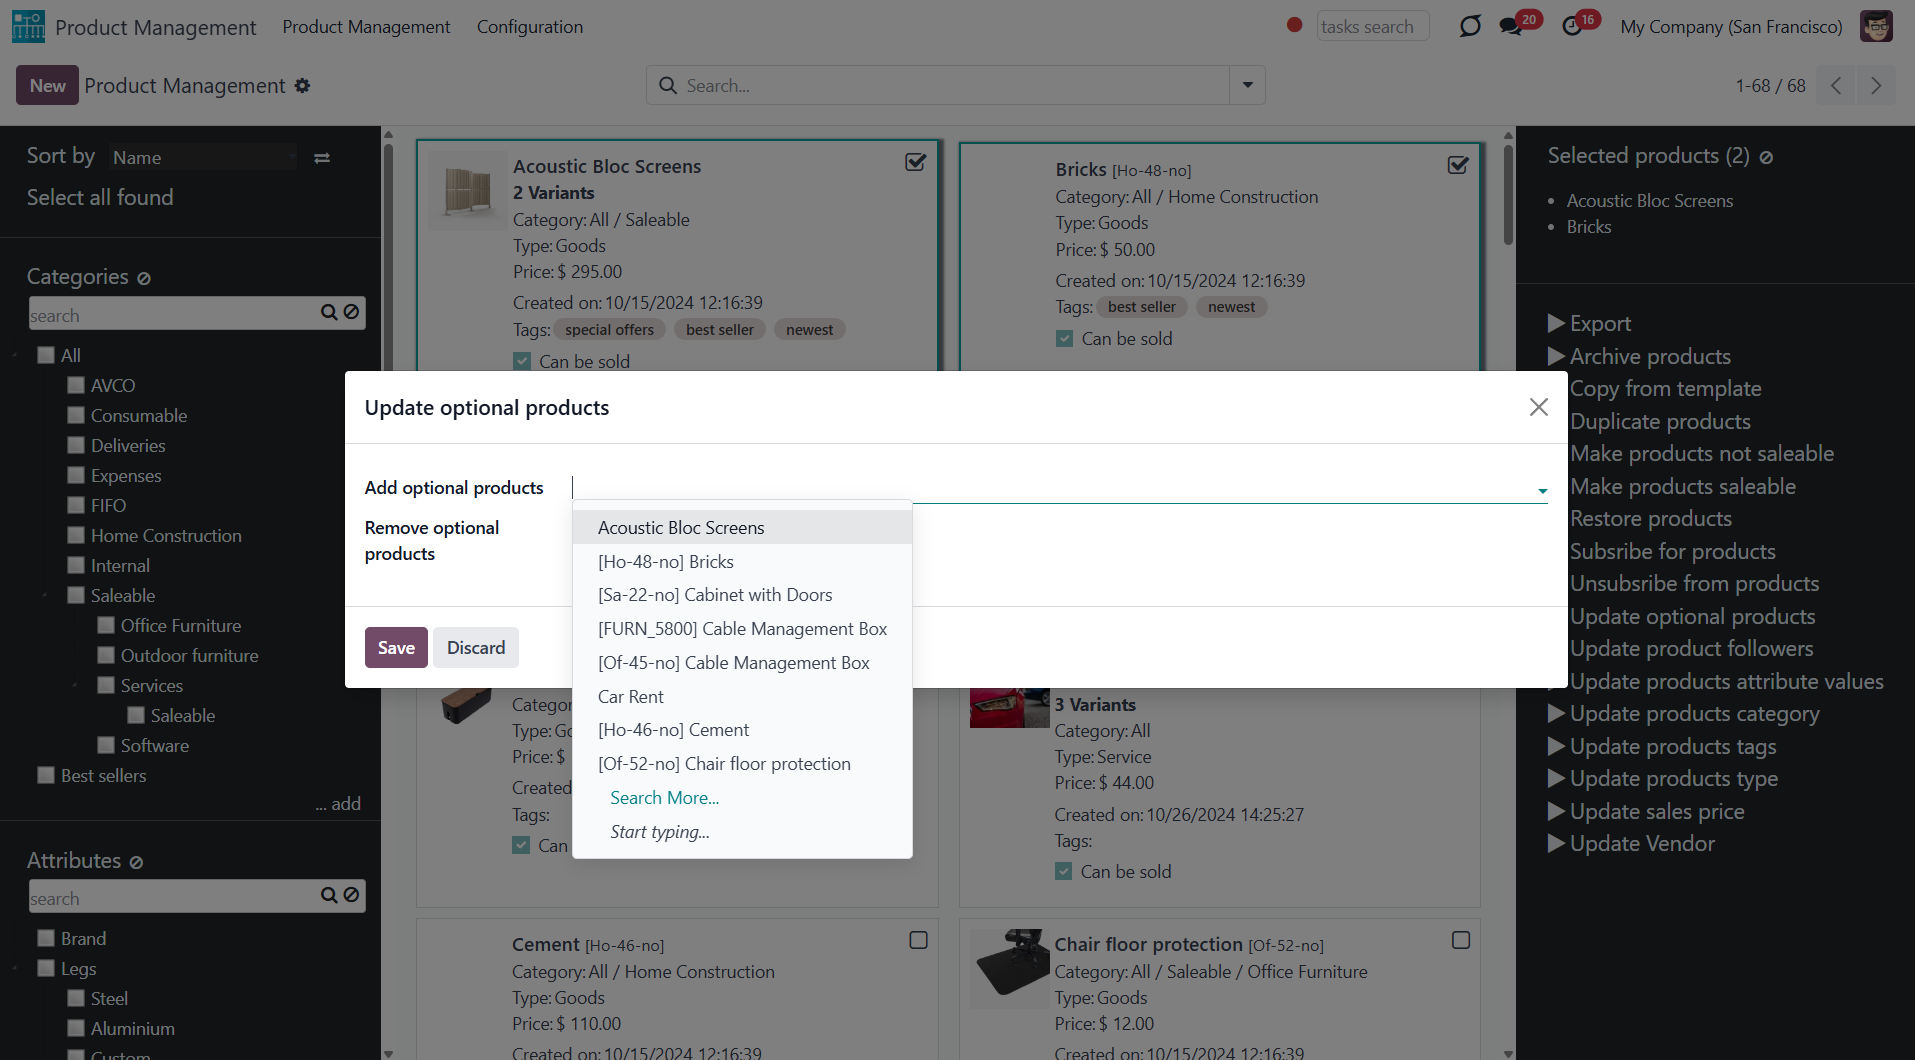
Click to add/remove optional products. You can add optional products by choosing them in the field 'Add optional products'. To remove some optional products, choose them in the field 'Remove optional products'.
For the mass action to work correctly, the module "Sales products configurator" should be installed in the instance, and the related option 'Product Configurator' should be turned on in sales configurations.
Take into account that updating a high number of product templates (e.g., 1000) might take significant time. In such a case, you should increase your Odoo configuration timeouts.
Product Management Interface: e-Commerce
An optional module (), which introduces mass product templates actions to change E-shop-related attributes and instant filtering by e-commerce categories. The standard Odoo module E-commerce is required.
Here are the mass actions that you can add by installing the add-on:
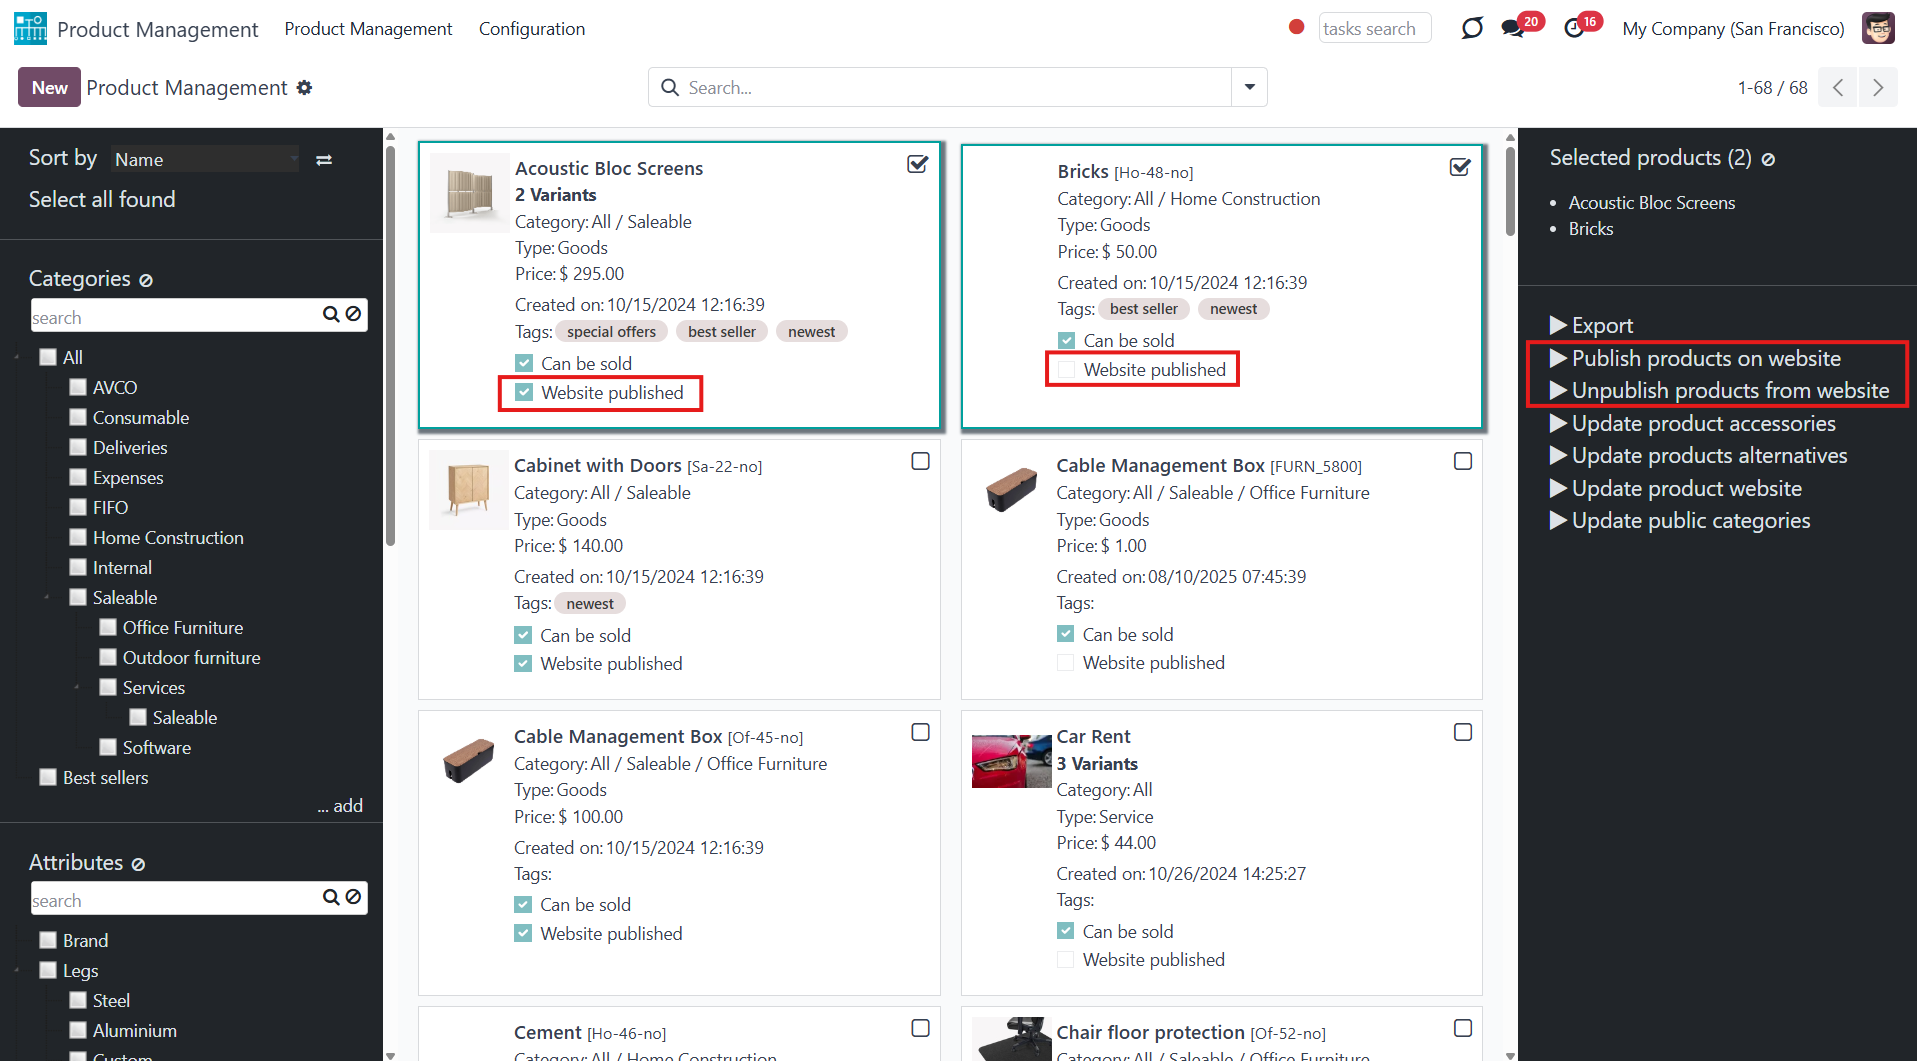
Click to publish or unpublish products from the website in a batch.
Click to add/remove public E-shop categories of selected templates. You can add categories by selecting them in the field 'Add public categories'. To remove categories, choose them in the field 'Remove public categories'.

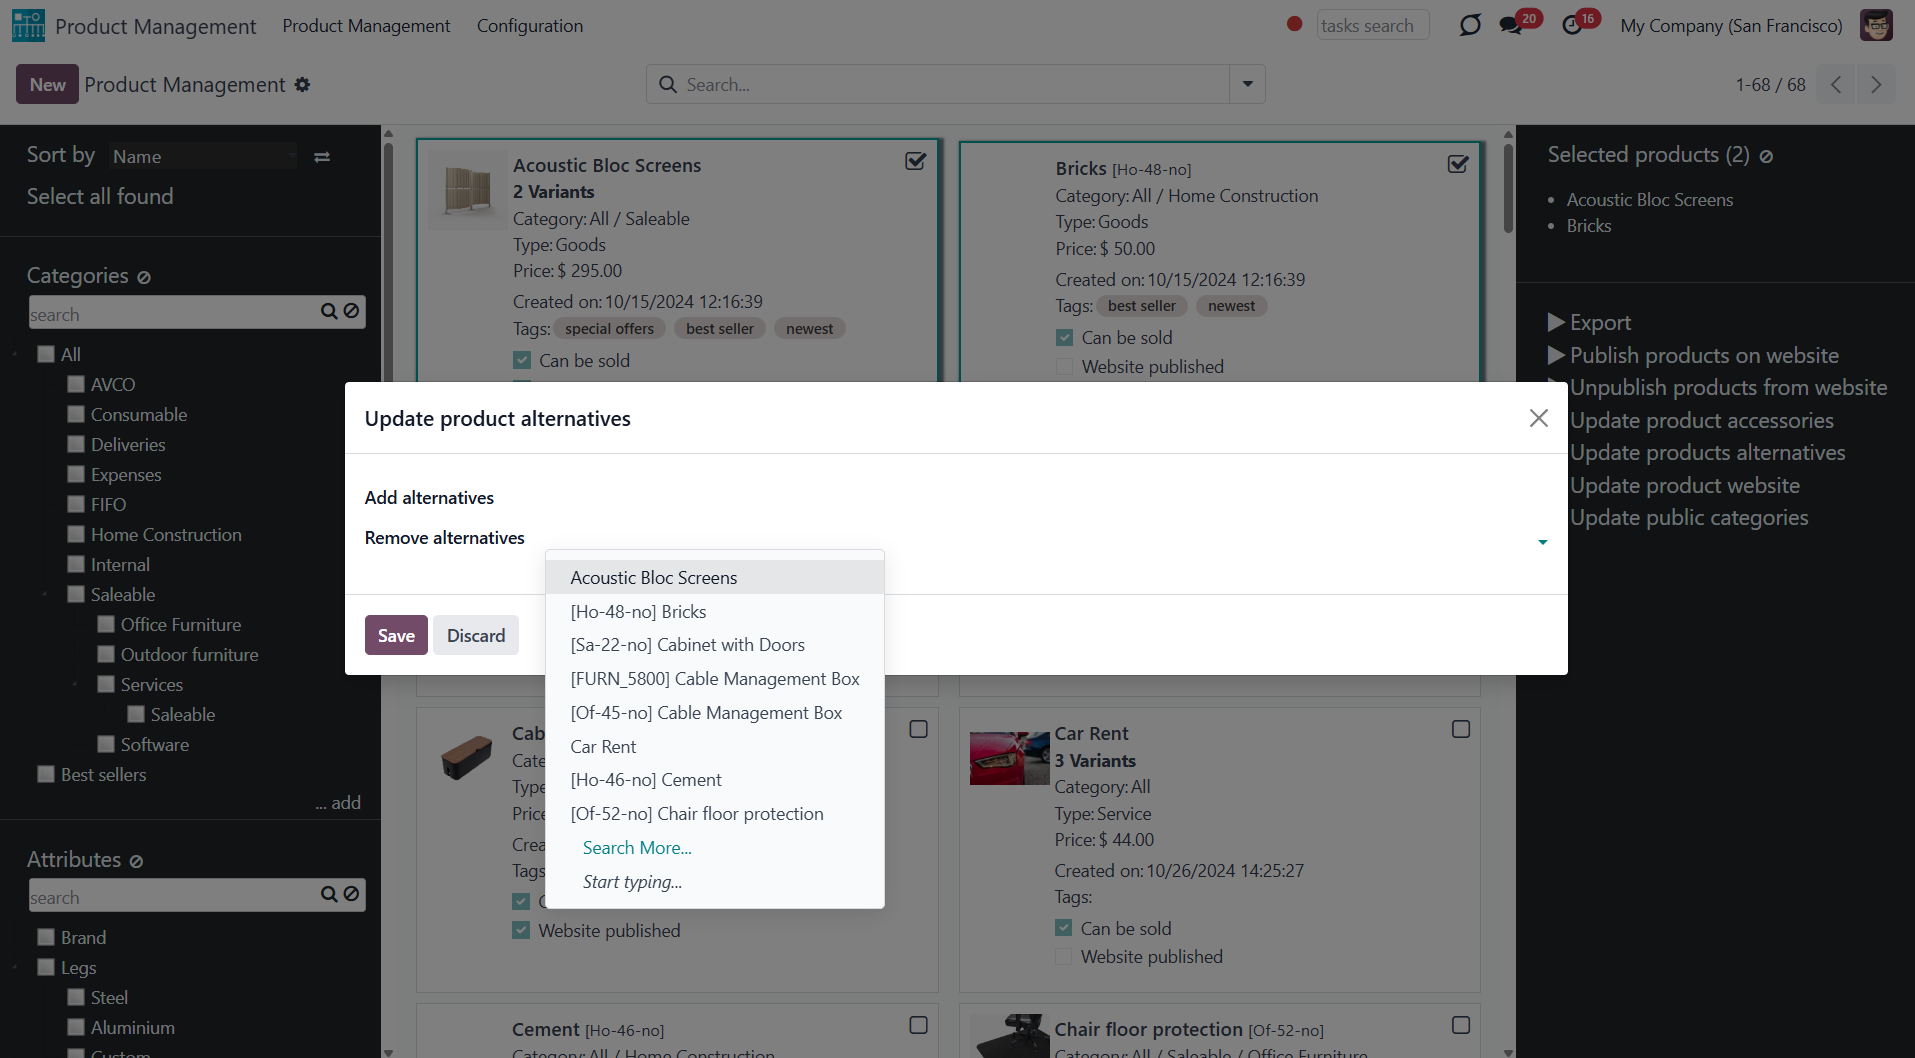
Click to add/remove products' alternatives. You can add product alternatives by selecting them in the field 'Add alternatives'. To remove alternatives, choose them in the field 'Remove alternatives'.
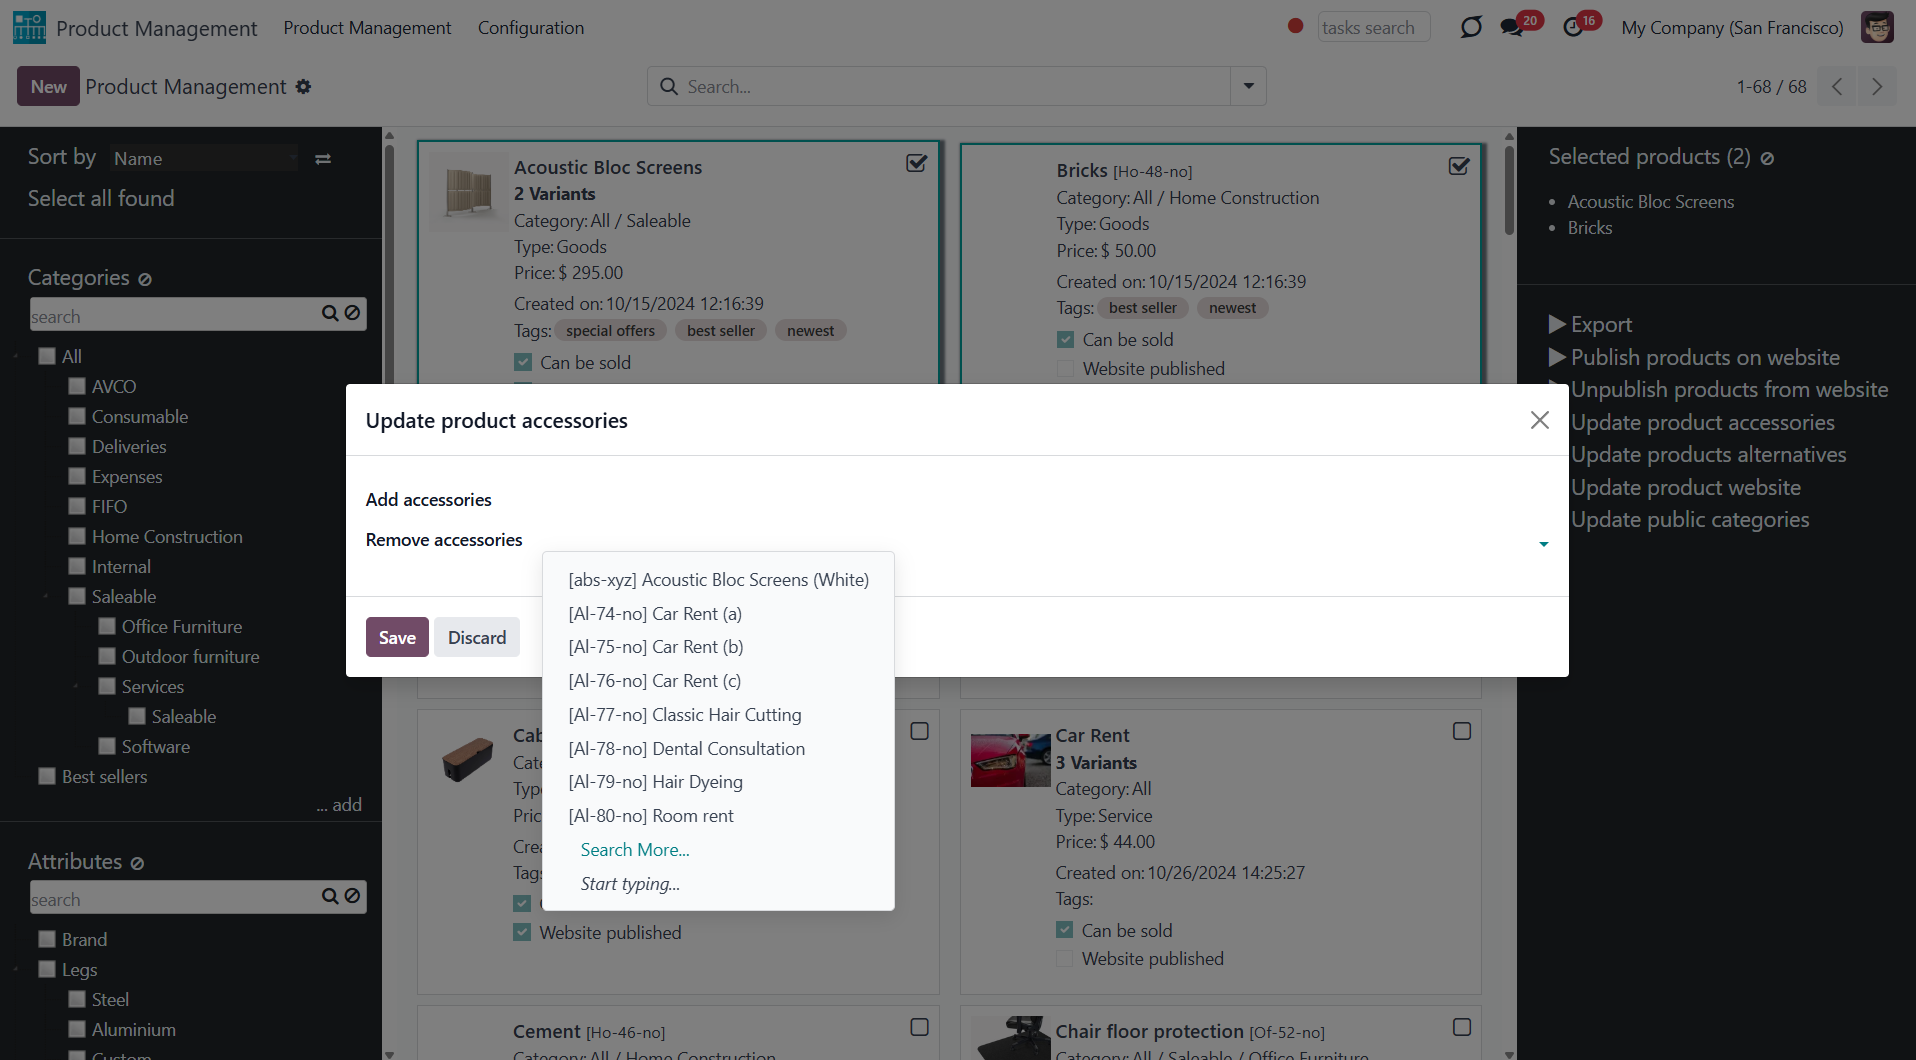
Click to add/remove products' accessories. You can add product accessories by selecting them in the field 'Add accessories'. To remove alternatives, choose them in the field 'Remove accessories'.
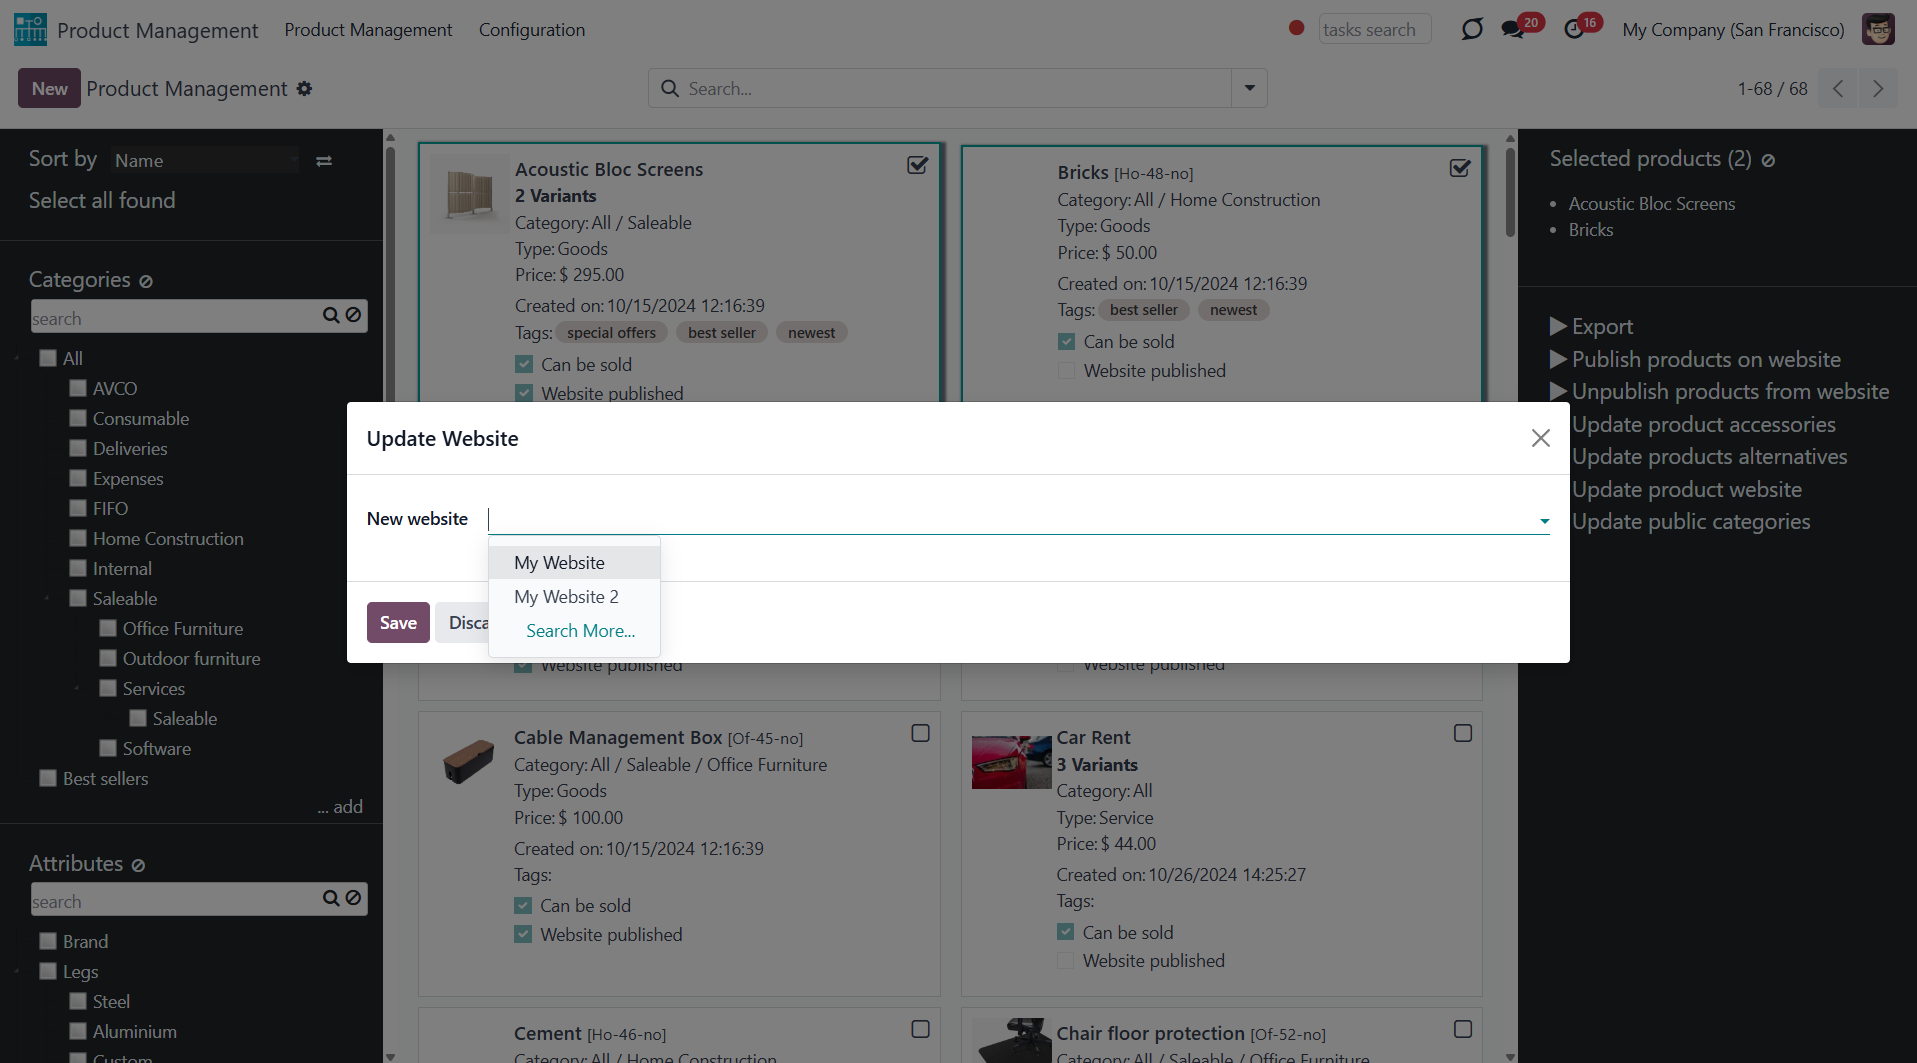
Click to change the website of all selected products. Choose the website in the field 'New website'.
In addition to mass actions, the module adds the opportunity to filter product templates by public categories. To see all products of one or several categories, just put a tick in the box next to them. E-commerce categories have a hierarchy: if you choose a parent category, you will see products in the child categories as well. You can filter product templates by several e-commerce categories at once (see Products Management Interface).
Product Management Interface: Warehouse
An optional module (), which adds warehouse mass actions on product templates. The standard Odoo module Inventory is required.
Here are the mass actions that you can add by installing the add-on:
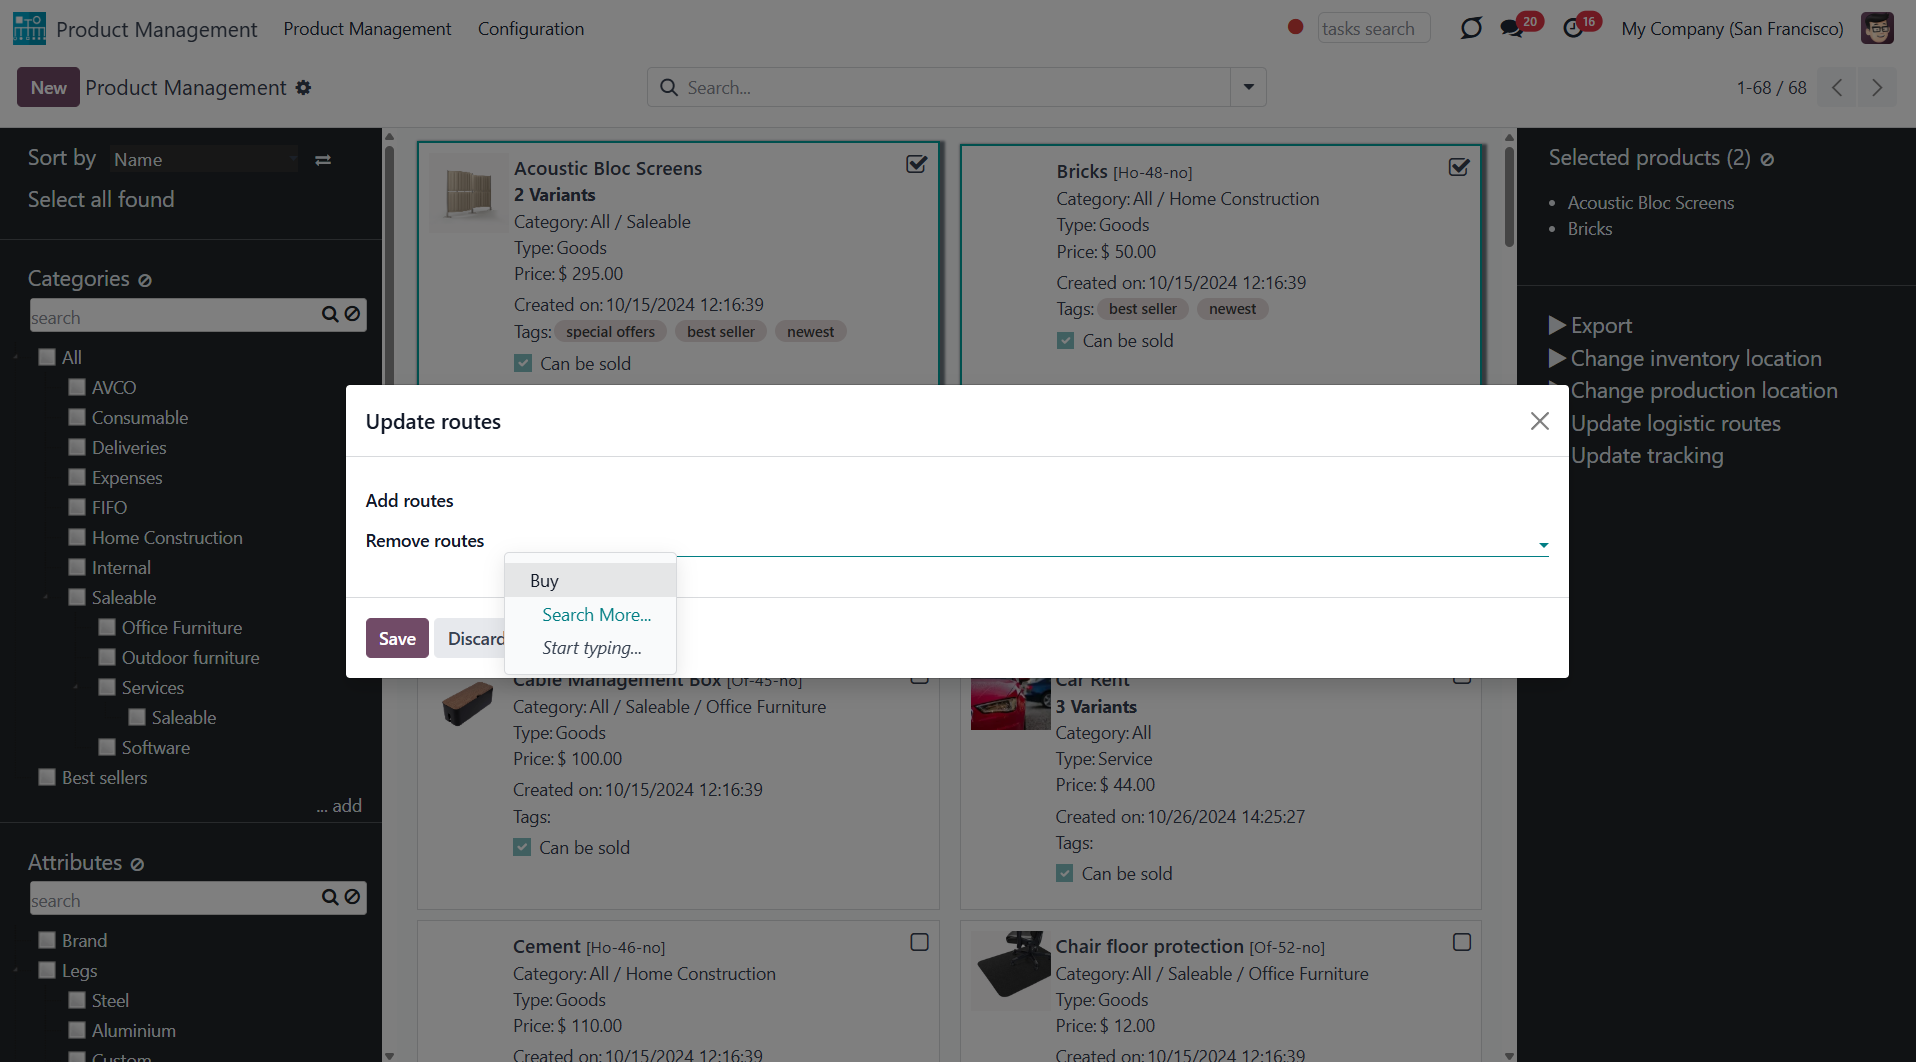
Click to change the logistic routes of all chosen products. You can add routes by selecting them in the 'Add routes' field. To remove routes, choose them in the field 'Remove routes'.
Click to change the tracking method of all chosen products. You can select the new tracking in the field 'New tracking'.

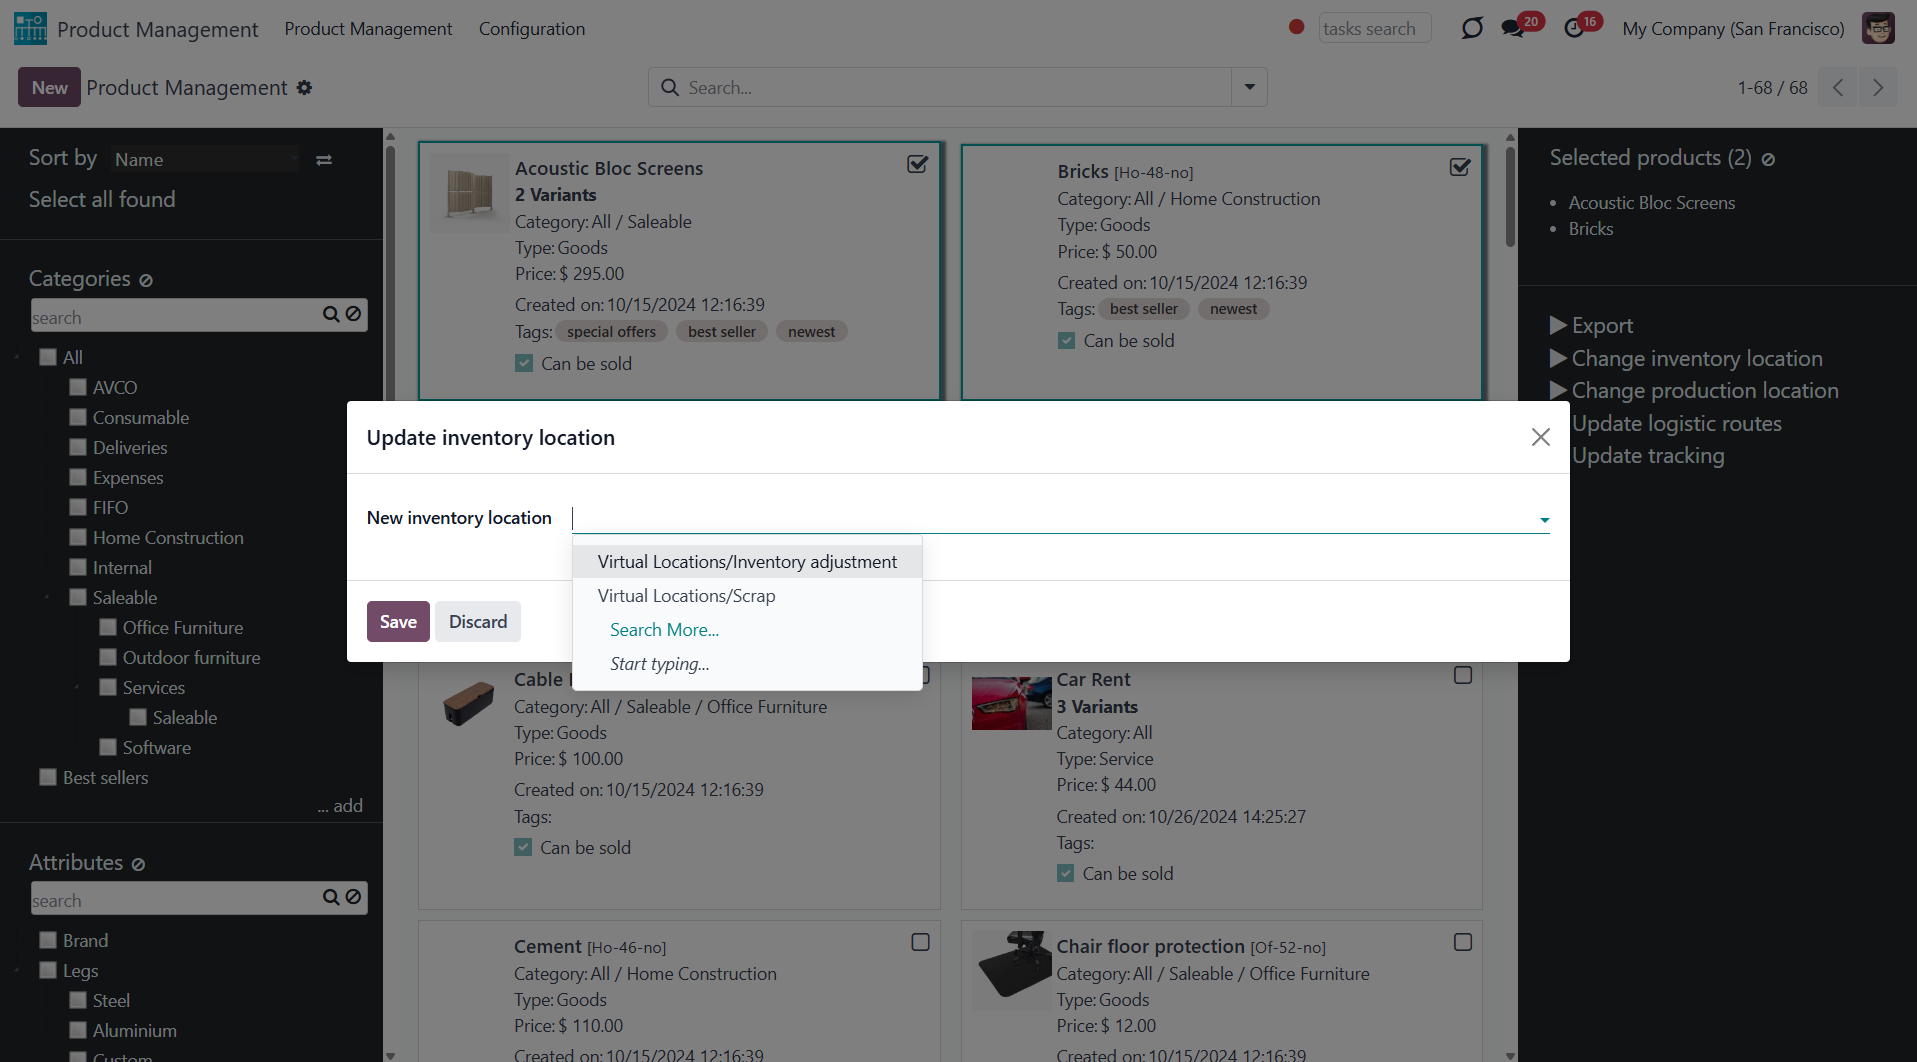
Click to update the inventory location of all chosen products. You can assign a new inventory location by selecting it in the field 'New inventory location'.
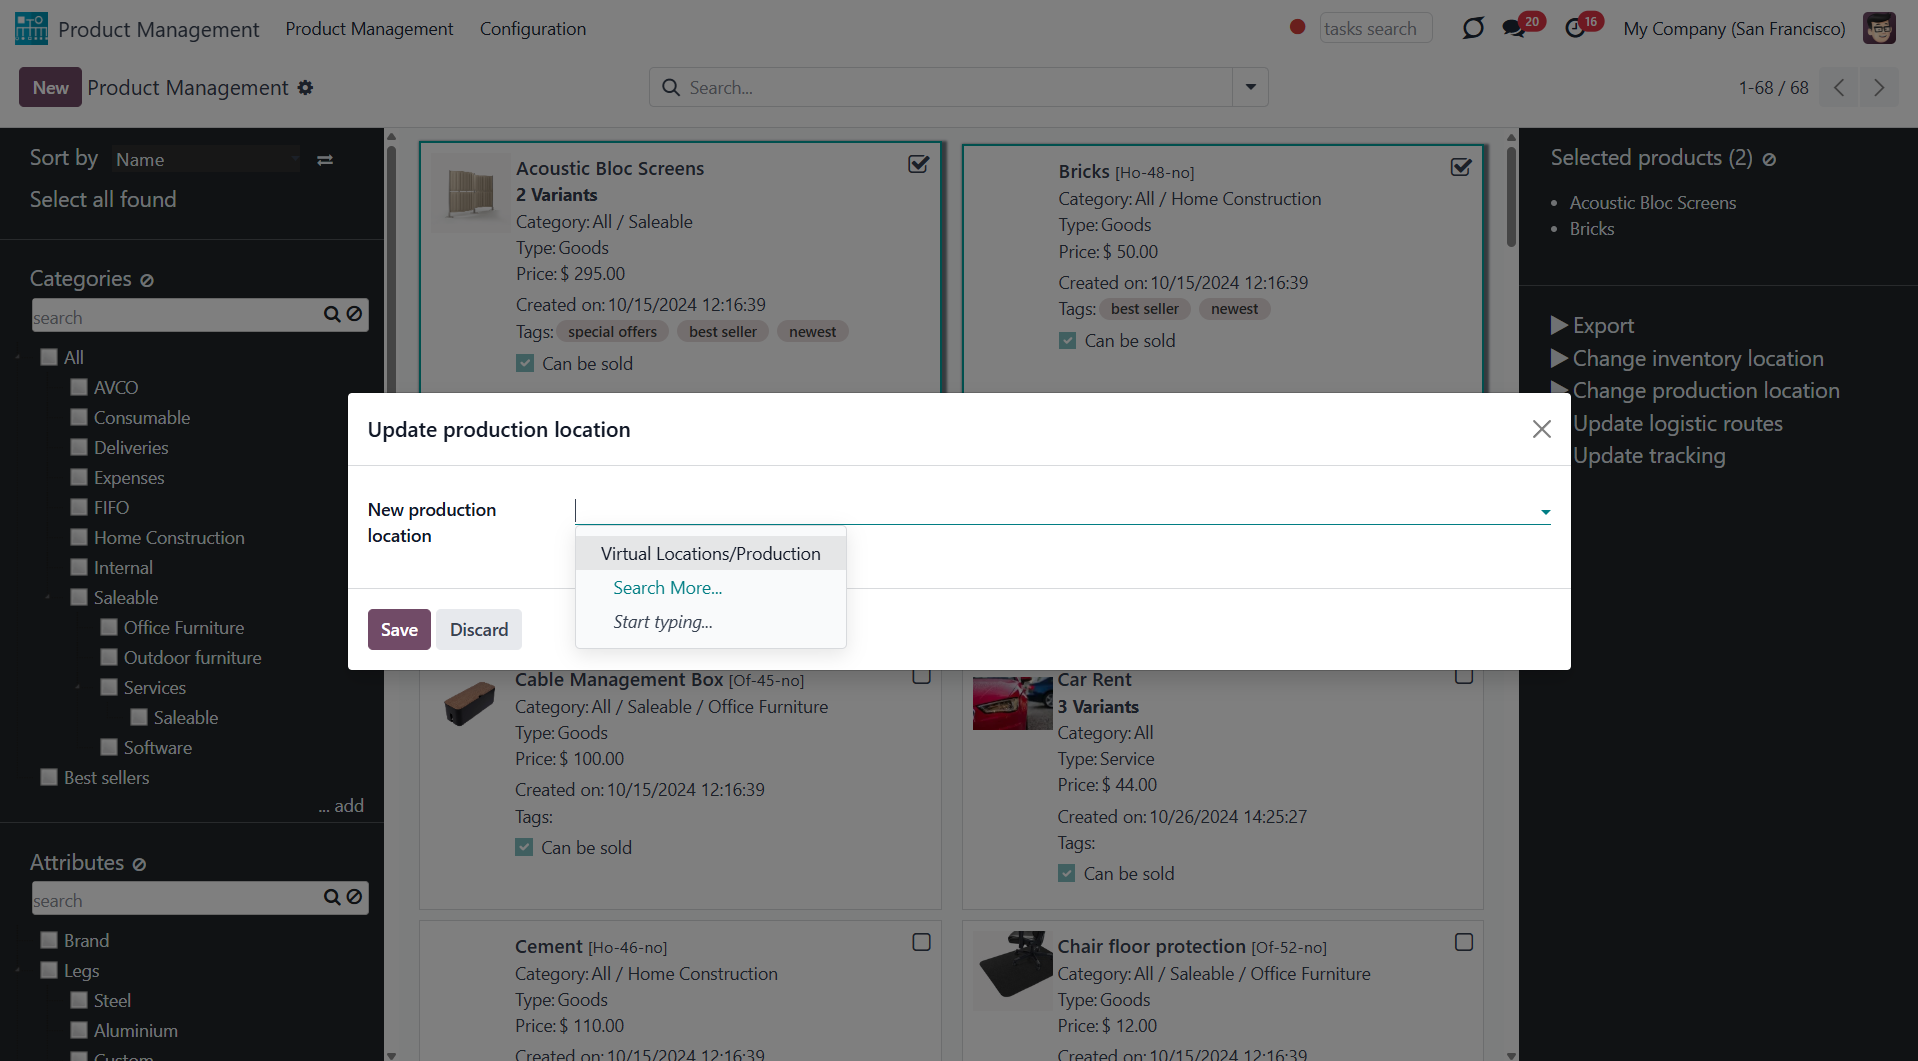
Click to update the location of all chosen products. You can assign the production location by selecting it in the field 'New production location'.
Product Management Interface: Accounting
An optional module (), which adds mass accounting actions on product templates. The standard Odoo module Accounting is required.
Here are the mass actions that you can add by installing the add-on:
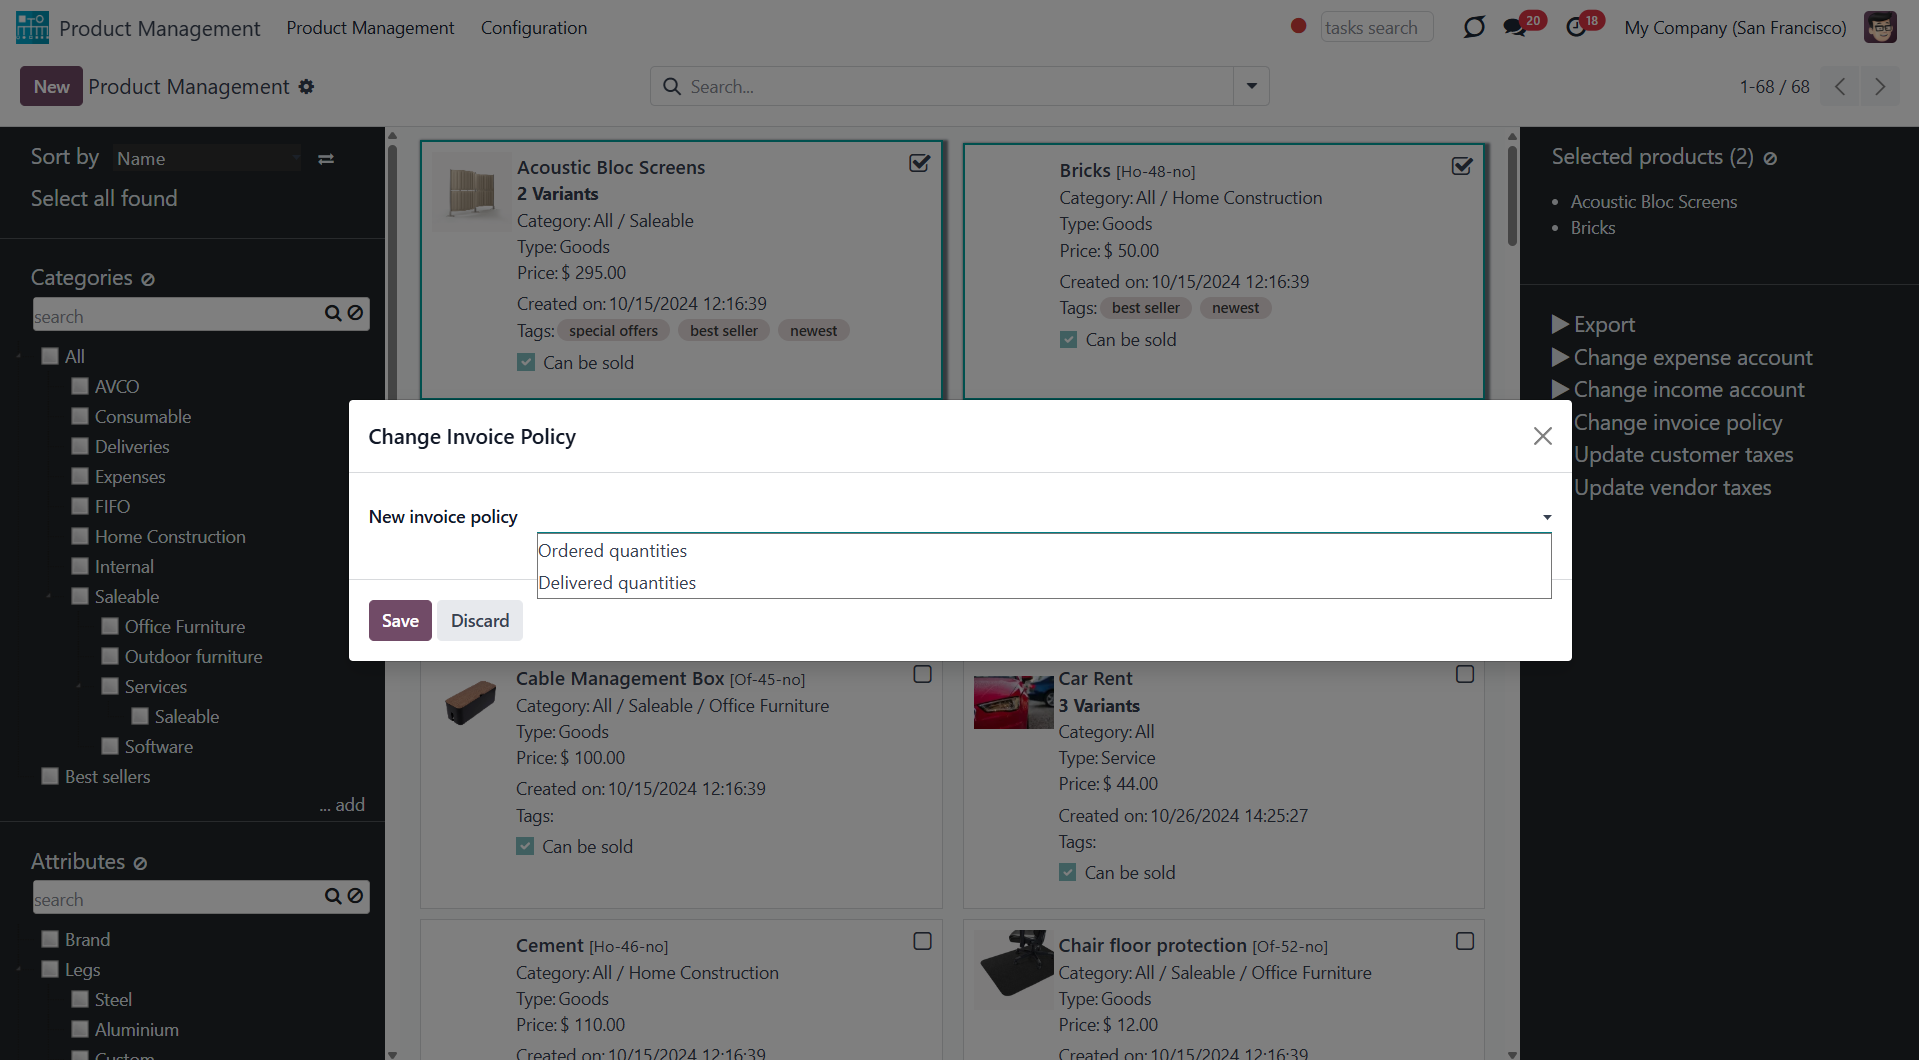
Click to modify the invoice policy in a batch. Change it, for example, to 'Ordered quantities' or 'Delivered quantities'.
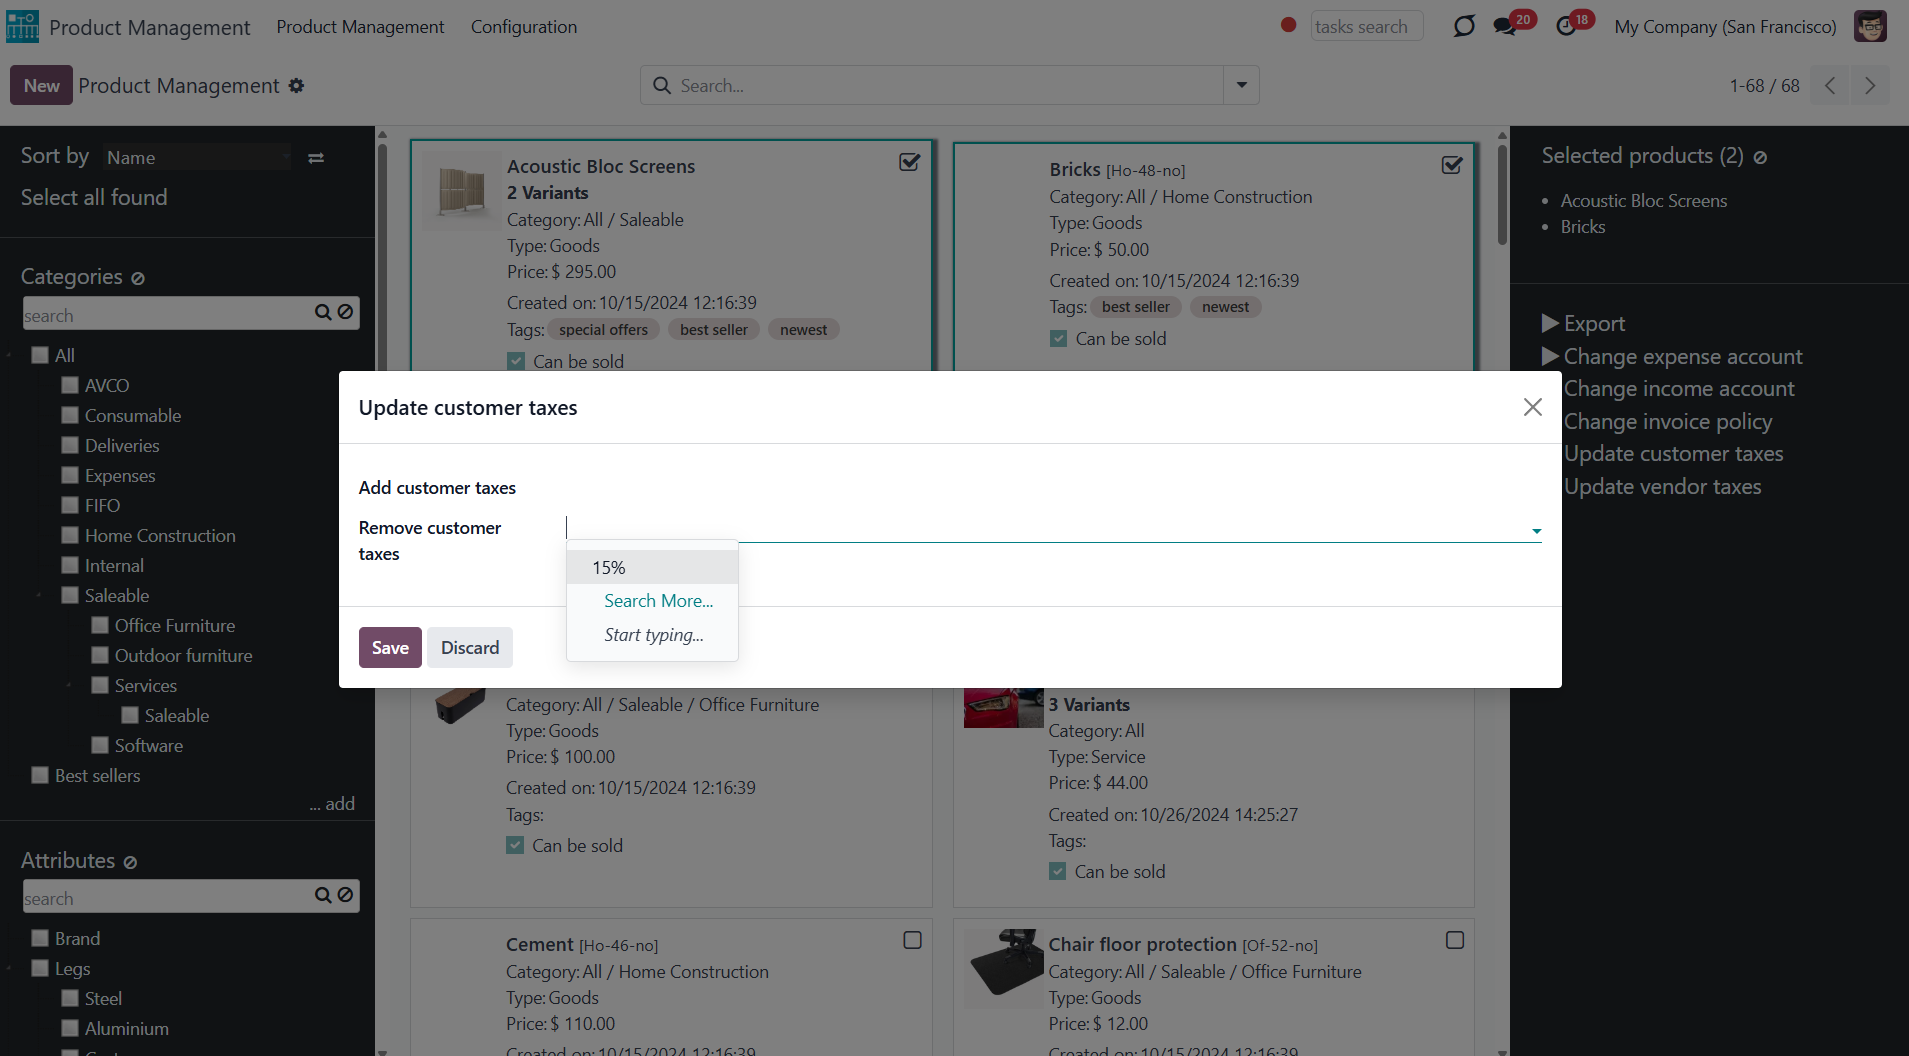
Click to add/remove customer taxes to selected product templates. You can add customer taxes by selecting them in the field 'Add customer taxes'. To remove some customer taxes, choose them in the field 'Remove customer taxes'.
Click to add/remove vendor taxes to selected product templates. You can add vendor taxes by selecting them in the field 'Add vendor taxes'. To remove some vendor taxes, choose them in the field 'Remove vendor taxes'.

Click to update the income account of all selected product templates. Choose the new account in the field 'New income account'.

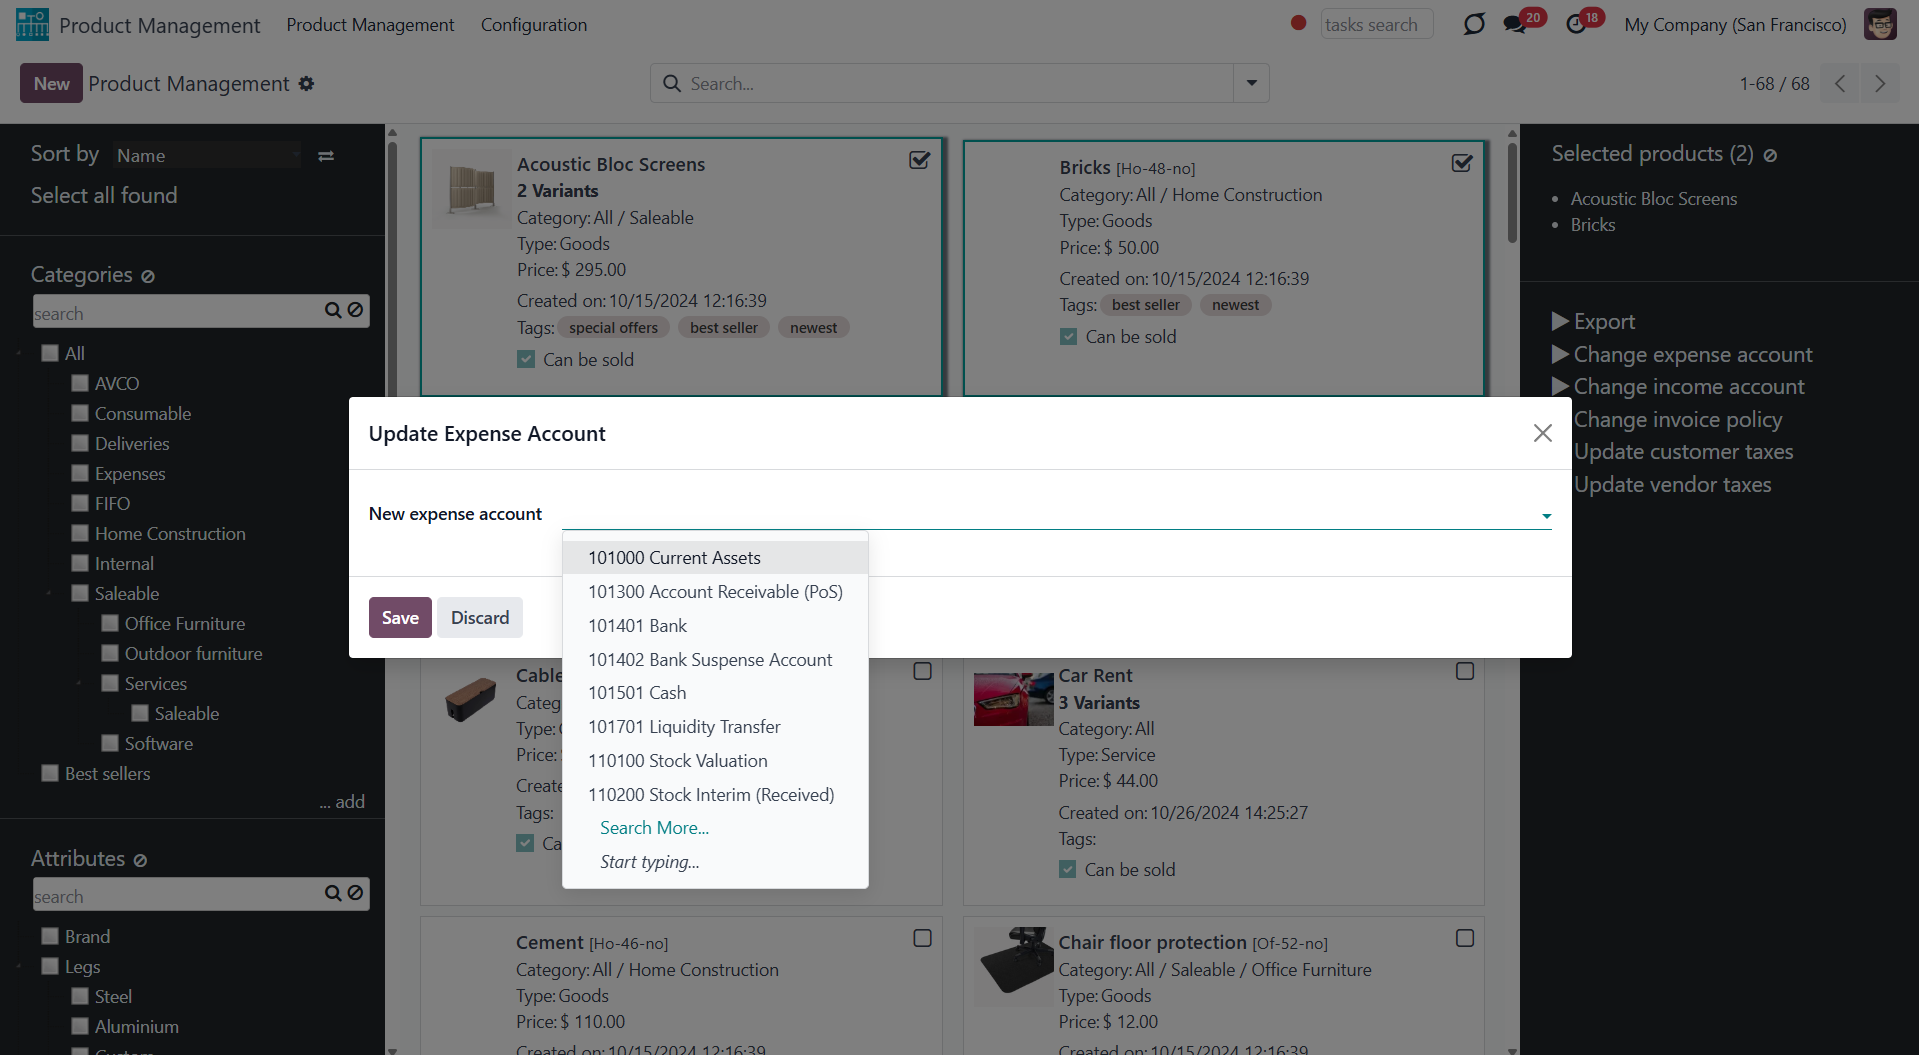
Click to update the expense account of all selected product templates. Choose the new account in the field 'New expense account'.
Product Management Interface: Purchases
An optional module (), which adds purchases' mass actions on product templates. The standard Odoo module Purchase is required.
Here are the mass actions that you can add by installing the add-on:
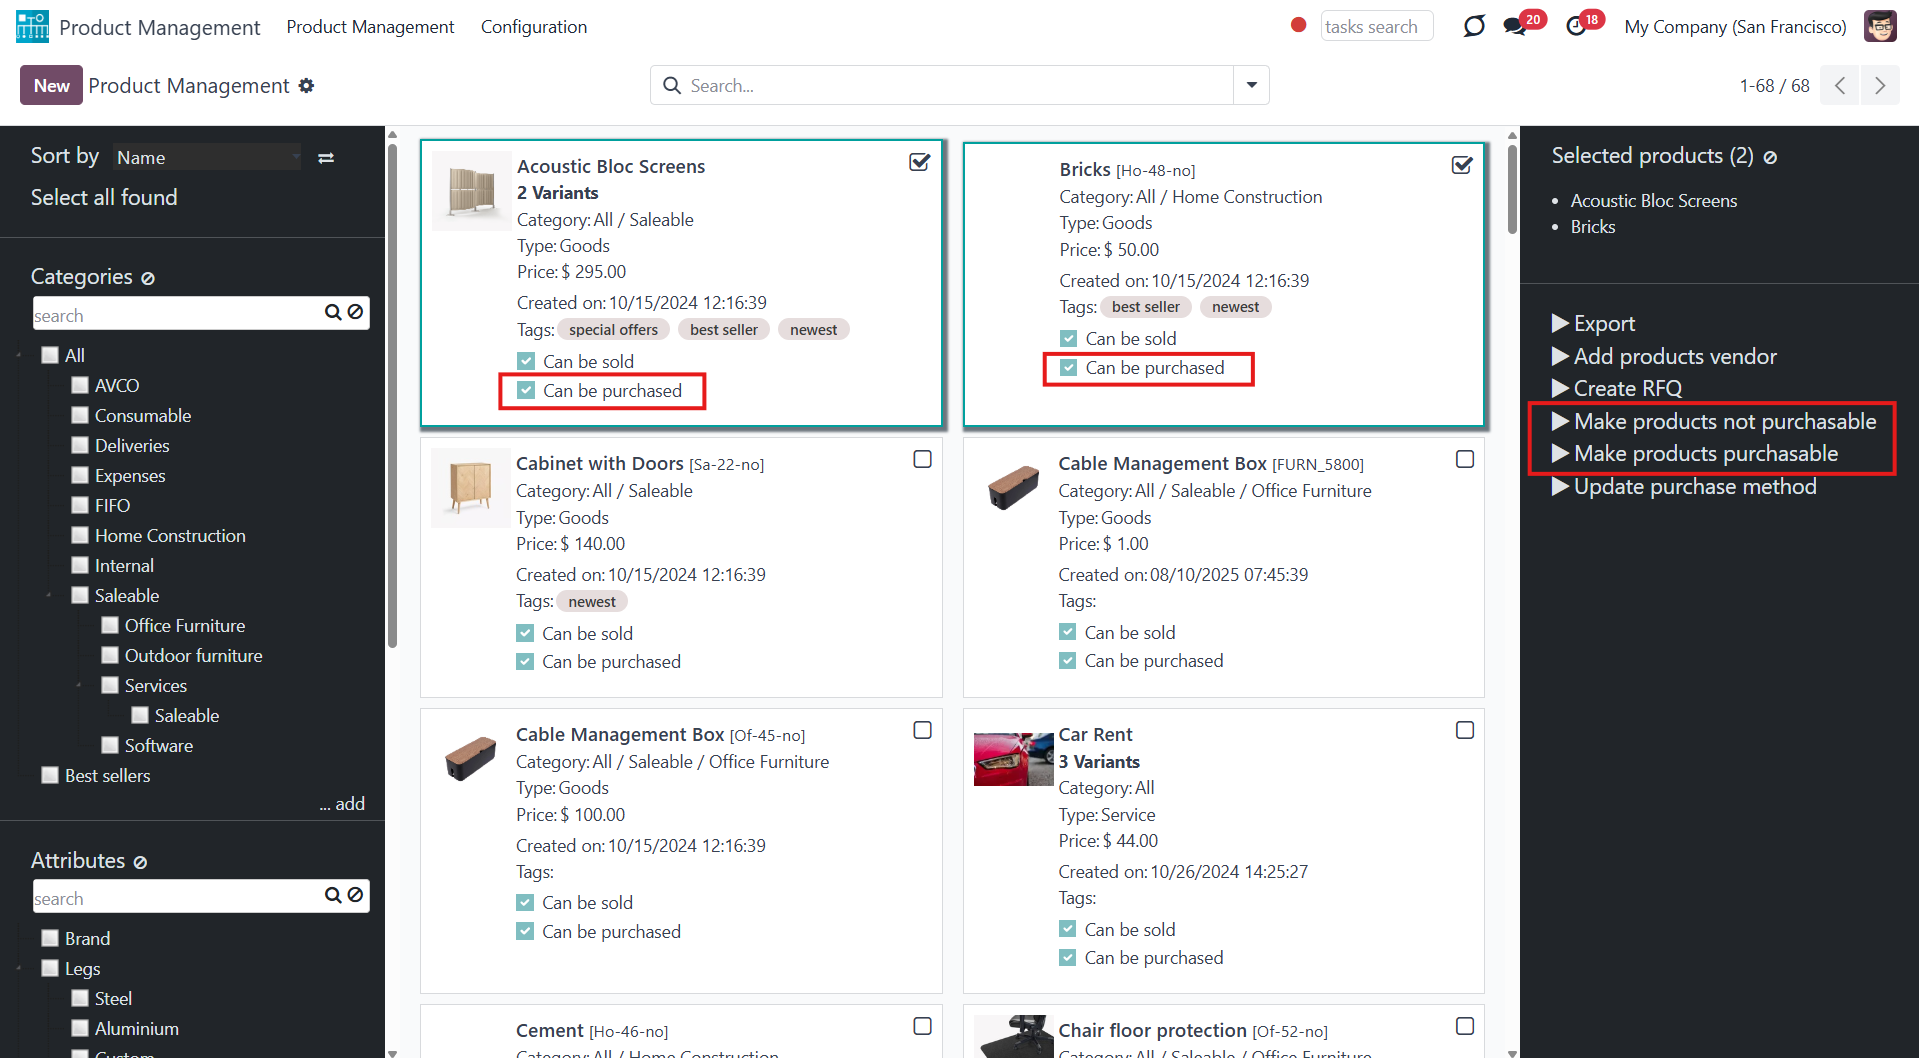
Click to update all chosen products to be purchasable or not purchasable.
Click to assign a new vendor to product templates in bulk and make this supplier the most prioritized. For that, choose the vendor in the field 'Supplier', optionally select the minimal quantity of products for purchase in the field 'Minimal quantity', and optionally set the delivery time in the field 'Time of delivery'.

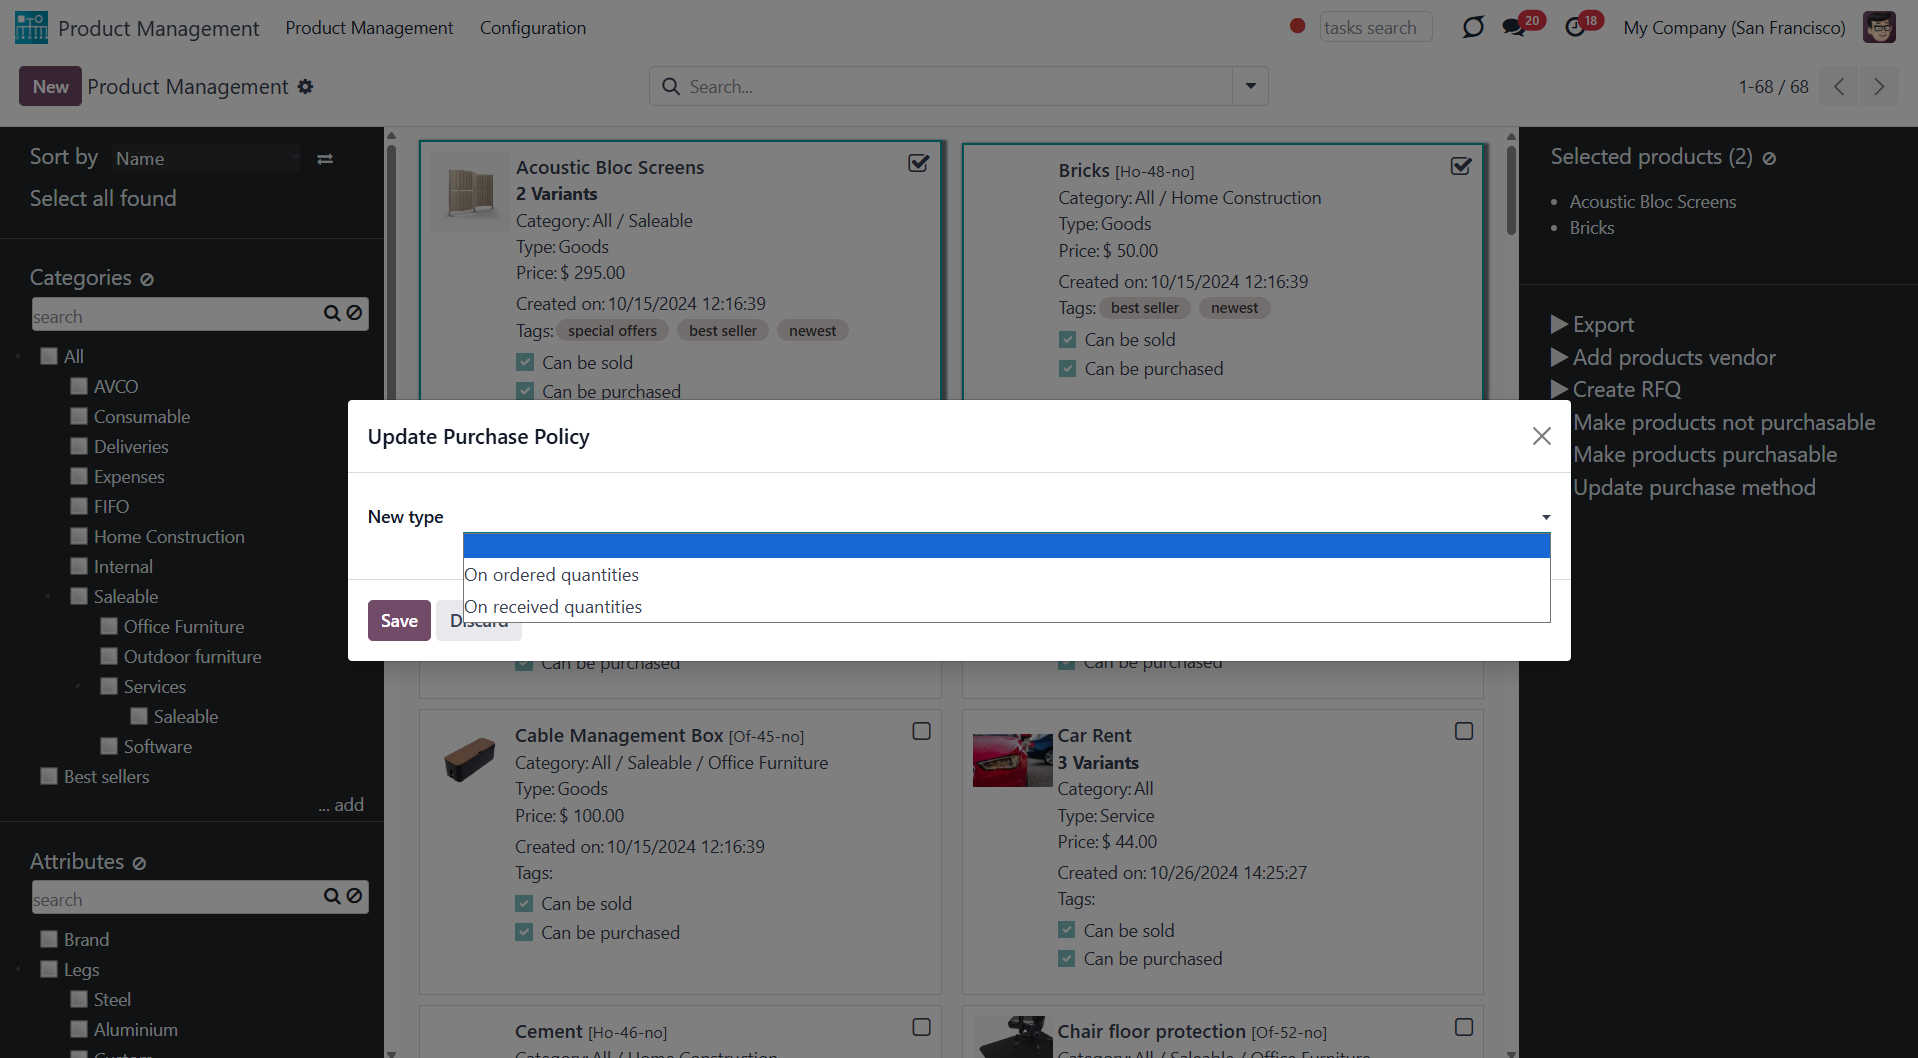
Click to change the purchase policy for all selected products. Update that, for example, to 'On ordered quantities' and 'On received quantities'.
Click to be redirected to a new purchase order form in editing mode with the order lines prefilled by the selected products.
To each order line, the first available product variant of all chosen product templates is added. This way, if there are multiple product variants, you should select the required one.
Suppose some product templates have no product variants available (i.e., product variants are dynamically created and none have been created yet). In that case, such products will not be added to the order lines unless the module Purchase Matrix is installed.
If there were some non-purchasable products among the selected ones, they would not be added to the order lines.
Custom Mass Editing Operations
In addition to the available actions, you can also prepare your mass actions. Batch actions for product templates are based on Odoo Server Actions. It means that you may add custom mass editing operations.
To create a new mass action:
1. Go to Configuration and find the section 'Mass Actions'
2. Click 'Add a line'
3. Click 'New'
4. Type the name of the action
5. Choose the model 'Product'
6. Choose an action to do (according to the action, the list of further configurations will change)
7. Create an action
8. Click 'Save&Close'
9. Click 'Save'.
After that, it will appear in the list of available mass actions, from where it can be added to the right navigation panel. Select the product templates and click the action to update the selected products.
For example, let's create a mass action 'Mark Fragile'. As a model, we should choose 'Product' and perform 'Update the Record'. After that, click 'Add a line' and select the field, which will be updated. As the 'Evaluation type', let's choose 'Value', and in the line 'Value' type, define what should be added to the field. Then, save the action.
Upon opening the single-view interface, the new action 'Fragile' is located in the right navigation panel. Choose product templates to apply the action. After that, on each selected product template, the value of the 'Description for internal transfers' will be updated to 'Fragile'.
When you create a custom mass action, take into account the following peculiarities:
1. As the model, always use 'Product'. Otherwise, your action would not be displayed in the list of operations
2. In case you want to return a wizard, such a wizard should not have a footer (only standard buttons) and should have an explicitly specified view_id. Look for examples in any module of the Product Management Bundle.
Consider that updating a large number of product templates (e.g., 1000) might take significant time. In such a case, you should increase your Odoo configuration timeouts. Besides, some operations might be impossible in Odoo: for instance, creating more than 1000 variants for a single template.
Module's Configuration
The module can be configured. To do this, open the module and click on the tab 'Configuration'. In the convenient configuration menu of the module, you can do the following:
1. Add/remove the filtering by attribute values. For that, just put/remove the tick from the option 'Filter by attribute values' (see Products Management Interface)
2. Add/remove the filtering by Odoo product tags. For that, just put/remove the tick from the option 'Filter by tags'
3. Add/remove the mass action export. For that, tick/remove the tick from the option 'Export'
4. Turn on/off the extra mass action sets. To turn an add-on with mass actions on/off, tick the box next to it. As you turn the add-on off, it will be uninstalled from the system. As you turn the option on, it will be installed again. To use the function, the related add-ons should be installed in the system (Read more in 'Product Management Interface: e-Commerce', 'Product Management Interface: Warehouse', 'Product Management Interface: Accounting', 'Product Management Interface: Purchases')
5. Manage mass actions. To add mass actions, click 'Add a line' and choose the action. Change the order of mass actions by drag and drop. To delete an action, click on the cross by the mass action (see Managing Mass Actions)
6. Manage Kanban fields. To add kanban fields, click 'Add a line' and choose the field. To delete a field, click on the cross by it (see Products Management Interface).
Access Rights
The module doesn't influence users' access rights to product templates. The access rights are regulated by Odoo standard apps (for example, Odoo Sales, or Odoo Purchases) or might be controlled by other third-party apps (for example, use the app Limited Access for Products to delegate products' administration only to a chosen group of users, while others will still have read-only access to products).
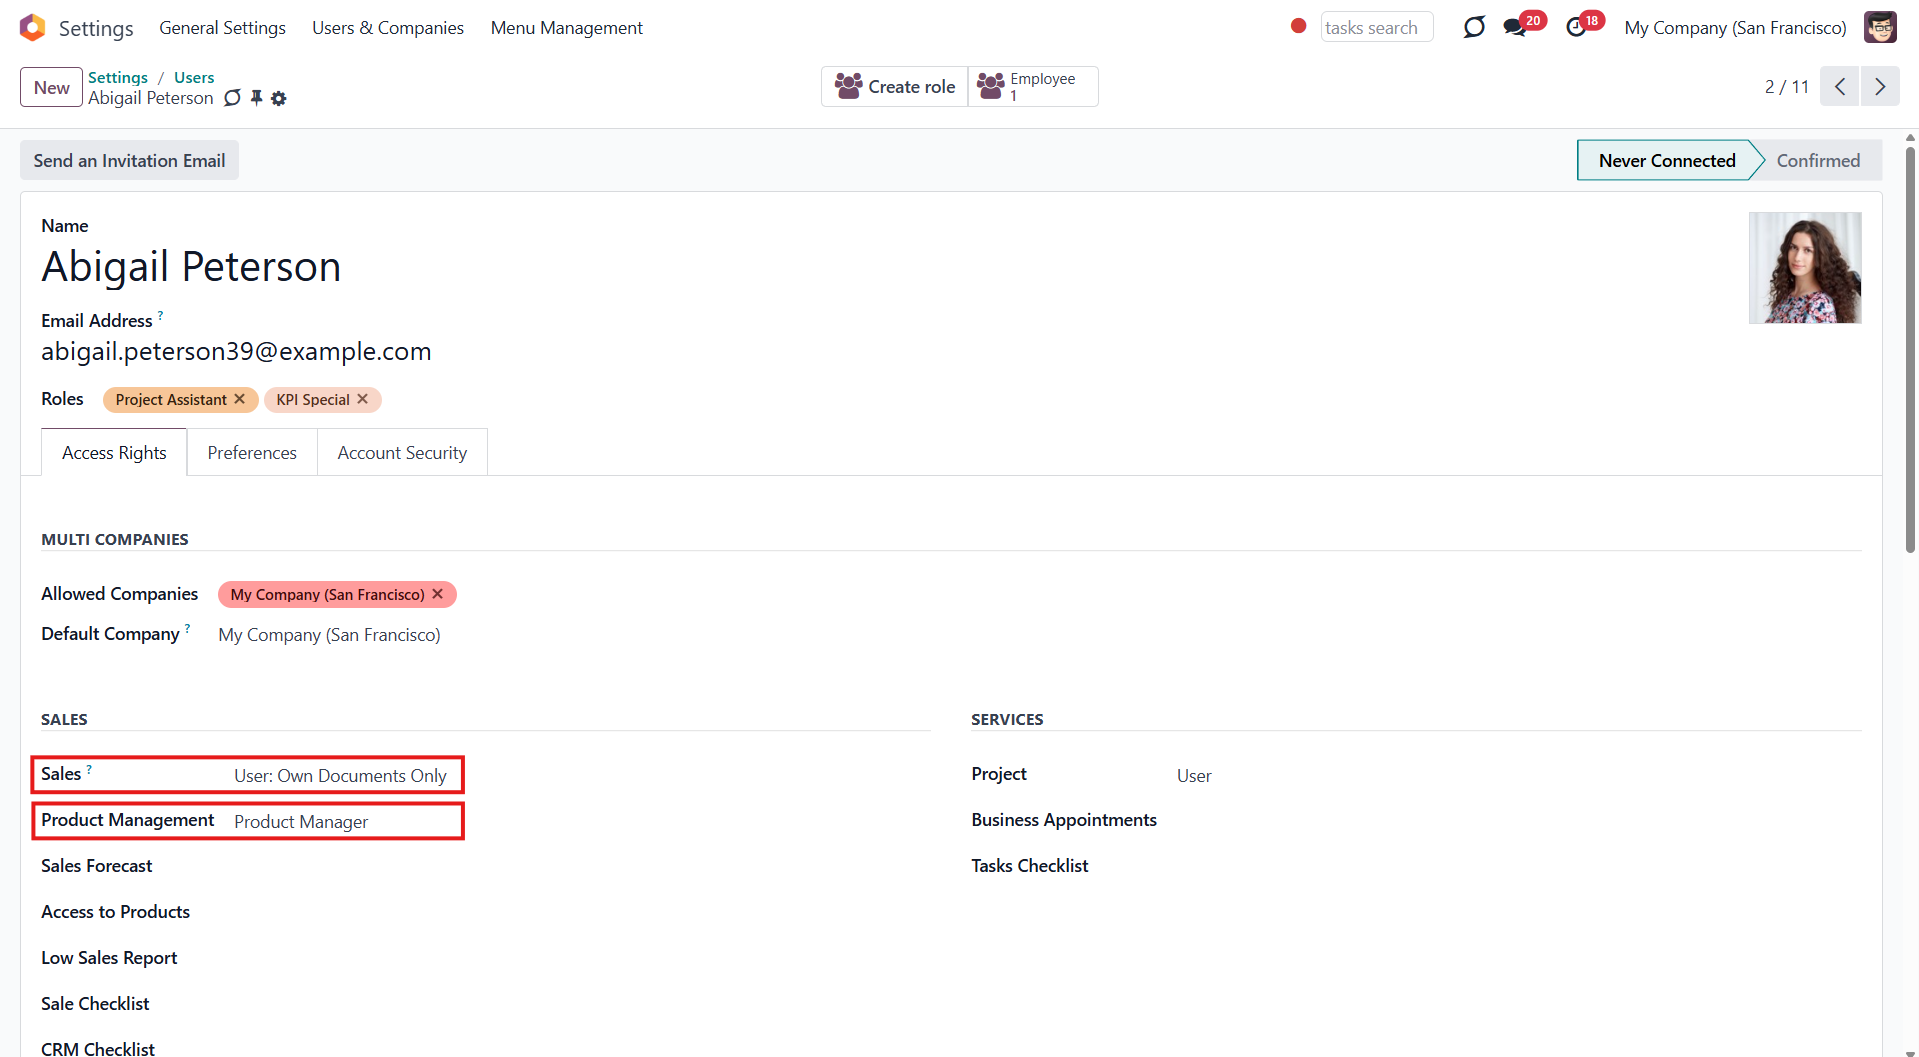
The interface is available for any user who has rights to products (e.g., sales, warehouse, or purchase manager) AND who has the group 'Product manager' assigned. The app configuration can only be done by the group Administration / Settings.
For example, we want Abigail Peterson to have access to the Product Management Interface. She already has a sales group 'User: Own Documents Only' assigned. So, we should add the group 'Product Manager' to the section Sales > Product Management. So, to get access to the menu, both groups are necessary; however, a sales group might be changed to another one, which gives access to products (e.g., warehouse or purchase).
About Products Management Interface
Products Management Interface is an Odoo app that helps to improve catalog administration and to simplify the implementation of changes. The app introduces an innovative interface to search, analyze, select, and mass edit Odoo product templates.
Filter products by the hierarchy of categories and tags: select one or a few. Systematize products by attributes: e.g., find products that are both white and made of metal. You can also filter products by the e-shop categories ().
Create and manage categories, attributes, and attribute values, e-categories (), and tags right from the product management interface. Drag and drop products to a category, attribute value, e-category, and tag to assign it to all chosen products.
Sort product templates by name, reference, category, type, and price. Apply to the standard Odoo search. Click on an image to open a product form; on the card, add it for selection.
Pick products up step by step: the selection is not cleared with a new search or after you've opened a record. Proceed mass action(s) for all chosen templates.
Define which mass operations are available from a predefined list or prepare your server actions. Just a few clicks to update the category, add attribute values, withdraw from sales, change price, etc.
Add any product template fields for kanban cards for an instant overview.
Assign any user with product rights (e.g., sales, warehouse, or purchase manager) the special role of 'Product manager' to access the products' interface.
Convenient navigation and interface
Configurable list of mass actions
Efficient multi-selection and mass update
Secured interface and actions
Add-ons icons
Features introduced by add-ons are marked by these signs:
Product Management Interface: e-Commerce
The optional module introduces mass product actions to change E-shop-related attributes.
Product Management Interface: Warehouse
The optional module allows for updating batch warehouse characteristics of product templates.
Product Management Interface: Accounting
The optional module to manage the accounting traits of products in bulk.
Product Management Interface: Purchases
The optional module offers mass actions on product purchase columns.
Products Management Interface
The innovative single-view interface is implemented in the module. This allows you to see product details and perform a mass action from the same entry, without opening product templates. The interface has three functional areas: the central part with products in the middle and two functional parts with sets of control elements on the sides of it.
The left navigation panel lets you sort products according to various criteria, select all found products, and filter products by categories, attributes, e-commerce categories (), and Odoo product tags.
You can sort products by name, category, product type, internal reference, and basic sale price. If you click on the 'Arrow' icon on the right side of the sorting criteria, then the sorting will be reversed.
To sort products:
1. Open Product Management Interface
2. Choose the sorting criterion
3. Click on the 'Arrows' sign to see the reversed sorting
You can filter products by categories. To see all products of one or several categories, just put a tick in the box next to them. Categories have a hierarchy: if you choose a parent category, you will see products in the child categories as well. You can choose different variations of them.
If you tick two categories, you will see the product templates that relate to either the first OR the second category. For example, if you filter by the category 'Consumable' and then also add the filtering option by the category 'Expenses', then the product templates related to ANY of these categories will be shown.
Categories have a hierarchy. You can set a parent category and some subcategories while editing or creating a category, or simply by dragging and dropping. The order of the parent and child categories is defined alphabetically (by name).
If a child category is selected, its parents will be hierarchically highlighted by the border of dots around the name of the element. Thus, it is always clear that some choice has been made somewhere (even if the structure itself is closed).
Apart from the standard way of creating a category, it is possible to create and edit categories right from the product management interface. To add a new category through the interface, click '...add' and write the title. Right-click on a category to see all available actions:
1. Create (click to start creating a child category)
2. Rename (click to change the category's name)
3. Edit (click to edit a category).
To create and edit categories, users should have the right to create products.
You can assign/change a category of a product in the field 'Product Category' as you create or edit a product. You can also quickly change the category of all selected products by dragging and dropping them to the required one.
Also, you can filter products by attributes. Unlike categories, when you choose two different product template attributes, only the products that have BOTH chosen attributes are shown. For example, you filter by the attribute 'Color' - 'White' and also by the attribute - 1 year ('Duration'). Then only product templates of the white color with a 3-year warranty will be shown.
If you select two values of one attribute, then the product templates, which relate to ANY of those, will be shown. For example, we have different values (Steel, Aluminium, Custom) for the attribute 'Legs'.
If we select several or all values within the attribute 'Legs', we will see all the product templates related to each of the chosen values.
As you filter products by attributes, only products that have the attribute assigned are shown, even if the related attribute values aren't chosen.
Attributes have a flat hierarchy, so it isn't possible to add child attributes to attributes, or child attribute values to attribute values, etc. You can change the order of the attributes and attribute values, or change the attribute of a particular attribute value simply by dragging and dropping.
If an attribute value is selected, the related attribute will be hierarchically highlighted by the border of dots around the name of the element. Thus, it is always clear that some choice has been made somewhere (even if the structure itself is closed).
Apart from the standard way of creating an attribute, it is possible to create and edit attributes right from the product management interface. To add a new attribute through the interface, click '...add' and write the title. Right-click on an attribute to see all available actions:
1. Create (click to start creating a new attribute value)
2. Rename (click to change the attribute's name)
3. Edit (click to edit an attribute).
To create and edit attributes and attribute values, users should have the right to create products.
You can add/change attributes and attribute values of a product in the tab 'Attributes & Variants' as you create or edit a product. You can also quickly add the attribute value to all selected products by dragging and dropping them to the required one.
You can also filter products by e-commerce categories (). To see all products of one or several e-categories, just put a tick in the box next to them. E-categories also have a hierarchy: if you choose a parent e-category, you will see products in the child e-categories as well.
If you filter by several e-categories, product templates are also displayed if they relate to ANY of the chosen ones.
If a product relates to two different e-commerce categories and only one of them is chosen, then this product template will be shown anyway.
Suppose you filter product templates both by a category and an e-category. Then, only products that relate to BOTH will be shown. For example, let's filter by the e-categories 'Chairs' and 'Boxes'. All products related to ANY of these e-categories will be displayed. Let's also add the category 'Expenses'. Here, we will not see any product templates, as there are no products that relate to both a category and an e-category.
E-categories have a hierarchy. You can set a parent e-category and some subcategories while editing or creating an e-category, or simply by dragging and dropping. It is also possible to change the order of the parent and child e-categories by drag and drop.
If a child e-category is selected, its parents will be hierarchically highlighted by the border of dots around the name of the element. Thus, it is always clear that some choice has been made somewhere (even if the structure itself is closed).
It is possible to create and edit e-categories right from the product management interface. To add a new e-category through the interface, click '...add' and write the title. Right-click on an e-category to see all available actions:
1. Create (click to start creating a child e-category)
2. Rename (click to change the e-category's name)
3. Edit (click to edit an e-category)
To create and edit e-categories, users should have the right Sales/Administrator.
You can assign/add an e-category of a product in the field 'Categories' as you create or edit a product. You can also quickly assign/add the e-category to all selected products by dragging and dropping them to the required one.
You can also filter products by the existing Odoo product tags. If you choose several tags, then the products that relate to either of the tags will be shown.
If you filter products by a tag and a category/e-category or an attribute, then only those that match both will be shown. For example, if we filter by the tag 'Best Seller' and the e-commerce category 'Chairs', then only the products that match both will be shown.
Apart from the standard way of creating a tag, it is possible to create and edit tags right from the product management interface. To add a new tag through the interface, click '...add' and write the title. Optionally, change the order of tags by drag and drop. Right-click on a tag to see all available actions:
1. Rename (click to change the tag's name)
2. Edit (click to edit a tag).
To create and edit tags through the interface, users should have the right to create products.
You can add a tag to a product in the field 'Product Template Tags' as you create or edit a product. You can also quickly add a tag to all selected products by dragging and dropping them to the required one.
Simultaneously, you can search for products with the help of the search bar at the top right of the page. The standard searching criteria are available; for example, you can search products by their category or title.
For extra convenience, above the categories/attributes/e-commerce categories/tags, special search bars were introduced. Type the word and click 'Enter' or the search button; the matching results will be displayed and highlighted in red. Click the 'Reset' button on the right side of the search bar to clear the search results.
You can combine filtering by attributes and searching by attributes. In this case, you will also see only those product templates that match both of the attribute values. For example, you filter by the attribute 'Color' - white and search by the attribute - steel ('Legs'). Then only product templates of the white color with legs made of steel will be shown.
If you choose a child category, attribute, or e-commerce option, then all parents in the hierarchy will be outlined. This way, it is always clear when limitations are applied, even if the structure is hidden. The outline is shown only in case the parent element itself is not chosen.
The central part of the interface shows the list of product templates. On a product template card, you will find the product's name and picture, its category, type, and price.
You may also find some of the product templates' characteristics. For example, 'Can be sold', 'Can be purchased', and 'Website published'.
The list of fields on the product's template might be changed according to the installed modules. For example, the product's stock 'On Hand' will be shown only if you have the extension 'Stock by Locations' installed.
Any field on the product template can also be manually added to the kanban view for an instant overview. For that:
1. Open the 'Products Management Interface' and go to Configuration
2. Scroll down the page and find the section 'Kanban Fields'
3. Click 'Add a line'
4. Choose the fields and click 'Select'
5. Click 'Save'.
To delete a field that you no longer need after adding it, you can click on the cross on the right side of the field.
If you click on a product's picture, then the product's template will be opened.
Tick a checkbox in the top right corner of a product or click anywhere on a product card (except the image) to choose it and open the right navigation panel.
Choose an unlimited number of products step by step. When you switch between filters or apply a new search, the selection will not be cleared, which is very convenient when you want to search, open, update, or perform another mass action on various products at once.
As you choose some products, the right navigation menu appears. There, you will find the list of selected products and the list of available mass actions for products (see Managing Mass Actions). Click on a product's title in the right functional interface to remove it from the list. Remove all products by clicking on the icon () on the right side of 'Selected products'.
Managing Mass Actions
The product management Interface allows applying mass actions to all chosen product templates in a batch. Our module and its add-ons offer a list of mass actions, among which you can select the ones you need. The complete list of available mass actions you can see in the articles: 'Product Management Basic Mass Actions', 'Product Management Interface: e-Commerce', 'Product Management Interface: Warehouse', 'Product Management Interface: Accounting', 'Product Management Interface: Purchases'.
You can select the mass actions to show only the ones that you need. To add a mass action:
1. Open the product management app and go to Configuration
2. Find the section 'Mass actions'
3. Click 'Add a line'
4. Choose mass actions by ticking the box next to the action
5. Click 'Select'
6. Click 'Save'.
After saving the changes in settings, the list of mass actions in the right navigation panel will be updated.
To add the mass action 'Export', in Configuration, in the section Product Management Options, tick the option 'Export'.
Besides the available ones, you can also prepare your server actions and then choose them as mass actions (see Custom Mass Editing Operations).
In the list of available mass actions for selection, you will also find some standard Odoo Server Actions for product templates. For example, the Manufacturing module adds the action 'Generate Pricelist Report', which is also detected by our module and can be added to the right navigation panel for managing product templates in a batch.
To delete a mass action that you don't need from the list, go to Configuration and find the section 'Mass Actions'. Click on a cross by the mass actions that you don't need. Then, click 'Save' in the top left corner of the page. The mass action will not be deleted from the system; it will just be hidden from the list. Thus, later, if you need this action, you will be able to select it again.
Product Management Basic Mass Actions
The list of the mass actions of the Product Management Interface includes:
Click to add or remove attribute values to all found templates. In the field 'Add attribute value', choose the one you want to add to all of the products, and in the field 'Remove attribute value', choose the one that you want to remove.
Click to change the Odoo product category of all selected products. Choose the category in the field 'New category'.
Click to specify the "master product" and its fields that should be copied to the selected products. Any storable, non-calculated field can be selected.
Choose the product to copy the field values from in the field 'Master Product' and the fields in the field 'Fields to copy'.
For example, you can assign the value from the fields price and description from the master products to all selected product templates.
Click to archive all chosen products. You can always restore previously archived products using the mass action 'Restore'.
To see all archived products, choose the filter 'Archived'.
Click to export all chosen products in .xlsx or .csv. You can select fields for export.
To see this mass action, you need to turn it on (see the Module's Configuration).
Click to change the price of all selected Odoo product templates. In the field 'Sales Price', type the price that will be applied.
Click to change the product type of all selected templates. For that, change the type in the field 'New type'. You can assign the following types: consumable, service, and storable.
Click to update all chosen products to be saleable or not saleable.
Click to duplicate a few product templates simultaneously. The duplicates will have a mark '(copy)' in the title.
Click to follow/unfollow all the selected products' discussions.
Click to add/remove product templates' followers. You can add partners by choosing them in the field 'Subscribe partners'. To remove some partners, choose them in the field 'Unsubscribe partners'.
Click to add/remove product tags. You can add tags by choosing them in the field 'Add tags'. To remove some tags, choose them in the field 'Remove tags'.
Click to add/remove optional products. You can add optional products by choosing them in the field 'Add optional products'. To remove some optional products, choose them in the field 'Remove optional products'.
For the mass action to work correctly, the module "Sales products configurator" should be installed in the instance, and the related option 'Product Configurator' should be turned on in sales configurations.
Take into account that updating a high number of product templates (e.g., 1000) might take significant time. In such a case, you should increase your Odoo configuration timeouts.
Product Management Interface: e-Commerce
An optional module (), which introduces mass product templates actions to change E-shop-related attributes and instant filtering by e-commerce categories. The standard Odoo module E-commerce is required.
Here are the mass actions that you can add by installing the add-on:
Click to publish or unpublish products from the website in a batch.
Click to add/remove public E-shop categories of selected templates. You can add categories by selecting them in the field 'Add public categories'. To remove categories, choose them in the field 'Remove public categories'.
Click to add/remove products' alternatives. You can add product alternatives by selecting them in the field 'Add alternatives'. To remove alternatives, choose them in the field 'Remove alternatives'.
Click to add/remove products' accessories. You can add product accessories by selecting them in the field 'Add accessories'. To remove alternatives, choose them in the field 'Remove accessories'.
Click to change the website of all selected products. Choose the website in the field 'New website'.
In addition to mass actions, the module adds the opportunity to filter product templates by public categories. To see all products of one or several categories, just put a tick in the box next to them. E-commerce categories have a hierarchy: if you choose a parent category, you will see products in the child categories as well. You can filter product templates by several e-commerce categories at once (see Products Management Interface).
Product Management Interface: Warehouse
An optional module (), which adds warehouse mass actions on product templates. The standard Odoo module Inventory is required.
Here are the mass actions that you can add by installing the add-on:
Click to change the logistic routes of all chosen products. You can add routes by selecting them in the 'Add routes' field. To remove routes, choose them in the field 'Remove routes'.
Click to change the tracking method of all chosen products. You can select the new tracking in the field 'New tracking'.
Click to update the inventory location of all chosen products. You can assign a new inventory location by selecting it in the field 'New inventory location'.
Click to update the location of all chosen products. You can assign the production location by selecting it in the field 'New production location'.
Product Management Interface: Accounting
An optional module (), which adds mass accounting actions on product templates. The standard Odoo module Accounting is required.
Here are the mass actions that you can add by installing the add-on:
Click to modify the invoice policy in a batch. Change it, for example, to 'Ordered quantities' or 'Delivered quantities'.
Click to add/remove customer taxes to selected product templates. You can add customer taxes by selecting them in the field 'Add customer taxes'. To remove some customer taxes, choose them in the field 'Remove customer taxes'.
Click to add/remove vendor taxes to selected product templates. You can add vendor taxes by selecting them in the field 'Add vendor taxes'. To remove some vendor taxes, choose them in the field 'Remove vendor taxes'.
Click to update the income account of all selected product templates. Choose the new account in the field 'New income account'.
Click to update the expense account of all selected product templates. Choose the new account in the field 'New expense account'.
Product Management Interface: Purchases
An optional module (), which adds purchases' mass actions on product templates. The standard Odoo module Purchase is required.
Here are the mass actions that you can add by installing the add-on:
Click to update all chosen products to be purchasable or not purchasable.
Click to assign a new vendor to product templates in bulk and make this supplier the most prioritized. For that, choose the vendor in the field 'Supplier', optionally select the minimal quantity of products for purchase in the field 'Minimal quantity', and optionally set the delivery time in the field 'Time of delivery'.
Click to change the purchase policy for all selected products. Update that, for example, to 'On ordered quantities' and 'On received quantities'.
Click to be redirected to a new purchase order form in editing mode with the order lines prefilled by the selected products.
To each order line, the first available product variant of all chosen product templates is added. This way, if there are multiple product variants, you should select the required one.
Suppose some product templates have no product variants available (i.e., product variants are dynamically created and none have been created yet). In that case, such products will not be added to the order lines unless the module Purchase Matrix is installed.
If there were some non-purchasable products among the selected ones, they would not be added to the order lines.
Custom Mass Editing Operations
In addition to the available actions, you can also prepare your mass actions. Batch actions for product templates are based on Odoo Server Actions. It means that you may add custom mass editing operations.
To create a new mass action:
1. Go to Configuration and find the section 'Mass Actions'
2. Click 'Add a line'
3. Click 'New'
4. Type the name of the action
5. Choose the model 'Product'
6. Choose an action to do (according to the action, the list of further configurations will change)
7. Create an action
8. Click 'Save&Close'
9. Click 'Save'.
After that, it will appear in the list of available mass actions, from where it can be added to the right navigation panel. Select the product templates and click the action to update the selected products.
For example, let's create a mass action 'Mark Fragile'. As a model, we should choose 'Product' and perform 'Update the Record'. After that, click 'Add a line' and select the field, which will be updated. As the 'Evaluation type', let's choose 'Value', and in the line 'Value' type, define what should be added to the field. Then, save the action.
Upon opening the single-view interface, the new action 'Fragile' is located in the right navigation panel. Choose product templates to apply the action. After that, on each selected product template, the value of the 'Description for internal transfers' will be updated to 'Fragile'.
When you create a custom mass action, take into account the following peculiarities:
1. As the model, always use 'Product'. Otherwise, your action would not be displayed in the list of operations
2. In case you want to return a wizard, such a wizard should not have a footer (only standard buttons) and should have an explicitly specified view_id. Look for examples in any module of the Product Management Bundle.
Consider that updating a large number of product templates (e.g., 1000) might take significant time. In such a case, you should increase your Odoo configuration timeouts. Besides, some operations might be impossible in Odoo: for instance, creating more than 1000 variants for a single template.
Module's Configuration
The module can be configured. To do this, open the module and click on the tab 'Configuration'. In the convenient configuration menu of the module, you can do the following:
1. Add/remove the filtering by attribute values. For that, just put/remove the tick from the option 'Filter by attribute values' (see Products Management Interface)
2. Add/remove the filtering by Odoo product tags. For that, just put/remove the tick from the option 'Filter by tags'
3. Add/remove the mass action export. For that, tick/remove the tick from the option 'Export'
4. Turn on/off the extra mass action sets. To turn an add-on with mass actions on/off, tick the box next to it. As you turn the add-on off, it will be uninstalled from the system. As you turn the option on, it will be installed again. To use the function, the related add-ons should be installed in the system (Read more in 'Product Management Interface: e-Commerce', 'Product Management Interface: Warehouse', 'Product Management Interface: Accounting', 'Product Management Interface: Purchases')
5. Manage mass actions. To add mass actions, click 'Add a line' and choose the action. Change the order of mass actions by drag and drop. To delete an action, click on the cross by the mass action (see Managing Mass Actions)
6. Manage Kanban fields. To add kanban fields, click 'Add a line' and choose the field. To delete a field, click on the cross by it (see Products Management Interface).
Access Rights
The module doesn't influence users' access rights to product templates. The access rights are regulated by Odoo standard apps (for example, Odoo Sales, or Odoo Purchases) or might be controlled by other third-party apps (for example, use the app Limited Access for Products to delegate products' administration only to a chosen group of users, while others will still have read-only access to products).
The interface is available for any user who has rights to products (e.g., sales, warehouse, or purchase manager) AND who has the group 'Product manager' assigned. The app configuration can only be done by the group Administration / Settings.
For example, we want Abigail Peterson to have access to the Product Management Interface. She already has a sales group 'User: Own Documents Only' assigned. So, we should add the group 'Product Manager' to the section Sales > Product Management. So, to get access to the menu, both groups are necessary; however, a sales group might be changed to another one, which gives access to products (e.g., warehouse or purchase).