About Joint Calendar
Joint Calendar is an Odoo tool that combines different Odoo events in one or a few configurable super calendars. Odoo users often need to keep in mind a lot of details that are spread out among numerous interfaces. Switching between those is not comfortable and error-prone for planning. This tool solves the problem. The app allows to configure rules to join and share various document types on a single super calendar view but with easy-reachable source objects.
The tool might merge any Odoo document types on the same view: opportunities, meetings, phone calls, activities, sale or purchase orders, shipments and deliveries, tasks and tickets, and time offs, ...
Configure as many calendars as you need: for various functional areas or different user groups. Each joint calendar has its menu item.
Define on your own what to consider a joint event title, start or stop date, who are target attendees, etc. Have even the same document twice on the same calendar just with a different start.
Joint events and their source documents are interrelated. Update the former and the latter will be changed immediately. A reverse operation will be applied according to the system schedule.
Calendar configuration lets assign popups and email alarms. Thus, it is possible to have notification of any Odoo event or activity.
Regulate joint calendar access right on its form. Make it public or share it only for chosen user groups. Shared calendars are especially suitable for team interactions. Users might switch between document types and participants in a single click.
Joint events are updated regularly by the cron job. It is fast, especially if you apply time frames. Refreshing is also available from the calendar interface.
Any Odoo document on the same calendar
Reminders for any Odoo documents
Instant access to source details
Simple user rights administration
Configuring Odoo Shared Calendars
The tool might merge any Odoo document type on the same view: opportunities, meetings, phone calls, activities, sale or purchase orders, shipments and deliveries, tasks and tickets, and time offs, ...
Configure as many calendars as you need: for various functional areas or different user groups. Each super calendar has its menu item. According to the company's needs, you can combine all required documents into one calendar, or divide them logically into several ones. For example, you can create a calendar 'Various calendars' for all documents or you can create a 'Sales Calendar', which will include everything, that relates to sales, and a 'Tasks and Time offs' calendar, which will include only tasks and employees time offs and leaves.
To create a Calendar:
1. Open the Events app and click Configurations > Calendars in the systray
2. Click 'New'
3. Introduce the title
4. Add Rules (see Joint Calendar Rules)
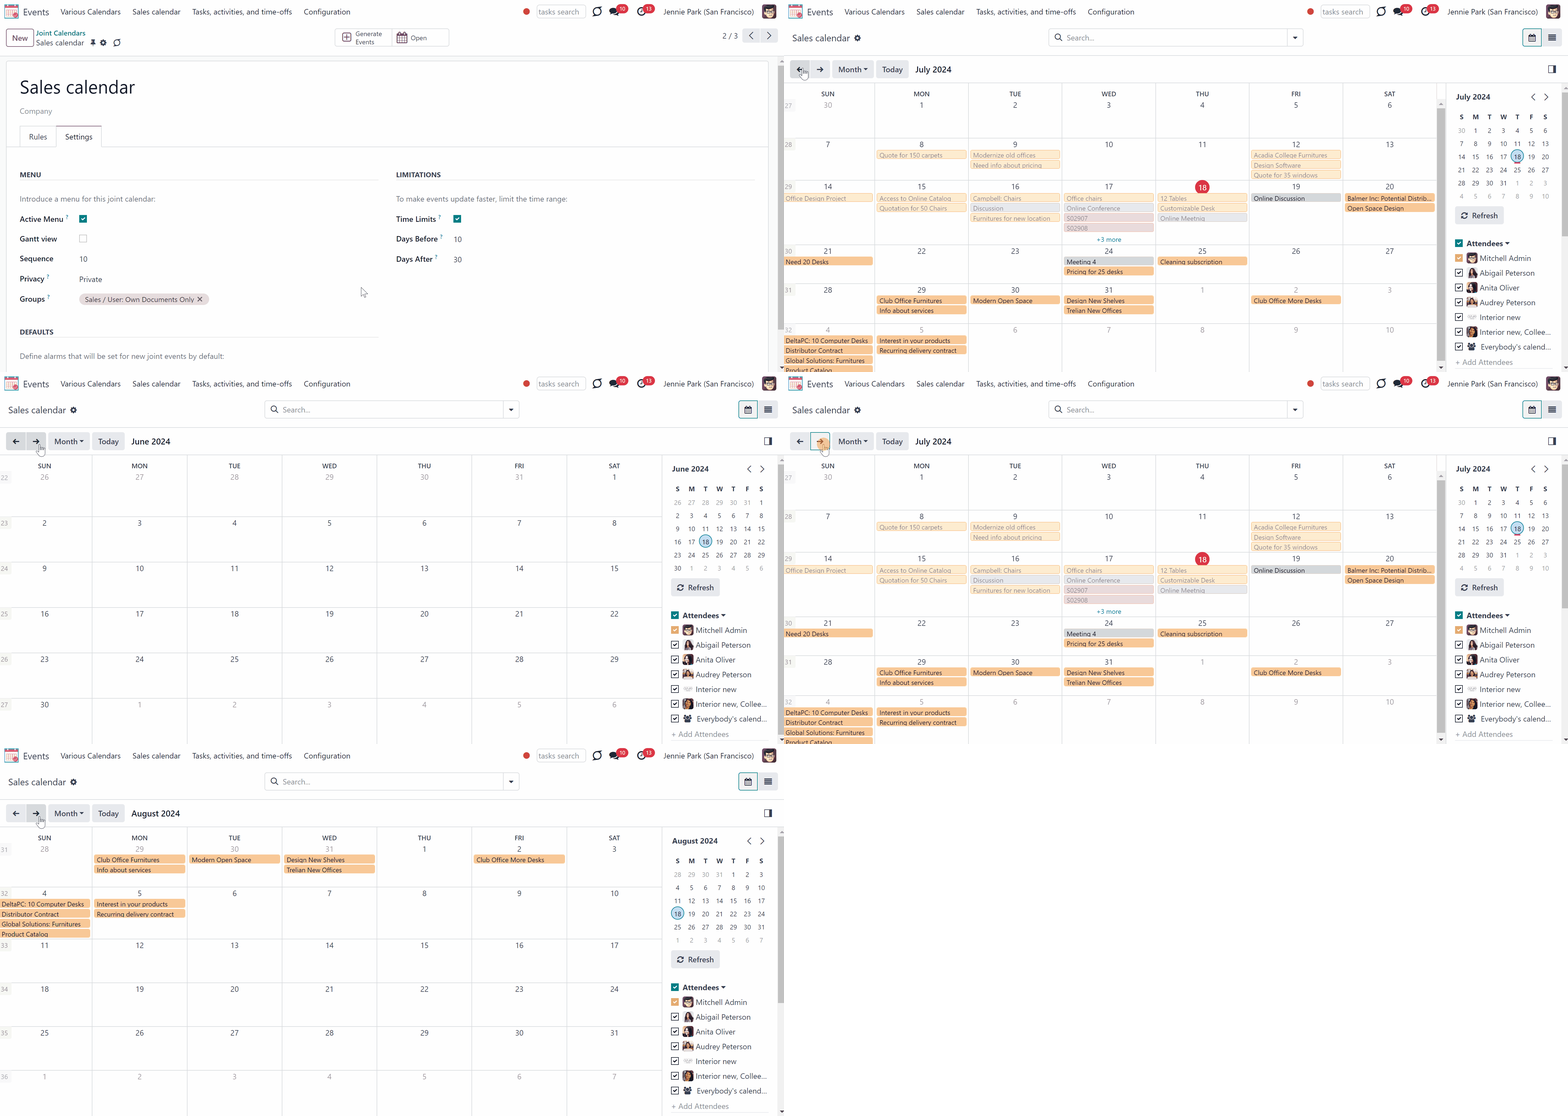
5. Go to the tab 'Settings'
6. Add/Remove the tick 'Active menu', to add/remove the Calendar from the Event's systray
7. Optionally add the sequence, set the privacy, time limits, and alarms
The button 'Generate Events' above the calendar's form can be used to trigger the scheduled job to add the events to the calendar (see Joint Calendar Scheduled Jobs).
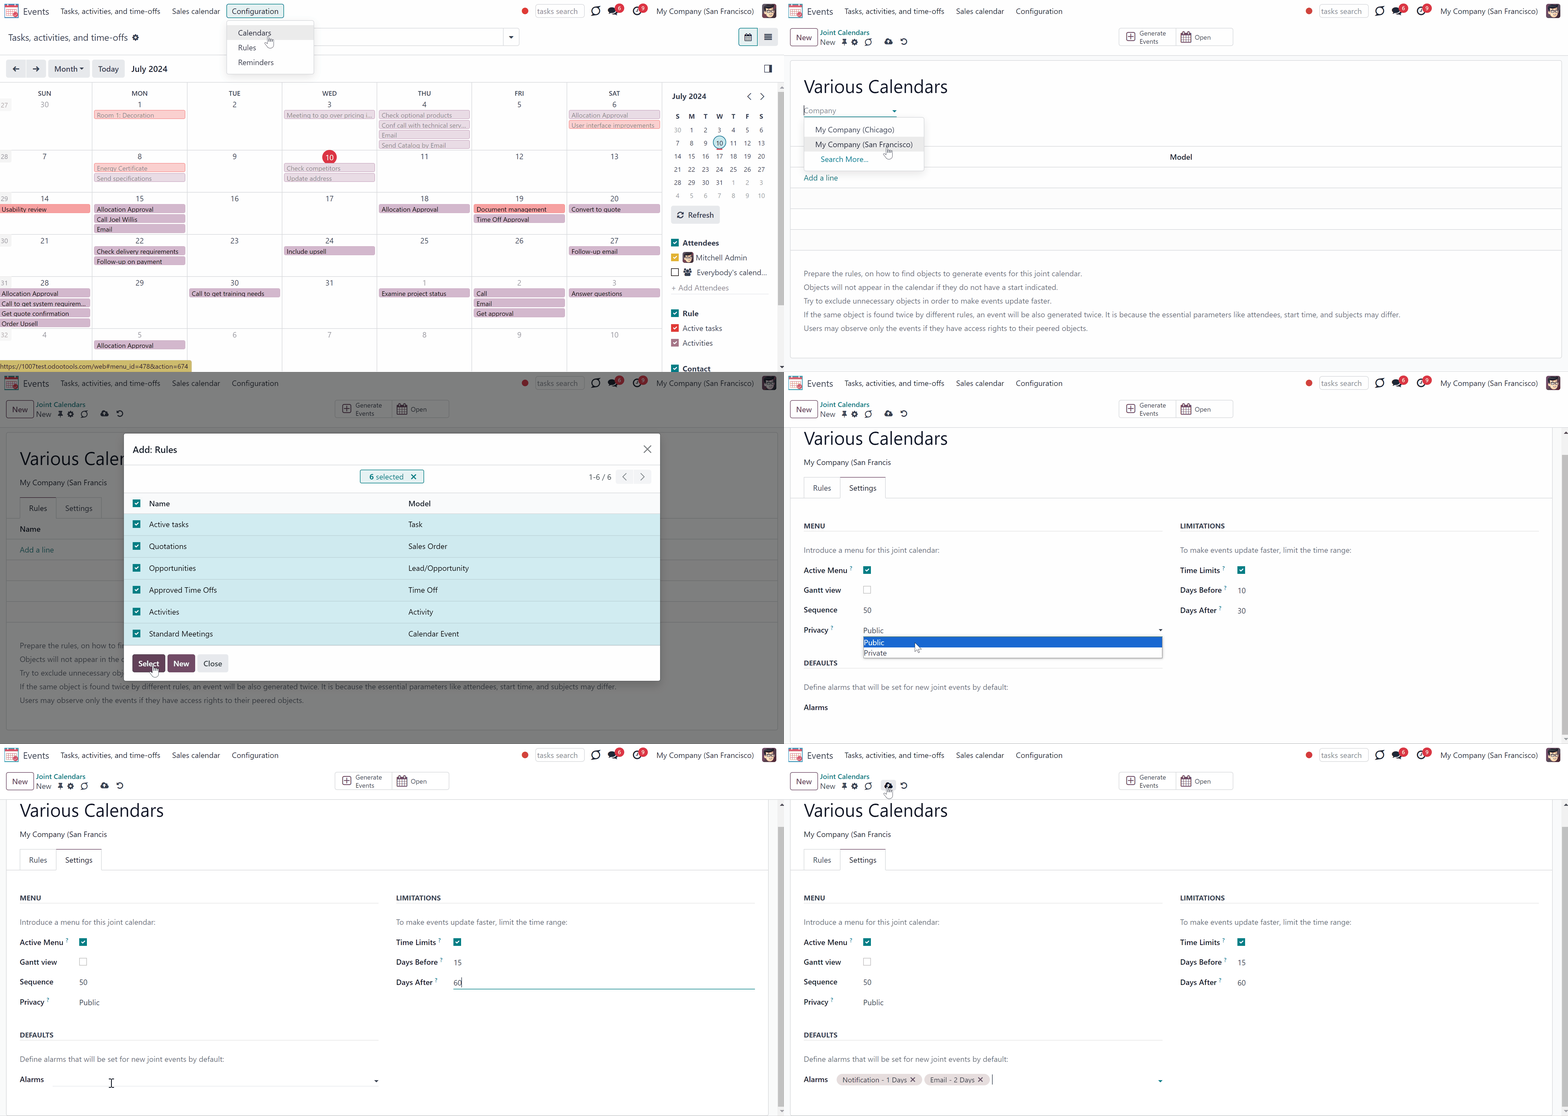
When you add rules to the calendar, you specify which models should be presented in the calendar (see Joint Calendar Rules). This allows to keep rules logically divided into several calendars and conveniently switch between them, so the calendar will not be overloaded (see Joint Calendar Interface). Also, it is especially useful to configure rules in a batch as it is the calendar's settings, that control the privacy, time limits, and alarms.
You can find all the features available for configuration in the tab 'Settings' while editing or creating a calendar.
The first feature is 'the Active menu'. If it is turned on, the entry for this shared calendar will be available under the menu ‘Events’ (see Joint Calendar Interface). Otherwise, the calendar will not be shown and you will not be able to access it. It is useful when you no longer need a calendar but don't want to delete it yet as it is still might be useful later.
If the option is turned off for all of the calendars, the menu 'Events' will be hidden from the main menu.
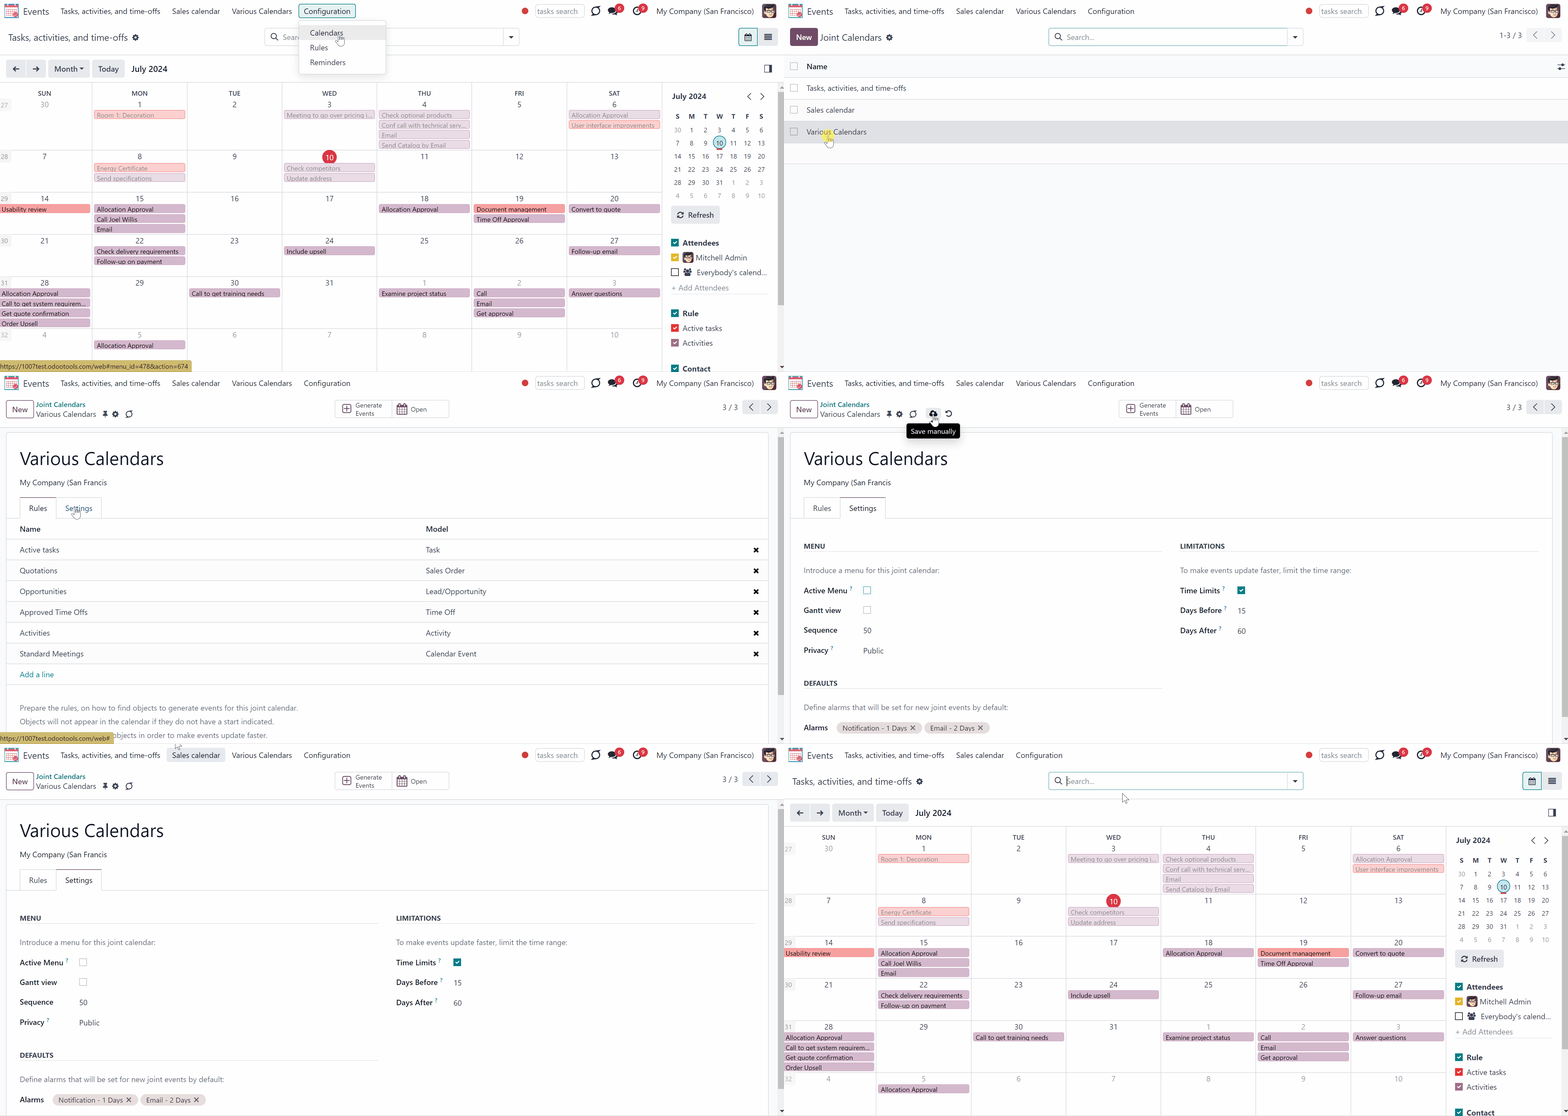
The field 'Sequence' below the 'Active menu' defines the order in which the calendars are displayed in the systray. The Calendar, which goes the first, has a lower sequence. So, the calendar with sequence 20 will be displayed before the calendar with sequence 50.
To change the sequence, type the number in the field 'Sequence'. The number can be either positive or negative or a zero.

For each calendar, you can set access rights. The calendar may be either public (seen by everyone) or private (seen by particular user groups).
The field 'groups' appear as you choose the option 'private' in the field ' Privacy'. Users may observe only the events to which related objects they have access rights (see Joint Calendar Access Rights).
Shared calendars are especially suitable for team interactions. Users might switch between document types and participants in a single click.
It is also possible to set limitations to make events update faster and consume system resources efficiently. For that, tick the box 'Time limits' and set 'Days before' and 'Days after', so only events within this time range will be shown in the calendar. By default, the events are shown 10 days before the event and 30 days after. For example, you have a Task 'Fix the sink' for the 30th of March. Today is the 15th of March, so the task will not be shown on the calendar. However, in 5 days, it will appear, as it is set to show events 10 days before. And the event will stay on the calendar till the 29th of April.
If you remove the tick from the box 'Time Limits', then the events for all time will be shown (see Refreshing Joint Events & Scheduled Jobs).
Calendar configuration lets assign default popups and email alarms. Thus, it is possible to have notification of any Odoo event or activity. You can choose the type of alarm and the time of warning (see Joint Calendar Alarms).
It is also possible to set an alarm for a particular event (see Joint Calendar Interface).
Joint Calendar Rules
To add a new document type for a shared interface you should set up a shared calendar rule. Rules define which Odoo objects should create events, which fields of that object should be used and shown, and whether any filtering should take place.
Define on your own what to consider a joint event title, start or stop date, who are target attendees, etc. Have even the same document twice on the same calendar just with a different start.
To create a rule:
1. Open the Events app and click Configurations > Rules in the systray
2. Click 'New'
3. Type the rule title
4. Choose a model (see Rules Fields)
5. Define a name field (see Rules Fields)
6. Select a start date field (see Rules Fields)
7. Choose an attendees field (see Rules Fields)
8. Optionally add a stop date field (see Rules Fields)
9. Optionally choose a description field (see Rules Fields)
10. Optionally select a contact links field (see Rules Fields)
11. Optionally add filters to specify events, that should be shown in a calendar with this rule (see Filters)
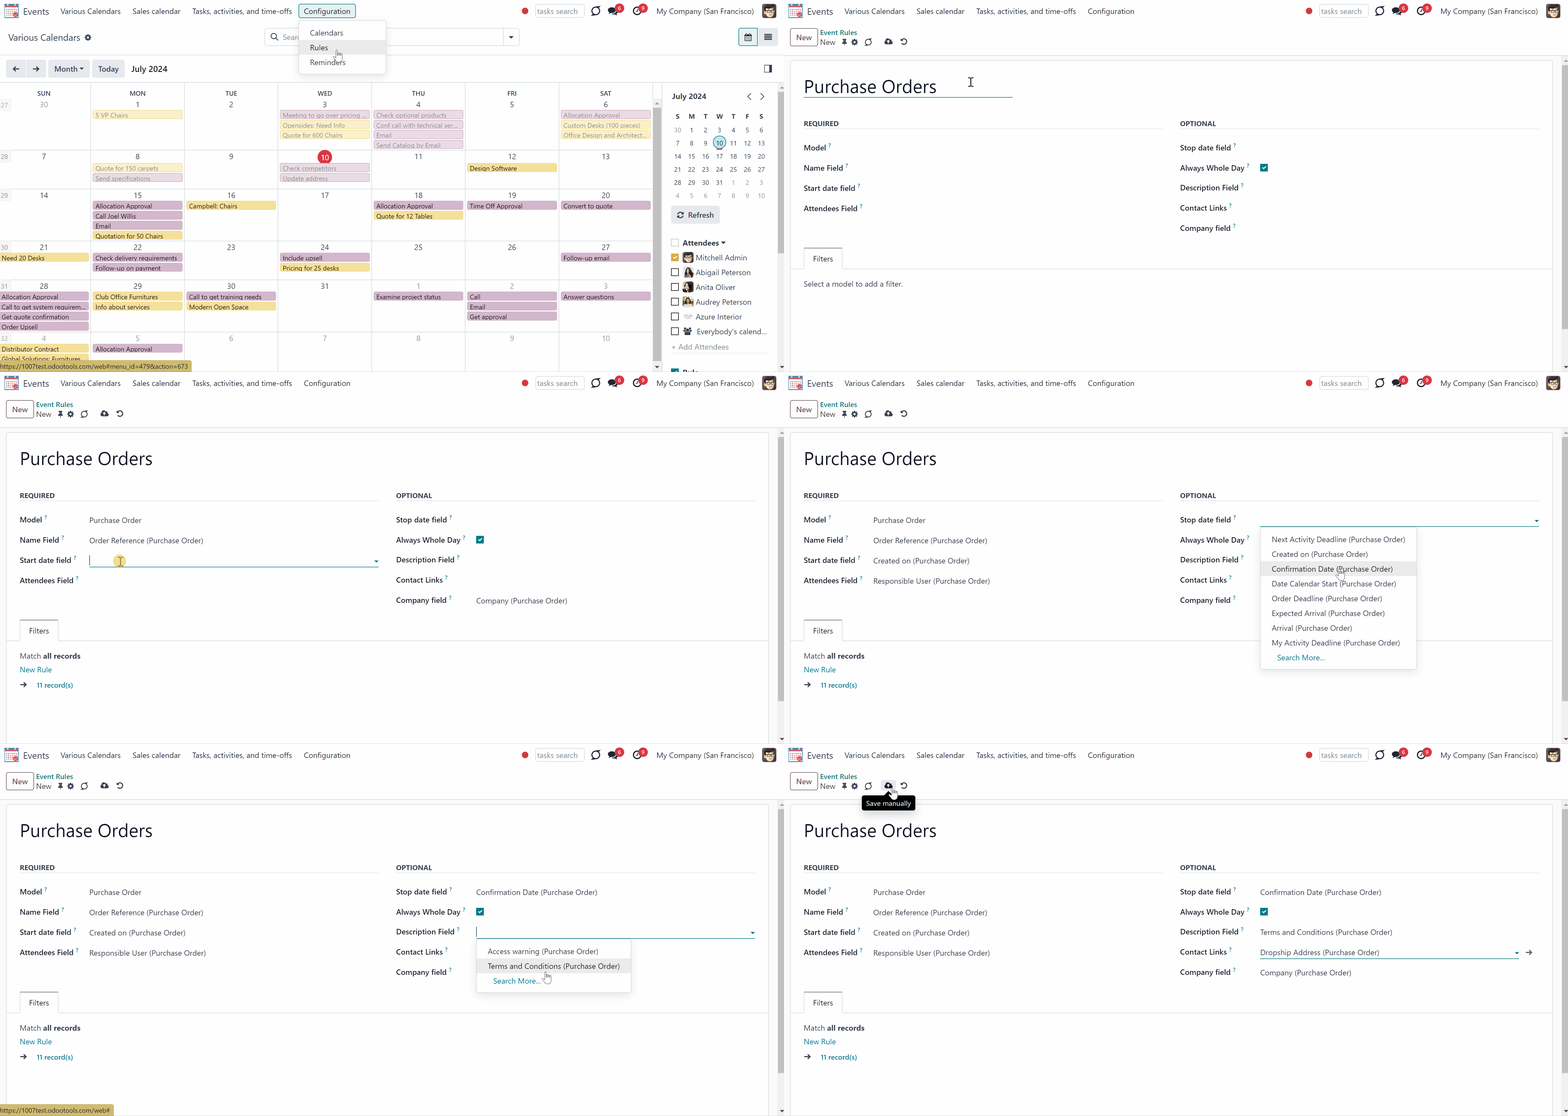
You can add a rule to a calendar while creating or editing it in the tab Rules by clicking 'Add a line'. To delete a rule from the calendar click on the cross by it.
You cannot add the same rule to one calendar twice. However, you can create a slightly different rule, with another title or fields used.
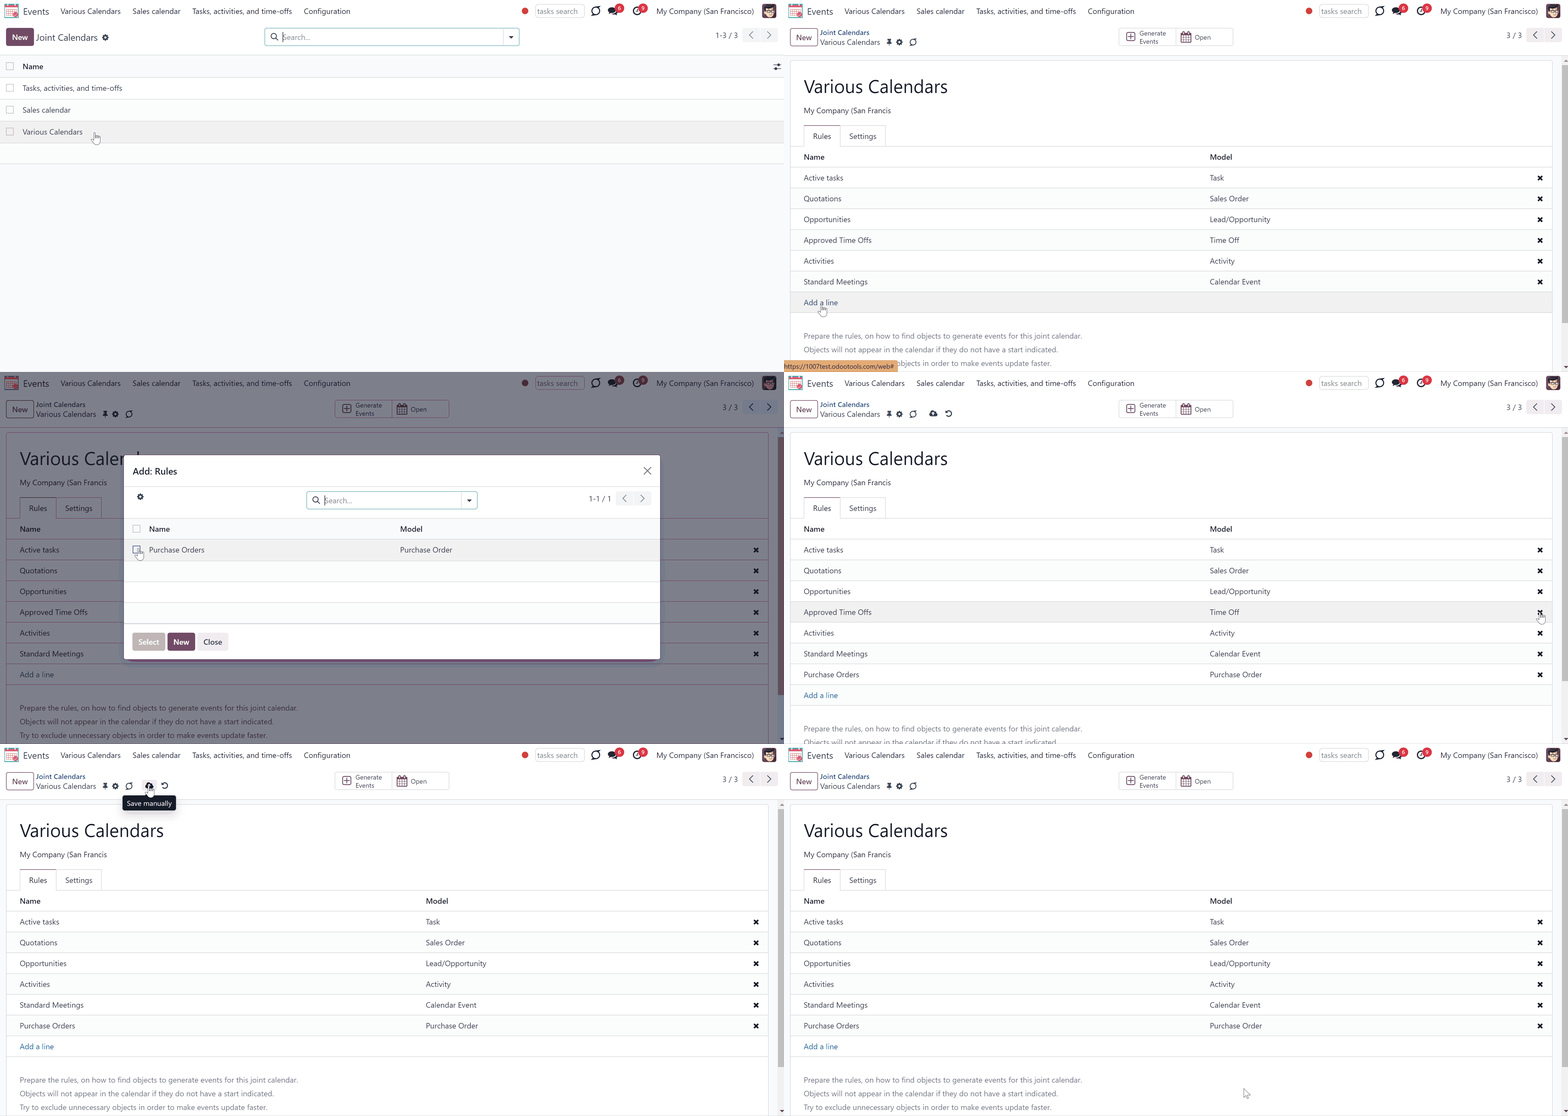
If the same object was found twice by different rules, an event will also be generated twice. It's because essential parameters like attendees, start time, and subjects may differ.
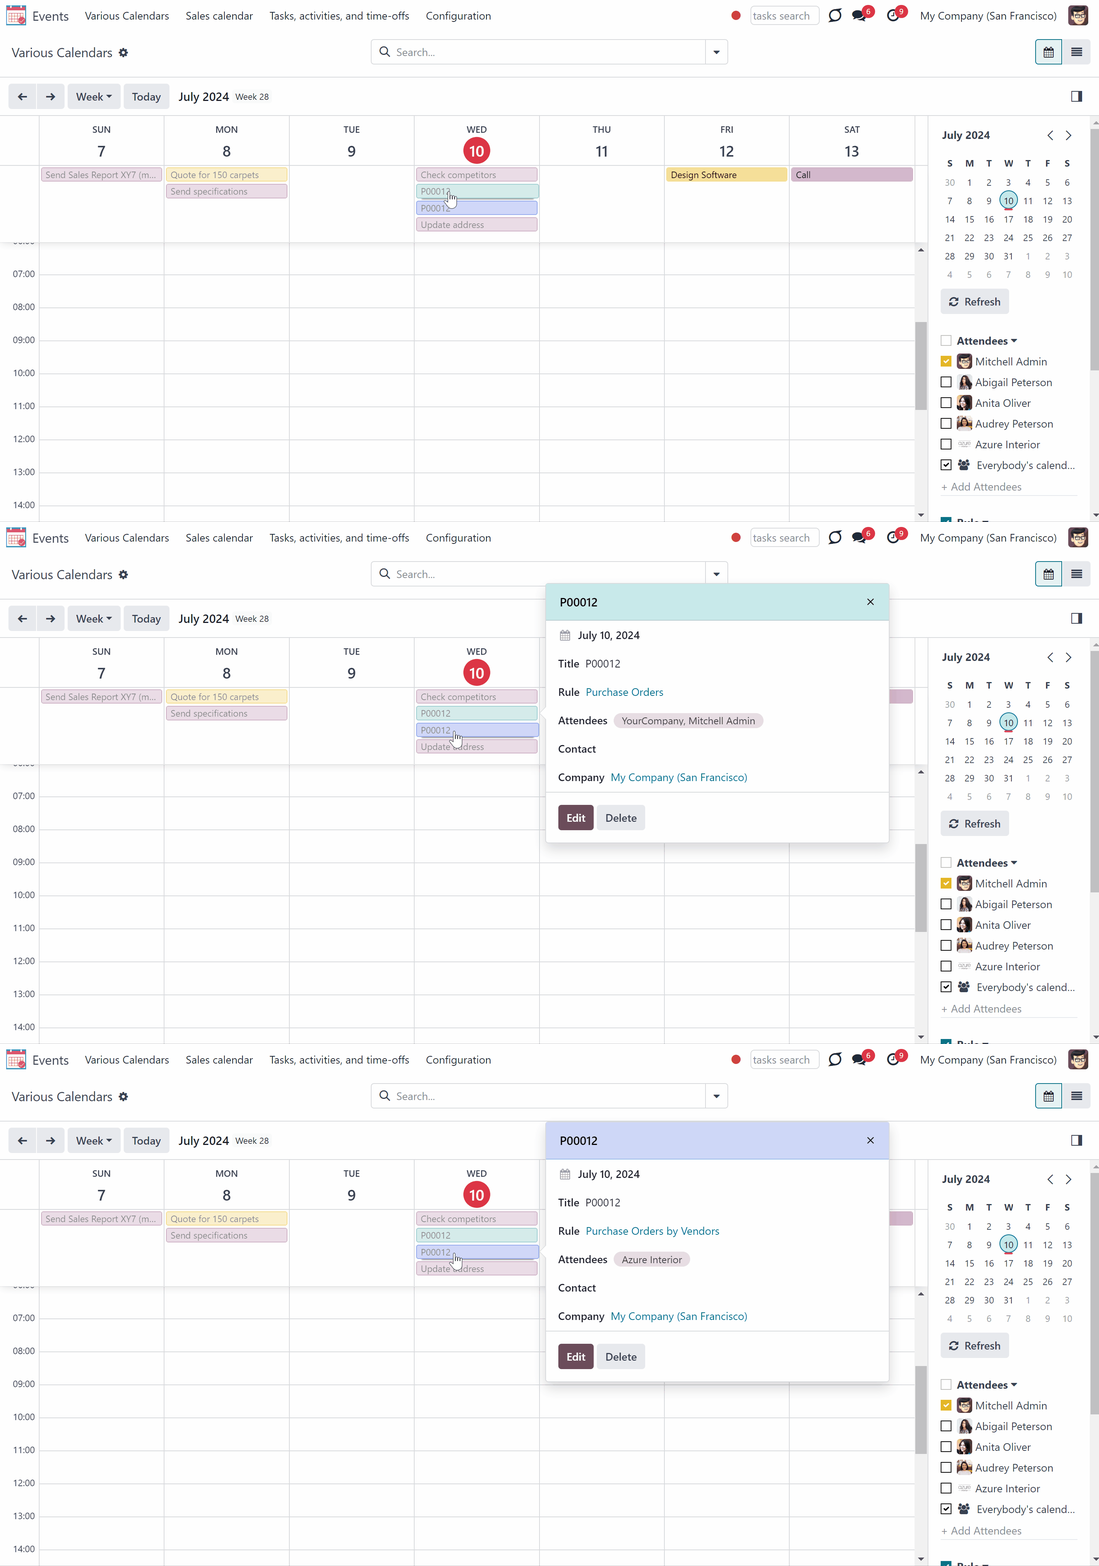
Setting up Joint Rule
Each field, that a rule has, serves a particular purpose. Below you can find the description of each setting.
Model - a target Odoo document, which defines what objects to scan: opportunities, tasks, orders, meetings, activities, and so on. You can choose your custom document type (including those created in Odoo Studio) as well. The mandatory field.
For example, if you choose the model 'Sales Order', then events will be created based on the existing Odoo quotations.

Name - a field of the target Odoo model, which defines what to use as a joint event name (also used as calendar event title). Usually, it is 'name', 'subject', or 'reference'. The mandatory field.
For example, if you create a rule for the model 'Sale Order' and choose the ‘Order reference’ for the Name Field, then, a joint even related to the quotation ‘S00001’ will be also named ‘S00001’.

Start date - a field of the target Odoo model, which defines when an event starts. For example, 'expecting closing' for opportunities or 'order date' for quotations. It may be any date or date with the time field of a source Odoo object. The mandatory field.
For example, if you create a rule for the model 'Sale Order' and choose the 'Order Date' for the Start date field, then the event will appear in the calendar on the same day for which the quotation is planned.
If the field, which was chosen as a start date isn't filled in related to the event document, then the event will not appear in the calendar.

Stop date - a field of the target Odoo model, which defines when an event is shown as finished on a calendar. The optional field.
For example, if you create a rule for the model 'Sale Order' and choose the 'Delivery Date' for the Stop date field, then the event will be shown in the events menu from the day for which this quotation is planned (Start Date field - Order Date) till the day of the product's delivery.
If you leave the field empty, then in the events menu, the event will be placed only on the day defined by the Start Date field.

Attendees - a field of the target Odoo model, which defines who are participants (responsible people, event owners). For instance, 'assigned to', 'sales person', or 'attendees'. You may use even document 'followers' since it's possible to apply both users and partners. The mandatory field.
For example, If you create a rule for the model 'Sale Order', and add choose the 'Salesperson' for the Attendees field, then joint even participants would include a quotation salesperson. Also, the event will be shown, if you sort events by this salesperson in the section attendees in the 'Events' menu (see Joint Calendar Interface).

Description - a field of the target Odoo model, which shows the notes, that the event has if there are any. Usually, the fields like 'internal notes' or 'comments' are used. The optional field.
For example, if you create a rule for the model 'Sale Order' and choose 'Terms and Conditions' for the Description field, then the related-to-order terms and conditions will be shown on the event's card.
If you leave the field empty, then the event's description field will be also empty.

Always Whole Day - an option, which can be turned on/off. When it is turned on, then all generated events created with the rule will last the whole day disregarding whether start or stop is defined with hours and minutes. Such an event will be shown at a special place on the calendar.
For example, if you create a rule for the model 'Sale Order', and turn on the option 'Always Whole Day', then the event will be placed on the daily and weekly super calendars above the timeline.
If you turn off the option, then, if the start or stop are defined with hours/minutes, the event will be placed at a particular time on the day's timeline and you will see the time before the event's title.

Whole Day - a special boolean field of the source object, which indicates that a related joint event may last the whole day. This setting is usually applied to standard Odoo calendar events which both might have definite time indicated or might be planned for a whole day. This optional field is available only if the setting 'Always Whole Day' is turned off.
For example, if we create a rule for the model 'Calendar Event' and choose 'All Day' as the Whole Day field, then, in case the event lasts all day, an event without the timing will be created. The event will be on the calendar the whole day and it will be placed above the timeline.
If you leave the field empty, then in case the calendar event has a definite time, it will be mentioned.

Contact Link - a field of the target Odoo model, which defines a specific partner, that is linked to the event. Usually, the fields like 'customer' or 'vendor' are used. The optional field.
For example, if we create a rule for the model 'Sale Order' and choose 'Customer' as the Contact Links field, then, the user from the field, will be written on the event template in the field 'Contact'.
If you leave the field empty, then the event will not be linked to the event.

Company field - a field of the target Odoo model, which defines to what company the object relates to. The optional field.
For example, if we create a rule for the model 'Sale Order' and choose 'Company' as the Company field, then, in case we assign a calendar to a particular company, the module will be able to distinguish to what company the object relates to, and, therefore will show only the related ones.
If you leave the field empty, then the module will not be able to distinguish the objects and will show the events related to all companies, even if the calendar relates to a particular company.

Domain - the Odoo filters' constructor to include only topical documents into a merged calendar. You might apply any storable attribute. For example, show only quotations without sales orders, or show opportunities only for this sales team.
Creating domains allows you to filter the records, which will be used to create the events. Only the ones, that match the specified conditions will be used. If you edit or delete an automatic rule, then the list of matching records will change.
You can apply filters by any storable field. For example, show only the sale orders of a particular salesperson or sales team, only tasks of a particular project, only opportunities of a particular customer, etc.
How to add a rule:
1. Start creating or editing a rule
2. Click '+Add Filter'
3. Choose an ID, by scrolling or typing the beginning in the search field and choose the filter options
For example, let's see some filters, which can be added to the model 'Sale Order'.
If you add a domain 'Salesperson contains Anita Oliver', then only based on orders related to Anita the events will be created.
If you introduce a filter 'Total >=50000', then only the orders with the total more or equal to 50000, will be considered for joint events.
If you add a filter 'Sales Team contains America', then only based on the matching records the events will be created, in this case only Sale Orders of the sales team America.
If the field is left empty, then all the records will be used to create events.

Rules Examples
Here are some examples of useful Joint Calendar rules:
As a model use 'Task'
As a name use 'Title'
As a start date field use 'Deadline'
As attendees fields use 'Assignees'
As a domain optionally you can set definite projects or stage name

As a model use 'Sales order'
As a name use 'Order Reference'
As a start date field use 'Order Date'
As attendees' fields use 'Salesperson'
As a contact link use customer
As a domain optionally restrict quotations by sales teams

As a model use 'Lead / Opportunity'
As a name use 'Opportunity'
As a start date field use 'Expecting Closing'
As attendees' fields use 'Salesperson'
As a contact link use customer
As a domain optionally restrict opportunities by sales teams

As a model use 'Activity'
As a name use 'Display Name'
As a start date field use 'Due Date'
As attendees fields use 'Assigned to'
As a domain optionally apply 'Summary is set'

As a model use 'Calendar Event'
As a name use 'Meeting Subject'
As a start date field use 'Start'
As a stop date field use 'Stop'
As attendees fields use 'Attendees'
As a whole day field 'All Day'

As a model use 'Time Off'
As a name use 'Description'
As a start date field use 'Start Date'
As attendees fields use 'User'
As a stop date field use 'End Date'
As a domain filter by status use 'Status = Approved' to show only approved leaves

Joint Calendar Interface
Users may access Joint Calendar through the interface events menu. Each super calendar has its own systray button. Thus, you can choose among the created calendars, which one to show.
By default, the first calendar is opened. You can change the calendar's order, by setting up their sequence in the settings tab, while creating or editing a calendar. The calendar with the smaller sequence goes first (see Creating Calendars).

As a user clicks on a super calendar menu, he/she sees joint events on a monthly timetable. It is possible to switch between the daily, weekly, monthly, and yearly views in the top left corner. On the right navigation bar, you see a small calendar that allows quickly move to the required date. For that, just click on the day you want to see. Use arrows to see the previous/next month.
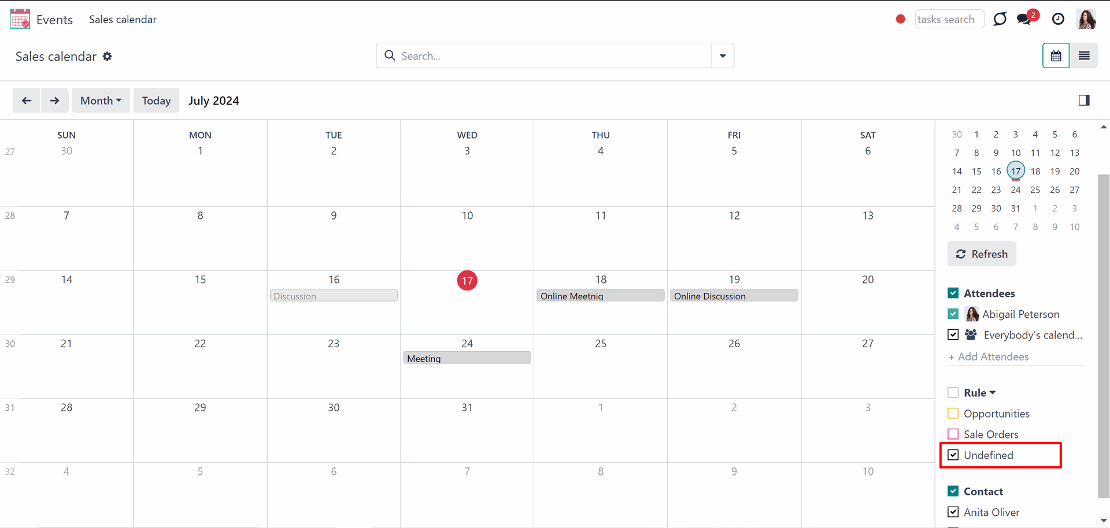
Here you can also filter joint events by a joint rule, so by an actual Odoo model. For example, to show only tasks or sale orders. Each of them is marked by color. Manually created joint events (not linked to any Odoo object) would be available under the filter ‘Undefined’, without color.
To create a joint event manually, just click on any day, introduce the event name, and click 'New'. The undefined event will be available for the same calendar from which it was created.
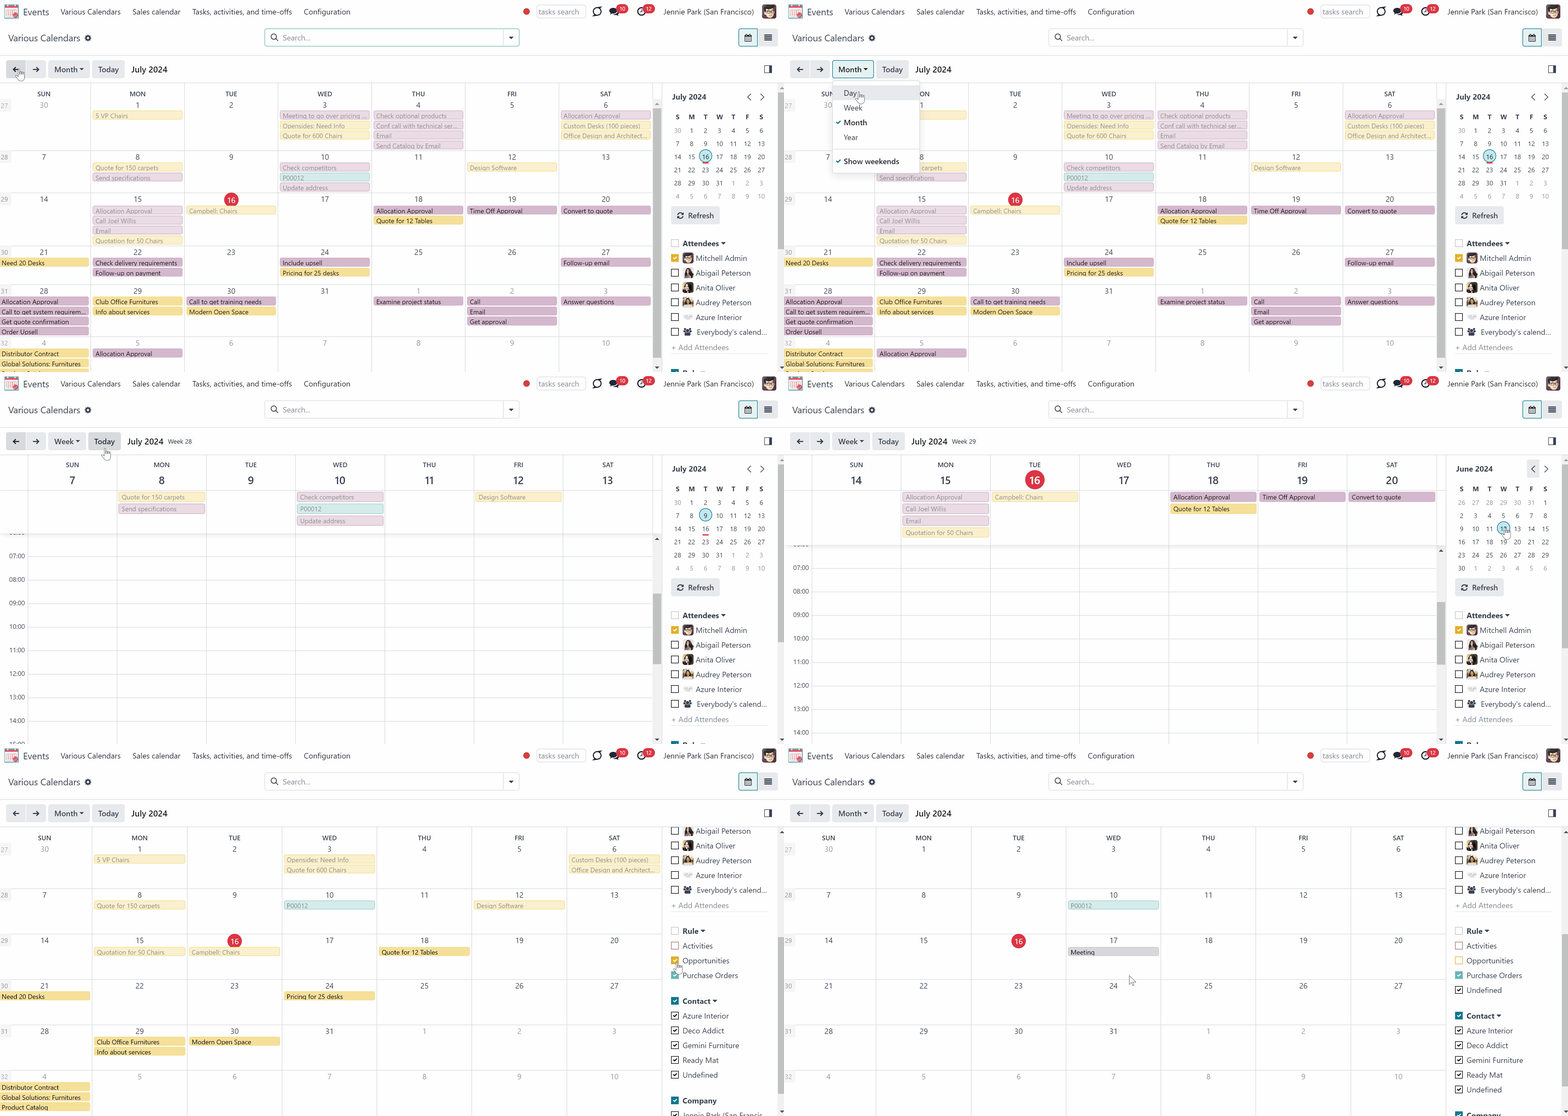
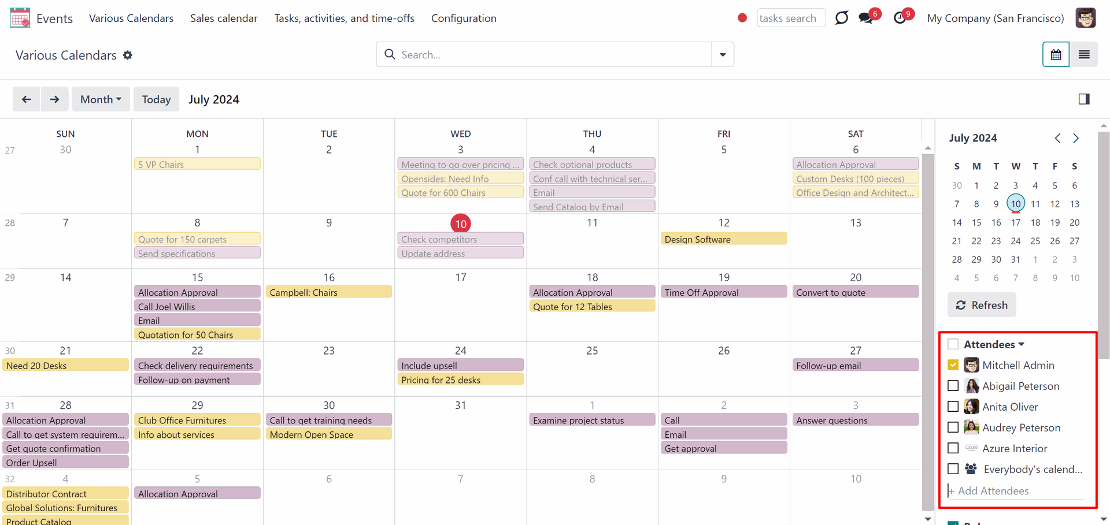
Also, below the filtering by models, you can apply a search by actual joint event attendees, for instance, if you wish to see only your own documents or documents of a particular person(s). If required, apply ‘Everybody’s calendar’ to see everybody's calendar at once, or add a new attendee filter by clicking on the field '+ Add Attendees' and choosing a person from the list. You can also start typing the person's name.
It is only up to you, what attendees to keep. You can delete the ones, that you don't need by clicking on the cross by the person. However, you can't delete the default one 'Everybody's Calendar'.
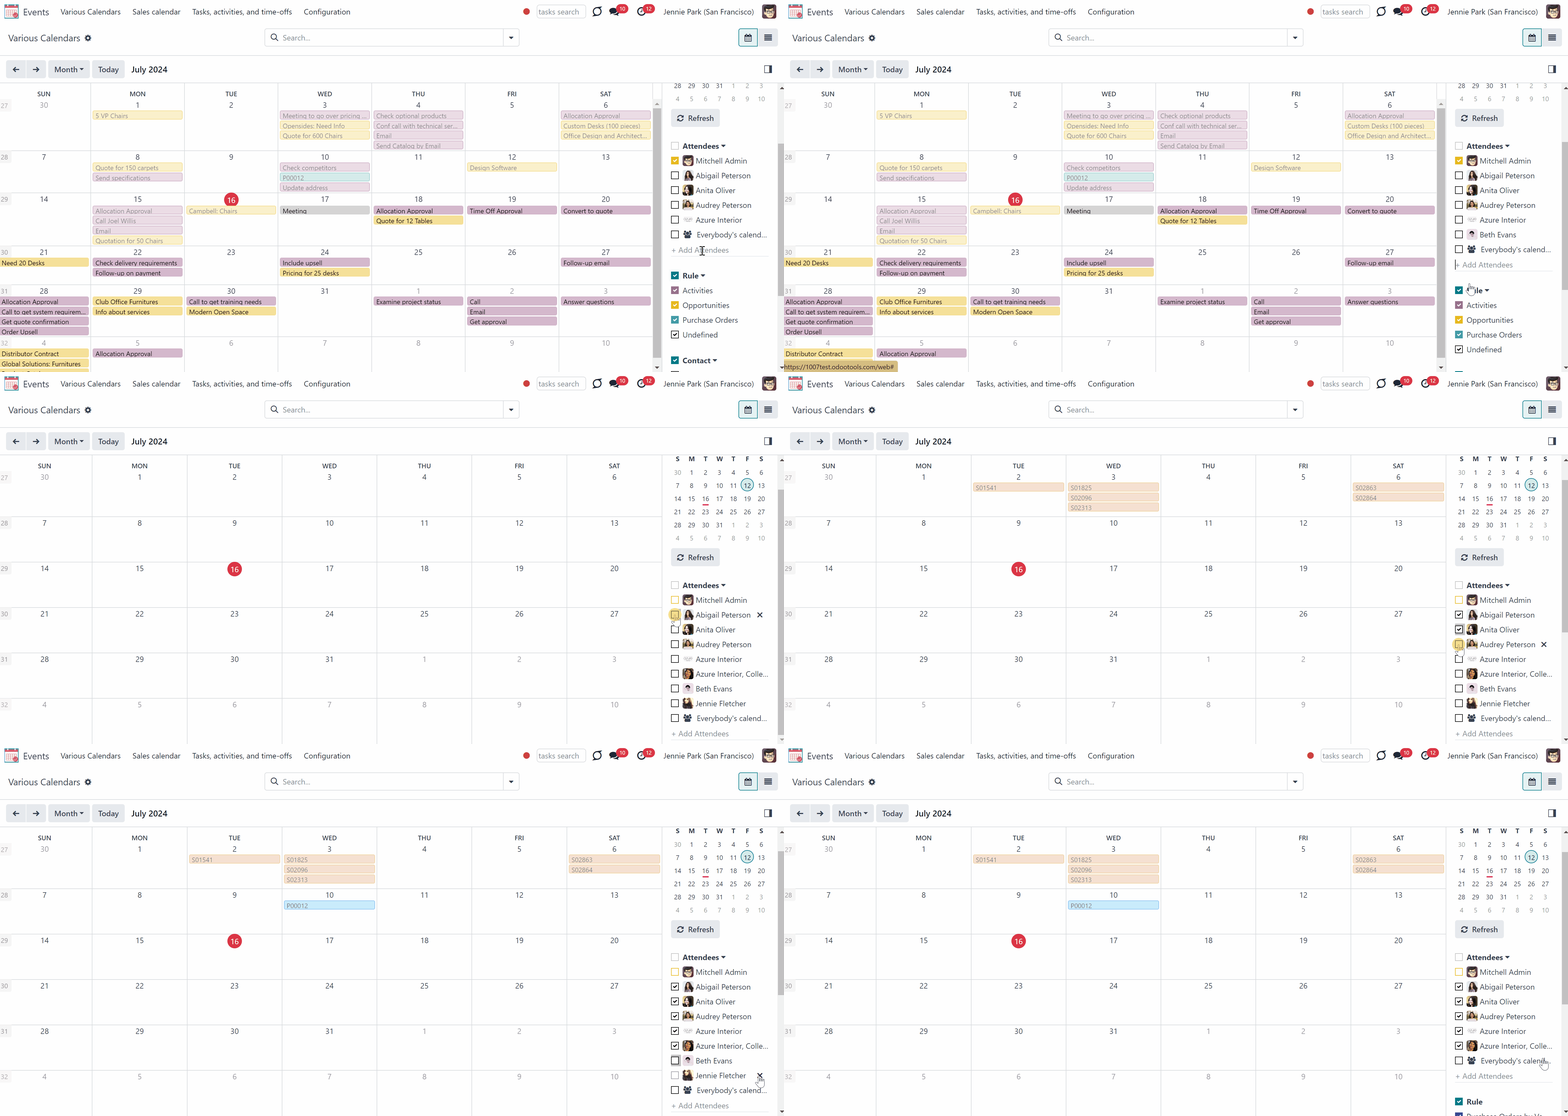
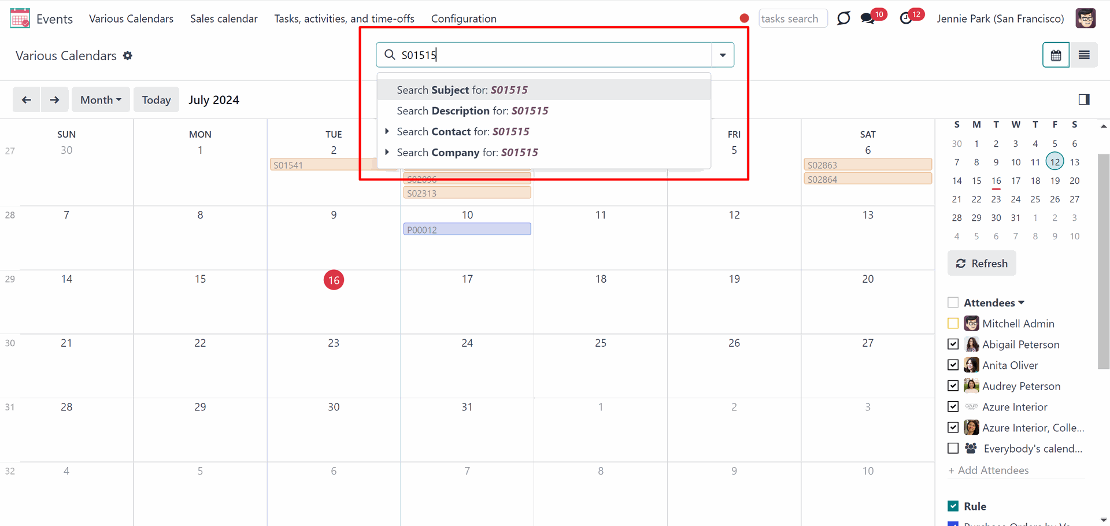
Use Odoo standard omnibox above the calendar to search by:
1. Subject (the title of the event)
2. Description (by event's extra notes)
3. Contact (the customer)
4. Company (the company of the event)
To search, just start typing the word and then choose the search option.
You can access the main information of an event right from the Events app. Simply click on an event in the calendar to see its details.
Click on the 'Edit' button to change the starting or ending date and time, contact, and configure an alarm for this particular object.
Joint events and their source documents are interrelated. Update the former and the latter will be changed according to the system schedule.
Changes in the event card will lead to changes in the source document immediately. However, the read-only and computed fields cannot be changed. So, if you try to change such fields, the changes will be reverted with the next scheduled job.
You can find out, what is the type of used field, by clicking on the arrow by it as you create a rule.
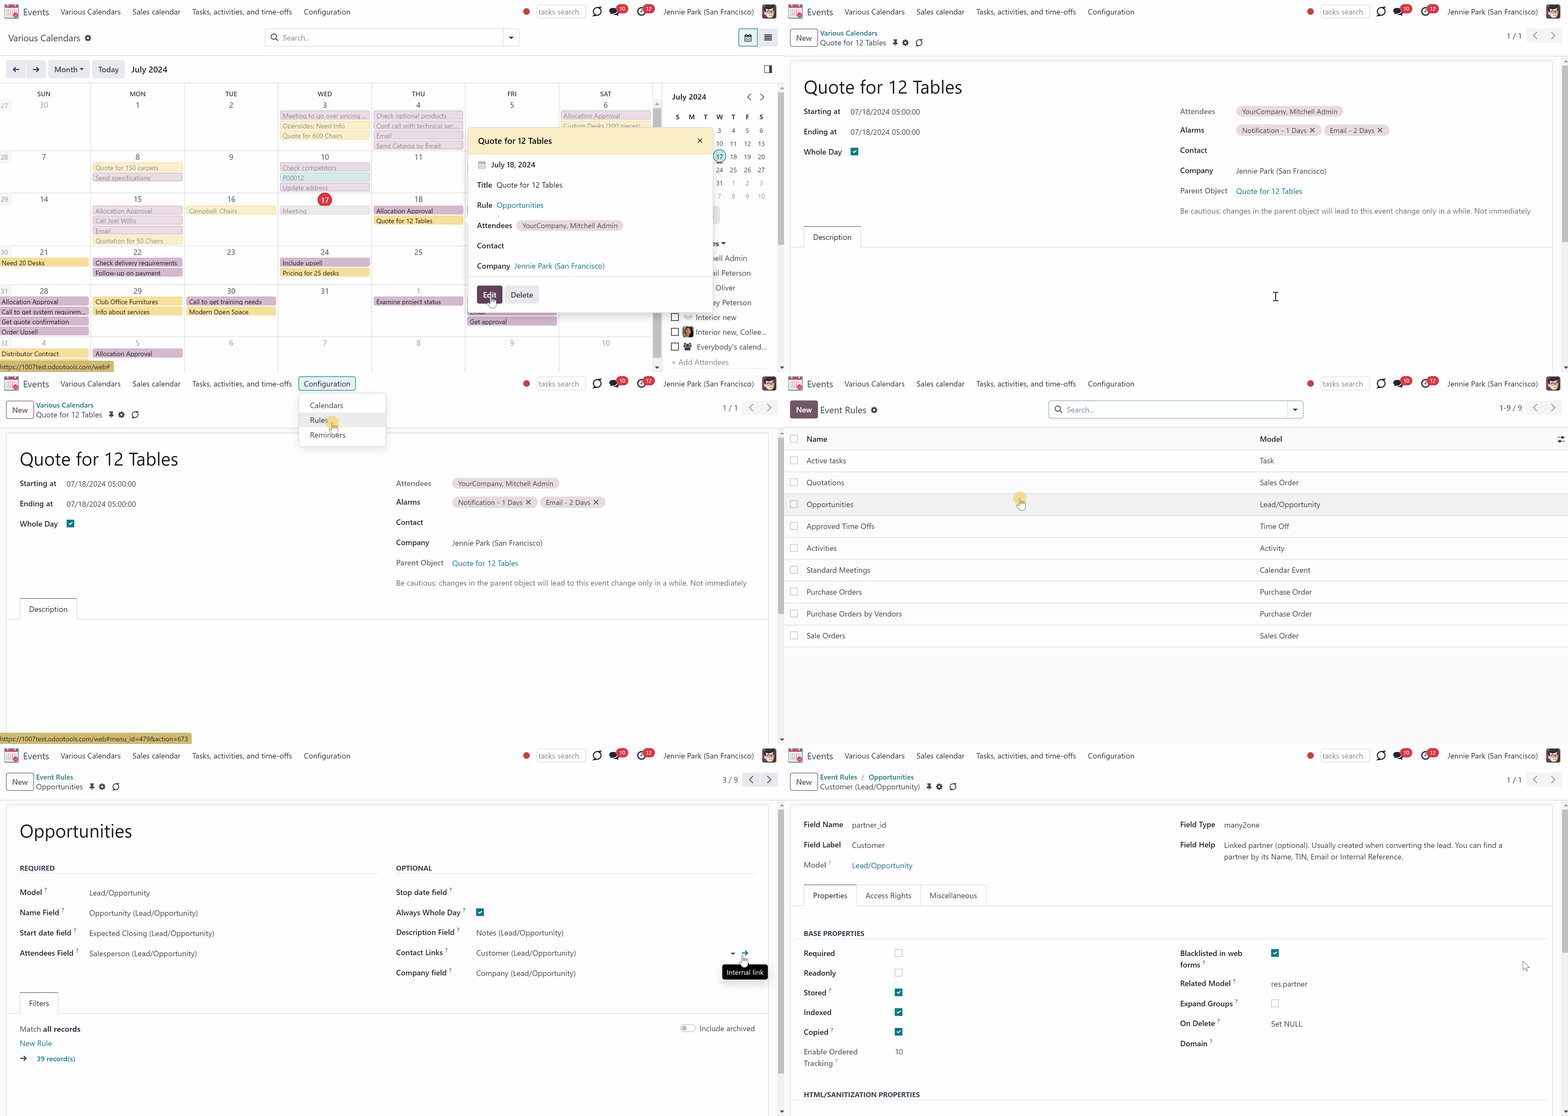
For example, you have created an event based on the task 'Customizable desk'. After a while, you decided to change the name of the task. You changed the name to the 'White desk' and the name of the related event changed after the system update. If you change the event's name to 'Black desk', then with the next scheduled job, the title will be changed back to the 'White desk' since the used field was of the read-only type.
At the same time, if you have created an event based on the opportunity 'Quote for 12 tables', and decided to change the title of the event to 12 tables, the title of the related opportunity would be changed as well, while it isn't read-only.
If you click on the parent object, then you will be redirected to the source document.
You can also delete an event by clicking 'Delete'. That will not result in a deletion of the source document.

Joint Calendar Access Rights
Joint events can be seen differently by various users depending on their access rights.
There is no need to configure any additional roles to see the events menu. If a person has access to one of the calendars, then the 'Events' menu will be visible for this user and the corresponding calendar's title will be added to the events' systray.
If a user has no access to see a particular calendar, then it will not be visible.
Keep in mind, that if there are some calendars, but a user has no access to any of them, then the events menu will be hidden for this user.
If there aren't any calendars at all, then the events menu will not be shown in the module's menu of all users.
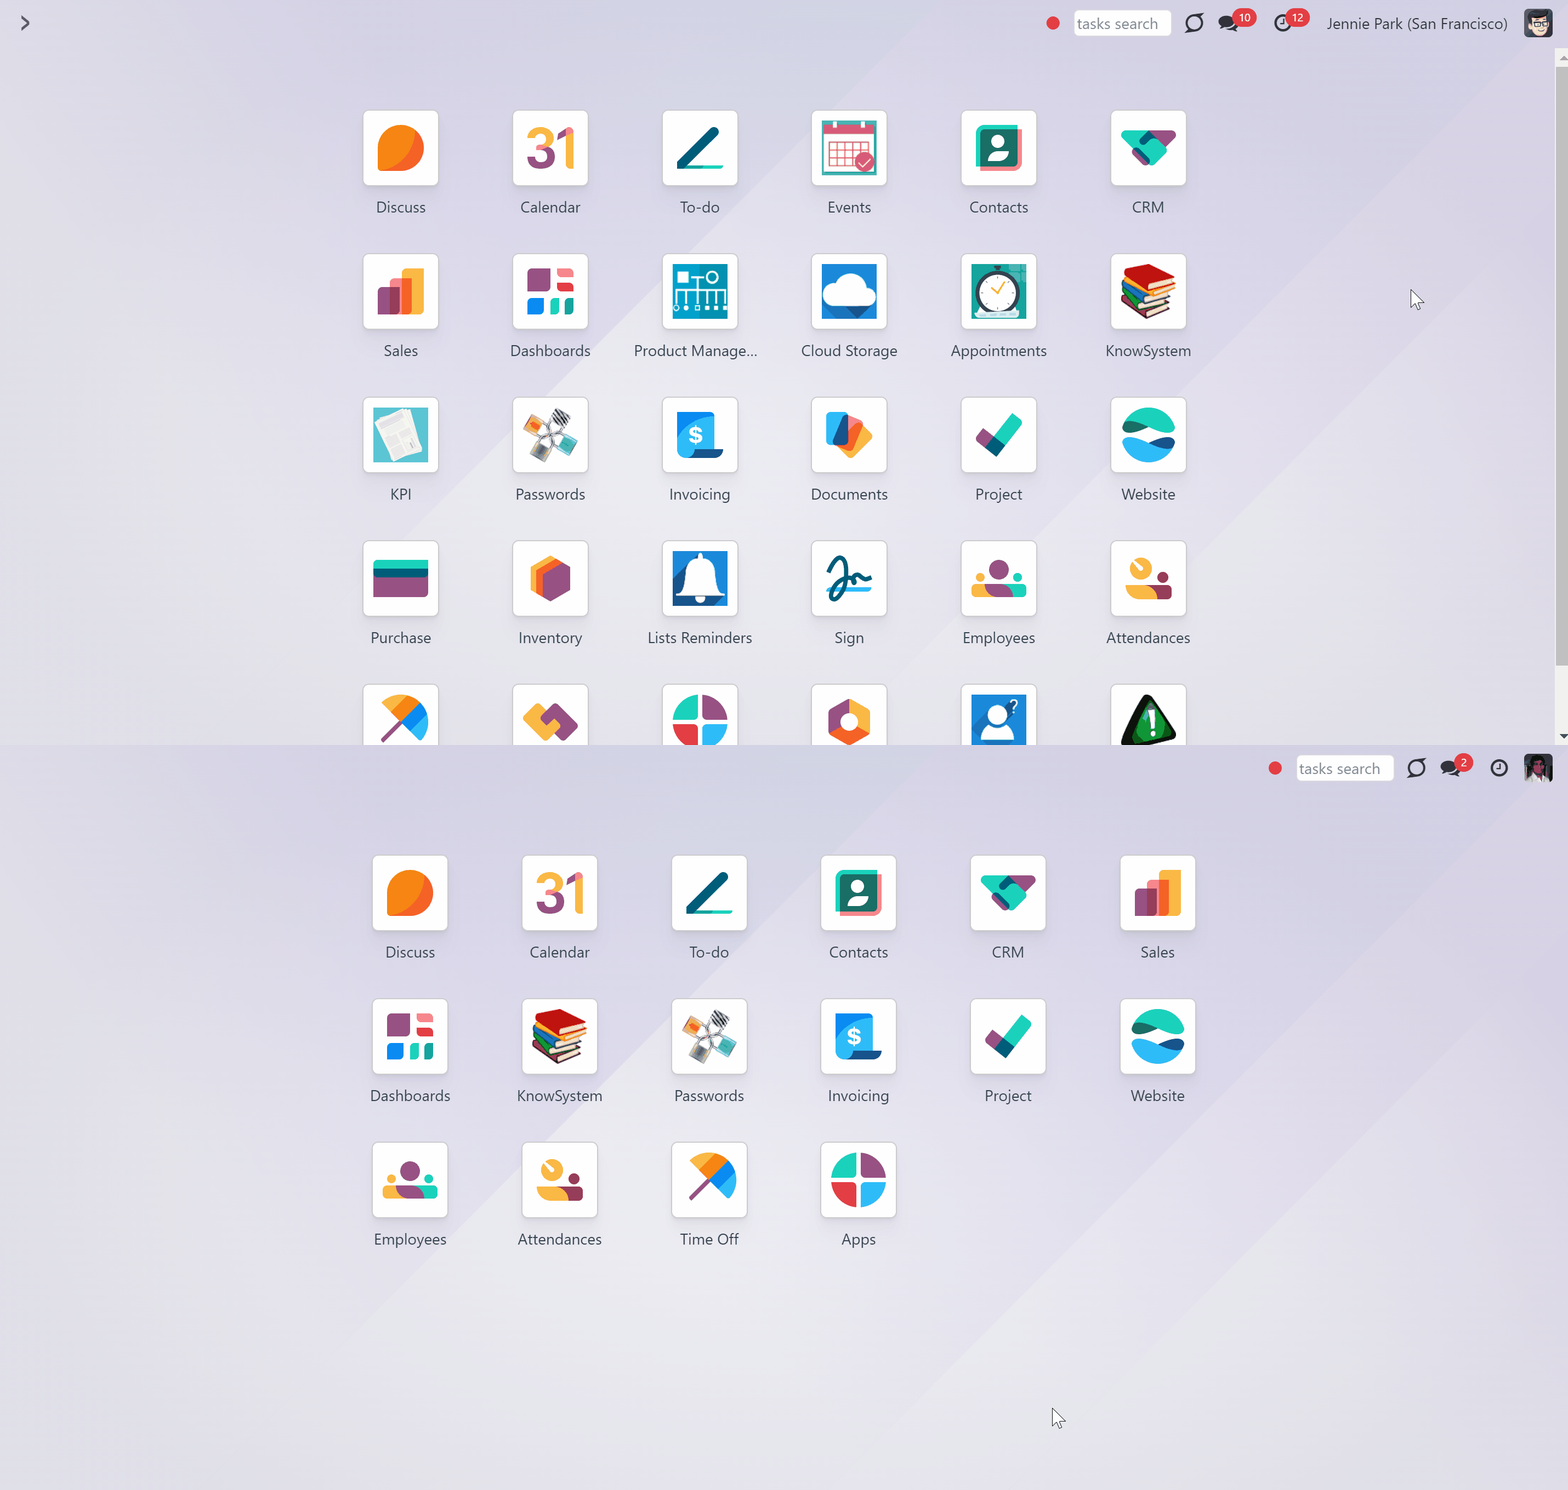
Access to the calendar doesn't guarantee, that a person will see all the events, which it includes. Users may observe only the events to which related objects they have access rights. Thus, if a user has the rights to the object AND the calendar, then he or she can access its linked joint event.
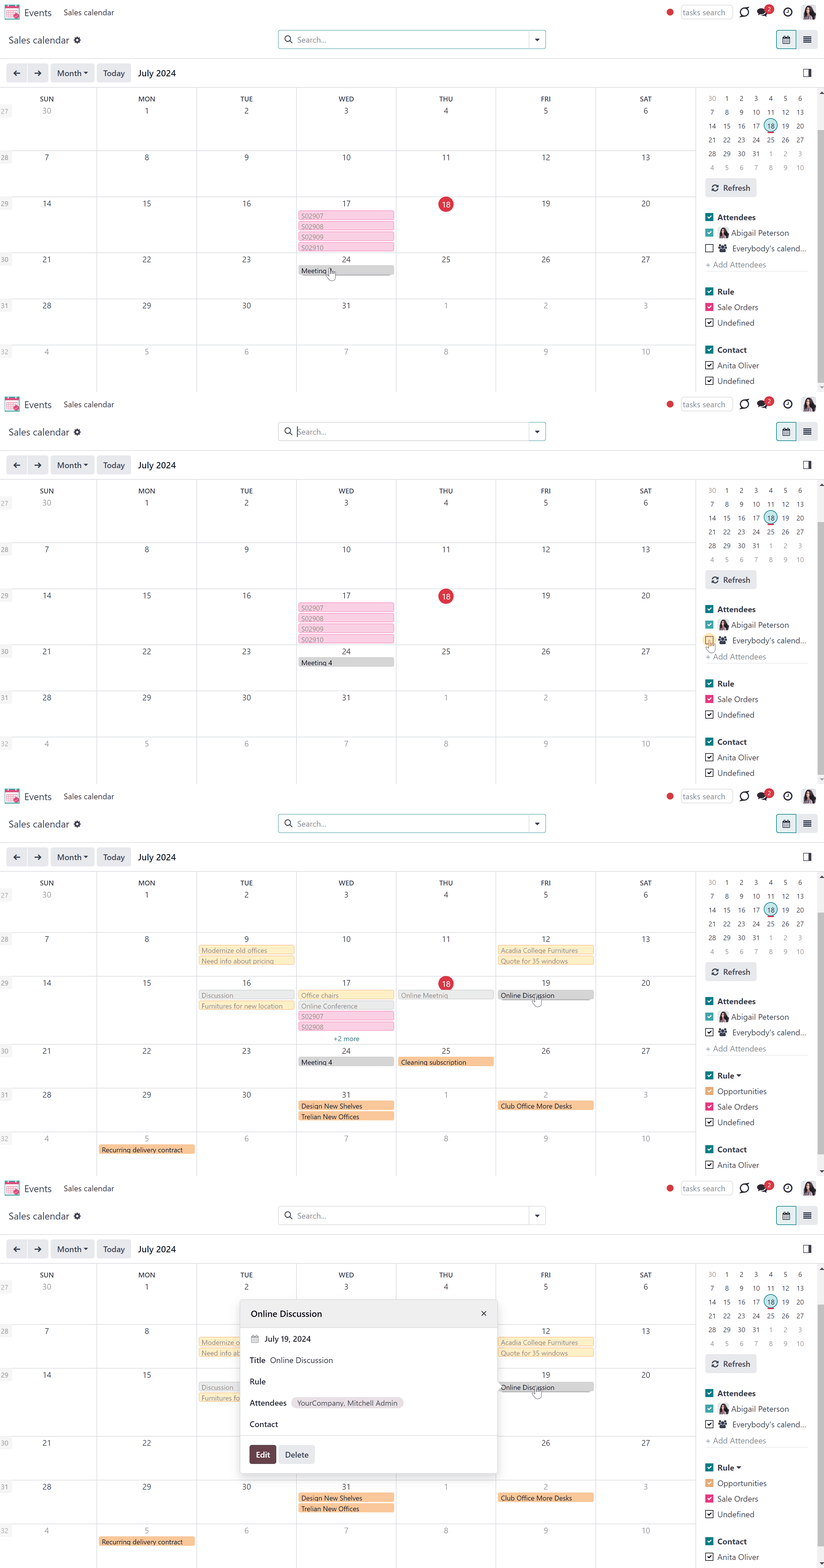
The rights to the objects are regulated by the related Odoo modules. For example, Abigail Peterson sees the order 'S02907', but doesn't have access to Mitchel's order 'S02911', so she will not see it in the calendar as well.
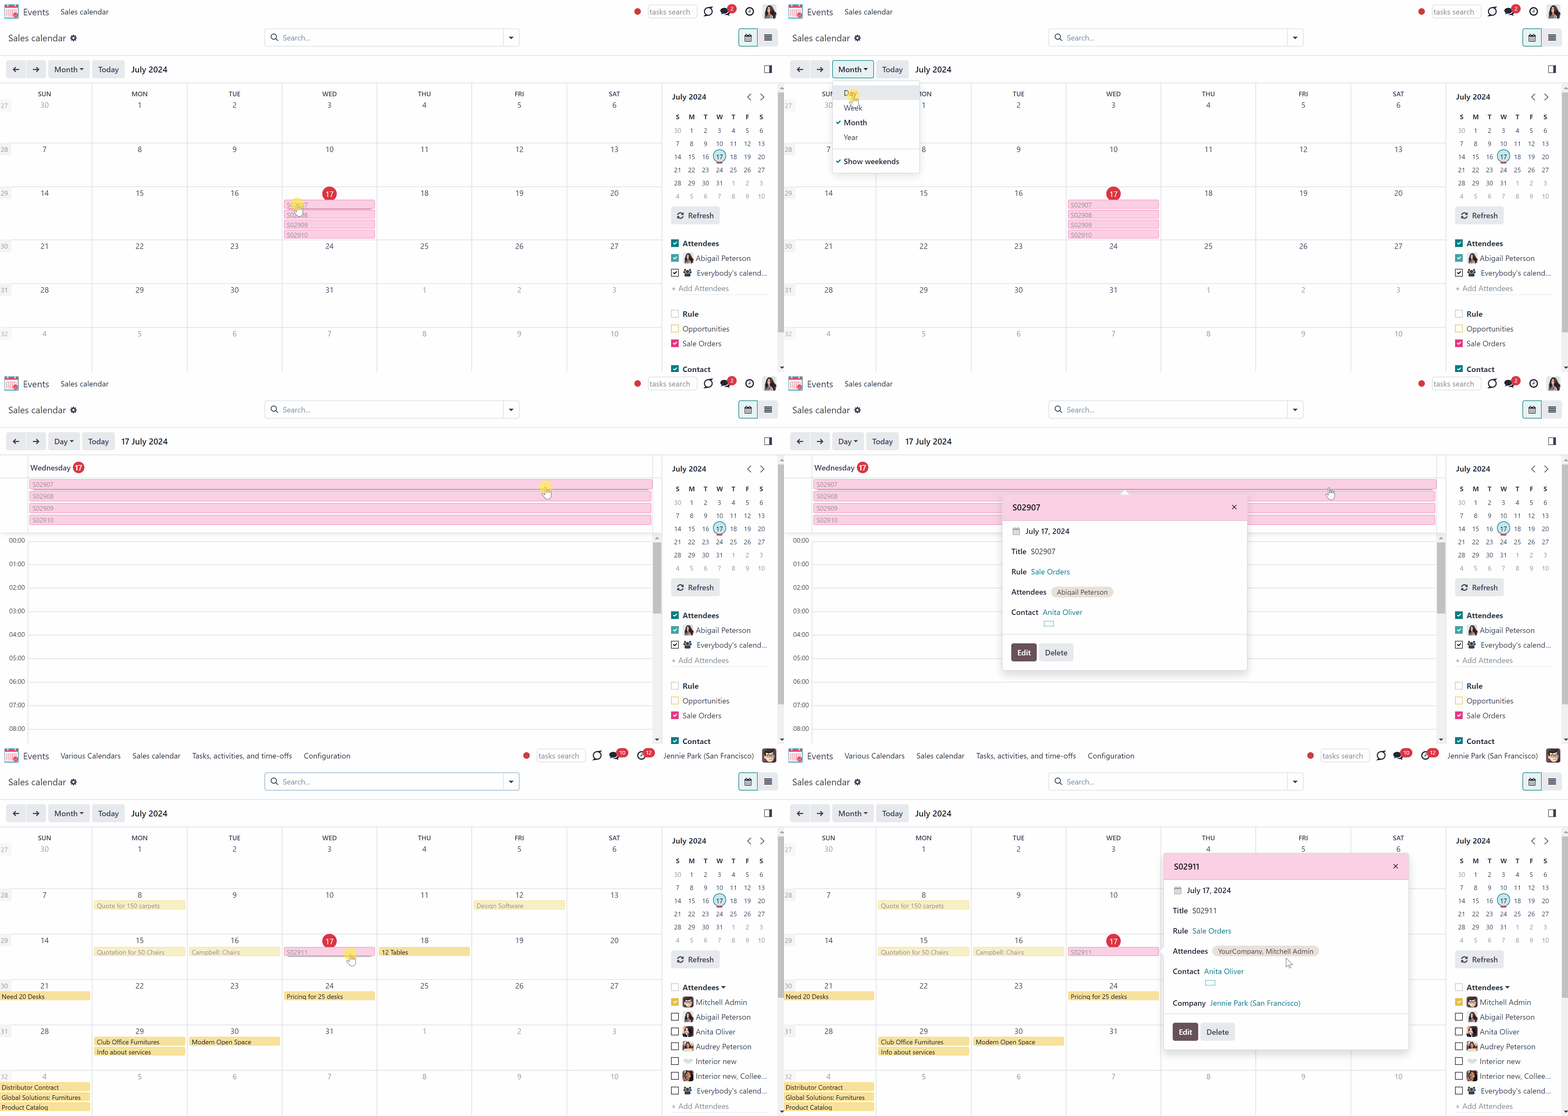
Sometimes there may be some undefined objects. An undefined object is an object that was created right from the calendar, has no parent object, and is not regulated by a rule. You can see all undefined events by putting a tick by the line 'Undefined' in the section 'Rule' on the right side of the interface.
All people, who have access to the calendar, may create and see its undefined events.
Let's see an example. We have a 'Sales Calendar', which can be accessed by sales administrators and salespeople. If Abigail Peterson, our salesperson, enters the menu 'Events', she sees this calendar. By default, she sees only her events. In January, that is the event she created herself - 'Meeting 4'. If she clicks 'Everybody's calendars' on the right side of the interface, then she will see all the events, to which she has the access to. Although, those events relate to other team members and not to Abigail.
The right to create and edit joint calendars and rules belongs to the system administrators.
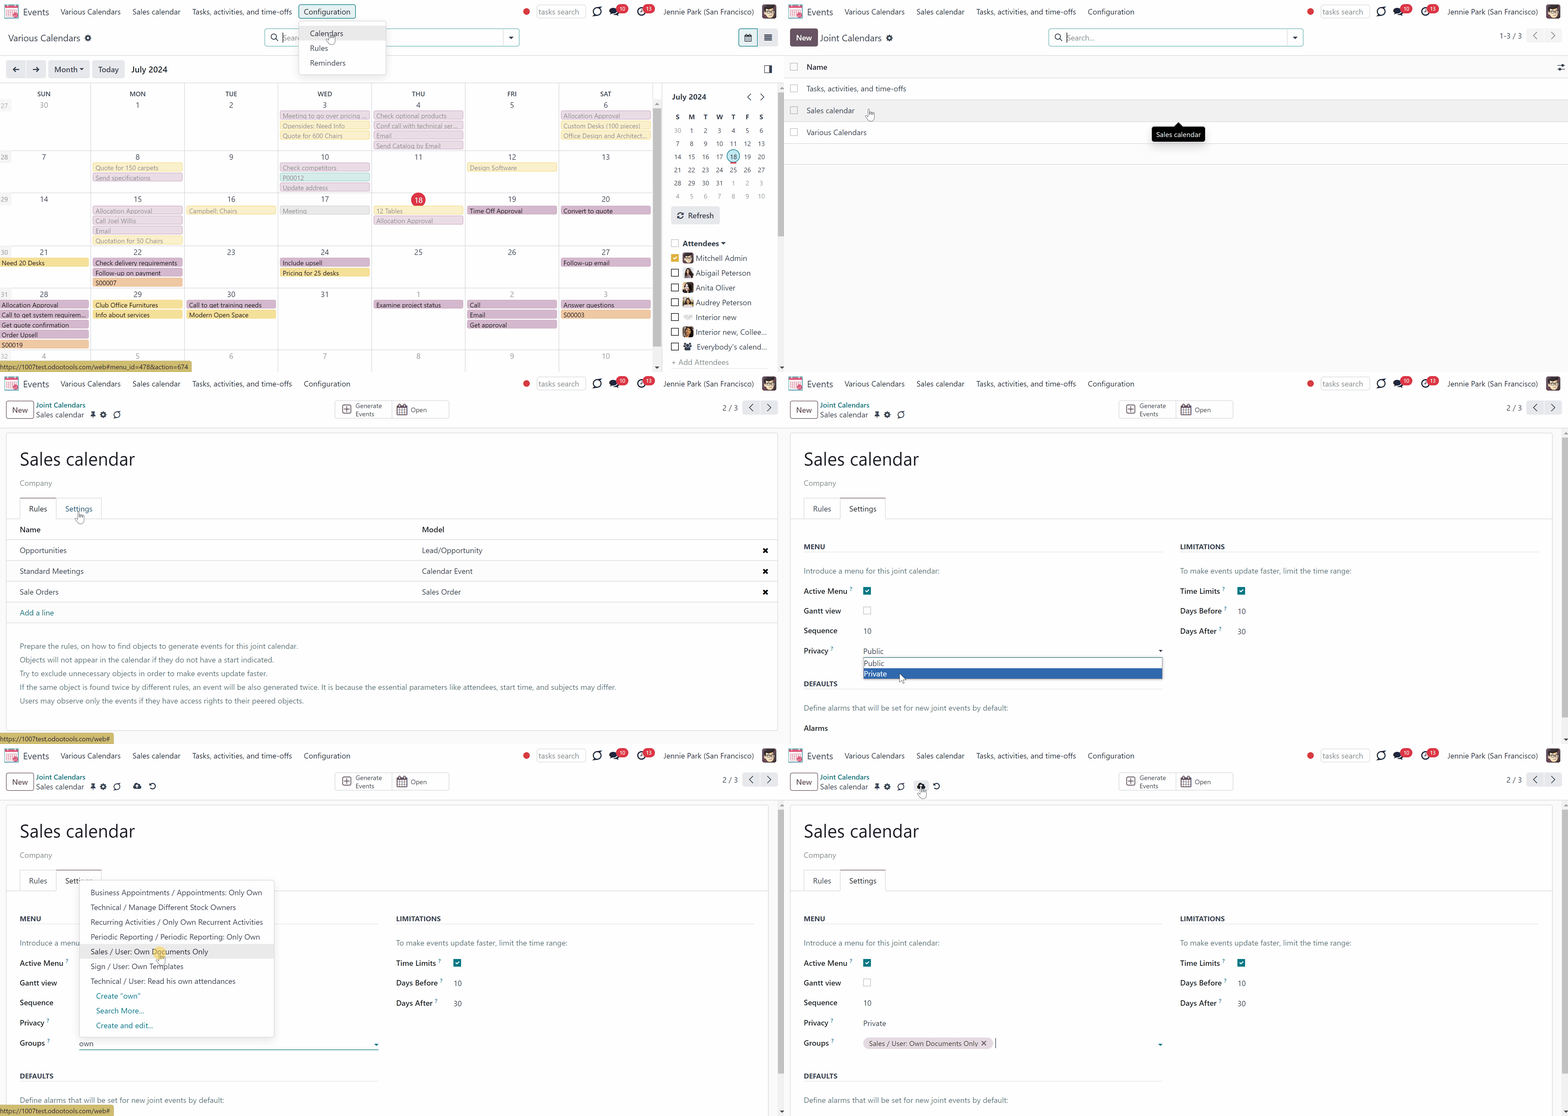
The access rights for a calendar can be set in the tab 'Settings' as you create or edit a calendar. The calendar may be either public (seen by everyone) or private (seen by particular user groups).
If you choose to make the calendar private you can specify the particular groups, that will be able to see the calendar. Add the groups in the field 'groups', which appear as you choose the option 'private' in the field ' Privacy'. It is possible to add as many groups as necessary.
It might be particularly useful if you want to create a calendar for a particular department or team, so they will be able to control the related events.
For example, create a 'Sales Calendar' for the sales department. Then specify the group 'Sales / User: Own Documents Only'. So, all users, who have this right and extended sale rights, e.g. Sale Administrators, will be able to see the 'Sales Calendar'.
Configuring Alarms & Notifications
Set the alarms to be warned before an event starts. You can either set an alarm to the automatically created events or set an alarm manually to a particular event. It is possible to add more, than one alarm.
The alarm to the automatically created events can be set in the tab 'Settings' as you create or edit a Calendar. The person or people, that will be warned are defined by the Attendees field of a rule (see Rules Fields).
When you edit alarms of the existing calendars, the changes aren't applied to already existing events, only to the newly generated ones. This was made, to allow changing the alarms of separate events manually. Otherwise, even after changing the alarms of an event, the settings would be returned to defaults with the next scheduled job.
The alarm for a particular event can be set right in the 'Events' menu. Just click on the event and choose 'Edit'. You can add new alarms or delete the existing ones (see Joint Calendar Interface).
The alarms to the undefined events are not influenced by the calendar's alarm settings and should be added manually, if necessary.

It is possible to notify users through the standard Odoo popup notification, or by email. You can choose the type of the reminder while creating, or editing it.
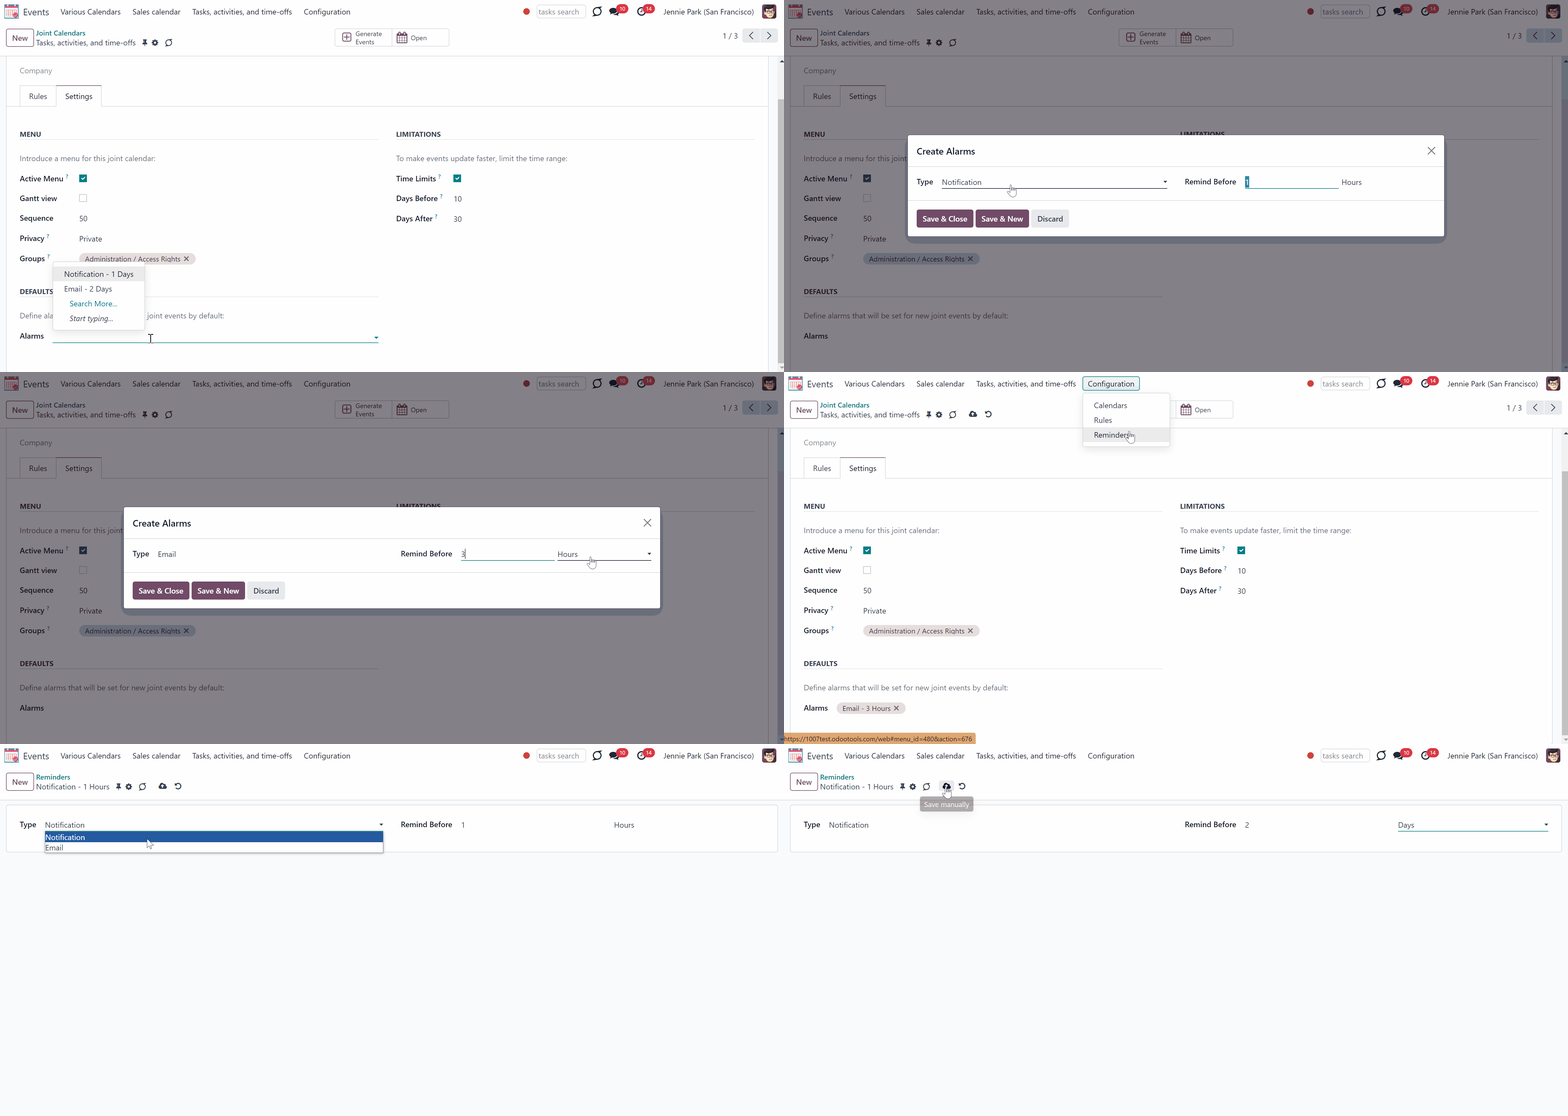
The alarms can be created through the separate menu, or right from the field 'Alarms' on the form of a calendar, or an event.
To create an alarm through the special menu:
1. Open the Events app
2. In the systray, go to Configuration > Reminders
3. Click 'New'
4. Choose the alarm type
5. Choose the time before the event, when the reminder should be sent by typing the number of periods and choosing the type of the period (minutes, hours, or days) in the field 'Remind before'
To create an alarm right from the form of a calendar, or an event:
1. Start typing its title in the field 'Alarms' and click 'Create and Edit'.
2. Choose the alarm type
3. Choose the time before the event, when the reminder should be sent by typing the number of periods and choosing the type of the period (minutes, hours, or days) in the field 'Remind before'
4. Click 'Save&Close'.
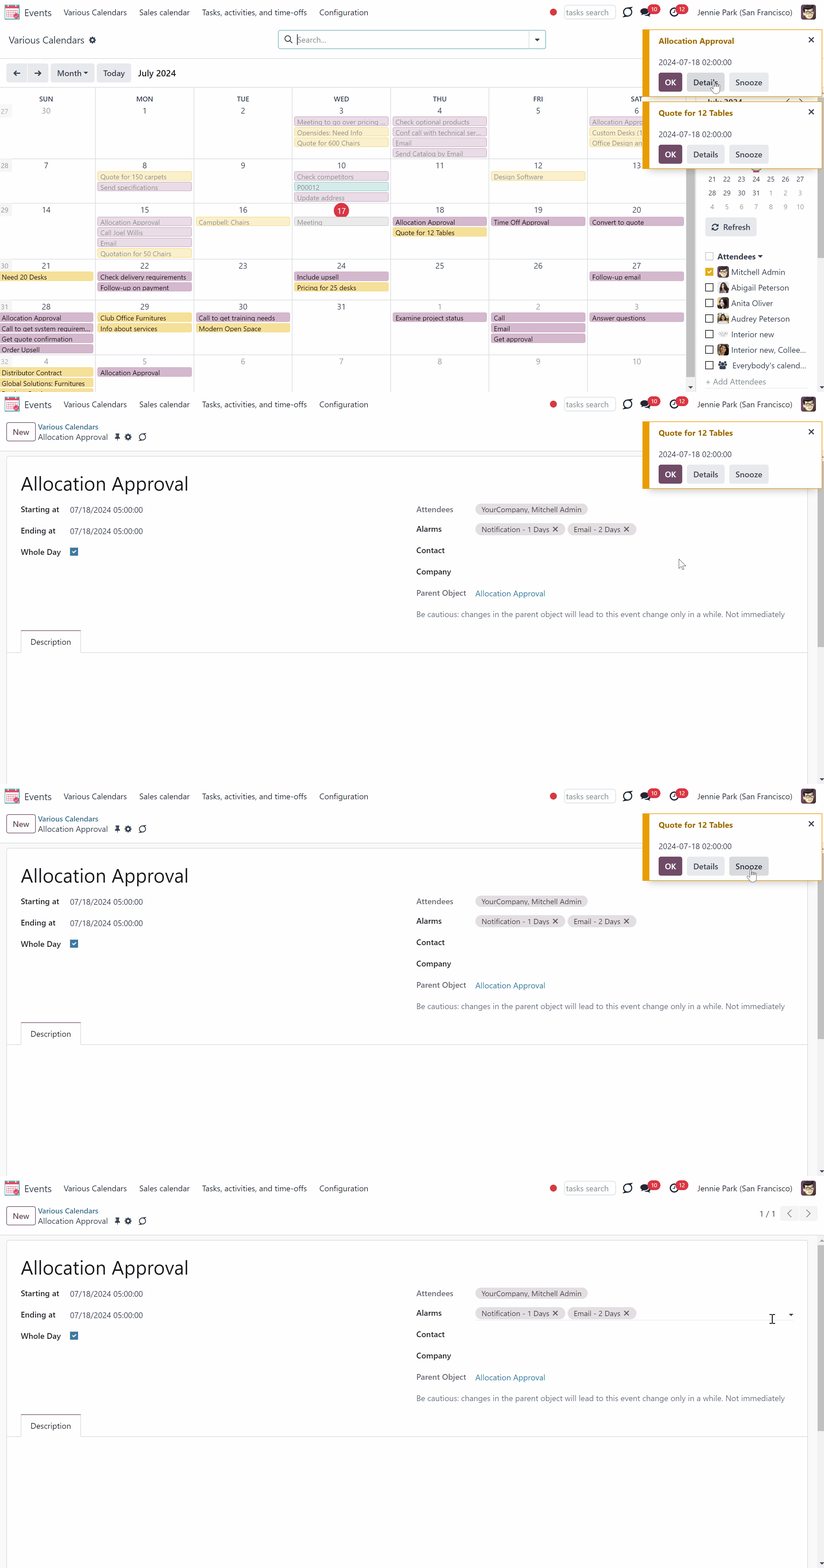
If a notification to remind about an event is set, then according to the alarm timing, related to the event users (attendees) will see the pop-up window. The pop-up window has 3 buttons.
To turn off the alarm, click 'OK'.
To see the details of the event click 'Details'.
If you want to receive another alarm about the event later, click 'Snooze'. Then, the alarm will repeat later.
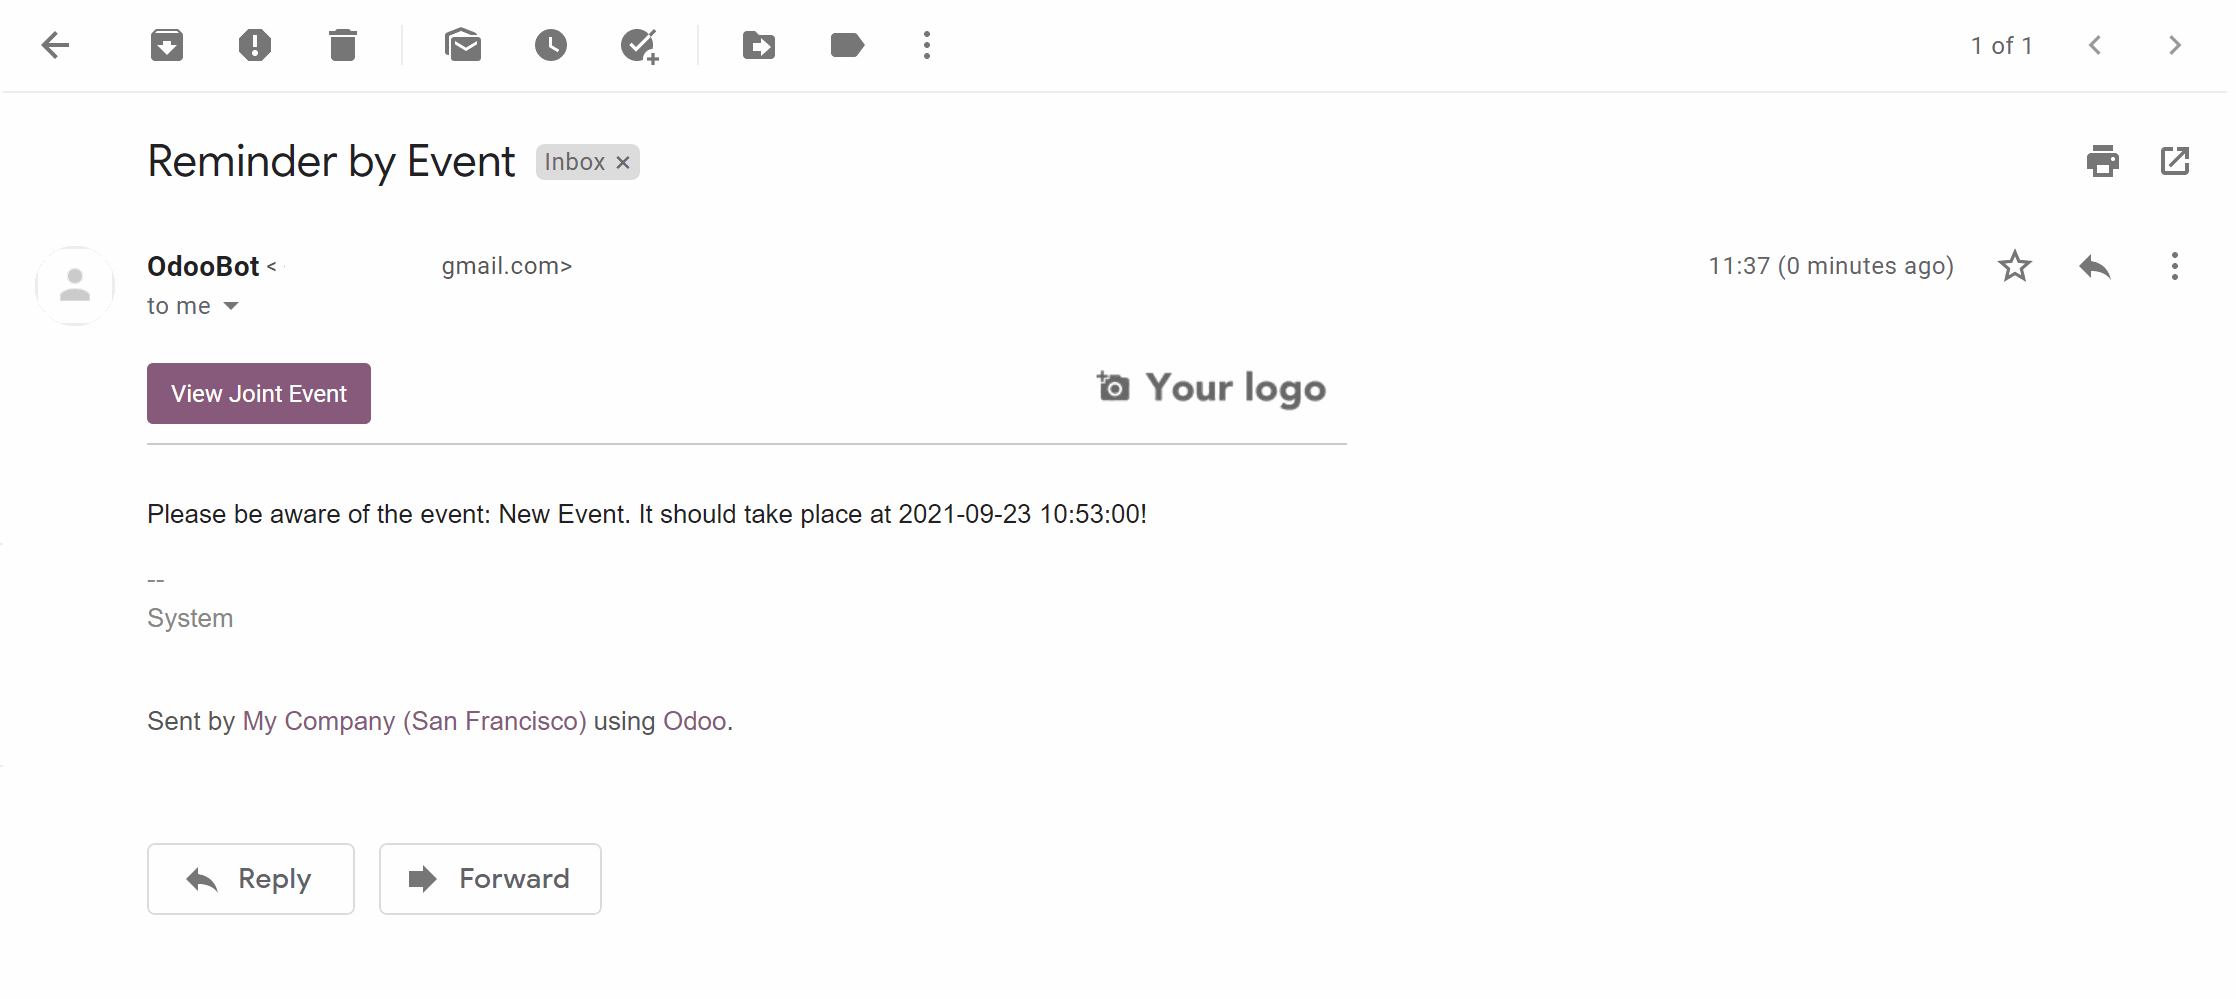
If an email alarm to an event is set, then according to the reminder's timing, related to the event users (attendees) will receive an email. The email includes the name and the time of the event.
You can also click on the button 'View Joint Event' to be redirected to the event.
Refreshing Joint Events & Odoo Scheduled Jobs
The module automatically collects various documents into one super interface based on the flexibly set rules. The update of the calendar takes place regularly according to the system schedule.
It is possible to set any update frequency. However, it isn't recommended to make it more often, than once in 5 minutes. In case you have a huge number of objects, it is better to do the update even less often, so Odoo would have enough time to process the events list. If necessary, set calendar limits and filters in the rules to create only corresponding conditions events.
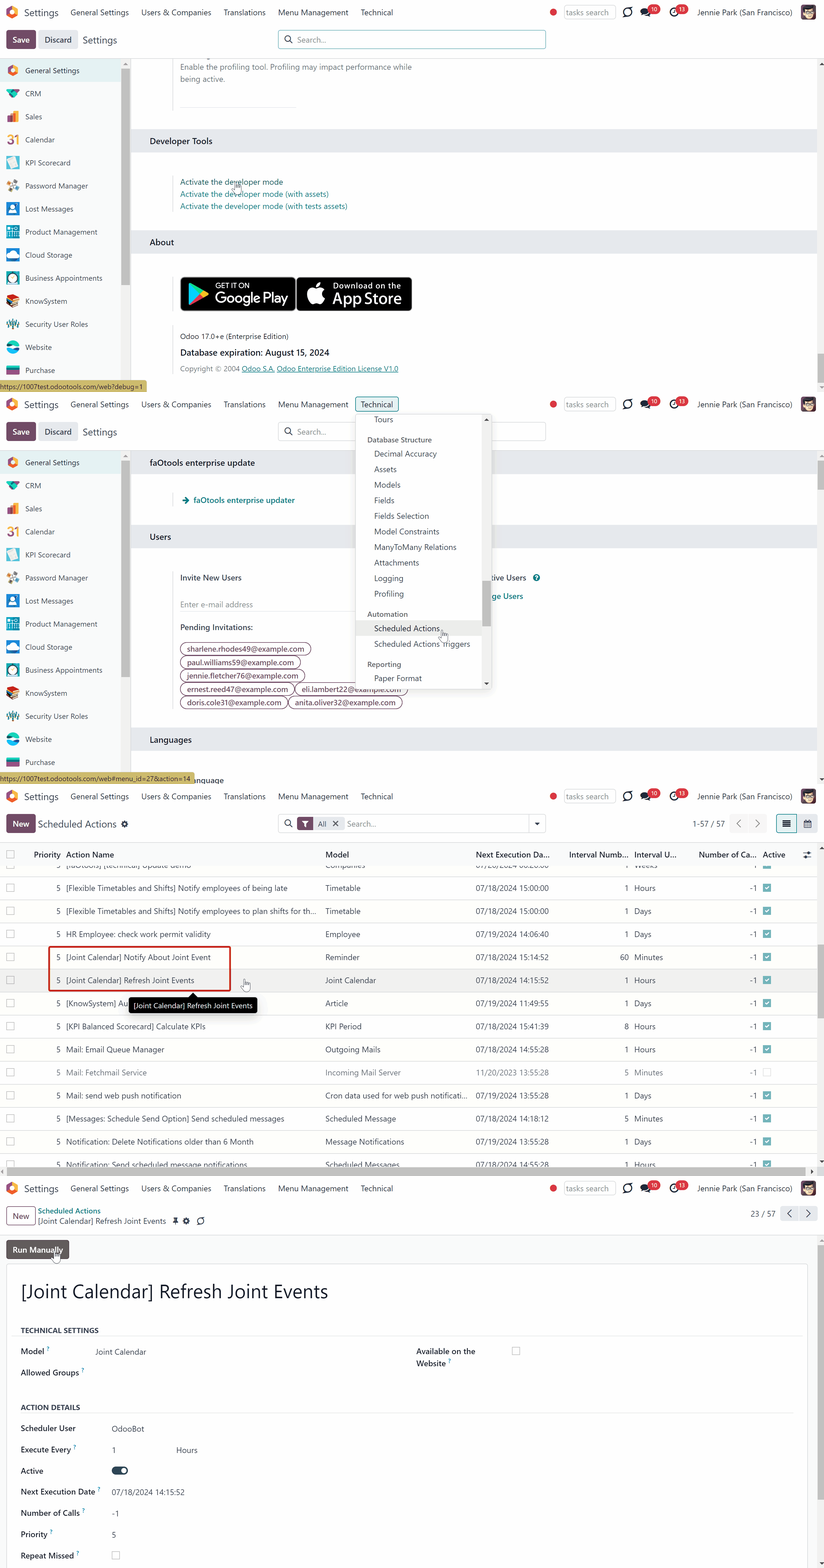
To change the frequency of merged calendar refreshing and emails-reminders checks:
1. Turn on the debug mode
2. Go to technical settings > Automation > Scheduled jobs
3. Find the job 'Refresh Joint Events' to change the frequency of super calendars' update
4. Find the job 'Notify About Joint Event' to change the frequency of email alarms
The module works not in a real-time, but according to the system schedule.
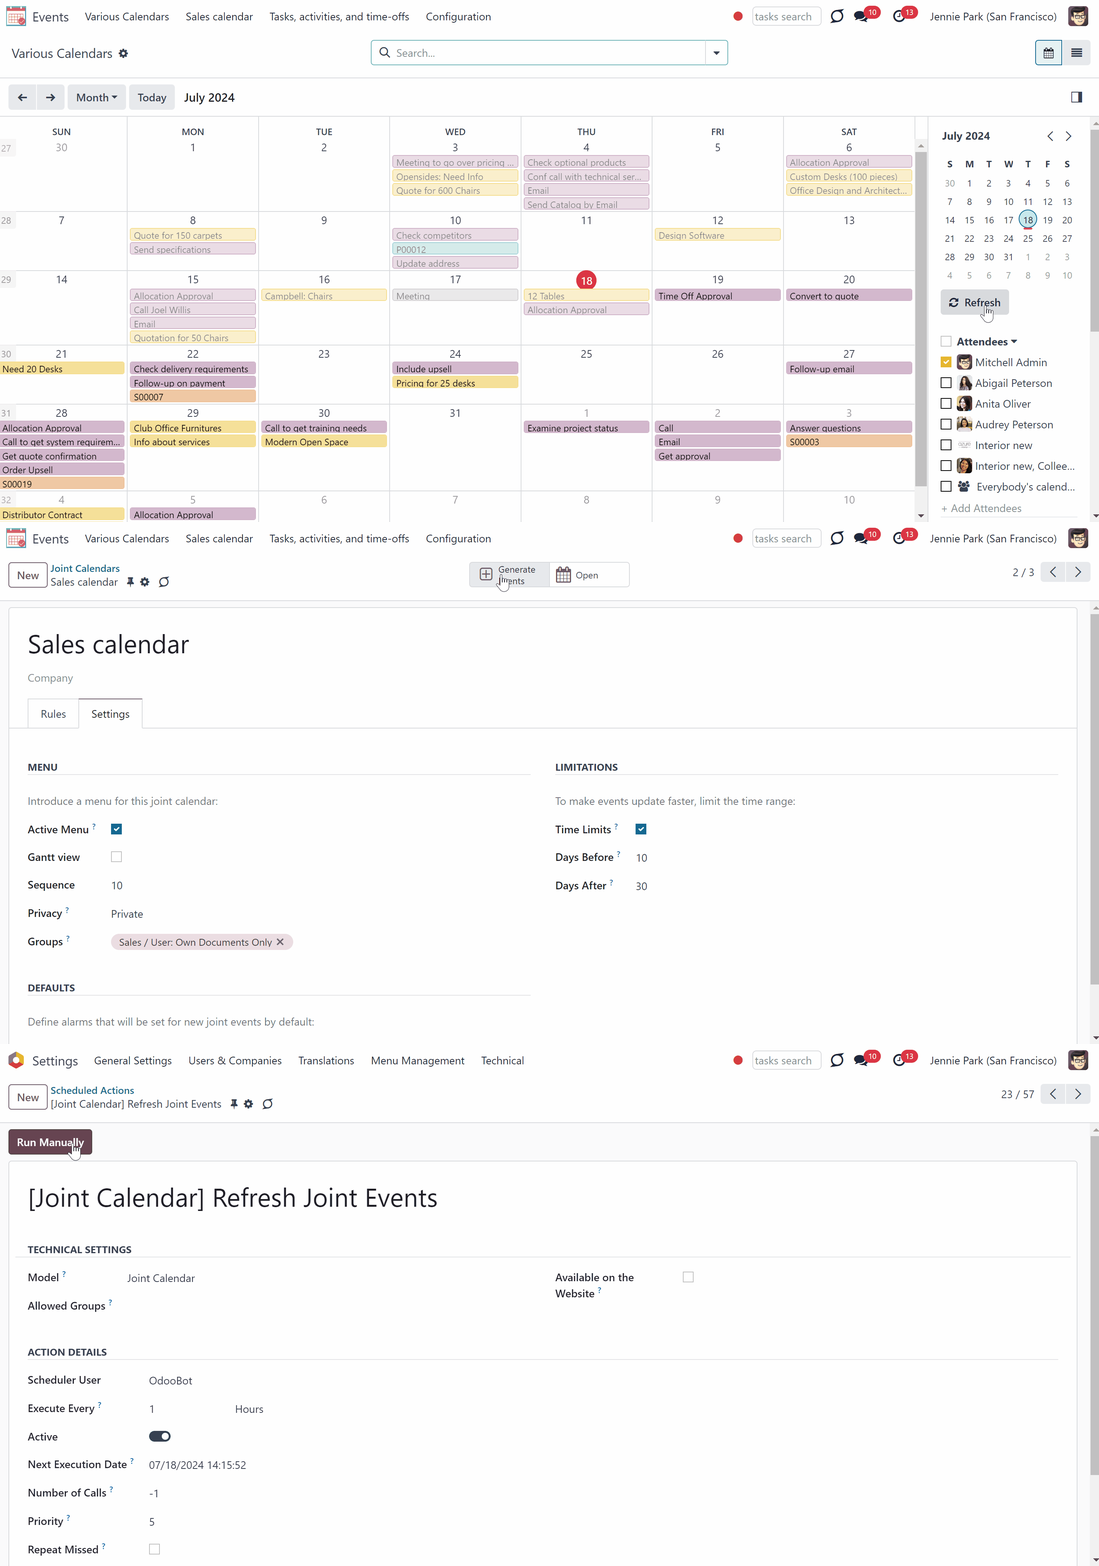
You can also launch the events update manually:
1. From the user's calendar interface (by clicking 'Refresh')
2. From the calendar's settings (by clicking 'Generate Events')
After the update don't forget to hardly reload the browser page (CTRL+SHIFT+R).
Time Limits
All matching-the-rules events are checked regularly. So, if you have a lot of documents found by joint rules in your database, refreshing might take longer or even not enough fast for your Odoo server timeouts. That’s why it is preferable to filter documents for a calendar and introduce time limits.
Time limits define which documents will be considered according to a document start field.
You can specify time limits in the tab 'Settings' while creating or editing a calendar. Tick the box 'Time Limits' and choose the number of days before and after the event.
For example, you have a Task 'Fix the sink' with the deadline set for the 30th of March. Today is the 15th of March, so the task will not be shown on the calendar. However, in 5 days, it will appear, as it is set to show events 10 days before. And the event will stay on the calendar till the 29th of April.
If you remove the tick from the box 'Time Limits', then the events for all time will be shown. However, we highly recommend using this function, as specifying time limits will help to make events update faster and consume system resources efficiently.
Joint Calendar: Gantt
Joint Calendar: Gantt - is an optional add-on that introduces the Gantt view for events. The add-on requires the Enterprise license of Odoo. In this way, you can have a single super Gantt view for various Odoo documents: tasks, time-offs, manufacturing orders, quotations, etc.
With the help of the add-on you will be able to manage the events conveniently: reassign responsible users, drag and drop those to change periods, etc.
The Gantt view is turned on per calendar. So, it is only up to you to decide what calendars will have the possibility to switch to the Gantt view. To add the Gantt view to the calendar, just check the box 'Gantt view' on the shared calendar settings. The app would automatically extend a target super calendar action after you saved the changes.
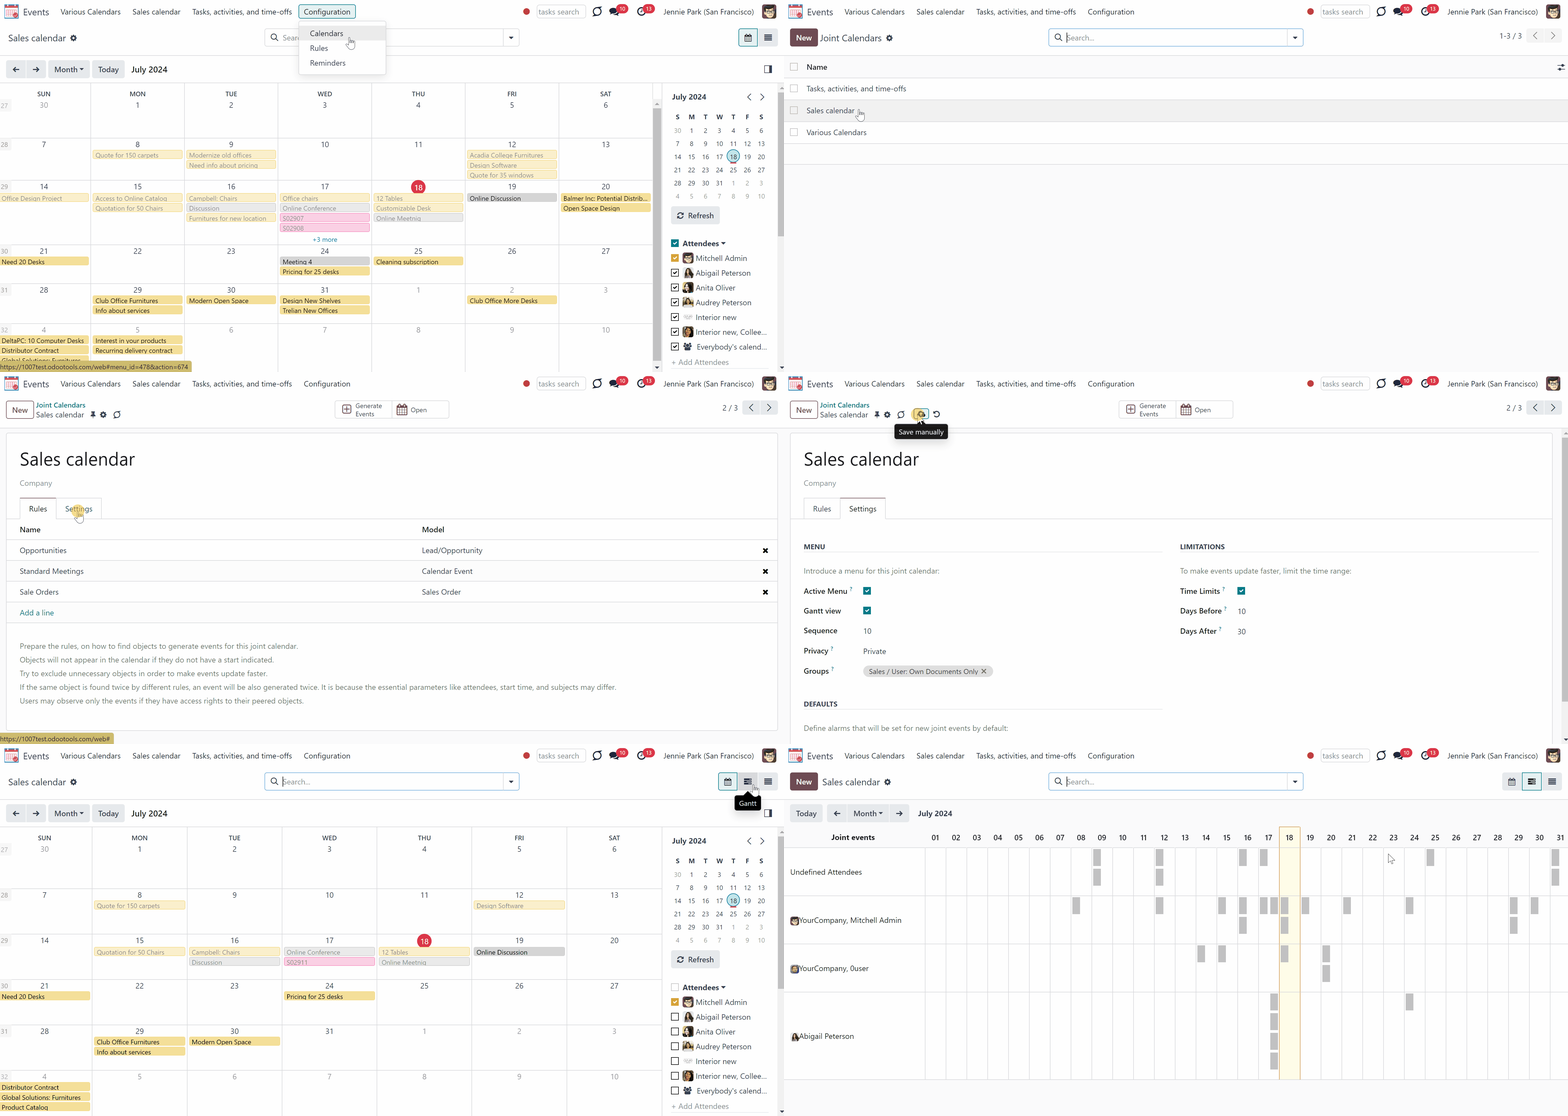
As you open the events menu and choose the calendar, in the top right corner above the calendar, you will find the buttons to switch between the events views. Click on the second button () to switch to the Gantt view.
From the Gantt view, by default, you see the attendees on the vertical scale and the dates/days/time on the horizontal scale. You can select various searching and filtering criteria to limit the number of shown events. For example, show only events related to the contact Deco Addict.
Apply various grouping options to change or create different hierarchies of groupings by clicking on several options one by one. To reset the grouping, just click on the cross by it in the search bar. For example, click on the option attendee, then the option rule and contact.
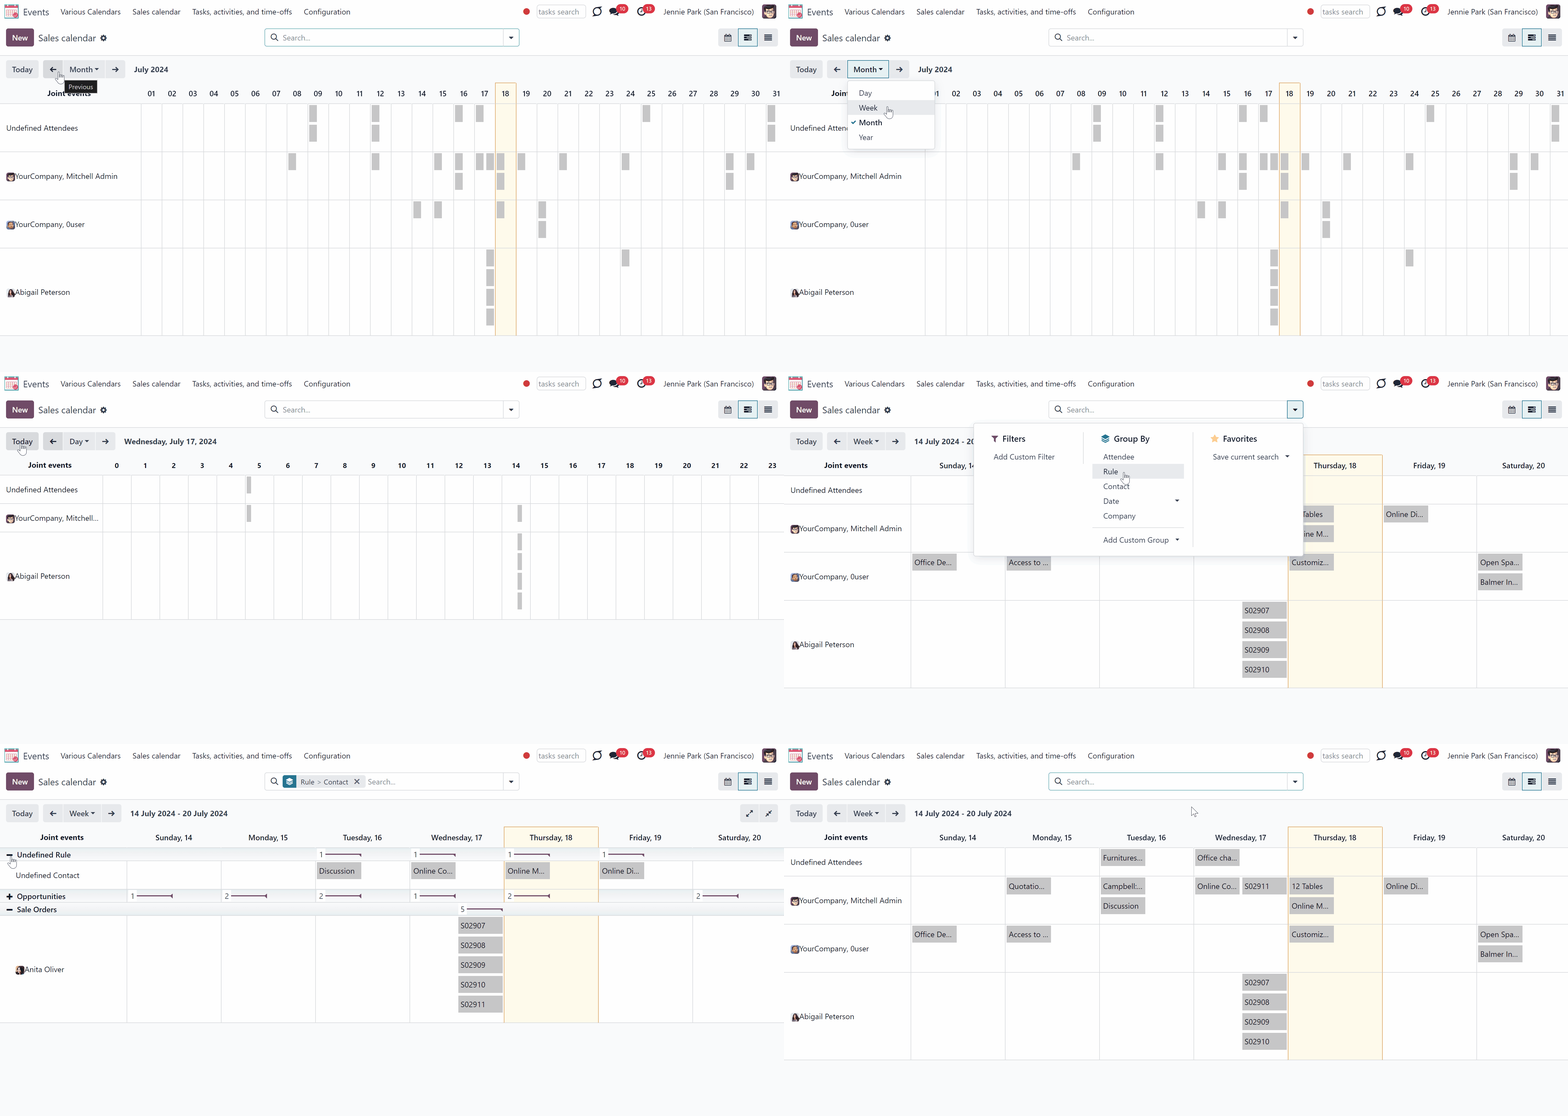
Instantly access information about any event by hovering over it. To view the event, just click on it in the calendar. There you will be able to see the details of the event, change its starting/ending date, add/remove alarms, and so on.
To add a new event, just click on the plus icon, which appears as you hover over any time/day slot.
Change the day/time of the event simply by dragging and dropping it.
To delete an event, just open any event by clicking on it, push the button 'Remove', and confirm your choice.

About Joint Calendar
Joint Calendar is an Odoo tool that combines different Odoo events in one or a few configurable super calendars. Odoo users often need to keep in mind a lot of details that are spread out among numerous interfaces. Switching between those is not comfortable and error-prone for planning. This tool solves the problem. The app allows to configure rules to join and share various document types on a single super calendar view but with easy-reachable source objects.
The tool might merge any Odoo document types on the same view: opportunities, meetings, phone calls, activities, sale or purchase orders, shipments and deliveries, tasks and tickets, and time offs, ...
Configure as many calendars as you need: for various functional areas or different user groups. Each joint calendar has its menu item.
Define on your own what to consider a joint event title, start or stop date, who are target attendees, etc. Have even the same document twice on the same calendar just with a different start.
Joint events and their source documents are interrelated. Update the former and the latter will be changed immediately. A reverse operation will be applied according to the system schedule.
Calendar configuration lets assign popups and email alarms. Thus, it is possible to have notification of any Odoo event or activity.
Regulate joint calendar access right on its form. Make it public or share it only for chosen user groups. Shared calendars are especially suitable for team interactions. Users might switch between document types and participants in a single click.
Joint events are updated regularly by the cron job. It is fast, especially if you apply time frames. Refreshing is also available from the calendar interface.
Any Odoo document on the same calendar
Reminders for any Odoo documents
Instant access to source details
Simple user rights administration
Configuring Odoo Shared Calendars
The tool might merge any Odoo document type on the same view: opportunities, meetings, phone calls, activities, sale or purchase orders, shipments and deliveries, tasks and tickets, and time offs, ...
Configure as many calendars as you need: for various functional areas or different user groups. Each super calendar has its menu item. According to the company's needs, you can combine all required documents into one calendar, or divide them logically into several ones. For example, you can create a calendar 'Various calendars' for all documents or you can create a 'Sales Calendar', which will include everything, that relates to sales, and a 'Tasks and Time offs' calendar, which will include only tasks and employees time offs and leaves.
To create a Calendar:
1. Open the Events app and click Configurations > Calendars in the systray
2. Click 'New'
3. Introduce the title
4. Add Rules (see Joint Calendar Rules)
5. Go to the tab 'Settings'
6. Add/Remove the tick 'Active menu', to add/remove the Calendar from the Event's systray
7. Optionally add the sequence, set the privacy, time limits, and alarms
The button 'Generate Events' above the calendar's form can be used to trigger the scheduled job to add the events to the calendar (see Joint Calendar Scheduled Jobs).
When you add rules to the calendar, you specify which models should be presented in the calendar (see Joint Calendar Rules). This allows to keep rules logically divided into several calendars and conveniently switch between them, so the calendar will not be overloaded (see Joint Calendar Interface). Also, it is especially useful to configure rules in a batch as it is the calendar's settings, that control the privacy, time limits, and alarms.
You can find all the features available for configuration in the tab 'Settings' while editing or creating a calendar.
The first feature is 'the Active menu'. If it is turned on, the entry for this shared calendar will be available under the menu ‘Events’ (see Joint Calendar Interface). Otherwise, the calendar will not be shown and you will not be able to access it. It is useful when you no longer need a calendar but don't want to delete it yet as it is still might be useful later.
If the option is turned off for all of the calendars, the menu 'Events' will be hidden from the main menu.
The field 'Sequence' below the 'Active menu' defines the order in which the calendars are displayed in the systray. The Calendar, which goes the first, has a lower sequence. So, the calendar with sequence 20 will be displayed before the calendar with sequence 50.
To change the sequence, type the number in the field 'Sequence'. The number can be either positive or negative or a zero.
For each calendar, you can set access rights. The calendar may be either public (seen by everyone) or private (seen by particular user groups).
The field 'groups' appear as you choose the option 'private' in the field ' Privacy'. Users may observe only the events to which related objects they have access rights (see Joint Calendar Access Rights).
Shared calendars are especially suitable for team interactions. Users might switch between document types and participants in a single click.
It is also possible to set limitations to make events update faster and consume system resources efficiently. For that, tick the box 'Time limits' and set 'Days before' and 'Days after', so only events within this time range will be shown in the calendar. By default, the events are shown 10 days before the event and 30 days after. For example, you have a Task 'Fix the sink' for the 30th of March. Today is the 15th of March, so the task will not be shown on the calendar. However, in 5 days, it will appear, as it is set to show events 10 days before. And the event will stay on the calendar till the 29th of April.
If you remove the tick from the box 'Time Limits', then the events for all time will be shown (see Refreshing Joint Events & Scheduled Jobs).
Calendar configuration lets assign default popups and email alarms. Thus, it is possible to have notification of any Odoo event or activity. You can choose the type of alarm and the time of warning (see Joint Calendar Alarms).
It is also possible to set an alarm for a particular event (see Joint Calendar Interface).
Joint Calendar Rules
To add a new document type for a shared interface you should set up a shared calendar rule. Rules define which Odoo objects should create events, which fields of that object should be used and shown, and whether any filtering should take place.
Define on your own what to consider a joint event title, start or stop date, who are target attendees, etc. Have even the same document twice on the same calendar just with a different start.
To create a rule:
1. Open the Events app and click Configurations > Rules in the systray
2. Click 'New'
3. Type the rule title
4. Choose a model (see Rules Fields)
5. Define a name field (see Rules Fields)
6. Select a start date field (see Rules Fields)
7. Choose an attendees field (see Rules Fields)
8. Optionally add a stop date field (see Rules Fields)
9. Optionally choose a description field (see Rules Fields)
10. Optionally select a contact links field (see Rules Fields)
11. Optionally add filters to specify events, that should be shown in a calendar with this rule (see Filters)
You can add a rule to a calendar while creating or editing it in the tab Rules by clicking 'Add a line'. To delete a rule from the calendar click on the cross by it.
You cannot add the same rule to one calendar twice. However, you can create a slightly different rule, with another title or fields used.
If the same object was found twice by different rules, an event will also be generated twice. It's because essential parameters like attendees, start time, and subjects may differ.
Setting up Joint Rule
Each field, that a rule has, serves a particular purpose. Below you can find the description of each setting.
Model - a target Odoo document, which defines what objects to scan: opportunities, tasks, orders, meetings, activities, and so on. You can choose your custom document type (including those created in Odoo Studio) as well. The mandatory field.
For example, if you choose the model 'Sales Order', then events will be created based on the existing Odoo quotations.
Name - a field of the target Odoo model, which defines what to use as a joint event name (also used as calendar event title). Usually, it is 'name', 'subject', or 'reference'. The mandatory field.
For example, if you create a rule for the model 'Sale Order' and choose the ‘Order reference’ for the Name Field, then, a joint even related to the quotation ‘S00001’ will be also named ‘S00001’.
Start date - a field of the target Odoo model, which defines when an event starts. For example, 'expecting closing' for opportunities or 'order date' for quotations. It may be any date or date with the time field of a source Odoo object. The mandatory field.
For example, if you create a rule for the model 'Sale Order' and choose the 'Order Date' for the Start date field, then the event will appear in the calendar on the same day for which the quotation is planned.
If the field, which was chosen as a start date isn't filled in related to the event document, then the event will not appear in the calendar.
Stop date - a field of the target Odoo model, which defines when an event is shown as finished on a calendar. The optional field.
For example, if you create a rule for the model 'Sale Order' and choose the 'Delivery Date' for the Stop date field, then the event will be shown in the events menu from the day for which this quotation is planned (Start Date field - Order Date) till the day of the product's delivery.
If you leave the field empty, then in the events menu, the event will be placed only on the day defined by the Start Date field.
Attendees - a field of the target Odoo model, which defines who are participants (responsible people, event owners). For instance, 'assigned to', 'sales person', or 'attendees'. You may use even document 'followers' since it's possible to apply both users and partners. The mandatory field.
For example, If you create a rule for the model 'Sale Order', and add choose the 'Salesperson' for the Attendees field, then joint even participants would include a quotation salesperson. Also, the event will be shown, if you sort events by this salesperson in the section attendees in the 'Events' menu (see Joint Calendar Interface).
Description - a field of the target Odoo model, which shows the notes, that the event has if there are any. Usually, the fields like 'internal notes' or 'comments' are used. The optional field.
For example, if you create a rule for the model 'Sale Order' and choose 'Terms and Conditions' for the Description field, then the related-to-order terms and conditions will be shown on the event's card.
If you leave the field empty, then the event's description field will be also empty.
Always Whole Day - an option, which can be turned on/off. When it is turned on, then all generated events created with the rule will last the whole day disregarding whether start or stop is defined with hours and minutes. Such an event will be shown at a special place on the calendar.
For example, if you create a rule for the model 'Sale Order', and turn on the option 'Always Whole Day', then the event will be placed on the daily and weekly super calendars above the timeline.
If you turn off the option, then, if the start or stop are defined with hours/minutes, the event will be placed at a particular time on the day's timeline and you will see the time before the event's title.
Whole Day - a special boolean field of the source object, which indicates that a related joint event may last the whole day. This setting is usually applied to standard Odoo calendar events which both might have definite time indicated or might be planned for a whole day. This optional field is available only if the setting 'Always Whole Day' is turned off.
For example, if we create a rule for the model 'Calendar Event' and choose 'All Day' as the Whole Day field, then, in case the event lasts all day, an event without the timing will be created. The event will be on the calendar the whole day and it will be placed above the timeline.
If you leave the field empty, then in case the calendar event has a definite time, it will be mentioned.
Contact Link - a field of the target Odoo model, which defines a specific partner, that is linked to the event. Usually, the fields like 'customer' or 'vendor' are used. The optional field.
For example, if we create a rule for the model 'Sale Order' and choose 'Customer' as the Contact Links field, then, the user from the field, will be written on the event template in the field 'Contact'.
If you leave the field empty, then the event will not be linked to the event.
Company field - a field of the target Odoo model, which defines to what company the object relates to. The optional field.
For example, if we create a rule for the model 'Sale Order' and choose 'Company' as the Company field, then, in case we assign a calendar to a particular company, the module will be able to distinguish to what company the object relates to, and, therefore will show only the related ones.
If you leave the field empty, then the module will not be able to distinguish the objects and will show the events related to all companies, even if the calendar relates to a particular company.
Domain - the Odoo filters' constructor to include only topical documents into a merged calendar. You might apply any storable attribute. For example, show only quotations without sales orders, or show opportunities only for this sales team.
Creating domains allows you to filter the records, which will be used to create the events. Only the ones, that match the specified conditions will be used. If you edit or delete an automatic rule, then the list of matching records will change.
You can apply filters by any storable field. For example, show only the sale orders of a particular salesperson or sales team, only tasks of a particular project, only opportunities of a particular customer, etc.
How to add a rule:
1. Start creating or editing a rule
2. Click '+Add Filter'
3. Choose an ID, by scrolling or typing the beginning in the search field and choose the filter options
For example, let's see some filters, which can be added to the model 'Sale Order'.
If you add a domain 'Salesperson contains Anita Oliver', then only based on orders related to Anita the events will be created.
If you introduce a filter 'Total >=50000', then only the orders with the total more or equal to 50000, will be considered for joint events.
If you add a filter 'Sales Team contains America', then only based on the matching records the events will be created, in this case only Sale Orders of the sales team America.
If the field is left empty, then all the records will be used to create events.
Rules Examples
Here are some examples of useful Joint Calendar rules:
As a model use 'Task'
As a name use 'Title'
As a start date field use 'Deadline'
As attendees fields use 'Assignees'
As a domain optionally you can set definite projects or stage name
As a model use 'Sales order'
As a name use 'Order Reference'
As a start date field use 'Order Date'
As attendees' fields use 'Salesperson'
As a contact link use customer
As a domain optionally restrict quotations by sales teams
As a model use 'Lead / Opportunity'
As a name use 'Opportunity'
As a start date field use 'Expecting Closing'
As attendees' fields use 'Salesperson'
As a contact link use customer
As a domain optionally restrict opportunities by sales teams
As a model use 'Activity'
As a name use 'Display Name'
As a start date field use 'Due Date'
As attendees fields use 'Assigned to'
As a domain optionally apply 'Summary is set'
As a model use 'Calendar Event'
As a name use 'Meeting Subject'
As a start date field use 'Start'
As a stop date field use 'Stop'
As attendees fields use 'Attendees'
As a whole day field 'All Day'
As a model use 'Time Off'
As a name use 'Description'
As a start date field use 'Start Date'
As attendees fields use 'User'
As a stop date field use 'End Date'
As a domain filter by status use 'Status = Approved' to show only approved leaves
Joint Calendar Interface
Users may access Joint Calendar through the interface events menu. Each super calendar has its own systray button. Thus, you can choose among the created calendars, which one to show.
By default, the first calendar is opened. You can change the calendar's order, by setting up their sequence in the settings tab, while creating or editing a calendar. The calendar with the smaller sequence goes first (see Creating Calendars).
As a user clicks on a super calendar menu, he/she sees joint events on a monthly timetable. It is possible to switch between the daily, weekly, monthly, and yearly views in the top left corner. On the right navigation bar, you see a small calendar that allows quickly move to the required date. For that, just click on the day you want to see. Use arrows to see the previous/next month.
Here you can also filter joint events by a joint rule, so by an actual Odoo model. For example, to show only tasks or sale orders. Each of them is marked by color. Manually created joint events (not linked to any Odoo object) would be available under the filter ‘Undefined’, without color.
To create a joint event manually, just click on any day, introduce the event name, and click 'New'. The undefined event will be available for the same calendar from which it was created.
Also, below the filtering by models, you can apply a search by actual joint event attendees, for instance, if you wish to see only your own documents or documents of a particular person(s). If required, apply ‘Everybody’s calendar’ to see everybody's calendar at once, or add a new attendee filter by clicking on the field '+ Add Attendees' and choosing a person from the list. You can also start typing the person's name.
It is only up to you, what attendees to keep. You can delete the ones, that you don't need by clicking on the cross by the person. However, you can't delete the default one 'Everybody's Calendar'.
Use Odoo standard omnibox above the calendar to search by:
1. Subject (the title of the event)
2. Description (by event's extra notes)
3. Contact (the customer)
4. Company (the company of the event)
To search, just start typing the word and then choose the search option.
You can access the main information of an event right from the Events app. Simply click on an event in the calendar to see its details.
Click on the 'Edit' button to change the starting or ending date and time, contact, and configure an alarm for this particular object.
Joint events and their source documents are interrelated. Update the former and the latter will be changed according to the system schedule.
Changes in the event card will lead to changes in the source document immediately. However, the read-only and computed fields cannot be changed. So, if you try to change such fields, the changes will be reverted with the next scheduled job.
You can find out, what is the type of used field, by clicking on the arrow by it as you create a rule.
For example, you have created an event based on the task 'Customizable desk'. After a while, you decided to change the name of the task. You changed the name to the 'White desk' and the name of the related event changed after the system update. If you change the event's name to 'Black desk', then with the next scheduled job, the title will be changed back to the 'White desk' since the used field was of the read-only type.
At the same time, if you have created an event based on the opportunity 'Quote for 12 tables', and decided to change the title of the event to 12 tables, the title of the related opportunity would be changed as well, while it isn't read-only.
If you click on the parent object, then you will be redirected to the source document.
You can also delete an event by clicking 'Delete'. That will not result in a deletion of the source document.
Joint Calendar Access Rights
Joint events can be seen differently by various users depending on their access rights.
There is no need to configure any additional roles to see the events menu. If a person has access to one of the calendars, then the 'Events' menu will be visible for this user and the corresponding calendar's title will be added to the events' systray.
If a user has no access to see a particular calendar, then it will not be visible.
Keep in mind, that if there are some calendars, but a user has no access to any of them, then the events menu will be hidden for this user.
If there aren't any calendars at all, then the events menu will not be shown in the module's menu of all users.
Access to the calendar doesn't guarantee, that a person will see all the events, which it includes. Users may observe only the events to which related objects they have access rights. Thus, if a user has the rights to the object AND the calendar, then he or she can access its linked joint event.
The rights to the objects are regulated by the related Odoo modules. For example, Abigail Peterson sees the order 'S02907', but doesn't have access to Mitchel's order 'S02911', so she will not see it in the calendar as well.
Sometimes there may be some undefined objects. An undefined object is an object that was created right from the calendar, has no parent object, and is not regulated by a rule. You can see all undefined events by putting a tick by the line 'Undefined' in the section 'Rule' on the right side of the interface.
All people, who have access to the calendar, may create and see its undefined events.
Let's see an example. We have a 'Sales Calendar', which can be accessed by sales administrators and salespeople. If Abigail Peterson, our salesperson, enters the menu 'Events', she sees this calendar. By default, she sees only her events. In January, that is the event she created herself - 'Meeting 4'. If she clicks 'Everybody's calendars' on the right side of the interface, then she will see all the events, to which she has the access to. Although, those events relate to other team members and not to Abigail.
The right to create and edit joint calendars and rules belongs to the system administrators.
The access rights for a calendar can be set in the tab 'Settings' as you create or edit a calendar. The calendar may be either public (seen by everyone) or private (seen by particular user groups).
If you choose to make the calendar private you can specify the particular groups, that will be able to see the calendar. Add the groups in the field 'groups', which appear as you choose the option 'private' in the field ' Privacy'. It is possible to add as many groups as necessary.
It might be particularly useful if you want to create a calendar for a particular department or team, so they will be able to control the related events.
For example, create a 'Sales Calendar' for the sales department. Then specify the group 'Sales / User: Own Documents Only'. So, all users, who have this right and extended sale rights, e.g. Sale Administrators, will be able to see the 'Sales Calendar'.
Configuring Alarms & Notifications
Set the alarms to be warned before an event starts. You can either set an alarm to the automatically created events or set an alarm manually to a particular event. It is possible to add more, than one alarm.
The alarm to the automatically created events can be set in the tab 'Settings' as you create or edit a Calendar. The person or people, that will be warned are defined by the Attendees field of a rule (see Rules Fields).
When you edit alarms of the existing calendars, the changes aren't applied to already existing events, only to the newly generated ones. This was made, to allow changing the alarms of separate events manually. Otherwise, even after changing the alarms of an event, the settings would be returned to defaults with the next scheduled job.
The alarm for a particular event can be set right in the 'Events' menu. Just click on the event and choose 'Edit'. You can add new alarms or delete the existing ones (see Joint Calendar Interface).
The alarms to the undefined events are not influenced by the calendar's alarm settings and should be added manually, if necessary.
It is possible to notify users through the standard Odoo popup notification, or by email. You can choose the type of the reminder while creating, or editing it.
The alarms can be created through the separate menu, or right from the field 'Alarms' on the form of a calendar, or an event.
To create an alarm through the special menu:
1. Open the Events app
2. In the systray, go to Configuration > Reminders
3. Click 'New'
4. Choose the alarm type
5. Choose the time before the event, when the reminder should be sent by typing the number of periods and choosing the type of the period (minutes, hours, or days) in the field 'Remind before'
To create an alarm right from the form of a calendar, or an event:
1. Start typing its title in the field 'Alarms' and click 'Create and Edit'.
2. Choose the alarm type
3. Choose the time before the event, when the reminder should be sent by typing the number of periods and choosing the type of the period (minutes, hours, or days) in the field 'Remind before'
4. Click 'Save&Close'.
If a notification to remind about an event is set, then according to the alarm timing, related to the event users (attendees) will see the pop-up window. The pop-up window has 3 buttons.
To turn off the alarm, click 'OK'.
To see the details of the event click 'Details'.
If you want to receive another alarm about the event later, click 'Snooze'. Then, the alarm will repeat later.
If an email alarm to an event is set, then according to the reminder's timing, related to the event users (attendees) will receive an email. The email includes the name and the time of the event.
You can also click on the button 'View Joint Event' to be redirected to the event.
Refreshing Joint Events & Odoo Scheduled Jobs
The module automatically collects various documents into one super interface based on the flexibly set rules. The update of the calendar takes place regularly according to the system schedule.
It is possible to set any update frequency. However, it isn't recommended to make it more often, than once in 5 minutes. In case you have a huge number of objects, it is better to do the update even less often, so Odoo would have enough time to process the events list. If necessary, set calendar limits and filters in the rules to create only corresponding conditions events.
To change the frequency of merged calendar refreshing and emails-reminders checks:
1. Turn on the debug mode
2. Go to technical settings > Automation > Scheduled jobs
3. Find the job 'Refresh Joint Events' to change the frequency of super calendars' update
4. Find the job 'Notify About Joint Event' to change the frequency of email alarms
The module works not in a real-time, but according to the system schedule.
You can also launch the events update manually:
1. From the user's calendar interface (by clicking 'Refresh')
2. From the calendar's settings (by clicking 'Generate Events')
After the update don't forget to hardly reload the browser page (CTRL+SHIFT+R).
Time Limits
All matching-the-rules events are checked regularly. So, if you have a lot of documents found by joint rules in your database, refreshing might take longer or even not enough fast for your Odoo server timeouts. That’s why it is preferable to filter documents for a calendar and introduce time limits.
Time limits define which documents will be considered according to a document start field.
You can specify time limits in the tab 'Settings' while creating or editing a calendar. Tick the box 'Time Limits' and choose the number of days before and after the event.
For example, you have a Task 'Fix the sink' with the deadline set for the 30th of March. Today is the 15th of March, so the task will not be shown on the calendar. However, in 5 days, it will appear, as it is set to show events 10 days before. And the event will stay on the calendar till the 29th of April.
If you remove the tick from the box 'Time Limits', then the events for all time will be shown. However, we highly recommend using this function, as specifying time limits will help to make events update faster and consume system resources efficiently.
Joint Calendar: Gantt
Joint Calendar: Gantt - is an optional add-on that introduces the Gantt view for events. The add-on requires the Enterprise license of Odoo. In this way, you can have a single super Gantt view for various Odoo documents: tasks, time-offs, manufacturing orders, quotations, etc.
With the help of the add-on you will be able to manage the events conveniently: reassign responsible users, drag and drop those to change periods, etc.
The Gantt view is turned on per calendar. So, it is only up to you to decide what calendars will have the possibility to switch to the Gantt view. To add the Gantt view to the calendar, just check the box 'Gantt view' on the shared calendar settings. The app would automatically extend a target super calendar action after you saved the changes.
As you open the events menu and choose the calendar, in the top right corner above the calendar, you will find the buttons to switch between the events views. Click on the second button () to switch to the Gantt view.
From the Gantt view, by default, you see the attendees on the vertical scale and the dates/days/time on the horizontal scale. You can select various searching and filtering criteria to limit the number of shown events. For example, show only events related to the contact Deco Addict.
Apply various grouping options to change or create different hierarchies of groupings by clicking on several options one by one. To reset the grouping, just click on the cross by it in the search bar. For example, click on the option attendee, then the option rule and contact.
Instantly access information about any event by hovering over it. To view the event, just click on it in the calendar. There you will be able to see the details of the event, change its starting/ending date, add/remove alarms, and so on.
To add a new event, just click on the plus icon, which appears as you hover over any time/day slot.
Change the day/time of the event simply by dragging and dropping it.
To delete an event, just open any event by clicking on it, push the button 'Remove', and confirm your choice.