About Task Check List and Approval Process
Task Check List and Approval Process is an Odoo app, which provides a checklist for each project stage to control the requirements' fulfillment and to make sure that each action is fully approved by responsible users. Choose stages to assign various checklists and prepare any number of checkpoints for each stage. Check the fulfillment progress on task kanban and form views.
To move a task forward, its checklist should be fully confirmed. Configure specific stages to be mandatory, so users would not be able to skip those. Then, the stages with the 'Forbid skipping this stage' option will be always visited and their checklists will be fulfilled.
Configure the project pipeline to forbid moving tasks back. To that goal, turn on the option 'Forbid regression to this stage' for particular states. For example, to make sure no task becomes 'Under consideration' again.
Mark some stages as 'No need for checklist', to avoid moving restrictions (e.g. 'Canceled').
Checklist actions are saved in history. If a task is moved between stages, already-done check items will be recovered. Turn on the setting 'not saved' to avoid that behavior for specific approval points.
The app lets assign security groups for each checklist point and only users from those groups would be able to confirm a related item. You can also assign a person to be a 'Checklists Super User'.
Stage-specific task checklists
Multiply task checklist roles
Checklist fulfillment progress
Approval history
Configuring Task Check Lists
Checklists are assigned per each project stage. So, the set of points for new and underwork tasks will vary.
This way, the stages and the list of related checkpoints may be also different for different projects. For example, you can have 5 stages in Project 1 and 7 stages in Project 2. Even if both projects have the 'New' stage, the related checkpoints may be different. It is only up to you what stages and checkpoints to create to correspond to the company's working process. You can prepare any number of checkpoints per each project stage.
The checklists can be managed in two interfaces: in the stage wizard and from the checklist menu.
To open a stage wizard click on the gear on the right side of a stage's name. There you will see all available checkpoints for the stage. Each task will require the completion of all the checkpoints to move on to the next stage. From here you can add checklist points for the current stage, change their order, delete them, and assign responsible people.
To add a checkpoint from the stage wizard:
1. Start creating or editing a project stage
2. Click 'Add a line'
3. Write the checkpoint title
4. Choose user groups, that will be able to mark the checkpoint as done
5. Click 'Not saved', if it is required to mark the checklist point done every time it gets to the stage
6. After adding several checkpoints, set their order by drag&drop
7. Optionally, click 'No need for checklist,' if the stage doesn't require completing a checklist (see Approving Process)
8. Optionally, click 'Forbid skipping this stage', to make sure that the stage will always be visited and its checklists will be fulfilled (see Approving Process)
9. Optionally, click 'Forbid regression to this stage' to forbid moving the task back to the stage (see Approving Process).
In the checklist menu, you can see and edit the checklist points for all available stages.
How to add a checklist point from the separate menu:
1. Go to Configuration > Checklist
2. Click 'New'
3. Write the checkpoint title
4. Select a project stage to which this checklist point relates to
5. Choose user groups, that will be able to mark the checkpoint as done
6. Click 'Not saved', if it is required to mark the checklist point done every time it gets to the stage
7. Optionally, add some notes to the checkpoint. The note will be shown as a user hovers over the checklist point.
Approving Process
A checklist represents a set of checkpoints that defines what should be done at this particular stage to move the task forward. A checklist is formed automatically as the task is created or put to the next stage according to the stage's checklist settings.
Each checkpoint is a certain statement that is assumed to be confirmed/completed at a certain project stage, e.g. 'Conduct Tests' or 'Approve Specifications'. The responsible for the checkpoint completion may be all employees or particular user groups.
Moving a task forward implies putting a task to the stage with a greater sequence. The stage sequence is its order on the pipeline. Thus, the transition from 'New' to 'In progress' is considered progress ('moving forward'), while from 'Done' to 'New' - is not ('moving back').
As you move the task forward, the app will consider whether the stage's checklist is fully complete. If not - a user would be shown a warning. Otherwise, this task would get to the target stage, and the checklist would be updated to checkpoints linked with this new stage.
A task with a completed checklist can be moved to any further stage. For example, you can move a task from the stage 'New' to the stage 'Done', skipping the stage 'In Progress'. Optionally, configure specific stages to be required, so users would not be able to skip those. For that, as you edit a stage, tick the option 'Forbid skipping this stage'. This way, you can make sure that the stages will be always visited and their checklists will be fulfilled prior to moving forward to one of the next stages.
The setting does not influence the option 'No need for checklist'. This way, you will still be able to move the task to the stage, that doesn't require completing a checklist, even if it is placed after the stage that is forbidden to skip, for example, it might be useful, when you cancel a task as it should be possible to cancel a task anytime, regardless the current stage.
The app assumes that users can move a task to one of the previous stages without the need to complete the checklist for that. For example, when a customer wants to introduce some changes to the contract or isn't satisfied with the result and sends some corrections. So, this task is returned from the stage 'Done' to the stage 'In Progress'. In such a case, a user would not have to approve 'Act of Acceptance', since it is senseless.
However, it is possible, to forbid moving a task back to the previous stage. It might be especially useful when the work on a certain stage is fully completed and there is no need to do it again or it is forbidden to introduce the changes. For example, when all the details are confirmed with the client and the contract is signed. So, no further changes can be made, and a new task must be created instead. For that, as you edit a stage to which it should be forbidden to return, tick the option 'Forbid regression to this stage'. This way, you can make sure, that no task will return to this stage, after leaving it.
Certain stages might be also marked as 'No need for checklist'. This setting indicates that even if a user moves a task to this stage, no checkpoints should be approved. For example, you can let employees move tasks to the 'Cancelled' stage without confirming that the 'Contract is signed'.
If a user tries to move any task further without completing all the checklist points, such a transition would be blocked and the warning would appear. Thus, to move a task forward, its checklist should be fully confirmed. The exception to the rule is the Checklists Super User, which can apply any changes (see User Roles).
If a person tries to mark a checkpoint to which he or she has no access, then the warning 'Access Error' appears and such changes cannot be saved (see User Roles). The warning also states which checklist point cannot be marked.
Interfaces
There are two interfaces, where you can see the checklist progress. Those are the form of a task and the pipeline kanban view.
To see the checklist in the task's form:
1. Open any task
2. Click on the tab 'Checklist'
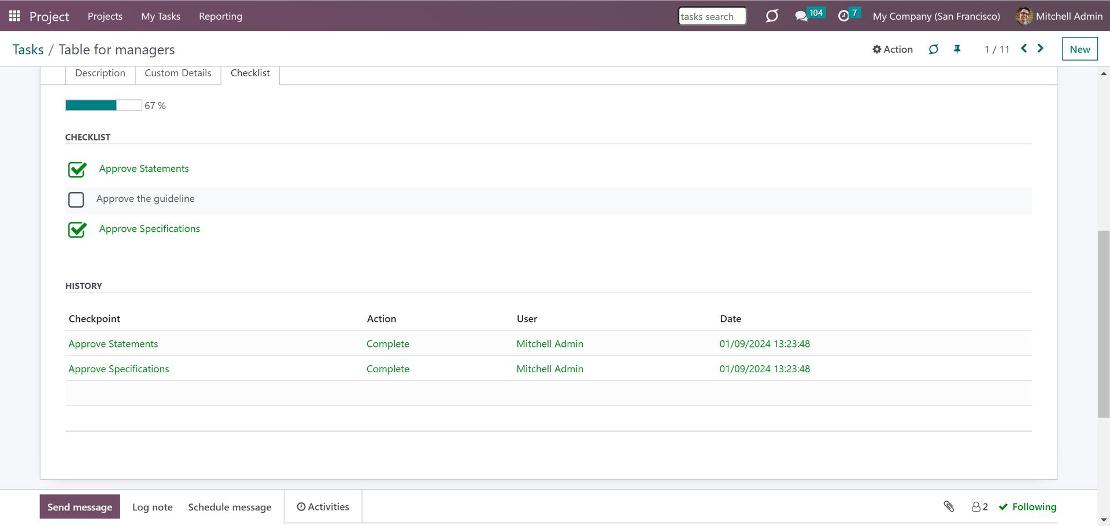
There you can see all the checkpoints for this stage and the completion progress, which is automatically calculated in percent and marked green.
To approve/disapprove any checkpoint, you just need to tick the box near the required item. The done checkpoints are marked in green color.
You can also track the checklist progress of all tasks from the pipeline kanban view. The progress is shown by a transparent rectangle box, which partially becomes green according to the done checkpoints. You also see how much is already done in percentages.
Approval History
You can see the history of approval on the task form. There you can find out who and when marked a particular checklist point, did or reset any of such approvals. In such a way it is always possible to control user actions and, if needed, ask for an explanation.
The app lets define statements that should be checked regularly and statements that might be approved only once.
By default, if a task is moved, previously done check items are recovered from the history. For instance, approving the deadline should be done only once disregarding how many times a task is on the stage 'New'.
Simultaneously, the tests should be conducted regularly, since something may be changed in the meantime. So, it might be useful, to mark the checkpoint 'Conduct Tests' done again when a task is returned to a certain stage. To make a checkpoint regularly approved, turn on the setting 'Not saved' by particular checklist points while editing a pipeline stage.
For example, two checkpoints were marked as done on the stage 'Done'. One of those was configured not to be saved. The task was moved back to one of the previous stages, and then returned to 'Done'. Out of two completed checkpoints, only one would be restored and the shown progress would be 50%. The other, that was 'Not saved' should be marked as done again.
User Roles
Access to mark the checkpoints can be given to various user groups.
To choose the responsible-for-a-checkpoint groups of users:
1. Start editing a stage or a checkpoint
2. In the field 'User groups' choose all user groups that will have a right to mark the point done
Each point can be available for different user groups. If the field is left empty, then any user with access to the task can approve that checkpoint.
Here are some examples of the assigned-per-checkpoint user groups:
1. 'Approve Specifications' User groups: Project/Administrator
2. 'Check the details' User groups: Project/User and Project/Administrator
3. 'Confirm the payment' User groups: Accountant
4. 'Sign the contract' User groups: Sales/Administrator
5. 'Feedback is requested' User groups: empty
If the checklist is not done, a user can't move the task forward: the warning will appear. Simultaneously, to approve a certain checkpoint, a user should have the right to that item. In such a way, you may configure the multi-role approval task process, when different groups are responsible for different actions.
Simultaneously, there is the special role 'Checklists Super User' which allows one to overcome the restrictions. In particular, such users would be able to:
1. Confirm any checkpoints disregarding defined security groups
2. Move any task further without fulfilling checklists
To assign a user the 'Checklists Super User' role:
1. Go to General Settings > Manage users
2. Choose a user
3. Scroll down to the section 'Services' and find the field 'Tasks Checklists'
4. Choose the option 'Checklists Super User'.
About Task Check List and Approval Process
Task Check List and Approval Process is an Odoo app, which provides a checklist for each project stage to control the requirements' fulfillment and to make sure that each action is fully approved by responsible users. Choose stages to assign various checklists and prepare any number of checkpoints for each stage. Check the fulfillment progress on task kanban and form views.
To move a task forward, its checklist should be fully confirmed. Configure specific stages to be mandatory, so users would not be able to skip those. Then, the stages with the 'Forbid skipping this stage' option will be always visited and their checklists will be fulfilled.
Configure the project pipeline to forbid moving tasks back. To that goal, turn on the option 'Forbid regression to this stage' for particular states. For example, to make sure no task becomes 'Under consideration' again.
Mark some stages as 'No need for checklist', to avoid moving restrictions (e.g. 'Canceled').
Checklist actions are saved in history. If a task is moved between stages, already-done check items will be recovered. Turn on the setting 'not saved' to avoid that behavior for specific approval points.
The app lets assign security groups for each checklist point and only users from those groups would be able to confirm a related item. You can also assign a person to be a 'Checklists Super User'.
Stage-specific task checklists
Multiply task checklist roles
Checklist fulfillment progress
Approval history
Configuring Task Check Lists
Checklists are assigned per each project stage. So, the set of points for new and underwork tasks will vary.
This way, the stages and the list of related checkpoints may be also different for different projects. For example, you can have 5 stages in Project 1 and 7 stages in Project 2. Even if both projects have the 'New' stage, the related checkpoints may be different. It is only up to you what stages and checkpoints to create to correspond to the company's working process. You can prepare any number of checkpoints per each project stage.
The checklists can be managed in two interfaces: in the stage wizard and from the checklist menu.
To open a stage wizard click on the gear on the right side of a stage's name. There you will see all available checkpoints for the stage. Each task will require the completion of all the checkpoints to move on to the next stage. From here you can add checklist points for the current stage, change their order, delete them, and assign responsible people.
To add a checkpoint from the stage wizard:
1. Start creating or editing a project stage
2. Click 'Add a line'
3. Write the checkpoint title
4. Choose user groups, that will be able to mark the checkpoint as done
5. Click 'Not saved', if it is required to mark the checklist point done every time it gets to the stage
6. After adding several checkpoints, set their order by drag&drop
7. Optionally, click 'No need for checklist,' if the stage doesn't require completing a checklist (see Approving Process)
8. Optionally, click 'Forbid skipping this stage', to make sure that the stage will always be visited and its checklists will be fulfilled (see Approving Process)
9. Optionally, click 'Forbid regression to this stage' to forbid moving the task back to the stage (see Approving Process).
In the checklist menu, you can see and edit the checklist points for all available stages.
How to add a checklist point from the separate menu:
1. Go to Configuration > Checklist
2. Click 'New'
3. Write the checkpoint title
4. Select a project stage to which this checklist point relates to
5. Choose user groups, that will be able to mark the checkpoint as done
6. Click 'Not saved', if it is required to mark the checklist point done every time it gets to the stage
7. Optionally, add some notes to the checkpoint. The note will be shown as a user hovers over the checklist point.
Approving Process
A checklist represents a set of checkpoints that defines what should be done at this particular stage to move the task forward. A checklist is formed automatically as the task is created or put to the next stage according to the stage's checklist settings.
Each checkpoint is a certain statement that is assumed to be confirmed/completed at a certain project stage, e.g. 'Conduct Tests' or 'Approve Specifications'. The responsible for the checkpoint completion may be all employees or particular user groups.
Moving a task forward implies putting a task to the stage with a greater sequence. The stage sequence is its order on the pipeline. Thus, the transition from 'New' to 'In progress' is considered progress ('moving forward'), while from 'Done' to 'New' - is not ('moving back').
As you move the task forward, the app will consider whether the stage's checklist is fully complete. If not - a user would be shown a warning. Otherwise, this task would get to the target stage, and the checklist would be updated to checkpoints linked with this new stage.
A task with a completed checklist can be moved to any further stage. For example, you can move a task from the stage 'New' to the stage 'Done', skipping the stage 'In Progress'. Optionally, configure specific stages to be required, so users would not be able to skip those. For that, as you edit a stage, tick the option 'Forbid skipping this stage'. This way, you can make sure that the stages will be always visited and their checklists will be fulfilled prior to moving forward to one of the next stages.
The setting does not influence the option 'No need for checklist'. This way, you will still be able to move the task to the stage, that doesn't require completing a checklist, even if it is placed after the stage that is forbidden to skip, for example, it might be useful, when you cancel a task as it should be possible to cancel a task anytime, regardless the current stage.
The app assumes that users can move a task to one of the previous stages without the need to complete the checklist for that. For example, when a customer wants to introduce some changes to the contract or isn't satisfied with the result and sends some corrections. So, this task is returned from the stage 'Done' to the stage 'In Progress'. In such a case, a user would not have to approve 'Act of Acceptance', since it is senseless.
However, it is possible, to forbid moving a task back to the previous stage. It might be especially useful when the work on a certain stage is fully completed and there is no need to do it again or it is forbidden to introduce the changes. For example, when all the details are confirmed with the client and the contract is signed. So, no further changes can be made, and a new task must be created instead. For that, as you edit a stage to which it should be forbidden to return, tick the option 'Forbid regression to this stage'. This way, you can make sure, that no task will return to this stage, after leaving it.
Certain stages might be also marked as 'No need for checklist'. This setting indicates that even if a user moves a task to this stage, no checkpoints should be approved. For example, you can let employees move tasks to the 'Cancelled' stage without confirming that the 'Contract is signed'.
If a user tries to move any task further without completing all the checklist points, such a transition would be blocked and the warning would appear. Thus, to move a task forward, its checklist should be fully confirmed. The exception to the rule is the Checklists Super User, which can apply any changes (see User Roles).
If a person tries to mark a checkpoint to which he or she has no access, then the warning 'Access Error' appears and such changes cannot be saved (see User Roles). The warning also states which checklist point cannot be marked.
Interfaces
There are two interfaces, where you can see the checklist progress. Those are the form of a task and the pipeline kanban view.
To see the checklist in the task's form:
1. Open any task
2. Click on the tab 'Checklist'
There you can see all the checkpoints for this stage and the completion progress, which is automatically calculated in percent and marked green.
To approve/disapprove any checkpoint, you just need to tick the box near the required item. The done checkpoints are marked in green color.
You can also track the checklist progress of all tasks from the pipeline kanban view. The progress is shown by a transparent rectangle box, which partially becomes green according to the done checkpoints. You also see how much is already done in percentages.
Approval History
You can see the history of approval on the task form. There you can find out who and when marked a particular checklist point, did or reset any of such approvals. In such a way it is always possible to control user actions and, if needed, ask for an explanation.
The app lets define statements that should be checked regularly and statements that might be approved only once.
By default, if a task is moved, previously done check items are recovered from the history. For instance, approving the deadline should be done only once disregarding how many times a task is on the stage 'New'.
Simultaneously, the tests should be conducted regularly, since something may be changed in the meantime. So, it might be useful, to mark the checkpoint 'Conduct Tests' done again when a task is returned to a certain stage. To make a checkpoint regularly approved, turn on the setting 'Not saved' by particular checklist points while editing a pipeline stage.
For example, two checkpoints were marked as done on the stage 'Done'. One of those was configured not to be saved. The task was moved back to one of the previous stages, and then returned to 'Done'. Out of two completed checkpoints, only one would be restored and the shown progress would be 50%. The other, that was 'Not saved' should be marked as done again.
User Roles
Access to mark the checkpoints can be given to various user groups.
To choose the responsible-for-a-checkpoint groups of users:
1. Start editing a stage or a checkpoint
2. In the field 'User groups' choose all user groups that will have a right to mark the point done
Each point can be available for different user groups. If the field is left empty, then any user with access to the task can approve that checkpoint.
Here are some examples of the assigned-per-checkpoint user groups:
1. 'Approve Specifications' User groups: Project/Administrator
2. 'Check the details' User groups: Project/User and Project/Administrator
3. 'Confirm the payment' User groups: Accountant
4. 'Sign the contract' User groups: Sales/Administrator
5. 'Feedback is requested' User groups: empty
If the checklist is not done, a user can't move the task forward: the warning will appear. Simultaneously, to approve a certain checkpoint, a user should have the right to that item. In such a way, you may configure the multi-role approval task process, when different groups are responsible for different actions.
Simultaneously, there is the special role 'Checklists Super User' which allows one to overcome the restrictions. In particular, such users would be able to:
1. Confirm any checkpoints disregarding defined security groups
2. Move any task further without fulfilling checklists
To assign a user the 'Checklists Super User' role:
1. Go to General Settings > Manage users
2. Choose a user
3. Scroll down to the section 'Services' and find the field 'Tasks Checklists'
4. Choose the option 'Checklists Super User'.