About Flexible Timetables and Shifts
The app introduces the innovative work calendar where users create shifts just by choosing a period and update those by merely dragging a card. A minute to plan a whole week. As flexible as needed.
Employees can access each other shifts calendar. The working schedule can be also printed to be physically stuck in the office. Thus, users always know where and when their colleagues are available.
Find a specific user shift using the built-in calendar filters by employee, department, context, or company. Analyze a single user or the whole team. Control shifts on the Odoo Enterprise Gantt view.
Shifts are auto-combined into weekly timetables from Monday to Sunday. There, employees check themselves while HR managers control the correctness and completeness of plans.
Based on the Odoo attendance features, HR administrators supervise shift fulfillment right in employees' timetables. Turn on the approval option also to force users to get a confirmation for their shifts.
For both attendance and planned shifts, users may be asked to choose a context. The list is up to you: 'distant', 'office central', 'office west', and so on. The features let us quickly understand where or why employees work.
Configure Odoo to remind employees to plan shifts for the next week. Notify users of being late if they have not checked in but were previously planning to work.
The tool fully supports multi-timezones and multi-companies environments. Perfect for geographically distributed teams where cooperation becomes really crucial.
Comfortable shifts planning
HR control
Team collaboration
Timetable reminders
Shifts Planning
All internal users that have a related employee assigned can create and manage their own shifts. The app's key idea is that employees may independently and flexibly plan shifts for the next or a few next weeks.
For that, the module introduces a special interface with various view types, where an employee can choose the most convenient way to see and navigate around shifts (see Team Collaboration & Interfaces).
To plan a shift:
1. Open the app Employees
2. Find the tab 'Timetables' in the systray and click 'Shifts'
3. In the calendar, click and hold down the left mouse button to select the working hours
4. In the pop-up window you can change the chosen time, user, and company, choose the shift's context, and add notes
5. Click 'Save&Close'.
After that, you will see the related shift in the calendar on the chosen timeline.
In case you want to change the shift's hours, you can do that in two ways: simply by dragging & dropping the shift to another day/time or by editing a shift in the field 'Time'. For example, Mitchell Admin planned a shift for Monday from 9 am to 12 pm. But then decided, that he will not be able to come so early, he drags & drops the shift lower to the timeline 10:30 am to 13:30.
This way a user can plan his/her shifts for the next week or several weeks. As a user adds a shift, he/she may be asked to choose a context. So, it will be possible to find out what the worker plans to do on a particular day, or from what place he/she plans to work. The list of contexts is completely up to you. For example, you can create contexts that reflect the workplaces: 'distant', 'office central', 'office west', and so on. To create a context:
1. Open the Employees' app's settings and find the section 'Flexible Timetables and Shifts'
2. Click on the button 'Set up timetable contexts'
3. Click 'New'
4. Introduce the context's name
5. Optionally, type the reference to the related icon
6. Tick the box 'Default', if you want this context to be chosen by default. The user will still be able to choose a different option. While signing in through the attendance, if the possibility to choose the context is disabled, the default context will be assigned
7. Tick the box 'Do not show if empty', to hide the context from the timetable, if there aren't any shifts with this context.
Planned shifts are automatically combined in weekly timetables from Monday to Sunday, regardless of the chosen start day in the language settings. It is done this way, to make sure, that the companies with employees from different locations (where the first day of the week may differ) could have a mutual timetables system. Each employee has his/her own timetable for the week generated as soon as at least one shift for the week is planned.
The timetable allows employees to check themselves for sufficient planning. They can see the total planned number of hours and the number of hours that should be planned. For example, Anita Oliver planned 4 shifts and saw in the timetable that she has to plan 4 more hours, as she has 40 hours to plan weekly. So, she planned a 4-hour shift for the fifth day. The hours to plan are set in the Employee's settings (see Configurations). The setting does not limit the number of shifts an employee can plan per week.
The timetable can be reused as a template and therefore reduce the time spent on planning. For example, if Anita Oliver liked how she planned the shifts for the current week, she can save the timetable as a template and use it to generate the shifts for the several forthcoming weeks (see Shift Planning Based on a Template).
Managers can refer to the timetable to control shifts' fulfillment. The tool relies on the Odoo attendance functionality to sign the planned shifts. As a user comes to work, he/she checks in in the Attendance app and checks out upon finishing work. Then, the actual working time is recorded and can be compared with the planned time. This way, the HR managers can control whether an employee actually attended during the planned time (see HR Control: Attendances).
Optionally, turn on the approval process, so the timetables would require being approved. This way, managers or any user with the right 'HR Administrator' may confirm (the button 'Approve') or refuse (the button 'Refuse') the shift schedule. The decision principles are fully up to you. This way, you can make sure, that the employee schedule fully reflects the company's policy (see Optional Managerial Approval).
Below the weekly timetable, you will find a standard Odoo messages thread, where superiors and subordinates might discuss any scheduling issues and set up activities.
To remind users about the necessity to plan shifts for the forthcoming weeks, set the notifications, that will be sent on all chosen weekdays prior to the target week. This way, the employees will finish planning beforehand and managers will not spend time reminding them about it (see Notifying About Shifts).
In the generated timetable, it is possible to change the name. For that, just start editing a timetable and in the field 'Reference' introduce the new name.
You can choose how the dates are displayed in the timetable according to your location. For example, set if the day or the month should go first to avoid confusion. All employees will see the date in the set format. You can apply the date format in the Employees app settings, in the section 'Flexible Timetables and Shifts', field 'Date Format'. The date is set with the help of symbols, the meaning of which can be seen in the language settings.
In the tab 'Timetable', switch between the time zones to see the shifts in the convenient one. Click the button "Export" in the top right corner above the table to download the timetable as an Excel table. It will be exported in the currently chosen time zone. This way, employees from different countries can easily find out the most suitable time to interact with each other.
The timetable interface groups shift by working contexts. It makes analysis much more comfortable and allows making corrections in time. For example, if you had certain restrictions on the number of hours for the 'distant work', here it is under full control.
The currently active timetable of a user, the timetable related to the current week, can be seen in the field 'Active Timetable', on the Employee's card in the tab 'Work Information'.
Shift Planning Based on a Template
When the schedule of an employee is more or less similar from week to week it might be a good idea to use one of the previous weeks to plan the next week(s). The module allows saving any timetable as a template, so the employees can re-use the same schedule for other weeks. This way, shift planning can be significantly simplified.
To make a timetable a template:
1. Open the Employees app and click the button Timetables > Timetables in the systray
2. Open any timetable
3. Click on the button 'Set as Template' in the top right corner
After that, the timetable will be available for the selection as you generate shifts for another week for the related-to-the-template user. The name of the timetable will be used as a template's name, but you can still change it. For example, change "#4 Mitchell Admin" to "Standard Shifts #4 Mitchell Admin".
When you no longer need a certain template, just click on the button 'Not a Template' in the top right corner of a related timetable.
To generate shifts for oneself:
1. Open the Employees app and click the button Timetables > Timetables in the systray
2. Click 'Generate'
3. In the pop-up window choose one of the templates. You can click on the icon on the right side of the chosen template, to open it. This way, you can make sure, that you have chosen the right template
4. In the field 'Period' choose the dates for which the new timetable will be generated
5. Click 'Generate'.
For example, our employee Anita Oliver has planned her shifts for a week, she has found that time very convenient, so used the week as a template to generate 2 more for further weeks. Then, she removed the timetable from the templates.
Managers can also generate shifts for an employee based on a template. The process is similar to generating shifts for oneself, but they also should choose the related employee in the field 'Employee'. As they choose a template, only the templates related to the currently chosen employee are shown. This way, only the relevant options are shown.
Keep in mind, that it isn't possible to use the timetable of one employee as a template to generate shifts for another employee
Notifying About Shifts
The tool introduces a number of notifications to make sure timetables are prepared in time and fulfilled. In particular, you can remind employees to plan shifts for the next week and notify users of being late.
To remind employees to plan shifts/prepare weekly timetable:
1. Open the configurations of the Employee's app and scroll down to the section 'Flexible Timetables and Shifts'
2. In the field 'Notification start' choose the day when the notifications with a reminder to plan shifts for the forthcoming week will start being sent
3. In the field 'Notifications end' define the end day of the week, after which the notifications with a reminder to plan shifts for the forthcoming week will stop being sent
4. Click 'Save'
5. In the employee's settings, tab 'Work Information', section 'Flexible Timetables' tick the checkbox 'Timetable notifications'.
Take into account: notifications are sent only to Odoo-registered users whose employees have the checkbox 'Timetable notifications' ticked.
The reminder is based on the scheduled job 'To create timetable', you can change the frequency of the checks in the developer mode, General Settings > Technical > Scheduled jobs.
For example, you can set to send reminders from Thursday to Friday, so the employees didn't forget to plan shifts for the next week before the weekend.
The module relies on the Odoo attendance functionality to sign the planned shifts. As a user comes to work, he/she checks in in the Attendance app and checks out upon finishing work (see HR Control: Attendances).
In case a user planned a shift, but didn't check in at that time, it may be a good idea to send a notification to such a user, to remind him/her about the shift. Some users may forget about shifts on the regular basis. With the help of the module, you can choose certain users that should be notified about being late. To send being-late notifications to the user, tick the option 'Being Late Notifications' in the employee's settings.
Those types of notifications are sent by special emails with the help of the scheduled job 'Being Late'. You can change the frequency of the checks in the developer mode, General Settings > Technical > Scheduled jobs.
For example, Anita Oliver has planned a shift on Wednesday from 10 am to 18 pm. But didn't check in at 10 am. So, the notification was sent to her and she managed to come to work a little bit later, while she has just forgotten about the shift and was available at that time. This way, with the help of the being late notifications, we can make sure our employees will not forget about their shifts and, will be able to, at least, warn us about the reasons, so the company could undertake the related measures. For example, to reassign the client to another sales assistant.
Team Collaboration & Interfaces
The module provides the features that allow organizing collaborative work. Every user can access not only their own shifts but also colleagues' shifts with the context in the read-only mode. So, it is always clear when and from where (based on the context) the colleague is working on a particular day. This way, they can find out whether it is an appropriate time to contact the colleague.
The app supports multi companies. Users can access only their real colleagues' shifts. If a user has an employee in a few companies, then he/she can plan and control shifts in both, but the module will make sure there are no overlapping shifts. In this case, a separate timetable will be created in each company for this user for a related employee. For example, our user Anita Oliver relates to two companies Azure New York and Azure San Francisco. An employee is created for her in both companies. She plans to work in New York from Monday to Wednesday and in San Francisco on Friday and Saturday, so she assigns the related company while choosing the shifts. Two timetables are generated for her. In the first one, there are shifts related to the company Azure New York and in the second one shifts related to Azure San Francisco.
The interface of the module can be accessed through the Employees app. The button 'Timetables' that leads to the module's features is located in the systray. Go to Timetables > Shifts to open the menu to create and manage shifts.
As a user opens the shifts menu, he/she sees shifts on a weekly timetable. It is possible to switch between the daily, weekly, monthly, and yearly views in the top left corner. On the right navigation bar, you see a small calendar that allows quickly move to the required date. For that, just click on the day you want to see. Use arrows to see the previous/next month.
It is possible to find a specific user shift using the built-in calendar filters by employee, department, context, or company. Analyze a single user or the whole team. For example, you can find out when Anita Oliver is planning to work from the office, by filtering shifts by the employee Anita Oliver, and by the context "Office".
Above the calendar, in the top right corner, you will also find the Odoo standard omnibox to search by employee, manager, context, department, and user. To search, start typing the word and then choose the search option.
It is possible to save search parameters, to access the search result quickly. For that, apply one or several search parameters, click 'Favorites', choose 'Save current search', and type the search's name. Tick 'Use by default' if you want to see the shifts this way as you open the app, OR tick 'Share with all users', if you want other people to be able to see and apply these search parameters.
After that, you will be able to switch to this search quickly by clicking 'Favorites' and choosing it. For example, save the search by a particular department and manager.
In the module's interface, users can create shifts just by choosing a period and update those by merely dragging a shift's card. This way it may take just a minute to plan a whole week (see Shifts Planning).
You can access the main information of a shift right from the calendar. Simply click on a shift in the calendar to see its details. Click the 'Edit' button to change the starting or ending time, related user, context, or company.
To change the time of the shift, you can simply drag & drop it.
In case plans have changed and you want to remove the shift from the calendar, you can delete it. For that, click on the shift and then on the button 'Delete'.
The module allows seeing shifts in several different views. You can switch around those in the top right corner. The first view is the calendar one. It is the default view, in which the shifts are opened as you go to the menu 'Shifts'. Other available views are Gantt, List, Pivot, and Graph.
The Gantt view is available only in the Enterprise version of Odoo. It is introduced by the free extension Flexible Timetables and Shifts: Gantt (see Flexible Timetables and Shifts: Gantt).
If you switch to the List view, you will see all planned shifts in the form of the list. The following columns will be presented: date, employee, time, time end, context, and company. Click on the button 'New' to add another shift. Click on any shift to see its card and edit it.
In the Pivot view, you will see a table, where you can choose what columns and lines to include. Choose the measures 'Duration' or 'Worktime' to see the total number of planned hours. Choose the measure 'Count' to see the total number of planned shifts. For example, you can create a table with the total hours planned by each worker for various periods of time.
In the Graph view, you can switch between bar, line, and pie charts. In the graph, you can see the comparison of the planned shifts by employees. Only, the employees, that have at least one planned shift are shown. Click on the employee's name above the graph to add/remove him/her from the graph.

Timetables Printing
Employees can rely on each other timetable to plan their own shifts. To make sure that colleagues know when their peer plans to work, it may be a good idea to share it or print it and put it on the wall somewhere in the office. This way, it simplifies the organization of the team works.
The tool allows generating a work schedule of a specified period that can be further printed. In the resulting file, you will see a table with employees and departments shown horizontally and the dates shown vertically. The shifts will be shown in squares highlighted with color and will contain their start and end times.
To generate and download a timetable for further sharing and/or printing:
1. Open the app Employees
2. In the systray click Timetables > Print Work Schedule
3. In the pop-up window choose the period for which shifts should be included (up to 31 days)
4. Choose the timezone in which shifts should be shown
5. Optionally, choose the departments or/and separate employees to see only relevant shifts in the timetable. You can choose to include the related child's departments and/or employees without departments by enabling the related option (the related lines will appear upon choosing a department)
6. Optionally, choose the contexts, the related shifts of which should be included in the table. For example, print only the shifts with the context 'Distant' to see when the employees will work remotely
7. In case you work in a multi-company environment, you can choose the company/companies that should be included in the timetable. This way, you can print separate timetables for each company to see only the related shifts
8. In the tab appearance, you will be able to choose the report's title and its appearance. The field 'Report title' is dynamic and includes the line 'Work schedule' and chosen dates, however, you can change that or introduce your own title. You can also choose to show days and/or employees without shifts, show departments, context colors, context icons, and cross for empty cells
9. When you are ready, you can click 'Print' to start downloading instantly, or you can click 'Print and save as default' to start downloading, and save the layout. This way, there will be no need, to select the filters and set the appearance, the next time you print the timetables.
The layout of the printable timetable is configurable: for example, you can make it A3 or A4, and add or remove a company logo. To change the layout of the printable form:
1. Go to the Employees app's configurations and find the section Flexible Timetables and Shifts
2. Find the setting 'Work Schedule Document Layout'
3. Choose one of the existing company's layouts or create a new one by writing its reference and choosing the option 'Create' or 'Create and Edit'
4. Introduce the changes and click 'Save'.
Below the setting, you will find three buttons to edit the report itself, the report's layout, and the paper format. This way, the module provides a set of features to flexibly adjust and personalize the report's view according to the company's needs.

HR Control: Attendances and Approval
The module provides the tools for managers to control shift creation and attendance. It is possible to track the total number of hours spent working and compare those with the planned ones. Optionally, you can turn on the timetable approval process to make sure that the timetable corresponds to the company's requirements.
In order to track the number of working hours and compare them with the planned ones, the app extends the standard functionality of the Odoo standard module "Attendance". Now, as a user checks in/checks out the tool records the time and shows it in the employee's timetables. This way, HR administrators will be able to supervise shift fulfillment right in employees' timetables in the field 'Total signed'.
To learn what an employee plans to do on a certain shift, you can turn on the attendance contexts in configurations. This way, a worker will be able to choose the context of the shift, which can refer to a place of work or a certain assignment. Those are the same contexts, that the users choose while planning shifts. The list of contexts should be created beforehand.
Managers have the access to the employees' timetables. Unlike ordinary employees, they see the fields 'Signs', 'Total signed', and 'Overload' and, therefore, can control the weekly fulfillment and make related decisions, such as giving a bonus payment in case of overload.
Below the timetable, there is a standard messages thread, where superiors and subordinates might discuss any scheduling issues and set up activities. This way, all discussions are kept handy and can be referred to at any time.
Optionally, you can turn on the approval process to force users to get a confirmation for their shifts. Then, after planning shifts, an employee should send a weekly timetable to their department manager for confirmation. This is especially useful in case the company has certain restrictions or requirements to the schedule of employees.
The approval workflow for timetables is based on the states' updates. As soon as a timetable status is updated department managers and any HR administrators subscribed for this employee 'Timetables and shifts' subtype would get a notification.
The received timetable can be either confirmed or refused with the help of the related buttons. The decision principles are fully up to the company.
As a weekly timetable is sent for approval or has been already approved, ordinary employees cannot any more update shifts for that week. In this way, team collaboration becomes much more predictable and might be planned beforehand.
Attendances Control
In order to track the number of working hours and compare them with the planned ones, the app extends the standard functionality of the module "Attendance". As an employee starts working he/she needs to check in and then check out upon finishing. The time of work is recorded by the app and added to the timetable.
Both employees and managers have the access to the resulting timetable. However, they see the timetable differently. Unlike ordinary employees, managers see the fields 'Signs', 'Total signed', and 'Overload'. This way, department managers and users with the access group 'HR administrators' will be able not only to see the planned shifts but also to control their fulfillment: when a user actually checked in and out, how much work time is planned, how much is actually spent, and what calculated overload is.
Based on this information, some managerial decisions can be made. For example, if an employee deserves a bonus based on the overload or if certain types of work are more effective (based on contexts).
Below the timetable, there is a standard messages thread, where superiors and subordinates might discuss any scheduling issues, and questions and set up activities. This way, all discussions are kept handy and can be referred to at any time. For example, an employee may inform certain colleagues (with the help of the standard Odoo tags '@'), that his/her schedule is ready and that they can refer to it to plan the team work.
In the timetable, the shifts are divided based on the chosen context. With the help of the contexts, superiors and colleagues can learn what an employee plans to do on a certain shift or from where he/she is planning to work. The list of contexts is not predefined and is completely up to you. This way, you can introduce the list of options that is specific to your company.
The context of the shift can be chosen both while planning and while checking in through the Attendances module (if the attendance kiosk context is enabled).
To allow employees to choose a context while checking in:
1. Go to the configuration page of the module Employees' and scroll down to the section 'Flexible Timetables and Shifts'
2. Enable the option 'Attendance Kiosk Context'.
3. Click 'Save'.
If the feature is enabled, a worker will be forced to choose the context of the shift while checking in. Upon coming to work a user should open the app 'Attendances' and click the button 'Check in'. Then, he will be asked to choose one of the contexts out of the list of available ones.
In case, an employee has chosen one context while planning and then another one while checking in, the second one will be shown in the timetable. For example, Anita Oliver planned to work from the office on Monday and chose the context 'Office', but then changed her mind and decided to work from home and chose the context 'Distant' while checking in. In the table, the context 'Distant' was shown.
In case the feature 'Attendance Kiosk Context' is disabled, a user will not be asked to choose the context. The context, that was set as the default one will be applied automatically, even if another context was chosen upon planning the shift.
To manage the list of existing contexts and introduce some new ones, click 'Set up timetables contexts' (see Shift Planning).
Optional Managerial Approval
The tool presents an approval system to make sure that the shifts' planning corresponds to the company's goals and requirements. For example, to boost team work, you can make sure that certain employees and teams will be working at the same time. Also, this way, you can make sure, that the employees' timetables will be planned beforehand and not at the last moment.
The approval workflow for timetables is based on the states' updates. The available statuses are Planning > To approve > Approved. This way, after planning shifts, an employee will be able to send a weekly timetable to their department manager for further confirmation. The shifts related to the timetables in the statuses 'To approve' and 'Approved' can no longer be updated by ordinary employees.
To turn on the feature, in the settings of the Employees module, scroll down to the section 'Flexible Timetables and Shifts' and enable the option 'Shifts Approval'. After that, on the timetable form, in the top left corner, the employees will see the button 'Send for Approval' and the managers will see the buttons 'Approve' and 'Refuse'. In the top left corner, the stages of the timetable will be shown.
In case of refusal or any other questions, it might be a good idea to use the messages thread below the timetable. This way, an employee may inform the superiors, why he/she cannot attend on a certain day, and the superiors can give comments on the timetable and suggest some options. A change in the timetable's status will be also shown in the messages thread below the timetable.
When an employee finishes planning shifts, he/she can send a timetable for approval. For that, an employee should simply click the button 'Send for approval'. Then, the timetable will change its status to 'To approve' and managers will be notified if configured.
Then, managers or any users with the right 'HR Administrator' may confirm or refuse the shift schedule. To confirm the timetable click the button 'Approve' in the top right corner. To decline the timetable click the button 'Refuse'.
In case the timetable is refused, it is returned to the status 'Planning'. And an employee can edit the working time in the shifts menu and then, when ready, send it for approval again.
In case the timetable is confirmed, its status is changed to 'Approved'. After that, ordinary employees can no longer update shifts for that week. In this way, team collaboration becomes much more predictable and might be planned beforehand.

When a timetable state is updated, notifications might be sent. For that, the module uses the standard Odoo notifications. This way, the Department managers and any HR administrators can be notified about a timetable being updated. To be notified, those managers should be subscribed to the related employee and the 'Timetables and shifts' option of subscription subtypes should be chosen.
To edit the subscription options, click on the 'Pencil' button by the follower and tick all the options when a user should be notified.
Configurations
Flexible Timetables and Shifts has its own section on the Employees module's configuration page, where you can turn on and off some features and make necessary changes to make your work convenient.
Contexts: configure timetable contexts to analyze planned working time and attendance (see Shift Planning).
Attendance Kiosk Context: let users choose a context while starting attendance in kiosk mode. Otherwise, the default context will be assigned (see HR Control: Attendances).
Gantt view for shifts: turn on to introduce the Odoo Enterprise Gantt view for shifts (see Flexible Timetables and Shifts: Gantt).
Next week's timetable notifications: notify users to prepare a schedule for the next week. You can choose the days when the notifications to prepare weekly timetables should be sent. Both the start and end indicate the days of the week preceding the timetable week. Take into account: notifications are sent only to Odoo-registered users whose employees have the checkbox 'Timetable notifications' flagged (see Notifying About Shifts).
Date format: define how the date should look like in the generated timetable. See the language settings for hints (see Shifts Planning).
Shifts Approval: turn on to introduce the timetable approval system, where shifts should be sent for confirmation to superiors or HR managers (see Optional Managerial Approval).
Work Schedule Document Layout: in which you can choose or create the layout for the work schedule printing. Use the buttons below to edit the report, its layout and paper format (see Timetables Printing).
Cron Job 'To create timetable': define when and how frequently to check the necessity to create new timetables (see Notifying About Shifts).
Cron Job 'Being late': define when and how frequently to notify users of being late (see Notifying About Shifts).

Some of the module's employee-specific settings are placed in the tab 'Work Information' on an Employee card.
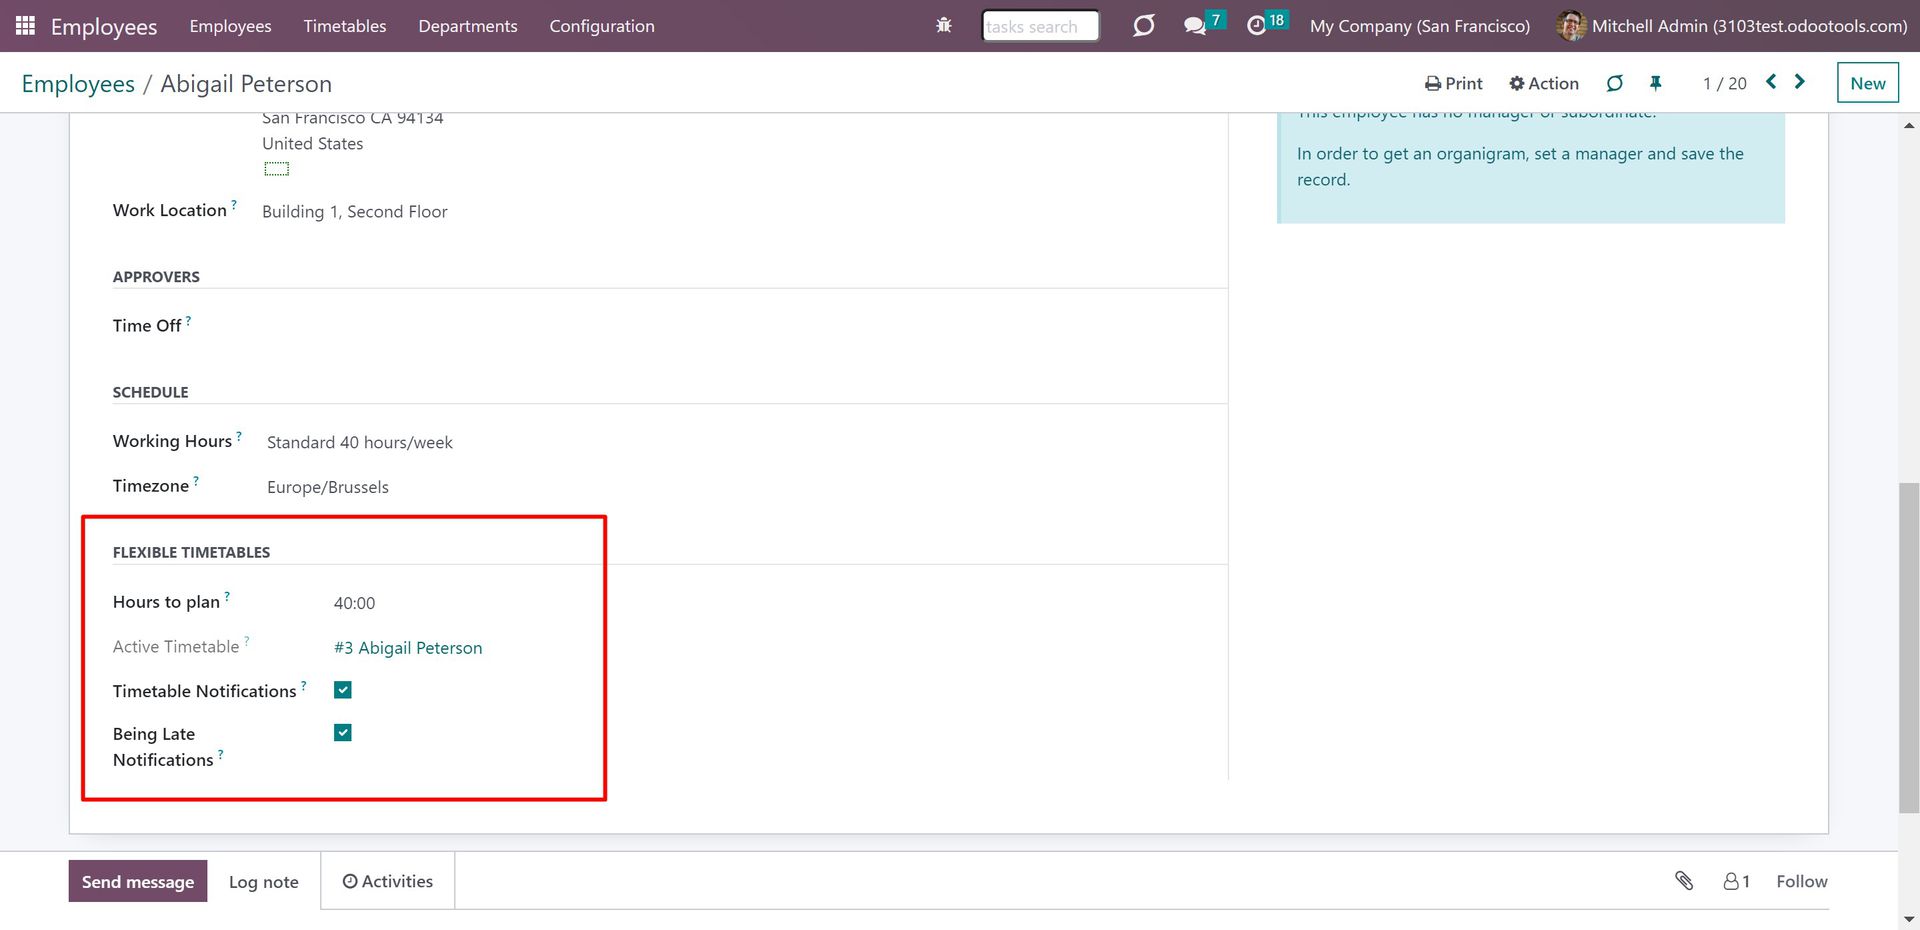
Hours to plan: specify the number of hours that a person should plan per week. The total planned and signed hours in the timetable will be compared to this number.
Timetable Notifications: enable the option, if a user should be regularly reminded to create a new shift schedule for the forthcoming week. It is also required to set the 'Next week's timetable notifications' in configurations (see Notifying About Shifts).
Being Late Notifications: enable the option, if a user should be notified in case of being late to check in for the shift (see Notifying About Shifts).
Flexible Timetables and Shifts: Gantt
Flexible Timetables and Shifts: Gantt - is an optional add-on that introduces the Gantt view for shifts. The add-on requires the Enterprise license of Odoo. With the help of the add-on, you will be able to see, create, and control shifts in the familiar well-known interface.
To turn on the features of the module, make sure, that the option 'Gantt view for shifts' is enabled in Configurations of the module Employees, section 'Flexible Timetables and Shifts'.
As you open the shifts menu, in the top right corner above the calendar, you will find the buttons to switch between the shifts views. Click on the second button () to switch to the Gantt view. Here you will be able to see all planned shifts, switch between the daily, weekly, monthly, and yearly calendar view, search, filter, and group the shifts to find the required ones quickly.
From the Gantt view, by default, you see the employees on the vertical scale and the dates/days/time on the horizontal scale. You can select various searching and filtering criteria to limit the number of shown shifts. For example, show only your own or subordinates' shifts.
Apply various grouping options to change or create different hierarchies of groupings by clicking on several options one by one. To reset the grouping, just click on the cross by it in the search bar. For example, click on the options department, then the option employee and context.
Instantly access information about any shift by hovering over it. To view the shift, just click on it in the calendar. There you will be able to see the details of the shift, change its time/user/company/context, and add notes.
To add a new shift, just click on the plus icon, which appears as you hover over any time/day slot.
Change the day/time of the shift simply by drag&dropping it.
To delete a shift, just open any shift by clicking on it, push the button 'Remove', and confirm your choice.

About Flexible Timetables and Shifts
The app introduces the innovative work calendar where users create shifts just by choosing a period and update those by merely dragging a card. A minute to plan a whole week. As flexible as needed.
Employees can access each other shifts calendar. The working schedule can be also printed to be physically stuck in the office. Thus, users always know where and when their colleagues are available.
Find a specific user shift using the built-in calendar filters by employee, department, context, or company. Analyze a single user or the whole team. Control shifts on the Odoo Enterprise Gantt view.
Shifts are auto-combined into weekly timetables from Monday to Sunday. There, employees check themselves while HR managers control the correctness and completeness of plans.
Based on the Odoo attendance features, HR administrators supervise shift fulfillment right in employees' timetables. Turn on the approval option also to force users to get a confirmation for their shifts.
For both attendance and planned shifts, users may be asked to choose a context. The list is up to you: 'distant', 'office central', 'office west', and so on. The features let us quickly understand where or why employees work.
Configure Odoo to remind employees to plan shifts for the next week. Notify users of being late if they have not checked in but were previously planning to work.
The tool fully supports multi-timezones and multi-companies environments. Perfect for geographically distributed teams where cooperation becomes really crucial.
Comfortable shifts planning
HR control
Team collaboration
Timetable reminders
Shifts Planning
All internal users that have a related employee assigned can create and manage their own shifts. The app's key idea is that employees may independently and flexibly plan shifts for the next or a few next weeks.
For that, the module introduces a special interface with various view types, where an employee can choose the most convenient way to see and navigate around shifts (see Team Collaboration & Interfaces).
To plan a shift:
1. Open the app Employees
2. Find the tab 'Timetables' in the systray and click 'Shifts'
3. In the calendar, click and hold down the left mouse button to select the working hours
4. In the pop-up window you can change the chosen time, user, and company, choose the shift's context, and add notes
5. Click 'Save&Close'.
After that, you will see the related shift in the calendar on the chosen timeline.
In case you want to change the shift's hours, you can do that in two ways: simply by dragging & dropping the shift to another day/time or by editing a shift in the field 'Time'. For example, Mitchell Admin planned a shift for Monday from 9 am to 12 pm. But then decided, that he will not be able to come so early, he drags & drops the shift lower to the timeline 10:30 am to 13:30.
This way a user can plan his/her shifts for the next week or several weeks. As a user adds a shift, he/she may be asked to choose a context. So, it will be possible to find out what the worker plans to do on a particular day, or from what place he/she plans to work. The list of contexts is completely up to you. For example, you can create contexts that reflect the workplaces: 'distant', 'office central', 'office west', and so on. To create a context:
1. Open the Employees' app's settings and find the section 'Flexible Timetables and Shifts'
2. Click on the button 'Set up timetable contexts'
3. Click 'New'
4. Introduce the context's name
5. Optionally, type the reference to the related icon
6. Tick the box 'Default', if you want this context to be chosen by default. The user will still be able to choose a different option. While signing in through the attendance, if the possibility to choose the context is disabled, the default context will be assigned
7. Tick the box 'Do not show if empty', to hide the context from the timetable, if there aren't any shifts with this context.
Planned shifts are automatically combined in weekly timetables from Monday to Sunday, regardless of the chosen start day in the language settings. It is done this way, to make sure, that the companies with employees from different locations (where the first day of the week may differ) could have a mutual timetables system. Each employee has his/her own timetable for the week generated as soon as at least one shift for the week is planned.
The timetable allows employees to check themselves for sufficient planning. They can see the total planned number of hours and the number of hours that should be planned. For example, Anita Oliver planned 4 shifts and saw in the timetable that she has to plan 4 more hours, as she has 40 hours to plan weekly. So, she planned a 4-hour shift for the fifth day. The hours to plan are set in the Employee's settings (see Configurations). The setting does not limit the number of shifts an employee can plan per week.
The timetable can be reused as a template and therefore reduce the time spent on planning. For example, if Anita Oliver liked how she planned the shifts for the current week, she can save the timetable as a template and use it to generate the shifts for the several forthcoming weeks (see Shift Planning Based on a Template).
Managers can refer to the timetable to control shifts' fulfillment. The tool relies on the Odoo attendance functionality to sign the planned shifts. As a user comes to work, he/she checks in in the Attendance app and checks out upon finishing work. Then, the actual working time is recorded and can be compared with the planned time. This way, the HR managers can control whether an employee actually attended during the planned time (see HR Control: Attendances).
Optionally, turn on the approval process, so the timetables would require being approved. This way, managers or any user with the right 'HR Administrator' may confirm (the button 'Approve') or refuse (the button 'Refuse') the shift schedule. The decision principles are fully up to you. This way, you can make sure, that the employee schedule fully reflects the company's policy (see Optional Managerial Approval).
Below the weekly timetable, you will find a standard Odoo messages thread, where superiors and subordinates might discuss any scheduling issues and set up activities.
To remind users about the necessity to plan shifts for the forthcoming weeks, set the notifications, that will be sent on all chosen weekdays prior to the target week. This way, the employees will finish planning beforehand and managers will not spend time reminding them about it (see Notifying About Shifts).
In the generated timetable, it is possible to change the name. For that, just start editing a timetable and in the field 'Reference' introduce the new name.
You can choose how the dates are displayed in the timetable according to your location. For example, set if the day or the month should go first to avoid confusion. All employees will see the date in the set format. You can apply the date format in the Employees app settings, in the section 'Flexible Timetables and Shifts', field 'Date Format'. The date is set with the help of symbols, the meaning of which can be seen in the language settings.
In the tab 'Timetable', switch between the time zones to see the shifts in the convenient one. Click the button "Export" in the top right corner above the table to download the timetable as an Excel table. It will be exported in the currently chosen time zone. This way, employees from different countries can easily find out the most suitable time to interact with each other.
The timetable interface groups shift by working contexts. It makes analysis much more comfortable and allows making corrections in time. For example, if you had certain restrictions on the number of hours for the 'distant work', here it is under full control.
The currently active timetable of a user, the timetable related to the current week, can be seen in the field 'Active Timetable', on the Employee's card in the tab 'Work Information'.
Shift Planning Based on a Template
When the schedule of an employee is more or less similar from week to week it might be a good idea to use one of the previous weeks to plan the next week(s). The module allows saving any timetable as a template, so the employees can re-use the same schedule for other weeks. This way, shift planning can be significantly simplified.
To make a timetable a template:
1. Open the Employees app and click the button Timetables > Timetables in the systray
2. Open any timetable
3. Click on the button 'Set as Template' in the top right corner
After that, the timetable will be available for the selection as you generate shifts for another week for the related-to-the-template user. The name of the timetable will be used as a template's name, but you can still change it. For example, change "#4 Mitchell Admin" to "Standard Shifts #4 Mitchell Admin".
When you no longer need a certain template, just click on the button 'Not a Template' in the top right corner of a related timetable.
To generate shifts for oneself:
1. Open the Employees app and click the button Timetables > Timetables in the systray
2. Click 'Generate'
3. In the pop-up window choose one of the templates. You can click on the icon on the right side of the chosen template, to open it. This way, you can make sure, that you have chosen the right template
4. In the field 'Period' choose the dates for which the new timetable will be generated
5. Click 'Generate'.
For example, our employee Anita Oliver has planned her shifts for a week, she has found that time very convenient, so used the week as a template to generate 2 more for further weeks. Then, she removed the timetable from the templates.
Managers can also generate shifts for an employee based on a template. The process is similar to generating shifts for oneself, but they also should choose the related employee in the field 'Employee'. As they choose a template, only the templates related to the currently chosen employee are shown. This way, only the relevant options are shown.
Keep in mind, that it isn't possible to use the timetable of one employee as a template to generate shifts for another employee
Notifying About Shifts
The tool introduces a number of notifications to make sure timetables are prepared in time and fulfilled. In particular, you can remind employees to plan shifts for the next week and notify users of being late.
To remind employees to plan shifts/prepare weekly timetable:
1. Open the configurations of the Employee's app and scroll down to the section 'Flexible Timetables and Shifts'
2. In the field 'Notification start' choose the day when the notifications with a reminder to plan shifts for the forthcoming week will start being sent
3. In the field 'Notifications end' define the end day of the week, after which the notifications with a reminder to plan shifts for the forthcoming week will stop being sent
4. Click 'Save'
5. In the employee's settings, tab 'Work Information', section 'Flexible Timetables' tick the checkbox 'Timetable notifications'.
Take into account: notifications are sent only to Odoo-registered users whose employees have the checkbox 'Timetable notifications' ticked.
The reminder is based on the scheduled job 'To create timetable', you can change the frequency of the checks in the developer mode, General Settings > Technical > Scheduled jobs.
For example, you can set to send reminders from Thursday to Friday, so the employees didn't forget to plan shifts for the next week before the weekend.
The module relies on the Odoo attendance functionality to sign the planned shifts. As a user comes to work, he/she checks in in the Attendance app and checks out upon finishing work (see HR Control: Attendances).
In case a user planned a shift, but didn't check in at that time, it may be a good idea to send a notification to such a user, to remind him/her about the shift. Some users may forget about shifts on the regular basis. With the help of the module, you can choose certain users that should be notified about being late. To send being-late notifications to the user, tick the option 'Being Late Notifications' in the employee's settings.
Those types of notifications are sent by special emails with the help of the scheduled job 'Being Late'. You can change the frequency of the checks in the developer mode, General Settings > Technical > Scheduled jobs.
For example, Anita Oliver has planned a shift on Wednesday from 10 am to 18 pm. But didn't check in at 10 am. So, the notification was sent to her and she managed to come to work a little bit later, while she has just forgotten about the shift and was available at that time. This way, with the help of the being late notifications, we can make sure our employees will not forget about their shifts and, will be able to, at least, warn us about the reasons, so the company could undertake the related measures. For example, to reassign the client to another sales assistant.
Team Collaboration & Interfaces
The module provides the features that allow organizing collaborative work. Every user can access not only their own shifts but also colleagues' shifts with the context in the read-only mode. So, it is always clear when and from where (based on the context) the colleague is working on a particular day. This way, they can find out whether it is an appropriate time to contact the colleague.
The app supports multi companies. Users can access only their real colleagues' shifts. If a user has an employee in a few companies, then he/she can plan and control shifts in both, but the module will make sure there are no overlapping shifts. In this case, a separate timetable will be created in each company for this user for a related employee. For example, our user Anita Oliver relates to two companies Azure New York and Azure San Francisco. An employee is created for her in both companies. She plans to work in New York from Monday to Wednesday and in San Francisco on Friday and Saturday, so she assigns the related company while choosing the shifts. Two timetables are generated for her. In the first one, there are shifts related to the company Azure New York and in the second one shifts related to Azure San Francisco.
The interface of the module can be accessed through the Employees app. The button 'Timetables' that leads to the module's features is located in the systray. Go to Timetables > Shifts to open the menu to create and manage shifts.
As a user opens the shifts menu, he/she sees shifts on a weekly timetable. It is possible to switch between the daily, weekly, monthly, and yearly views in the top left corner. On the right navigation bar, you see a small calendar that allows quickly move to the required date. For that, just click on the day you want to see. Use arrows to see the previous/next month.
It is possible to find a specific user shift using the built-in calendar filters by employee, department, context, or company. Analyze a single user or the whole team. For example, you can find out when Anita Oliver is planning to work from the office, by filtering shifts by the employee Anita Oliver, and by the context "Office".
Above the calendar, in the top right corner, you will also find the Odoo standard omnibox to search by employee, manager, context, department, and user. To search, start typing the word and then choose the search option.
It is possible to save search parameters, to access the search result quickly. For that, apply one or several search parameters, click 'Favorites', choose 'Save current search', and type the search's name. Tick 'Use by default' if you want to see the shifts this way as you open the app, OR tick 'Share with all users', if you want other people to be able to see and apply these search parameters.
After that, you will be able to switch to this search quickly by clicking 'Favorites' and choosing it. For example, save the search by a particular department and manager.
In the module's interface, users can create shifts just by choosing a period and update those by merely dragging a shift's card. This way it may take just a minute to plan a whole week (see Shifts Planning).
You can access the main information of a shift right from the calendar. Simply click on a shift in the calendar to see its details. Click the 'Edit' button to change the starting or ending time, related user, context, or company.
To change the time of the shift, you can simply drag & drop it.
In case plans have changed and you want to remove the shift from the calendar, you can delete it. For that, click on the shift and then on the button 'Delete'.
The module allows seeing shifts in several different views. You can switch around those in the top right corner. The first view is the calendar one. It is the default view, in which the shifts are opened as you go to the menu 'Shifts'. Other available views are Gantt, List, Pivot, and Graph.
The Gantt view is available only in the Enterprise version of Odoo. It is introduced by the free extension Flexible Timetables and Shifts: Gantt (see Flexible Timetables and Shifts: Gantt).
If you switch to the List view, you will see all planned shifts in the form of the list. The following columns will be presented: date, employee, time, time end, context, and company. Click on the button 'New' to add another shift. Click on any shift to see its card and edit it.
In the Pivot view, you will see a table, where you can choose what columns and lines to include. Choose the measures 'Duration' or 'Worktime' to see the total number of planned hours. Choose the measure 'Count' to see the total number of planned shifts. For example, you can create a table with the total hours planned by each worker for various periods of time.
In the Graph view, you can switch between bar, line, and pie charts. In the graph, you can see the comparison of the planned shifts by employees. Only, the employees, that have at least one planned shift are shown. Click on the employee's name above the graph to add/remove him/her from the graph.
Timetables Printing
Employees can rely on each other timetable to plan their own shifts. To make sure that colleagues know when their peer plans to work, it may be a good idea to share it or print it and put it on the wall somewhere in the office. This way, it simplifies the organization of the team works.
The tool allows generating a work schedule of a specified period that can be further printed. In the resulting file, you will see a table with employees and departments shown horizontally and the dates shown vertically. The shifts will be shown in squares highlighted with color and will contain their start and end times.
To generate and download a timetable for further sharing and/or printing:
1. Open the app Employees
2. In the systray click Timetables > Print Work Schedule
3. In the pop-up window choose the period for which shifts should be included (up to 31 days)
4. Choose the timezone in which shifts should be shown
5. Optionally, choose the departments or/and separate employees to see only relevant shifts in the timetable. You can choose to include the related child's departments and/or employees without departments by enabling the related option (the related lines will appear upon choosing a department)
6. Optionally, choose the contexts, the related shifts of which should be included in the table. For example, print only the shifts with the context 'Distant' to see when the employees will work remotely
7. In case you work in a multi-company environment, you can choose the company/companies that should be included in the timetable. This way, you can print separate timetables for each company to see only the related shifts
8. In the tab appearance, you will be able to choose the report's title and its appearance. The field 'Report title' is dynamic and includes the line 'Work schedule' and chosen dates, however, you can change that or introduce your own title. You can also choose to show days and/or employees without shifts, show departments, context colors, context icons, and cross for empty cells
9. When you are ready, you can click 'Print' to start downloading instantly, or you can click 'Print and save as default' to start downloading, and save the layout. This way, there will be no need, to select the filters and set the appearance, the next time you print the timetables.
The layout of the printable timetable is configurable: for example, you can make it A3 or A4, and add or remove a company logo. To change the layout of the printable form:
1. Go to the Employees app's configurations and find the section Flexible Timetables and Shifts
2. Find the setting 'Work Schedule Document Layout'
3. Choose one of the existing company's layouts or create a new one by writing its reference and choosing the option 'Create' or 'Create and Edit'
4. Introduce the changes and click 'Save'.
Below the setting, you will find three buttons to edit the report itself, the report's layout, and the paper format. This way, the module provides a set of features to flexibly adjust and personalize the report's view according to the company's needs.
HR Control: Attendances and Approval
The module provides the tools for managers to control shift creation and attendance. It is possible to track the total number of hours spent working and compare those with the planned ones. Optionally, you can turn on the timetable approval process to make sure that the timetable corresponds to the company's requirements.
In order to track the number of working hours and compare them with the planned ones, the app extends the standard functionality of the Odoo standard module "Attendance". Now, as a user checks in/checks out the tool records the time and shows it in the employee's timetables. This way, HR administrators will be able to supervise shift fulfillment right in employees' timetables in the field 'Total signed'.
To learn what an employee plans to do on a certain shift, you can turn on the attendance contexts in configurations. This way, a worker will be able to choose the context of the shift, which can refer to a place of work or a certain assignment. Those are the same contexts, that the users choose while planning shifts. The list of contexts should be created beforehand.
Managers have the access to the employees' timetables. Unlike ordinary employees, they see the fields 'Signs', 'Total signed', and 'Overload' and, therefore, can control the weekly fulfillment and make related decisions, such as giving a bonus payment in case of overload.
Below the timetable, there is a standard messages thread, where superiors and subordinates might discuss any scheduling issues and set up activities. This way, all discussions are kept handy and can be referred to at any time.
Optionally, you can turn on the approval process to force users to get a confirmation for their shifts. Then, after planning shifts, an employee should send a weekly timetable to their department manager for confirmation. This is especially useful in case the company has certain restrictions or requirements to the schedule of employees.
The approval workflow for timetables is based on the states' updates. As soon as a timetable status is updated department managers and any HR administrators subscribed for this employee 'Timetables and shifts' subtype would get a notification.
The received timetable can be either confirmed or refused with the help of the related buttons. The decision principles are fully up to the company.
As a weekly timetable is sent for approval or has been already approved, ordinary employees cannot any more update shifts for that week. In this way, team collaboration becomes much more predictable and might be planned beforehand.
Attendances Control
In order to track the number of working hours and compare them with the planned ones, the app extends the standard functionality of the module "Attendance". As an employee starts working he/she needs to check in and then check out upon finishing. The time of work is recorded by the app and added to the timetable.
Both employees and managers have the access to the resulting timetable. However, they see the timetable differently. Unlike ordinary employees, managers see the fields 'Signs', 'Total signed', and 'Overload'. This way, department managers and users with the access group 'HR administrators' will be able not only to see the planned shifts but also to control their fulfillment: when a user actually checked in and out, how much work time is planned, how much is actually spent, and what calculated overload is.
Based on this information, some managerial decisions can be made. For example, if an employee deserves a bonus based on the overload or if certain types of work are more effective (based on contexts).
Below the timetable, there is a standard messages thread, where superiors and subordinates might discuss any scheduling issues, and questions and set up activities. This way, all discussions are kept handy and can be referred to at any time. For example, an employee may inform certain colleagues (with the help of the standard Odoo tags '@'), that his/her schedule is ready and that they can refer to it to plan the team work.
In the timetable, the shifts are divided based on the chosen context. With the help of the contexts, superiors and colleagues can learn what an employee plans to do on a certain shift or from where he/she is planning to work. The list of contexts is not predefined and is completely up to you. This way, you can introduce the list of options that is specific to your company.
The context of the shift can be chosen both while planning and while checking in through the Attendances module (if the attendance kiosk context is enabled).
To allow employees to choose a context while checking in:
1. Go to the configuration page of the module Employees' and scroll down to the section 'Flexible Timetables and Shifts'
2. Enable the option 'Attendance Kiosk Context'.
3. Click 'Save'.
If the feature is enabled, a worker will be forced to choose the context of the shift while checking in. Upon coming to work a user should open the app 'Attendances' and click the button 'Check in'. Then, he will be asked to choose one of the contexts out of the list of available ones.
In case, an employee has chosen one context while planning and then another one while checking in, the second one will be shown in the timetable. For example, Anita Oliver planned to work from the office on Monday and chose the context 'Office', but then changed her mind and decided to work from home and chose the context 'Distant' while checking in. In the table, the context 'Distant' was shown.
In case the feature 'Attendance Kiosk Context' is disabled, a user will not be asked to choose the context. The context, that was set as the default one will be applied automatically, even if another context was chosen upon planning the shift.
To manage the list of existing contexts and introduce some new ones, click 'Set up timetables contexts' (see Shift Planning).
Optional Managerial Approval
The tool presents an approval system to make sure that the shifts' planning corresponds to the company's goals and requirements. For example, to boost team work, you can make sure that certain employees and teams will be working at the same time. Also, this way, you can make sure, that the employees' timetables will be planned beforehand and not at the last moment.
The approval workflow for timetables is based on the states' updates. The available statuses are Planning > To approve > Approved. This way, after planning shifts, an employee will be able to send a weekly timetable to their department manager for further confirmation. The shifts related to the timetables in the statuses 'To approve' and 'Approved' can no longer be updated by ordinary employees.
To turn on the feature, in the settings of the Employees module, scroll down to the section 'Flexible Timetables and Shifts' and enable the option 'Shifts Approval'. After that, on the timetable form, in the top left corner, the employees will see the button 'Send for Approval' and the managers will see the buttons 'Approve' and 'Refuse'. In the top left corner, the stages of the timetable will be shown.
In case of refusal or any other questions, it might be a good idea to use the messages thread below the timetable. This way, an employee may inform the superiors, why he/she cannot attend on a certain day, and the superiors can give comments on the timetable and suggest some options. A change in the timetable's status will be also shown in the messages thread below the timetable.
When an employee finishes planning shifts, he/she can send a timetable for approval. For that, an employee should simply click the button 'Send for approval'. Then, the timetable will change its status to 'To approve' and managers will be notified if configured.
Then, managers or any users with the right 'HR Administrator' may confirm or refuse the shift schedule. To confirm the timetable click the button 'Approve' in the top right corner. To decline the timetable click the button 'Refuse'.
In case the timetable is refused, it is returned to the status 'Planning'. And an employee can edit the working time in the shifts menu and then, when ready, send it for approval again.
In case the timetable is confirmed, its status is changed to 'Approved'. After that, ordinary employees can no longer update shifts for that week. In this way, team collaboration becomes much more predictable and might be planned beforehand.
When a timetable state is updated, notifications might be sent. For that, the module uses the standard Odoo notifications. This way, the Department managers and any HR administrators can be notified about a timetable being updated. To be notified, those managers should be subscribed to the related employee and the 'Timetables and shifts' option of subscription subtypes should be chosen.
To edit the subscription options, click on the 'Pencil' button by the follower and tick all the options when a user should be notified.
Configurations
Flexible Timetables and Shifts has its own section on the Employees module's configuration page, where you can turn on and off some features and make necessary changes to make your work convenient.
Contexts: configure timetable contexts to analyze planned working time and attendance (see Shift Planning).
Attendance Kiosk Context: let users choose a context while starting attendance in kiosk mode. Otherwise, the default context will be assigned (see HR Control: Attendances).
Gantt view for shifts: turn on to introduce the Odoo Enterprise Gantt view for shifts (see Flexible Timetables and Shifts: Gantt).
Next week's timetable notifications: notify users to prepare a schedule for the next week. You can choose the days when the notifications to prepare weekly timetables should be sent. Both the start and end indicate the days of the week preceding the timetable week. Take into account: notifications are sent only to Odoo-registered users whose employees have the checkbox 'Timetable notifications' flagged (see Notifying About Shifts).
Date format: define how the date should look like in the generated timetable. See the language settings for hints (see Shifts Planning).
Shifts Approval: turn on to introduce the timetable approval system, where shifts should be sent for confirmation to superiors or HR managers (see Optional Managerial Approval).
Work Schedule Document Layout: in which you can choose or create the layout for the work schedule printing. Use the buttons below to edit the report, its layout and paper format (see Timetables Printing).
Cron Job 'To create timetable': define when and how frequently to check the necessity to create new timetables (see Notifying About Shifts).
Cron Job 'Being late': define when and how frequently to notify users of being late (see Notifying About Shifts).
Some of the module's employee-specific settings are placed in the tab 'Work Information' on an Employee card.
Hours to plan: specify the number of hours that a person should plan per week. The total planned and signed hours in the timetable will be compared to this number.
Timetable Notifications: enable the option, if a user should be regularly reminded to create a new shift schedule for the forthcoming week. It is also required to set the 'Next week's timetable notifications' in configurations (see Notifying About Shifts).
Being Late Notifications: enable the option, if a user should be notified in case of being late to check in for the shift (see Notifying About Shifts).
Flexible Timetables and Shifts: Gantt
Flexible Timetables and Shifts: Gantt - is an optional add-on that introduces the Gantt view for shifts. The add-on requires the Enterprise license of Odoo. With the help of the add-on, you will be able to see, create, and control shifts in the familiar well-known interface.
To turn on the features of the module, make sure, that the option 'Gantt view for shifts' is enabled in Configurations of the module Employees, section 'Flexible Timetables and Shifts'.
As you open the shifts menu, in the top right corner above the calendar, you will find the buttons to switch between the shifts views. Click on the second button () to switch to the Gantt view. Here you will be able to see all planned shifts, switch between the daily, weekly, monthly, and yearly calendar view, search, filter, and group the shifts to find the required ones quickly.
From the Gantt view, by default, you see the employees on the vertical scale and the dates/days/time on the horizontal scale. You can select various searching and filtering criteria to limit the number of shown shifts. For example, show only your own or subordinates' shifts.
Apply various grouping options to change or create different hierarchies of groupings by clicking on several options one by one. To reset the grouping, just click on the cross by it in the search bar. For example, click on the options department, then the option employee and context.
Instantly access information about any shift by hovering over it. To view the shift, just click on it in the calendar. There you will be able to see the details of the shift, change its time/user/company/context, and add notes.
To add a new shift, just click on the plus icon, which appears as you hover over any time/day slot.
Change the day/time of the shift simply by drag&dropping it.
To delete a shift, just open any shift by clicking on it, push the button 'Remove', and confirm your choice.