About Sale Order Approval Check Lists
Sale Order Check List and Approval Process is an Odoo app that provides a checklist for each sale order state to control requirements' fulfillment and ensure that responsible users fully approve each action. Choose states to assign various checklists and prepare any number of checkpoints for each stage. Check the fulfillment progress on the sale order and quotation kanban and form views.
The checklist should be fully confirmed to move a sale order forward to the next stage. Or, to avoid moving restrictions (e.g., moving from 'Won' to the further stages as 'Won Archived' might not require approving any statements), don't add checklist points to some states.
Checklist actions are saved in history. If a sale order is moved between stages, already-done check items will be recovered. To avoid this behavior, enable the 'Not Saved' setting. The option is assigned for each checklist point separately.
The app allows you to assign security groups for each checklist point, and only users from those groups can confirm related items. You can also assign a person to be a 'Sale Order Checklists Super User'.
Stage and team-specific Sale Order checklist
Multiply Sale Order checklist roles
Checklist fulfillment process
Approval history
Configuring Sale Order Approval Check Lists
Checklists are defined for each sales team to enable reflection of various workflows based on the applied sales typology. Sales managers specify what and in what order the state should be done and approved. The number of checkpoints is unlimited, might reflect custom stages, and is as unique as you want. A checklist is automatically prepared when a sales order has an assigned team and gets its state updated.
The checklist is added for each team separately. To add a checklist to a particular sales team:
1. Go to the Sales app
2. Click Configuration > Sales Teams
3. Choose a team
4. Click on the tab 'Checklist'
5. Click 'Add a line' and choose an order's state
6. In the next column, write what should be done at this stage
7. Add some notes to the checkpoint. The note will be shown as a user hovers over the checklist point
8. Choose responsible user groups or leave the field empty, so all users with access to a sale order will be able to confirm the checklist point (see User Roles)
9. Put a tick in the box 'Not saved', to avoid saving the done checklist points, if the order stage was changed and then returned to this state
10. Choose the point's color
11. Choose the stages that don't require completing a checklist.
Approving process
Each checklist represents a set of checkpoints, which should be ticked to move a sale order to the next stage. A checklist is formed automatically as the sale order is created. In the checklist tab of a sale order, you see only the checkpoints that relate to the current stage.
A checkpoint is a written task on the checklist that should be marked done at a particular stage to move the sale order to the next stage. For example, in the 'New' stage of a sale order, there might be checkpoints 'Check client's details' and 'Call to confirm the purchase' which should be completed by the person responsible. The responsible individuals for checkpoint completion may be all employees or specific user groups.
You can move a sale order forward to the next state and back to a prior one. For example, the quotation was created, the checklist filled, and after that, the quotation was sent to a client. Therefore, the sale order moved from the stage 'Quotation' to the stage 'Quotation sent' and a new checklist was assigned.
AFor instance, when moving to a prior stage, the quotation was sent, and the order was moved to the 'Sale order' stage. However, the sale order was canceled after a client requested changes, and the order was returned to the 'Quotation' stage. Therefore, the checklist was recovered. However, there might be a need to revise some of the checklist points to make sure everything is up-to-date. In this case, it might be useful to avoid saving some of the checklist points. For that, enable the setting 'Not Saved' (see Approval history).
To move a sale order to a new stage, a salesperson must enter all confirmation points and obtain approval for those they are not authorized to confirm. As you mark checkpoints on the order's form, you will see the progress in percent above the checklist.
To mark a checkpoint as done:
1. Open a sale order
2. In the 'Checklist' tab, put a tick by a completed checkpoint.
If the checklist is not completed, a user cannot proceed with the sale order to the next stage. To move a sale order forward, its checklist should be fully confirmed. Otherwise, you would see the 'Validation error', which states that not all the checklist points are confirmed.
It is impossible to mark a checkpoint done if it is assigned to other user groups. In this case, a warning appears. The warning states the checkpoint, which cannot be confirmed (see User Roles).
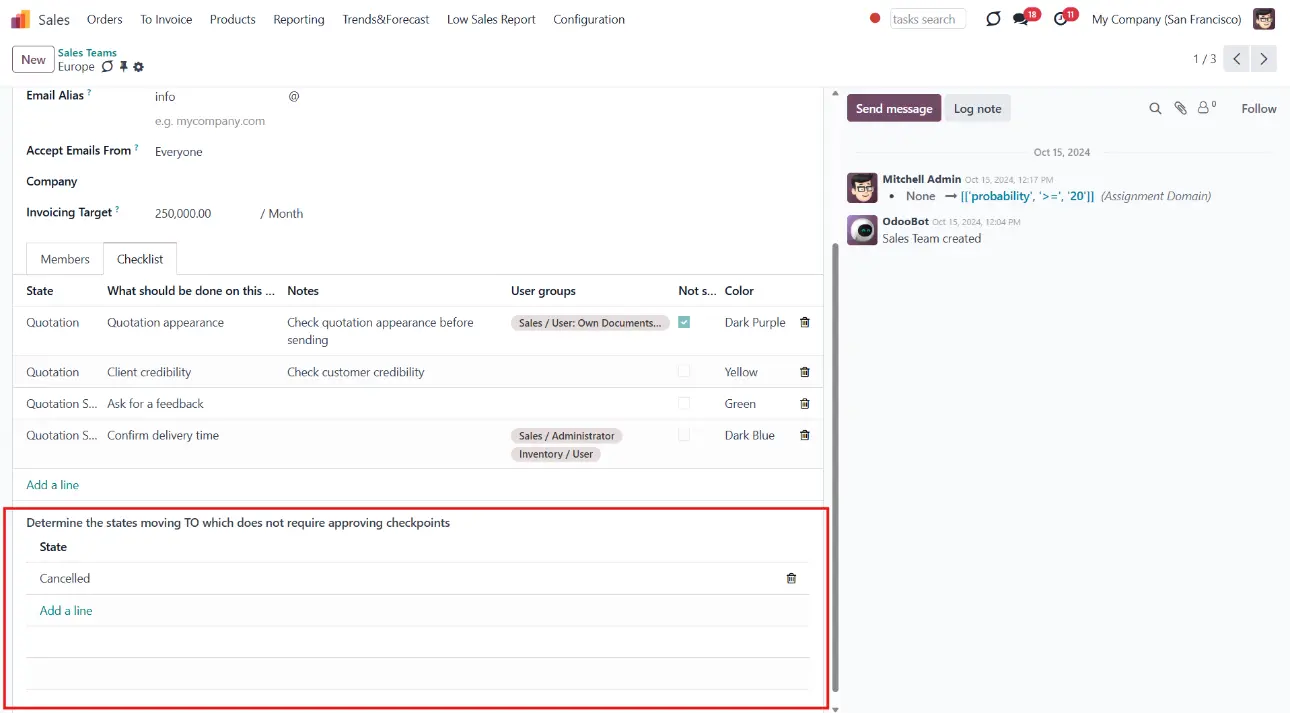
You can identify certain stages at which a sales order can be moved without completing the checklist. For that, find the section 'Determine the states moving to which do not require approving checkpoints' below the checklist as you edit the sales team. For example, you can let employees move a sale order to the 'Cancelled' stage, as there is no need to complete checklist points when the sale order is no longer active.
Interfaces
You can track the checklist progress of all sales orders from the quotations and orders list view.
To see the checklist in the sales order form:
1. Open any sale order
2. Click on the tab 'Checklist'.
There, you can see all the checkpoints for this stage and the completion progress. The completion progress is automatically calculated. Also, you can see how much is already done in percentages.
To mark a checkpoint as done, tick the box near the required item. The completed checkpoints are marked in green.
Not yet done checkpoints are shown right on the tree of sale orders and quotations. You can distinguish those by color and can always search for them by keywords. To search among the checklist, choose the option 'Checklist To-Do:' as you type in the search bar.
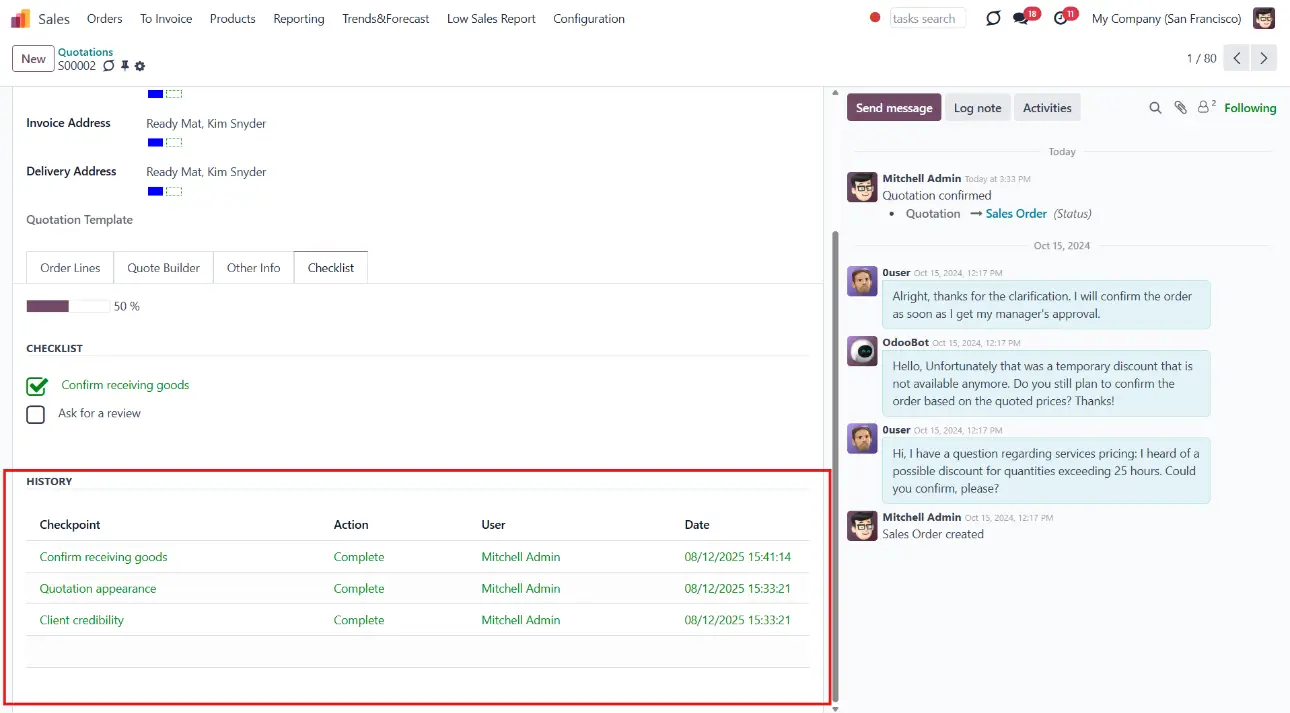
Approval history
See the history of approval on the sale order form. There, you can find out who and when marked a particular checklist point, and whether any of such approvals were reset. In such a way, it is always possible to control user actions and, if needed, ask for an explanation. For example, if a checkpoint 'Pass the documents to the accountant' is marked done, but the accountant has not received anything. You can open the history to see who and when it was marked as done, helping you understand the situation.
It is beneficial because there are things that should be checked regularly, as well as those that should be changed only once. If a sale order is moved between stages, check items that are already done by default and ensure they are marked done again. To avoid this behavior, turn off the setting 'Not Saved'. The option is assigned for each checklist point separately.
For example, a client's purchase details might be checked regularly, and signing the terms of the agreement or confirming the payment method should be done only once.
To turn on the recovery of a checklist point:
1. Go to Configuration > Sales Teams
2. Choose a Sales Team
3. Open the tab 'Checklist'
4. Make sure that the option 'Not Saved' in the related column is disabled (isn't ticked) by the checkpoints you want to save.
User Roles
Access to mark the checkpoints can be given to various user groups.
To choose the responsible-for-a-checkpoint groups of users:
1. Start editing a Sales Team
2. In the field 'User groups', choose all user groups that will have the right to mark the point done.
Each point can be available for more than one user group. If the field is left empty, then any user with access to the sale order can mark the checkpoint.
Here are some examples of the assigned-per-checkpoint user groups:
1. 'Approve linked contract' User groups: Sales manager
2. 'Check the details' User groups: Sales/User: all documents and Sales/User: Own Documents only
3. 'Create invoice' User groups: Accountant
4. 'Confirm receiving the documents' User groups: Accountant
5. 'Send confirmation to the client' User groups: empty
Simultaneously, there is the special role 'Sale Order Checklists Super User' which allows overcoming the restrictions. It is possible to assign the super checklist access level to any responsible employee. A user with such rights would be able to change a sale order state without approving the checklist and confirming any checkpoint, disregarding security restrictions.
To assign a user the 'Sale Order Checklists Super User':
1. Go to General Settings > Manage users
2. Choose a user
3. Scroll down to the section 'Sales' and find the field 'Sale Checklist'
4. Choose the option 'Sale Order Checklists Super User'.

About Sale Order Approval Check Lists
Sale Order Check List and Approval Process is an Odoo app that provides a checklist for each sale order state to control requirements' fulfillment and ensure that responsible users fully approve each action. Choose states to assign various checklists and prepare any number of checkpoints for each stage. Check the fulfillment progress on the sale order and quotation kanban and form views.
The checklist should be fully confirmed to move a sale order forward to the next stage. Or, to avoid moving restrictions (e.g., moving from 'Won' to the further stages as 'Won Archived' might not require approving any statements), don't add checklist points to some states.
Checklist actions are saved in history. If a sale order is moved between stages, already-done check items will be recovered. To avoid this behavior, enable the 'Not Saved' setting. The option is assigned for each checklist point separately.
The app allows you to assign security groups for each checklist point, and only users from those groups can confirm related items. You can also assign a person to be a 'Sale Order Checklists Super User'.
Stage and team-specific Sale Order checklist
Multiply Sale Order checklist roles
Checklist fulfillment process
Approval history
Configuring Sale Order Approval Check Lists
Checklists are defined for each sales team to enable reflection of various workflows based on the applied sales typology. Sales managers specify what and in what order the state should be done and approved. The number of checkpoints is unlimited, might reflect custom stages, and is as unique as you want. A checklist is automatically prepared when a sales order has an assigned team and gets its state updated.
The checklist is added for each team separately. To add a checklist to a particular sales team:
1. Go to the Sales app
2. Click Configuration > Sales Teams
3. Choose a team
4. Click on the tab 'Checklist'
5. Click 'Add a line' and choose an order's state
6. In the next column, write what should be done at this stage
7. Add some notes to the checkpoint. The note will be shown as a user hovers over the checklist point
8. Choose responsible user groups or leave the field empty, so all users with access to a sale order will be able to confirm the checklist point (see User Roles)
9. Put a tick in the box 'Not saved', to avoid saving the done checklist points, if the order stage was changed and then returned to this state
10. Choose the point's color
11. Choose the stages that don't require completing a checklist.
Approving process
Each checklist represents a set of checkpoints, which should be ticked to move a sale order to the next stage. A checklist is formed automatically as the sale order is created. In the checklist tab of a sale order, you see only the checkpoints that relate to the current stage.
A checkpoint is a written task on the checklist that should be marked done at a particular stage to move the sale order to the next stage. For example, in the 'New' stage of a sale order, there might be checkpoints 'Check client's details' and 'Call to confirm the purchase' which should be completed by the person responsible. The responsible individuals for checkpoint completion may be all employees or specific user groups.
You can move a sale order forward to the next state and back to a prior one. For example, the quotation was created, the checklist filled, and after that, the quotation was sent to a client. Therefore, the sale order moved from the stage 'Quotation' to the stage 'Quotation sent' and a new checklist was assigned.
AFor instance, when moving to a prior stage, the quotation was sent, and the order was moved to the 'Sale order' stage. However, the sale order was canceled after a client requested changes, and the order was returned to the 'Quotation' stage. Therefore, the checklist was recovered. However, there might be a need to revise some of the checklist points to make sure everything is up-to-date. In this case, it might be useful to avoid saving some of the checklist points. For that, enable the setting 'Not Saved' (see Approval history).
To move a sale order to a new stage, a salesperson must enter all confirmation points and obtain approval for those they are not authorized to confirm. As you mark checkpoints on the order's form, you will see the progress in percent above the checklist.
To mark a checkpoint as done:
1. Open a sale order
2. In the 'Checklist' tab, put a tick by a completed checkpoint.
If the checklist is not completed, a user cannot proceed with the sale order to the next stage. To move a sale order forward, its checklist should be fully confirmed. Otherwise, you would see the 'Validation error', which states that not all the checklist points are confirmed.
It is impossible to mark a checkpoint done if it is assigned to other user groups. In this case, a warning appears. The warning states the checkpoint, which cannot be confirmed (see User Roles).
You can identify certain stages at which a sales order can be moved without completing the checklist. For that, find the section 'Determine the states moving to which do not require approving checkpoints' below the checklist as you edit the sales team. For example, you can let employees move a sale order to the 'Cancelled' stage, as there is no need to complete checklist points when the sale order is no longer active.
Interfaces
You can track the checklist progress of all sales orders from the quotations and orders list view.
To see the checklist in the sales order form:
1. Open any sale order
2. Click on the tab 'Checklist'.
There, you can see all the checkpoints for this stage and the completion progress. The completion progress is automatically calculated. Also, you can see how much is already done in percentages.
To mark a checkpoint as done, tick the box near the required item. The completed checkpoints are marked in green.
Not yet done checkpoints are shown right on the tree of sale orders and quotations. You can distinguish those by color and can always search for them by keywords. To search among the checklist, choose the option 'Checklist To-Do:' as you type in the search bar.
Approval history
See the history of approval on the sale order form. There, you can find out who and when marked a particular checklist point, and whether any of such approvals were reset. In such a way, it is always possible to control user actions and, if needed, ask for an explanation. For example, if a checkpoint 'Pass the documents to the accountant' is marked done, but the accountant has not received anything. You can open the history to see who and when it was marked as done, helping you understand the situation.
It is beneficial because there are things that should be checked regularly, as well as those that should be changed only once. If a sale order is moved between stages, check items that are already done by default and ensure they are marked done again. To avoid this behavior, turn off the setting 'Not Saved'. The option is assigned for each checklist point separately.
For example, a client's purchase details might be checked regularly, and signing the terms of the agreement or confirming the payment method should be done only once.
To turn on the recovery of a checklist point:
1. Go to Configuration > Sales Teams
2. Choose a Sales Team
3. Open the tab 'Checklist'
4. Make sure that the option 'Not Saved' in the related column is disabled (isn't ticked) by the checkpoints you want to save.
User Roles
Access to mark the checkpoints can be given to various user groups.
To choose the responsible-for-a-checkpoint groups of users:
1. Start editing a Sales Team
2. In the field 'User groups', choose all user groups that will have the right to mark the point done.
Each point can be available for more than one user group. If the field is left empty, then any user with access to the sale order can mark the checkpoint.
Here are some examples of the assigned-per-checkpoint user groups:
1. 'Approve linked contract' User groups: Sales manager
2. 'Check the details' User groups: Sales/User: all documents and Sales/User: Own Documents only
3. 'Create invoice' User groups: Accountant
4. 'Confirm receiving the documents' User groups: Accountant
5. 'Send confirmation to the client' User groups: empty
Simultaneously, there is the special role 'Sale Order Checklists Super User' which allows overcoming the restrictions. It is possible to assign the super checklist access level to any responsible employee. A user with such rights would be able to change a sale order state without approving the checklist and confirming any checkpoint, disregarding security restrictions.
To assign a user the 'Sale Order Checklists Super User':
1. Go to General Settings > Manage users
2. Choose a user
3. Scroll down to the section 'Sales' and find the field 'Sale Checklist'
4. Choose the option 'Sale Order Checklists Super User'.