About Google Drive Odoo Integration
Google Drive Odoo Integration is a tool to integrate Google Drive features into your Odoo business workflow. The app automatically stores Odoo attachments in Google Drive, and it provides instant access to them via web links. In such a way users work with files comfortably in the cloud storage, while the results are fully available in Odoo.
Synchronization between Odoo and Google Drive is based on scheduled jobs. No manual interaction is required. Odoo sends attachments to Google Drive and retrieves files from there. Binary content is kept in clouds, while Odoo provides direct access to synced items.
You can choose models for synchronization: customers, opportunities, sale or purchase orders, tasks or issues, employees or users, etc. Custom models are also supported.
The tool redefines Odoo attachments boxes to make work comfortable: download files locally without login, open files and folders in Google Drive (if possible, items would be opened in Google Drive editors and previewers), use standard Odoo previewers.
Sync works both for individual and team drives (Google Suite business and enterprise tariffs). In the latter case, the root folder Odoo is placed within a chosen team drive, in the former case - within a current user drive.
See the synchronization history by enabling 'Sync Logs'.
The tool lets generate default directories' structure for this document type during the very first sync of a related object. For example, for all employees, you may have pre-defined folders 'Scans', 'Scans/Official', 'Photos', etc.
Automatic regular bilateral sync
Any Odoo document types for sync
Instant access for Google Drive
Google team and Individual drives
Module Configuration and Log in
After the installation of the module in your database, it is required to finish the setup by doing the following:
1. Go to the Google Developer Console via the URL: https://console.developers.google.com
If it is your first time on the platform, you will be asked to agree to the Terms of Service and Email updated. The mandatory one is only the Terms of service.
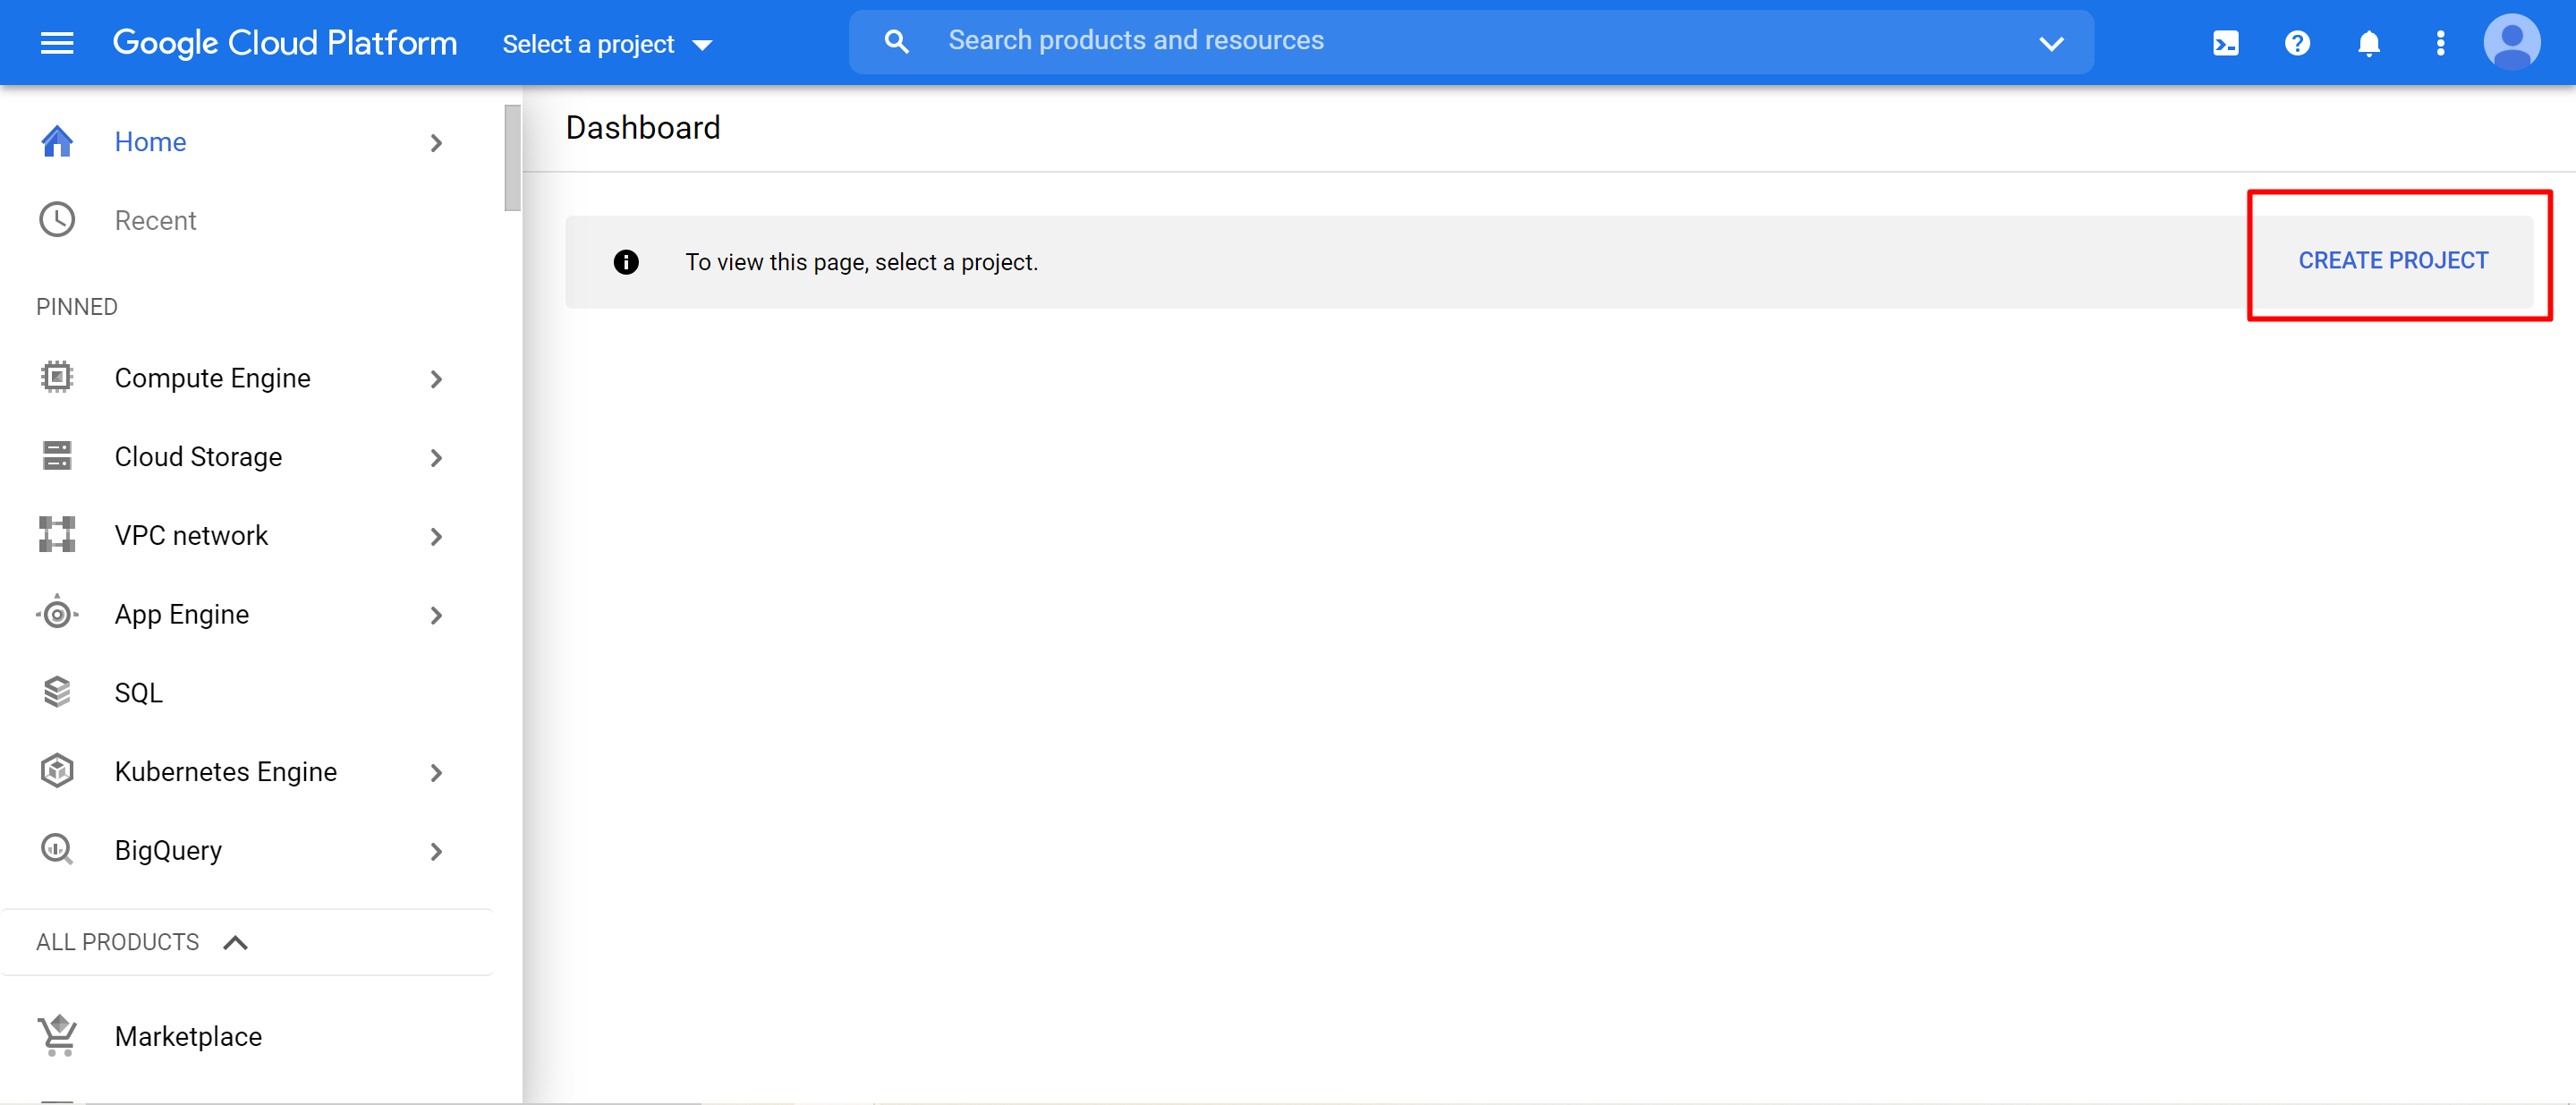
2. Select or create a project After clicking on the button 'Create Project', the new form will appear. There you need to write the title of the project, optionally add your organization, and click 'Create'.

3. From the project's dashboard go to API's overview and press 'ENABLE APIS AND SERVICES'
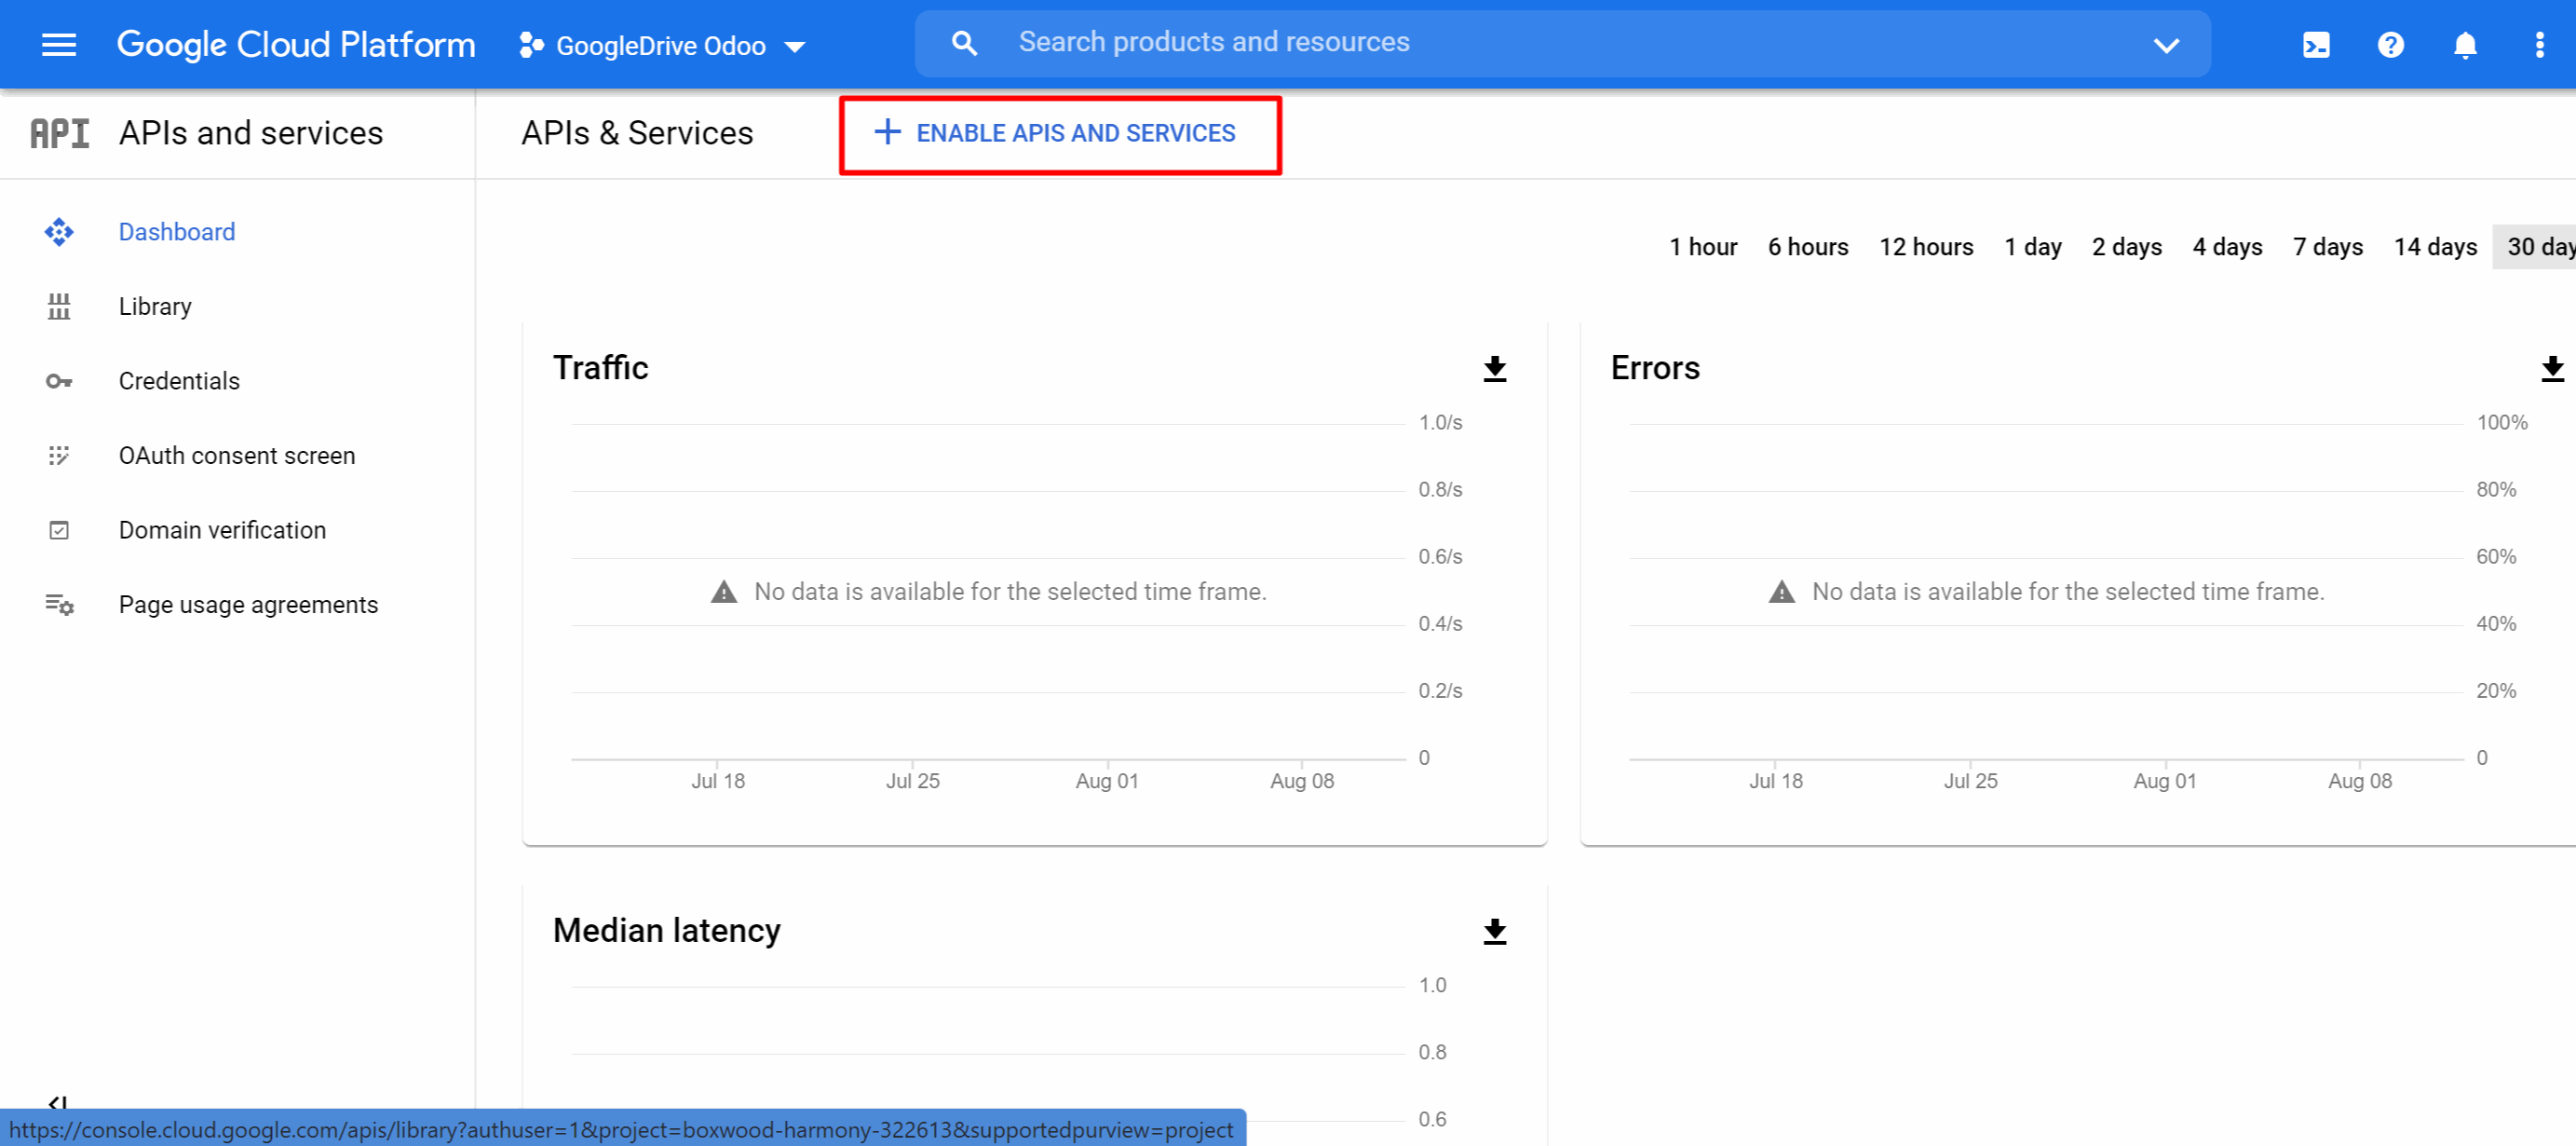
4. Find Google Drive API and push the button to enable its API


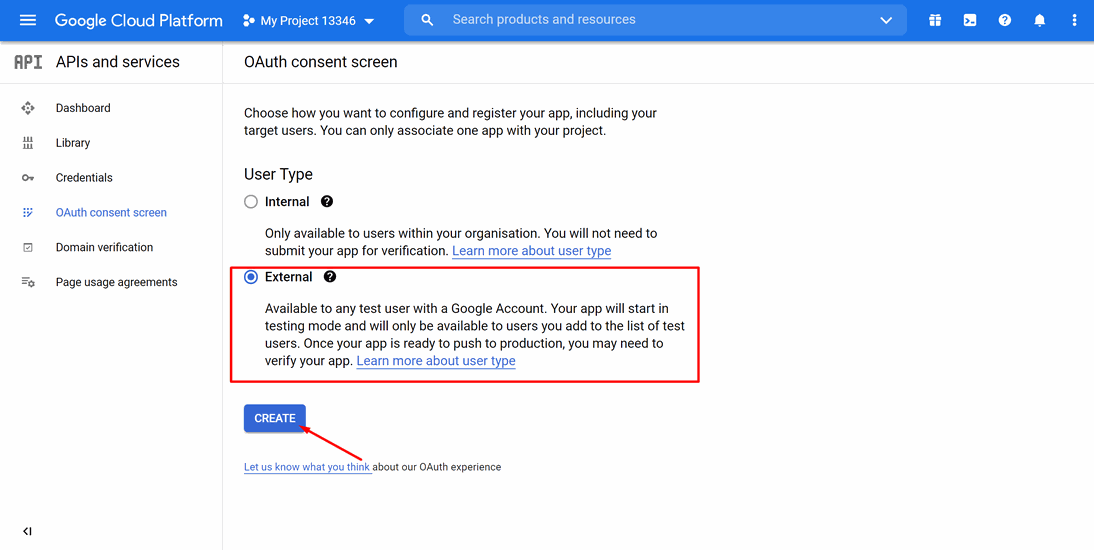
5. Go to 'Credentials' and press the button 'Configure Consent Screen'.


6. As the User Type select 'External' and push 'Create'
7. Add app information
8. As an app name select any suitable and as a user support email select your email
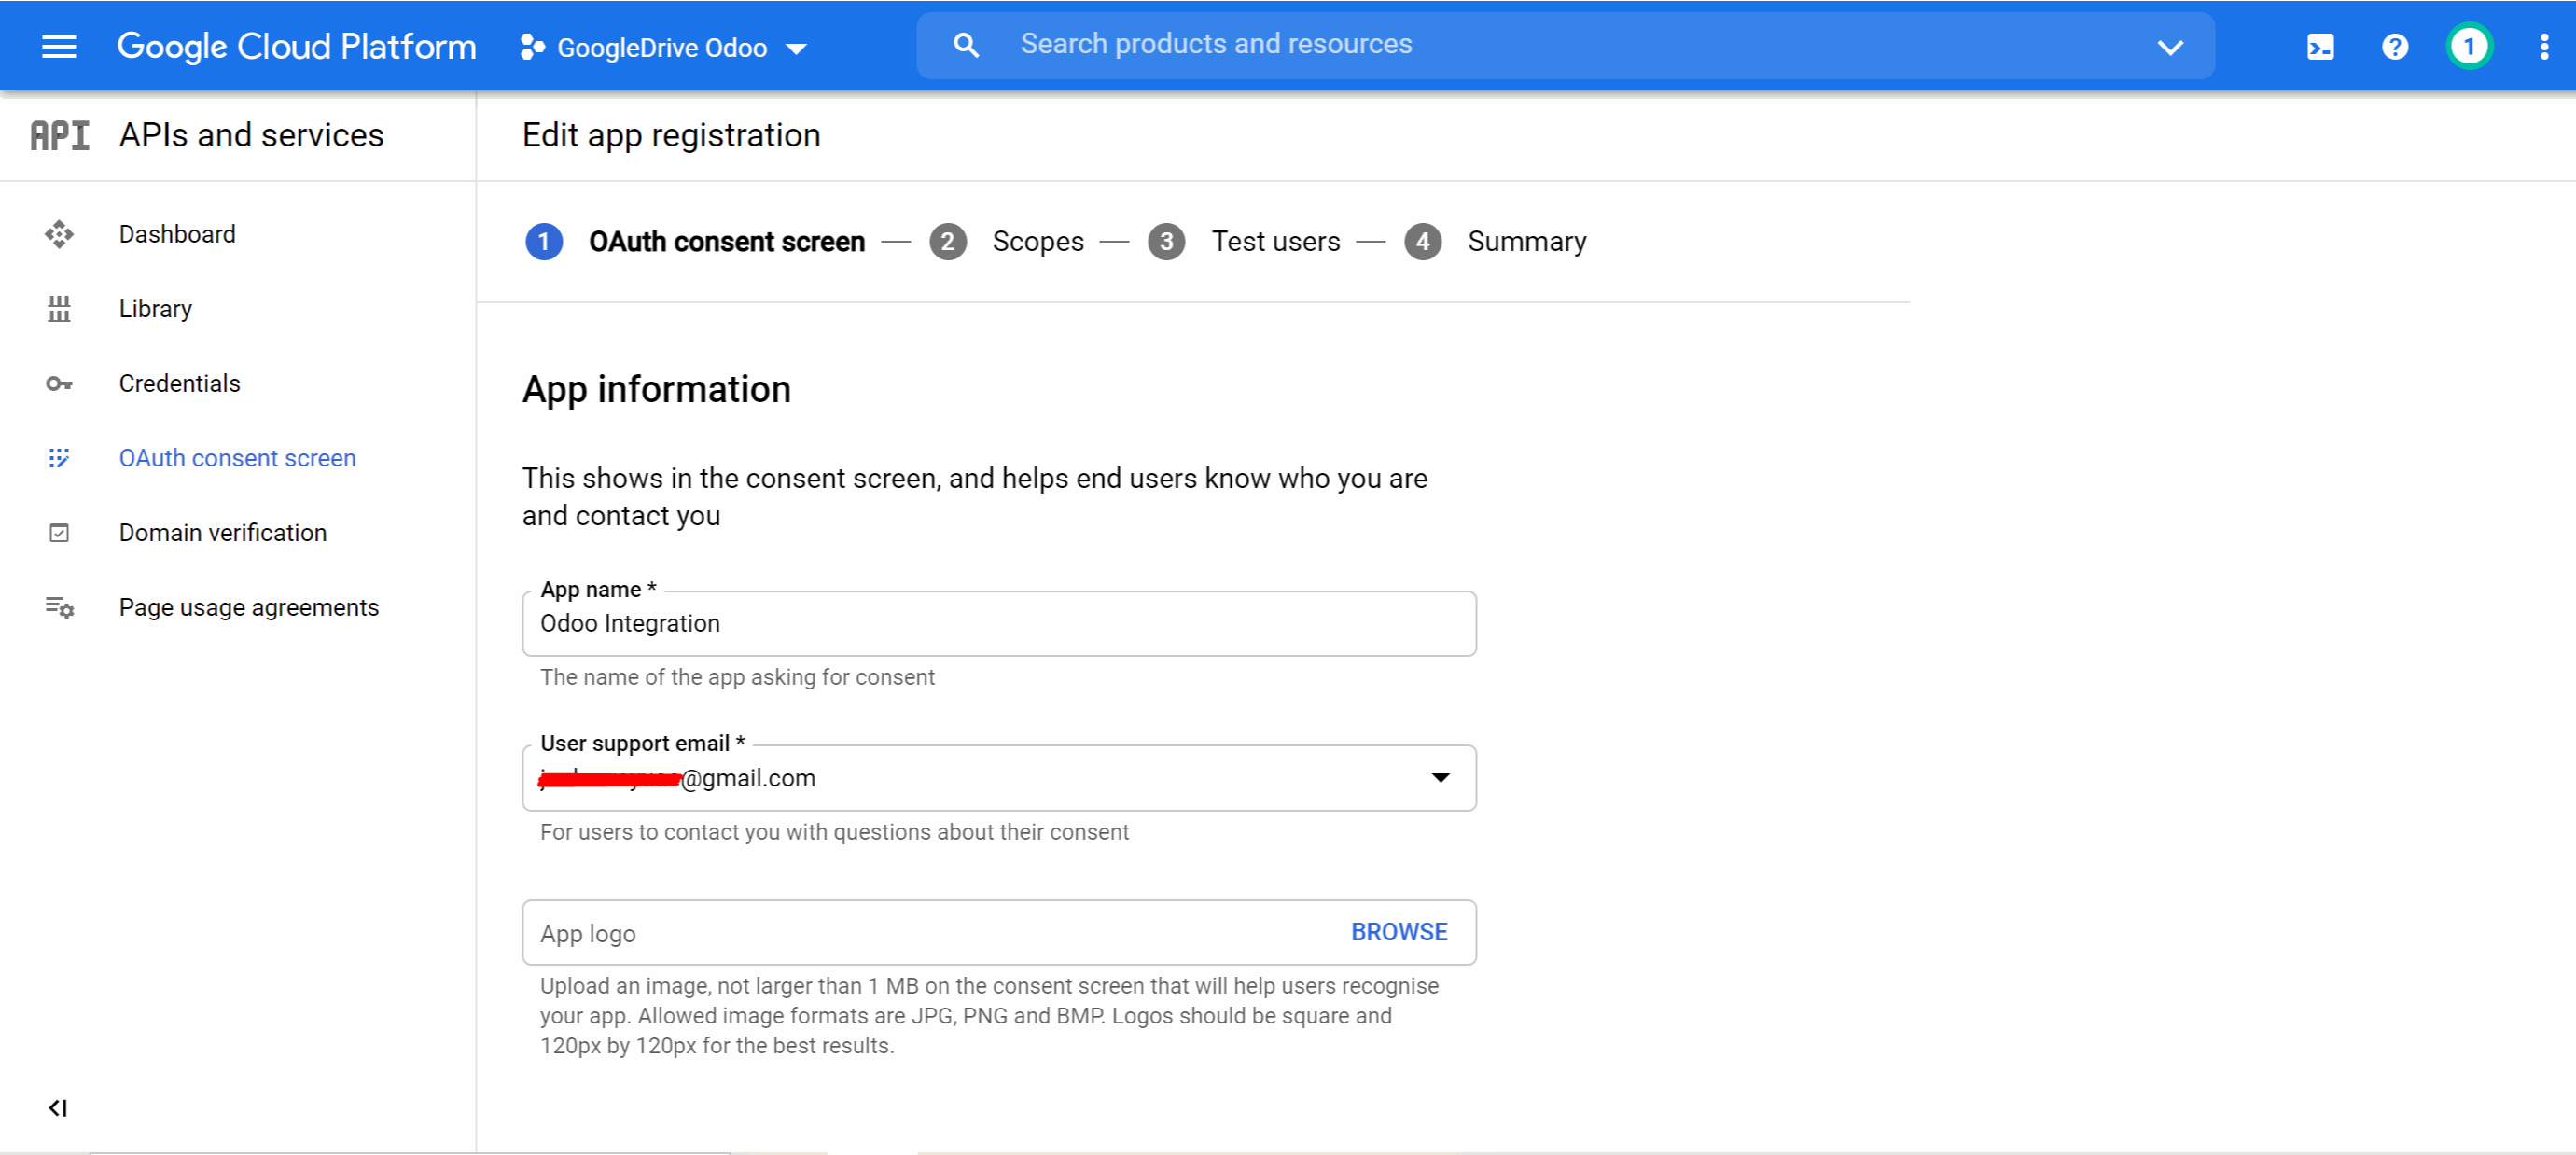
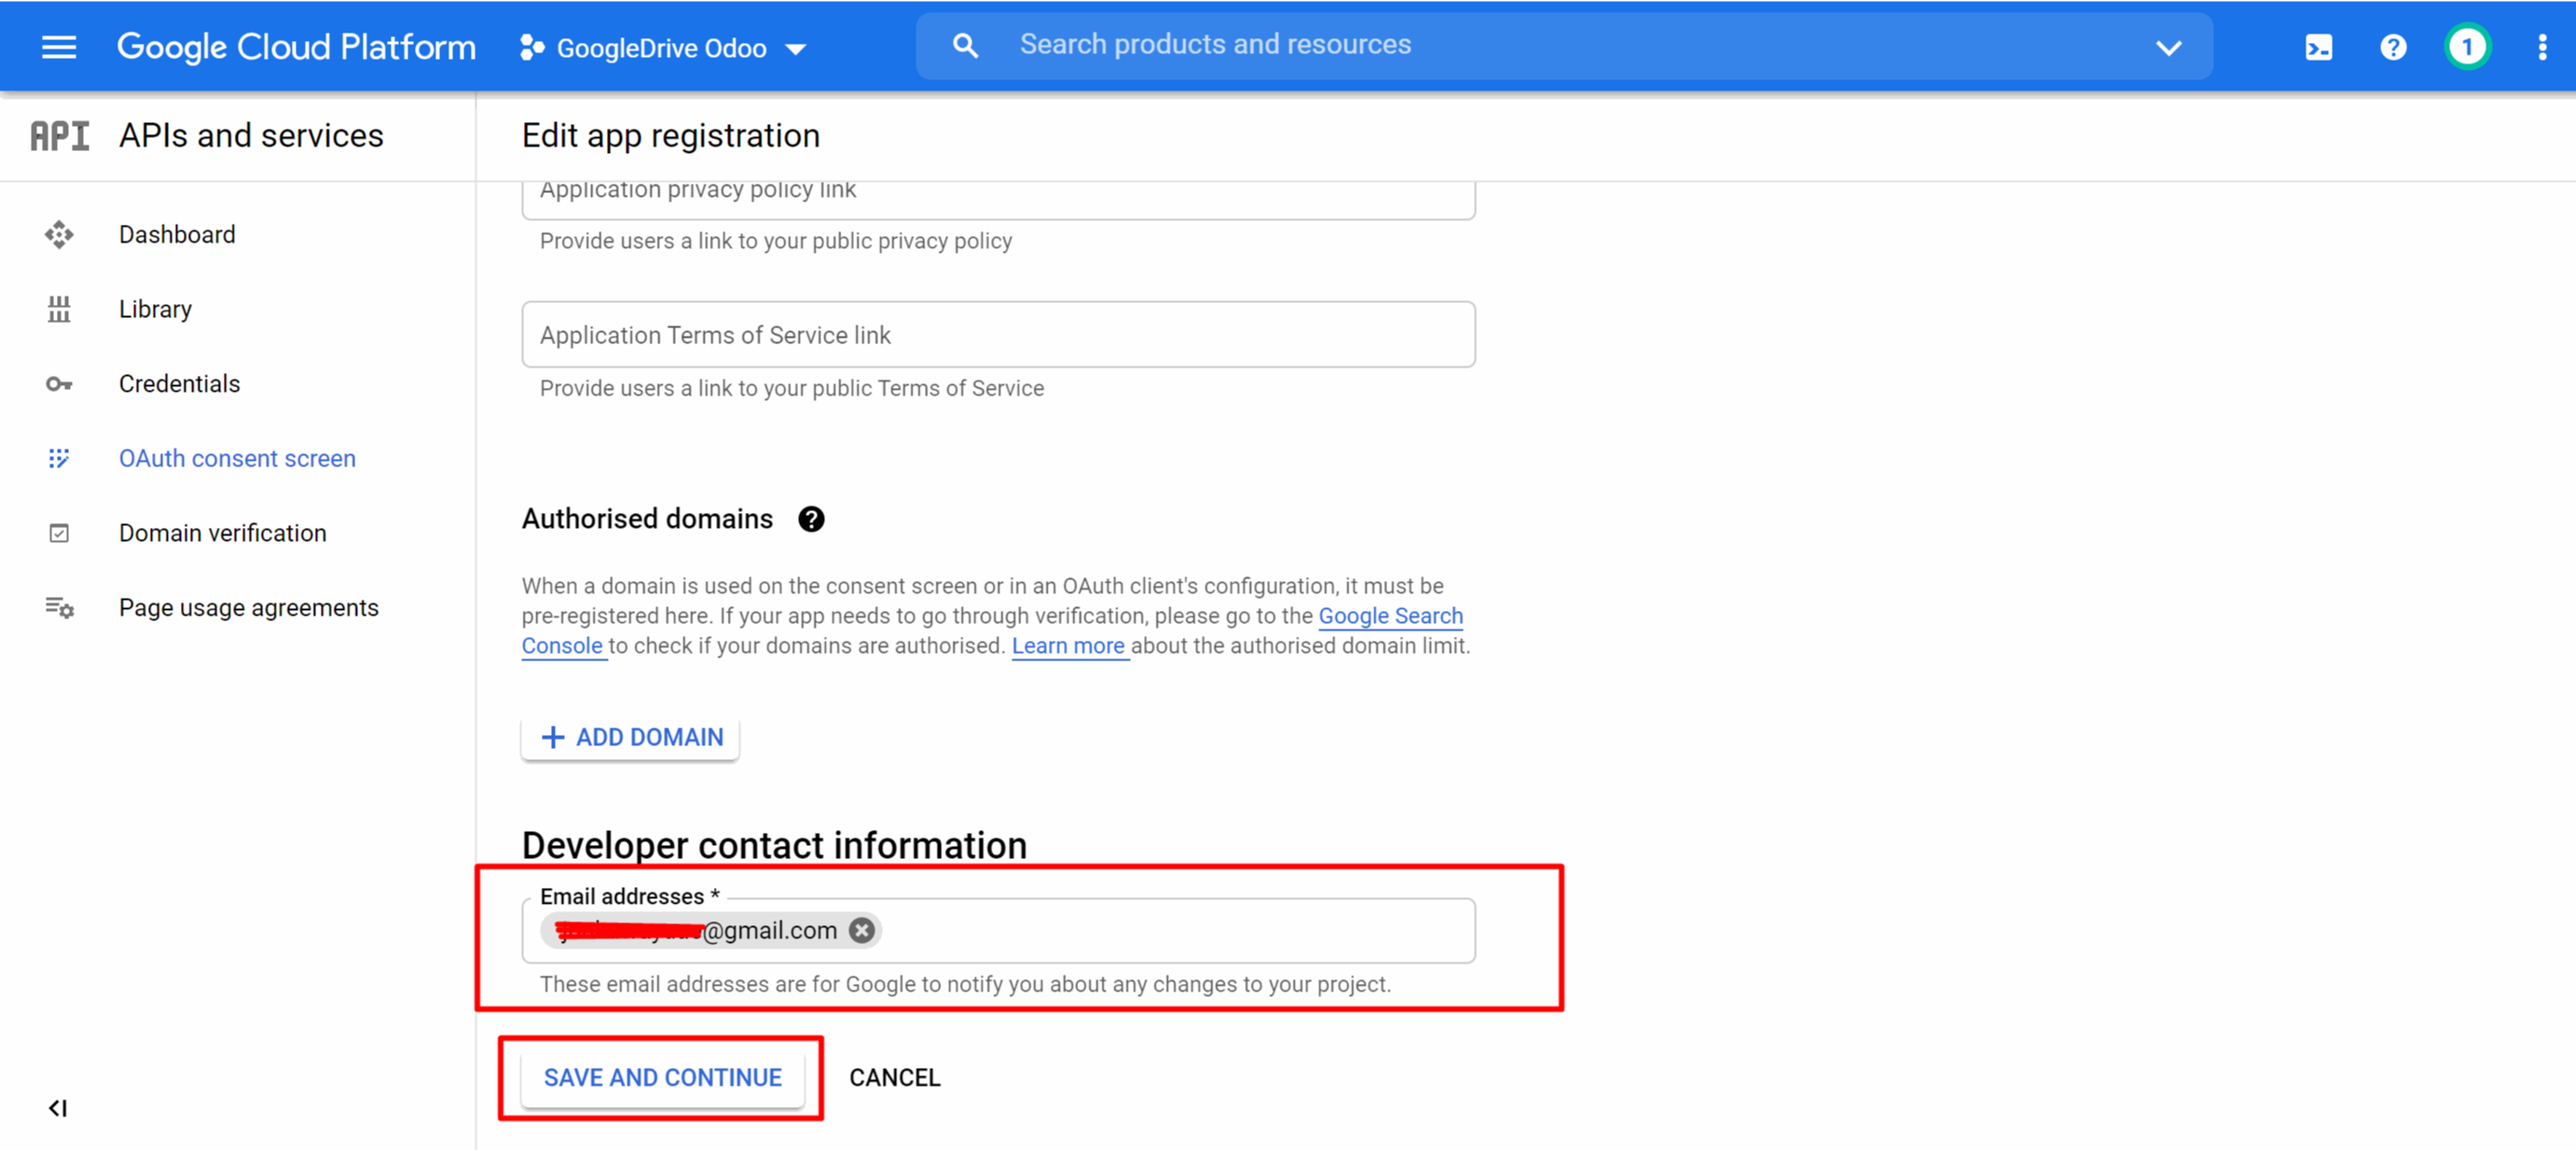
9. In the field Developer contact information add your email address again and press 'Save and Continue'
10. On the 'Scopes' page just press 'Save and Continue'
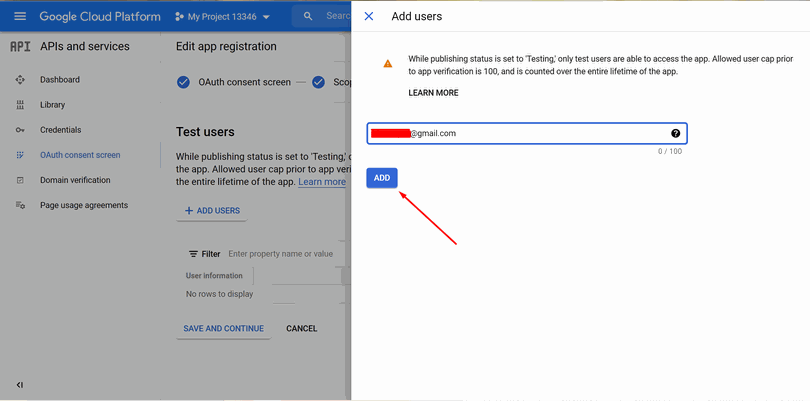
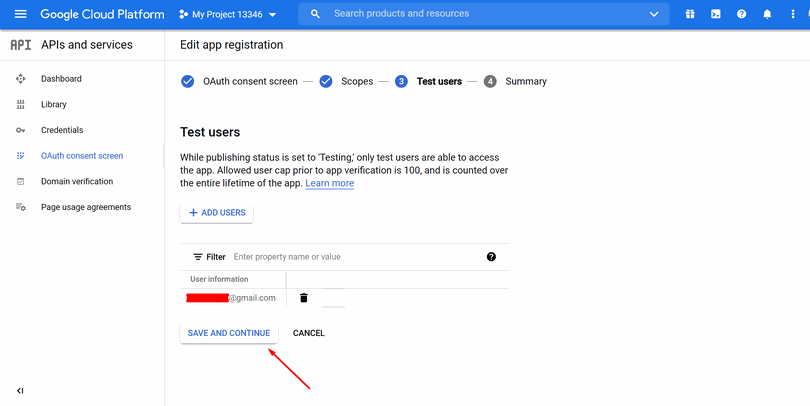
11. As Test Users add your Gmail email address by clicking on the button '+Add users', then press 'Save and Continue'
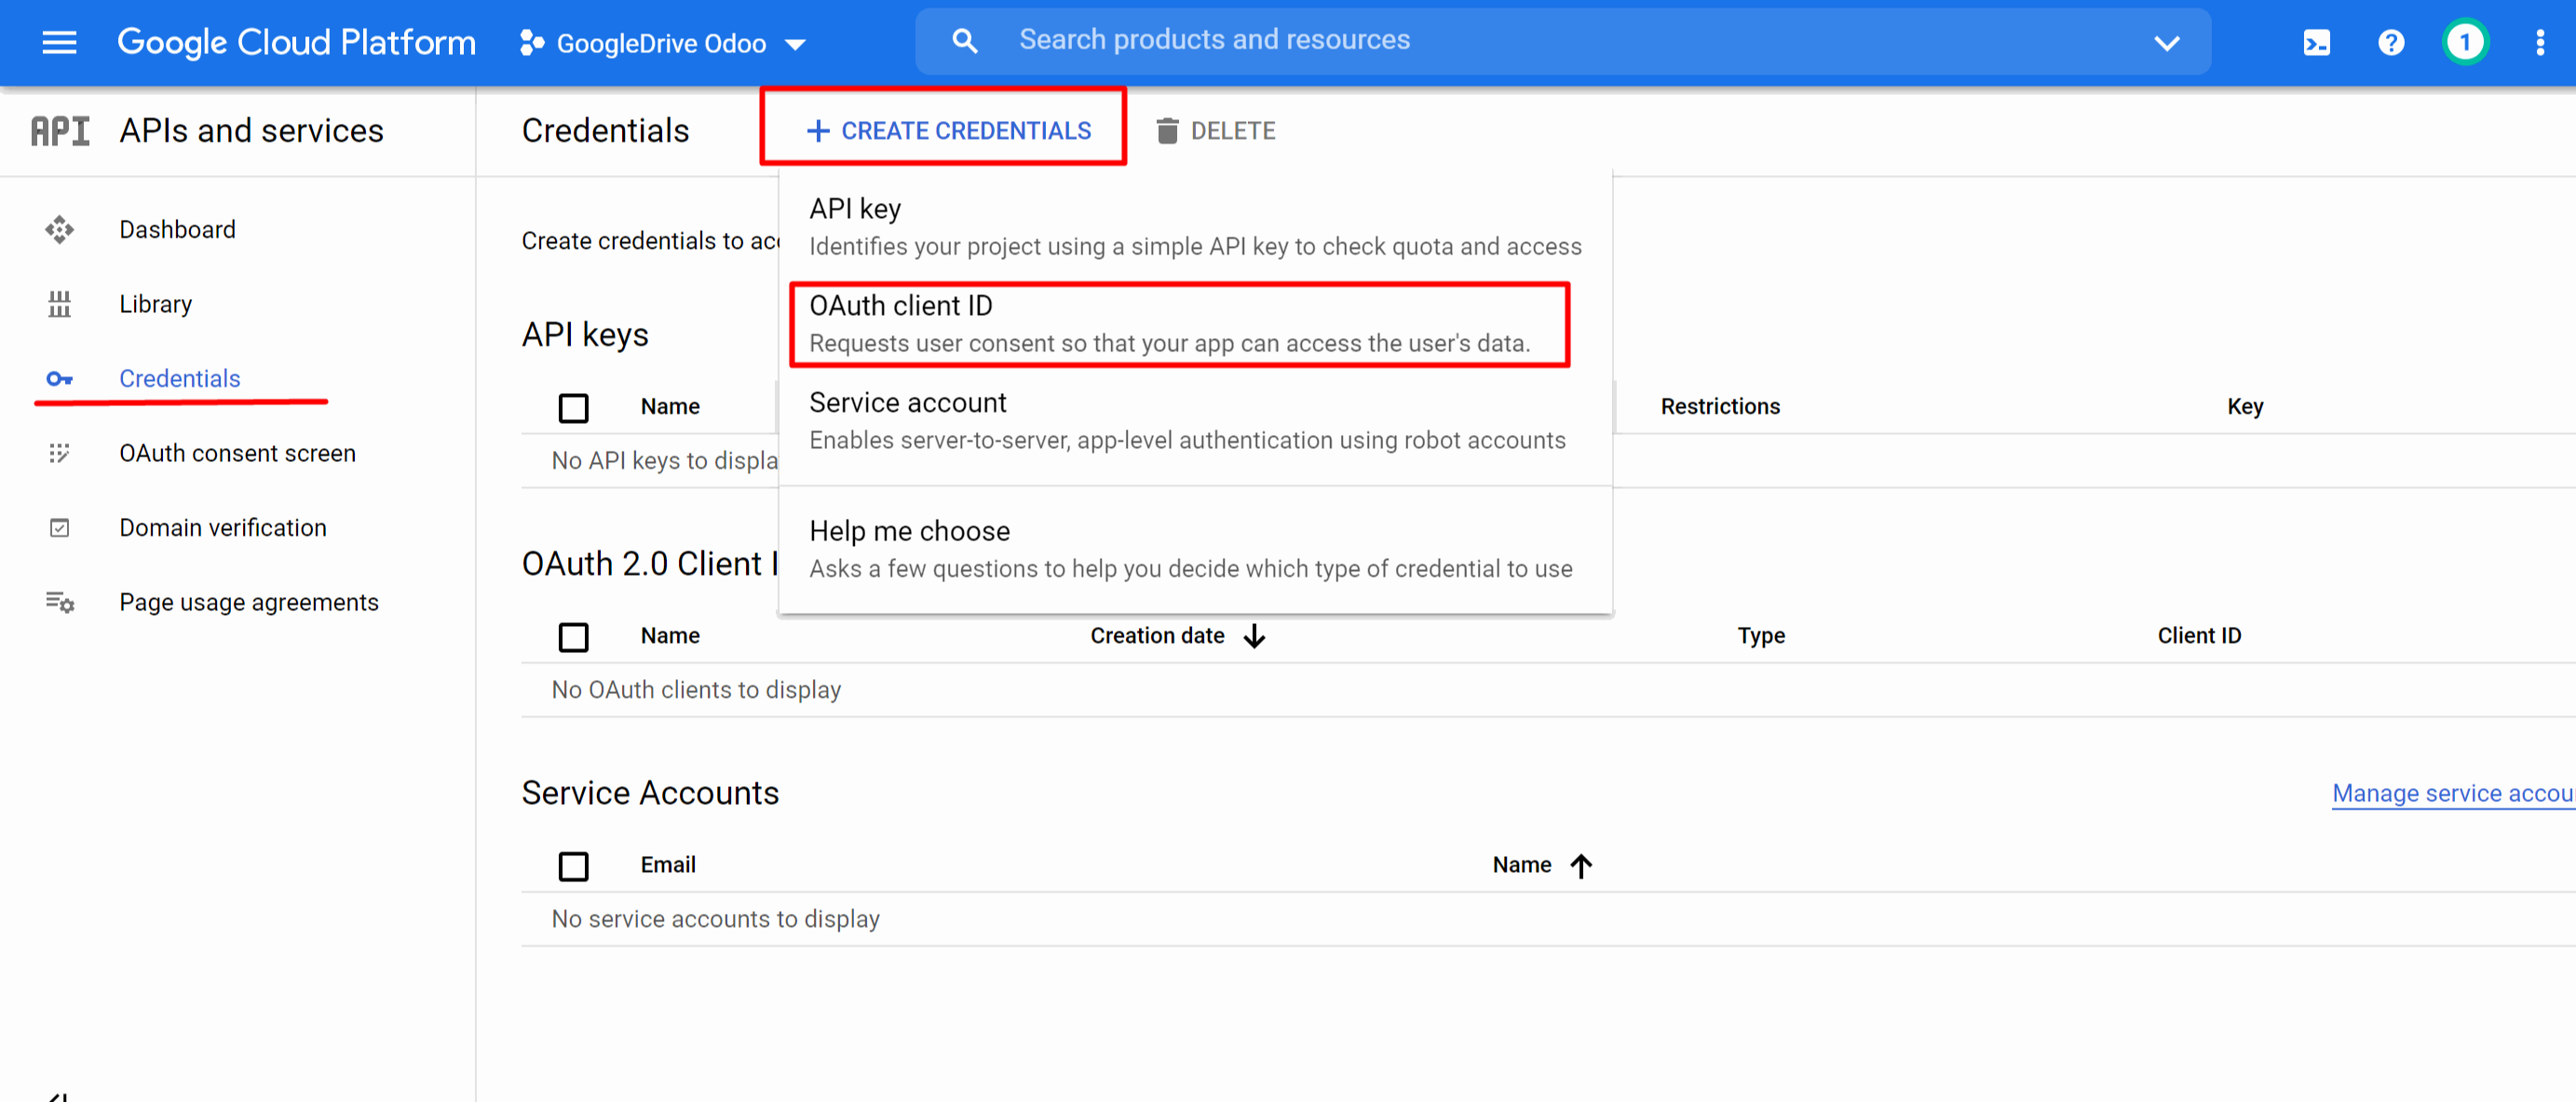
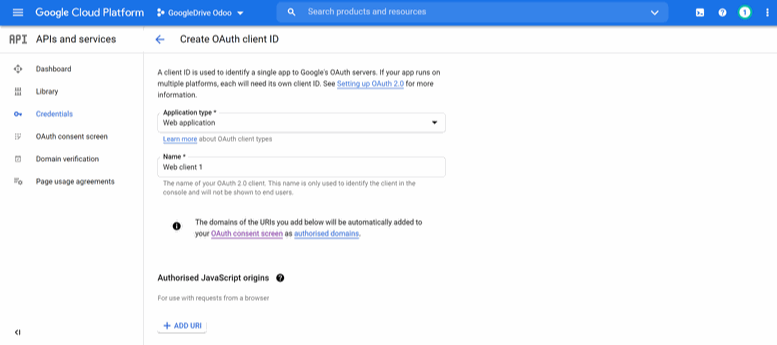
12. Then, go to Credentials and push the button 'Create Credentials', in the list choose 'OAuth client ID'
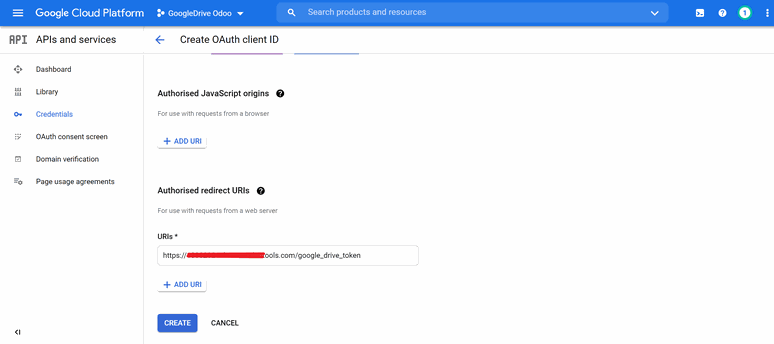
13. As the application type choose 'Web application', as the authorized redirect URI add the link in a format [YOURODOOSITENAME]/google_drive_token (for example, https://odootools.com/google_drive_token).
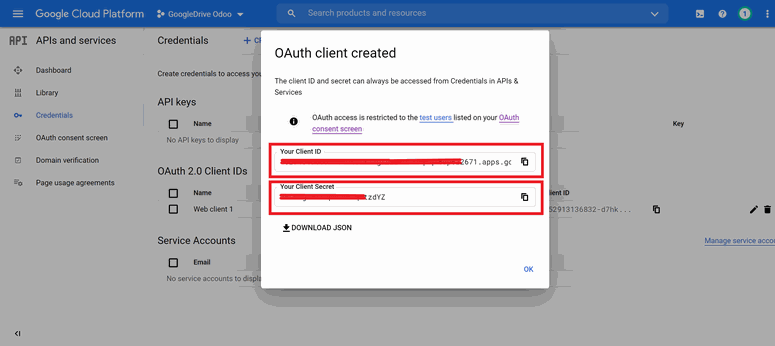
14. Save the app and copy 'Client ID' and 'Client Secret'
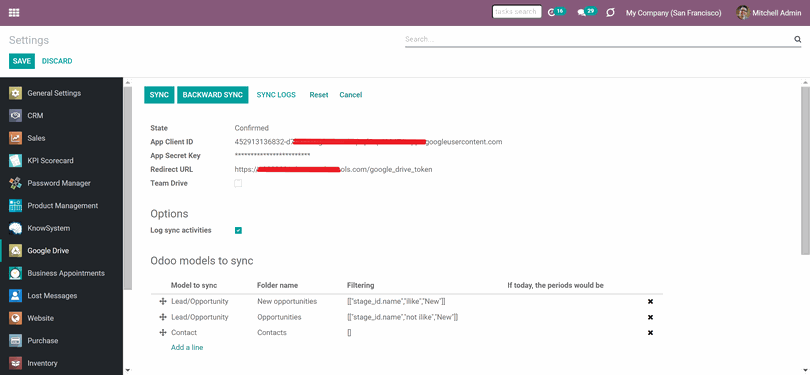
15. Go to the Odoo Google Drive Settings
16. Copy&Paste 'Client ID' to the 'App Client ID'
17. Copy&Paste 'Client Secret' into the field 'App Secret Key'
18. Insert previously generated redirect URL

19*. If you use team drives, check the related box.
Make sure you really use team drives. In your Google Drive, you should find the item 'Team Drives' in the left sidebar. This feature is available only for business and enterprise tariffs.
If the option 'Team Drive' is enabled, introduce its name. It should be absolutely the same as you see it in your Google Drive. Make sure that your user has full rights to all team drives.
If you configure a team drive account, make sure, that your user has full rights to all team drives. Usually, it is the admin user, who have set the Google account up.
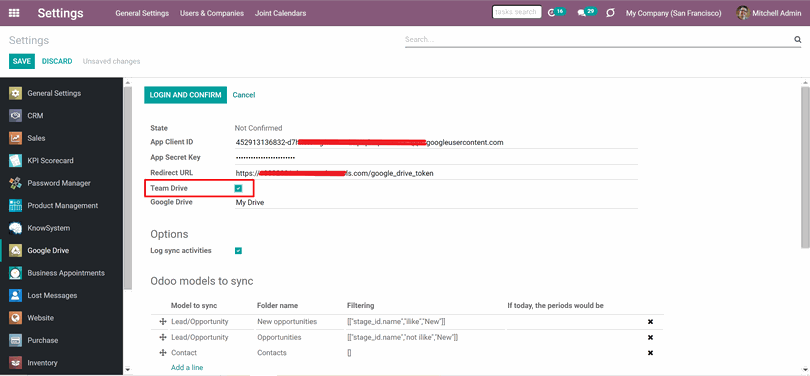
20. Press 'Save'
21. Press 'Login and Confirm'
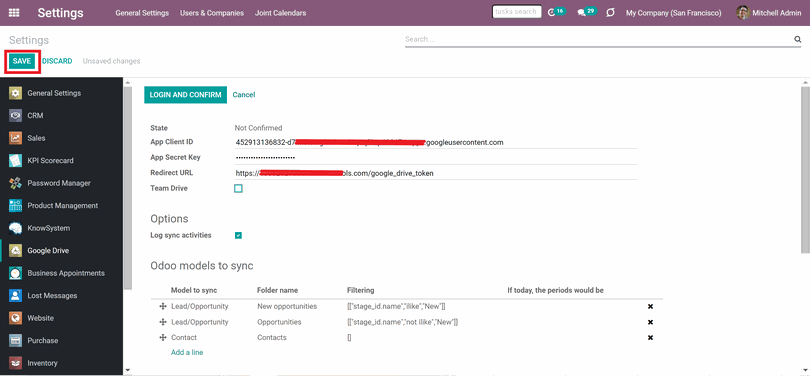
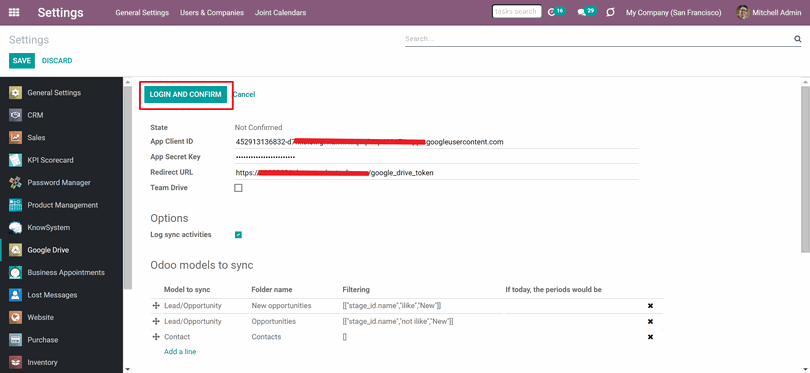
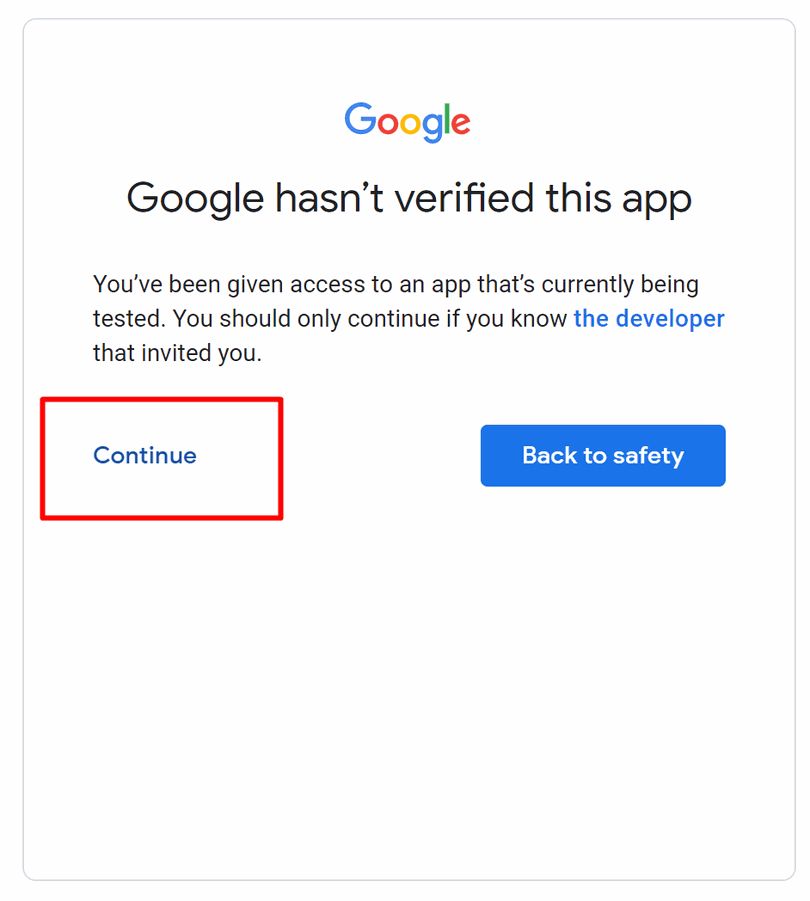
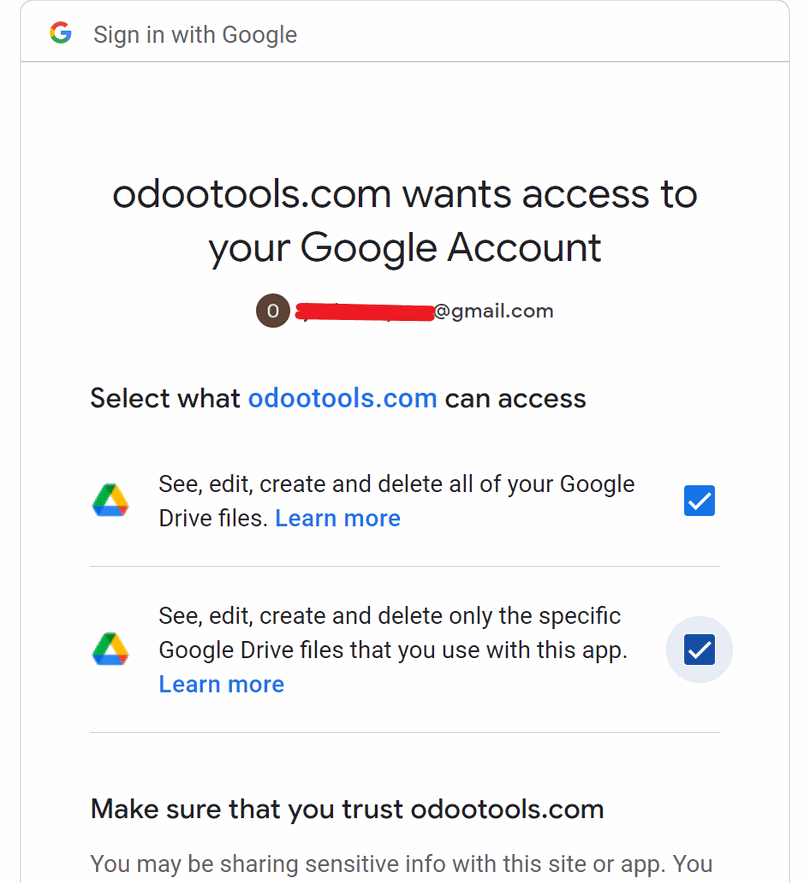
After that, you will be redirected to the Google login page. Check-in, agree with all conditions, and grant permissions asked.
After login, Google redirects you back to Odoo. Google Drive - Odoo synchronization is ready to be done.
After the successful setup, you will be redirected back to the module's settings. You will see the interface, that includes two buttons 'Sync' and 'Backward Sync'. You can use the button 'Sync' for the first synchronization. After that, it is better to avoid clicking on these buttons, as the synchronization is launched regularly, according to the system schedule. And it is important for direct and backward synchronization to be launched at a different time (see Basic Configuration).
Basic Configuration
Proper database and server setup are required to provide enough resources for sync operations and to avoid slowdowns of queue processing. Besides, it minimizes the risks of concurrent updates and conflict errors in API requests. To apply the configuration, make sure you have done the following:
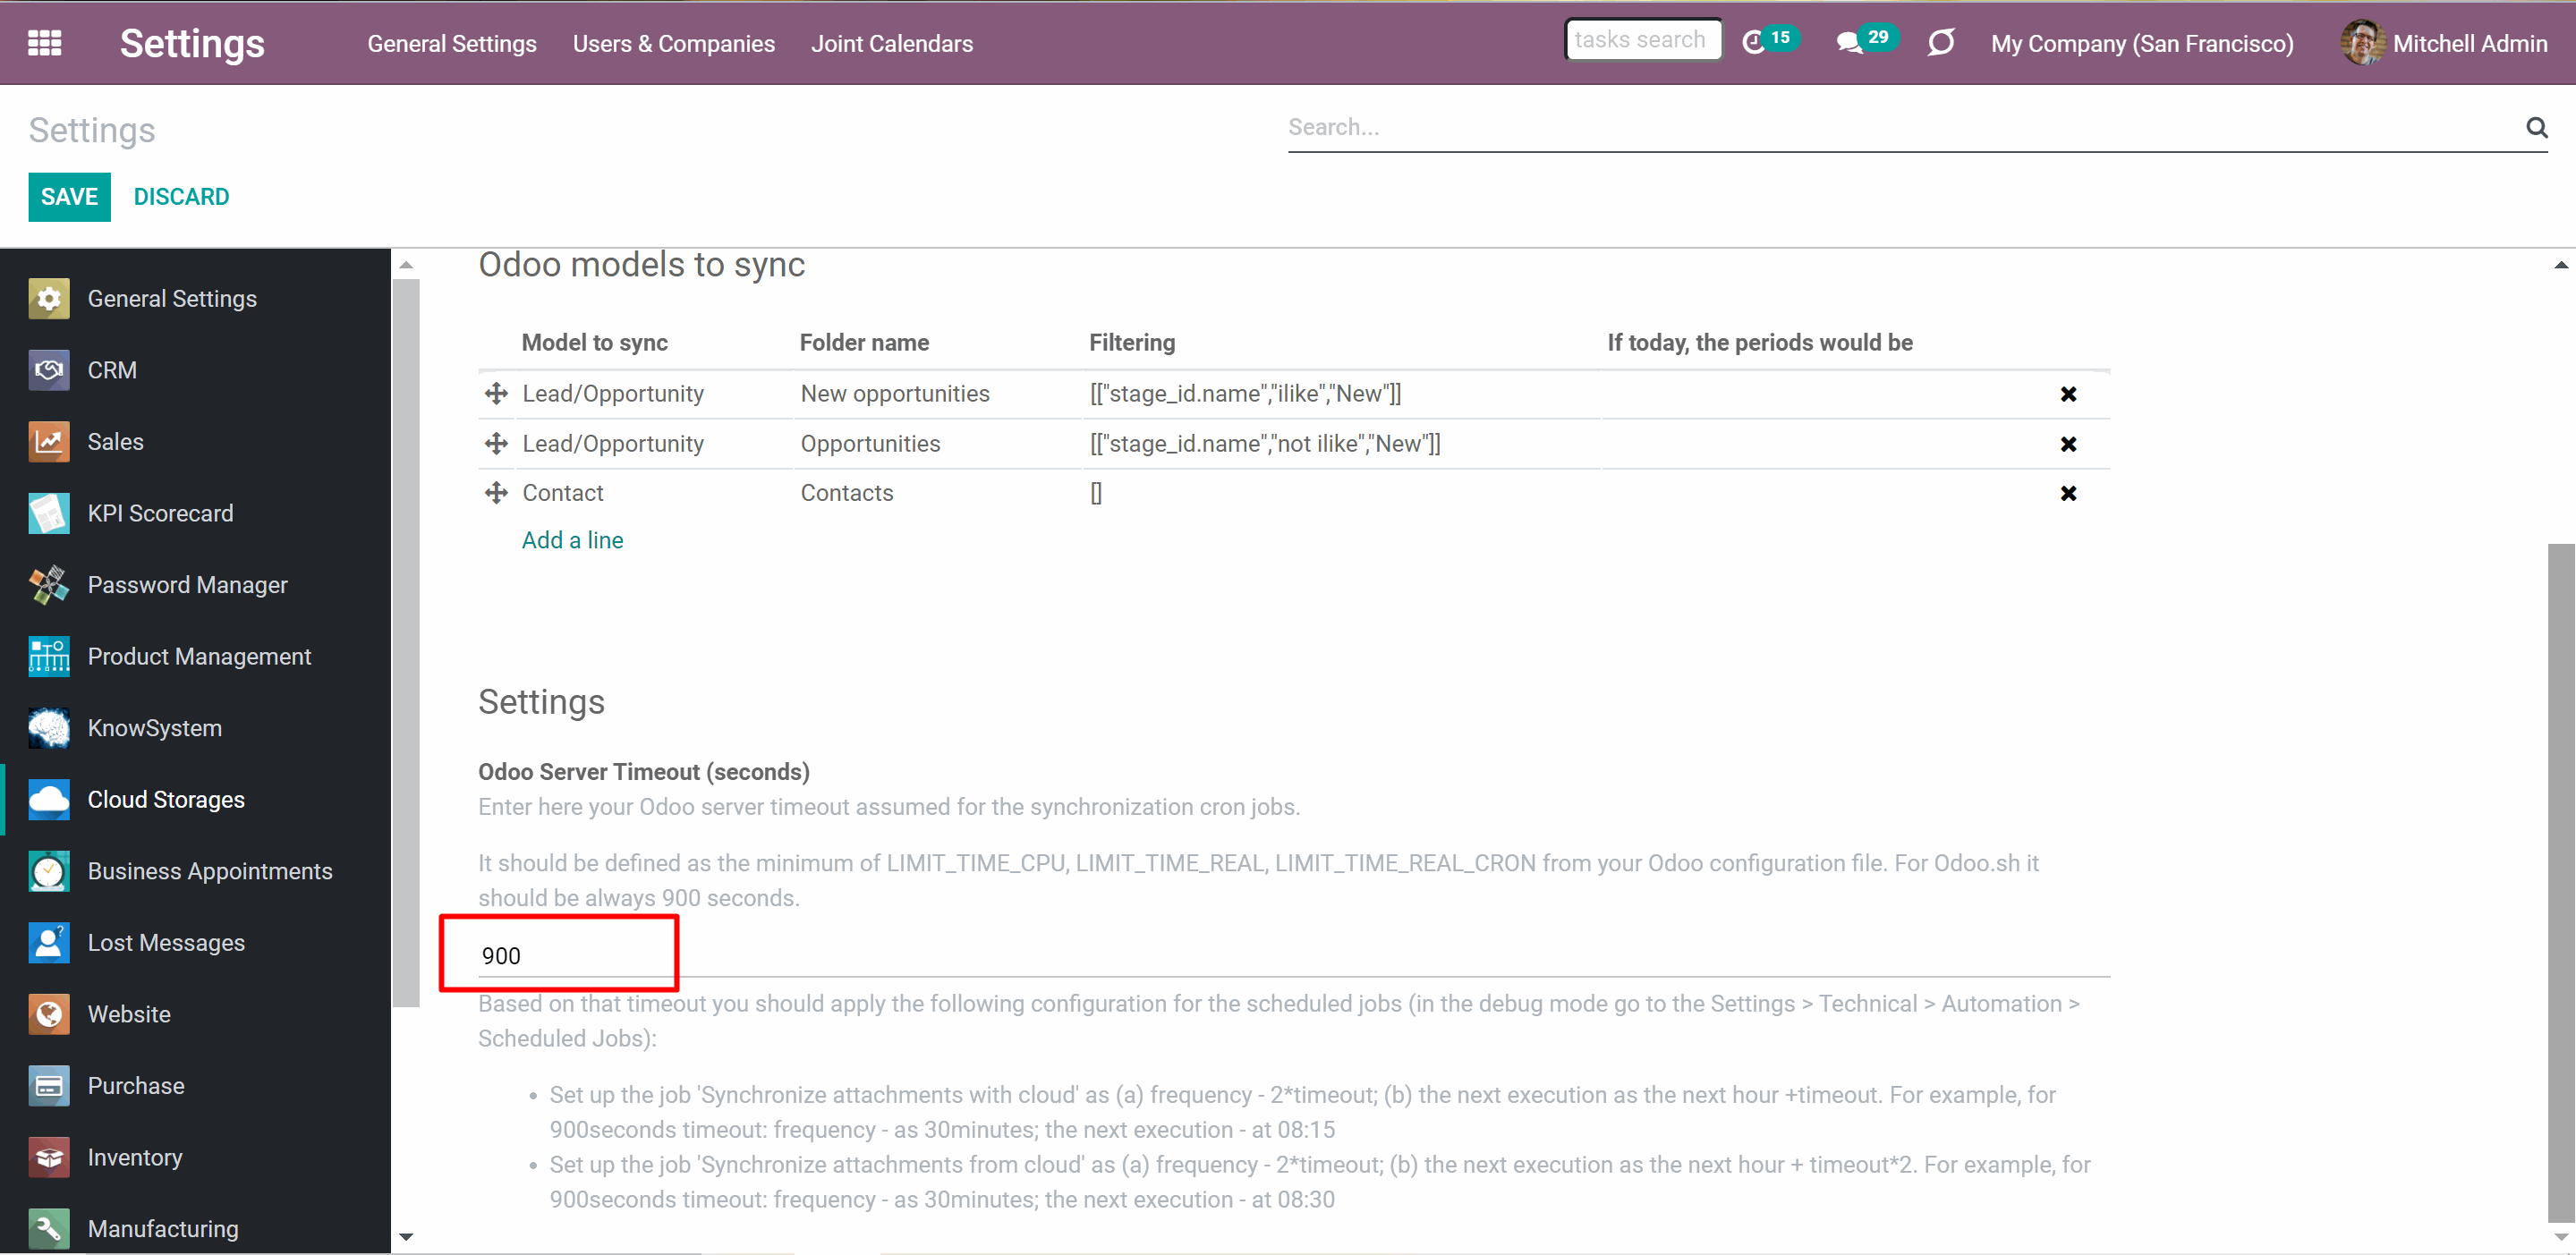
1) Start configuration by applying proper timeouts to the Odoo configuration file: LIMIT_TIME_CPU, LIMIT_TIME_REAL & LIMIT_TIME_REAL_CRON. They should be more or equal 900 seconds, in order to give enough time for sync and to forbid the server to cut it earlier. If you use Odoo.sh, then you don't need to Server Timeouts, since they are predefined and not configurable
2) Then enter the timeout to your Odoo. To that goal find the section 'Settings' on the app configuration page and copy the number there (This way the module will be able to get the information about the timeouts of your server)
3) Finally, make the cron jobs suit the applied timeouts. Direct synchronization is based on the scheduled job 'Synchronize attachments with cloud'. Backward synchronization is based on the scheduled job 'Synchronize attachments from the cloud'
To find and manage these scheduled jobs:
1. Go to General Settings
2. Turn on the Developer mode
3. Click on the tab 'Technical' or, if it is hidden, on the + button in the systray
4. In the open list, find the section 'Automation' and click on the line ' Scheduled Actions'
5. There, find the mentioned scheduled jobs and click on any, to see and manage it
1. Change the frequency in the line 'Execute Every' by the formula 2*timeout
2. Set the next execution date as the next hour +timeout
For example, for 900seconds timeout: frequency - 30minutes; the next execution - at 08:15
Change the frequency in the line 'Execute Every' by the formula 2*timeout
2. Set the next execution date as the next hour + timeout*2
For example, for 900 seconds timeout: frequency - 30minutes; the next execution - at 08:30
Thus, both cron jobs would never be overlapped. Depending on the sync scope, you may increase server timeouts up to a few hours, but make sure that you amend the Odoo configuration according to the principles above.
On the module's configuration page, you will find the buttons for triggering both direct and backward sync manually. However, push the buttons only to configure the Cloud Client and for testing purposes. Avoid pushing the button also when cron is active and running. Give enough time for the system to finish one of the syncs before manually triggering the second one (f.e. don't click at both buttons at once, wait at least 10 minutes depending on the number of models and objects to sync).
Don't trigger the sync manually by clicking on the buttons 'Sync' and 'Backwards Sync' to avoid errors. These buttons can be used for the first or test syncs only.
Administrator's Interface
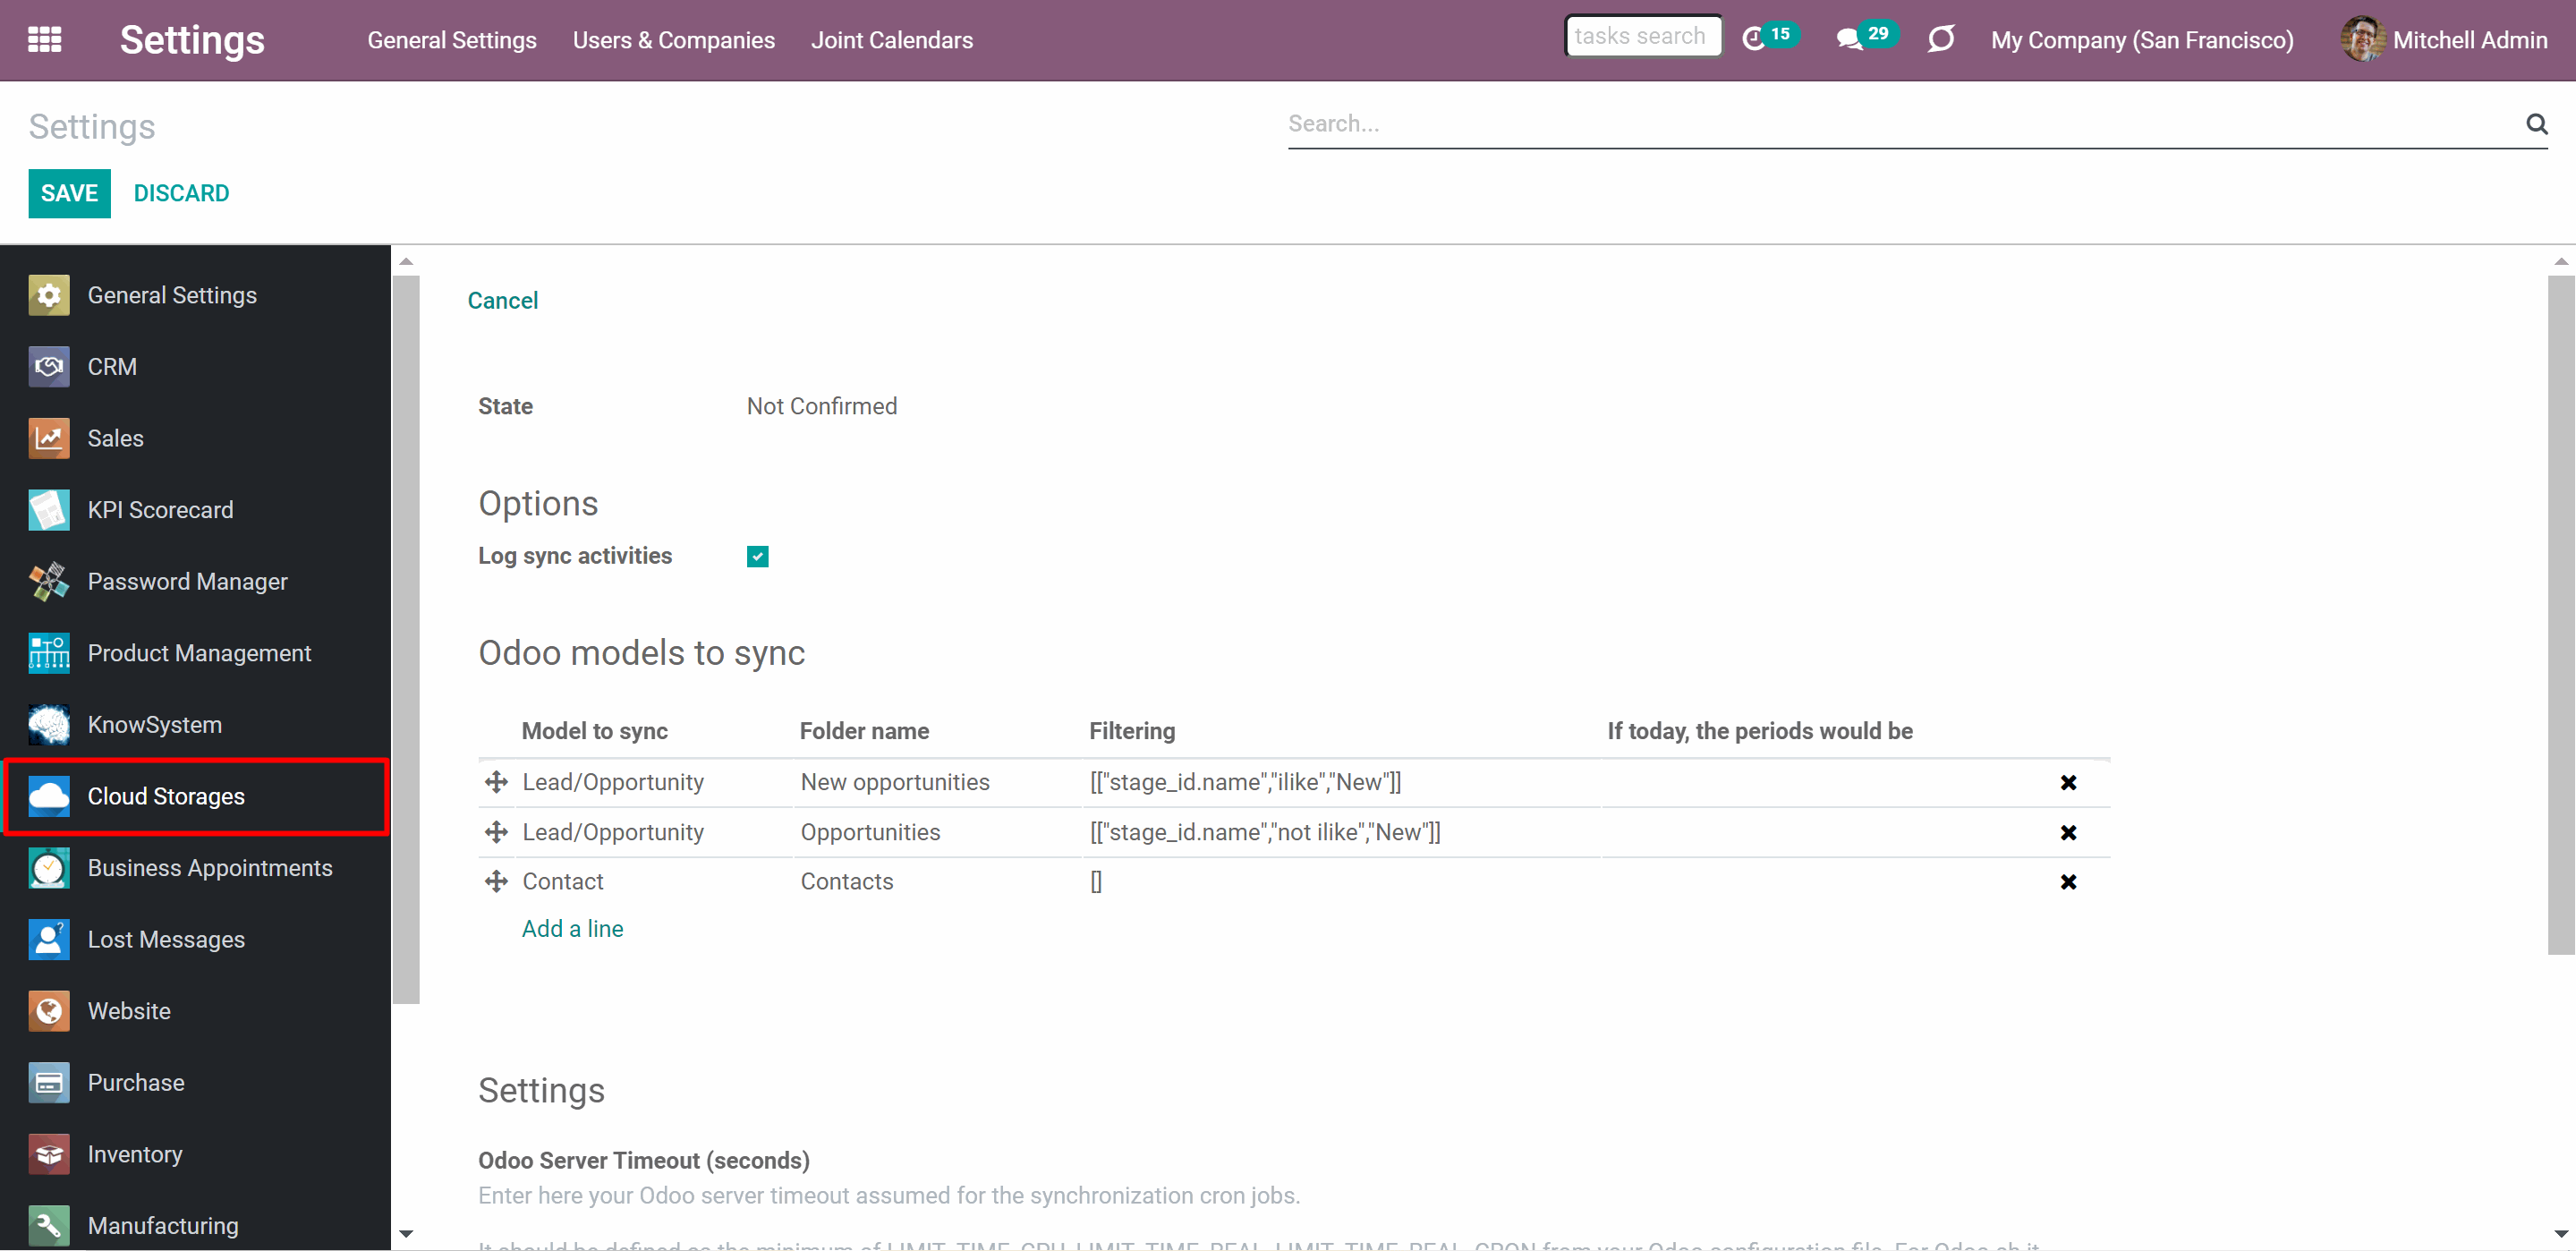
The module's interface can be found on the app's tab in the Settings. From it you can:
1. Set up and reset connection
2. Trigger sync manually
3. Choose and set up Odoo Models to sync (see Sync Models)
4. Set the Odoo Server Time Out (see Basic configuration hints above)
5. See Sync Logs, turn on/off Sync Logs (see Sync Logs)
On the configuration page, administrators might configure sync for a target cloud storage. For that, the admin should enter the client's credentials log into the cloud client and give the required permissions to the module.
After establishing the connection, it is possible to reset the configuration in order to stop sync and, for example, set up another client.
Take into account that resetting the connection is not revocable action: the information about Cloud Client items would be erased. In particular, it means that even if you connected to the same storage, Odoo would re-create all folders, while previously synced attachments would not be sent there (since they are already of the URL type). All the following synchronizations will send files to the newly created directories. Simultaneously, attachments’ links for cloud items would still work, since files would be anyway kept in the cloud storage.
Also, at the administrator's interface, after successful login to the Cloud Client, you will see the buttons 'Sync' and 'Backward Sync'. These buttons allow triggering the sync manually. However, this way of launching the synchronization should be used only for testing purposes or when it is the first sync. It is also important, to avoid sync overlap. Make sure the direct sync is over before triggering the backward sync and vice versa. The time, that requires for the sync depends on the number of models, objects, and files for sync, that you have. If the Odoo Server Timeout is set, then you may refer to it, to understand when the sync is over.
Don't trigger the sync manually by clicking on the buttons 'Sync' and 'Backwards Sync' to avoid errors. These buttons can be used for the first or test syncs only.
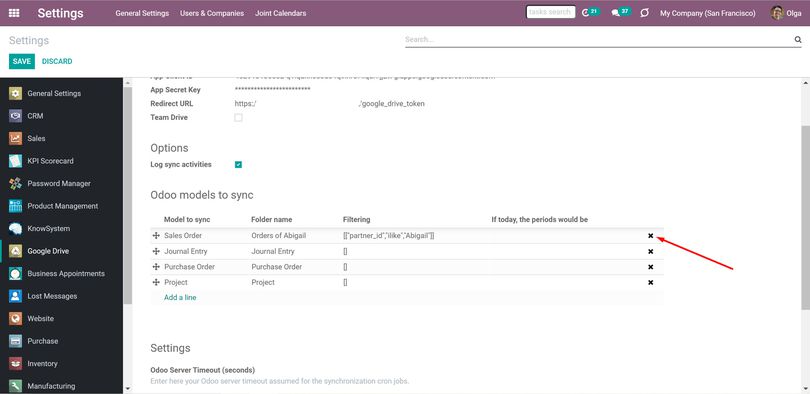
Find the section 'Odoo models to sync' to choose the models which will be synced with your Cloud Client. If you remove all the models and leave the section empty, then nothing will be synced. To sync only the objects, that you need, it is possible to set various filters and periods (see Sync Models).
If you want to sync the files from the Odoo Documents app, you shouldn't create a model to sync. The add-on 'Cloud Sync for Enterprise Documents' is required (see Solutions for Enterprise Documents).
If you applied any changes on the configuration page do not forget to press the button 'Save'.
Sync Logs
In the app's settings, for extra convenience, was added the button Sync Logs. This is an optional function, which is turned on by default, but you can deactivate it at any time. For that:
1. Open the app's page in the settings
2. Find the section Options and remove the tick from the box 'Log sync activities
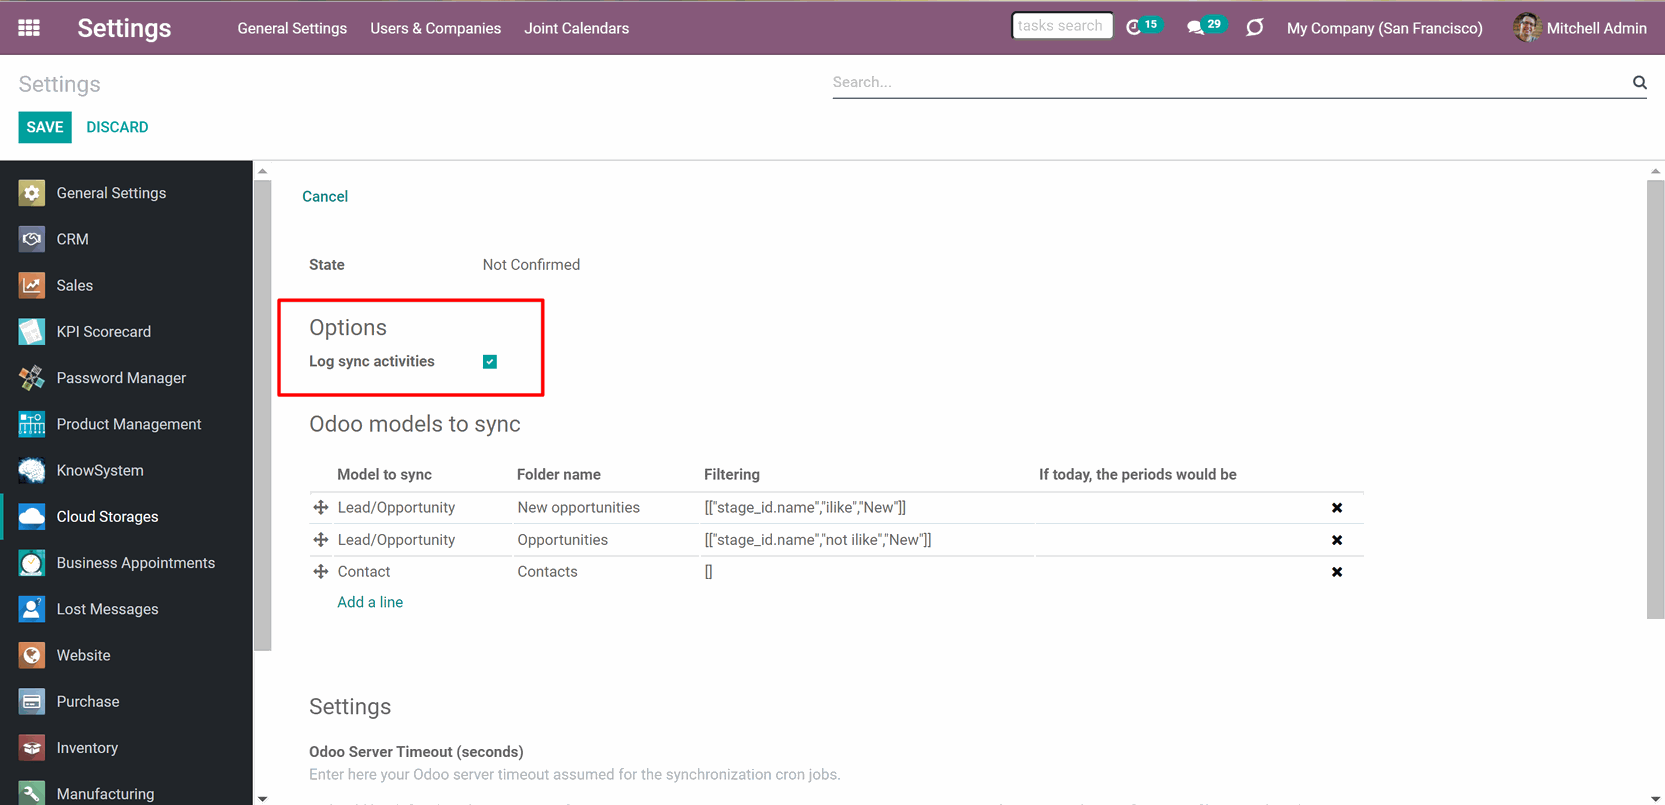
Turning off the sync logs will slightly speed up the sync process. But, it is recommended to leave the option turned on, while it serves some very important purposes. It is possible to:
1. See the sync history
2. Know, whether the sync took place, and what has changed
3. Check, whether a particular file was synchronized
4. Investigate the sync problems
The sync history contains all the necessary information, about all the actions of the module. For example, what folders were created, what files were imported or exported. The time of the action is also tracked, so you may see when the action took place.
By clicking on the button 'Sync Logs', you can see the list of changes, which take place while syncing. You can also see it in real-time, as the objects and files are managed.
One of the most important functions of the Sync Logs is to point out the problem in sync. If there is a problem - a mistake and its details will appear in the sync logs. From here you may find out what actions to take or may export the logs, in order to send to the customer support email for further investigation of an issue. Depending on the result of the sync, the Sync operation may be either green (if it was successful), orange (for warning, if there was an unserious error), or red (if there was an error).
When there are a lot of files synchronizing every day, it might be rather difficult to find the information you need through Sync Logs. Therefore there are several ways to conveniently search through the sync records. The ways to search Sync Logs:
1. By matches in the messages. For that, just start writing your request in the search bar in the top right corner
2. By applying filters. For that, click 'Filters' and choose the existing one or add your own. By default, you can filter to see only Failures, Warnings, Success logs
3. By grouping them. For that, click 'Group by' and choose the existing grouping condition or add your own. By default, you can group by type, month, and day
Sync Logs do not assume replacing Odoo server logs. It is a complementary function, which allows controlling sync from the configuration interface. You may need Odoo sever logs as well, to investigate the roots of detected in Sync Logs warnings.
Sync Models
Sync Models - are rules, which define what Odoo document type (for example, Sale Orders or Contacts) should be synced with the Cloud Client. Thus, it defines what documents would have their own folders in cloud storage.
The app lets split models into a few folders based on selected filters. Use any document storable field to distinguish a directory. Have a separate folder for individuals and companies, for European and American opportunities, for quotations and confirmed orders, for each project, etc. You can also limit documents by relative periods by using date fields of linked documents. For example, leads registered in the last 3 months or invoices updated the last week (see Filters & Periods).
Define name expressions to specify titles of documents' Cloud Client folders. For instance, to include a project name in a task directory (see Name Expressions).
Prepare a hierarchy of default folders to be created when a document directory is synced to Cloud Client for the first time (see Default Folders).
To sync a specific document type, you should add it as a model to sync. Any Odoo model might be chosen. An exception is the module Odoo Documents. For it, you should use the add-on Cloud Sync for Enterprise Documents (see Solutions for Enterprise Documents).
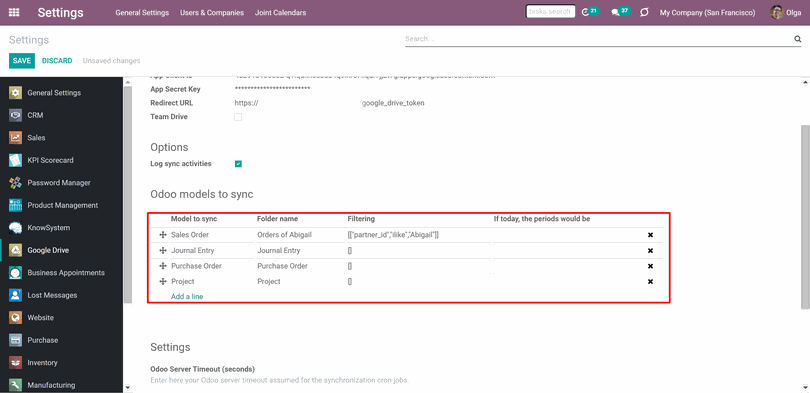
You can add models to sync from the module's interface in settings (see Sync Interface). For that:
1. Find the section 'Odoo models to sync'
2. Click 'Add a line'
3. In the pop-up window click 'Create'
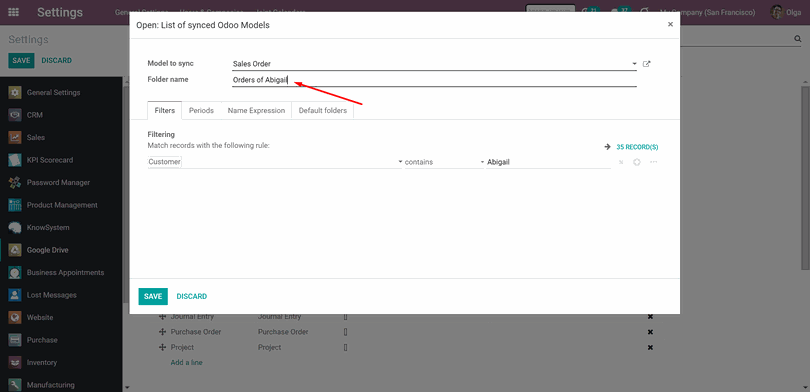
4. Choose the model for sync
5. Type the folder name, that will be used in your Cloud Client to store all object's folders
6. Click 'Save&Close'
In that way you would define the document types for sync, to guarantee the correct structure of cloud folders as Odoo > Document Type > Object > Files and Folders related to the Object (for example, Odoo > Sale Order > S00001 > Files and Folders related ).
You can also change the models' order simply by drag&drop. This way the sequence of the models will be changed. The higher is the model in the list, the more prioritized it is. So, if you added some filters to the models and it turned out, that some of the objects relate to several models, then the object with the attachments will be placed to the model, which is higher in the list. For example, there are two models to sync: Sale Orders and Cancelled Sale Orders. One order, S0001, relates to both. As the model 'Cancelled Sale Orders' is placed higher in the list 'Odoo models to sync', the object will be its folder in the Cloud Client.
To delete the model click on the cross by it. This preset model will be saved, and you will be able to add it back as you click on the button 'Add a line'. Keep in mind, that once the model is deleted from the sync list, its folder with the content will remain in the Cloud Client and only links to them will be kept in Odoo. Newly added files will not be synchronized.
If you applied any changes on the configuration page do not forget to press the button 'Save'.
Filters & Periods
Sometimes, there may be a need to sync only particular objects of a specific model, and not to sync others. Or, there might be a necessity to keep particular objects separately, for easy access. For example, to sync only won opportunities, to divide sale orders by the salesperson or particular period of time. Therefore, the app lets limit objects for sync. The list of the model's objects to sync can be limited by:
1. Filters
2. Periods
With the help of filters, you can use any document storable field to distinguish a directory. Have a separate folder for individuals and companies, for European and American opportunities, for quotations and confirmed orders, for each project, etc.
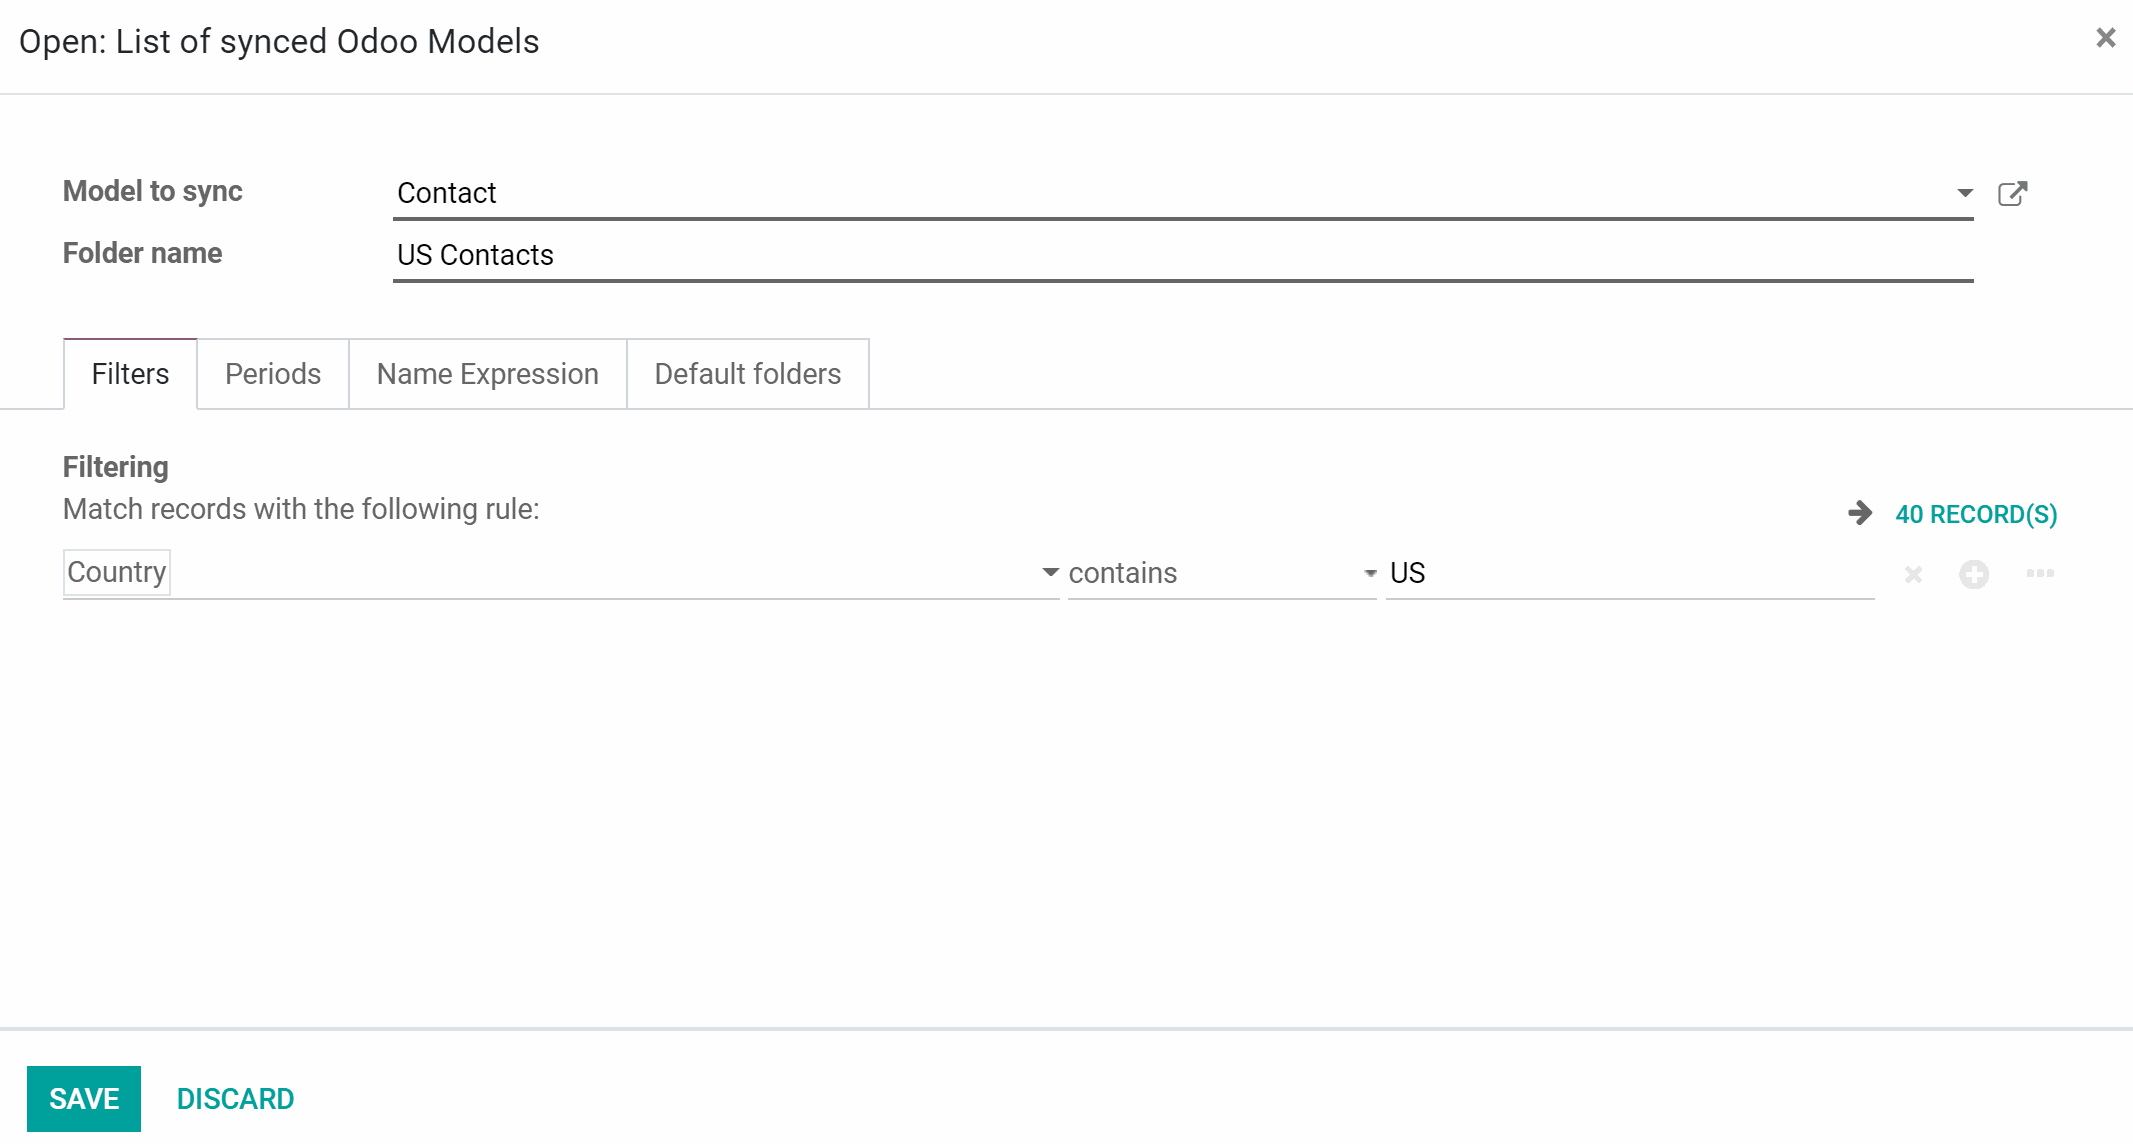
To add a filter:
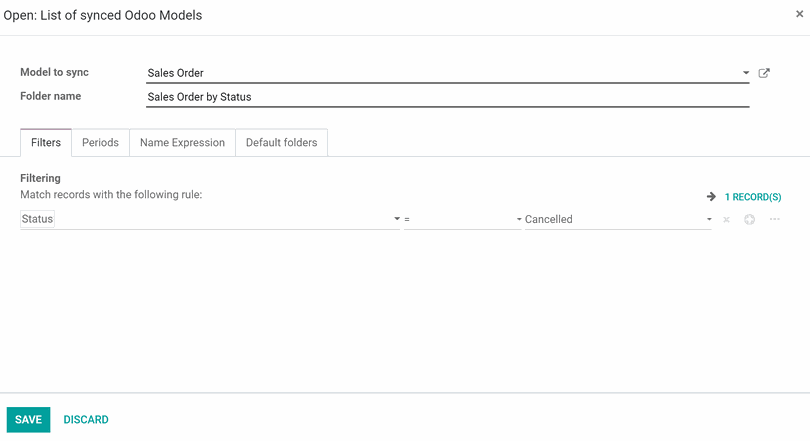
1. Click on one of the models to sync or start creating a new one
2. Click on the button '+Add a filter'
3. Set up the rule, for example, 'country contains US'
4. If there are any records, that match the filter you will see their number on the right side (click on it to see the records to make sure the filter is correctly set)
5. Optionally click on the '+' button by the filter to add one more rule, so only records, that match 'ALL' or 'ANY' of the rules will be considered for sync
6. Click 'Save'

Here are some useful filters examples by models:
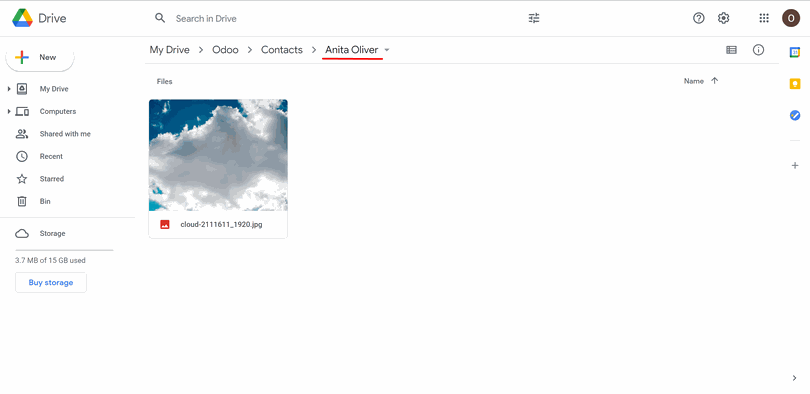
Sync only projects of a particular project manager. For that add a filter Project Manager = Anita Oliver

Sync only contacts of a particular country. For that add a filter Country = US
Sync only won opportunities. For that add a filter Is Won = Won

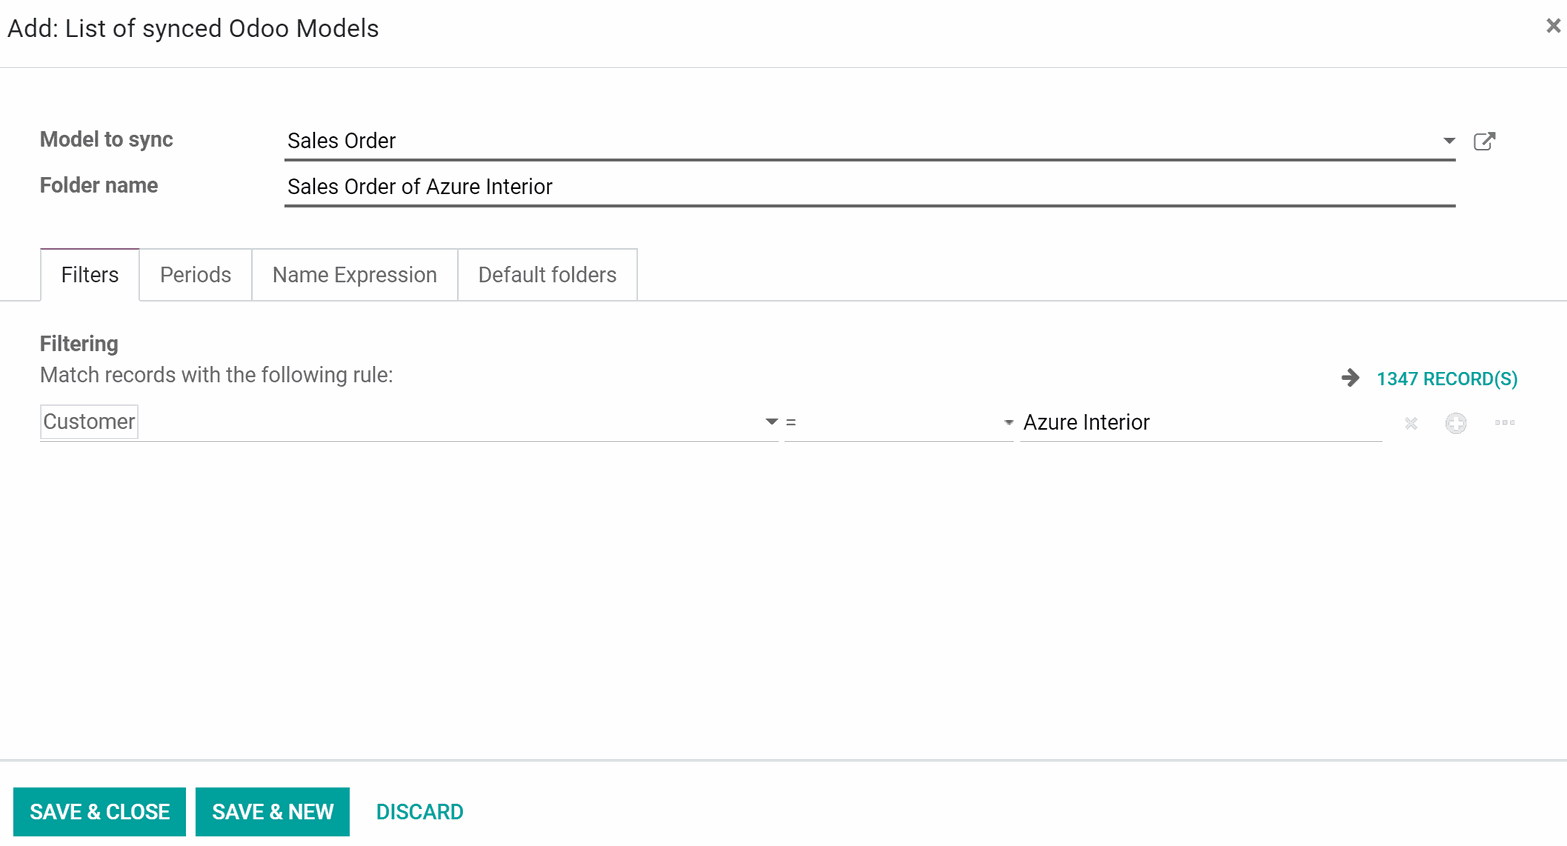
Sync only sale orders of a particular customer. For that add a filter Customer = Azure Interior
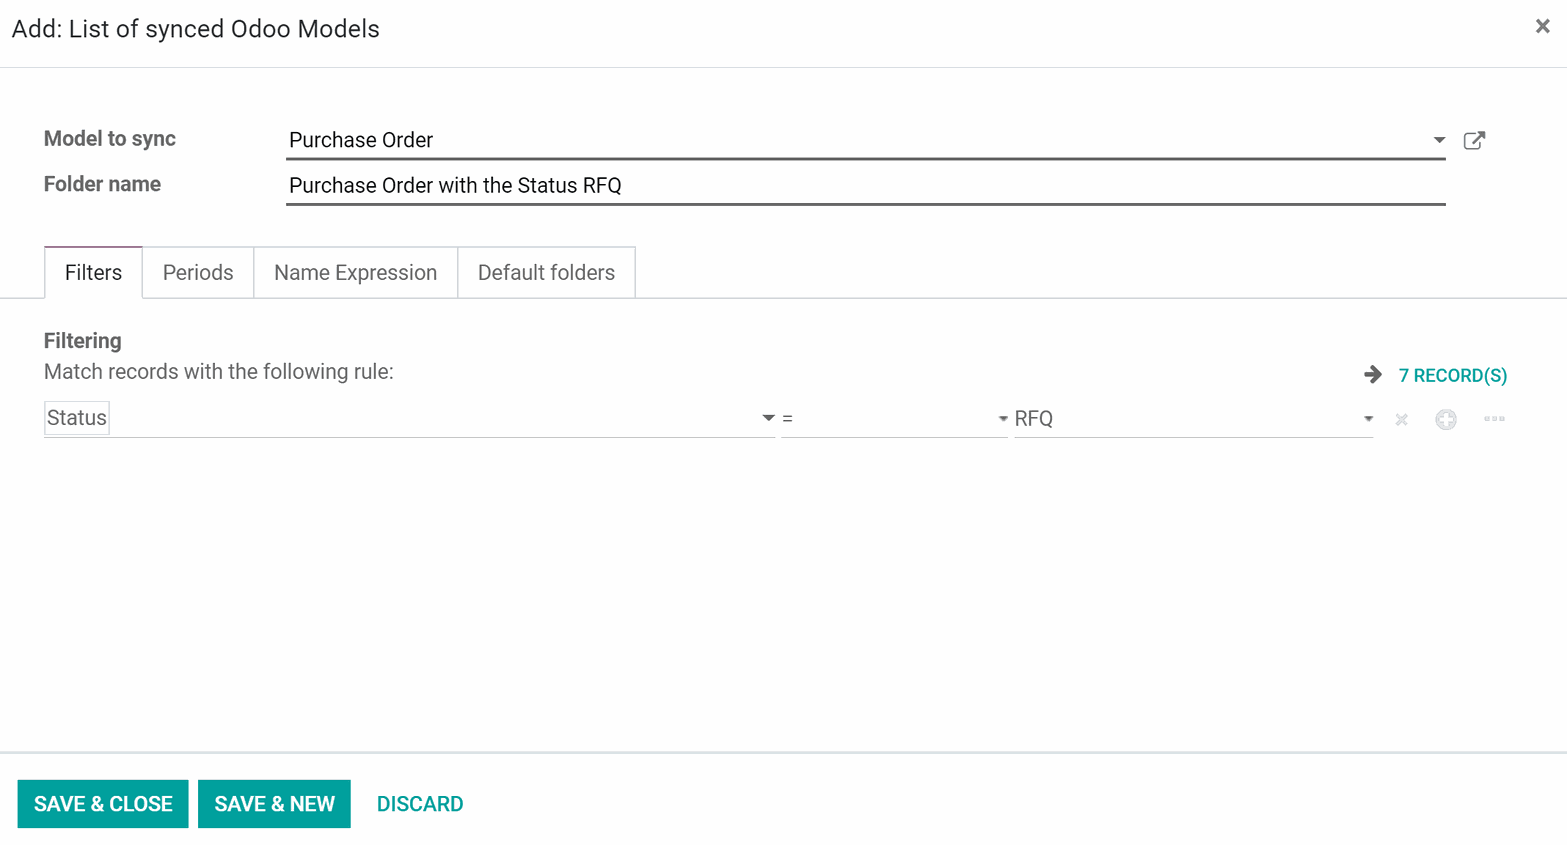
Sync only purchase orders with a particular status. For that add a filter Status = RFQ
Sync only appointments of a particular responsible person. For that add a filter Responsible = Anita Oliver

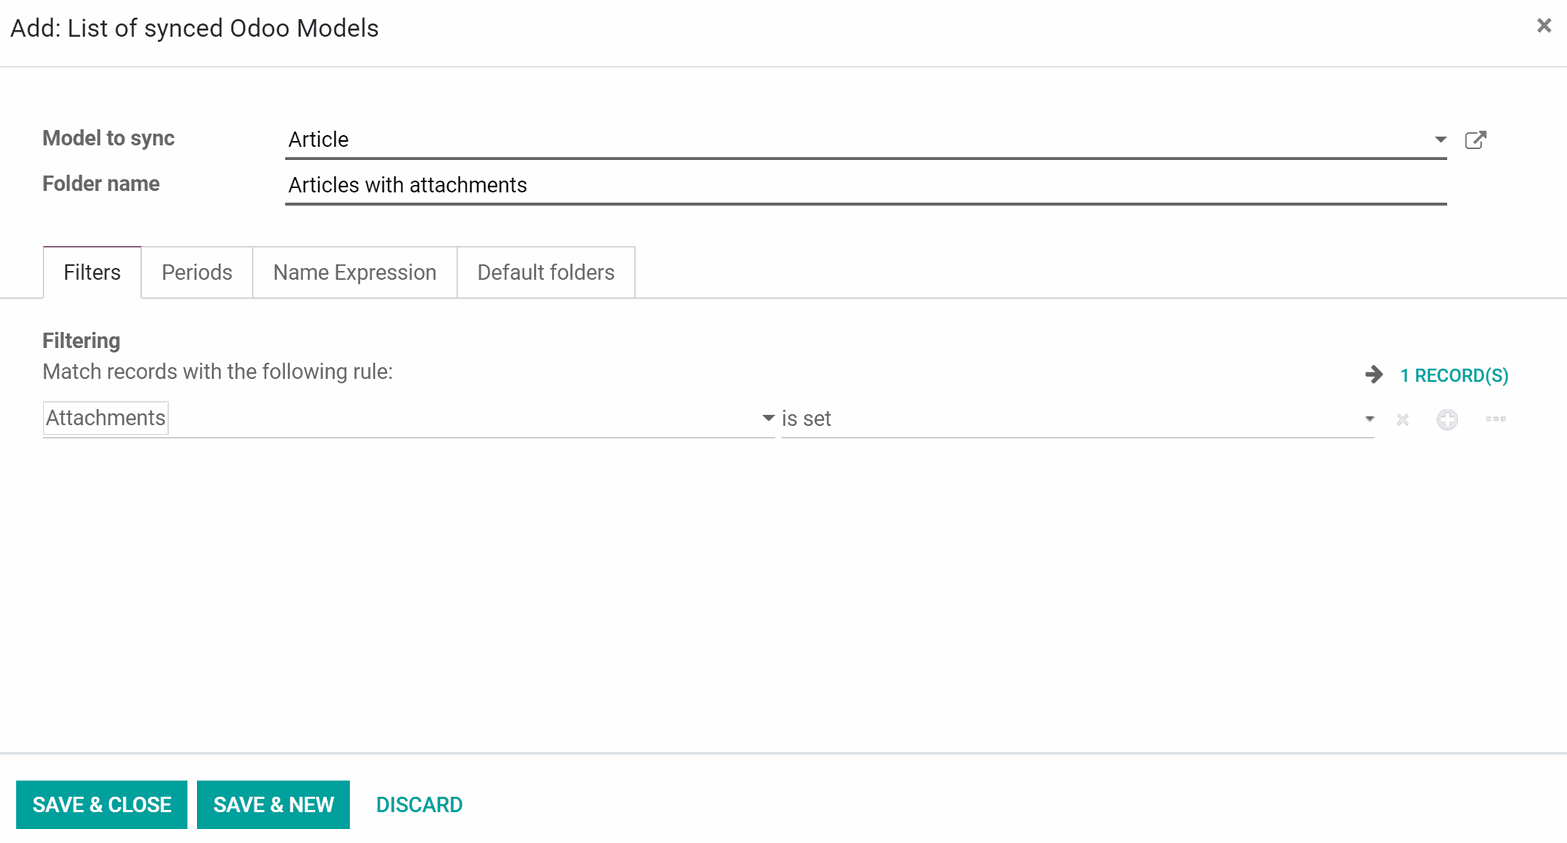
Sync only articles with attachments. For that add a filter Attachment is set
You can create as many models to sync, that refer to the same model as you want. But, try to make filters self-exclusive in order for a document can be definitely assigned. For instance, 'customer but not supplier', 'supplier but not customer'. Otherwise, a specific document folder will be synced to the model to sync, which sequence is smaller (such models are higher in the list 'Models to Sync'). For example, you have 2 Models to sync: 'Sale Orders' and 'Cancelled Sale Orders'. The order S00001 was cancelled and therefore it matches the conditions of both models. However, the Model to sync 'Cancelled Sale Orders' has a smaller sequence, as it was placed above the model 'Sale Orders'. Thus, the object S00001 will be synced to the model 'Cancelled Sale Orders'.
If, after adding some filters or periods, an object no longer relates to a Model for sync, then its folder with files will still remain in the Cloud Client and will be accessible from Odoo. However, the newly added object files will not be synchronized and will be kept in Odoo.
If an object is used to relate to a non synced Model, but later matched the conditions of a Model to sync, then its folder will be created in the related directory in Cloud Client and the attachments will be synced.
It is also possible, to limit documents for sync by relative periods through using date fields of linked documents. That will help to minimize the consumption of the resources spent on the sync and will let you concentrate only on the relevant objects. For example, sync only leads registered in the last 3 months or invoices updated the last week.
Periods are especially useful when we want to create a special folder for the old objects. In order, to keep those separately. For example, you can create such folders as ‘this year invoices’, ‘last year invoices’, ‘archived invoices’. Otherwise, when a synced invoice no longer matches any filters or periods, it will remain in the same folder in the Cloud Client, but will no longer be checked during the sync.
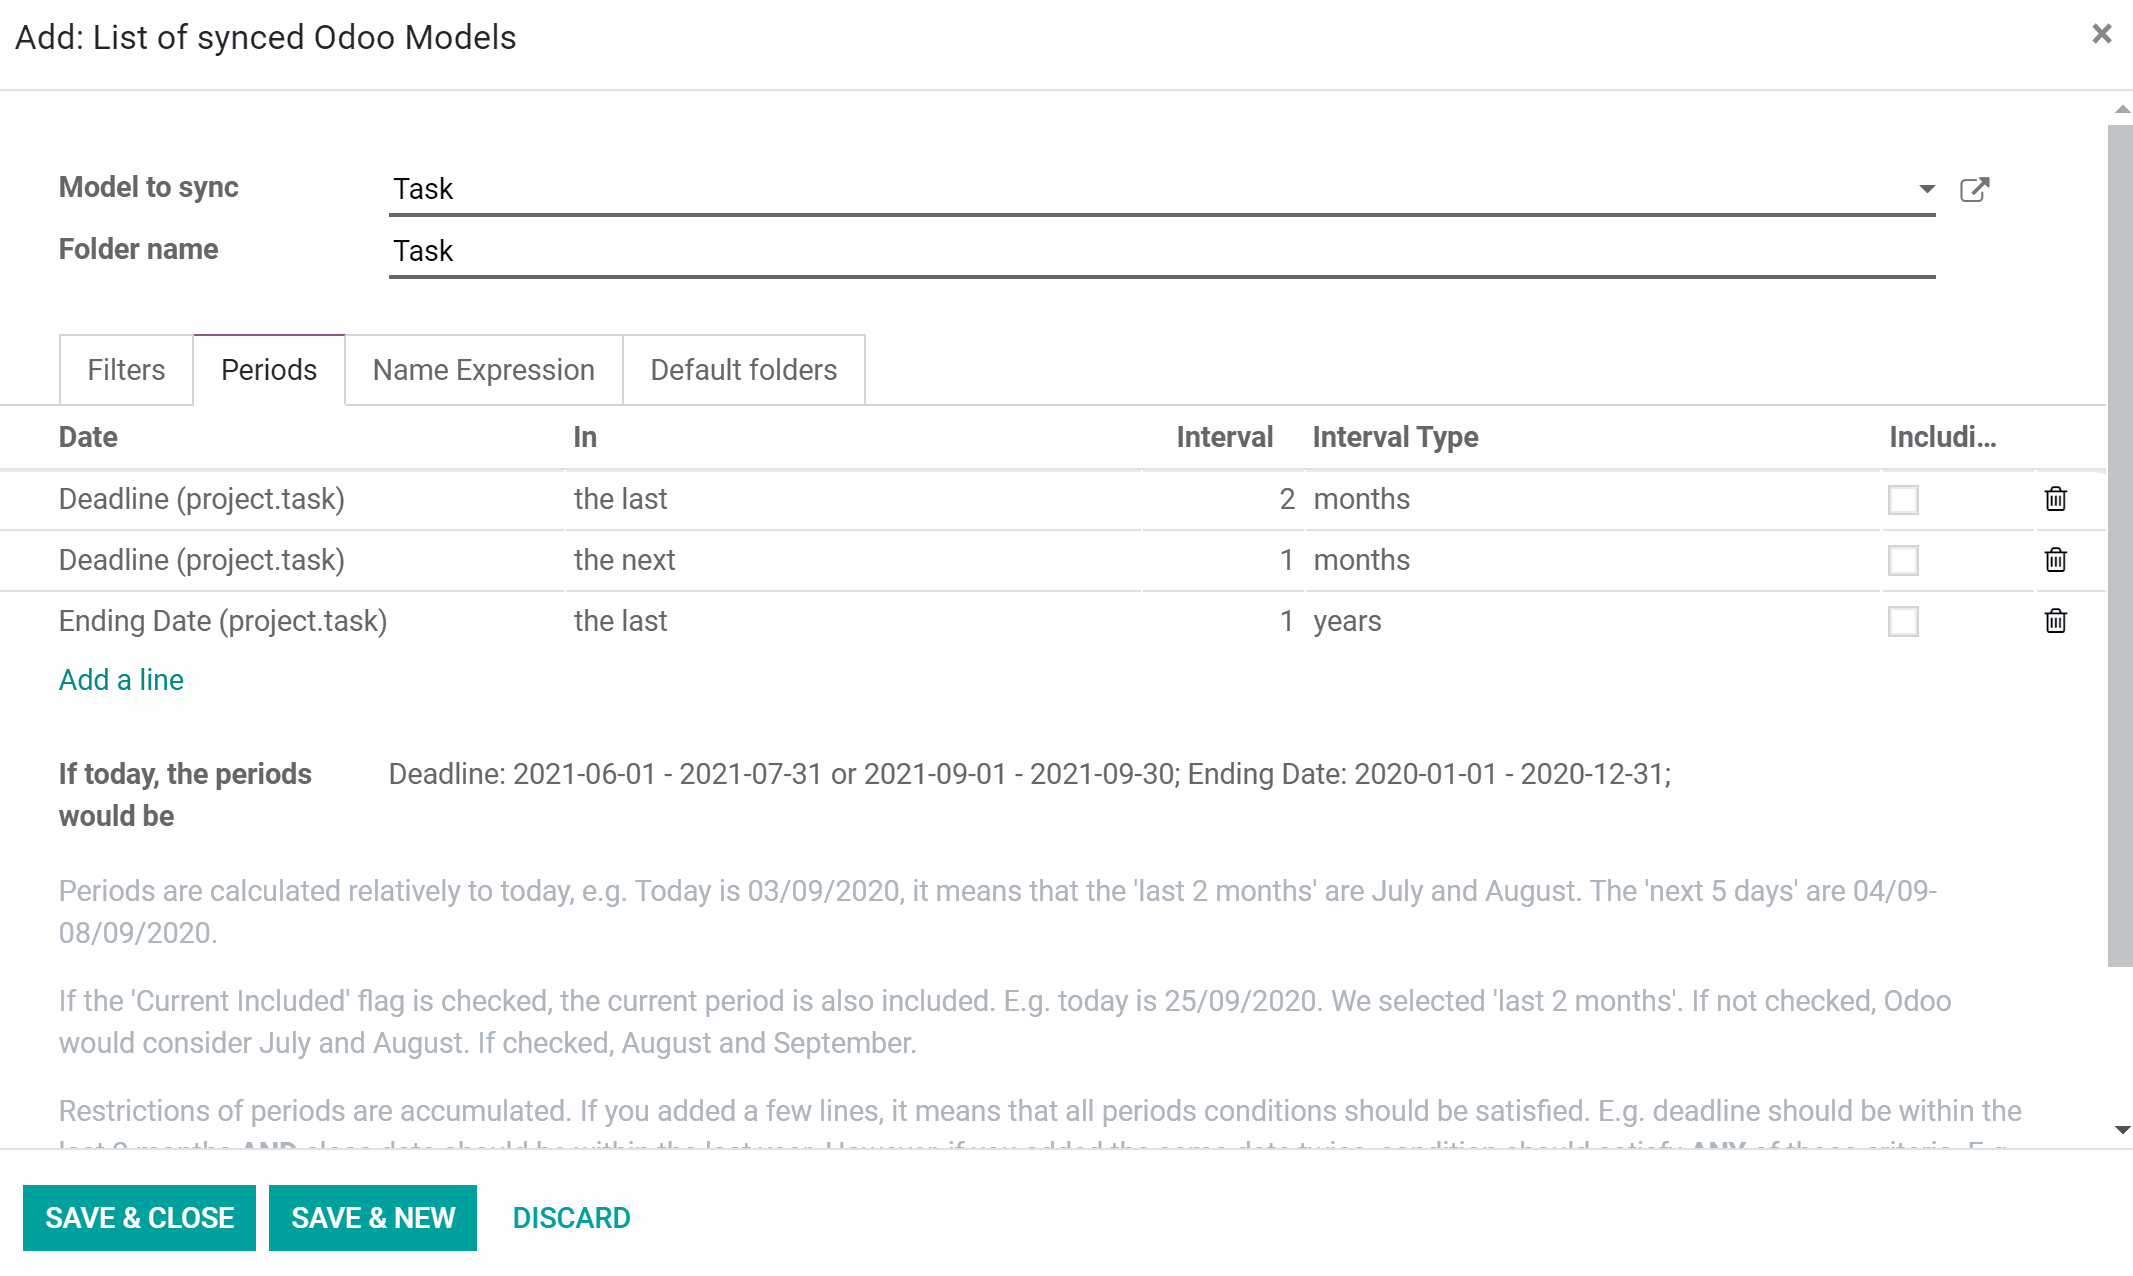
To set the time period of a model to sync:
1. Click on one of the models to sync or start creating a new one
2. Choose the tab 'Periods'
3. Click 'Add a line'
4. Choose the object's field, which will be considered to choose the objects for sync
5. Chose to consider the next or the last period
6. Set interval and interval type
7. Tick the box 'Including current', to include the current period to the calculations (For example, today is 25/09/2020. For example, in case 'last 2 months' is selected. If the box is not checked, Odoo would consider July and August. If checked, August and September)
8. You can check the set periods below in the section 'If today, the periods would be...'
9. Optionally add some more periods
10. Click 'Save'
Periods are calculated relatively to today, for example, today is 03/09/2020, which means that the 'last 2 months' are July and August. The 'next 5 days' are 04/09-08/09/2020. If the 'Including current' flag is checked, the current period is also included. For example, today is 25/09/2020. For example, in case 'last 2 months' is selected. If the box is not checked, Odoo would consider July and August. If checked, August and September
Restrictions of periods are accumulated. If you added a few lines, it means that all periods conditions should be satisfied. For example, the deadline should be within the last 2 months AND the ending date should be within the last year. However, if you added the same date field twice, the condition should satisfy ANY of those criteria. For example, the deadline should be within the last 2 months OR the next month AND the ending date should be within the last year.
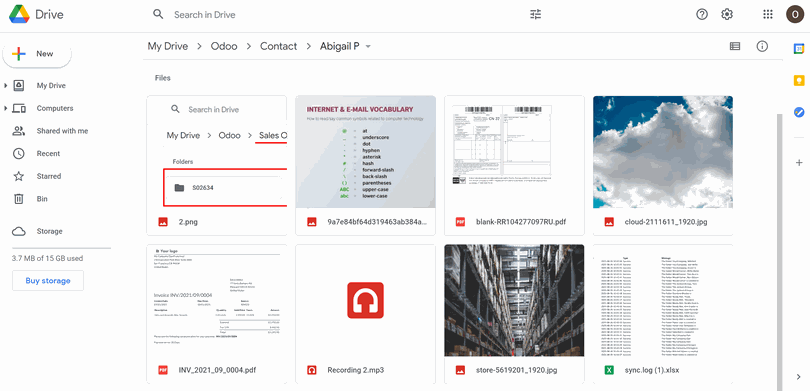
Folders' Structure
Based on the configured sync models, the app would create the following folders’ structure:
1. Odoo - a core folder for sync
2. Models - folders for each Odoo document type. (For example, 'Projects', 'Partners'. Distinguished by the domain (filter) there might be more specific folders: for example, 'Customer 1 Projects', 'Projects of the Customer 2', 'Internal Projects', etc. (see Sync Models))
3. Objects - folders for each document, for example, 'Project 1' or 'Customer 1'
4. Files and folders related to this Odoo document to be synced.
As a result, you may have for instance:
Odoo / Projects / Project 1 / files and folders related to project 1
Odoo / Customers / Customer 1 / files and folders related to the customer 1
With the help of Filters, you can also achieve the following structures (see Filters & Periods):
Odoo / Customer 1 Projects / Project 1, Project 2 ,... AND Odoo / Customer 2 Projects / Project 3, ... (In this case, two models to sync related to Projects were created and were filtered by the customer)
You can use any document storable field to distinguish a directory. Have a separate folder for individuals and companies, for European and American opportunities, for quotations and confirmed orders, for each project, etc. However, each model to sync should be created separately (as in the case above, when two models to sync filtered by the customer were created). So, if you want to filter Sale Orders by a salesperson and store it that way in the Cloud Client, then you should create a separate model to sync to each of your salespeople.
You can create as many models to sync, that refer to the same model as you want. But, try to make filters self-exclusive, so a document can be definitely assigned. For instance, 'customer but not supplier', 'supplier but not customer'. Otherwise, a specific document folder will be synced to the model to sync, which sequence is smaller (such models are higher in the list 'Models to Sync'). You can change a model's sequence by drag&drop (see Sync Models).
If, after adding some filters or periods, an object no longer relates to the ones for sync, then its folder with files will still remain in the Cloud Client and will be accessible from Odoo. However, the newly added object files will not be synchronized and will be kept in Odoo.
If an object used to relate to the non synced ones, but later matched the conditions, then its folder will be created in the Cloud Client and the attachments will be synced.
This structure is always flat, meaning that there are only those levels of hierarchy. Thus, it is correct that various document types can't be done within the same structure. Within the folder 'Customer 1' it is impossible to keep the files related both to sale orders, invoices, and projects. Each of those document types has its own (or a few own) folders. Otherwise, there will not be a chance to make backward synchronization, since there would be no criteria to rely upon.
Name Expressions
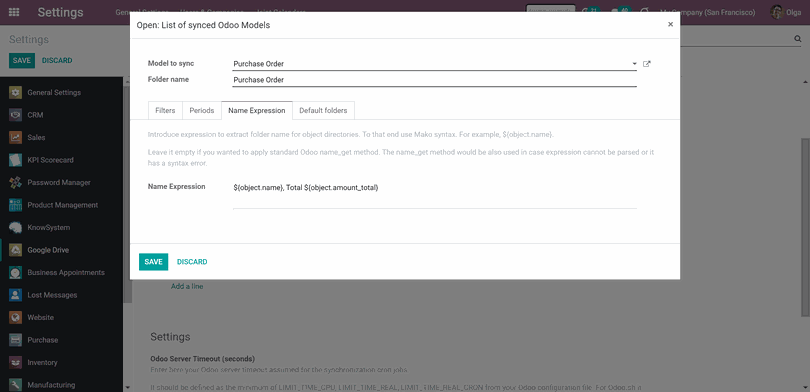
It is also possible, to define the rules for cloud folder names, so they would include the information of one or several fields. To that end-use Mako syntax. For example, ${object.name}. Introduce expression to extract folder name for object directories or leave the field empty if you want to apply the standard Odoo name_get method.
To add an object's name using the Mako syntax:
1. Start creating and choose a model to sync, or start editing an existing one, if it wasn't synced yet
2. Open the tab Name Expression
3. Type the name using Mako syntax in the field 'Name Expression'
4. Click 'Save'
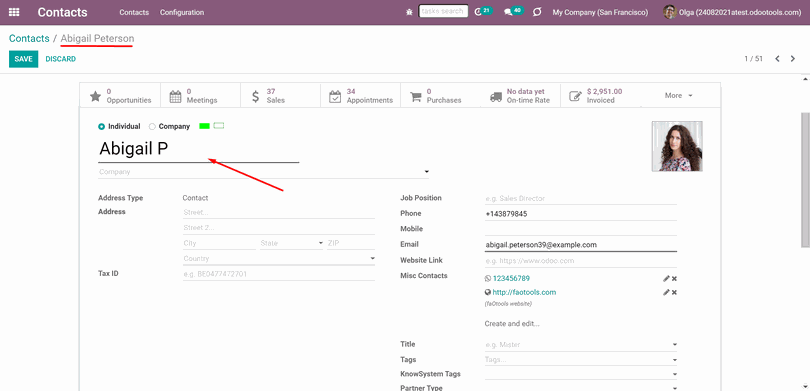
An expression, created with the help of Mako Syntax starts with the dollar sign $ and is written in curly brackets {}. Everything, that is not included in brackets, will be written in the folder's name. For example, let's add a name expression to Contacts. Add the expression 'Files of ${object.name}, synced' in the field 'Name Expression'. After sync, the contact's folders will look the following way: Files of Abigail Peterson, synced; Files of Anita Oliver, synced. The comma was also outside the brackets, so it will be also applied right after the parsed expression.
You can add a condition, so if the object has a particular field filled, then the name will be taken from the particular field. The conditions are introduced by the operator 'and'. The field following the last 'and' will be used as a name if all the previous conditions were true. The action, that should be done otherwise is introduced by the operator 'or'. For example, let's add the name expression '${object.mobile and object.mobile or "no mobile phone"}' to Contacts. In this example, if a contact has a mobile phone, then the field mobile phone should be used for the folder's name. Otherwise, the information in the quotation marks will be used, in this case - no phone. After sync, the contact's folders will look the following way: -43454123453; no phone. Pay attention, that the mobile number starts with -, however there should be +. That happened because direct sync replaces such symbols with '-'. It is done to avoid conflicts with file systems.
Try to avoid the following symbols in folders' and files' names: *, ?, ", ', :, <, >, /, +, %, !, @, \, /,. Direct sync will replace such symbols with '-'. It is done to avoid conflicts with file systems.
You can also create a complex expression, which contains information from several fields. In this case, each field should be written in separate curly brackets. Add a space to make sure they will not be written too close to each other. Let's add a complex expression '${object.name} ${object.phone and object.phone or "no phone"}, ${object.mobile and object.mobile or "no mobile"}' to Contacts. In this complex expression, the first represents an object's name, the second and the third are conditions, which check whether the fields phone and mobile are filled. After sync, the contact's folders will look the following way: Abigail Peterson 356745, no mobile; Anita Oliver no phone, -37854756231. Pay attention, that there isn't a coma, after the name expression, so it wasn't added in the result.
In case an expression is parsed successfully, the title of each object changes according to it.
In case the expression cannot be parsed because of the syntax error, the standard name_get method will be used.
When a part of the title can be parsed, and the second one contains a condition, you should also add the operator 'or' to the condition to introduce what to write in the title, if the condition is false. Otherwise, when the condition is not met, you will see 'False' as part of an object's title. For example, here is a name expression ${object.name}, ${object.phone and object.phone}. The second part of it ${object.phone and object.phone} is a condition. If the phone field is empty, then the result will look the following way: Abigail Petersen, False.
You can change the syntax anytime or even return to the default name_get method. For that, introduce a new name expression, or clear the field 'Name Expression' and with the next sync, the name_get method will be applied again.
If after rendering, the folder name appears to be empty, the app would use the standard name_get method to avoid folders without names.
Here are some useful examples of the names, created with the help of the Mako Syntax:
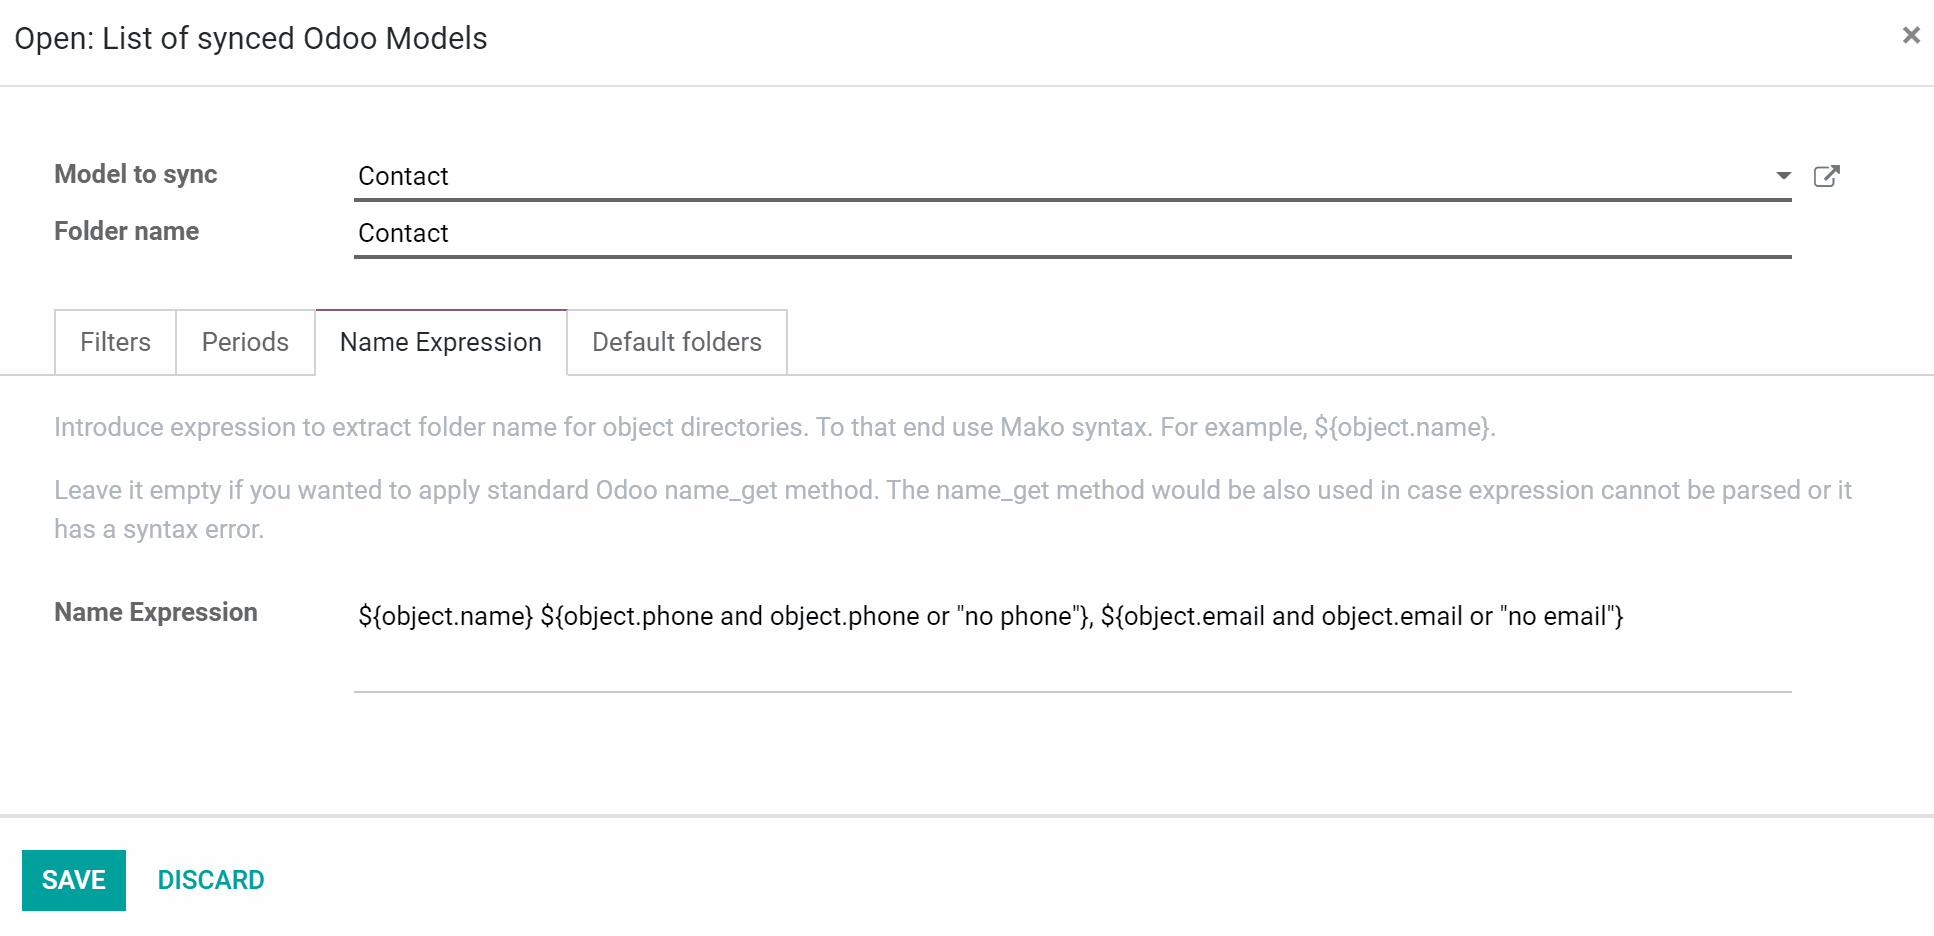
Name expression: ${object.name} ${object.phone and object.phone or "no phone"}, ${object.email and object.email or "no email"}
Result examples: Anita Oliver, 34854325, anitao@test.com
Use this expression to include contact's phone number and email in the folder's title.

Name expression: ${object.name}, ${object.state}
Result examples: S03093, draft; S03094, sale
Use this expression to see the state of a sale order in the folder's title.
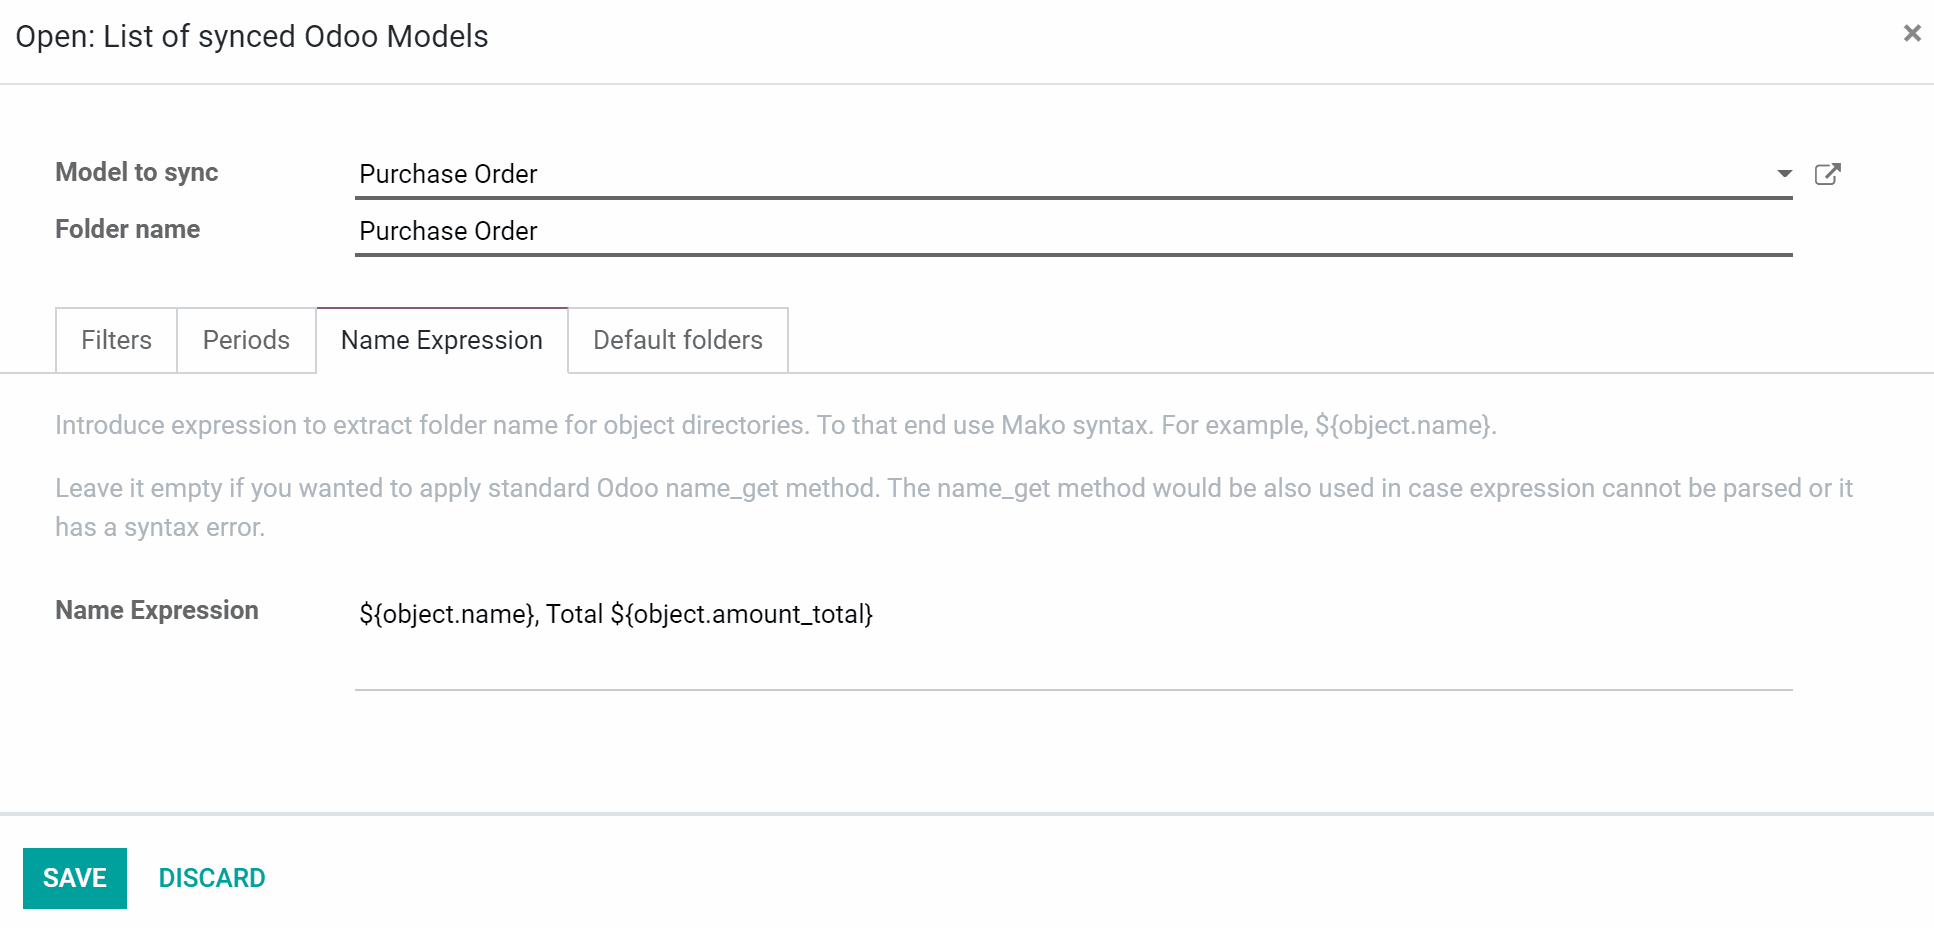
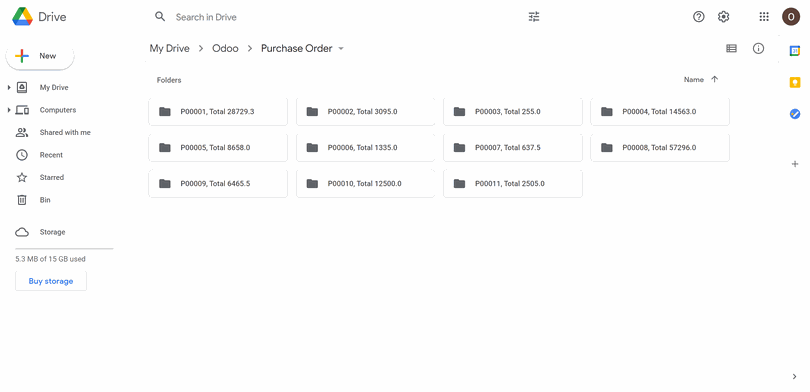
Name expression: ${object.name}, Total ${object.amount_total}
Result examples: P00001, Total 28700.0
Use this expression to see the total for a purchase order in the folder's title.
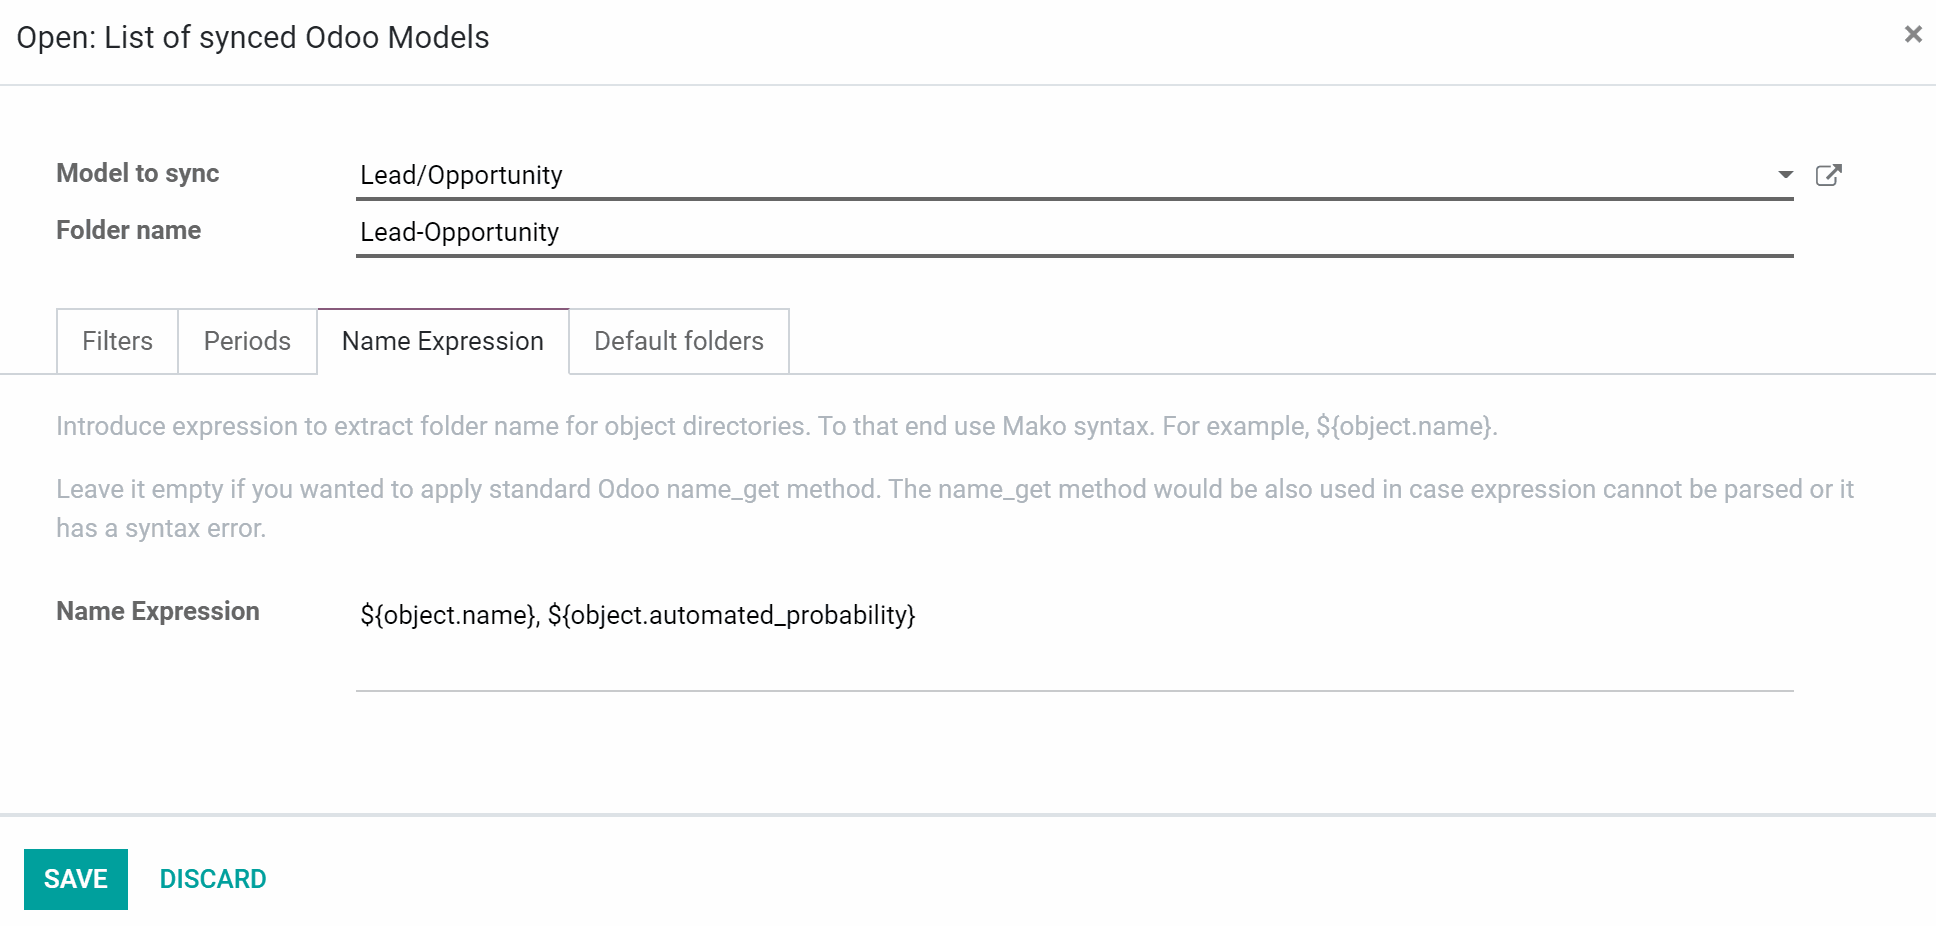
Name expression: ${object.name}, ${object.automated_probability}
Result examples: Table with chairs, 50.0
Use this expression to see the automated probability of an opportunity in the Cloud Client. The probability will change after sync as the opportunity will move in the pipeline.
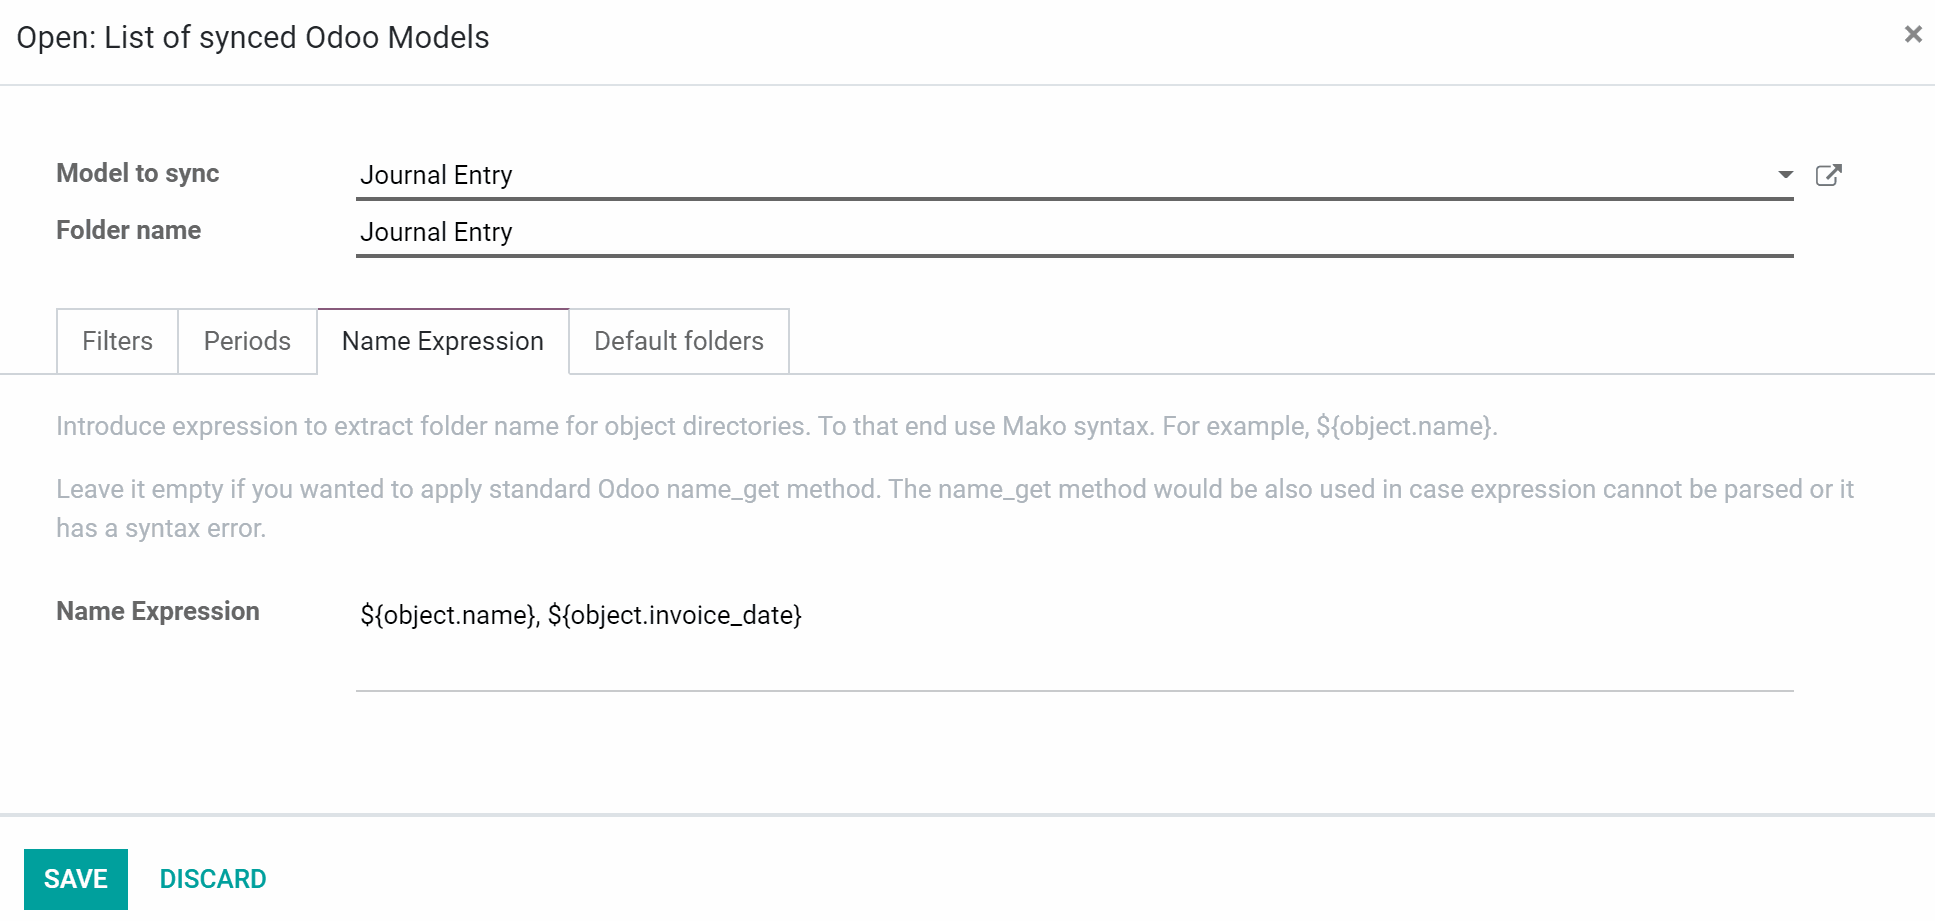
Name expression: ${object.name}, ${object.invoice_date}
Result examples: BILL-2018-09-0001, 2021-07-12
Use this expression to see the invoice date in the folder's title.
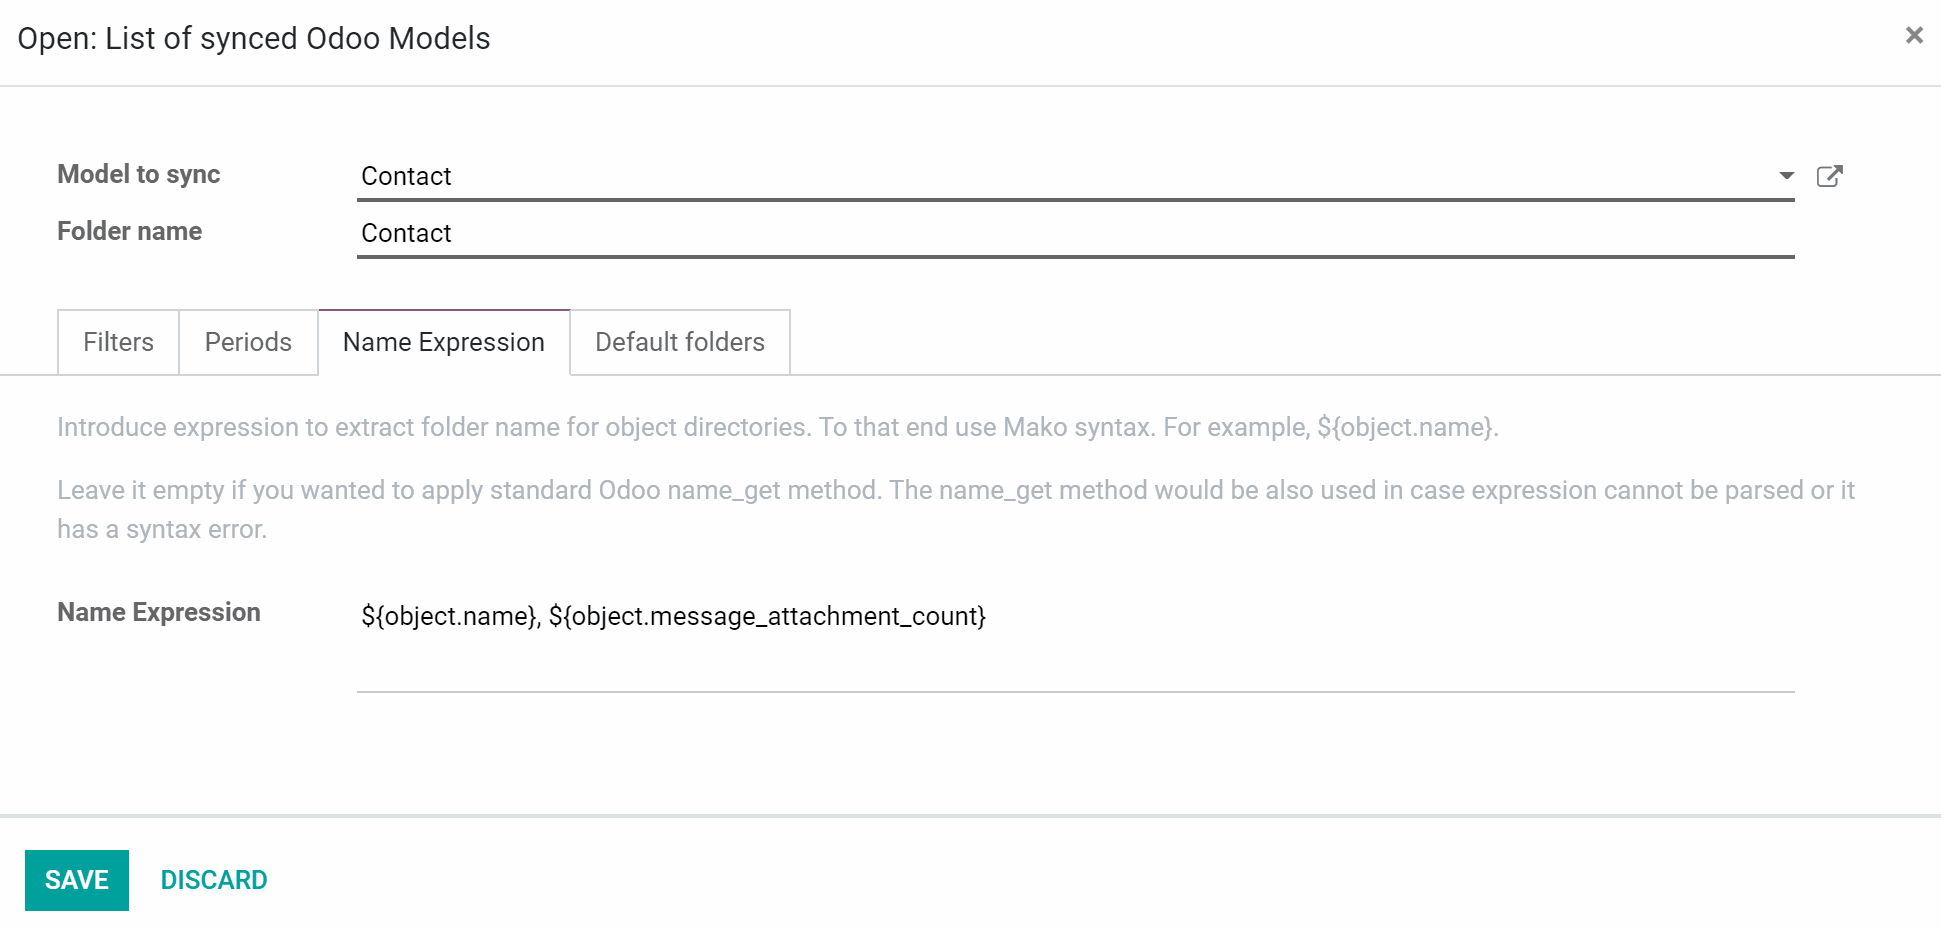
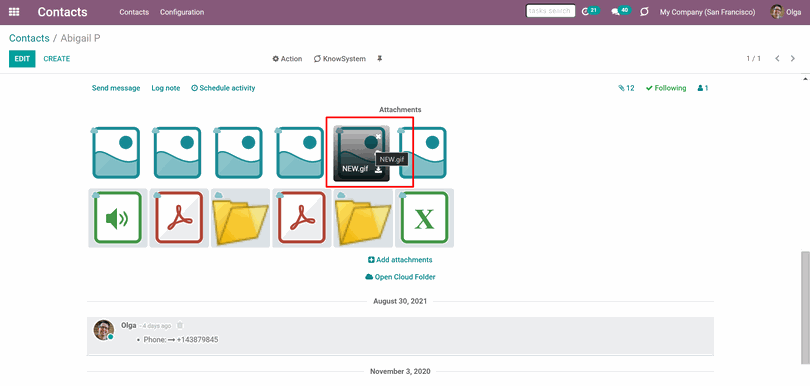
Name expression: ${object.name}, ${object.message_attachment_count}
Result examples: Abigail Peterson, 12
Use this expression to see how many attachments are in each object's folder, without opening it. Can be used for any Model to sync.
Default folders
Default folders - is the folders structure, which you want to see in the object's directory in the Cloud Client. With the first sync of an object, they are created in its cloud storage. Further synchronizations don't affect this setting, as well as any changes conducted to these folders, will not be synchronized. You can delete the folders anytime.
This function allows creating the same structure of folders in each object of the model to sync. For example, the model to sync 'Sale Order' was set. The default folders structure 'Folder 1 > Folder 1.1' was set. So at the end, the structure will be 'Odoo > Sale Order > S00001, S0002... > Folder 1 > Folder 1.1'.
To create a default folder:
1. Start creating and choose a model to sync, or start editing an existing one, if it wasn't synced yet
2. Open the tab Default Folders
3. Click Create
4. Type a name of a folder
5. Click create to add some more folders
6. Move folders by drag&drop to change the hierarchy
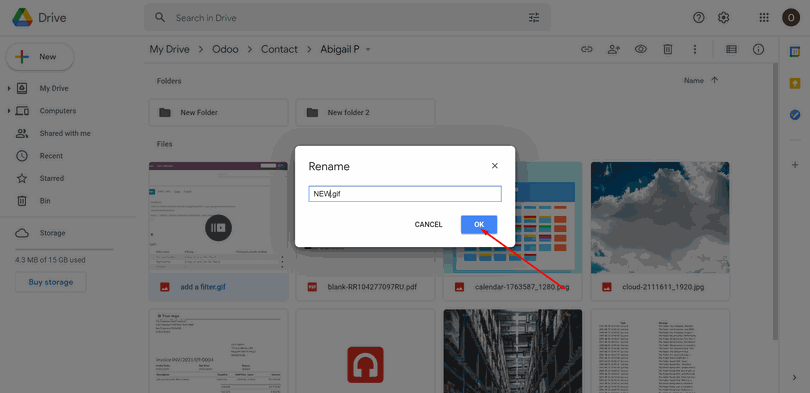
7. Click on the folder with the right side of the mouse: to create a folder inside the folder, to rename, edit or delete it
8. Click Save&Close

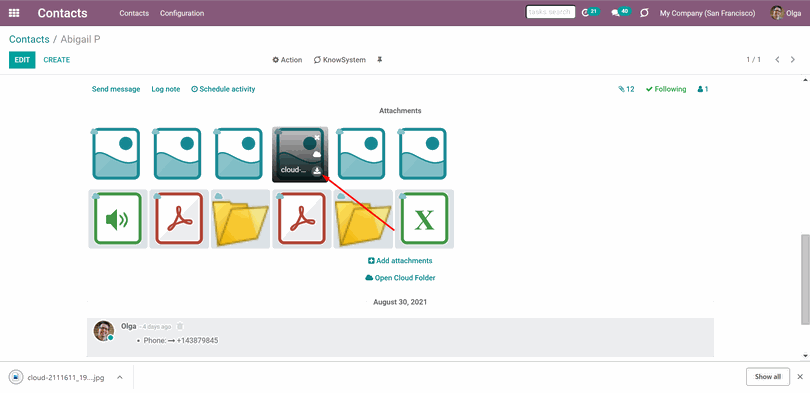
Synced Files and Folders in Odoo
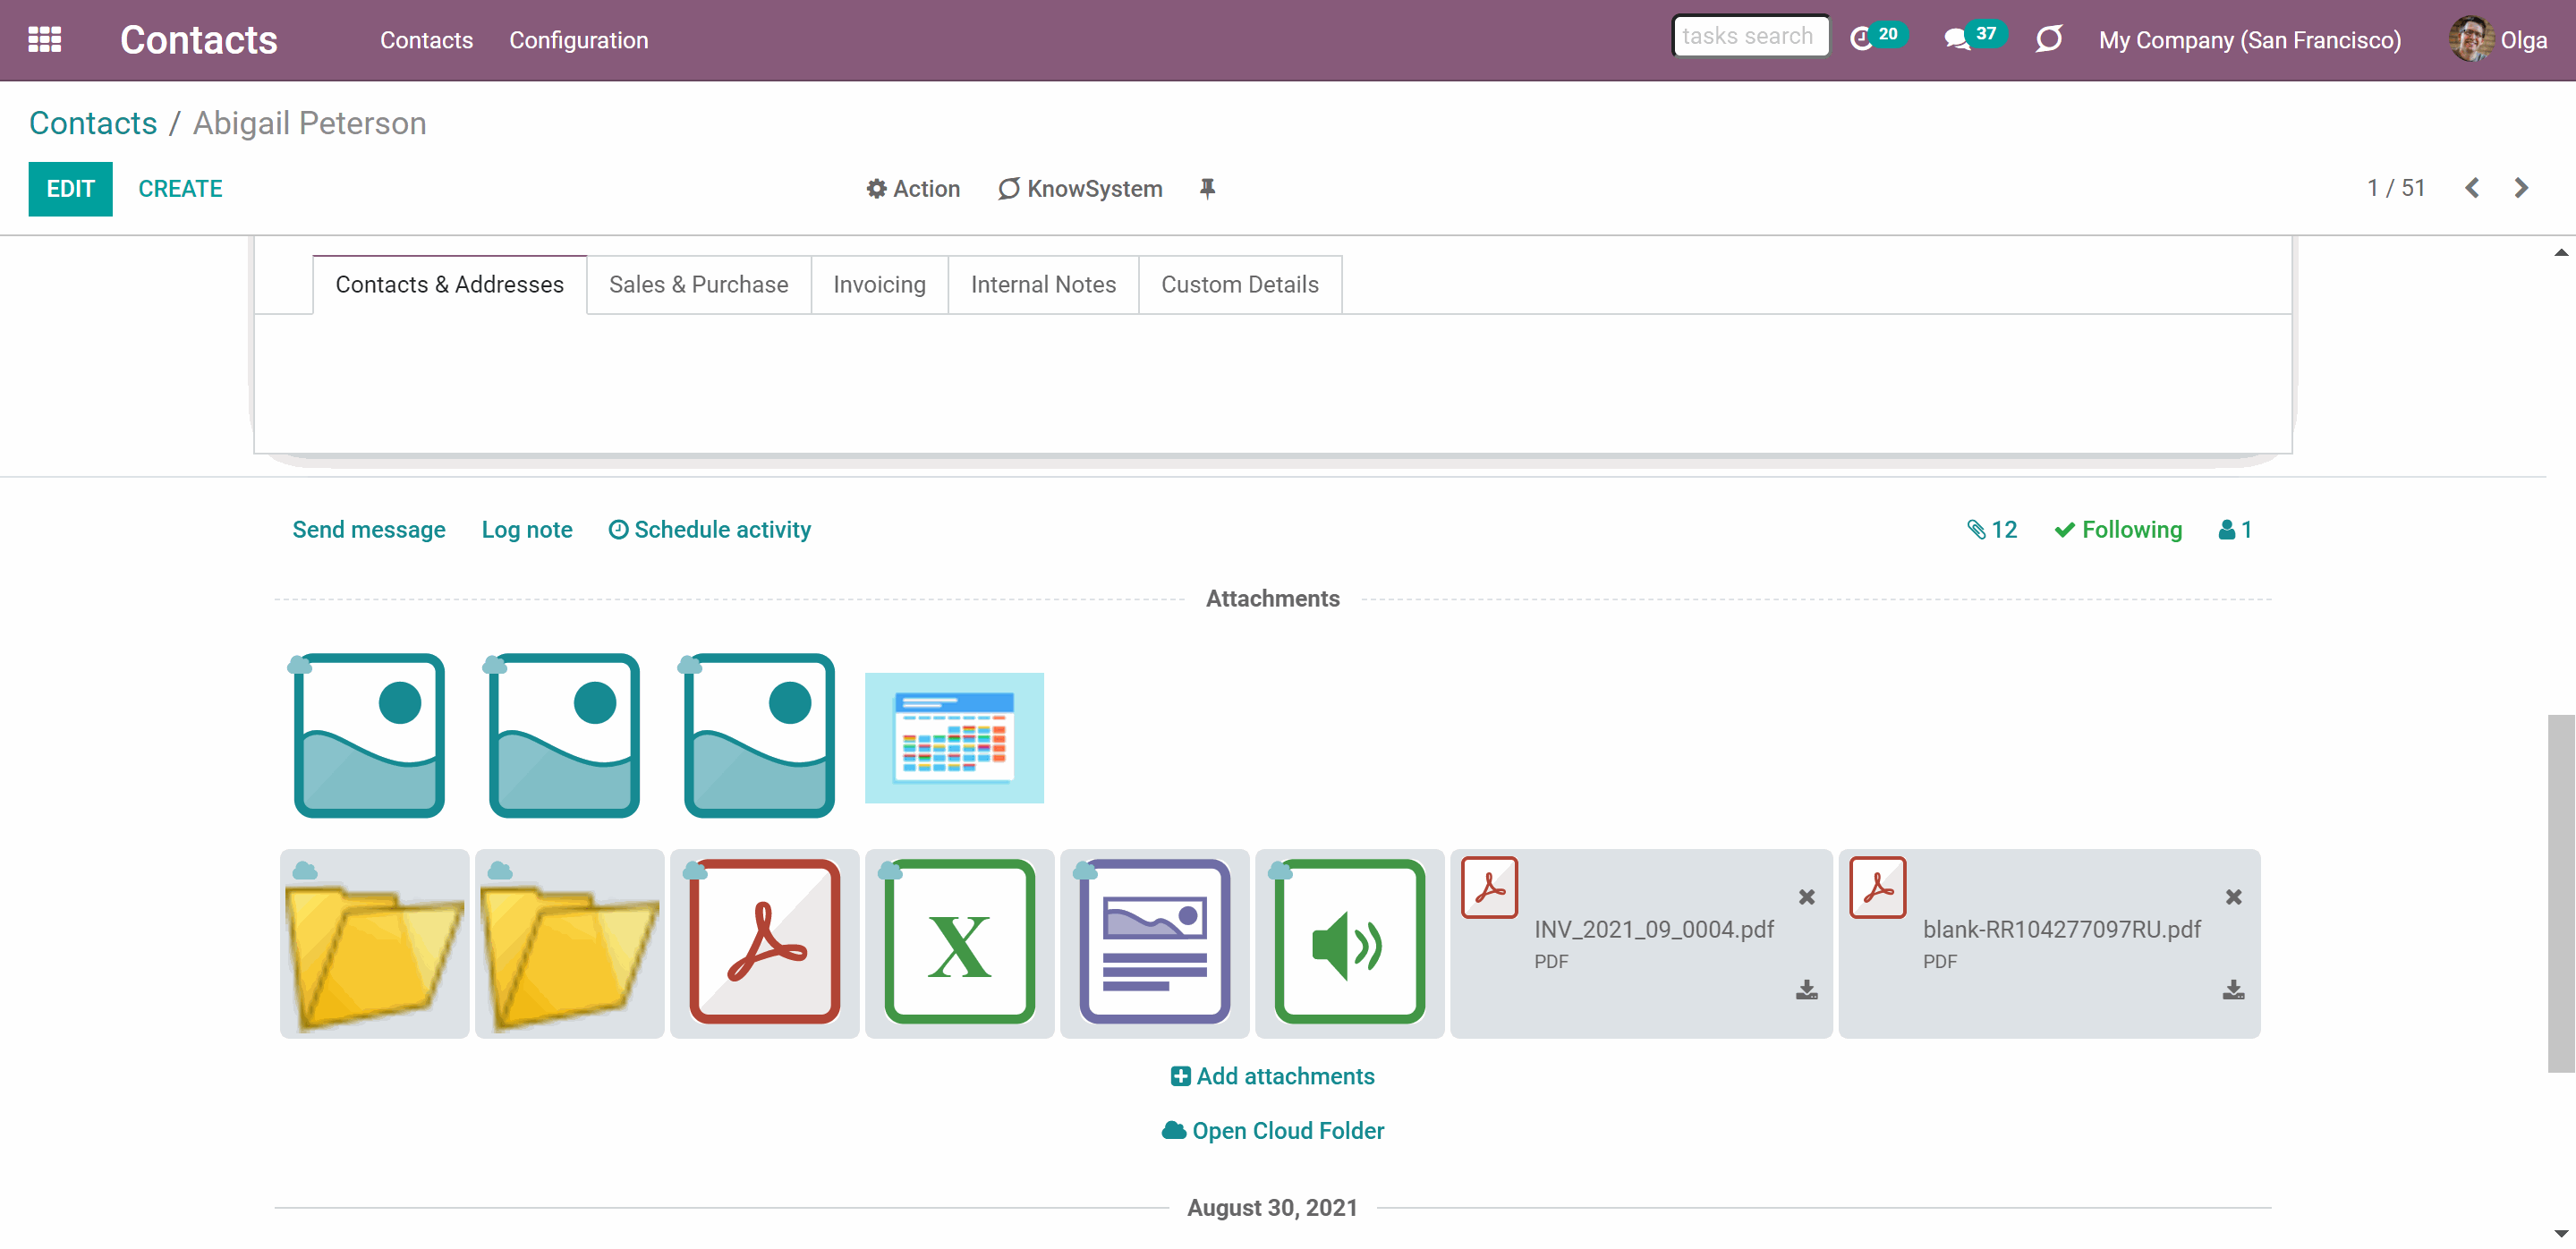
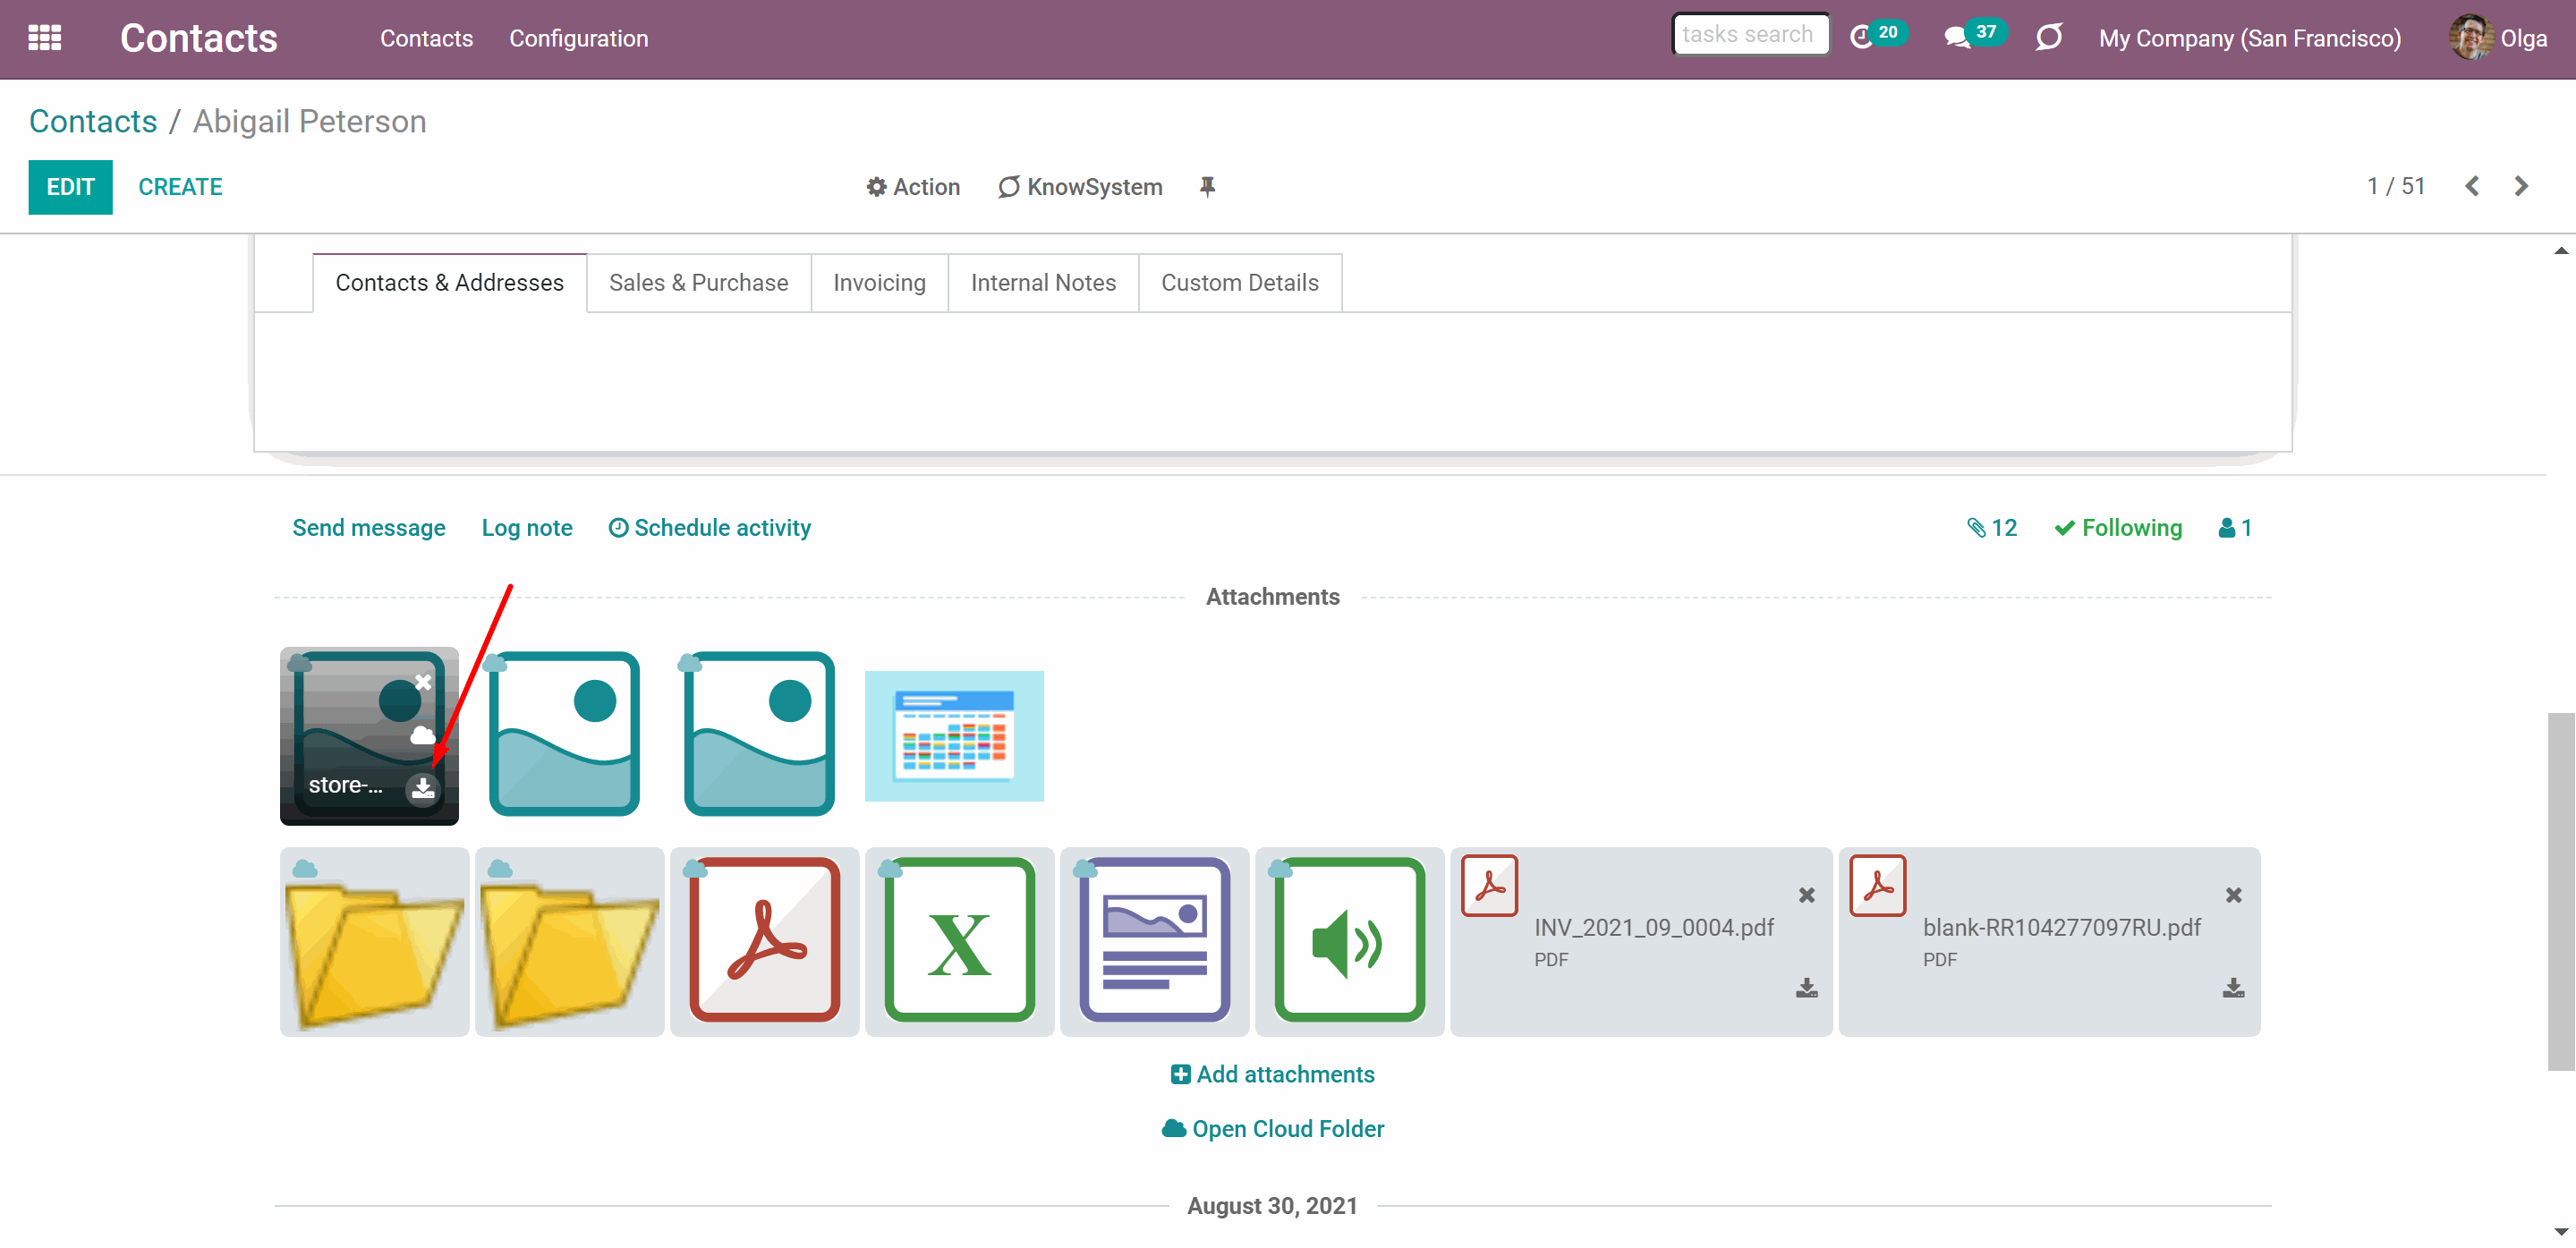
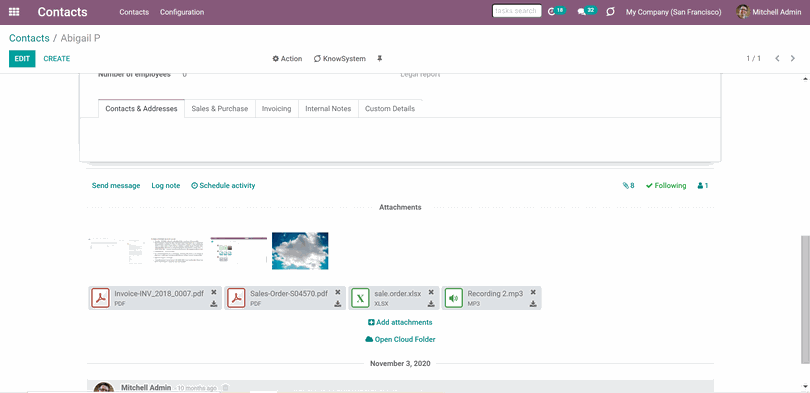
You can access both synced and not synced files and folders through the standard attachments box. To open it, just go to any Odoo object’s form view, find the ‘Clip’ icon, and click on it. Here you would see all object’s attachments, which users can manage. You can also conveniently open synced files and folders in cloud storage.
All files attached through ‘+add attachments’ would be synced to cloud storage with one of the next cron jobs. Until that, files will not change their look and will be displayed the same way as they are in Odoo.
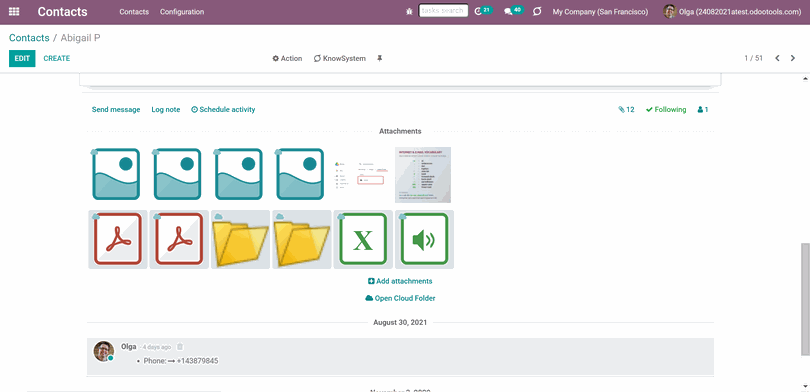
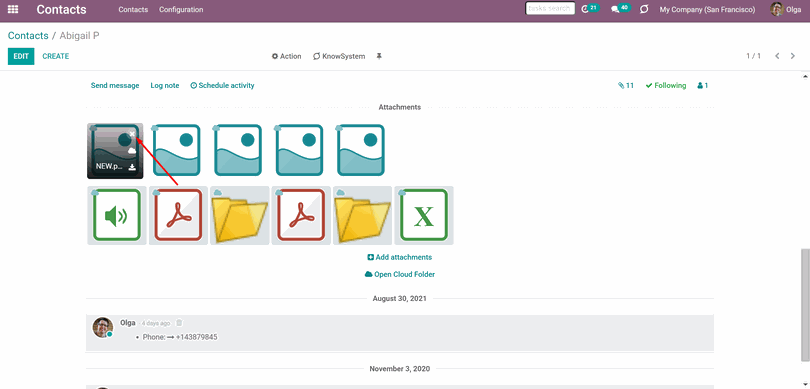
After the sync, the files will be marked by a cloud in the top left corner. Synced files would have app-related thumbnails instead of standard small previews to avoid excess requests to the Cloud Client for each form opening.
From the attachments box, you can also open the Cloud Folder to see all the synced files and folders related to the object. For that, the button 'Open Cloud Folder' is introduced. Click on it and in a new tab you will be redirected to the related folder.
The app assumes that the binary content of attachments is kept in cloud storage instead of the Odoo server. So, such attachments become of the URL type, and you may any time access them either from the attachments box or from the Cloud Client.
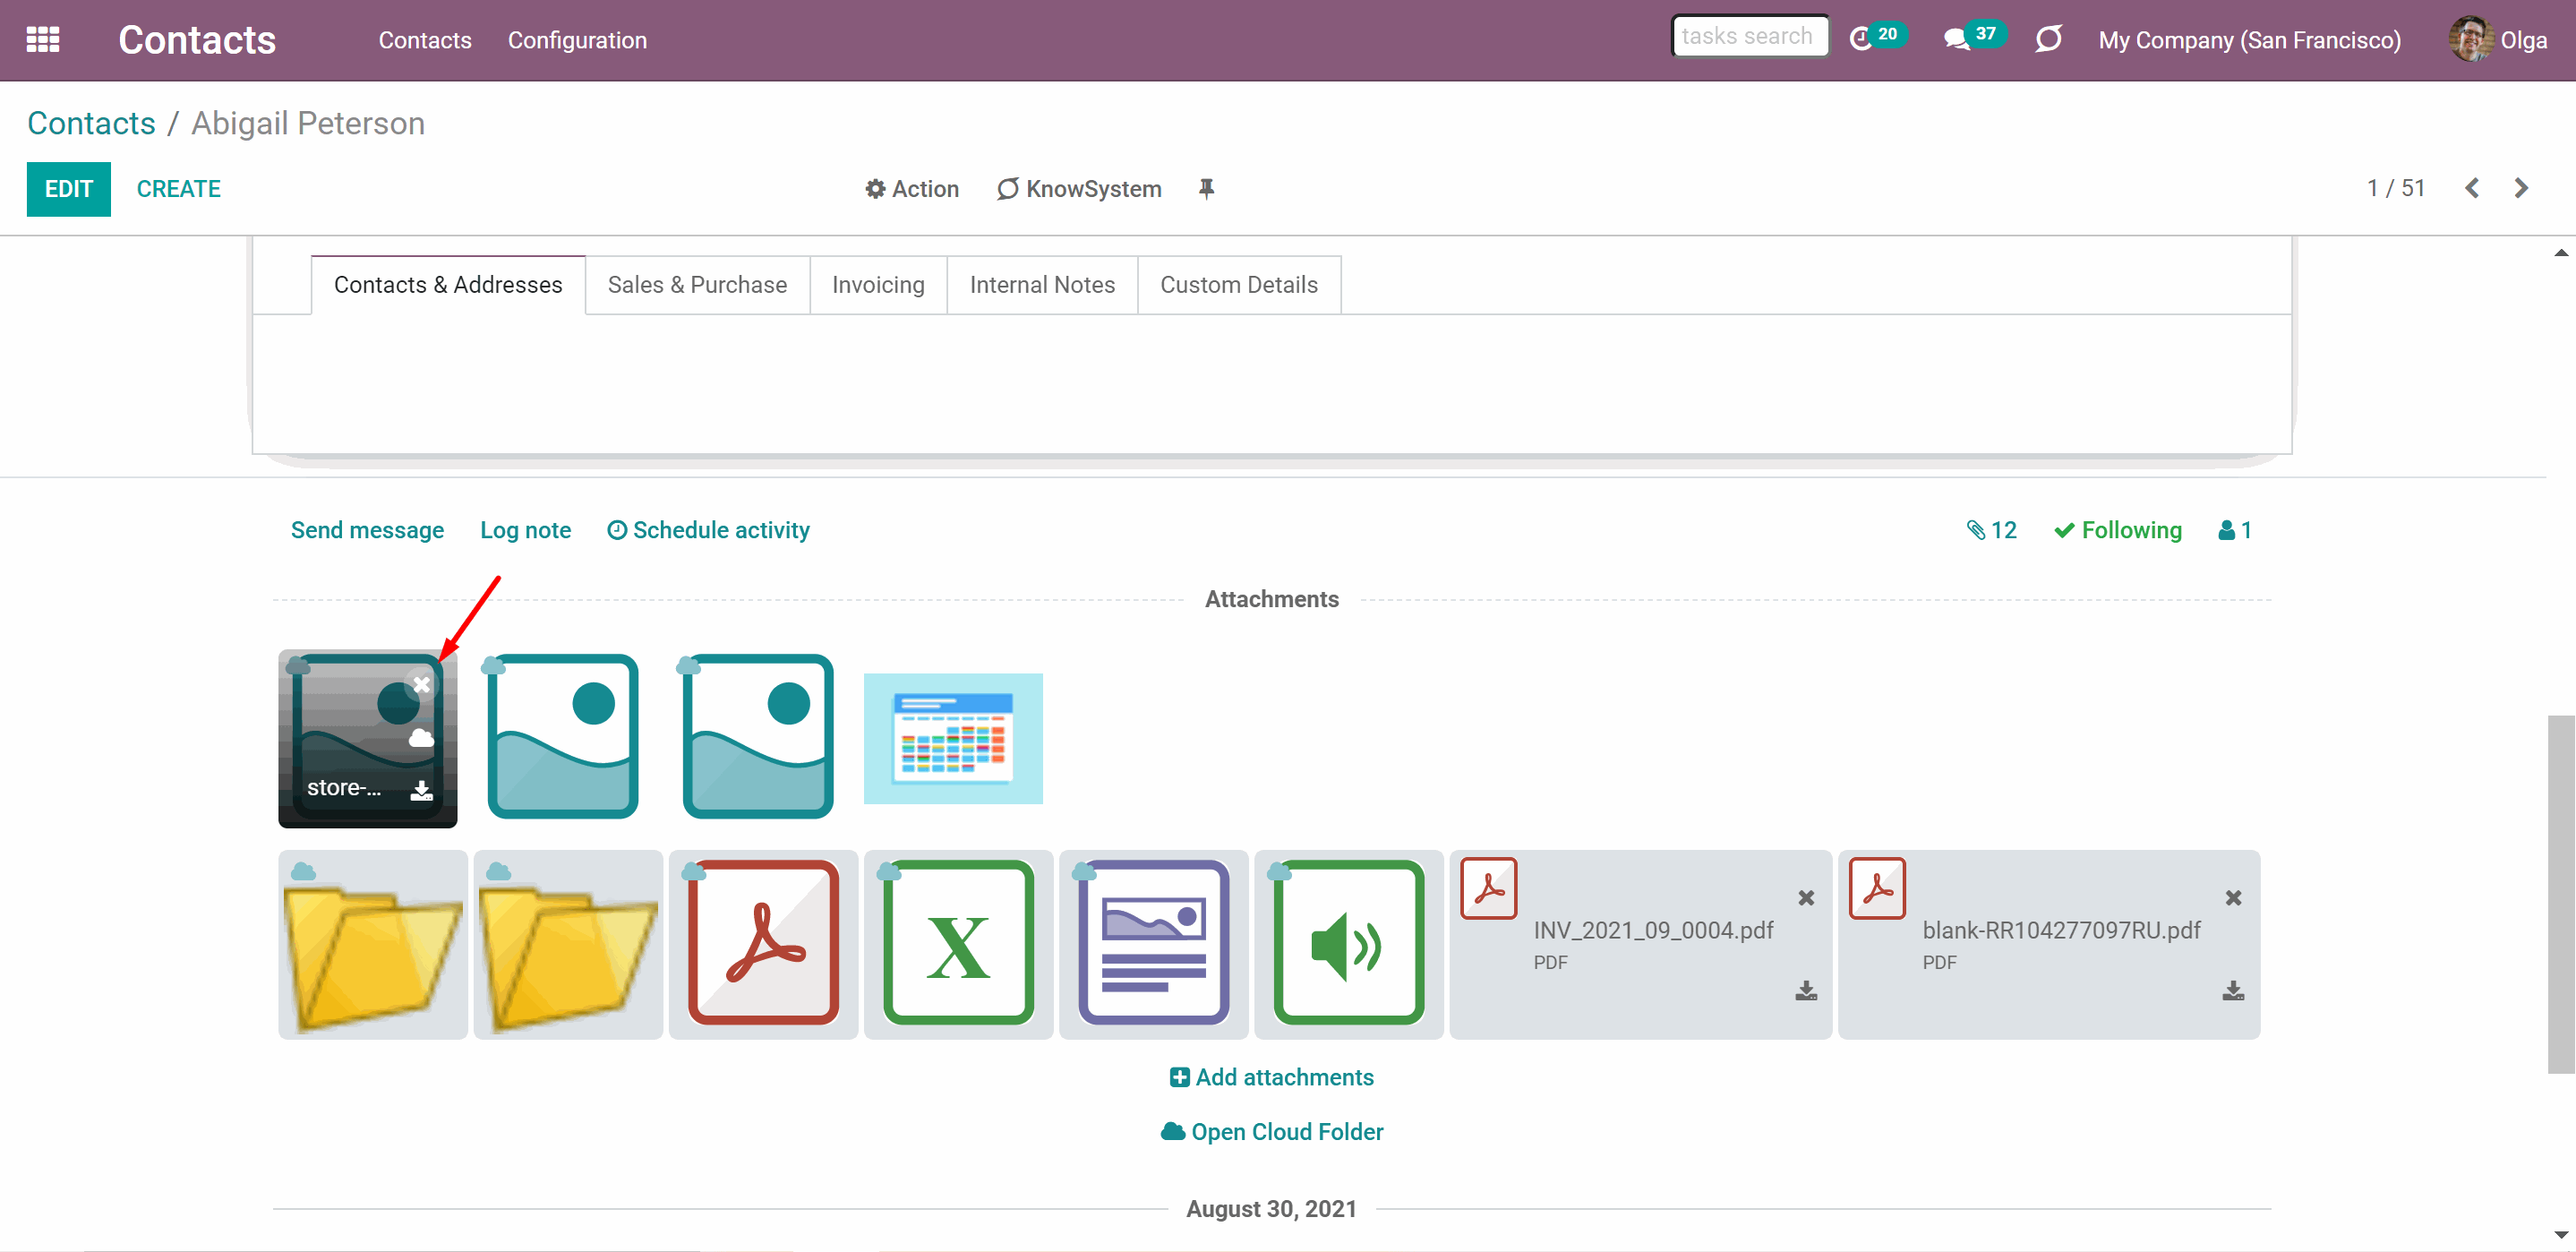
Both files and folders can be simply accessed by clicking on them. To open a file in the Cloud Client, click on the 'Open in the Cloud' button on the file. To open files in the Cloud Client, the module uses the same editor, which is set in your Cloud Client's settings.

Even after the sync, a user might download attachments locally by clicking on the ‘Download’ icon on the file. The only exception is folders. They do not have the button and can be downloaded only from the Cloud Client. The downloading of the synced files from Odoo doesn’t require login into the Cloud Client.
Odoo standard preview would equally work for standard Odoo attachments and synced attachments. However, files, which do not have the preview function in Odoo (for example, .doc), will be opened in the Cloud Client.
Synced files would have app-related thumbnail instead of standard small previews to avoid excess requests to the Cloud Client for each form opening.
If you click on the remove button, then after submitting your decision in a pop-up window, the link will be removed from the Odoo. And after the next sync, the file will be removed from the Cloud Storage as well (see How Synchronisation works).
If you deleted a folder related to this document type in the Cloud Client, their child files would be deleted as well. Thus, Odoo would remove related attachments. The folders, however, will be recovered with the next direct sync.
In object-related cloud folders, you may add subfolders. Such subfolders would be added as Odoo attachments for this object during one of the following backward synchronizations. They would be of URL type and shown with a special 'Folder' thumbnail. By clicking on it a user would be redirected to a linked cloud directory. Please take into account that only the first-level child folders would be shown in the attachment box. If they have other folders inside, those will not be shown in the attachments box.

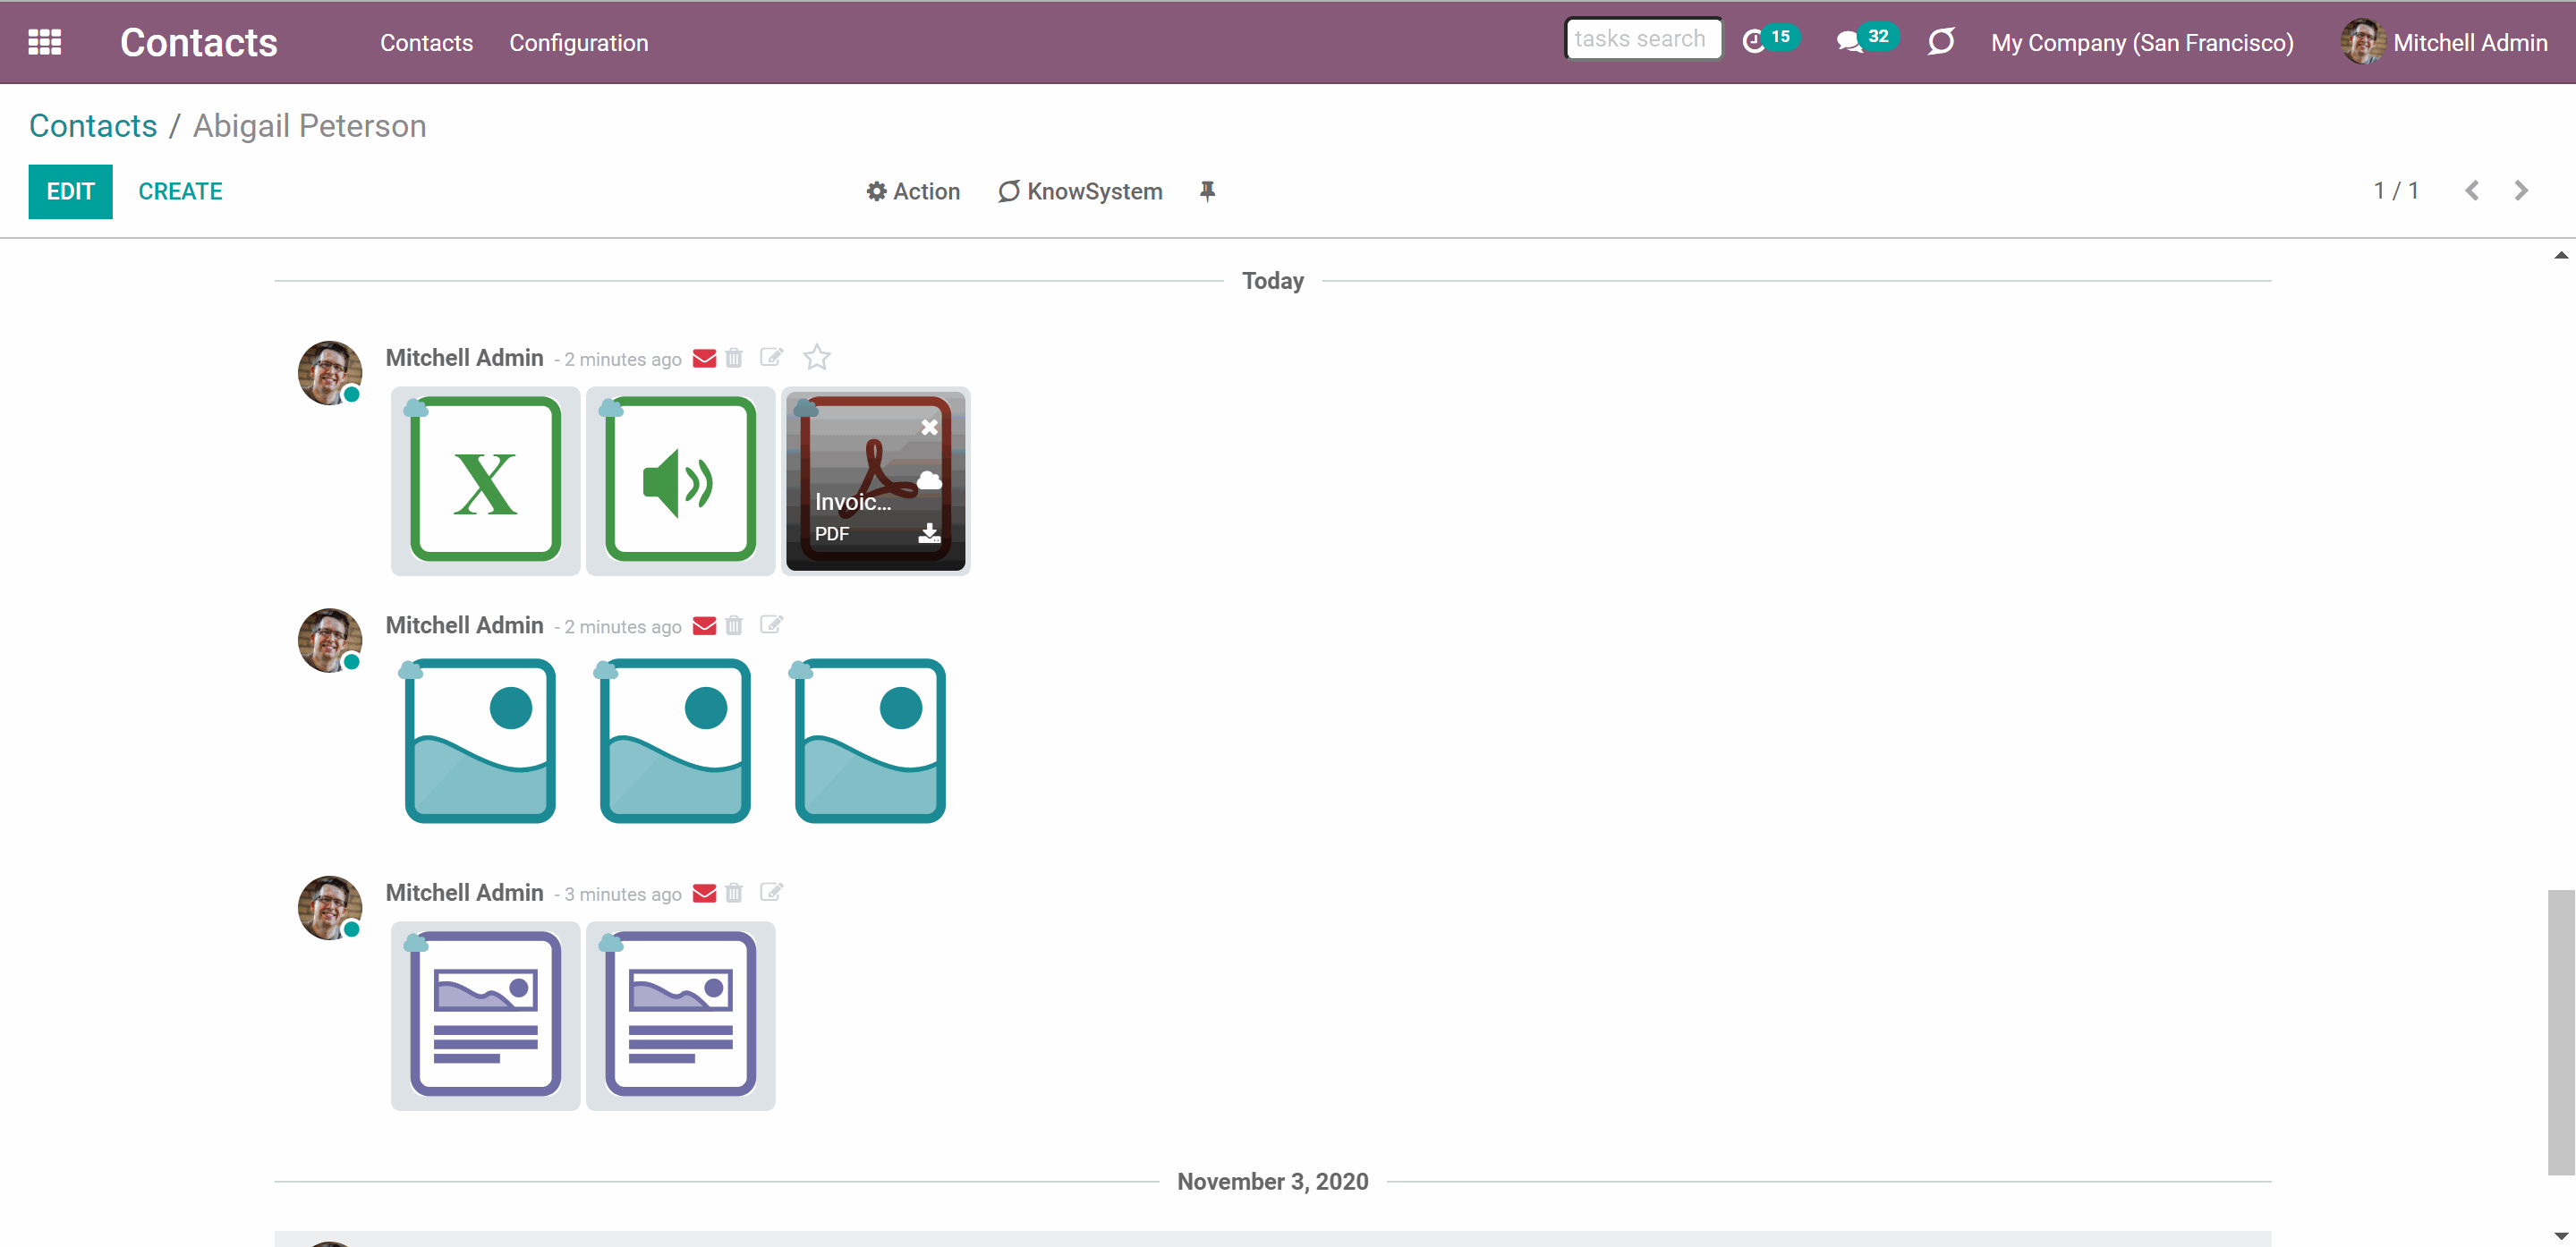
When a file is added to the message thread of an object, it also gets to the attachments box. Therefore, all files, which were added through the message thread of an object, are also synced.
The files in the message thread have the same functional buttons. You can also open, download, and delete them, without opening the attachments box.
Basic Principles of Synchronization
Synchronization is a fully automatic process and after the setup, no manual actions are required. Just decide which Odoo document types should be synced and create a model to sync for each of those (Customers, opportunities, sale or purchase orders, tasks or issues, employees or users, etc.).
Synchronization is a schedule-based process, so a particular time is required for the changes to be applied. The connector works on a queue (first in - first out) principle: it tries to firstly reflect the oldest changes. Each sync, especially the very first one, might take quite long. It is not recommended to make sync too frequent (see Basic Configuration).
The synchronization doesn't take place in real-time to avoid performance, conflict and functionality issues.
Synchronization is bilateral, which means that it is done in both ways: from Odoo to the Cloud Client and backward. It is important, to avoid overlapping of direct and backward sync to prevent errors (see How Synchronization Works).
As you choose some Models to sync, after the first sync their folders are created in the Cloud Client. So, each model will have its own folder (see Sync Models). In the Cloud folders, you can put not only files but also child folders. In that case, a link for this folder (not its content) would be kept in Odoo attachments (see How Synchronization Works).
File names and content should be managed in Cloud Client: each backward sync would recover Cloud Client names, Odoo is here less important. The key principle is: folders are managed by Odoo, files are managed by the Cloud Client.
Scope of synchronization is configurable: you can choose models for synchronization (Customers, Opportunities, Sale or Purchase orders, Tasks or Issues, Employees or Users, etc.). Custom models are also supported (see Sync Models).
The final goal of direct Cloud integration is to have the structure 'Odoo / Document Types / Documents / Files. For example, 'Odoo / Quotations / SO019 / commercial offer.pdf' (see Sync Structure).
Odoo sends attachments to Cloud Client and retrieves files from there. Files created in Odoo will be added to the cloud storage and will be replaced with links in Odoo. Files created in cloud storage will generate URL attachments within a paired documents directory (see Synced Files and Folders in Odoo).
Binary content is kept in clouds, while Odoo provides direct access to synced items.
The tool relies upon a single-user endpoint. It means that all sync processes are done under a single cloud admin (app). Access rights for created folders/files are not automatized. You should administrate those rights in your Cloud Client.
The module doesn't provide the functionality to manage access rights to the synced files. You should administrate those rights in your Cloud Client.
As an interface of the module serves the attachment box of an object. Through the standard attachments box, you can access both synced and not synced files and folders. To open it, just go to any Odoo object’s form view, find the ‘Clip’ icon, and click on it. Here you would see all object’s attachments, which users can manage. You can also conveniently open synced files and folders in cloud storage (see Synced Files and Folders in Odoo).
How synchronization works
The module works on a bilateral basis. That means, the synchronization is done in both ways: directly - from Odoo to Google Drive, and backward - from Google Drive to Odoo. Each sync serves a particular purpose.
Direct sync:
1. Creates a root folder Odoo, where model's folders with related object's folders are stored. The final goal of direct Cloud integration is to have the structure 'Odoo / Document Types / Documents / Files. For example, 'Odoo / Quotations / SO019 / commercial offer.pdf' (see Sync Structure)
2. Uploads all the attachments of chosen Models to sync from Odoo to the related object's folders in Google Drive
3. Makes all synced Odoo attachments change their type to a link (URL), while binary content is removed with a next Odoo cleaner. So, no actual files would be stored on your Odoo server
4. Checks whether a new document type (for example, sale orders) is added/renamed/replaced in the to-sync-models configurations. If so, this will be reflected in Google Drive
5. Checks whether a new document (for example, quotation SO-001) related to a synced document type is generated/updated/unlinked. If so, the connector would make the same changes in Google Drive
6. Checks whether attachments are added or deleted for synced documents. If so, they would be created or removed in Google Drive
Backward sync:
1. Checks whether any items are added to a Google Drive document folder. If so, the app would create URL attachments for those items in a linked Odoo object
2. Checks whether any item is renamed in Google Drive. If so, a chained Odoo attachment should be also renamed
3. Checks whether any items are deleted/moved in a Google Drive document folder. If so, a linked Odoo attachment would be also unlinked or moved
Synchronization of Enterprise Documents has its own specific. Therefore, the special add-on 'Solutions for Enterprise Documents' is required. In order to sync files from Enterprise Documents, you shouldn't specify the model to sync. The synchronization starts automatically after installing the extra module (see Solutions for Enterprise Documents).
Models Sync
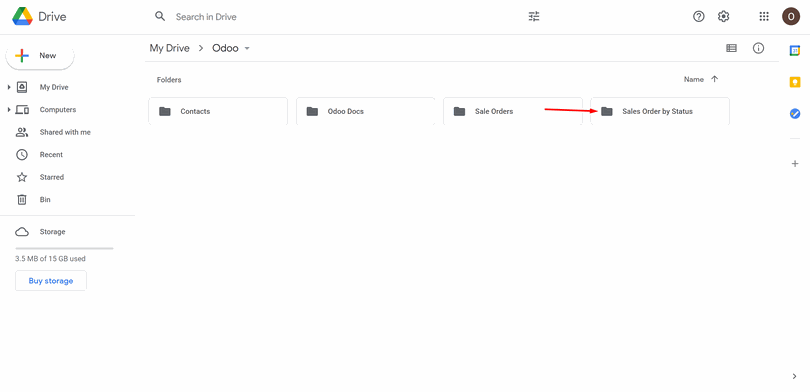
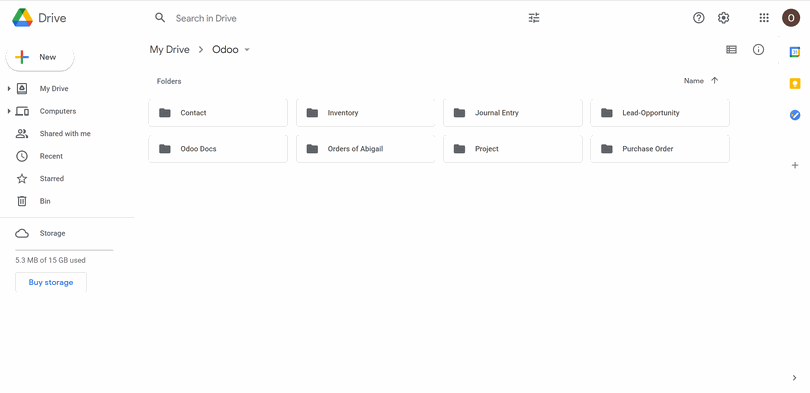
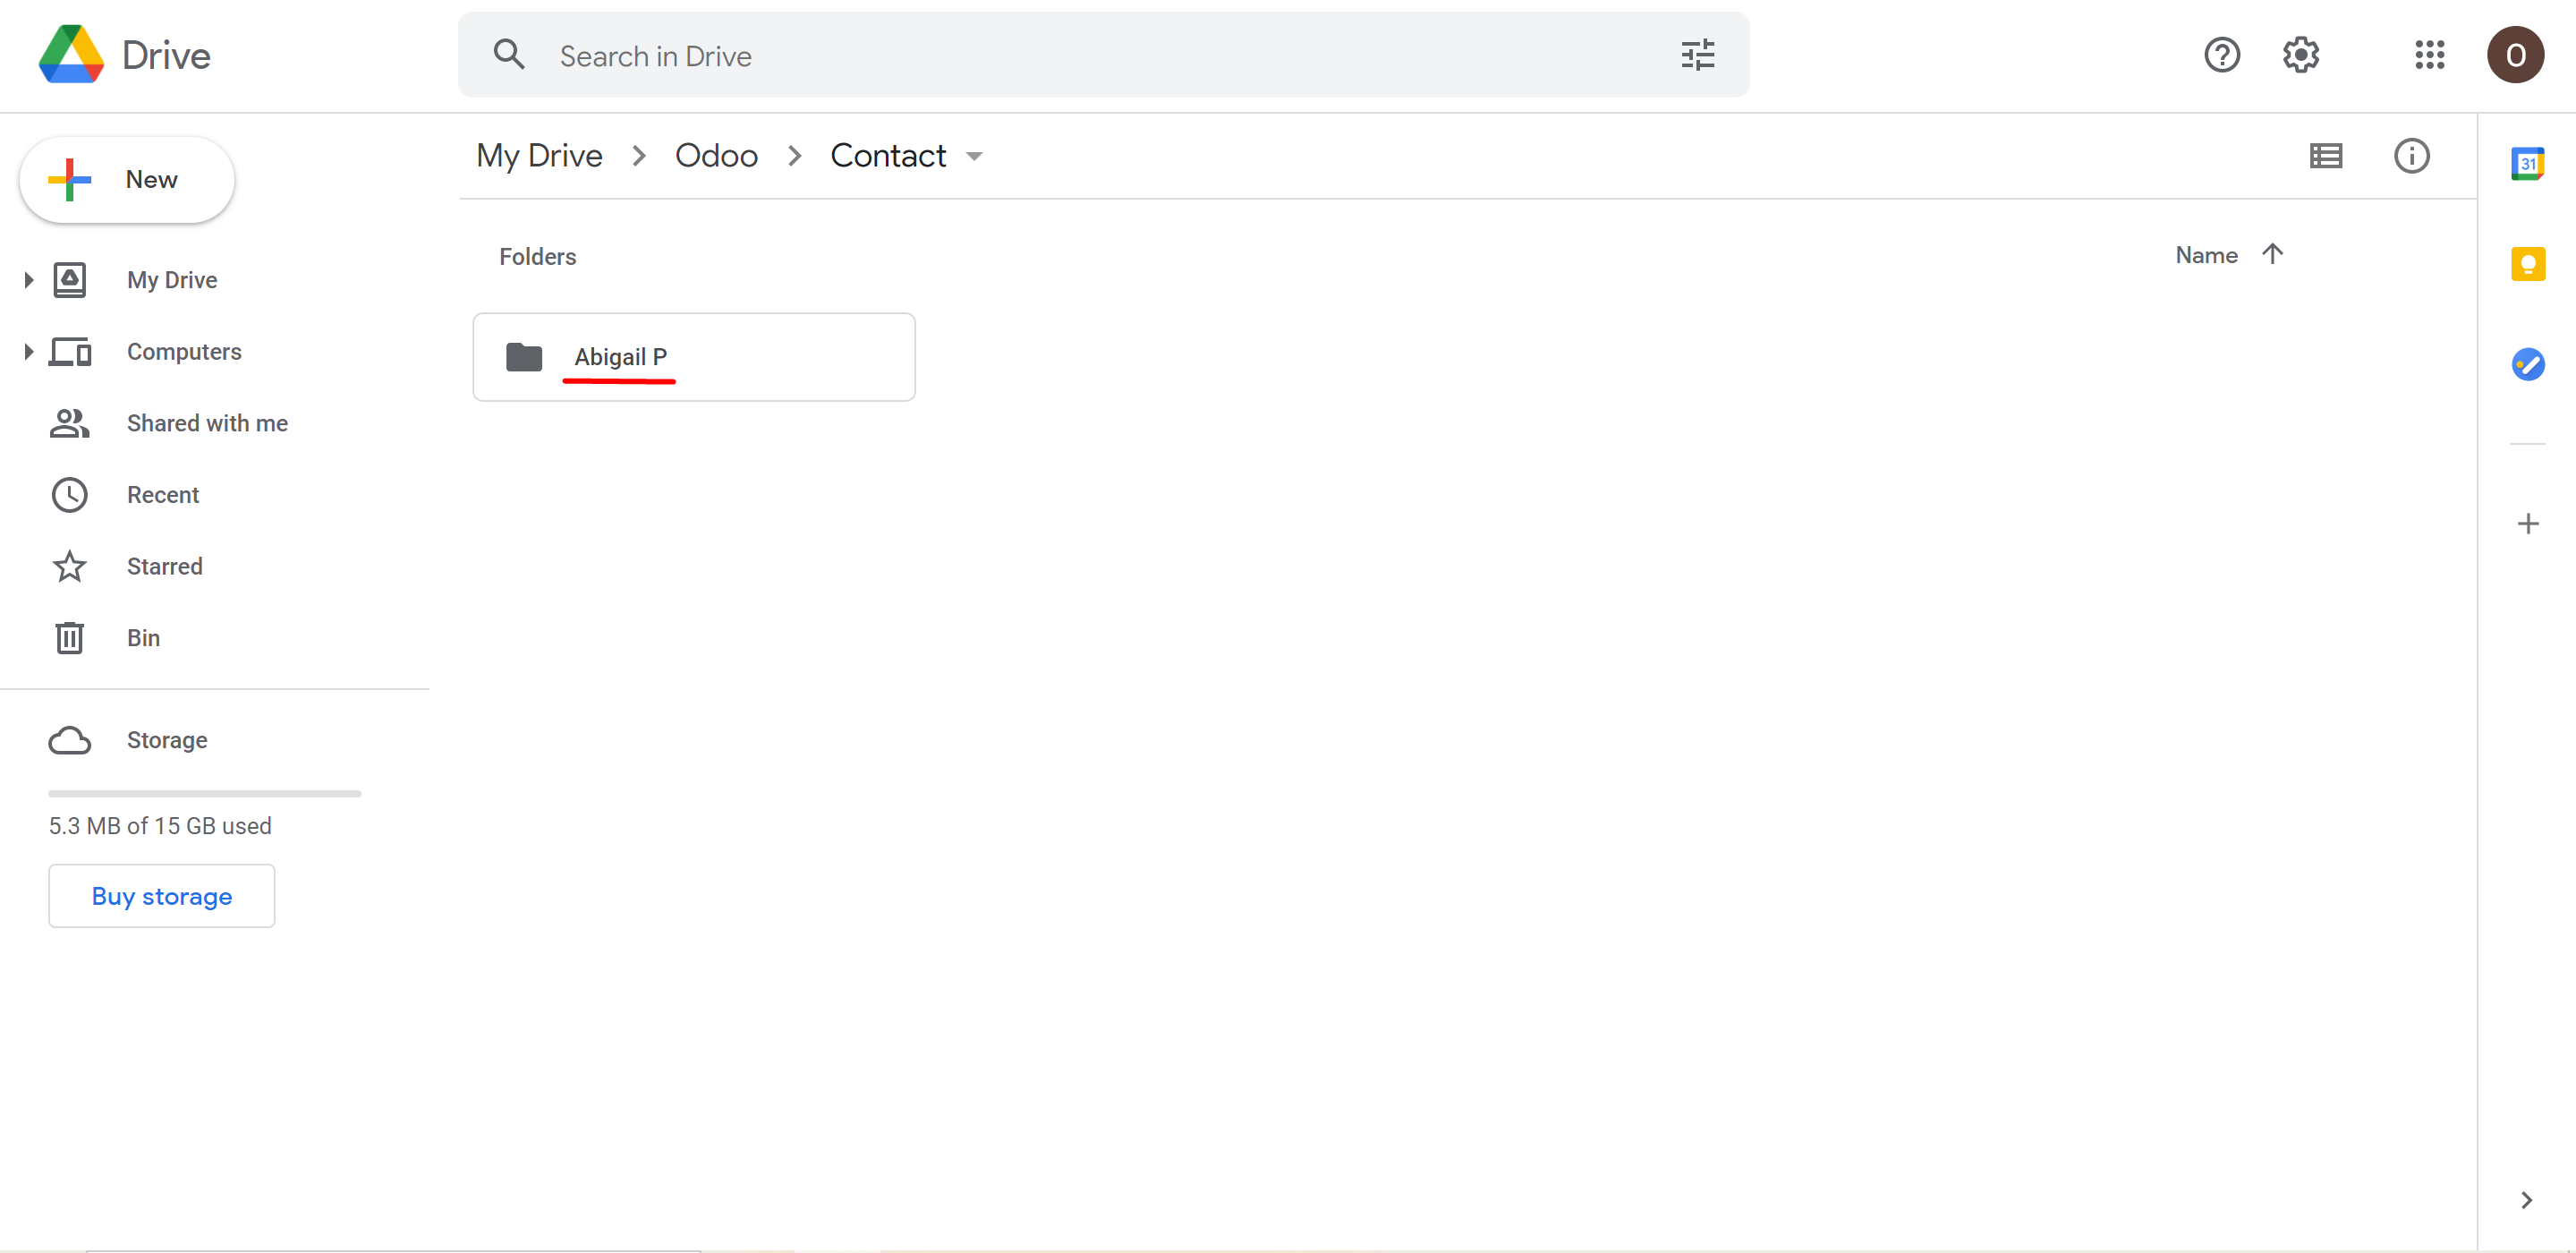
As you choose some Models to sync, after the first sync their folders are created in Google Drive (see Sync Rules). So, each model will have its own folder. All model folders are created inside the root folder ‘Odoo’. Model folders serve as storage for object-related folders. For example, Odoo > Customers > Azure Interior > files and folders related to the object.
The result of your actions will be different, depending on the place, where the changes are introduced (in Odoo or in a Client). When considering models and changes in them, the changes made in Odoo are prior. Therefore, the biggest role plays the direct sync.
Let's see some actions performed to the models to sync and their consequences:
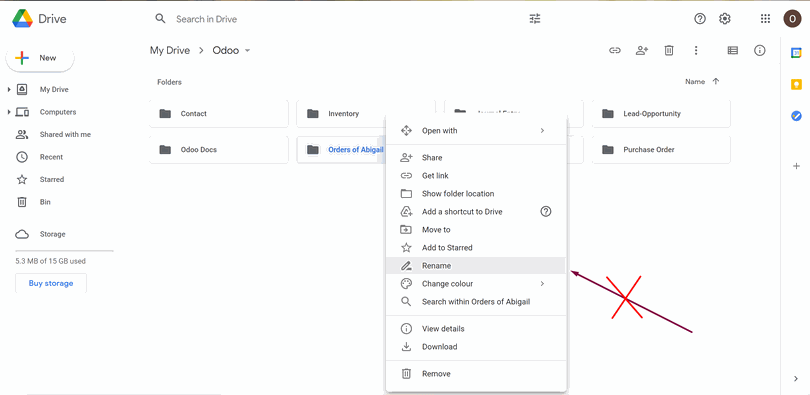
1. Rename model in Odoo / Google Drive
You can rename a model to sync in Odoo by opening the module's settings and clicking on a model (see Name Expressions). There in the field 'Folder name' introduce a new name, and, after the next direct sync, the changes will be applied in Google Drive as well.
If you try to change a model's name in Google Drive, then, the name will be changed back with the next direct sync.
2. Delete model in Odoo / Google Drive
You can delete a model to sync from Odoo (see Sync Models). After that, this model will not be synced anymore. However, its' folder will remain in Google Drive with all the objects and corresponding files. They will still be accessible through the links in Odoo. New attachments will remain in Odoo as files and will not be moved to Google Drive.
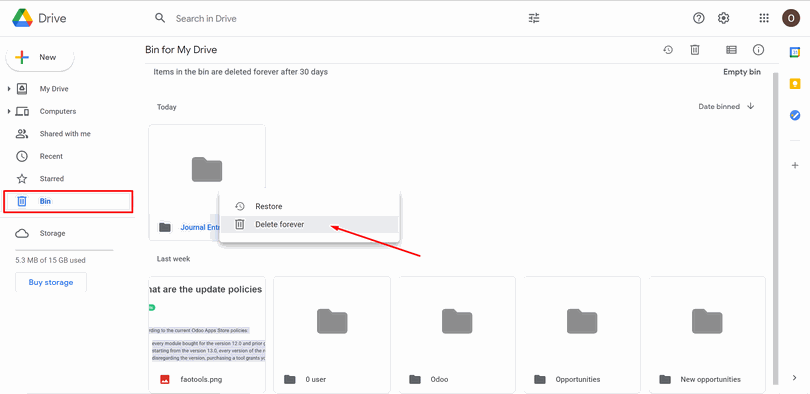
If you try to delete a model's folder in Google Drive, then after the next direct sync, the folder with the objects will be recreated. But, as the files were stored in cloud storage and they were deleted - after the next backward sync, the links will be removed from the objects' attachments.
3. Attach an object to two different models by the domain (filter)
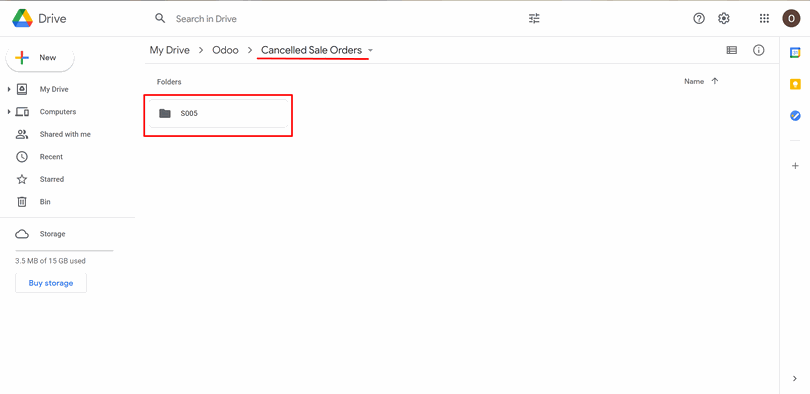
If you have, for example, two models to sync, that relate to the same model, then the object, that relates to both of them, will be synced to the model with the smaller sequence. The one, which is higher in the list of Models to sync.
For example, 'Sale Orders of Anita Oliver' and 'Cancelled Sale Orders' both relate to the same model - 'Sales Order'. One of Anita's orders was canceled 'S005', so it matches the filters of both models to sync. However, the Model to sync 'Cancelled Sale Orders' has a smaller sequence, as it was placed above the model 'Sale Orders of Anita Oliver'. Thus, the object 'S005' will be synced to the model 'Cancelled Sale Orders'.

4. Attach an object to another model folder by the domain (filter)
If you filtered your Sale Orders by a salesperson at first and then, changed your mind and decided to introduce another domain system (for example by the status), then after deleting the unused models to sync from the list in Odoo and introducing the new one, the files will be transferred to the right directory in Google Drive with the next direct sync. Those files which will not match the new filters, will stay in the same folder in Google Drive and will not be synced anymore (see Filters & Periods).
5. Attach an object to a non-synced model (after it was synced)
Sometimes, there may be a situation, when you change filters of a model to sync and some objects, which were synced before, don't match new filters and therefore, those objects will not be synced anymore. However, the folder with the attachments of such objects will remain in Google Drive and will be presented as links in Odoo. So, you will not lose your files.
Objects Sync
After the first sync, each object gets its own folder in Google Drive, where the corresponding attachments are stored. For example, Odoo > Customers > Azure Interior > files and folders related to the object. The folder is created, even if an object has no attachments.
As with models, certain actions have a different result depending on the place, where the changes are introduced (in Odoo or in a Client). When considering objects and changes in them, the changes made in Odoo are prior. Therefore, the biggest role plays the direct sync.
Let's see some common actions performed on objects and their consequences:
1. Rename an object in Odoo / Google Drive
If you rename an object in Odoo, through 'Edit', then the changes will be applied in your Google Drive as well with the first direct sync. If you change an object's name in Google Drive, then the name will be changed back to the way it is written in Odoo.
If you introduce a name expression to a model, then the changes will be applied to the model's objects in Google Drive as well with the first direct sync. If you don't like the result, for example, if some objects have the chosen name fields empty, then, you can simply delete the code and the names will be extracted by the standard name_get method (see Name Expressions).
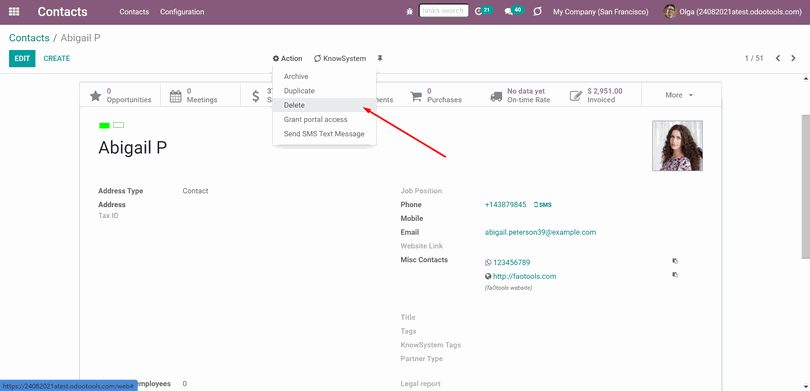
2. Remove object from Odoo / Google Drive
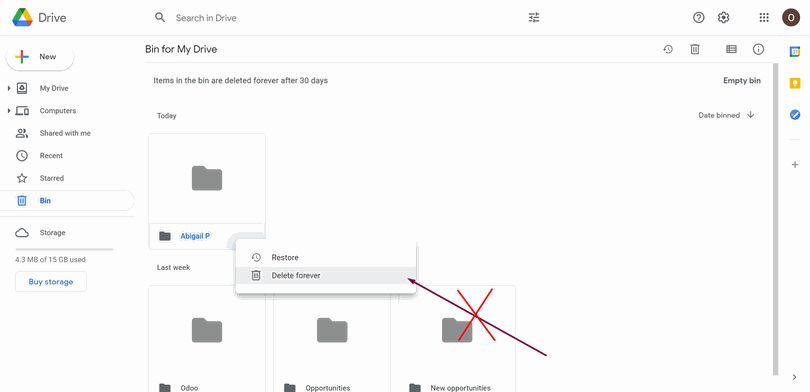
If you remove an object from the Odoo, then the corresponding folder with all the attachments will also be removed from Google Drive.
If you remove an object from Google Drive, then, the folder will be created again with the next sync. If you forget to delete the folder from the bin, then the folder will not appear again in the Google Drive menu with the next sync, however, the changes performed with it in Odoo will still keep being synchronized.
Files Sync
After the sync, the attachments of each object will be moved to Google Drive. For example, Odoo > Customers > Azure Interior > scan1.jpeg. Only links to the files will be kept in Odoo.
As with models and objects, certain actions have a different result depending on the place, where the changes are introduced (in Odoo or in a Client). When considering files and changes in them, both the direct sync and the backward sync are equally important.
Let's see some common actions performed to the files and their consequences:
1. Upload files to Odoo / Upload files and folders to Google Drive
If you upload files to Odoo, then those files will be transferred to Google Drive. Only links to them will remain in Odoo. You still will be able to access the file quickly, just by clicking on it in Odoo.
In case, you upload the files to Google Drive directly, the app will create URL attachments for those items in a linked Odoo object.
In Google Drive's folders, you can put not only files but child folders as well. In that case, a link for this folder (not its content) would be kept in Odoo attachments.
2. Rename a file in Google Drive
If you rename a file in Google Drive, then the chained Odoo attachment will be also renamed.
You should't introduce changes to a synced file from the Odoo side as these changes will not be reflected in Google Drive. However, the changes performed to the file in Google Drive will be reflected in Odoo.
3. Move a file in Google Drive
If you move a file from Google Drive from one object to another, a linked Odoo attachment would be also moved.

4. Delete a file from Odoo / Google Drive
If you delete a URL attachment from Odoo, it will also be deleted from Google Drive.
If you delete a file from Google Drive, a linked Odoo attachment would be also deleted.
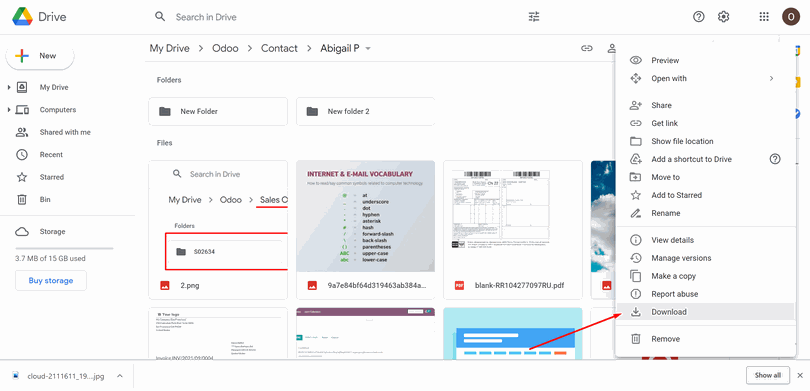
5. Download files from Odoo / Google Drive
Regardless of the place, you can always download any attachment. To download the attachment from Odoo, just click on the 'Download' icon and the downloading will start automatically. To download a file from the client, click on the file with the right side of the mouse and choose the appropriate command.
Solutions for Enterprise Documents
'Cloud Sync for Enterprise documents' is an add-on to a Cloud client, which helps to synchronize Cloud Client with the Odoo app 'Documents' (the latter is distributed under the Odoo Enterprise license). The module allows preserving the structure of the documents workspace, through the corresponding folders in the Cloud Client.
The module doesn't require configuration. After the installation, with the first sync, the folder 'Odoo Docs' will be created inside the 'Odoo' folder in your Cloud Client. Inside the folder, will appear all the folders from the workspace.
You shouldn't create a Model to sync for documents. After the installation of the module, the documents are synced automatically to the Odoo directory in the Cloud Client.
There is no need to create a Model to sync, the synchronization takes place automatically.
Based on the add-on the Odoo documents' hierarchy would be reflected within the folder 'Odoo / Odoo Docs'. Therefore, the name 'Odoo Docs' shouldn't be used, in any Model to sync. Each Odoo folder would have a linked Cloud Client folder.
The add-on doesn't affect any of the Enterprise Documents functions. You can still manage your documents in an ordinary way, download them right from Odoo, if necessary.
You still will be able to:
1. Download a file locally from Odoo and download files in a batch
2. Share or Lock the selected files
3. Archive documents
4. Schedule activities
5. Add tags
6. Move a document to another workspace folder
7. Open chatter
8. Perform an action
9. Sign documents using the Odoo Enterprise app ‘Sign’
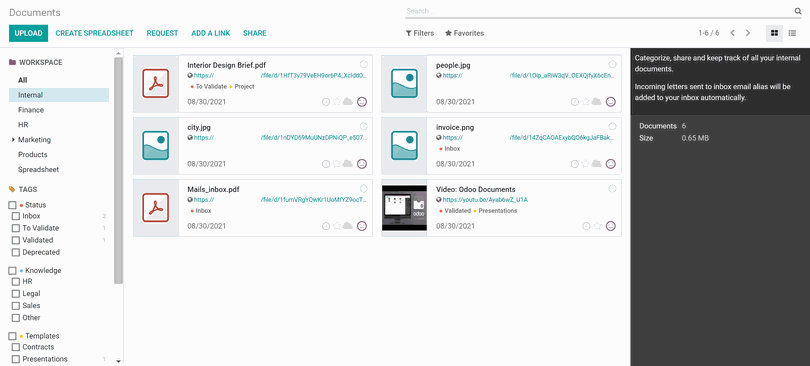
The only thing, that changes after the sync is the Documents Interface.
The link to the file in Cloud Client appears below the file's title. To open a file, just click on the link below the title.
Synced files would have app-related thumbnails instead of standard small previews to avoid excess requests to the Cloud Client for each form opening.
Also, on each synced file you will see a cloud. If you click on the cloud then, the downloading of the file will start automatically.
Standard Cloud Client sync and integration with Enterprise Documents are done within the same jobs. Avoid the scenarios when a single file is synced as a simple Odoo attachment and as an Odoo document simultaneously.

Objects & Files Sync
After the first sync, each object gets its own folder in the Cloud Client, where the corresponding documents are stored. For example, Odoo > Odoo Docs > HR > files related to the object. The folder is created, even if an object has no documents.
As with attachments, certain actions with objects will have a different result depending on the place, where the changes are introduced (in Odoo or in a Client):
1. If you add a subfolder in Odoo, then the structure will be reflected in the Cloud Client. If you add a subfolder in the Cloud Client, then it will be synced as a link to this folder (not Documents workspace) and you will not be able to add files to it from the Odoo side
2. You can rename the object's name in Odoo. This way the name will be applied to the folder in Cloud Client as well. If you rename a folder in the cloud, then with the next sync it will be changed back
3. If you remove an object from the Odoo, then the corresponding folder with all the documents will also be removed from the Cloud Client. If you remove an object from the Cloud Client, then, the folder will be recreated with the next sync
After the sync, the documents of each object will be moved to the Cloud Client. For example, Odoo > Odoo Docs > HR > scan1.jpeg. Only links to the files will be kept in Odoo. However, Odoo spreadsheet files are not synced by the connector: so, they are still manageable in Odoo.
Certain actions with files also will have a different result depending on the place, where the changes are introduced (in Odoo or in a Client):
1. Files created in Odoo will be added to the cloud storage and will be replaced with links in Odoo. Files created in cloud storage will generate URL documents within a paired documents directory
2. There is no use trying to rename a file in Odoo, as the name will be changed back with the next sync. The synced files are stored in the Cloud Client, so, in case you want to rename a file, you should do that in cloud storage
You should't introduce changes to a synced file from the Odoo side as these changes will not be reflected in the Cloud Client. However, the changes performed to the file in the Cloud Client will be reflected in Odoo.
3. If you move a file from the Cloud Client from one object to another, a linked Odoo document would be also moved.
4. If you delete a URL document from Odoo, it will also be deleted from the Cloud Client.
If you delete a file from the Cloud Client, a linked Odoo document would be also deleted.
5. Regardless of the place, you can always download any document. To download documents from Odoo, just click on the 'Download' icon and the downloading will start automatically. If you download the documents in a batch, then they will be combined in one .zip file. To download a file from the client, click on the file and choose the appropriate command.
Performance issues
The module is based on API requests to the third-party service (Cloud Client). The more is the sync scope (number of synced objects & files), the more requests the app has to send. Moreover, each sync requires special checks (for example, the access request to the cloud storage). Each request might take a significant amount of time comparing with similar requests within the Odoo platform.
The module provides the FIFO (first in - first out) logic of the sync. That means, the files are uploaded based on the queue: the oldest changes are reflected firstly. Therefore, not a single file is lost and the system resources are efficiently used. Even if you have a lot of files, they all will be synced for a particular time. For example, you have 10000 sale orders to sync and 15 minutes of time until the system time out. After 15 minutes, 3000 files are synced. Then during the next sync, 3000 more are synced. Therefore, to sync all the files several synchronizations will be required.
However, such a huge number of files to sync may lead to a long wait and, under some circumstances, to some errors. So, it would be better, to limit the synchronization amount with the help of filters by fields and periods. For example, sync only sale orders for August, or sync only sale orders with a total of more than 50000$. The models' configuration lets you restrict the sync of obsolete items (e.g there is no sense to sync archived partners or orders which are done 2 years ago) (see Filters & Periods).
Also, it is important, to set the Odoo in a correct way. Particularly, to provide the regular activation of the cron job and set the proper server timeouts (see Basic Configuration).
About Google Drive Odoo Integration
Google Drive Odoo Integration is a tool to integrate Google Drive features into your Odoo business workflow. The app automatically stores Odoo attachments in Google Drive, and it provides instant access to them via web links. In such a way users work with files comfortably in the cloud storage, while the results are fully available in Odoo.
Synchronization between Odoo and Google Drive is based on scheduled jobs. No manual interaction is required. Odoo sends attachments to Google Drive and retrieves files from there. Binary content is kept in clouds, while Odoo provides direct access to synced items.
You can choose models for synchronization: customers, opportunities, sale or purchase orders, tasks or issues, employees or users, etc. Custom models are also supported.
The tool redefines Odoo attachments boxes to make work comfortable: download files locally without login, open files and folders in Google Drive (if possible, items would be opened in Google Drive editors and previewers), use standard Odoo previewers.
Sync works both for individual and team drives (Google Suite business and enterprise tariffs). In the latter case, the root folder Odoo is placed within a chosen team drive, in the former case - within a current user drive.
See the synchronization history by enabling 'Sync Logs'.
The tool lets generate default directories' structure for this document type during the very first sync of a related object. For example, for all employees, you may have pre-defined folders 'Scans', 'Scans/Official', 'Photos', etc.
Automatic regular bilateral sync
Any Odoo document types for sync
Instant access for Google Drive
Google team and Individual drives
Module Configuration and Log in
After the installation of the module in your database, it is required to finish the setup by doing the following:
1. Go to the Google Developer Console via the URL: https://console.developers.google.com
If it is your first time on the platform, you will be asked to agree to the Terms of Service and Email updated. The mandatory one is only the Terms of service.
2. Select or create a project After clicking on the button 'Create Project', the new form will appear. There you need to write the title of the project, optionally add your organization, and click 'Create'.
3. From the project's dashboard go to API's overview and press 'ENABLE APIS AND SERVICES'
4. Find Google Drive API and push the button to enable its API
5. Go to 'Credentials' and press the button 'Configure Consent Screen'.
6. As the User Type select 'External' and push 'Create'
7. Add app information
8. As an app name select any suitable and as a user support email select your email
9. In the field Developer contact information add your email address again and press 'Save and Continue'
10. On the 'Scopes' page just press 'Save and Continue'
11. As Test Users add your Gmail email address by clicking on the button '+Add users', then press 'Save and Continue'
12. Then, go to Credentials and push the button 'Create Credentials', in the list choose 'OAuth client ID'
13. As the application type choose 'Web application', as the authorized redirect URI add the link in a format [YOURODOOSITENAME]/google_drive_token (for example, https://odootools.com/google_drive_token).
14. Save the app and copy 'Client ID' and 'Client Secret'
15. Go to the Odoo Google Drive Settings
16. Copy&Paste 'Client ID' to the 'App Client ID'
17. Copy&Paste 'Client Secret' into the field 'App Secret Key'
18. Insert previously generated redirect URL
19*. If you use team drives, check the related box.
Make sure you really use team drives. In your Google Drive, you should find the item 'Team Drives' in the left sidebar. This feature is available only for business and enterprise tariffs.
If the option 'Team Drive' is enabled, introduce its name. It should be absolutely the same as you see it in your Google Drive. Make sure that your user has full rights to all team drives.
If you configure a team drive account, make sure, that your user has full rights to all team drives. Usually, it is the admin user, who have set the Google account up.
20. Press 'Save'
21. Press 'Login and Confirm'
After that, you will be redirected to the Google login page. Check-in, agree with all conditions, and grant permissions asked.
After login, Google redirects you back to Odoo. Google Drive - Odoo synchronization is ready to be done.
After the successful setup, you will be redirected back to the module's settings. You will see the interface, that includes two buttons 'Sync' and 'Backward Sync'. You can use the button 'Sync' for the first synchronization. After that, it is better to avoid clicking on these buttons, as the synchronization is launched regularly, according to the system schedule. And it is important for direct and backward synchronization to be launched at a different time (see Basic Configuration).
Basic Configuration
Proper database and server setup are required to provide enough resources for sync operations and to avoid slowdowns of queue processing. Besides, it minimizes the risks of concurrent updates and conflict errors in API requests. To apply the configuration, make sure you have done the following:
1) Start configuration by applying proper timeouts to the Odoo configuration file: LIMIT_TIME_CPU, LIMIT_TIME_REAL & LIMIT_TIME_REAL_CRON. They should be more or equal 900 seconds, in order to give enough time for sync and to forbid the server to cut it earlier. If you use Odoo.sh, then you don't need to Server Timeouts, since they are predefined and not configurable
2) Then enter the timeout to your Odoo. To that goal find the section 'Settings' on the app configuration page and copy the number there (This way the module will be able to get the information about the timeouts of your server)
3) Finally, make the cron jobs suit the applied timeouts. Direct synchronization is based on the scheduled job 'Synchronize attachments with cloud'. Backward synchronization is based on the scheduled job 'Synchronize attachments from the cloud'
To find and manage these scheduled jobs:
1. Go to General Settings
2. Turn on the Developer mode
3. Click on the tab 'Technical' or, if it is hidden, on the + button in the systray
4. In the open list, find the section 'Automation' and click on the line ' Scheduled Actions'
5. There, find the mentioned scheduled jobs and click on any, to see and manage it
1. Change the frequency in the line 'Execute Every' by the formula 2*timeout
2. Set the next execution date as the next hour +timeout
For example, for 900seconds timeout: frequency - 30minutes; the next execution - at 08:15
Change the frequency in the line 'Execute Every' by the formula 2*timeout
2. Set the next execution date as the next hour + timeout*2
For example, for 900 seconds timeout: frequency - 30minutes; the next execution - at 08:30
Thus, both cron jobs would never be overlapped. Depending on the sync scope, you may increase server timeouts up to a few hours, but make sure that you amend the Odoo configuration according to the principles above.
On the module's configuration page, you will find the buttons for triggering both direct and backward sync manually. However, push the buttons only to configure the Cloud Client and for testing purposes. Avoid pushing the button also when cron is active and running. Give enough time for the system to finish one of the syncs before manually triggering the second one (f.e. don't click at both buttons at once, wait at least 10 minutes depending on the number of models and objects to sync).
Don't trigger the sync manually by clicking on the buttons 'Sync' and 'Backwards Sync' to avoid errors. These buttons can be used for the first or test syncs only.
Administrator's Interface
The module's interface can be found on the app's tab in the Settings. From it you can:
1. Set up and reset connection
2. Trigger sync manually
3. Choose and set up Odoo Models to sync (see Sync Models)
4. Set the Odoo Server Time Out (see Basic configuration hints above)
5. See Sync Logs, turn on/off Sync Logs (see Sync Logs)
On the configuration page, administrators might configure sync for a target cloud storage. For that, the admin should enter the client's credentials log into the cloud client and give the required permissions to the module.
After establishing the connection, it is possible to reset the configuration in order to stop sync and, for example, set up another client.
Take into account that resetting the connection is not revocable action: the information about Cloud Client items would be erased. In particular, it means that even if you connected to the same storage, Odoo would re-create all folders, while previously synced attachments would not be sent there (since they are already of the URL type). All the following synchronizations will send files to the newly created directories. Simultaneously, attachments’ links for cloud items would still work, since files would be anyway kept in the cloud storage.
Also, at the administrator's interface, after successful login to the Cloud Client, you will see the buttons 'Sync' and 'Backward Sync'. These buttons allow triggering the sync manually. However, this way of launching the synchronization should be used only for testing purposes or when it is the first sync. It is also important, to avoid sync overlap. Make sure the direct sync is over before triggering the backward sync and vice versa. The time, that requires for the sync depends on the number of models, objects, and files for sync, that you have. If the Odoo Server Timeout is set, then you may refer to it, to understand when the sync is over.
Don't trigger the sync manually by clicking on the buttons 'Sync' and 'Backwards Sync' to avoid errors. These buttons can be used for the first or test syncs only.
Find the section 'Odoo models to sync' to choose the models which will be synced with your Cloud Client. If you remove all the models and leave the section empty, then nothing will be synced. To sync only the objects, that you need, it is possible to set various filters and periods (see Sync Models).
If you want to sync the files from the Odoo Documents app, you shouldn't create a model to sync. The add-on 'Cloud Sync for Enterprise Documents' is required (see Solutions for Enterprise Documents).
If you applied any changes on the configuration page do not forget to press the button 'Save'.
Sync Logs
In the app's settings, for extra convenience, was added the button Sync Logs. This is an optional function, which is turned on by default, but you can deactivate it at any time. For that:
1. Open the app's page in the settings
2. Find the section Options and remove the tick from the box 'Log sync activities
Turning off the sync logs will slightly speed up the sync process. But, it is recommended to leave the option turned on, while it serves some very important purposes. It is possible to:
1. See the sync history
2. Know, whether the sync took place, and what has changed
3. Check, whether a particular file was synchronized
4. Investigate the sync problems
The sync history contains all the necessary information, about all the actions of the module. For example, what folders were created, what files were imported or exported. The time of the action is also tracked, so you may see when the action took place.
By clicking on the button 'Sync Logs', you can see the list of changes, which take place while syncing. You can also see it in real-time, as the objects and files are managed.
One of the most important functions of the Sync Logs is to point out the problem in sync. If there is a problem - a mistake and its details will appear in the sync logs. From here you may find out what actions to take or may export the logs, in order to send to the customer support email for further investigation of an issue. Depending on the result of the sync, the Sync operation may be either green (if it was successful), orange (for warning, if there was an unserious error), or red (if there was an error).
When there are a lot of files synchronizing every day, it might be rather difficult to find the information you need through Sync Logs. Therefore there are several ways to conveniently search through the sync records. The ways to search Sync Logs:
1. By matches in the messages. For that, just start writing your request in the search bar in the top right corner
2. By applying filters. For that, click 'Filters' and choose the existing one or add your own. By default, you can filter to see only Failures, Warnings, Success logs
3. By grouping them. For that, click 'Group by' and choose the existing grouping condition or add your own. By default, you can group by type, month, and day
Sync Logs do not assume replacing Odoo server logs. It is a complementary function, which allows controlling sync from the configuration interface. You may need Odoo sever logs as well, to investigate the roots of detected in Sync Logs warnings.
Sync Models
Sync Models - are rules, which define what Odoo document type (for example, Sale Orders or Contacts) should be synced with the Cloud Client. Thus, it defines what documents would have their own folders in cloud storage.
The app lets split models into a few folders based on selected filters. Use any document storable field to distinguish a directory. Have a separate folder for individuals and companies, for European and American opportunities, for quotations and confirmed orders, for each project, etc. You can also limit documents by relative periods by using date fields of linked documents. For example, leads registered in the last 3 months or invoices updated the last week (see Filters & Periods).
Define name expressions to specify titles of documents' Cloud Client folders. For instance, to include a project name in a task directory (see Name Expressions).
Prepare a hierarchy of default folders to be created when a document directory is synced to Cloud Client for the first time (see Default Folders).
To sync a specific document type, you should add it as a model to sync. Any Odoo model might be chosen. An exception is the module Odoo Documents. For it, you should use the add-on Cloud Sync for Enterprise Documents (see Solutions for Enterprise Documents).
You can add models to sync from the module's interface in settings (see Sync Interface). For that:
1. Find the section 'Odoo models to sync'
2. Click 'Add a line'
3. In the pop-up window click 'Create'
4. Choose the model for sync
5. Type the folder name, that will be used in your Cloud Client to store all object's folders
6. Click 'Save&Close'
In that way you would define the document types for sync, to guarantee the correct structure of cloud folders as Odoo > Document Type > Object > Files and Folders related to the Object (for example, Odoo > Sale Order > S00001 > Files and Folders related ).
You can also change the models' order simply by drag&drop. This way the sequence of the models will be changed. The higher is the model in the list, the more prioritized it is. So, if you added some filters to the models and it turned out, that some of the objects relate to several models, then the object with the attachments will be placed to the model, which is higher in the list. For example, there are two models to sync: Sale Orders and Cancelled Sale Orders. One order, S0001, relates to both. As the model 'Cancelled Sale Orders' is placed higher in the list 'Odoo models to sync', the object will be its folder in the Cloud Client.
To delete the model click on the cross by it. This preset model will be saved, and you will be able to add it back as you click on the button 'Add a line'. Keep in mind, that once the model is deleted from the sync list, its folder with the content will remain in the Cloud Client and only links to them will be kept in Odoo. Newly added files will not be synchronized.
If you applied any changes on the configuration page do not forget to press the button 'Save'.
Filters & Periods
Sometimes, there may be a need to sync only particular objects of a specific model, and not to sync others. Or, there might be a necessity to keep particular objects separately, for easy access. For example, to sync only won opportunities, to divide sale orders by the salesperson or particular period of time. Therefore, the app lets limit objects for sync. The list of the model's objects to sync can be limited by:
1. Filters
2. Periods
With the help of filters, you can use any document storable field to distinguish a directory. Have a separate folder for individuals and companies, for European and American opportunities, for quotations and confirmed orders, for each project, etc.
To add a filter:
1. Click on one of the models to sync or start creating a new one
2. Click on the button '+Add a filter'
3. Set up the rule, for example, 'country contains US'
4. If there are any records, that match the filter you will see their number on the right side (click on it to see the records to make sure the filter is correctly set)
5. Optionally click on the '+' button by the filter to add one more rule, so only records, that match 'ALL' or 'ANY' of the rules will be considered for sync
6. Click 'Save'
Here are some useful filters examples by models:
Sync only projects of a particular project manager. For that add a filter Project Manager = Anita Oliver
Sync only contacts of a particular country. For that add a filter Country = US
Sync only won opportunities. For that add a filter Is Won = Won
Sync only sale orders of a particular customer. For that add a filter Customer = Azure Interior
Sync only purchase orders with a particular status. For that add a filter Status = RFQ
Sync only appointments of a particular responsible person. For that add a filter Responsible = Anita Oliver
Sync only articles with attachments. For that add a filter Attachment is set
You can create as many models to sync, that refer to the same model as you want. But, try to make filters self-exclusive in order for a document can be definitely assigned. For instance, 'customer but not supplier', 'supplier but not customer'. Otherwise, a specific document folder will be synced to the model to sync, which sequence is smaller (such models are higher in the list 'Models to Sync'). For example, you have 2 Models to sync: 'Sale Orders' and 'Cancelled Sale Orders'. The order S00001 was cancelled and therefore it matches the conditions of both models. However, the Model to sync 'Cancelled Sale Orders' has a smaller sequence, as it was placed above the model 'Sale Orders'. Thus, the object S00001 will be synced to the model 'Cancelled Sale Orders'.
If, after adding some filters or periods, an object no longer relates to a Model for sync, then its folder with files will still remain in the Cloud Client and will be accessible from Odoo. However, the newly added object files will not be synchronized and will be kept in Odoo.
If an object is used to relate to a non synced Model, but later matched the conditions of a Model to sync, then its folder will be created in the related directory in Cloud Client and the attachments will be synced.
It is also possible, to limit documents for sync by relative periods through using date fields of linked documents. That will help to minimize the consumption of the resources spent on the sync and will let you concentrate only on the relevant objects. For example, sync only leads registered in the last 3 months or invoices updated the last week.
Periods are especially useful when we want to create a special folder for the old objects. In order, to keep those separately. For example, you can create such folders as ‘this year invoices’, ‘last year invoices’, ‘archived invoices’. Otherwise, when a synced invoice no longer matches any filters or periods, it will remain in the same folder in the Cloud Client, but will no longer be checked during the sync.
To set the time period of a model to sync:
1. Click on one of the models to sync or start creating a new one
2. Choose the tab 'Periods'
3. Click 'Add a line'
4. Choose the object's field, which will be considered to choose the objects for sync
5. Chose to consider the next or the last period
6. Set interval and interval type
7. Tick the box 'Including current', to include the current period to the calculations (For example, today is 25/09/2020. For example, in case 'last 2 months' is selected. If the box is not checked, Odoo would consider July and August. If checked, August and September)
8. You can check the set periods below in the section 'If today, the periods would be...'
9. Optionally add some more periods
10. Click 'Save'
Periods are calculated relatively to today, for example, today is 03/09/2020, which means that the 'last 2 months' are July and August. The 'next 5 days' are 04/09-08/09/2020. If the 'Including current' flag is checked, the current period is also included. For example, today is 25/09/2020. For example, in case 'last 2 months' is selected. If the box is not checked, Odoo would consider July and August. If checked, August and September
Restrictions of periods are accumulated. If you added a few lines, it means that all periods conditions should be satisfied. For example, the deadline should be within the last 2 months AND the ending date should be within the last year. However, if you added the same date field twice, the condition should satisfy ANY of those criteria. For example, the deadline should be within the last 2 months OR the next month AND the ending date should be within the last year.
Folders' Structure
Based on the configured sync models, the app would create the following folders’ structure:
1. Odoo - a core folder for sync
2. Models - folders for each Odoo document type. (For example, 'Projects', 'Partners'. Distinguished by the domain (filter) there might be more specific folders: for example, 'Customer 1 Projects', 'Projects of the Customer 2', 'Internal Projects', etc. (see Sync Models))
3. Objects - folders for each document, for example, 'Project 1' or 'Customer 1'
4. Files and folders related to this Odoo document to be synced.
As a result, you may have for instance:
Odoo / Projects / Project 1 / files and folders related to project 1
Odoo / Customers / Customer 1 / files and folders related to the customer 1
With the help of Filters, you can also achieve the following structures (see Filters & Periods):
Odoo / Customer 1 Projects / Project 1, Project 2 ,... AND Odoo / Customer 2 Projects / Project 3, ... (In this case, two models to sync related to Projects were created and were filtered by the customer)
You can use any document storable field to distinguish a directory. Have a separate folder for individuals and companies, for European and American opportunities, for quotations and confirmed orders, for each project, etc. However, each model to sync should be created separately (as in the case above, when two models to sync filtered by the customer were created). So, if you want to filter Sale Orders by a salesperson and store it that way in the Cloud Client, then you should create a separate model to sync to each of your salespeople.
You can create as many models to sync, that refer to the same model as you want. But, try to make filters self-exclusive, so a document can be definitely assigned. For instance, 'customer but not supplier', 'supplier but not customer'. Otherwise, a specific document folder will be synced to the model to sync, which sequence is smaller (such models are higher in the list 'Models to Sync'). You can change a model's sequence by drag&drop (see Sync Models).
If, after adding some filters or periods, an object no longer relates to the ones for sync, then its folder with files will still remain in the Cloud Client and will be accessible from Odoo. However, the newly added object files will not be synchronized and will be kept in Odoo.
If an object used to relate to the non synced ones, but later matched the conditions, then its folder will be created in the Cloud Client and the attachments will be synced.
This structure is always flat, meaning that there are only those levels of hierarchy. Thus, it is correct that various document types can't be done within the same structure. Within the folder 'Customer 1' it is impossible to keep the files related both to sale orders, invoices, and projects. Each of those document types has its own (or a few own) folders. Otherwise, there will not be a chance to make backward synchronization, since there would be no criteria to rely upon.
Name Expressions
It is also possible, to define the rules for cloud folder names, so they would include the information of one or several fields. To that end-use Mako syntax. For example, ${object.name}. Introduce expression to extract folder name for object directories or leave the field empty if you want to apply the standard Odoo name_get method.
To add an object's name using the Mako syntax:
1. Start creating and choose a model to sync, or start editing an existing one, if it wasn't synced yet
2. Open the tab Name Expression
3. Type the name using Mako syntax in the field 'Name Expression'
4. Click 'Save'
An expression, created with the help of Mako Syntax starts with the dollar sign $ and is written in curly brackets {}. Everything, that is not included in brackets, will be written in the folder's name. For example, let's add a name expression to Contacts. Add the expression 'Files of ${object.name}, synced' in the field 'Name Expression'. After sync, the contact's folders will look the following way: Files of Abigail Peterson, synced; Files of Anita Oliver, synced. The comma was also outside the brackets, so it will be also applied right after the parsed expression.
You can add a condition, so if the object has a particular field filled, then the name will be taken from the particular field. The conditions are introduced by the operator 'and'. The field following the last 'and' will be used as a name if all the previous conditions were true. The action, that should be done otherwise is introduced by the operator 'or'. For example, let's add the name expression '${object.mobile and object.mobile or "no mobile phone"}' to Contacts. In this example, if a contact has a mobile phone, then the field mobile phone should be used for the folder's name. Otherwise, the information in the quotation marks will be used, in this case - no phone. After sync, the contact's folders will look the following way: -43454123453; no phone. Pay attention, that the mobile number starts with -, however there should be +. That happened because direct sync replaces such symbols with '-'. It is done to avoid conflicts with file systems.
Try to avoid the following symbols in folders' and files' names: *, ?, ", ', :, <, >, /, +, %, !, @, \, /,. Direct sync will replace such symbols with '-'. It is done to avoid conflicts with file systems.
You can also create a complex expression, which contains information from several fields. In this case, each field should be written in separate curly brackets. Add a space to make sure they will not be written too close to each other. Let's add a complex expression '${object.name} ${object.phone and object.phone or "no phone"}, ${object.mobile and object.mobile or "no mobile"}' to Contacts. In this complex expression, the first represents an object's name, the second and the third are conditions, which check whether the fields phone and mobile are filled. After sync, the contact's folders will look the following way: Abigail Peterson 356745, no mobile; Anita Oliver no phone, -37854756231. Pay attention, that there isn't a coma, after the name expression, so it wasn't added in the result.
In case an expression is parsed successfully, the title of each object changes according to it.
In case the expression cannot be parsed because of the syntax error, the standard name_get method will be used.
When a part of the title can be parsed, and the second one contains a condition, you should also add the operator 'or' to the condition to introduce what to write in the title, if the condition is false. Otherwise, when the condition is not met, you will see 'False' as part of an object's title. For example, here is a name expression ${object.name}, ${object.phone and object.phone}. The second part of it ${object.phone and object.phone} is a condition. If the phone field is empty, then the result will look the following way: Abigail Petersen, False.
You can change the syntax anytime or even return to the default name_get method. For that, introduce a new name expression, or clear the field 'Name Expression' and with the next sync, the name_get method will be applied again.
If after rendering, the folder name appears to be empty, the app would use the standard name_get method to avoid folders without names.
Here are some useful examples of the names, created with the help of the Mako Syntax:
Name expression: ${object.name} ${object.phone and object.phone or "no phone"}, ${object.email and object.email or "no email"}
Result examples: Anita Oliver, 34854325, anitao@test.com
Use this expression to include contact's phone number and email in the folder's title.
Name expression: ${object.name}, ${object.state}
Result examples: S03093, draft; S03094, sale
Use this expression to see the state of a sale order in the folder's title.
Name expression: ${object.name}, Total ${object.amount_total}
Result examples: P00001, Total 28700.0
Use this expression to see the total for a purchase order in the folder's title.
Name expression: ${object.name}, ${object.automated_probability}
Result examples: Table with chairs, 50.0
Use this expression to see the automated probability of an opportunity in the Cloud Client. The probability will change after sync as the opportunity will move in the pipeline.
Name expression: ${object.name}, ${object.invoice_date}
Result examples: BILL-2018-09-0001, 2021-07-12
Use this expression to see the invoice date in the folder's title.
Name expression: ${object.name}, ${object.message_attachment_count}
Result examples: Abigail Peterson, 12
Use this expression to see how many attachments are in each object's folder, without opening it. Can be used for any Model to sync.
Default folders
Default folders - is the folders structure, which you want to see in the object's directory in the Cloud Client. With the first sync of an object, they are created in its cloud storage. Further synchronizations don't affect this setting, as well as any changes conducted to these folders, will not be synchronized. You can delete the folders anytime.
This function allows creating the same structure of folders in each object of the model to sync. For example, the model to sync 'Sale Order' was set. The default folders structure 'Folder 1 > Folder 1.1' was set. So at the end, the structure will be 'Odoo > Sale Order > S00001, S0002... > Folder 1 > Folder 1.1'.
To create a default folder:
1. Start creating and choose a model to sync, or start editing an existing one, if it wasn't synced yet
2. Open the tab Default Folders
3. Click Create
4. Type a name of a folder
5. Click create to add some more folders
6. Move folders by drag&drop to change the hierarchy
7. Click on the folder with the right side of the mouse: to create a folder inside the folder, to rename, edit or delete it
8. Click Save&Close
Synced Files and Folders in Odoo
You can access both synced and not synced files and folders through the standard attachments box. To open it, just go to any Odoo object’s form view, find the ‘Clip’ icon, and click on it. Here you would see all object’s attachments, which users can manage. You can also conveniently open synced files and folders in cloud storage.
All files attached through ‘+add attachments’ would be synced to cloud storage with one of the next cron jobs. Until that, files will not change their look and will be displayed the same way as they are in Odoo.
After the sync, the files will be marked by a cloud in the top left corner. Synced files would have app-related thumbnails instead of standard small previews to avoid excess requests to the Cloud Client for each form opening.
From the attachments box, you can also open the Cloud Folder to see all the synced files and folders related to the object. For that, the button 'Open Cloud Folder' is introduced. Click on it and in a new tab you will be redirected to the related folder.
The app assumes that the binary content of attachments is kept in cloud storage instead of the Odoo server. So, such attachments become of the URL type, and you may any time access them either from the attachments box or from the Cloud Client.
Both files and folders can be simply accessed by clicking on them. To open a file in the Cloud Client, click on the 'Open in the Cloud' button on the file. To open files in the Cloud Client, the module uses the same editor, which is set in your Cloud Client's settings.
Even after the sync, a user might download attachments locally by clicking on the ‘Download’ icon on the file. The only exception is folders. They do not have the button and can be downloaded only from the Cloud Client. The downloading of the synced files from Odoo doesn’t require login into the Cloud Client.
Odoo standard preview would equally work for standard Odoo attachments and synced attachments. However, files, which do not have the preview function in Odoo (for example, .doc), will be opened in the Cloud Client.
Synced files would have app-related thumbnail instead of standard small previews to avoid excess requests to the Cloud Client for each form opening.
If you click on the remove button, then after submitting your decision in a pop-up window, the link will be removed from the Odoo. And after the next sync, the file will be removed from the Cloud Storage as well (see How Synchronisation works).
If you deleted a folder related to this document type in the Cloud Client, their child files would be deleted as well. Thus, Odoo would remove related attachments. The folders, however, will be recovered with the next direct sync.
In object-related cloud folders, you may add subfolders. Such subfolders would be added as Odoo attachments for this object during one of the following backward synchronizations. They would be of URL type and shown with a special 'Folder' thumbnail. By clicking on it a user would be redirected to a linked cloud directory. Please take into account that only the first-level child folders would be shown in the attachment box. If they have other folders inside, those will not be shown in the attachments box.
When a file is added to the message thread of an object, it also gets to the attachments box. Therefore, all files, which were added through the message thread of an object, are also synced.
The files in the message thread have the same functional buttons. You can also open, download, and delete them, without opening the attachments box.
Basic Principles of Synchronization
Synchronization is a fully automatic process and after the setup, no manual actions are required. Just decide which Odoo document types should be synced and create a model to sync for each of those (Customers, opportunities, sale or purchase orders, tasks or issues, employees or users, etc.).
Synchronization is a schedule-based process, so a particular time is required for the changes to be applied. The connector works on a queue (first in - first out) principle: it tries to firstly reflect the oldest changes. Each sync, especially the very first one, might take quite long. It is not recommended to make sync too frequent (see Basic Configuration).
The synchronization doesn't take place in real-time to avoid performance, conflict and functionality issues.
Synchronization is bilateral, which means that it is done in both ways: from Odoo to the Cloud Client and backward. It is important, to avoid overlapping of direct and backward sync to prevent errors (see How Synchronization Works).
As you choose some Models to sync, after the first sync their folders are created in the Cloud Client. So, each model will have its own folder (see Sync Models). In the Cloud folders, you can put not only files but also child folders. In that case, a link for this folder (not its content) would be kept in Odoo attachments (see How Synchronization Works).
File names and content should be managed in Cloud Client: each backward sync would recover Cloud Client names, Odoo is here less important. The key principle is: folders are managed by Odoo, files are managed by the Cloud Client.
Scope of synchronization is configurable: you can choose models for synchronization (Customers, Opportunities, Sale or Purchase orders, Tasks or Issues, Employees or Users, etc.). Custom models are also supported (see Sync Models).
The final goal of direct Cloud integration is to have the structure 'Odoo / Document Types / Documents / Files. For example, 'Odoo / Quotations / SO019 / commercial offer.pdf' (see Sync Structure).
Odoo sends attachments to Cloud Client and retrieves files from there. Files created in Odoo will be added to the cloud storage and will be replaced with links in Odoo. Files created in cloud storage will generate URL attachments within a paired documents directory (see Synced Files and Folders in Odoo).
Binary content is kept in clouds, while Odoo provides direct access to synced items.
The tool relies upon a single-user endpoint. It means that all sync processes are done under a single cloud admin (app). Access rights for created folders/files are not automatized. You should administrate those rights in your Cloud Client.
The module doesn't provide the functionality to manage access rights to the synced files. You should administrate those rights in your Cloud Client.
As an interface of the module serves the attachment box of an object. Through the standard attachments box, you can access both synced and not synced files and folders. To open it, just go to any Odoo object’s form view, find the ‘Clip’ icon, and click on it. Here you would see all object’s attachments, which users can manage. You can also conveniently open synced files and folders in cloud storage (see Synced Files and Folders in Odoo).
How synchronization works
The module works on a bilateral basis. That means, the synchronization is done in both ways: directly - from Odoo to Google Drive, and backward - from Google Drive to Odoo. Each sync serves a particular purpose.
Direct sync:
1. Creates a root folder Odoo, where model's folders with related object's folders are stored. The final goal of direct Cloud integration is to have the structure 'Odoo / Document Types / Documents / Files. For example, 'Odoo / Quotations / SO019 / commercial offer.pdf' (see Sync Structure)
2. Uploads all the attachments of chosen Models to sync from Odoo to the related object's folders in Google Drive
3. Makes all synced Odoo attachments change their type to a link (URL), while binary content is removed with a next Odoo cleaner. So, no actual files would be stored on your Odoo server
4. Checks whether a new document type (for example, sale orders) is added/renamed/replaced in the to-sync-models configurations. If so, this will be reflected in Google Drive
5. Checks whether a new document (for example, quotation SO-001) related to a synced document type is generated/updated/unlinked. If so, the connector would make the same changes in Google Drive
6. Checks whether attachments are added or deleted for synced documents. If so, they would be created or removed in Google Drive
Backward sync:
1. Checks whether any items are added to a Google Drive document folder. If so, the app would create URL attachments for those items in a linked Odoo object
2. Checks whether any item is renamed in Google Drive. If so, a chained Odoo attachment should be also renamed
3. Checks whether any items are deleted/moved in a Google Drive document folder. If so, a linked Odoo attachment would be also unlinked or moved
Synchronization of Enterprise Documents has its own specific. Therefore, the special add-on 'Solutions for Enterprise Documents' is required. In order to sync files from Enterprise Documents, you shouldn't specify the model to sync. The synchronization starts automatically after installing the extra module (see Solutions for Enterprise Documents).
Models Sync
As you choose some Models to sync, after the first sync their folders are created in Google Drive (see Sync Rules). So, each model will have its own folder. All model folders are created inside the root folder ‘Odoo’. Model folders serve as storage for object-related folders. For example, Odoo > Customers > Azure Interior > files and folders related to the object.
The result of your actions will be different, depending on the place, where the changes are introduced (in Odoo or in a Client). When considering models and changes in them, the changes made in Odoo are prior. Therefore, the biggest role plays the direct sync.
Let's see some actions performed to the models to sync and their consequences:
1. Rename model in Odoo / Google Drive
You can rename a model to sync in Odoo by opening the module's settings and clicking on a model (see Name Expressions). There in the field 'Folder name' introduce a new name, and, after the next direct sync, the changes will be applied in Google Drive as well.
If you try to change a model's name in Google Drive, then, the name will be changed back with the next direct sync.
2. Delete model in Odoo / Google Drive
You can delete a model to sync from Odoo (see Sync Models). After that, this model will not be synced anymore. However, its' folder will remain in Google Drive with all the objects and corresponding files. They will still be accessible through the links in Odoo. New attachments will remain in Odoo as files and will not be moved to Google Drive.
If you try to delete a model's folder in Google Drive, then after the next direct sync, the folder with the objects will be recreated. But, as the files were stored in cloud storage and they were deleted - after the next backward sync, the links will be removed from the objects' attachments.
3. Attach an object to two different models by the domain (filter)
If you have, for example, two models to sync, that relate to the same model, then the object, that relates to both of them, will be synced to the model with the smaller sequence. The one, which is higher in the list of Models to sync.
For example, 'Sale Orders of Anita Oliver' and 'Cancelled Sale Orders' both relate to the same model - 'Sales Order'. One of Anita's orders was canceled 'S005', so it matches the filters of both models to sync. However, the Model to sync 'Cancelled Sale Orders' has a smaller sequence, as it was placed above the model 'Sale Orders of Anita Oliver'. Thus, the object 'S005' will be synced to the model 'Cancelled Sale Orders'.
4. Attach an object to another model folder by the domain (filter)
If you filtered your Sale Orders by a salesperson at first and then, changed your mind and decided to introduce another domain system (for example by the status), then after deleting the unused models to sync from the list in Odoo and introducing the new one, the files will be transferred to the right directory in Google Drive with the next direct sync. Those files which will not match the new filters, will stay in the same folder in Google Drive and will not be synced anymore (see Filters & Periods).
5. Attach an object to a non-synced model (after it was synced)
Sometimes, there may be a situation, when you change filters of a model to sync and some objects, which were synced before, don't match new filters and therefore, those objects will not be synced anymore. However, the folder with the attachments of such objects will remain in Google Drive and will be presented as links in Odoo. So, you will not lose your files.
Objects Sync
After the first sync, each object gets its own folder in Google Drive, where the corresponding attachments are stored. For example, Odoo > Customers > Azure Interior > files and folders related to the object. The folder is created, even if an object has no attachments.
As with models, certain actions have a different result depending on the place, where the changes are introduced (in Odoo or in a Client). When considering objects and changes in them, the changes made in Odoo are prior. Therefore, the biggest role plays the direct sync.
Let's see some common actions performed on objects and their consequences:
1. Rename an object in Odoo / Google Drive
If you rename an object in Odoo, through 'Edit', then the changes will be applied in your Google Drive as well with the first direct sync. If you change an object's name in Google Drive, then the name will be changed back to the way it is written in Odoo.
If you introduce a name expression to a model, then the changes will be applied to the model's objects in Google Drive as well with the first direct sync. If you don't like the result, for example, if some objects have the chosen name fields empty, then, you can simply delete the code and the names will be extracted by the standard name_get method (see Name Expressions).
2. Remove object from Odoo / Google Drive
If you remove an object from the Odoo, then the corresponding folder with all the attachments will also be removed from Google Drive.
If you remove an object from Google Drive, then, the folder will be created again with the next sync. If you forget to delete the folder from the bin, then the folder will not appear again in the Google Drive menu with the next sync, however, the changes performed with it in Odoo will still keep being synchronized.
Files Sync
After the sync, the attachments of each object will be moved to Google Drive. For example, Odoo > Customers > Azure Interior > scan1.jpeg. Only links to the files will be kept in Odoo.
As with models and objects, certain actions have a different result depending on the place, where the changes are introduced (in Odoo or in a Client). When considering files and changes in them, both the direct sync and the backward sync are equally important.
Let's see some common actions performed to the files and their consequences:
1. Upload files to Odoo / Upload files and folders to Google Drive
If you upload files to Odoo, then those files will be transferred to Google Drive. Only links to them will remain in Odoo. You still will be able to access the file quickly, just by clicking on it in Odoo.
In case, you upload the files to Google Drive directly, the app will create URL attachments for those items in a linked Odoo object.
In Google Drive's folders, you can put not only files but child folders as well. In that case, a link for this folder (not its content) would be kept in Odoo attachments.
2. Rename a file in Google Drive
If you rename a file in Google Drive, then the chained Odoo attachment will be also renamed.
You should't introduce changes to a synced file from the Odoo side as these changes will not be reflected in Google Drive. However, the changes performed to the file in Google Drive will be reflected in Odoo.
3. Move a file in Google Drive
If you move a file from Google Drive from one object to another, a linked Odoo attachment would be also moved.
4. Delete a file from Odoo / Google Drive
If you delete a URL attachment from Odoo, it will also be deleted from Google Drive.
If you delete a file from Google Drive, a linked Odoo attachment would be also deleted.
5. Download files from Odoo / Google Drive
Regardless of the place, you can always download any attachment. To download the attachment from Odoo, just click on the 'Download' icon and the downloading will start automatically. To download a file from the client, click on the file with the right side of the mouse and choose the appropriate command.
Solutions for Enterprise Documents
'Cloud Sync for Enterprise documents' is an add-on to a Cloud client, which helps to synchronize Cloud Client with the Odoo app 'Documents' (the latter is distributed under the Odoo Enterprise license). The module allows preserving the structure of the documents workspace, through the corresponding folders in the Cloud Client.
The module doesn't require configuration. After the installation, with the first sync, the folder 'Odoo Docs' will be created inside the 'Odoo' folder in your Cloud Client. Inside the folder, will appear all the folders from the workspace.
You shouldn't create a Model to sync for documents. After the installation of the module, the documents are synced automatically to the Odoo directory in the Cloud Client.
There is no need to create a Model to sync, the synchronization takes place automatically.
Based on the add-on the Odoo documents' hierarchy would be reflected within the folder 'Odoo / Odoo Docs'. Therefore, the name 'Odoo Docs' shouldn't be used, in any Model to sync. Each Odoo folder would have a linked Cloud Client folder.
The add-on doesn't affect any of the Enterprise Documents functions. You can still manage your documents in an ordinary way, download them right from Odoo, if necessary.
You still will be able to:
1. Download a file locally from Odoo and download files in a batch
2. Share or Lock the selected files
3. Archive documents
4. Schedule activities
5. Add tags
6. Move a document to another workspace folder
7. Open chatter
8. Perform an action
9. Sign documents using the Odoo Enterprise app ‘Sign’
The only thing, that changes after the sync is the Documents Interface.
The link to the file in Cloud Client appears below the file's title. To open a file, just click on the link below the title.
Synced files would have app-related thumbnails instead of standard small previews to avoid excess requests to the Cloud Client for each form opening.
Also, on each synced file you will see a cloud. If you click on the cloud then, the downloading of the file will start automatically.
Standard Cloud Client sync and integration with Enterprise Documents are done within the same jobs. Avoid the scenarios when a single file is synced as a simple Odoo attachment and as an Odoo document simultaneously.
Objects & Files Sync
After the first sync, each object gets its own folder in the Cloud Client, where the corresponding documents are stored. For example, Odoo > Odoo Docs > HR > files related to the object. The folder is created, even if an object has no documents.
As with attachments, certain actions with objects will have a different result depending on the place, where the changes are introduced (in Odoo or in a Client):
1. If you add a subfolder in Odoo, then the structure will be reflected in the Cloud Client. If you add a subfolder in the Cloud Client, then it will be synced as a link to this folder (not Documents workspace) and you will not be able to add files to it from the Odoo side
2. You can rename the object's name in Odoo. This way the name will be applied to the folder in Cloud Client as well. If you rename a folder in the cloud, then with the next sync it will be changed back
3. If you remove an object from the Odoo, then the corresponding folder with all the documents will also be removed from the Cloud Client. If you remove an object from the Cloud Client, then, the folder will be recreated with the next sync
After the sync, the documents of each object will be moved to the Cloud Client. For example, Odoo > Odoo Docs > HR > scan1.jpeg. Only links to the files will be kept in Odoo. However, Odoo spreadsheet files are not synced by the connector: so, they are still manageable in Odoo.
Certain actions with files also will have a different result depending on the place, where the changes are introduced (in Odoo or in a Client):
1. Files created in Odoo will be added to the cloud storage and will be replaced with links in Odoo. Files created in cloud storage will generate URL documents within a paired documents directory
2. There is no use trying to rename a file in Odoo, as the name will be changed back with the next sync. The synced files are stored in the Cloud Client, so, in case you want to rename a file, you should do that in cloud storage
You should't introduce changes to a synced file from the Odoo side as these changes will not be reflected in the Cloud Client. However, the changes performed to the file in the Cloud Client will be reflected in Odoo.
3. If you move a file from the Cloud Client from one object to another, a linked Odoo document would be also moved.
4. If you delete a URL document from Odoo, it will also be deleted from the Cloud Client.
If you delete a file from the Cloud Client, a linked Odoo document would be also deleted.
5. Regardless of the place, you can always download any document. To download documents from Odoo, just click on the 'Download' icon and the downloading will start automatically. If you download the documents in a batch, then they will be combined in one .zip file. To download a file from the client, click on the file and choose the appropriate command.
Performance issues
The module is based on API requests to the third-party service (Cloud Client). The more is the sync scope (number of synced objects & files), the more requests the app has to send. Moreover, each sync requires special checks (for example, the access request to the cloud storage). Each request might take a significant amount of time comparing with similar requests within the Odoo platform.
The module provides the FIFO (first in - first out) logic of the sync. That means, the files are uploaded based on the queue: the oldest changes are reflected firstly. Therefore, not a single file is lost and the system resources are efficiently used. Even if you have a lot of files, they all will be synced for a particular time. For example, you have 10000 sale orders to sync and 15 minutes of time until the system time out. After 15 minutes, 3000 files are synced. Then during the next sync, 3000 more are synced. Therefore, to sync all the files several synchronizations will be required.
However, such a huge number of files to sync may lead to a long wait and, under some circumstances, to some errors. So, it would be better, to limit the synchronization amount with the help of filters by fields and periods. For example, sync only sale orders for August, or sync only sale orders with a total of more than 50000$. The models' configuration lets you restrict the sync of obsolete items (e.g there is no sense to sync archived partners or orders which are done 2 years ago) (see Filters & Periods).
Also, it is important, to set the Odoo in a correct way. Particularly, to provide the regular activation of the cron job and set the proper server timeouts (see Basic Configuration).